The Lost Nabashima Clan Kaolin Mine

Mr  Kanaiwa tells me story about the Lost Kaolin mine of the ancient Nabashima Clan. The Nabashima clan were very well known for the excellence of their white porcelain with overglaze enamel decoration. The tough men of the clan marched into Arita one day, 350 years ago and stole the kidnapped Korean potters away from Arita and took them to the hidden valley of Okawachiyama, where they put them to work making the most excellent shirajiki – super fine white porcelain, that was destined for the exclusive use of the leaders of the clan and their cronies. This porcelain had to be the whitest and finest of any that it was possible to make under the threat of death. These twice kidnapped Korean potters did just that and to achieve it they had to find some very white materials to do the job.

So, the legend has it according to Kanaiwa san, that they found a source of ultra pure, white porcelain stone and kaolin somewhere to the south East of Arita village up in a tributary valley. As I understand it, and I could have this wrong, but what I thought that I was told, was that this lost mine was located at a place called Iwatanikawachi.

Kanaiwa san has spent a lot of his life researching the special milky white glaze quality of the early Nabishima wares and has analysed samples of the ware. He shows me the analysis sheets and the Seger formulas that he has derived from them. It’s a wonderfull and extensive piece of research. I’m Impressed. It’s the sort of thing that I would have done if I were here doing his job. I can read the formula and know the general glaze that he is describing. It’s not anything special, with no surprise ingredients. I know it well. As with so many things in life and particularly in ceramics. It’s not the secret formula that is important, but the materials that are used and how it is all fired that creates the special quality.

Kanaiwa san suggests that we go for an expedition into the Iwatanikawachi valley and look for the stuff of legends. I agree enthusiastically. So we set off and park the car at the foot of the valley where we make a ‘habakari’ stop. Tsuru san who is my translator on this venture, reads out from a memorial plaque set in a stone in the pack. She exclaims with excitement that this is the very site of an early kiln. One of the first in the valley 400 years ago. This kiln made imitation Ming Dynasty wares for export to Europe. When the civil war in China closed off the export trade in porcelain to the Dutch Traders, they came to Arita to see if they could make similar porcelain wares for their export trade. The potters here were given sample of the Ming porcelain to copy, and they did that exactly. Even to the extant of writing “Made in China in the Ming Dynasty” on the bottom of the pots in ‘gosu’ cobalt blue pigment. Some of these ‘fake’ Ming wares are on show here in the local museum. Tsuru san is very excited to see this sign and reads it out to me. She knows the story well and has seen the wares, as she works in the museum part time. So this is the very spot where the archeologists discovered the shards!

Everywhere around here reeks of history and can surprise even the locals it seems.

IMG_3572

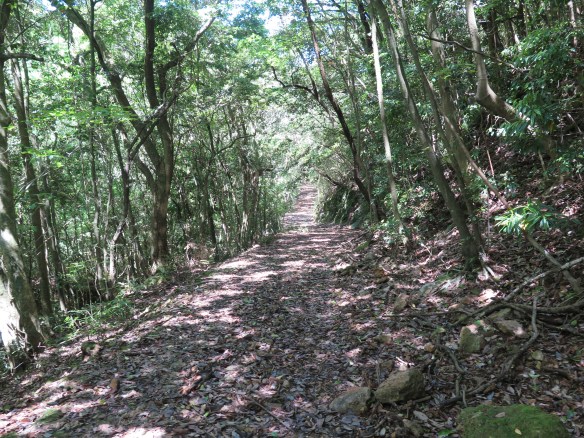
We set off on our walk up the valley. As we go Tsuru san translates for me the story that Kanaiwa san is telling me in his local Arita dialect. This walking track was once upon a time the main road from Sasebo to Hasani and would have been the very road that Ri SamPei would have walked along to get to Arita where he discovers the special porcelain stone that has made this place rich over the 400 years since. We walk. He talks. Tsuru san translates. I listen. It’s a nice warm day and the sun is out, but we are walking all the way in the shade of the dense forest canopy. There are beautiful samples of porcelain stone all along the track, but none of it is ultra white and pure. There must be, or have been, a particularly pure vein of pegmatite somewhere along here that could produce such a stunningly white and clear product. I can’t see any sign of it. I’m supposing that others must have looked. If Kanaiwa san has found old documents that indicate that this is the place, then others must know this too and have been along here with the same intension.

IMG_3575

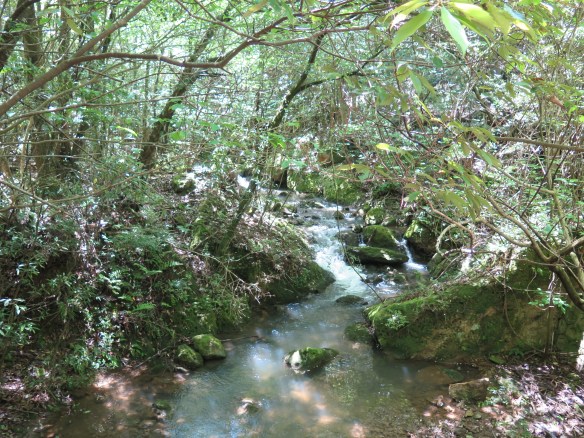
I don’t find the pegmatite dyke, but I do stop and admire the exquisite beauty of the small gurgling stream as it passes over some small falls. The word shibui comes to mind.

Eventually, we arrive at the top of the mountain, to find a reservoir under repair and maintenance. There have been heavy trucks and earthmoving equipment coming and going in the last few days from the other direction. I ask where they come from. Kanaiwa san tells me that this is the end of the Utan street. I’m amazed. We have almost half circumnavigated the Arita valley from South to North on the East side. Utan street is where Tatsuya San’s workshop is located and where I worked briefly last year.

IMG_3571

We set off back along the old Edo period road. Its been a beautiful, if largely uneventful day. We discuss where the deposit might have been, as we haven’t seen any sign of extensive excavations anywhere along our path. We come to the conclusion that any workings that might still remain, must be well covered with the dense undergrowth of the valley and are most likely on the other side of the river to the path that we have taken. As it is late in the afternoon now, we decide that we will need to make another trip with more preparation to slash our way through some of the denser thickets on the other side.

Nothing is ever finished.

Best wishes from Steve in the Iwatanikawachi valley of the Nabeshima Clan

A Brief Visit to Tamba

The small village of Tamba is situated up in the hills somewhere inland between Kyoto and Osaka. It is more or less indistinct, except for the fact that it has a very long tradition of pottery making going back 800 hundred years.

The village lies along strangling secluded valley. It isn’t really close to anywhere in particular and is about an hour and a half from Kyoto by train to Aino station and then a 25 min bus trip to the village of Tachikui. Tachikui is the name of the village where the tradition of Tamba pottery technique is centered.

There are about 35 pottery workshops speed out along the valley. This valley doesn’t look all that different from any other Japanese farming valley, with a small river flowing along the valley, with paddy fields along either side. The small winding road hugs the bottom of the surrounding hills to maximise the area available for growing crops and vegetables in the fertile soil of the valley floor. The big difference in this valley is that there are lots of chimneys sprouting from the various sheds along the hill-side. These sheds are unique in that their roofs follow the contour of the slope of the hill to maximise the draught available for the firing of the kilns.

IMG_3105

The kilns here are unique, in that they are essentially ‘Korean’ style kilns. Shaped like long tunnels sitting on the side of the hill. They are known locally as ‘snake’ kilns or ‘split bamboo’ kilns, as this is a reasonable description of their shape. They have a door way every few metres along the tunnel to allow access for the pots to be passed in during the packing of the kiln and then again during the unloading after firing. There are 9 doorways all together and the whole kiln is 47 metres long.

IMG_3109

The kiln is fired with wood in the old fashioned way. After all, it is an 800 year old tradition. The fire is kindled from the fire mouth at the front of the kiln and the fire is progressively increased in intensity, with more and more wood being introduced into the front fire mouth until the full heat is achieved at the front of the long tunnel.

IMG_3110

IMG_3112

Once the top temperature is reached at the front, then wood is introduced into the small circular stoke holes situated all along the kiln, every 50 cm. or so. This takes the temperature of each subsequent section of kiln up to the top temperature required to melt the glazes in a short time and is very efficient of wood fuel. The whole process from start to finish takes just 48 hours.  12 hours of gently steaming. Then 24 hours of firing the main stoke hole at the front of the kiln and another 12 hours of side stoking.

IMG_3123 IMG_3125

IMG_3124

Because this kiln is situated on such a steep slope, there is no need for a chimney as such. The whole steeply inclined tunnel kiln chamber creates its own draught up the slope. The end of the kiln is fashioned into a kind of ceramic colander, so the flames just escape to the atmosphere from the grid of holes at the back off the kiln.

IMG_3132

IMG_3131

This is the village community kiln, has been on this site for hundreds of years. This particular construction is just a year old. The old kiln on this site threatened to fall down from lots of use over many years, so was demolished and rebuilt as a community effort less than a year ago. This is its 2nd firing. It is fired just twice a year, with many potters contributing work  to fill it, and taking turns in the firing schedule shifts.

IMG_3113

IMG_3106IMG_3137

It is a wonderful community effort and we are pleased to be here to witness it at this time. We are very lucky. Tamba is one of the 6 ancient kiln sites of Japan. It is a special place, but well past its prime just now. But still, it’s great to be here to witness this community event.

best wishes from the two ancient potters from Australia, doing their ceramic hajj.

Two Special pots

I’ve been able to spend a bit of time to clean up a couple of doubtful pots from the ‘zone of death’. They cleaned up rather well  I think. I was a quite surprised. I thought that they were stuck to the kin shelf. the pots from the floor were covered in charcoal too early and are just too dull and lacking interest. However there are always a few nice surprises. These are they.

DSC_0035_01DSC_0034_01DSC_0025_01DSC_0029_01


Blessed are the Cheese Makers

We live out our quiet days here in the Southern Highlands. On most days, nothing much happens. I turn the stiffening porcelain slip on the drying area. We throw or turn pots. We mow, weed and water the gardens and orchards. We harvest, preserve and cook our vegetables. We make clay and glazes from the rocks, ashes and shales that I collect out and about in the local environment. Some of it is 100% sourced off our own special little piece of land, right here.
We like to support local endeavours and a while ago we were invited to visit the local sheeps milk dairy. The pecora dairy has about 120 milking sheep of the East Friesian breed variety. The dairy isn’t open to visitors, but our son buys their sheeps milk, pecorino cheese for the Biota restaurant where he works.
The dairy makes a range of pecorino cheeses from their sheeps milk. We have bought 3 of them over the years that they have operated here. Apparently there are only two flocks of milking sheep in Australia. This one here locally and another one in a different state.
IMG_3679
We arrive with our son just before milking time and all the sheep have made their way down from the hills and far pastures to the dairy, ready for the milking. It takes about an hour to milk  the 120 odd sheep in groups of about 10 in the milking stalls. The sheep come in for the milking twice a day, morning and night. Each one gets closely examined and scrutinised while in the care of the milk maid. She examines them closely and makes remarks on the progress of a pregnancy or anything else unusual that might appear.
IMG_3672
The sheep get a feed of a high protein supplement while they are being milked. There is an ingenious contraption that feeds them while they are being milked. They are very keen to get their noses into the trough as soon as the gates open and allow them in for the milking. The contraption allocates a place at the feeding trough and a pair of suction milking cups to each animal individually. As they take their place at the trough, they push a bar that opens the gate for the next sheep to enter, and so in turn the whole row is neatly filled. The complete arrangement is raised up, so that the milkers don’t have to bend. Once milked and fed, the whole calliope folds in on itself and rises up to allow the sheep to walk through and out of the building, allowing the next batch of 10 sheep to enter. They anticipate the workings of the milking sequence and cue up and wait on the race. Waiting their turn.
IMG_3682 IMG_3681
It’s a beautiful thing to see and experience. These organic, wholesome people love their sheep and care for them lovingly. They take a lot of time over their charges and treat them with care and affection.
We are very privileged to be allowed to tag along with our son on this special occasion and we are grateful.
We come home to a light supper of, you guessed it,  some local pecorino cheeses, a few of our hazel nuts and some fresh garden veggies.
IMG_2353 Copying
The Lovely asks if we should think about making cheese again.
I say No Whey!

Another day, another problem solved

Before my summer ‘time-off’ ends this week, I need to get a few more jobs done.
The washing machine had started to leak a few drips of water from somewhere underneath. I moved it out and took the back off, but couldn’t see anywhere that it was leaking. It was just such a small leak. I checked all the hoses as best I could with a torch, laying on my back, but no insights were gained in this or any other way. I put it all back together and waited for the leak to get worse, so that I could find it. Now, 6 months on, it’s worse and a small trickle of water is emanating from somewhere underneath now. I manoeuvre it out from its snug position. It’s a heavy thing. Removing the front and back panels now reveals that the leak is coming from the water pump and not a perished hose, as I had suspected. This machine is 23 years old now and has proven to be very reliable. As a front loader, it uses very little water, good choice for us here on tank water. We can also use our own hot water, which we source from the wood stove or the solar panels, and which we have plenty of.
The water pump is a sealed plastic unit, so I can’t see the leak directly, but it appears to be from where the steel shaft passes through the plastic casing. I don’t think that I can do much about this very easily, so will enquire about a new replacement part. 23 years is a good life span for a plastic pump, so I’m not too unhappy. As long as the cost isn’t too excessive. I’ll just buy a new one and swap it over.
I replace all the panels and put it all back together. It will last a few more weeks the way it is, while I see about the cost of a new part.
The next job on my long list of repairs and maintenance is the wood fired stove. Purchased 40 years ago 2nd hand. It has served us well. I have done all sorts of minor repairs on it over the years to keep it going. This time it’s the cast iron heat shield in the fire box that protects the oven from the direct heat of the wood fire. It has corroded through and split apart in the middle.
There is nothing that I can do with it. It’s done a tremendous job over the years, but now its life is over. I don’t have any access to cast iron, and this is a custom made part. The Northburn company was already out of business when we bought this stove back in the seventies. We couldn’t get part then, so there is no chance now. But this isn’t a problem. I think that I can make something up that will do  the job.
I decide to try using one of my home made, refractory kiln shelves. I’m sure that it won’t last 40 years, but it may last a few more before it cracks. Ceramics are very brittle and are sensitive to heat shock, and there is plenty of heat shock in a wood fired stove firebox.
The refractory mix that I have developed to make my kiln shelves is based on very good quality kaolin and high fired refractory grog that we made by recycling our high alumina wadding after each stoneware firing. This sort of material will last as long as any ceramic. But ceramic slabs like this don’t like to be heated unevenly from one edge only. So I anticipate that this will be just a stop-gap measure.
It may not work for very long, but it will probably work for a while. I have another 30 or 40 of these old home made kiln shelves that I no longer use, so if it lasts a year. I have a life time supply already in stock. If it doesn’t work. I might try a sheet of mild or even stainless steel in stead. Mild steel will rust through fairly quickly, ceramics will probably crack and shatter, Stainless, apart from being very expensive, expands and contracts excessively, so will be hard to locate with sufficient leeway to get it to fit snuggly and yet stay securely fixed.
So I decide to go with what I’ve got and give it a go. All I have to loose is an hours work.
I have the challenge of adapting the flat slab of ceramic to the same profile as the original cast plate. It is fairly easy to cut the edge to resemble the original, but the locating lug for the other ceramic brick that is interlocked with it needs some thought. I decide to bolt on a steel lug using a recessed stainless steel bolt.
It all goes to plan and the new heat shield is soon back in place. The original top brick is totally shattered and spalled away, so I decide that the easiest solution is to cast a new top edge out of castable refractory. Simply because I just happen to have a small amount in a bag in the barn that was left over from a repair job for someone else a while ago. It doesn’t take long to cast the new section in-situ, all we have to do now is wait for it to set and then dry. A week should do it.
It is important to wear rubber gloves when handling castable cement. The cement is highly alkaline when freshly mixed with water, so it is extremely caustic on the hands. The essential ingrediant being quick lime. Once set however, it is no longer caustic and safe to touch.
Not a bad day, all in all. We reward ourselves with our Australian version of Japanese pan fried okonomiyaki cabbage pancake, sans flour, just using egg.

 and then a Provenḉal inspired egg plant parmigiana for dinner, all from our abundant summer garden. BBQ’d egg plant and zucchini simmered in Janine’s fresh tomato sugo, made with lots of chilli in this batch and then finished under the grill with a bit of parmigano grated on top.

It’s a gas stove delight while our wood burning stove is out of action.
Another day, another problem solved, This is self-reliance.
Best wishes from the frugality twins.

Kilns, what could possibly go wrong?

We end spring with a very warm day of 39oC. This is the start of Summer. Not as hot a it was last week at 42oC, but still hot enough for the beginning of the season. The vegetable garden needs to be watered twice a day at times like this, if we want all the small seedlings to survive and thrive.

IMG_1347

I have finished the big new gas kiln commissioned for the pottery at Sturt Workshops in Mittagong. I spent the last week making the burners and gas manifold, pressure testing and test firing. Then I had to disassemble some of it to get the height down, so that it would fit into its new home under the low wall beam access.

IMG_1336IMG_1334

IMG_1496IMG_1495

IMG_1543IMG_1544

Once it was shrink wrapped and onto my truck, I drove it up to the main drive way to meet up with Dave the truck driver. Mr. ‘Lift and Shift’, with the giant ‘palfinger’ crane. This amazing piece of technology can lift a kiln, or anything else, weighing up to 1  1/2 tonnes from a distance of up to 15 metres away!  All goes to plan. I am always relieved when things go right. They always should, I measure twice and do a lot of prep, but in anything that involves 1,000kgs, slings, chains, shackles and welded brackets, there is always the possibility for unseen eventualities.

Generally speaking, it always goes to plan, but that doesn’t stop me from being concerned, and taking every precaution to make sure that everything is right. There have been times when other forces have intervened and made the job a lot more difficult. See; Delivering a kiln, What could possibly go wrong?

Posted on 26/06/2015
We travel down to Mittagong without a hitch. Slowly and carefully, avoiding the pot holes and bumps, so that the kiln doesn’t get too shaken about. Dave skilfully manoeuvres the kiln into the exact position to fit on to the pallet lifter inside the building. It rolls into position without any problems. Nothing goes wrong!  It’s perfect, just the way it was planned.
IMG_1548
I take off the wrapping and look inside. It’s beautiful. It has travelled well, but there is just a small glitch. In transport, the bouncing and shaking on the truck has caused the brickwork to settle just a fraction of an inch, and now the arch has settled down a millimetre or two and just touches the door seal. I sand it down along a section of 50 mm x 1 mm. It’s perfect! If this this kiln turns out like all the other that i have built for potters, Art Schools and other institutions. It will last for 20 years or so without any major maintenance.
Cleaning the burners of spiders webs or dead insects, occasionally there are mud wasps that build their clay nest in there over the summer break. All small but annoying things that need minor attention. I once had a potter come to me with her burners that she had purchased from me for her own home made kiln. She told me.”These burners don’t work anymore. Not like they used too”. I told her to bring them to me and I would have a look at them. There is usually only one thing that can go wrong. The flame safety sensor gets pushed too far into the flame and gets damaged, then stops working all together, cutting off the supply of gas. I countered this by making a substantial Stainless steel bracket to hold the sensor firmly in place. However, this was not the problem on this occasion, as the gas was still working, but only just apparently.
When the burners arrived, I shook then upside down and lots of things came tumbling out, pieces of blown-up pots, wadding, some fresh and dry, others hard and fired, a bottle cap, even a 100 mm. ( 4″) length of snapped off ceramic pyrometer tube! I would have thought that when that broke off, for whatever reason. I would hear it break and go looking for where it landed. If it wasn’t on the floor of the kiln. I’d go looking elsewhere. I’m amazed that it could have gone straight down a burner flame nozzle and disappeared! Anyway, no matter! No wonder they weren’t producing a clear flame anymore. Simply fixed. It’s amazing what pushing a bottle scrubbing brush down a burner can achieve!
Kilns. What could possibly go wrong?

New and Old

We are in that interesting time of year that used to be called the hungry gap. We don’t have any concept of the hungry gap any more these days. Food is continually shipped, back and forth, all around the globe, all year round. This is the age of globalisation. Foods that used to be seasonal are now ever present.

In Australia, we can have all the available foods from the supermarket at all times of year, but Janine and I choose not to subscribe to this paradigm. We stick pretty strictly to eating what we grow ourselves. Here in the Southern Highlands of New South Wales, we find that with global warming, there are so few frosts, so we can grow a whole range of seasonal vegetables that are suitable for this climate. From the coolest Brussels Sprouts, to the warmest avacados.

Tonights dinner is a combination of new and old. Fresh vegetables, zucchinis, onions and garlic from the garden, spiced up with some dried tomatoes from the fridge. These are the old component of the meal. Harvested late last summer from the garden, dried and preserved in oil.

I slowly soften the onions over a low heat in some good olive oil, then later when they are glowing and translucent, I add the garlic, then the sliced zucchinis and finally the preserved, dried tomatoes. I cover the pan and let it sit on a very low heat for some time to let the zucchinis sweat out their juices and slowly soften into the oily, intensely tomato flavoured mixture.

IMG_1526.JPG

While the vegetables are sweating down and softening, I cook two lovely pieces of sword fish. Pan fried in olive oil, turned once and allowed to crisp up a little then steamed in their own juices under a lid for a few moments. while I serve up, I deglaze the pan with a little chardonnay, because it is open, and reduce the sauce a little, then serve. Sword fish, with new and old vegetables from the garden.

IMG_1527.JPG

For a desert, The lovely One has stewed a few of the mid season peaches. All the early peaches are long gone now. These midseason varieties are a little hard to skin, so she blanches them in a minimum of water for a couple of minutes to make them easier to peel. It also preserves them, when they are frozen in the freezer, for later breakfasts.

IMG_1528

She is about to discard the stewing water, when I take it and add a little sugar, then proceed to put it on a very low heat, at the back of the stove, to reduce it down to a near toffee-like thickness and concentration. it is really delicious, poured over the blanched peaches.

Reduced stewing liquor, poured over blanched fresh peaches. An old idea, bringing out the best of the new fruit.


Open Studio

Janine and I invite you to visit us at our home, pottery and garden for our annual Open Studio Sale. We can also offer a walk around our organic vegetable garden and orchards.

We have been busy working at all sorts of activities over the past year including making some new domestic wares. Please feel free to call in and visit us if you are in the area. Keeping it in the family, Why not consider making a day of it and travel down to Bowral and have lunch at Biota Dining, the only 2 hat restaurant in the Southern Highlands, where our son Geordie is the sous chef.

<http://www.biotadining.com>

image001 image002IMG_1370

IMG_1143

Janine King and Steve Harrison invite you to their Open Studio Weekends at Balmoral Village

As part of the Southern Highlands Arts Festival we will be opening our studio on the weekends of, Sat 7th and Sunday 8th of November, and again on the Sat 14th and Sunday 15th of November, open from 10.00 am till 5.00 pm

We are studio No.3 on the top right hand corner of the downloaded map page.

The program and the map of the studios is available from the website below;

Follow the festival on Facebook  www.facebook.com/SHAFAST

There will be yellow flags and yellow and black Studio Art Trail signs from the entrance into the village leading to the 3 open studios in Balmoral Village.

Hoping to see you here,

Best wishes

Steve and Janine

The Firing

In these times, when we are so concerned about pollution and air quality. I’m amazed to find that it is still allowable to fire a fairly dirty, wood fired kiln right in the heart of Arita’s main street, old town centre.

IMG_0668

This is a fairly old-fashioned sort of standard European, industrial, down-draught design of kiln, used early to mid last century. There is no attempt to install any scrubber or smoke minimization at all, not that I can see, and if they do have something in place it isn’t working, as is obvious from the smoke billowing from the chimney.

There are three men on shift over night, bringing it up to temperature throughout the day today. This is a stoneware reduction firing for the glaze. When this material is oxidised, it turns out a dark cream/dull beige colour. Not at all attractive. It’s because of the slight iron content. Even the hand-selected and hand-cleaned, super-white, ultra-expensive clay is just as dull. However, when this clay is reduced, it sings. It comes out a clear blue/white under a clear glaze and is a joy. This kiln is currently up to 1175oC and smack in the middle of its reduction cycle.

IMG_0670

The air is super filthy inside the kiln shed. The ventilation is very poor, so the men have to wear paper dust masks, but they have chosen the very poorly fitting hygiene masks, that are ubiquitous here and designed to stop you breathing out or coughing on people in public and spreading mucus carried diseases. They are useless to prevent dust and smoke entering the lungs. If these guys work at this all their days, their lives will be shortened. I’m quite surprised that this is still allowed. The ventilation is so bad that it must be hell in here in summer.

IMG_0671IMG_0673

IMG_0674

I’m also surprised that they are still firing a kiln like this with wood, as all the glazed pots are stacked in saggars inside the kiln, so there will be no aesthetic of wood fly-ash contact. The saggars add extra weight to the thermal mass and makes the firing less fuel-efficient. Seeing that there is no aesthetic benefit  showing on the work. I wonder why they persist, especially as everyone tells me that they are doing it so tough here now and no one is making any money. They could reduce their firing costs significantly and clean the towns’ air quality by switching to a light-weight, low-thermal-mass, gas-fired, fibre or RI brick-kiln. If there really is some sort of aesthetic reason for persisting with the wood firing, then I can’t help but feel that the kiln should be moved out-of-town, changed to a downdraught firebox, or installed with a scrubber. I’m only an ignorant outsider here and have no right to be offering anyone any opinion, but these are the thoughts that go through my mind as I watch.

IMG_0675IMG_0676

There are 2 fireboxes on each side of the kiln. Most likely firing up and over a bagwall, then down through the stacks of saggars to exit flues in the floor. These fireboxes are stoked alternately, first on the left, then the one on the right, symmetrical on each side, alternating every few minutes. There is a lot of smoky flame escaping through the vent holes and spy holes in the door, walls and dome. This is to inform the fireman as to the state of the atmosphere inside the kiln. He wants to know when the smoke is lessening and about to disappear. This indicates when it is time to re-stoke the fireboxes, so as to maintain the air-starved reduction atmosphere in the chamber. If I were here, doing this, I’d have all the windows open and a vent installed in the roof to clear the smoke from the work area. Actually, I’d probably get rid of the dirty up draught fireboxes with their expensive and short-lived metal fire bars and replace them with much cleaner downdraught fireboxes. For the comfort and health of the firemen, as well as improving air quality and fuel efficiency. I wonder if they realise that all that smoke billowing out of the kiln room and chimney top, represents expensive energy wasted?

IMG_0667

I can only suppose so. Everything has a reason here. Just because I can’t figure it out, doesn’t mean that it isn’t important and valid. It’s just not what I’m used to. Even so, I can’t help think  that there will be some health ramifications for these employees, working in that filthy air.

I wonder what the towns folk think about it? Fortunately, as I’m here alone, I don’t have the language ability to get involved in this sort of in-depth conversation. Probably for the better. I don’t want to offend anyone.

Welcome to the new/old Arita!

Oka-No-Mi-Yaki

I’ve just finished working on my stretchy stick, ‘nobebera’, and now the mossies are driving me inside. It’s time for dinner and I have most of the makings of an okonomiyaki pancake on hand, but I’m going to make an  Oka version.

IMG_0303

Okonomiyaki is an interesting compound word, that has come to mean ‘pancake’ in common parlance, but if you break it down, okonomi can mean ‘your choice’, and yaki can mean ‘cooked’. So it has come to mean that you can make a pancake out of what ever you want to put in it.

I like that kind of recipe. I don’t have all the things that usually go into an okonomiyaki, but it’s my choice, so I will use what I have. Plenty of vegetables, held together with a bit of egg.

Okonomiyaki, can also mean ‘a stupid thing, of, my, pottery’. This could be a term used to describe my meagre efforts on the potters wheel here in Arita, so I have an affinity.

It’s quick, it’s fresh and it’s reasonably healthy. What more can you ask? I don’t have some of the normal essentials here in my tiny kitchen. I haven’t bought any mayonnaise and I don’t have any Japanese ‘tonkatsu’, BBQ style sauce, or any nagaimo, long yam root, but as the name implies, it’s my choice so I have what I want.

What I really like about this is that, apart from being really tasty, it is a one pan meal, so just right for my tiny kitchen, and so little washing up!

IMG_0304IMG_0305

IMG_0306IMG_0307

IMG_0308

This could be enough for 2 helpings, but I manage to eat it all. I even have some bonito flakes to put on top. I love the way that they quiver around in excitement at the thought of being eaten! They know that they are delicious.

Itadakimas.

from Steve in Arita