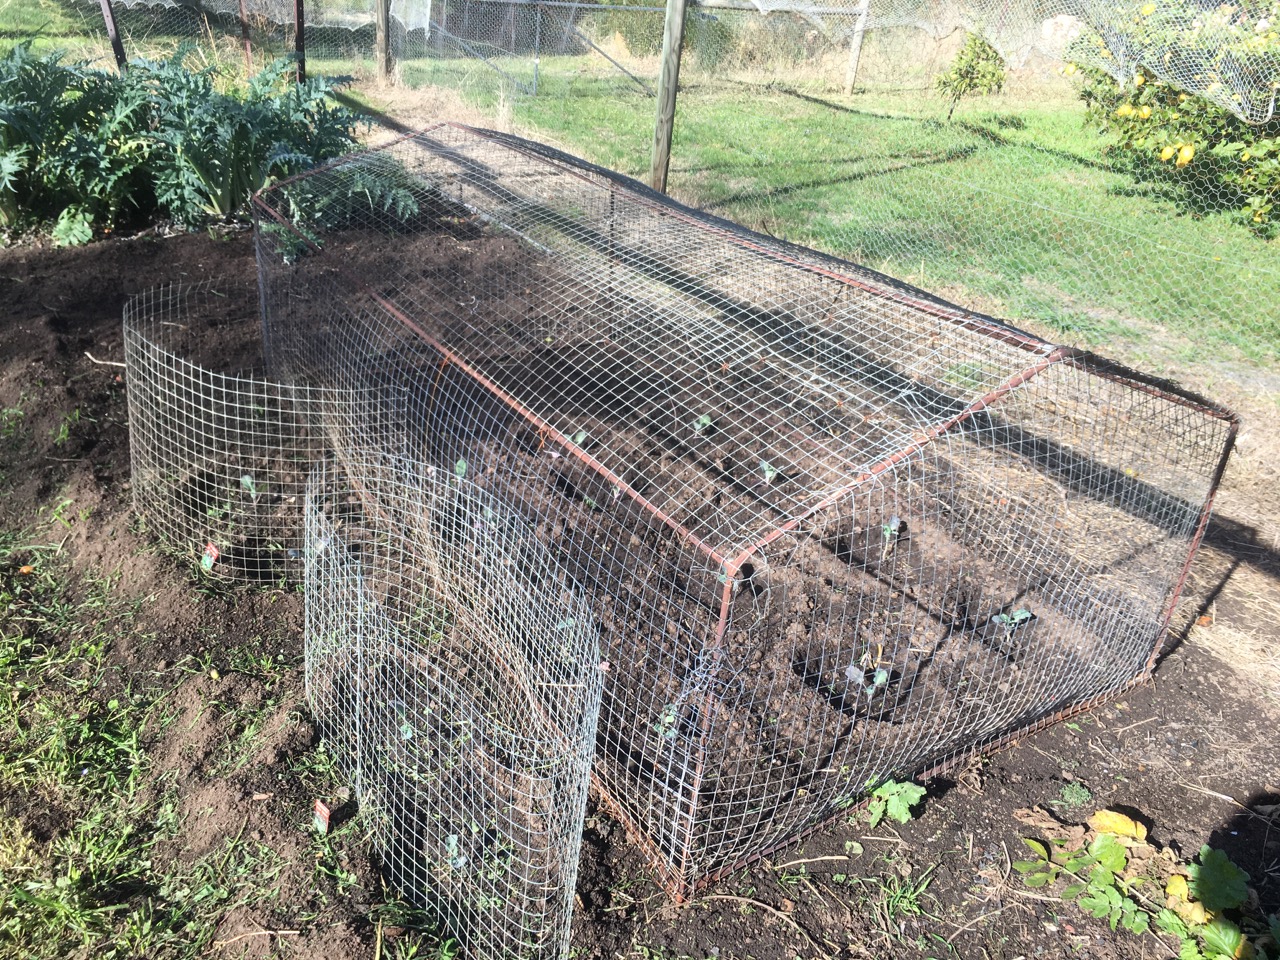
A few months ago a baby rabbit managed to find its way into the netted vegetable garden. I don’t know how it got in, but it did. I first realised that there was a rabbit in the garden when a new batch of germinating seeds and seedlings suddenly disappeared overnight! A few days later, I flushed it out while wartering. I was watering a dense patch of plants when suddenly a rabit scampered out of that patch when the water from the hose hit it. It ran off down the garden and disappeared into another dense patch.I flushed it out again and chased it towards the open gate, but it swerved away at the last moment and hid higher up in another bed.I spent some time running back and forth chasing it about, but it steadfastly refused to run out the door. I eventually gave up when I got puffed out from the running. I thought that maybe we could encourage a friend with a dog to visit us, and then the dog could do the running and chasing.On Sunday we spent the day in the garden. Firstly, I decided to get the whipper snipper mower out and clean up all the garden paths. Once that was done, I continued to mow some of the big clumps of weeds that had grown up in and around other fallow beds.After lunch, I kept on with the mowing, eventually getting the the point that there was only 2 dense patches of plants left. At the top of the garden there is a patch of gooseberries, and at the bottom of the garden, the asparagus patch was still full of weeds, as we hadn’t got around to weeding it yet. Earlier in the morning we had spent some time chasing Bugs Bunny up and down the garden. Both large garden gates were full open, but the rabbit refused to go out through them. We gave up again as it being just too difficult. Back to the mowing. It came to me that if I kept on mowing the big clumps of weeds, then there would be nowhere left for the rabbit to hide. it would have to run out to find new cover.I chased it again. but with no success. He refused to leave. When there was only one clump of weeds left in the asparagus. I could see Peter Rabbit hiding there. Just like Farmer McGregor, I caught him. And dispatched him quickly.
We have carrots, celery, onions, garlic, kale, parsnips, brussel sprouts and capsicums in the garden currently, and he had feasted on them all. In fact he ate everything that wasn’t covered by netting. We had netting within netting trying to keep some small plants and seedlings safe until they were more advanced.As he was fattened up on these veggies, I decided that it was best to cook our Bugs Bunny with exactly those veggies.I made a classic French style ‘Bugs au Vin’ sort of stew, all good, local, low carbon miles, garden produce, including our organically fed Peter Rabbit and half a bottle of good red wine.
I know I’ve been rabbiting on about this, but I hope that you have been Lapin it up. He was quite nice, although a little tough. I could have cooked him a bit longer. My good friend Leonard suggested that I should serve up my ‘Rabbit au Vin’ in a Hares fur bowl 🙂
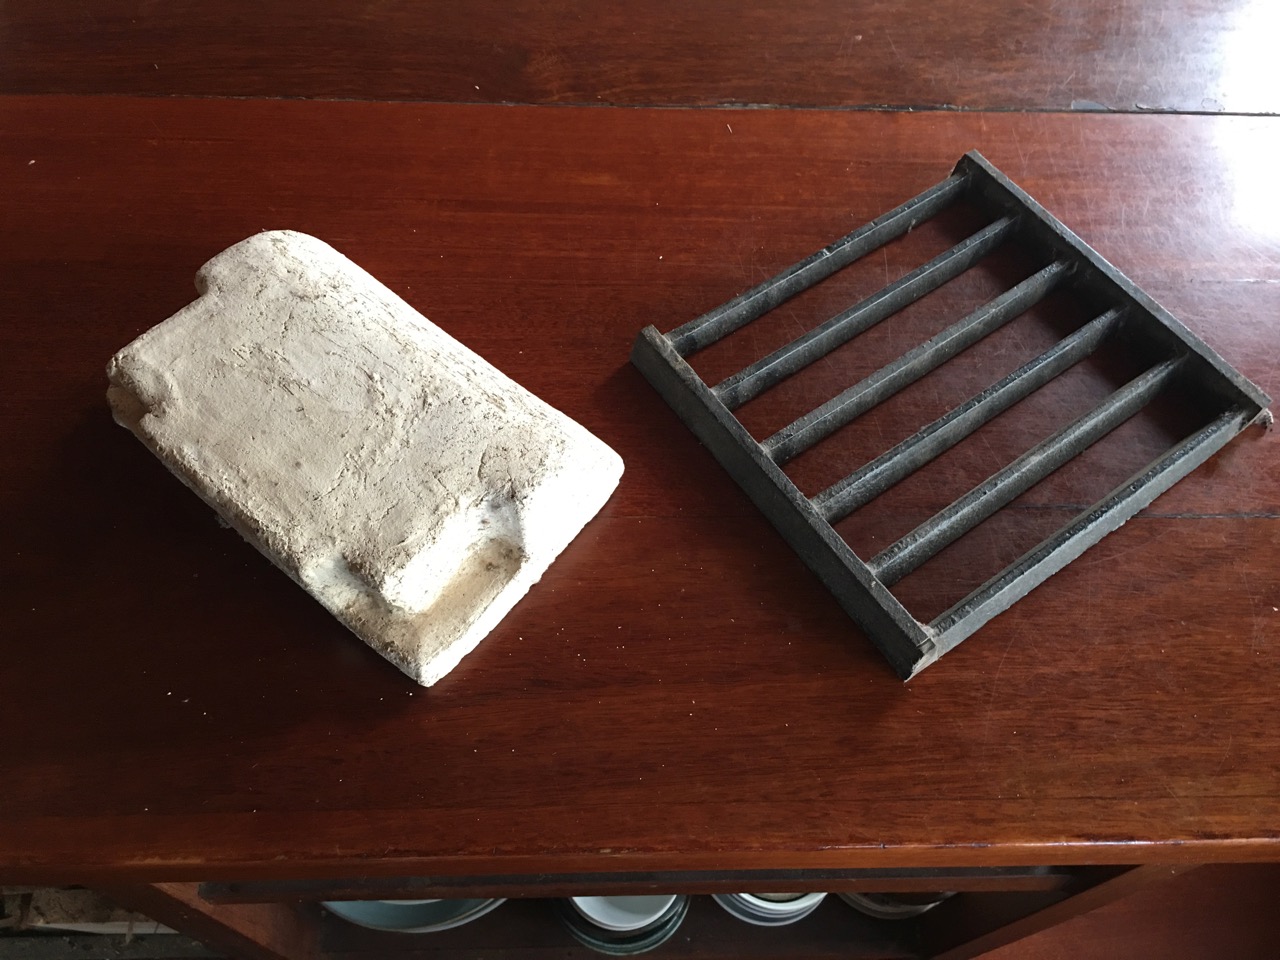
Our 45 year old wood fired kitchen stove is again in need of some repair.I have been working on this stove for 35 years. It was already out of production when we bought it second hand from a local farmer in the 70’s.The first thing to go was the cast iron grate under the firebox. My enquiries revealed that the Northburn company was bought out by Rayburn and closed down years before, but that there was still some spare parts available in the UK. An estimate for a new cast iron grate was more than the whole stove! I quickly realised that I would be needing more of these replacement ash pit grates in coming years. So I had better solve the problem now, and importing the last one from England wasn’t going to be the long term answer.
I worked out that cheap, local, cast iron drain covers could be cut up into 3 section and yield a decade of spares for $10. $3.33 each. About a dollar a year seemed good value. I have been using this solution ever since. When the fire brick in the front of the fire box crumbled, I reassembled the bits and filled in the missing parts with fresh clay and made a plaster cast of it. After that I was able to pop out a few each decade and pre-fire them in our potters kiln always keeping a few in stock under the kitchen hot water cupboard. Interestingly, the home made ones lasted longer than the original. Perhaps because I made ours out of my best home made high alumina grog and sillimanite clay mix that I used to make our own kiln shelves. Good stuff, and seemingly better than the original.
At some point in the past, many years ago I replaced the fibre rope seal around the hot plate. As this was almost certainly made of asbestos, given its age. I took it very seriously and got Janine out of the house. closed the doors and windows to stop any draughts, then soaked the fibre with water to kill dust. I wore long sleaves and a hospital theatre hair net cap and a dust mask. I lifted the wet but stiff fibre rope out and placed it into a plastic bag, sponged down the whole stove top and replaced the seal with modern kevlar fibre rope stove door seal. Then washed my clothes. The next part of the fire box to crumble was the fire wall between the fire box and oven. This was a thick cast iron sheet of metal. As it cracked up and started to fall apart I was wondering how I could get another one cast in cast iron. Then I thought, if I could use a home made kiln shelf in its place. I cut up a big 400mm x 400mm. kiln shell to custom fit the exact shape of the original. it fitted in pretty well. Snugly in fact. I thought that it might last a few months, giving me time to find a long term solution. To my surprise, it is still there and the stove works perfectly with its new heat shield. Its been in use for many years now, so will probably last for quite a while into the future. I have plenty more to replace it when the time comes. I was less successful with the large single piece fire box brick that makes up the left side of the firebox. it is a couple of inches thick and deeply embedded into the structure of the stove, such that to take it out and replace it would be a total rebuild job. Being the lazy opportunist that I am I decided that I would just repair the crumbled hole with a home made ceramic fibre and clay castable to fill the gaping hole, then cover the entire surface with another kiln shelf. This one needed to be longer then ti is wide, and a bit thinner to fit in easily. I found that I had a commercial kiln shelf of just about the right dimensions and cut it to fit. It worked perfectly for a few months and then cracked in half, then the two halves cracked, and so on… Yesterday it became apparent that it had all fallen to pieces the night before during the cooking of dinner. I extracted the parts and not having any other commercial shelves that were easily adapted since the fire cleaned up out. I decided to do a bit of a Japanese inspired ‘mottainai’ repair and stich it all back together with some old kanthal high temperature kiln element wire. ‘Mottainai’ is a bit hard to translate , but loosely means that something is too good to waste, so a little effort is worth being put in to save it and restore it, It also implies a bit of ‘waste not, want not’ and a stitch in time etc. It suits my life philosophy of living gently and minimal consumption.It survived last nights dinner cooking firing, so I’m hopeful that since it is now made up of several pieces instead of being one large sheet, it is now comprised of many expansion joints. It might work. I hope so. This was a first class commercial kiln shelf, supposedly with very good chemistry and excellent thermal shock resistance, but it seems a little bit too thin to take the combination of heat shock and small occasional impacts from wood stoking. I’m even more impressed with my own home made kiln shelf on the opposite side of the firebox that has been taking the same impacts and heat shock stresses for some years now.
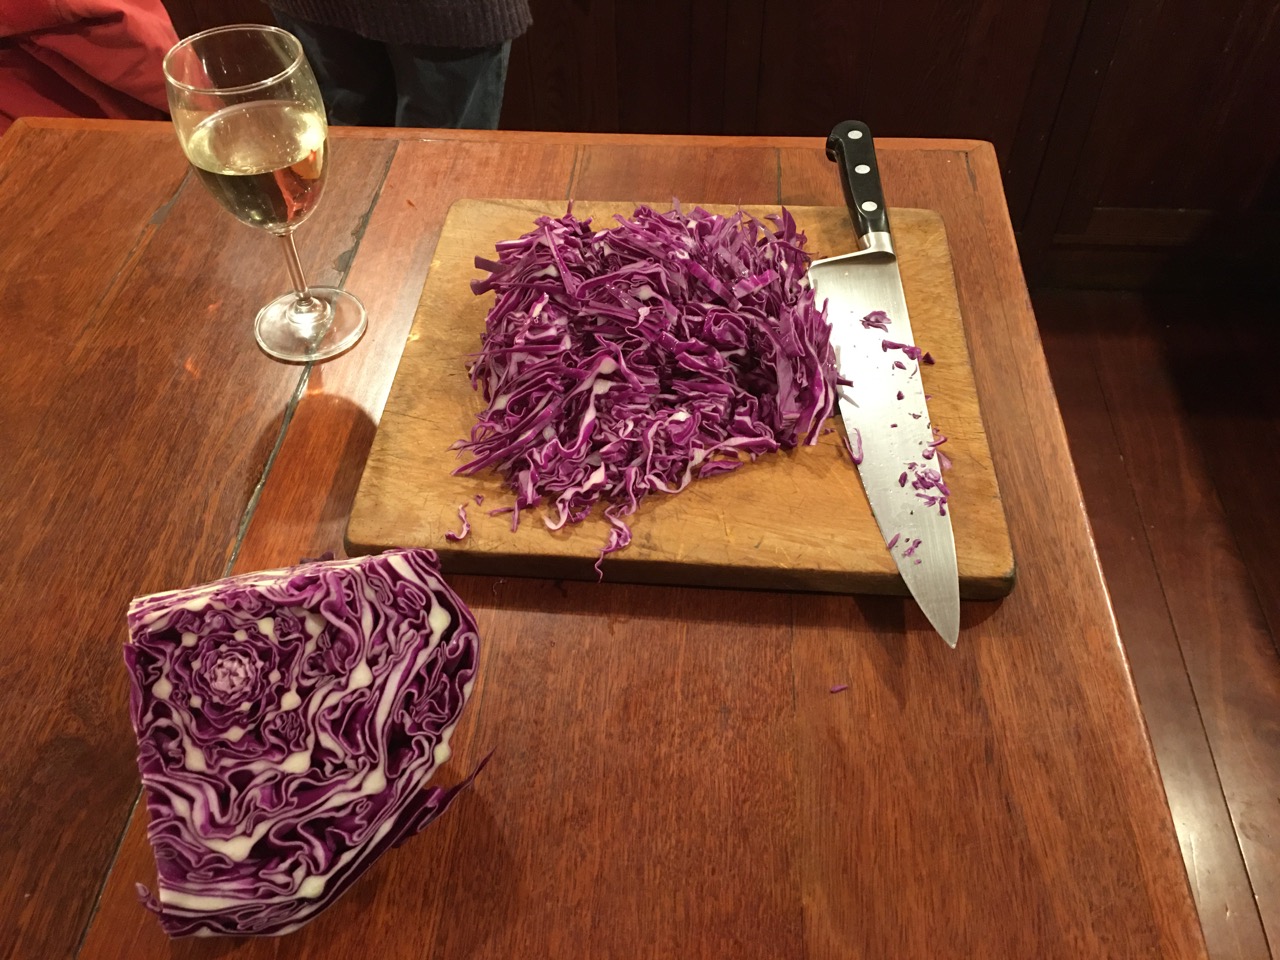
We have survived the longest night of the winter. The frosts have cut the last of the soft plants from the garden. We have harvested the last tomatoes from the dried brown burnt stems of the last surviving tomato plants. We come inside earlier these days at 4:30 and light the fires in the kitchen stove and the lounge room heater. We have just picked the first of the red cabbages for our dinner.
Fortunately for us, we have almost finished all the immediate outside work on the new pottery shed, at least until spring, and we are now concentrating on working inside each day in the relative warmth and comfort of the passively heated and draft free environment of the new pottery. It’s quite amazing how warm it gets in there with no heater on, with just the sunshine in through the north facing windows. It is particularly noticeable that there is no draught inside from the gusty cold chilling wind outside. This is the first pottery that we have had out of the 4 of them that has had no draughty gaps somewhere in the walls, roof or around the doors. Our first 3 buildings burnt down over the 47 years of our life together as potters, All the previous potteries were all home made buildings, as we have never had sufficient money to employ builders. These earlier buildings were created from recycled and scrounged materials, plus home made mud bricks, all with ill fitting and odd shaped windows and doors and no insulation. The last pottery did at least have silver paper in the roof, but no insulation, as it was just too expensive for us at the time. This new pottery is just a tin shed, but the wall cavity is stuffed full of insulwool and all the doors and windows are mostly BAL rated commercial units. We have done all this to get a high BAL fire rating and to prevent this one from burning down in any coming catastrophic bush fire, of which there is bound to be one sometime in the future. This past week I have been lining the pottery studio room with the timber planks that we milled from our own home grown pine trees. Janine and I planed them and sanded them over the past few weeks and now we have had the satisfaction of actually installing them in the metal frame shed. This is just about the only timber in the whole complex of 5 the rooms of the new pottery. It looks great, It is just so nice to have some timber in the place to give that warm natural look and feel. It’s even better to have some of our own home grown timber in the throwing room. The place where we will spend most of our time.
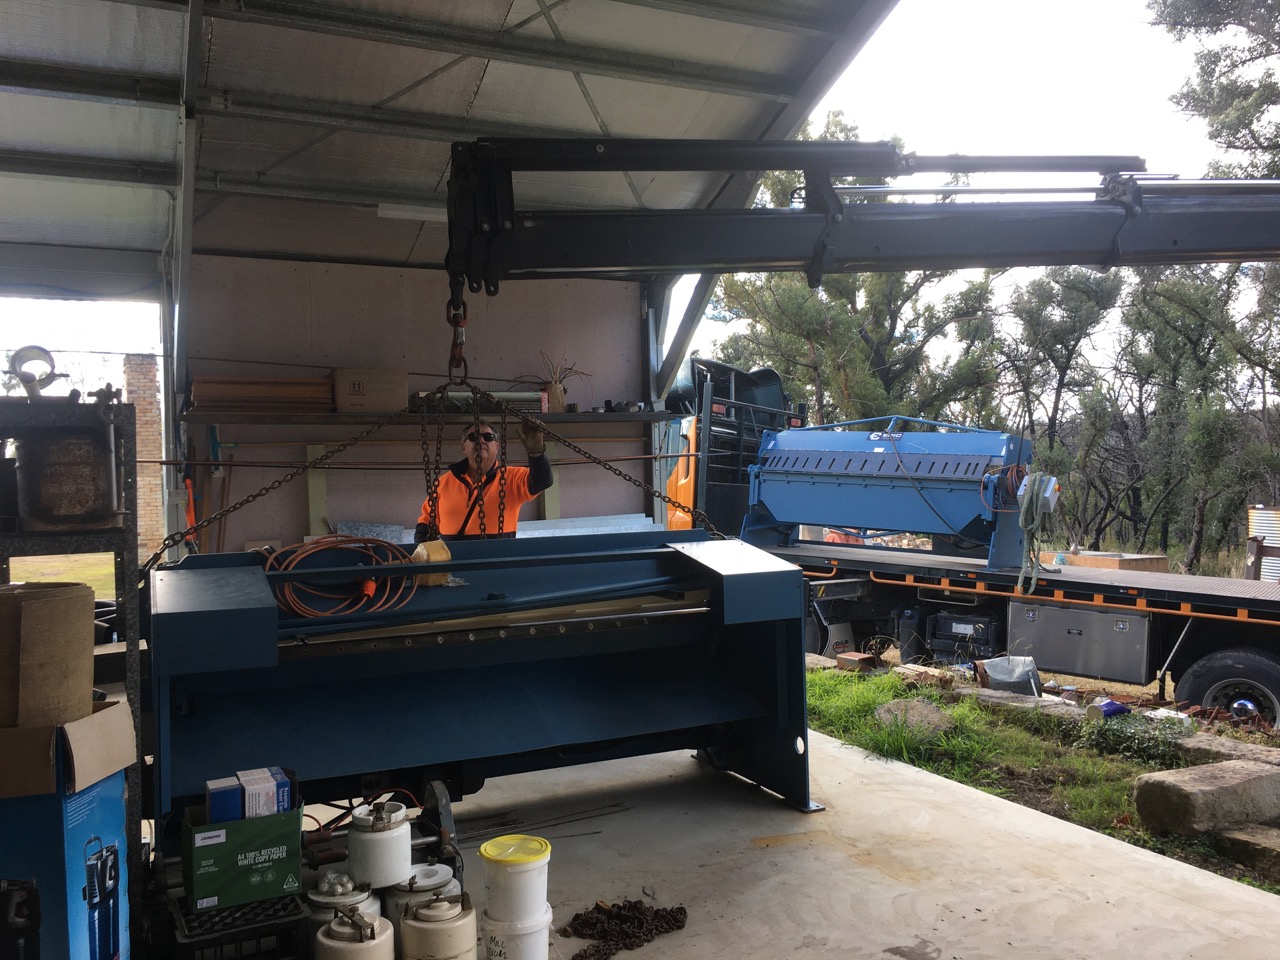
As the big maintenance shed is now almost finished, and I had access to my friend Dave’s big crane truck, as he was working just down the street from me. i got him to move my pan break and guillotine into the new shed while the opportunity presented itself.
Dave picked them up from their temporary home in the new car port building that we hastily built as soon as possible after the fire to house all the equipment that I was busy trying to restore and protect from the elements.We installed them in their new, and hopefully permanent, home in the big new shed. We only just finished the ceiling of this shed a month ago, so this is very timely. It’s also important, because my friend Dave is selling his truck at the end of this month EOFY. After that time it would be a whole lot more difficult to get jobs like these done.
Such an incredible machine, so powerful! This big crane can lift a tonne up to 16 metres from the truck and lifted my big 3 tonne pan break 9 metres into the shed
. Everything seems to be moving along at speed now. I’m beginning to feel positive and optimistic again
. Janine made a beautiful morning soyachino coffee with a gingko leaf
I had it with my piece of toast and some delicious goats milk curd, creamy smooth and with a delicate acidity. Lovely.
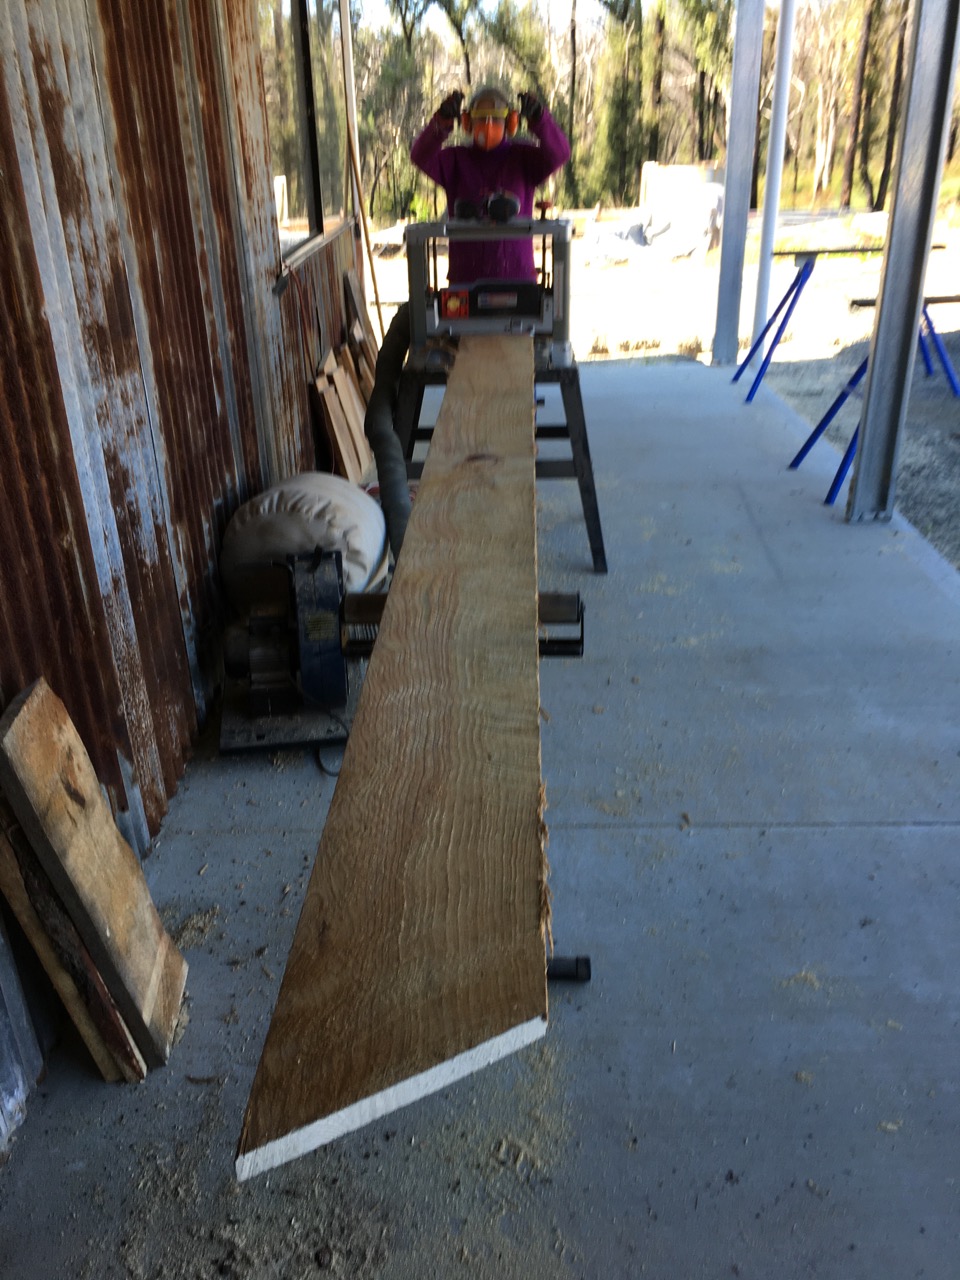
We have been spending some time, on and off, over the past 3 weeks in planing the stack of pine lining boards that we milled out of the dead pine trees that used to grow over our house. Killed by the fire. I couldn’t just let them go. I needed to use the wood for something positive. I also wanted to incorporate something of the old into the new studio. An act of reconciliation. Creating something positive out of this disaster. A creative, positive gesture.
Having sawn the planks to 250mm x 30mm. out of the logs last February, they are now dry enough to use, and we are now ready for them. We spent a week pushing them through the planer machine, thinning them down 1/4 of a millimetre at a time, because the machine is only a toy, and the blades are blunt. We only need to remote most of the circular saw teeth marks. I don’t want them perfect – they’re not, they are full of natural imperfections like knots, resin filled hollows, splits and what might be felling shakes? Half a day at this was enough each day, as there was always so much else to get done. Plus we both have sore arms from a bit of over use.
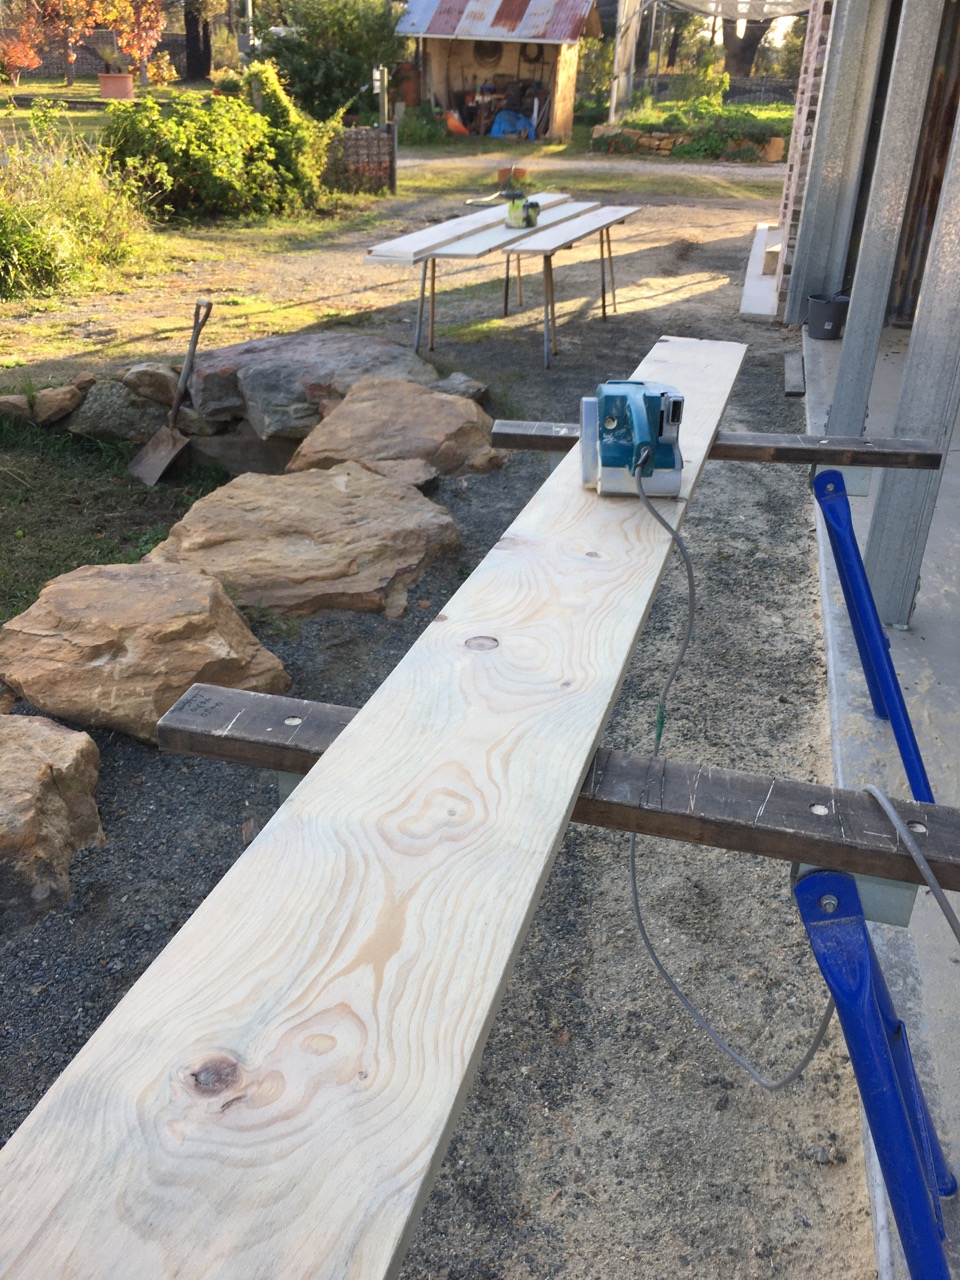
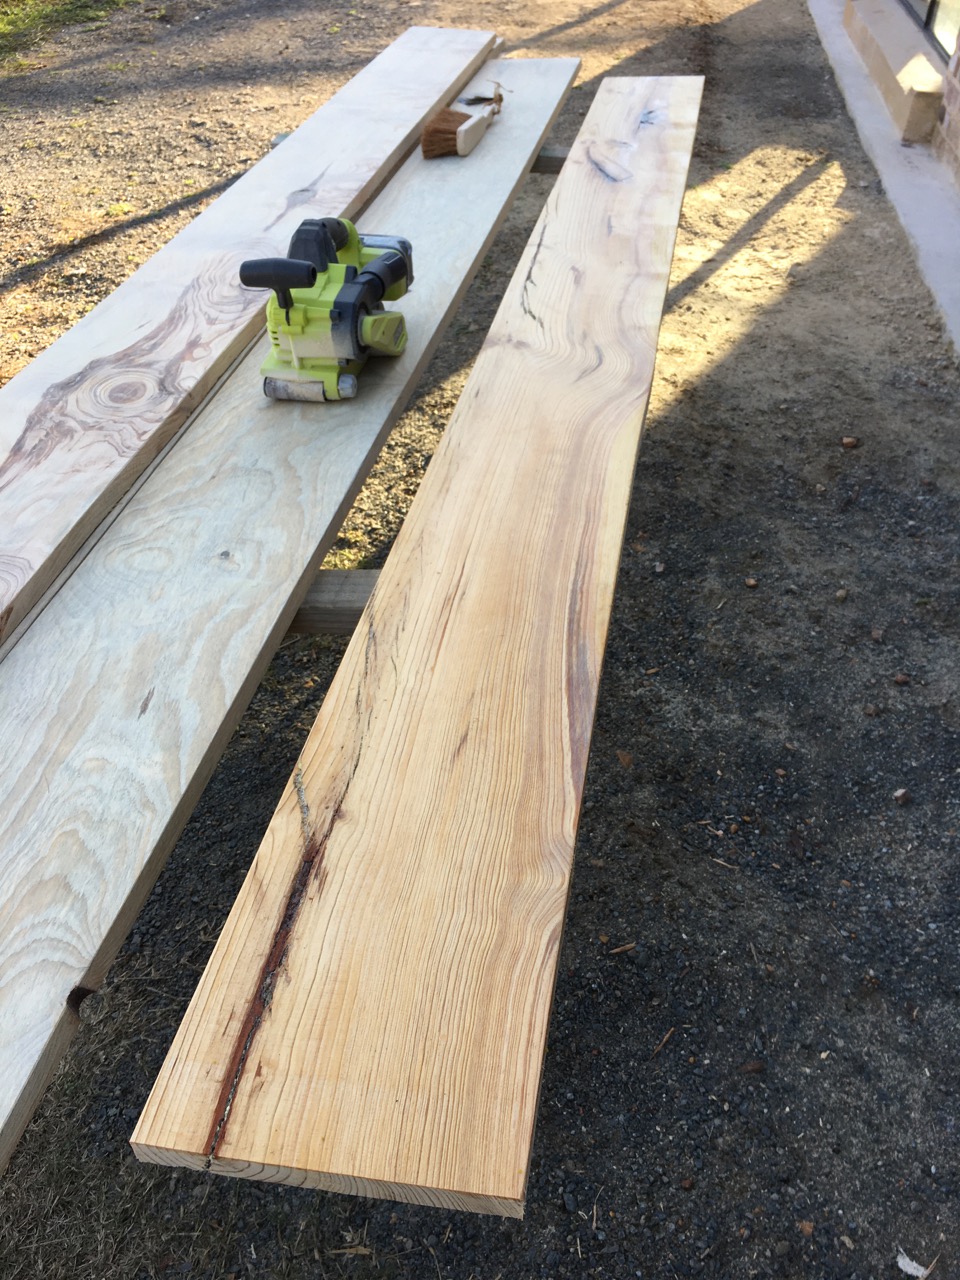
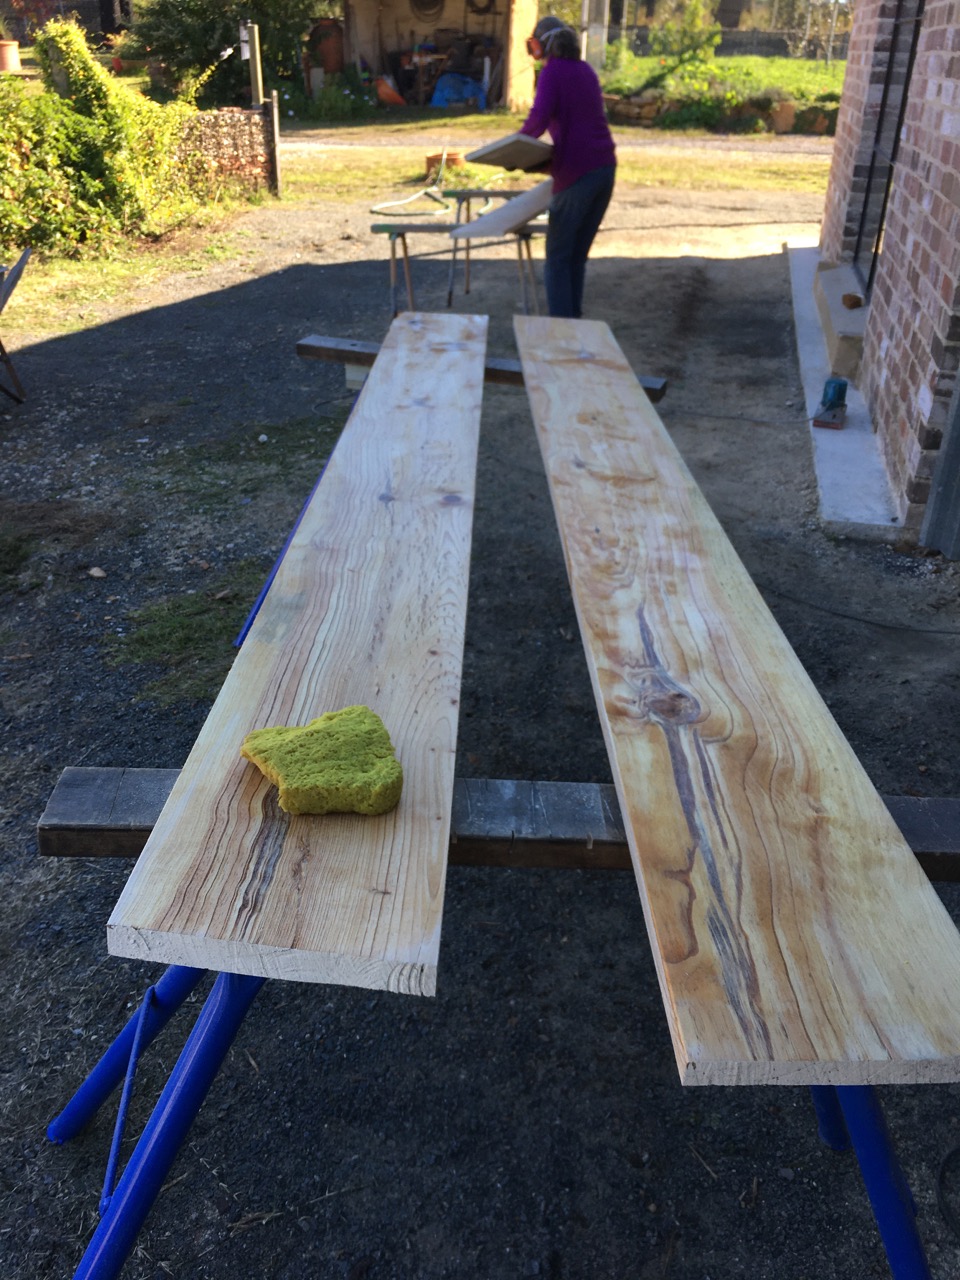
Last week we spent half of each day sanding the boards. First with a belt sander using a 40# grit belt, then again with a 60# belt. We could only work at this work for a few hours a day as the vibration from the sanding machine affected our hands. Too much of this kind of work can cause pins and needles in our fingers. This is natures way of telling you to stop doing whatever you’re doing. So we did.
We used an orbital sander the next day to get a finer finish, we used a 80# paper for this session. After this finer sanding, we wet the boards to raise the grain and stood them up in the pottery to let them dry over night. After drying out, the next day we sanded them all again using a 100# paper. This final sanding left them pretty silky smooth, but still with a lot of their ‘natural’ character. There are 120 boards to be done 4 times over. That’s why it has taken a week.
My friend Len Smith gave me all his power tools when we started to rebuild after the fire. Len built his own house, so had collected all the tools that you need to do this sort of work. I used to have a similar set. Having Lens tools allowed me to get a lot done, and saved me a lot of money. Thanks Len! This week I started to put the first few planks up on the wall. It’s very slow work, as each plank has warped around the knots, so has wobbly edges. Fortunately, Len gave me his circular saw and his electric planer. Even so, it still takes time to get the individual warps in each plank to match fairly evenly. Added to that the planks also have some degree of wind and camber. In other words, they have warped in 3 dimensions, like a snow ski and a banana on its side simultaneously. I don’t aspire to perfection. I want a more natural feel. I’m not perfect. We all have our quirks. I don’t expect my pottery studio to be perfect. I want it to express something about me, just like the work that will be made in it.
12 boards up in three days, tediously slow, but kind of rewarding. I’m happy doing this work slowly by myself. Although I’m in a rush to get this epic job finished. I don’t want to miss out on any of the joy of actually doing it, enjoying the feeling of achieving something at each completed stage. This is a hand made shed for potters making hand made pots. It has to have the apropriate character. Although we purchased 5 commercial kit form steel sheds, for speed and convenience, we have given them a character or quality that reflects us. Hopefully it reflects all the thought and effort that we have put into it.There is an aphorism about the journey being more important than arriving. I really feel that to be true just now.
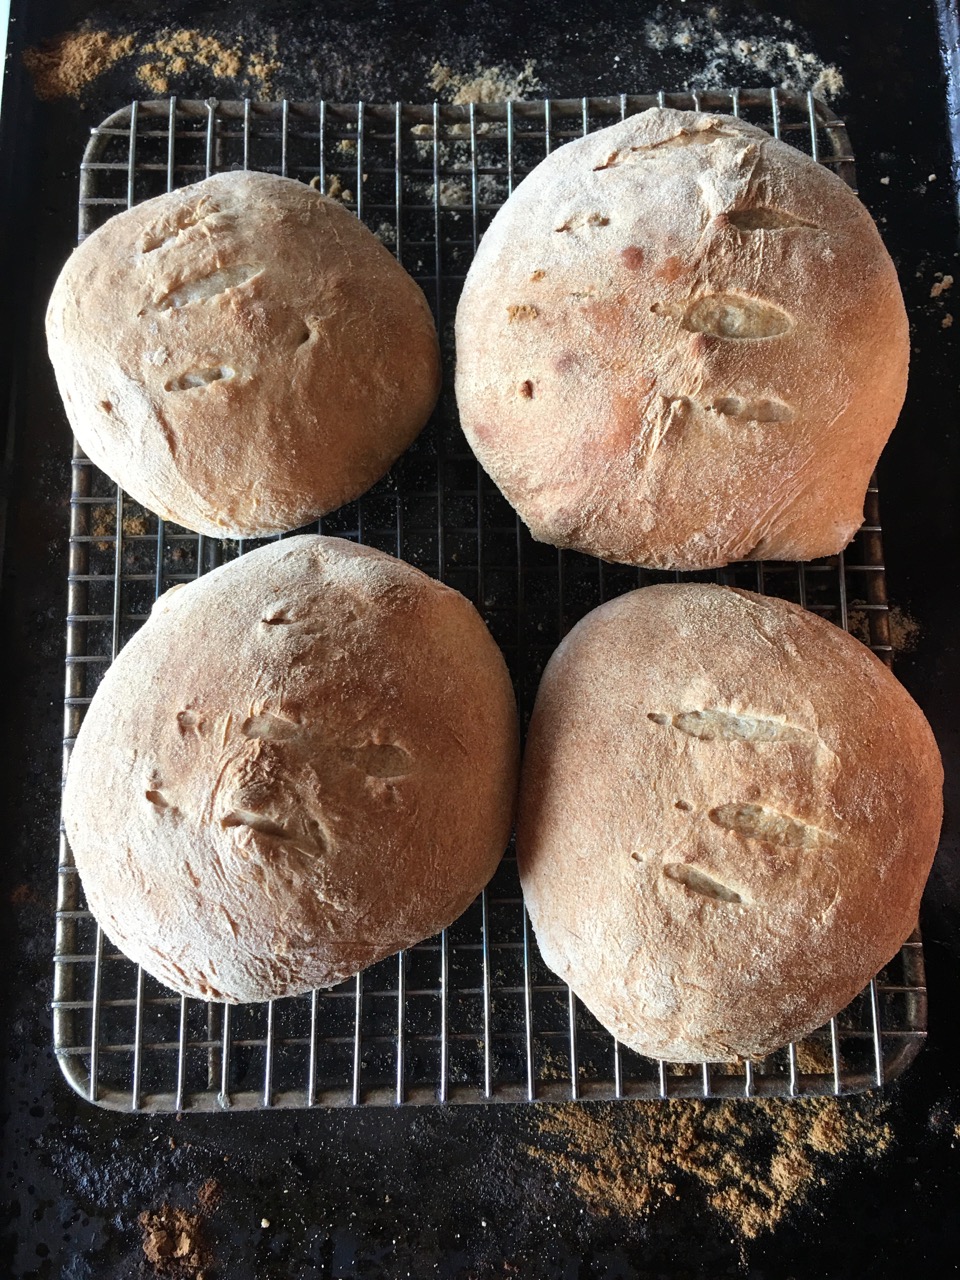
I was up very early this morning to put the bread on. I like to get it on early, so it can go in the oven during breakfast and be out ready for lunch.Everybody who makes bread has their own way or technique. We have been making bread for the past 45 years. My mother taught me how to make bread and she taught me what she knew, as she used to bake her own bread for us when we were kids. I grew up on home made crumbly, stoneground wholemeal flat loaves. I have never been really happy with the results of our own loaves, there was always so much room for improvement. I’m always interested in learning from others how they make bread. Some years ago, I was told by a fellow teacher at an Art School where I was working part time that his wife made really nice bread, she had been a profession baker. He told that the best results came from baking the bread in a closed environment to get a good crust. He told me that his wife used a cast iron camp oven to bake in. I didn’t own such an item, but googled it and they cost upwards of $100 at the time. That was way beyond my discretional expenditure budget so let it slip. Janine and I have owned a bread making machine for 20 years. Actually, we have worn one out and are now onto our 2nd one. They save a lot of time, but we don’t like the square loaves with the hole in the bottom, so we decided long ago to use the machine to only make the dough, which it does very well.
I like rye bread, but Janine finds it too heavy, so we compromise and I make a 50/50 mixed loaf of rye and wheat flour. The bread machine, or should I say the dough machine takes 1 1/2 hours to prepare the dough, which is OK for us. We can put it on and go out to work, then return to take the dough out and bake it our selves in our own tray in the home oven. Sometimes we make a platted loaf, other times we make buns or rolls, all free form just as my Mum did.
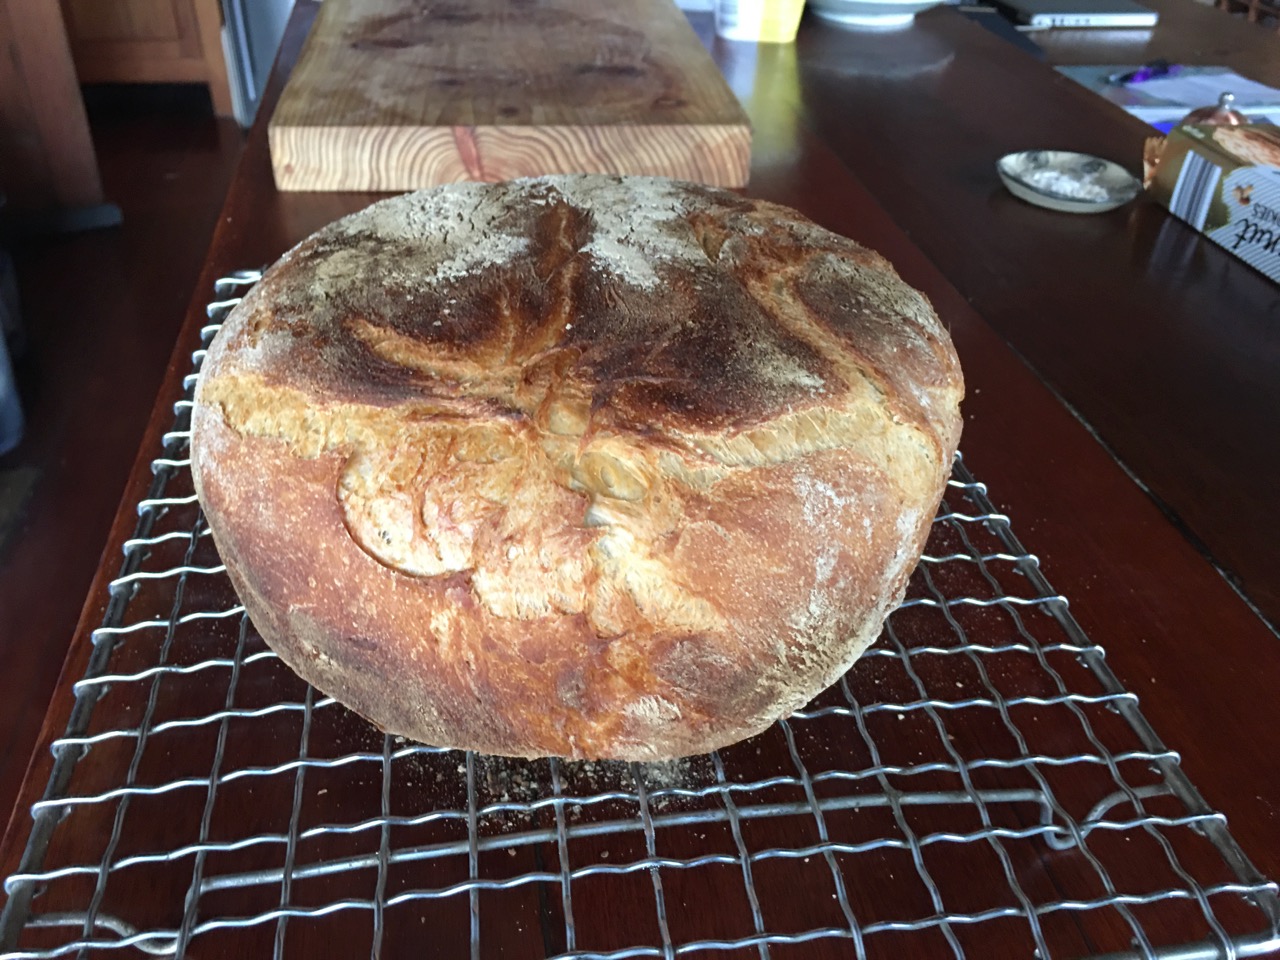
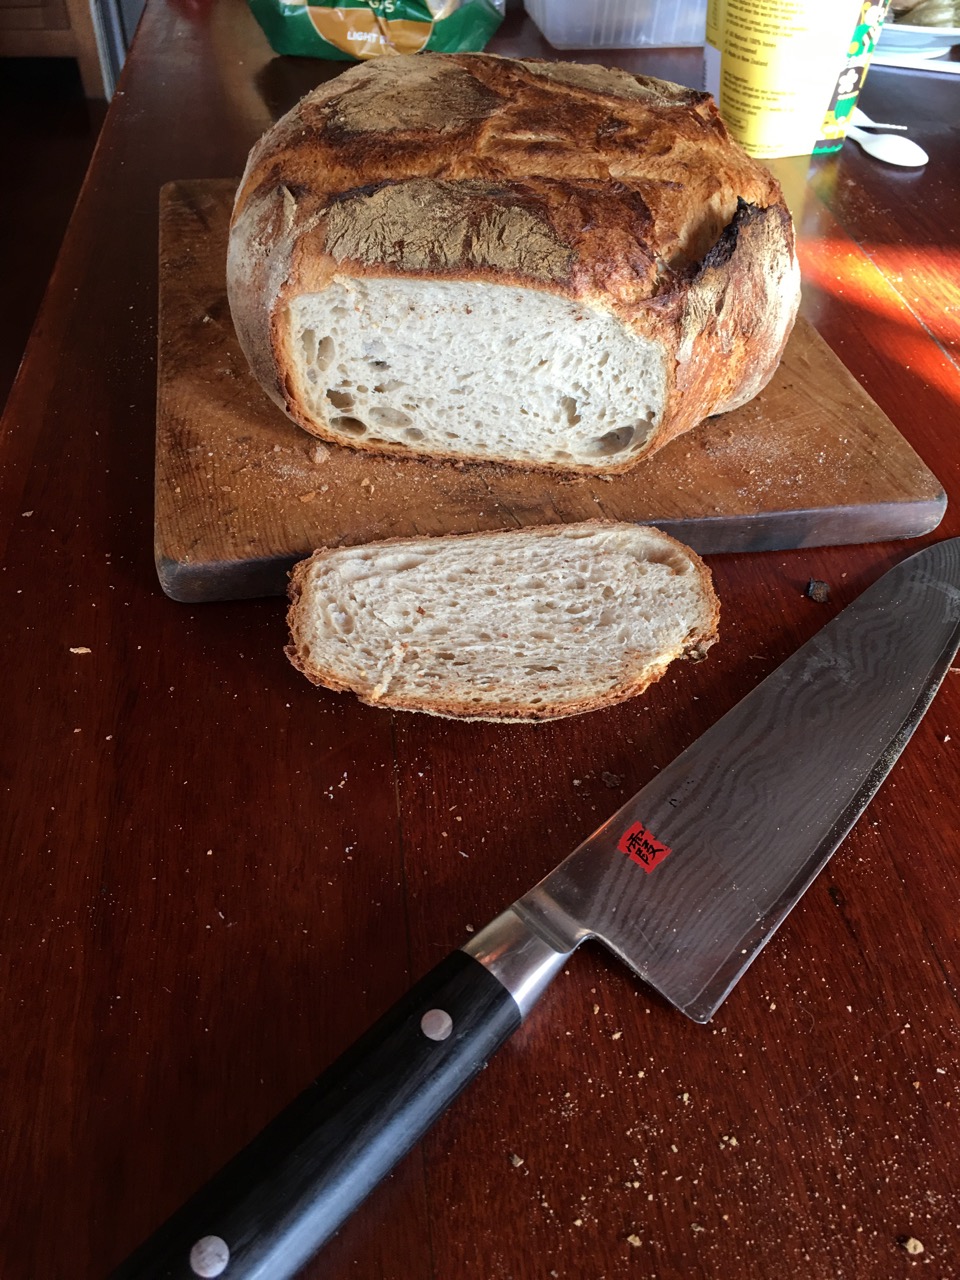
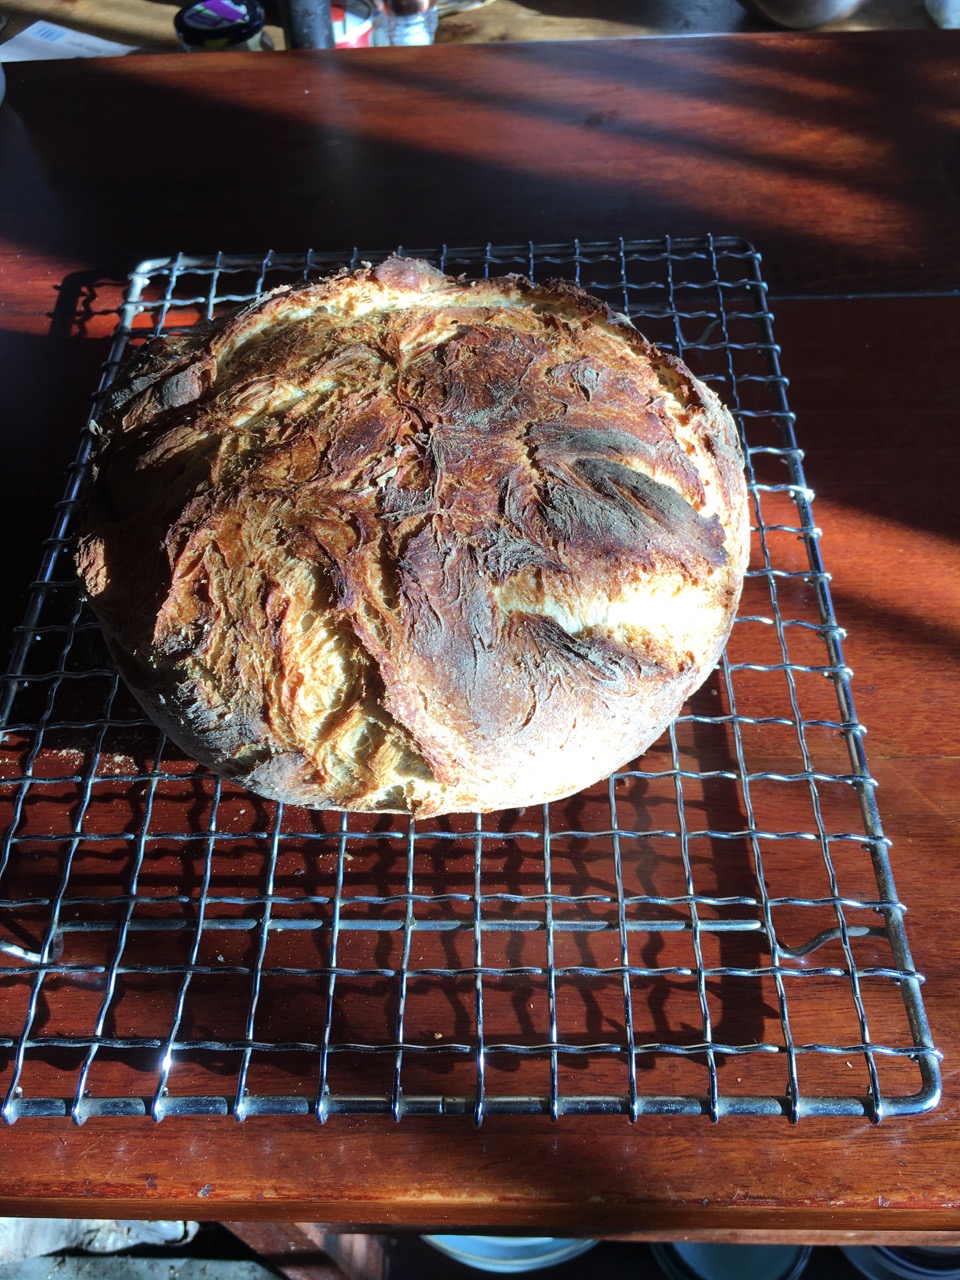
My son made excellent bread in his restaurant. from sour dough that they developed there over the years. They even went to the trouble of importing a special variety of wheat directly from the farmer in western NSW and getting it specially milled one tonne at a time for the restaurant. It was worth the effort. The bread was excellent. I even stopped baking bread when I could call in and pick up a loaf of yesterdays bread. A time that I believe caught the bread at its best. He made the dough in the evening after service, let it prove over night and baked it in the now cooling wood fired oven first thing in the morning, before stoking up the oven for the days service. That all ended when the restaurant closed due to Covid. My grandfather told me that the best bread was proved over night, a slow fermentation. He also told me that in commercial bakeries they blow steam into the oven to help create a better, crispier crust. I don’t know if this is true, but I believed my grandfather, but couldn’t ever figure out how I might achieve that. I spoke to another bread maker who we stayed with in Wales, He made fantastic bread at home. He even sold his bread locally to his various friends and neighbours. David made a sour dough in a rather fluid form, a very stiff liquid. David made a bread with loads of seeds in it. I loved it and we even asked him to bake extra loaves for us when we left to take with us. I’m really lazy about things that aren’t absolutely essential to my daily routine. I can buy a good rye bread in Bowral from the artisan bread shop, but I don’t always go to Bowral, and I won’t drive that far and back just for bread. That would be a crime against society in the form of wasted energy. So I have developed a system that suits me, my energy levels and my available time. We make our dough in the machine early in the morning, then bake it in the oven in a metal pot. I first experimented using a metal casserole, but instead of the usual loaf, I got a wide flat round sort of facaccia loaf. A little bit like the flat loaves that my mother baked. What I did learn from this experiment was that baking in a cassarole gives a better crust.
What I needed was a smaller diameter metal pot, so when I saw that a certain supermarket that has a garage sale down the centre isle, had a special on cast iron camp ovens. Under $20 if I remember correctly. Using this camp oven, I could bake a tighter, smaller, round loaf with a good crust.I recently visited one of my ex-students who I taught at the National Arts School in the late 70’s. He is long retired from making pottery, but still had some pottery gear that he hadn’t had the heart to get rid of, even though he hadn’t used it for years. He called me after the fire to ask if I wanted it. I did and we visited him recently to pick it up, as we are now in a position to accept bits of useful equipment. We actually have a shed to put it in now. Tony told me how he made bread. He does an over night ferment and then bakes in a cast iron lidded pot. His bread was very good. He advised me to take the lid off half way through the baking to let the crust become a little bit caramelised and crispy – even a little bit burnt. The initial baking time with the lid on steams the crust a little bit and sets up the crust, then the 2nd half of the baking with the lid off gives a nice brown crisp crust. It does work. Or at least it works for me in our oven with our Aldi pot. I don’t know anything about the technology of fermenting flour and yeast, or even of baking. I haven’t studied it. What I’ve learnt about making home made bread, I was taught by my mother, then augmented by our own experiments and what i learnt from others. It’s all a bit hit and miss experiments. Mostly misses. But this seems to work best for us.
Early this morning while I was preparing the dough machine. I noticed that there was a really good red sky, warning me about something?
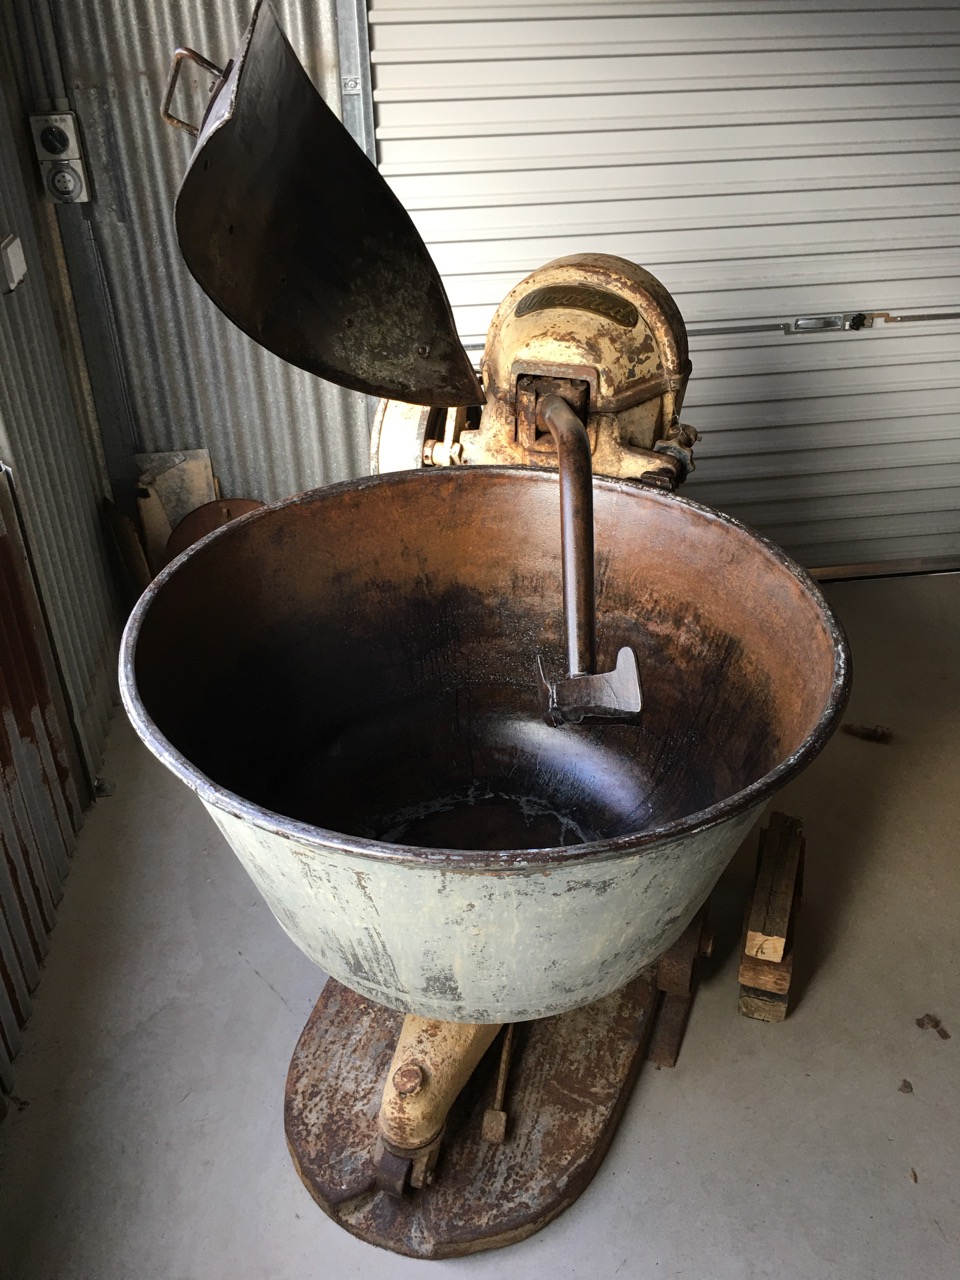
Janine and I bought a very old and well used bakery dough mixer back in 1978. This was a time when a lot of old, small, family run bakeries were being forced out of business by the big multinational food corporations, and a trend towards people buying mass produced bread in super markets, rather than going to the small family bakery.We didn’t have 3 phase power back in those days, so I adapted the dough mixer to run on the power from a 5HP petrol engine interfaced through a rather snazzy torque converter. The sort of thing that adapts automatic gear boxes to engines in cars. I was given it, so didn’t realise how expensive they were. We used that dough mixer in conjunction with a 200 mm. Venco de-airing pug mill for 5 years to mix all our clay bodies. Tragically, That pottery burnt down in 1983. That was a timber building and was totally destroyed by the fire. What was really amazing, was that I was able to rebuild both the pug mill and the dough mixer from the melted and charred remains. I spent a lot of time working on that equipment to get it going again. Luckily this machine was housed in a corner of the building with 2 sets of glass double doors on the corner, so as to allow for good ventilation. As this part of the building had very little wood in it, the machine didn’t get too hot during the fire and none of the cast iron parts cracked. The shaft of the dough mixer got rather bent during the fire, so had a very noticeable wobble in it when I got it going again, but at least I got it going. It was a bit of a mess, but I managed to keep it going for the next 36 years. After that fire, I converted it to a 3 hp single phase electric motor. The biggest motor that you can plug into a 15 amp power point, as that was all the power that we had at the time. It only just managed to do the job, as it wasn’t really powerfull enough, but I was carefull with it and nursed it along. I set it up with a home made, somewhat loose, slip-belt clutch as torque converters are so expensive.
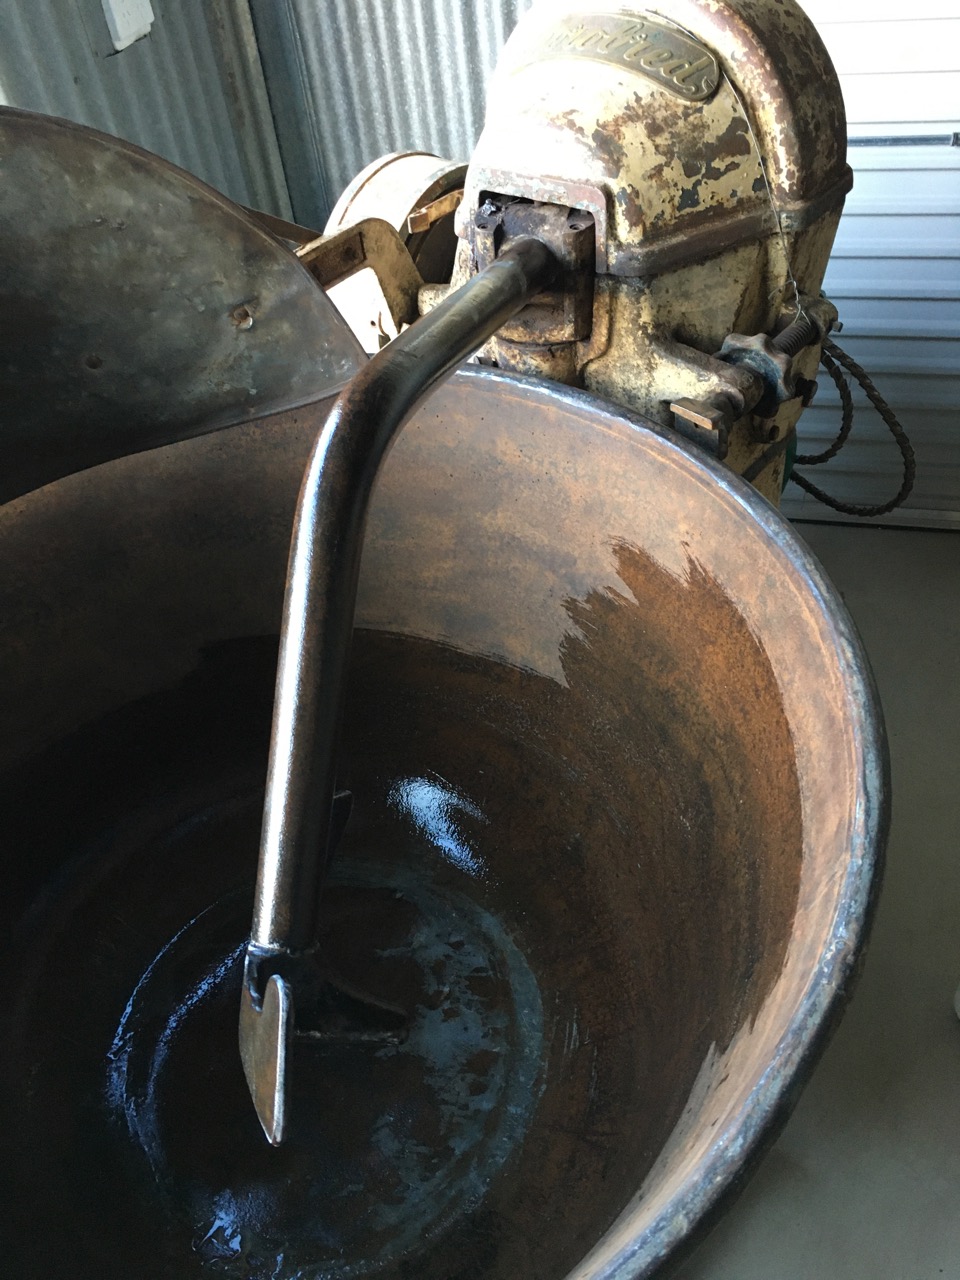
After this last fire in 2019, The machine really got cooked, That’s it in the centre of the picture above, in the burnt out shed. Fortunately, the fire didn’t crack the castings. However, this time the main shaft was so badly bent, that it wouldn’t even rotate. I gave up on it, as I had so much to do to rebuild the new pottery shed that I couldn’t see myself ever really finding the time to fix it. Then, when my friend John Edye retired. I was able to buy his dough mixer. Very lucky timing. I didn’t have a pottery to put it in at the time, but bought it anyway, to make sure that I had it ready for when I could install it. As it happened, John also had loads of other jobs to do, so it sat there for several months, before we could find a mutual time that suited us both, for me to go and collect it. In the interval, my friend Ross turned up one day, He is a really amazing person, who has so much knowledge and life experience with machinery. He saw me working on some of my ruined gear and asked what I planned for the dough mixer. I told him that I had given up on it for the time being, but couldn’t bring myself to abandon it. Ross had a good look at it and said that he thought that he could extract the main shaft from the gearbox and straighten it in his hydraulic press. He had done other jobs like that in the past. So I said “yes please, have a go at it”. I know that I won’t get around to it for a long time – if ever. Luckily, I had poured spent engine oil all over most of the machines to stop them from rusting too much and greased all the bearings to prevent them from siezing up, so as to preserve them until I could find the time to get to them and try to fix them. I also bought a massive tarpolin to cover them. This turned out to be a smart move, as they remained there, under cover, for over a year. I found out through this experience that there is a massive amount of condensation under a plastic tarp, so all the machines that wern’t oiled were very badly rusted. We worked on the dough mixer. Ross and I were able to dismantle all of the moving parts that still moved, and Ross took the main shaft home with him. He called a few weeks ago to say that it was now back in a good shape. Not perfect, but very good. We water-blasted the carcas to remove all the old oil, carbon, ash and burnt paint from it and I moved all the other bits inside, to keep them dry while I set about re-assembling the gearbox and all other moving parts. Ross organised a new oil seal and I had removed the main bearings and soaked it in oil to rinse clean and preserve them.
At this point, it’s looking a bit like a burnt out darlek!
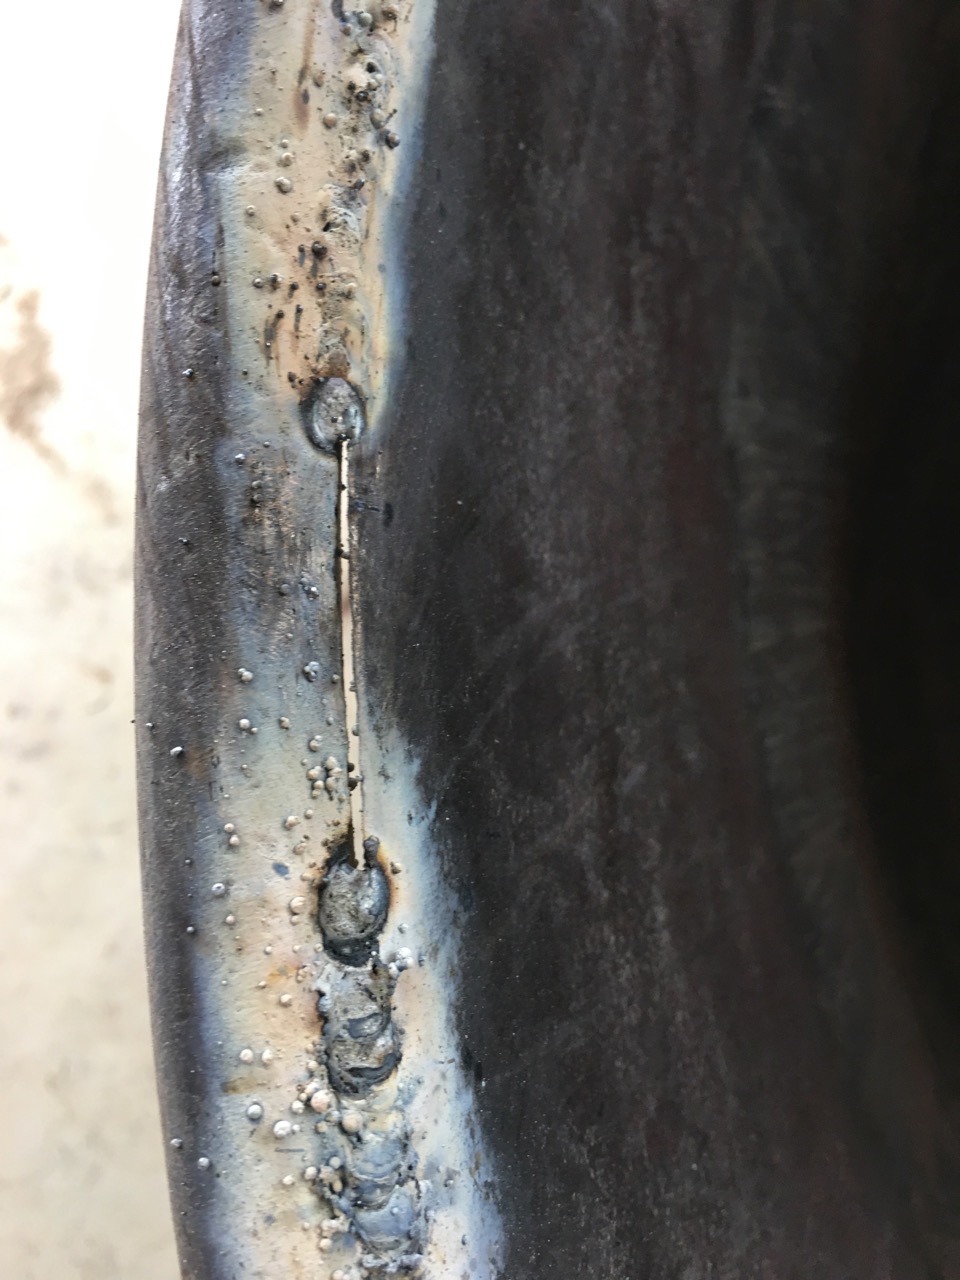
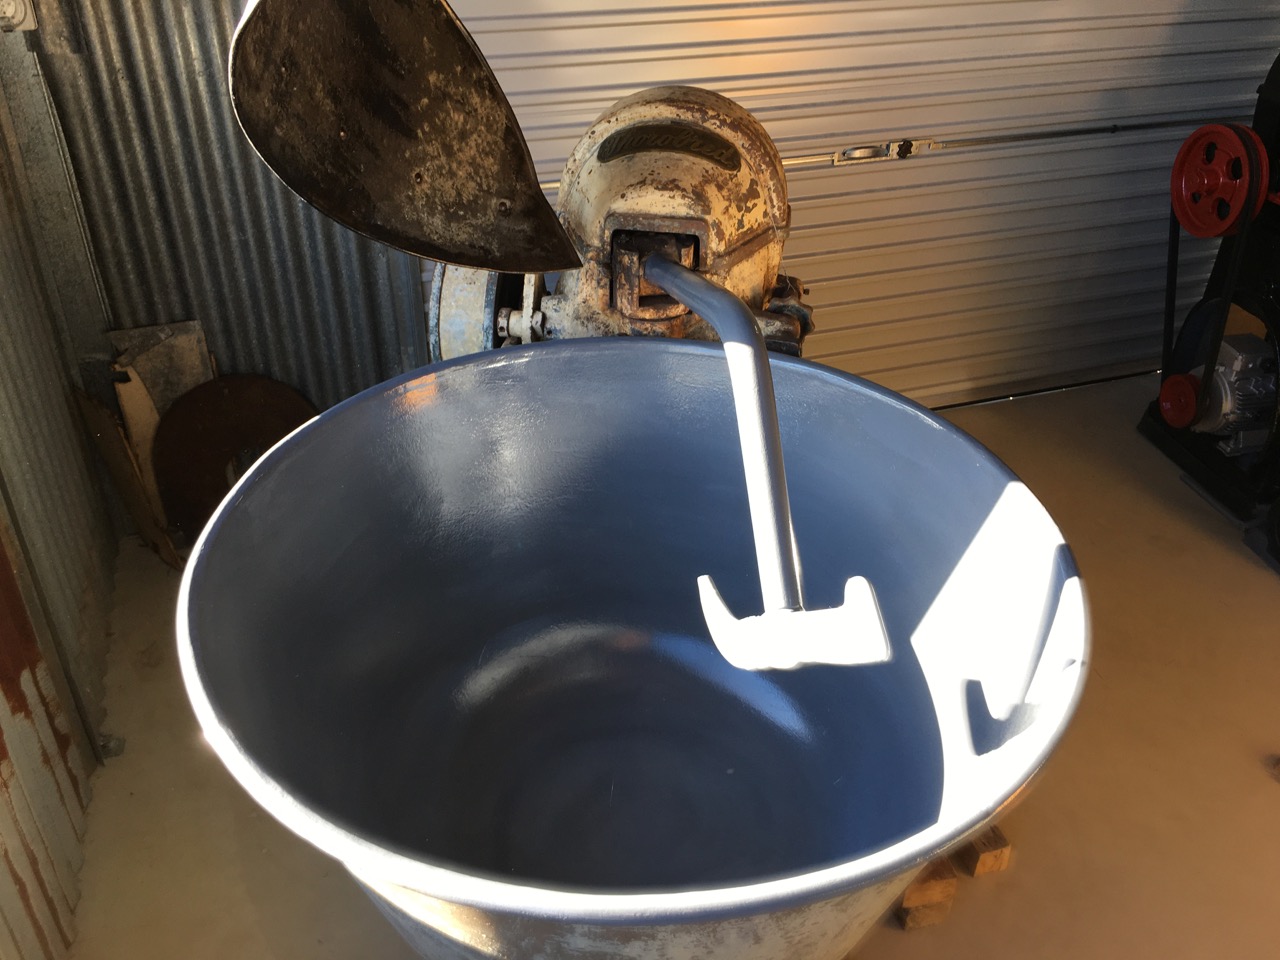
A new 3 phase electric motor, a good clean, some rust converter and a coat of zinc primer and it starts to look as though it will go again. The mixing bowl on the other hand had copped a bit of a hiding. It was split in 4 places around the rim and was no longer completely round, in fact it was a little bit heart shaped. I spent some time on it, a bit at a time, clamping it back in shape and tack welding it together, getting it as round as possible, then welding all the splits back solid again.
After a week of nights, doing all the usual things, rust converter, penetrol sealer, zinc primer, several top coats of hard gloss oil paint and its looking great.
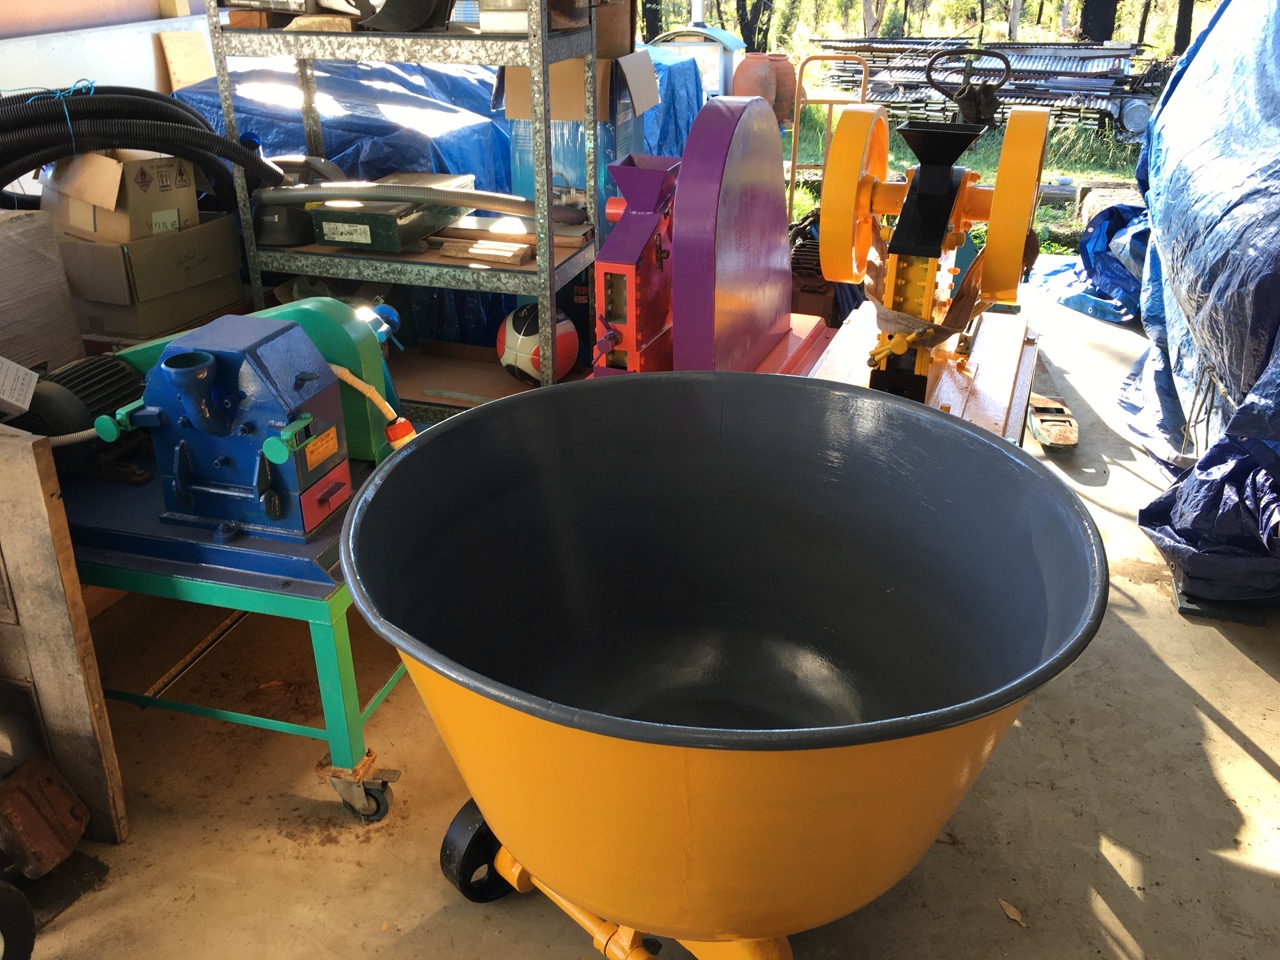
Everything is coming together now. The housing, gearbox and mixing arm have been given their severel top coats and are looking good. I bought a new 3 phase motor, new drive belts and electricals, so when I plugged it in the first time, and it actually went – I was really moved that it was back from the dead. Again! Thanks to Ross!
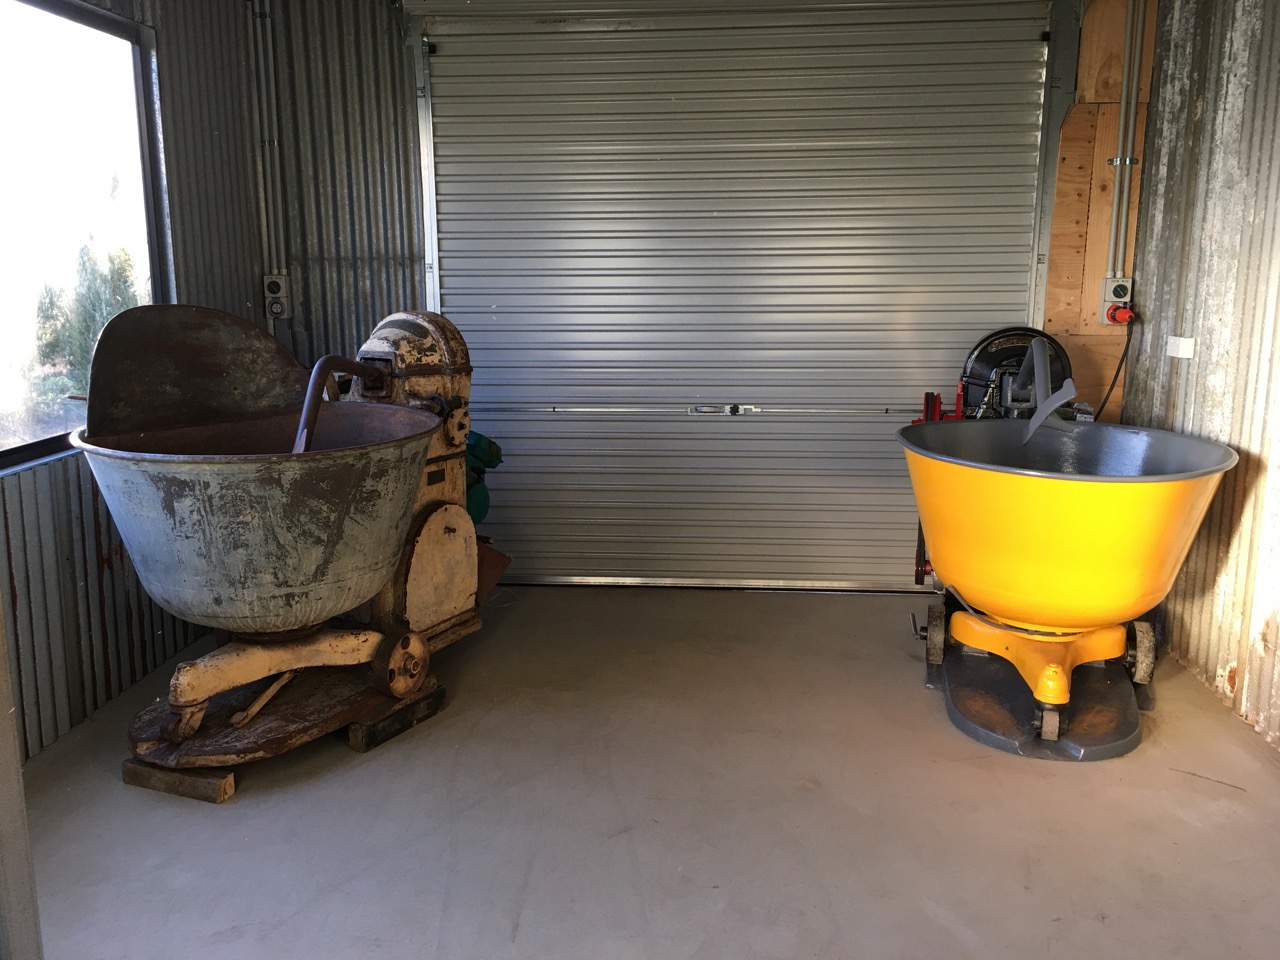
Now I need a pug mill and we are back in business, ready to make clay again. This restored ‘phoenix like’ twice burnt, and twice restored dough mixer sits in the same room as John Edye’s mixer that I bought when I had absolutely no idea that mine might be recoverable. Hints of ‘two-sheds Jackson’ here. Steve ‘two-mixers’ Harrison. Weirdly, my old ruined one is now ready to work before I have finally gotten around to finishing cleaning out and painting the bowl of John’s machine.
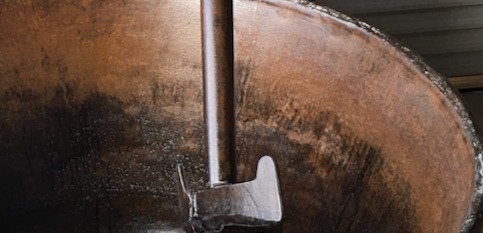
Rust converter being applied inside the bowl and the mixing arm to neutralise the rust, by converting the iron oxide that is very susceptible to oxidation with air when it gets wet, and converting the iron oxide to iron phosphate, which is quite stable and inhibits further rusting. However. The iron phosphate really needs to be sealed with a water impermeable membrane. In this case it also needs to be fairly impact and wear resistant. I have found that an oil based, high zinc, machinery paint works quite well. Well, similar stuff that I used in 1983, the first time that I restored this mixing bowl worked really well and lasted for 36 years! Of course, there is no guarantee that anything on sale today will last as long.
The bowl after rust conversion. I sent this image to John and we both agreed that the inside looked al to like an ancient ‘hare’s fur’ tenmoku glazed tea bowl.
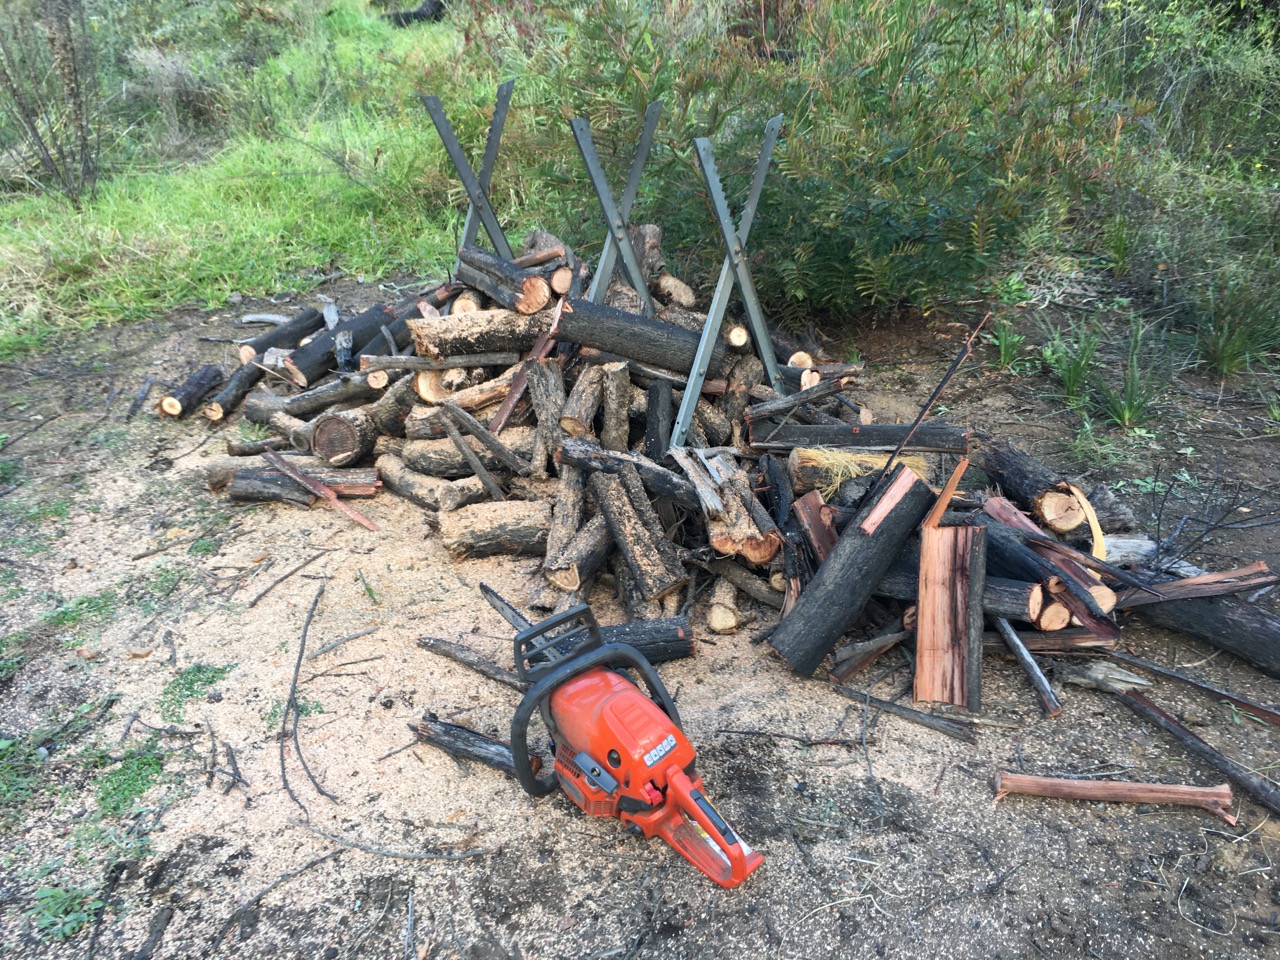
Winter is here now and we are having frosts each night. Janine and I took two days off from the building work to clear a lot of regrowth that has colonised our wood pile site. If I don’t clear these young trees now. It will be a massive and expensive job to take out and clear bigger trees and their stumps later. But more importantly, there are loads of weeds setting seeds that need to be cleared and burnt. Before I could clear the site and mow it. I had to cut up a lot of fallen trees that we didn’t ever get around to clearing up last year.
The old wood storage site being overrun by weeds and regrowth.
I was just so overwhelmed by the scale of the job of clearing up after the fire. There were other jobs that were more pressing at the time. Actually, everything needed doing NOW. But as that was impossible given our age and energy levels, We had to prioritise, a kind of palliaire sort of thinking. Cloaked in our selective thinking, or perhaps blinkered by it, we set about doing what we could manage and afford. Now that things are more settled, I can briefly get back to the cleaning up.
There were two things on my mind. It wasn’t just that the regrowth needed clearing to minimise the fuel load and therefore fire danger in the next hot summer, but all that wood laying on the ground needed to be removed, just to be able to drive over the site. Plus, as it is winter now. we needed to think about refilling the wood shed, as we are lighting the slow-combustion fuel stove in the kitchen every night to cook dinner, and also the slow-combustion heater in the lounge room.
All of the other trees that were burnt on our land are sprouting new growth from epicormic buds, but there are hundreds of dead trees that are going to fall sometime in the coming years. Is so dangerous in there that I will have to wear a hard hat when I walk in there. There is absolutely nothing that I can do about it. I will just have to leave it to sort itself out and stay out.


You must be logged in to post a comment.