It’s an ill wind that blows nobody any good.

It’s an ill wind that  blows nobody any good. Citrus stinkbug up-date

My friend down the road just emailed me to say that he had been doing just the same as me. Getting out there and squashing the citrus bugs, but unlike me, he has taken the precaution of wearing the rubber gloves. Unfortunately, although he wears glasses, one of the little buggers managed to give him a serious squirt in the eye from an oblique angle. He ended up in hospital. His eye all swollen and weeping. Unable to open it. The hospital said that the caustic juice had corroded the surface of his eye! Poor bugger!

I’ve never been squirted in the eye by these stinky little effers. I can only imagine how painful it is. But I have coped a little spray on my neck and face and it really burns the delicate parts of my skin that might be exposed. The most pain that I have suffered at the hands, or should I say butts, of these little squirty critters is when I had a cut on my fingers and the acidic juice get into the cut. You can’t wash it out fast enough and it never really goes away for hours.

I go about on my rounds of the citrus trees this morning, I only find 5 victims. However, I’m wearing rubber gloves and clear protective goggles this time. A lesson well learnt by my friend and passed on in a timely manner. I see that ants are completely immune to the caustic acid juices of the stink bugs. All of yesterdays corpses are covered in ants, being dissected and devoured. It’s an ill wind that  blows nobody any good!

img_4326 img_4335

img_4336 img_4337


The Summer Vegetables have Arrived

In these last few dying days of the old year, the heat has set in and all the summer vegetables that were dawdling along last month, are now racing in the heat and we have to water the garden every day. We had our first red tomato before the Solstice, as well as  beans, zucchinis and our first aubergines. There are lettuces shooting up, along with the radishes, mesclun greens and rocket. We have enjoyed the first meal of pan-fried, stuffed, zucchini flowers. It’s a rich and varied, fresh and crisp menu these days, with plenty of garlic, chilli and sweet basil. Roll on the summer days of veggie stir fries, BBQ’s and salads. Not to mention our blueberries, blackberries, golden berries, peaches and apricots for our breakfast fruit salads, all given a little bit of a lift with a squeeze of lime juice.

img_4317 img_4318

img_4319 img_4320

img_4332 img_4334

img_4242

Citrus Stink Bugs Move In

The weather is hot and the insects are very active. There are termites swarming in the evenings. Suddenly, I realise that the citrus stink bugs have moved in. Usually, they come in small numbers and are green. They slowly change over a week or two to a copper colour. Then finally to a shiny black. This is when they are sexually mature and start to breed. I hadn’t noticed them in the lead up as I might usually do. I guess that I’ve been too busy lately. I’ve been watering the citrus trees, but I didn’t notice them.

Now that I have noticed them, I start to crush them with my fingers. There are lots of ways to deal with them, but quickly reaching in to the foliage and crushing them between the fingers is the fastest and most effective. I have a 98% hit rate. Very few are fast enough to get away. If they do, they don’t go far and usually land on another branch where I track them down and finish them off.

If i don’t deal with them, they will breed up and eventually suck all the juices out of the new growth, killing it. Also sucking  the life out of the small fruit, until it drops of. So, with all the new growth dead and all the small fruit gone. this sets the tree back a whole year. Left unchecked, it’s a disaster that means hardly any fruit and an stunted tree.

I finish off every bug that I can see. So much so that my hands turn yellow with the acrid juices that the bugs spray out as some sort of protection. I have to be careful to keep my eyes clear, so as not to get sprayed in the eye. My hands are quite stained and they stink, but the job is mostly done. I will now return every day to the citrus grove to clean up any strays that I might have missed. I get 100 or so the first day and maybe another 30 or so the next. I don’t like killing things, but this is a case of defending my food supply. I can’t get them all, there will be some that get away and go on to breed, so that there is always another generation every year.

The second day I take out another 20 or so more. This time, I take the precaution of wearing rubber gloves. I’m not too sure what long term effect this caustic stink bug juice will have on my skin. It certainly smells awful!

img_4323img_4326

How Many Potters Does it Take to Change a Light Bulb?

How many potters does it take to change a light bulb?

The answer is, only one. But it takes about one hour and lots of frustration. Actually it just took me over 2 hrs, because I couldn’t believe that such a simple job could be designed to be made to be so difficult and monumentally stupid by a car designer, so I spent an hour on the internet looking up what other people had done to solve the problem.

The problem is that the low beam head light bulb on our car wore out after ten years of use. I have no problem with this. It’s the first thing to have worn out on the car. A Mitsubishi Colt hatchback. It’s been a really good, reliable, fuel efficient, little car. Changing it should be simple. The light bulb can just be twisted and pulled out and unplugged. A new one plugged in and twisted back into the socket, BUT and its a BIG BUT. You can’t reach the back of the head light with your hand. It’s been designed to be located into such a cramped space, that access to the back of the light is not possible from the open bonnet.

The owners manual makes light of this. Just rotate the steering wheel in the opposite direction to make space in the wheel well, remove the liner and replace the bulb as shown in the illustration. It sounds so easy – just do it. The only problem is that it isn’t. It isn’t easy at all! When you get down to it, it is a lot more involved. So I read it up on the web. And yes, it is a lot more involved. Very much more.

One mechanic wrote that it is much quicker and easier to remove the entire front of the car. Front bumper and other fittings , then take out the entire headlight enclosure. It is so simple to swap the bulb once you have the entire fitting in your hands! He claimed that it only took him 1 hr! I doubt that, unless you do it all the time and are used to it.

I decided to follow the manual instructions, and go in the back way, through the wheel arch. Using the added advice from the web chat line and the 15 minute video of high lights on You Tube. I like watching highlights! It’s my favourite way to take in the Boxing day cricket test match too!

So, this is what you have to do. You have to jack the car up on one side, as it is too low and cramped to get in there if you don’t. Good advice from the web. Remove the front tire. remove the wheel arch liner, or at least most of it – about 3/4. This involves snapping off he plastic rivets that hold it in. These all need to be replaced, but the manual doesn’t tell you that. I’m a careful sort of guy and take my time with these things, but I could only manage to salvage one of the plastic gadgets for reuse. It doesn’t help that you have to lay on your back, in a very uncomfortable position, in a restricted space, with all the years of accumulated dirt and sand dropping in your eyes while you work.

Next, you peel back the liner and twist it out-of-the-way. Finally you get to see the back of the head light fitting, but you can only manage to fit one hand up there in the narrow gap.

You simply have to release a wire clip, by twisting lowering and pulling. Simple on the kitchen table, using two hands. But not so easy in the dark, up in the small cramped space allocated. I say in the dark, because when you insert your hand up there, it blocks out almost all of your vision, so the operation has to be done by Braille. Oh! And the other thing that I forgot to mention, is that you are not allowed to touch the light globe with your hands! You must always hold it by the mounting socket only, or it will explode!

I finally get the old unit released so that the fitting can hang down on its connecting wires, to where I can get two hands onto it. I have to wear plastic gloves at this point, to avoid touching the bulb. I swap it over, but it won’t go back in to where it just came out of. It sort of goes in but the wire clip won’t go back into place to secure it. I manage to tear holes in 3 rubber gloves trying to manage this. I decide that there must be a left and right, or up and down option for plugging the bulb into the socket, but it is too dark to see if there is and the wires aren’t long enough to bring it into view. I just take it all apart and try again in reverse. Non of this is mentioned in the manual or on the webinar.

This does work however, I swap my thin sensitive rubber gloves that I can feel through, for a pair of thicker, plastic, work gloves that are clumsy but more robust, and by now I know what I ought to be feeling/sensing through the gloves. The bulb goes in, the mounting eventually goes back in, and the clip finally gets secured. I replace the wheel arch liner with the one remaining good plastic rivet. I can’t drive anywhere in the car like this. So then I hop in my truck and drive down to Mittagong to get a packet of new plastic clips/rivets, but they only come in blister packs off 3! So I have to buy a dozen in 4 boxes. All unnecessary land fill.

I replace everything as it should be, refit the tyre and lower the car back down. It costs as much for the plastic rivets as it does for the bulb. But most of all, I have just wasted 2 hours of my life that I will never get back, and had to drive 100 kms! Someone once told me that the garage charged an embarrassing amount to replace a blown bulb. Based on this experience I can understand why.

Maybe next time, I’ll try dismantling the front of the car and go in that way? At least I’ll be standing upright! There is bound to be a next time, as the car is now 10 years old and the other side bulbs will be getting old too. At least I’ll know what to expect. I’ll buy all the plastic clips as well along with the bulbs. I console my self with the knowledge that I’ve just saved myself a few hundred dollars. This car has never been to a garage to be worked on. I’ve managed to keep it all tidy and well serviced for all these years. It’s all just a tiny part of being self-reliant and living frugally.

img_4282 img_4283

The First Ripe Tomato Before Xmas

We have just picked our first ripe tomato before Xmas. This was never possible when we came to live here 40 years ago, but now, with global warming, we have been able to do it for the last 3 or 4 years in a row.

img_4264 img_4265 img_4266

We have a nice crop of red cabbage coming along just now, so it’s time to make a batch of pickled red cabbage. I slice it finely and remove all the coarse bits to be fed to the worms. Then place it in a big bowl and pour over some brine. This is the standard 1 cup of salt to 2 litres of water. This is a pretty saturated solution. It’s just about as much salt as cold water can dissolve. It’s left to stand over night with a weight on top to compress. It soon drops down and is submerged in the brine. In the morning I pour off the brine and rinse it once on cold water, then pack the cabbage into sterilised jars. I prepare a batch of pickling vinegar, by heating up standard white wine vinegar with all the usual spices and a spoon full of sugar. This is poured over the cabbage and the lids sealed down. It couldn’t be simpler.

I want the cabbage to remain crunchy for use in salads, so I don’t cook it. It’ll need to be kept in the fridge for safe keeping.

img_4269 img_4272 img_4285


A good job well done

Last week, I delivered the latest kiln to its new home at the Sturt Pottery in Mittagong. Fortunately, everything went as it should, no drunks coming along to ‘help’. No neighbours off their ‘meds’, no visits from the police. Everything went just as it should.

I loaded the kiln on my truck and delivered it to the site. Dave turned up and met me there with his big crane truck, That crane is just the most amazing piece of technology. Every ten years, when Dave replaces his truck, he gets a new crane and it gets bigger and bigger each time. This one is so powerful that he doesn’t even have to turn the truck around to get the crane closer. It reaches right over the truck and lifts the kiln into position perfectly and without effort – but not without cost!

Dave is fitting me into his busy Xmas schedule, between other loads that he has booked in for the day.  The old kiln was moved out and the new one lifted off my truck and onto the lifter trolley. While we push the kiln into position, Dave packs up his crane and it is all over in 30 mins. Just as it should.

A big think you to Mark, Simon and Dave for all doing their essential parts. The kiln now has a new home for many years to come.

img_4222 img_4225

img_4229 img_4230

img_4233

Get your Claus off me

It’s that time of year again and the Village is having its Xmas party for the residents and the emphasis is on the children as always. That’s what Xmas is all about.

It’s my turn to be Santa again this year. This job is rotated around all the fathers about once a decade. This is my third turn. The first time, Santa turned up in a horse and cart. The next I was delivered in the Village Toyota Land Cruiser Ute from the fire shed. This year I’m in the big, shiny new, all wheel drive, 10 tonne tanker, fire trick. I arrive with sirens blazing and lights flashing.

It’s funny that they choose a Bah Humbug person like me to be Santa, but every other compliant father has already done it a couple of times too, so It’s my turn again. I remember the first or second time that I did it. I was wearing hand painted pink sand shoes that were visible from under the long red pants. My little son spotted them and the Jig was up, the game was over. Santa was really his Dad in disguise. Word soon spread through the kiddies in his milieu , that’s Geordie’s Dad under there. Look at the shoes!

Geordie is now in his 30’s, so no one will recognise me this time. I don’t know many of these little toddlers. My job is to turn up in the truck, say “Ho, Ho, Ho” and “Merry Xmas”, “Have you been good?” etcetera, etcetera. I hand out the presents and a bag of lollies each. Pink parcels for the girls and blue wrapped presents for the boys. It all goes off smoothly and my civic Santa duty is over for another year or two – or ten. Someone else’s turn next year.

Once all the kiddies have their presents and are gorging themselves on the lollies. I’m asked  to stay and sit for the photo shoot. I do, and this lovely grown-up girl comes and sits on my lap. I put my arm around her and she tells me to “get your Claus off me”.

IMG_6682.jpeg

Berry Jelly

As we approach the summer solstice, the red berries are starting to ripen. We have to cover them with one of our large sheets of nylon bird netting. If we don’t cover the ripening fruit, the birds will take the lot in a couple of days.

We have made a few small picks over the last week, but now, the real crop is ripening. We go out early, before the heat of the sun builds up. We pull back the net half way and work over one side, then the other. In half an hour we fill half a dozen plastic tubs with luscious ripe red/black berries.

img_4026img_4027

We will do this every 2nd day for a week now and then once or twice more during the next week and they will all be all but gone before Xmas.
Back in the kitchen, Janine weighs the munificence of the canes. We have harvested 3 1/2 kilos this morning, and another 3 kilos the day before. It’s a great start to the day and the week.
img_4028img_4029
Bach in the cool of the house, we re-hydrate with a cup of last years preserved dark grape juice. It’s so thick and concentrated, it is 100% grape juice and nothing else, pasteurized and vacuum sealed. It’s really amazing stuff that bears no resemblance to anything that you can buy in a shop. The commercial grape juices that i have tried, taste like they are 80% water in comparison. This stuff is just so rich and thick and concentrated in comparison. So much so that it has to be mixed 50/50 with water, otherwise it is just too strong. It’s a great natural, flavourful thirst quencher.
While I go back to work down to the kiln factory finishing up the last of the work on the current job, that is due for delivery on Wednesday, Janine stays in the kitchen to make todays harvest into 3 gratifying indulgences.
First, a youngberry sorbet, which is made from the juice sieved from the berries, no pulp in there, she only adds a very small amount of gelatine and some orange juice and then it is churned in the freezer, until it sets.
img_4451
juice of 500g youngberries
juice of a couple of oranges
1 tbs of gelatine powder
img_4058
Second, she makes a youngberry jelly. This jelly is a desert jelly. It is made with the berry juice and gelatine and placed in the fridge until it sets.
First bring the whole fresh fruit to the boil and mash it all up with a potato masher as it is heating. This liberates the juice quicker. Pour through a sieve or cheese cloth to remove the pulp and pits. While still warm, pour the juice into a medium pottery bowl and add one tbs of dried gelatine and stir until dissolved. Leave to cool, stirring occasionally while cooling to keep the gelatine in suspension. Once cooled, place in the fridge to set.
Her third creation is youngberry jelly This is a fruit conserve jelly. The kind that you spread on toast at breakfast. This is really sensational. I think that this is the best thing that can be made from youngberries. Everything made with youngberries is good, but this is the best! The balance of concentrated fruit flavour, the natural fruit acid and the natural sweetness of the fruit is just amazing. It takes a bit of time, but it is all there, just for there making.
Fill two 5 litre boilers with fresh fruit. Bring the fruit to the boil and simmer for a short time, while mashing the fruit pulp to express the juice. When it has cooled, pour it through cheese cloth and let the liquid drain freely from the fruit for several hours, or overnight. Don’t squeeze of press the cloth to extract more juice, or the jelly will become cloudy. You can add a small amount of sugar to the clear juice and bring back to the boil. Most recipes say to add equal weight of sugar to that of the juice for this kind of jelly, but that makes it ridiculously sweet. However, it does ‘gell’ quicker. Janine only adds a 1/4 of that amount  of sugar and cooks it a little longer. This serves to concentrate it more and makes it all the more intense.
img_4050 img_4054
img_4059 img_4449
Simmer this mixture to allow the fruit flavour to concentrate and intensify. Test by putting a small sample on a dish and place it in the fridge until it ‘sets’. If it doesn’t ‘set’ , cook it for longer. This standard jam making procedure. Once ready, bottle in sterilized jars straight from the oven and screw the lids down tight.
Technically, it will keep for a year, but it never lasts that long. This jelly making activity makes the kitchen and most of the house smell so delicious. The sweet, acidic fragrance wafts right through the house. It smells so amazingly good. We polish off the first jar in just two sittings.
img_4037 img_4036
Janine also bottles the whole berries as simmered pulp, once sterilised it is bottled hot jars from the oven and keeps for ages. We made so much of this last year, we still have some left.
We are grateful for this largesse of our canes. They provide for us in this bountiful way each year in the early summer and I reciprocate in kind by diverting the underground seepage trench from the septic system over into their direction. These vines and the cherry trees below them are now well watered and well fed throughout the year by this artificially created underground spring of nutrient rich water. Totally natural, gravity fed and organic!
Best wishes Steve

Built-out Obsolescence

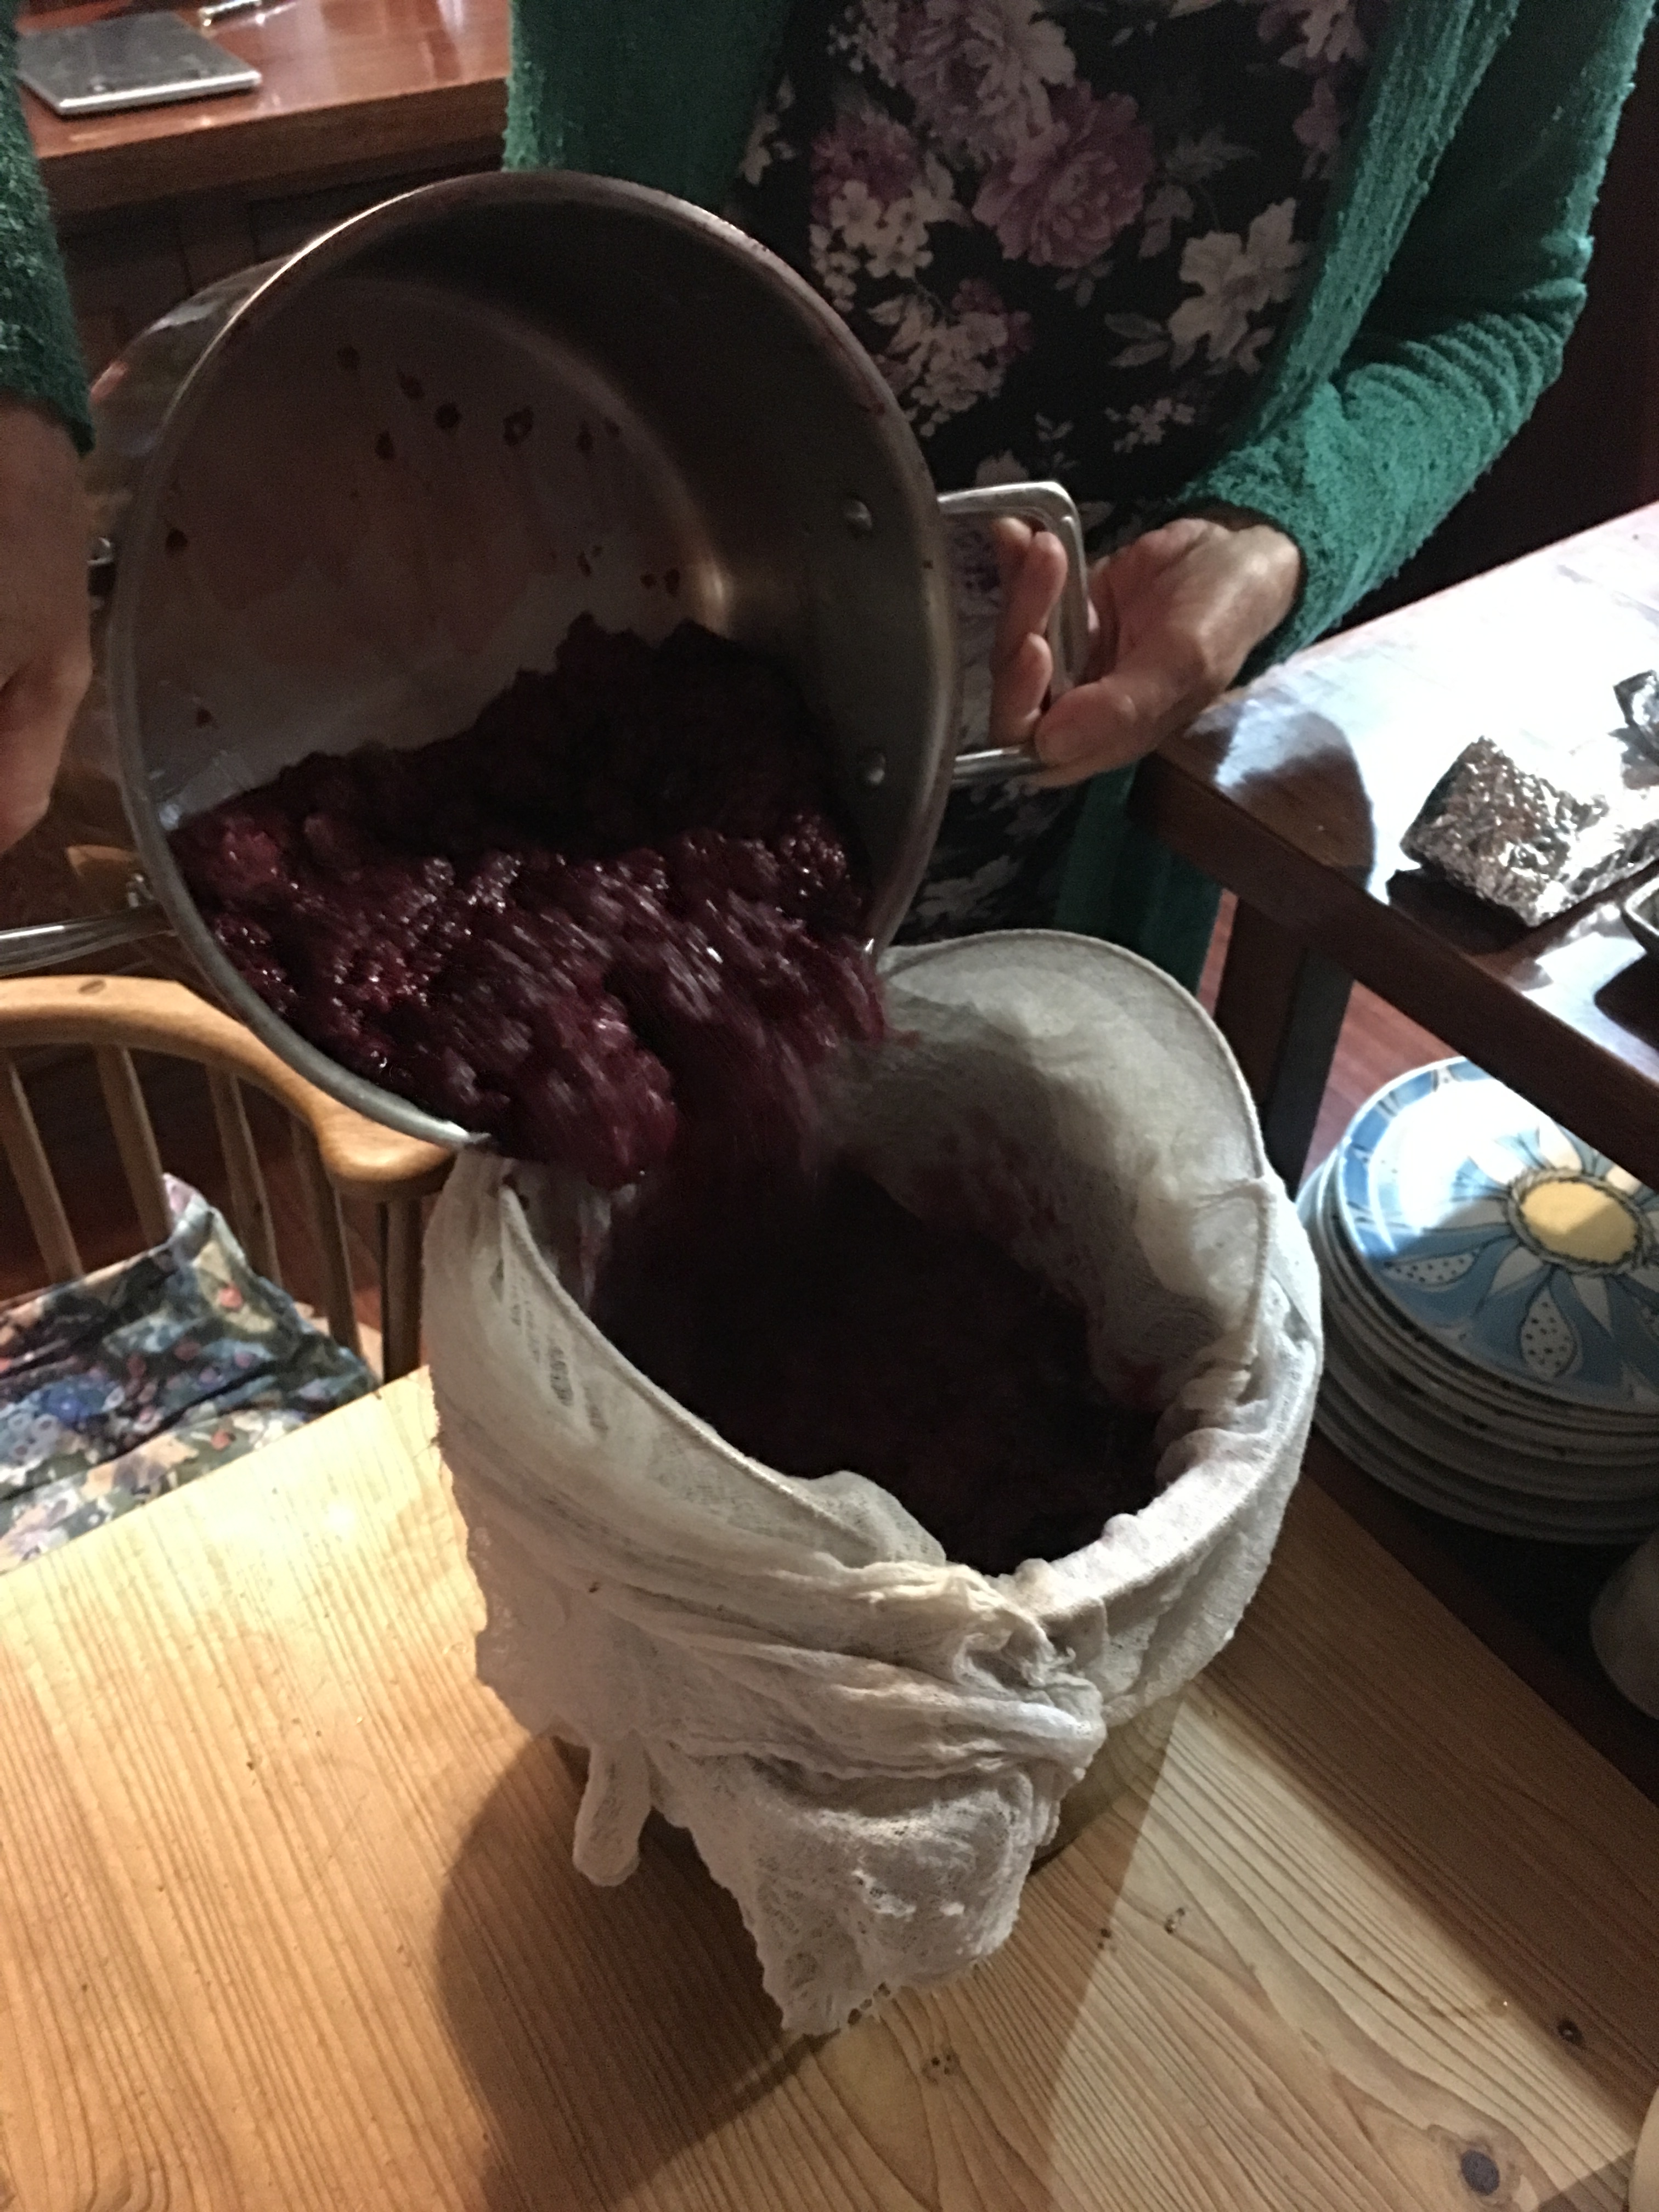
We are living a life committed to self reliance, which means lots of gardening, and therefore weeding and at this time of year watering and more weeding, then mulching and more watering. Did I mention weeding? This is all to secure our supply of fresh fruit and vegetables. We are conscious that because we live in an advanced economy, should our efforts fail, we can always go to the supermarket. No Problem! I am mindful of all the others in the world who are not so lucky as to have a local supermarket, or if they do, they don’t have the money to go there. Our life is very easy here compared to that situation. I recognise and appreciate this social safety net that our advanced western economy provides. We might have a drought here sometimes, but we have the facility to buy in drinking water if we need to. We’ve never had to, but it is there as a safety net, as long as you have the cash. Something that we don’t have to deal with is civil unrest or political turmoil. We are so lucky to be here and I am grateful for that luck of my birth.
In between doing all of this on-site manual gardening/farming/produce work here, I also have to earn a living to find the cash to pay the rent. Even though we own our own home, we need to pay all the various institutions that govern our lives for the privilege of living here. So there are the council rates, the home insurance and business insurance, the car registration and its insurance, land tax and public risk, the electricity and all the other minor bills that all add up to a significant sum over the year. I haven’t worked it out recently, but the last time I did, I shocked myself. It’s about 1/3rd of my income. It’s a good thing that I don’t have to pay real rent as well. I’ve worked hard to avoid that.
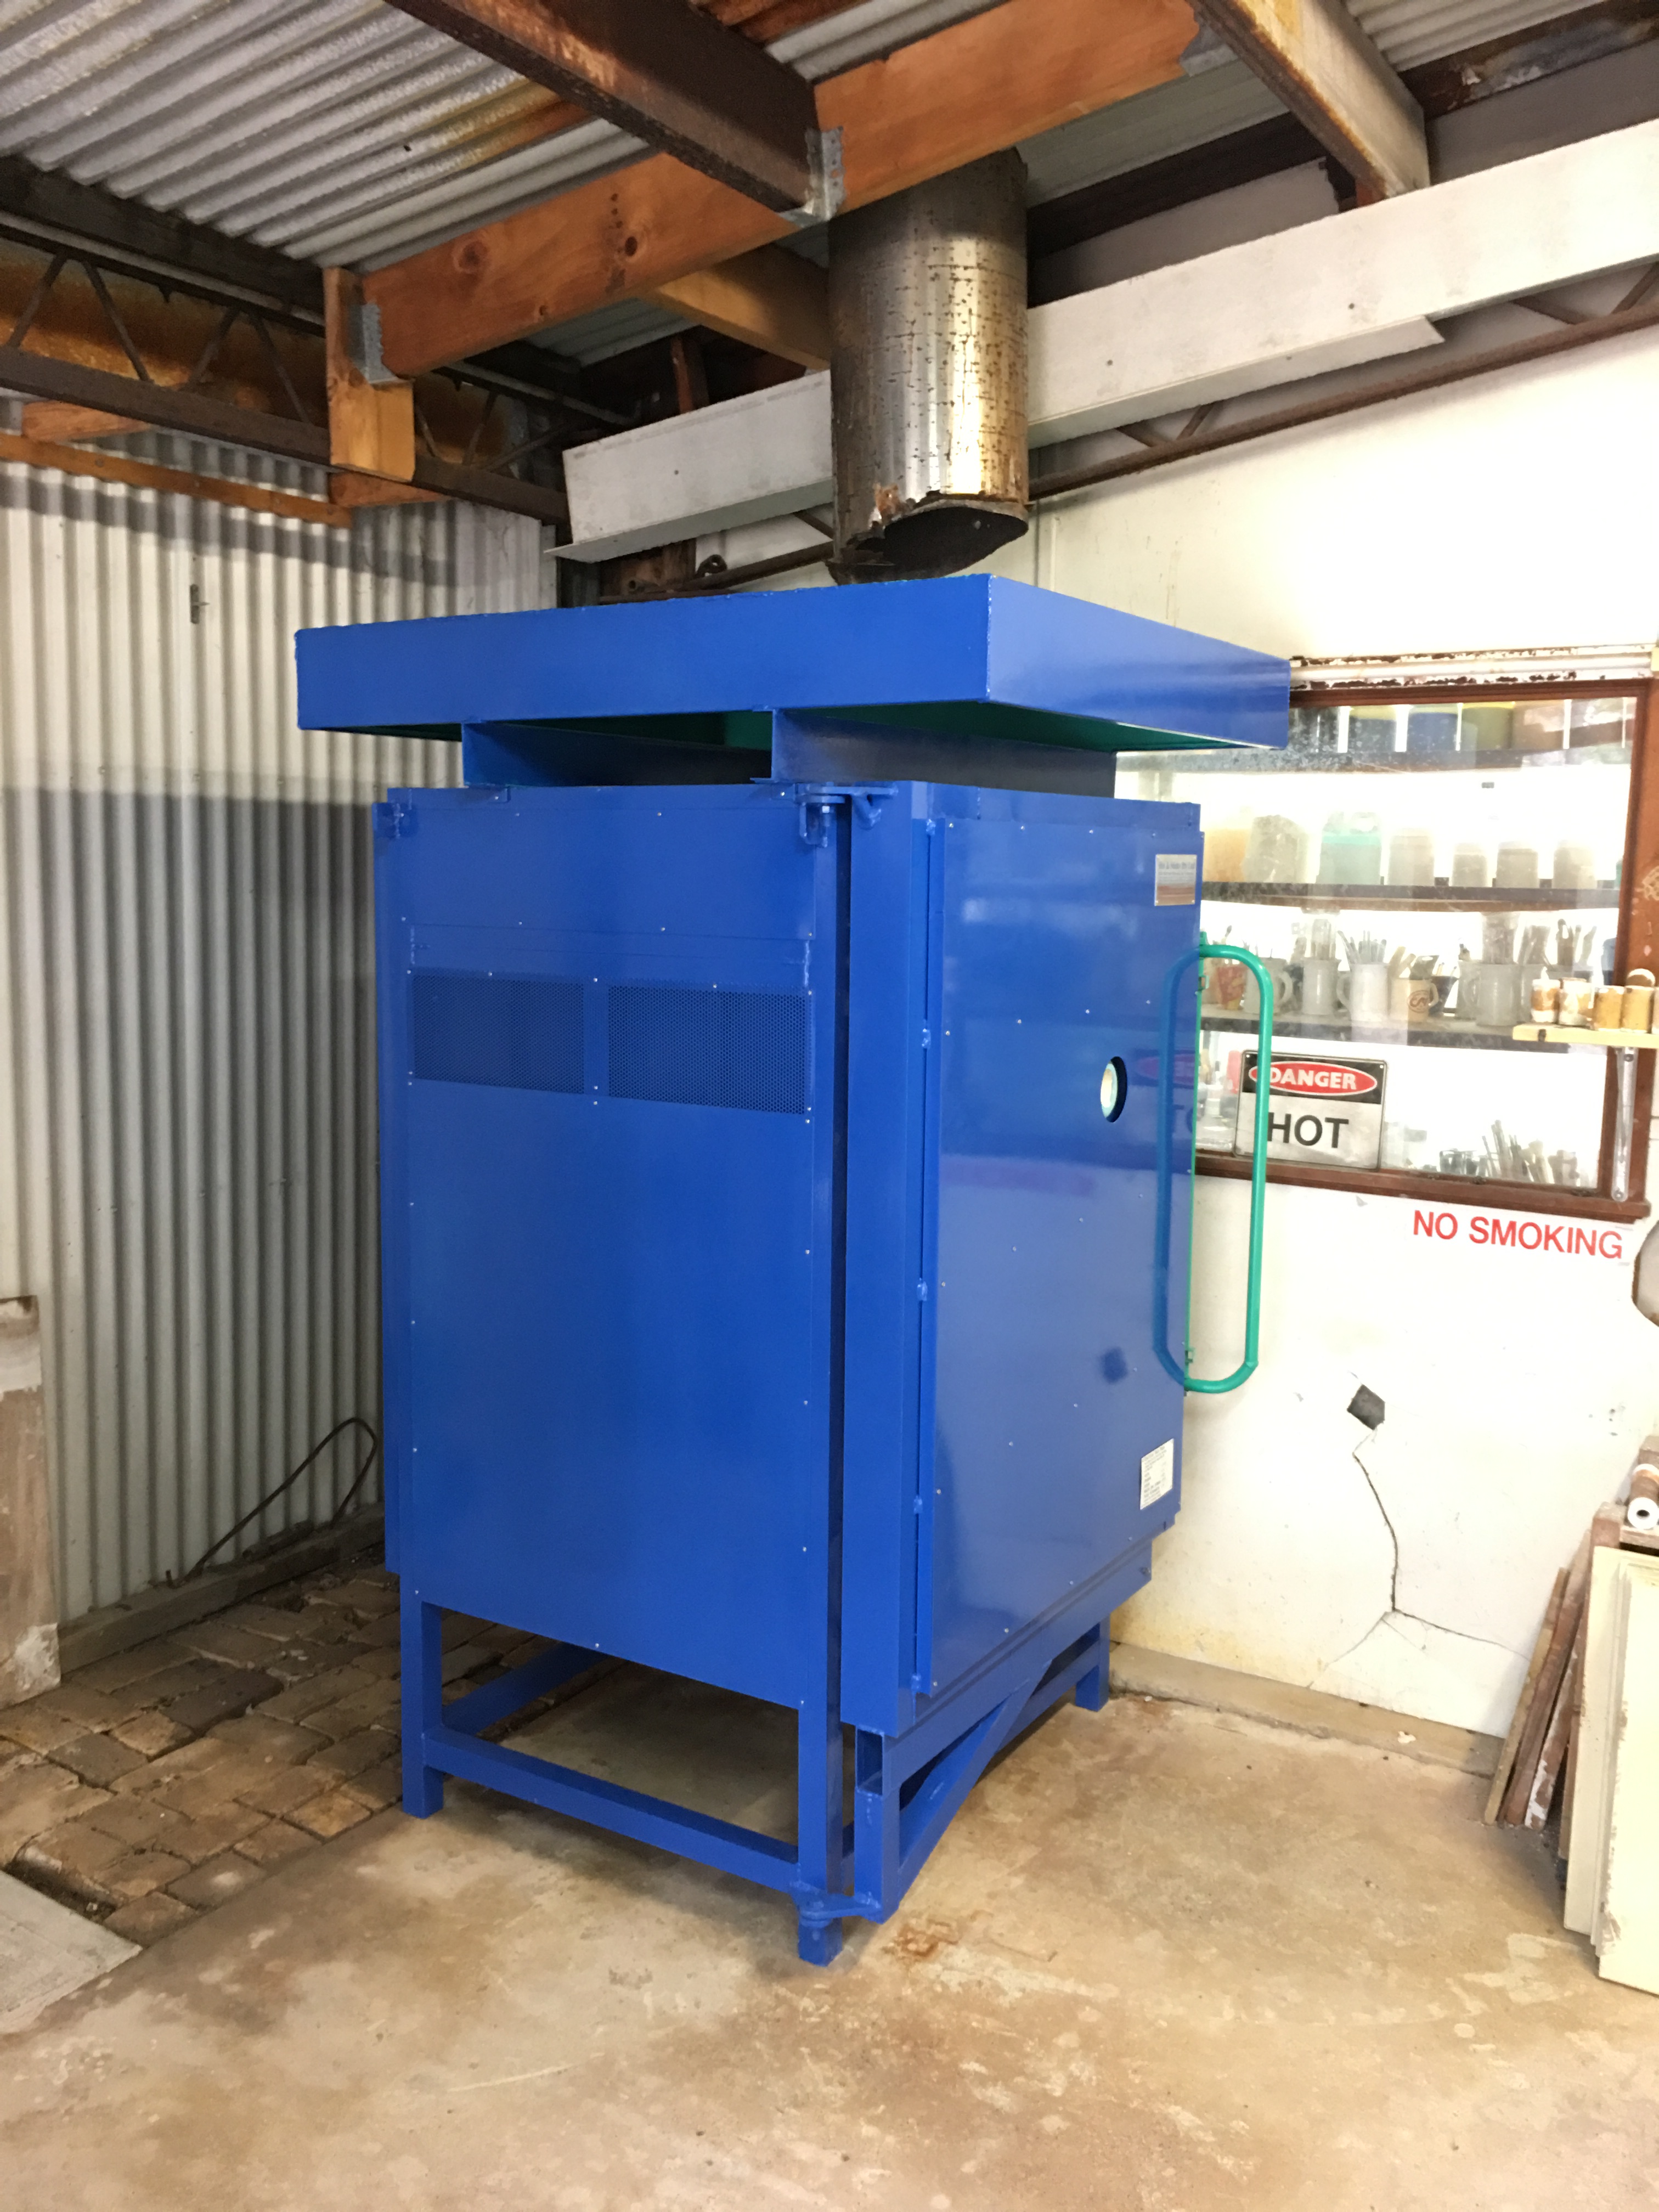
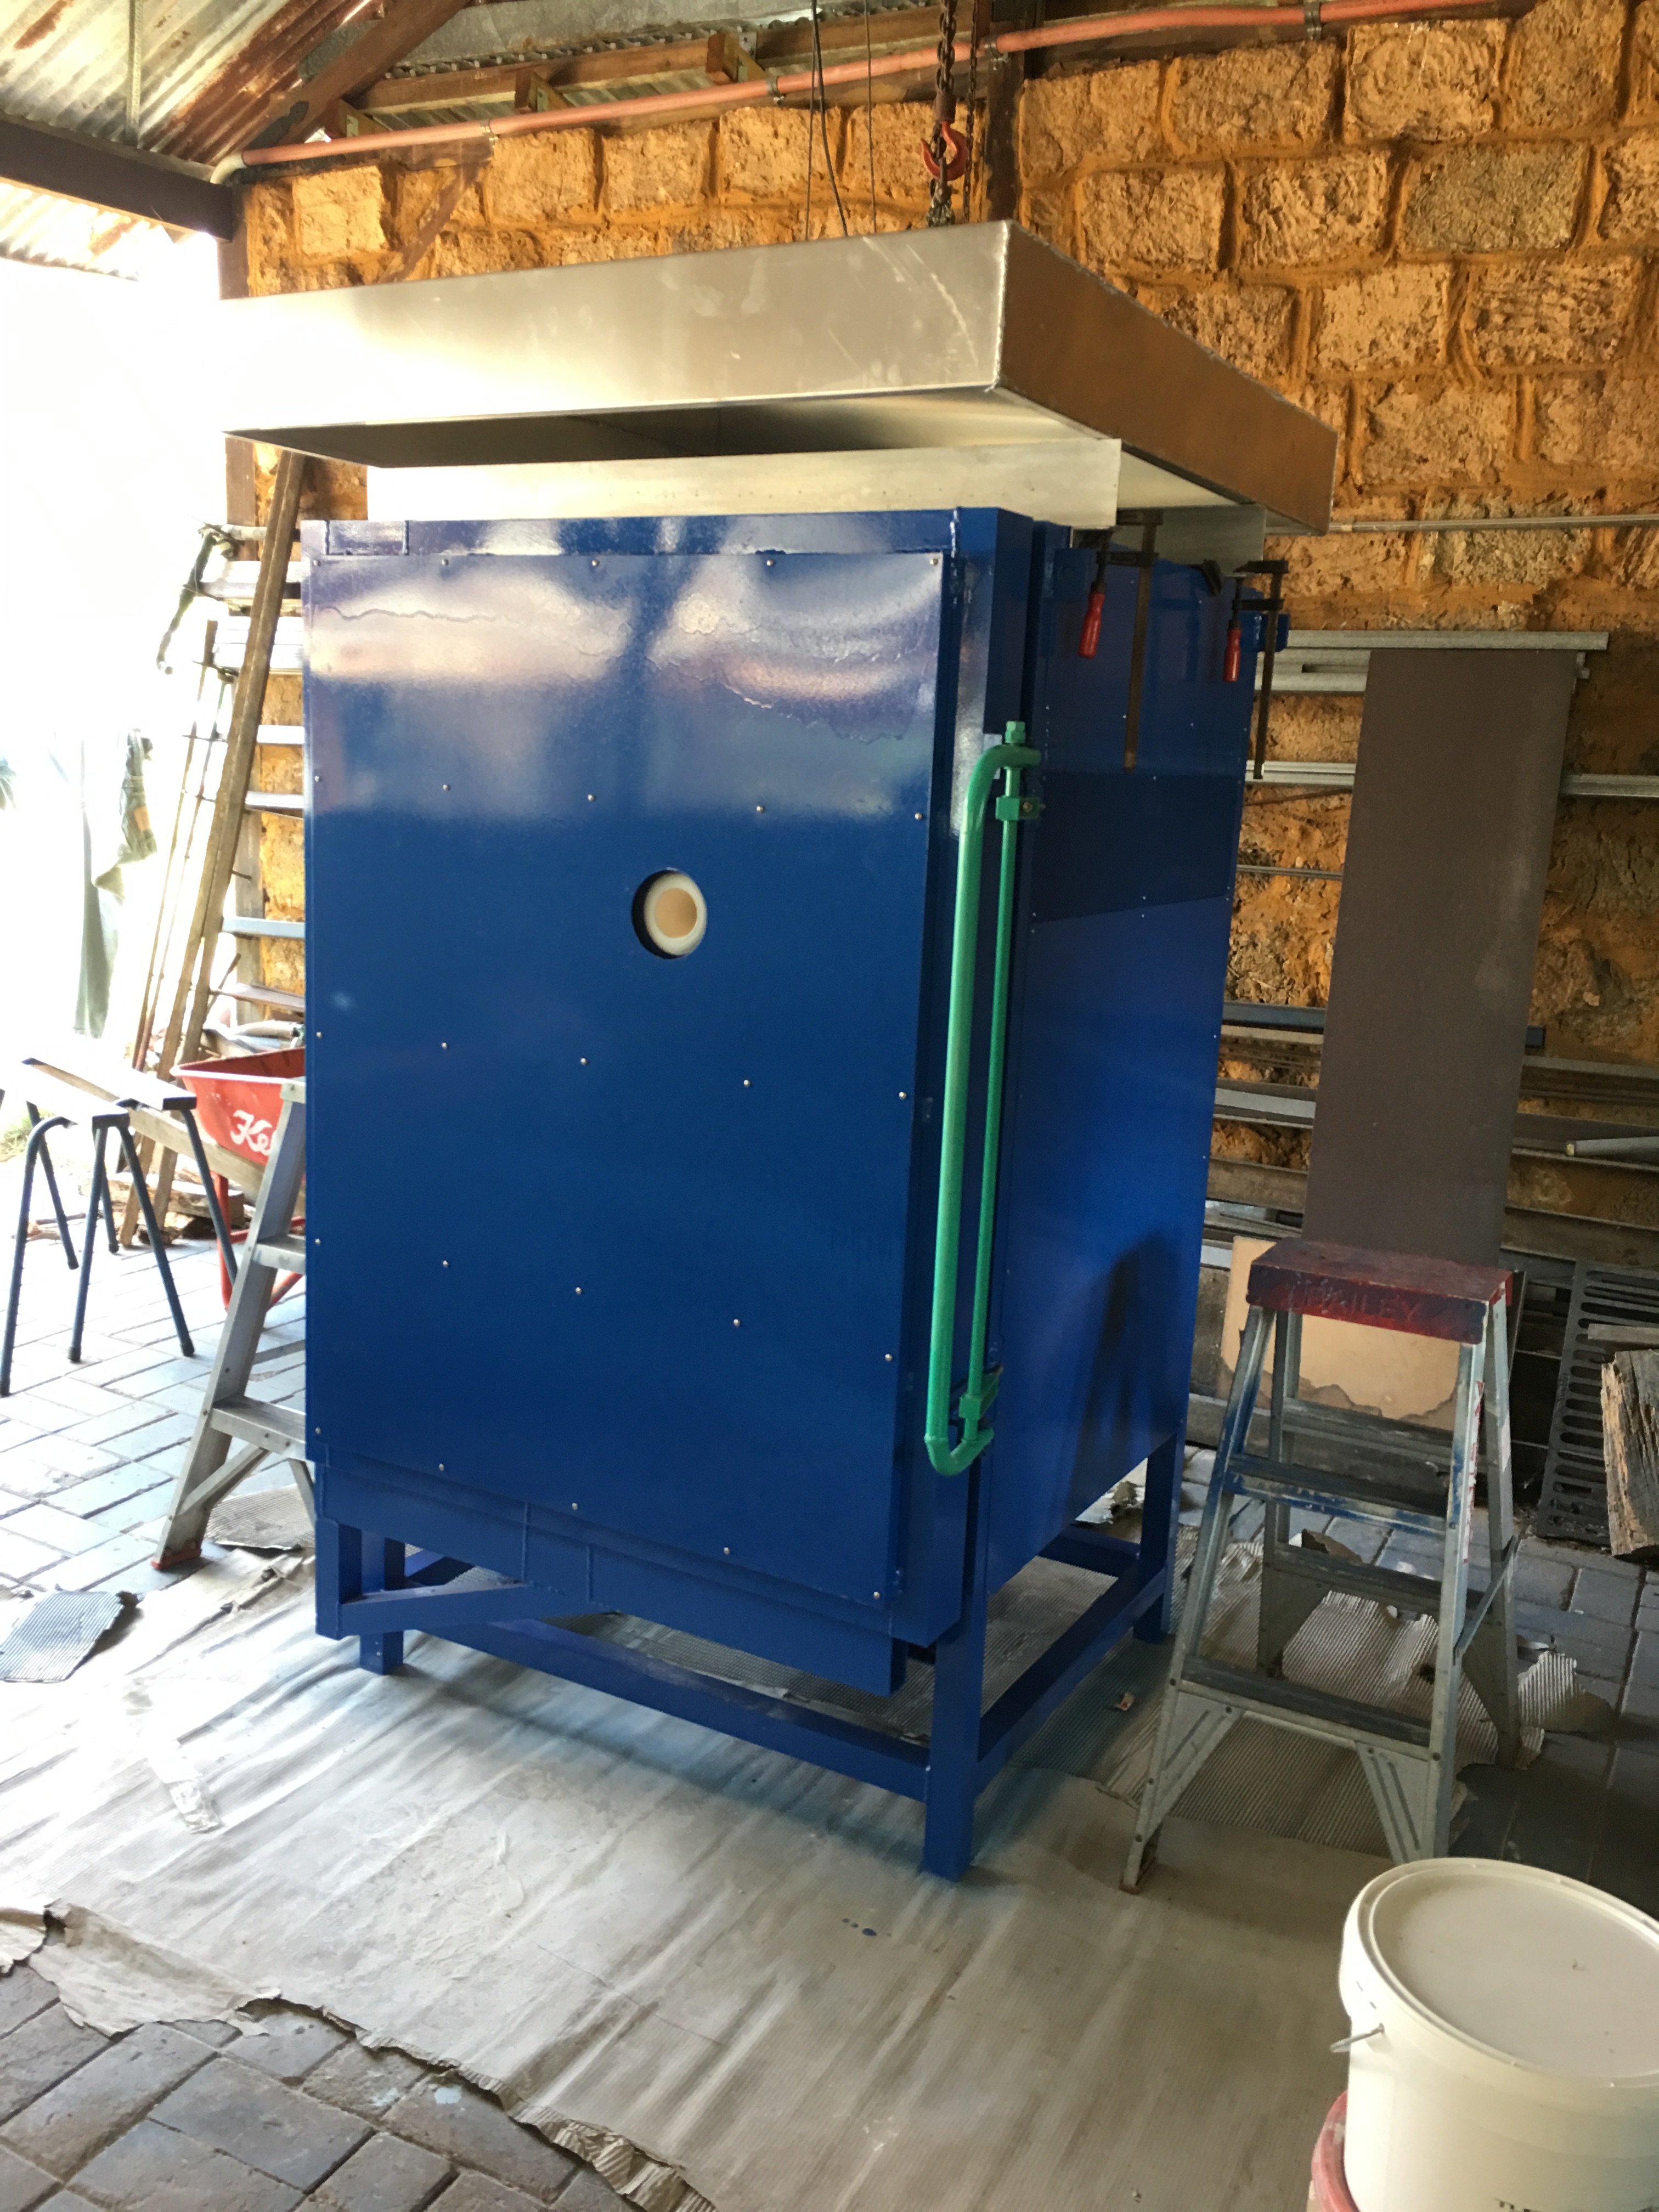
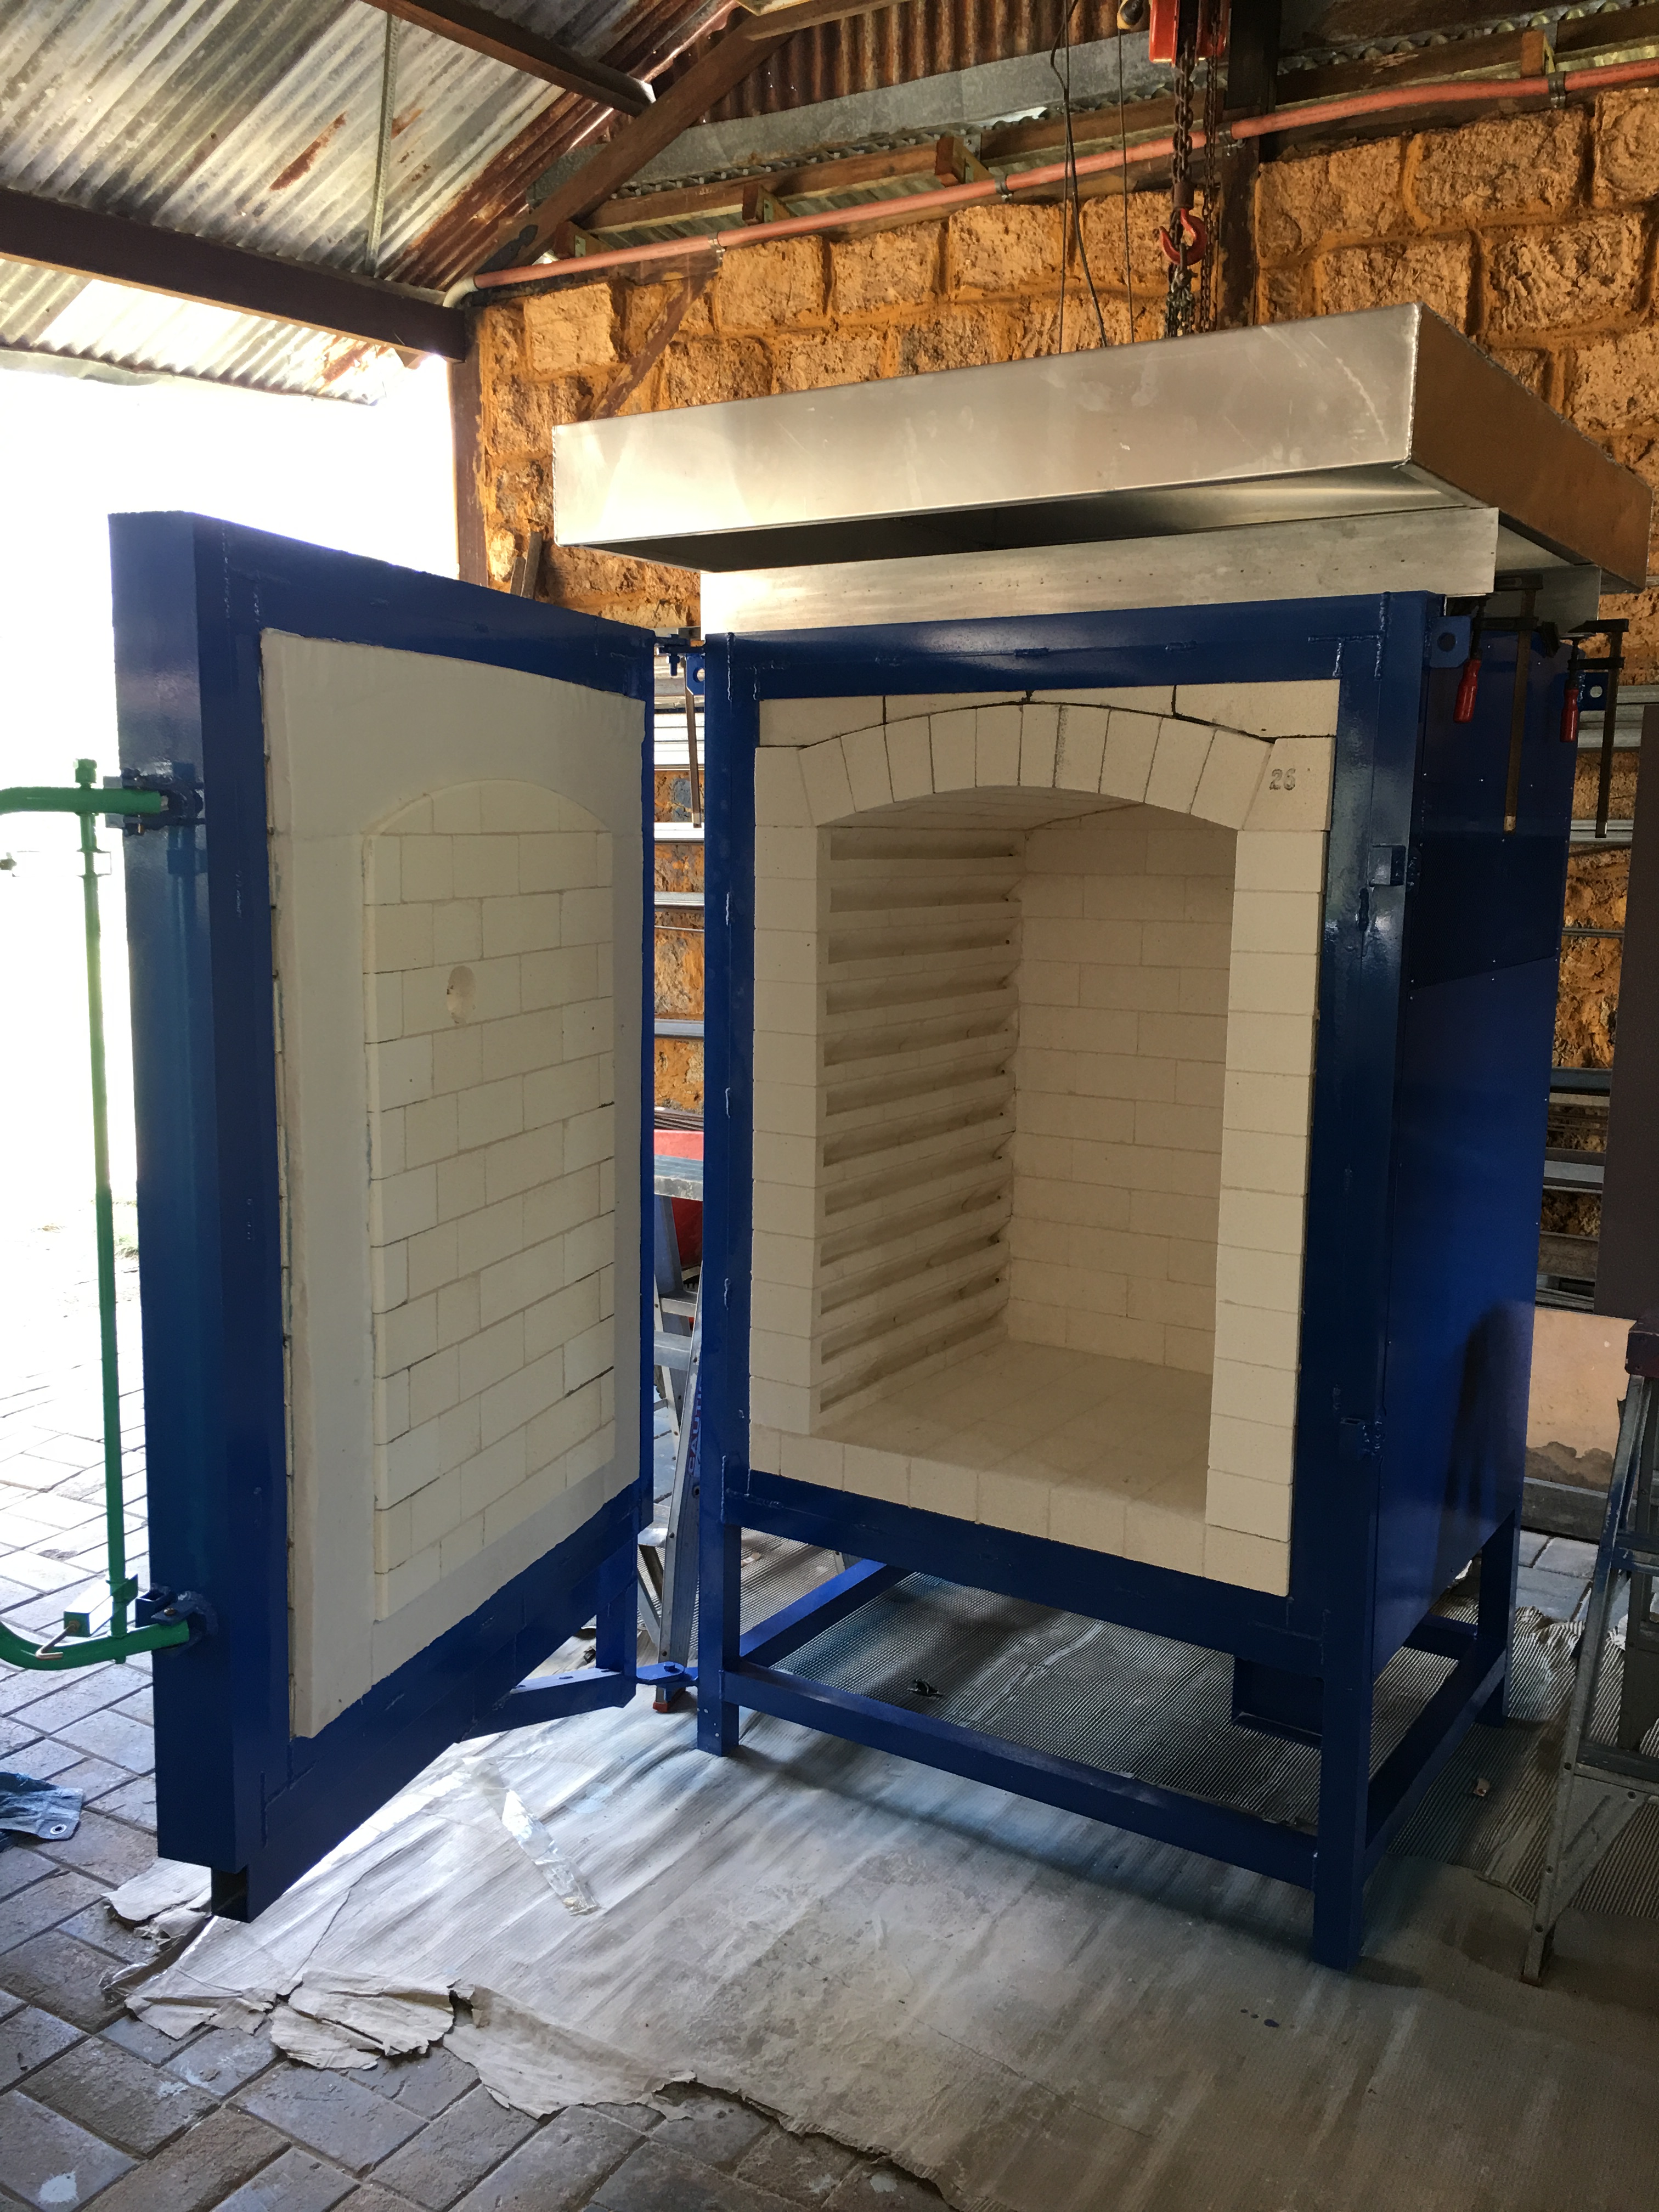
So I’m in the kiln shed this last few weeks, finishing off this great big, beautiful, electric kiln. It’s a gorgeous thing. I wouldn’t mind owning it myself, but I wouldn’t be able to afford it!  I want it to be the best that it can be. I have sourced 3 different kinds of refractory bricks to line it. Each one has different properties. I do the same sort of thing with my gas kilns, but I use different bricks, because the demands are different. Buying bricks used to be simple. There were several different suppliers, but now, with international trade the way it is, and a global economy. There is now more or less only one source, and that’s China, and there is really only one supplier left in Sydney to source them from, so for this last kiln, I have been ringing around to buy up all of the last remaining RI bricks that will suit my needs from other places for this job.
img_3967 img_3969
It’s a complex situation, because as all the manufacturing enterprises have left or shut down in Australia, all the support systems that went along with a manufacturing industry have also disappeared. We are now a post-industrial nation.
Now, as a post industrial society, we have an amazing choice of all manner of imported, cheap, plastic crap. If that is what you want, and apparently the majority of Australians do? Because that is what is selling, so that is what shops are stocking. However, it has left us so much poorer in choice for any kind of quality product. The growth industry in Australia, it seems, is land fill.
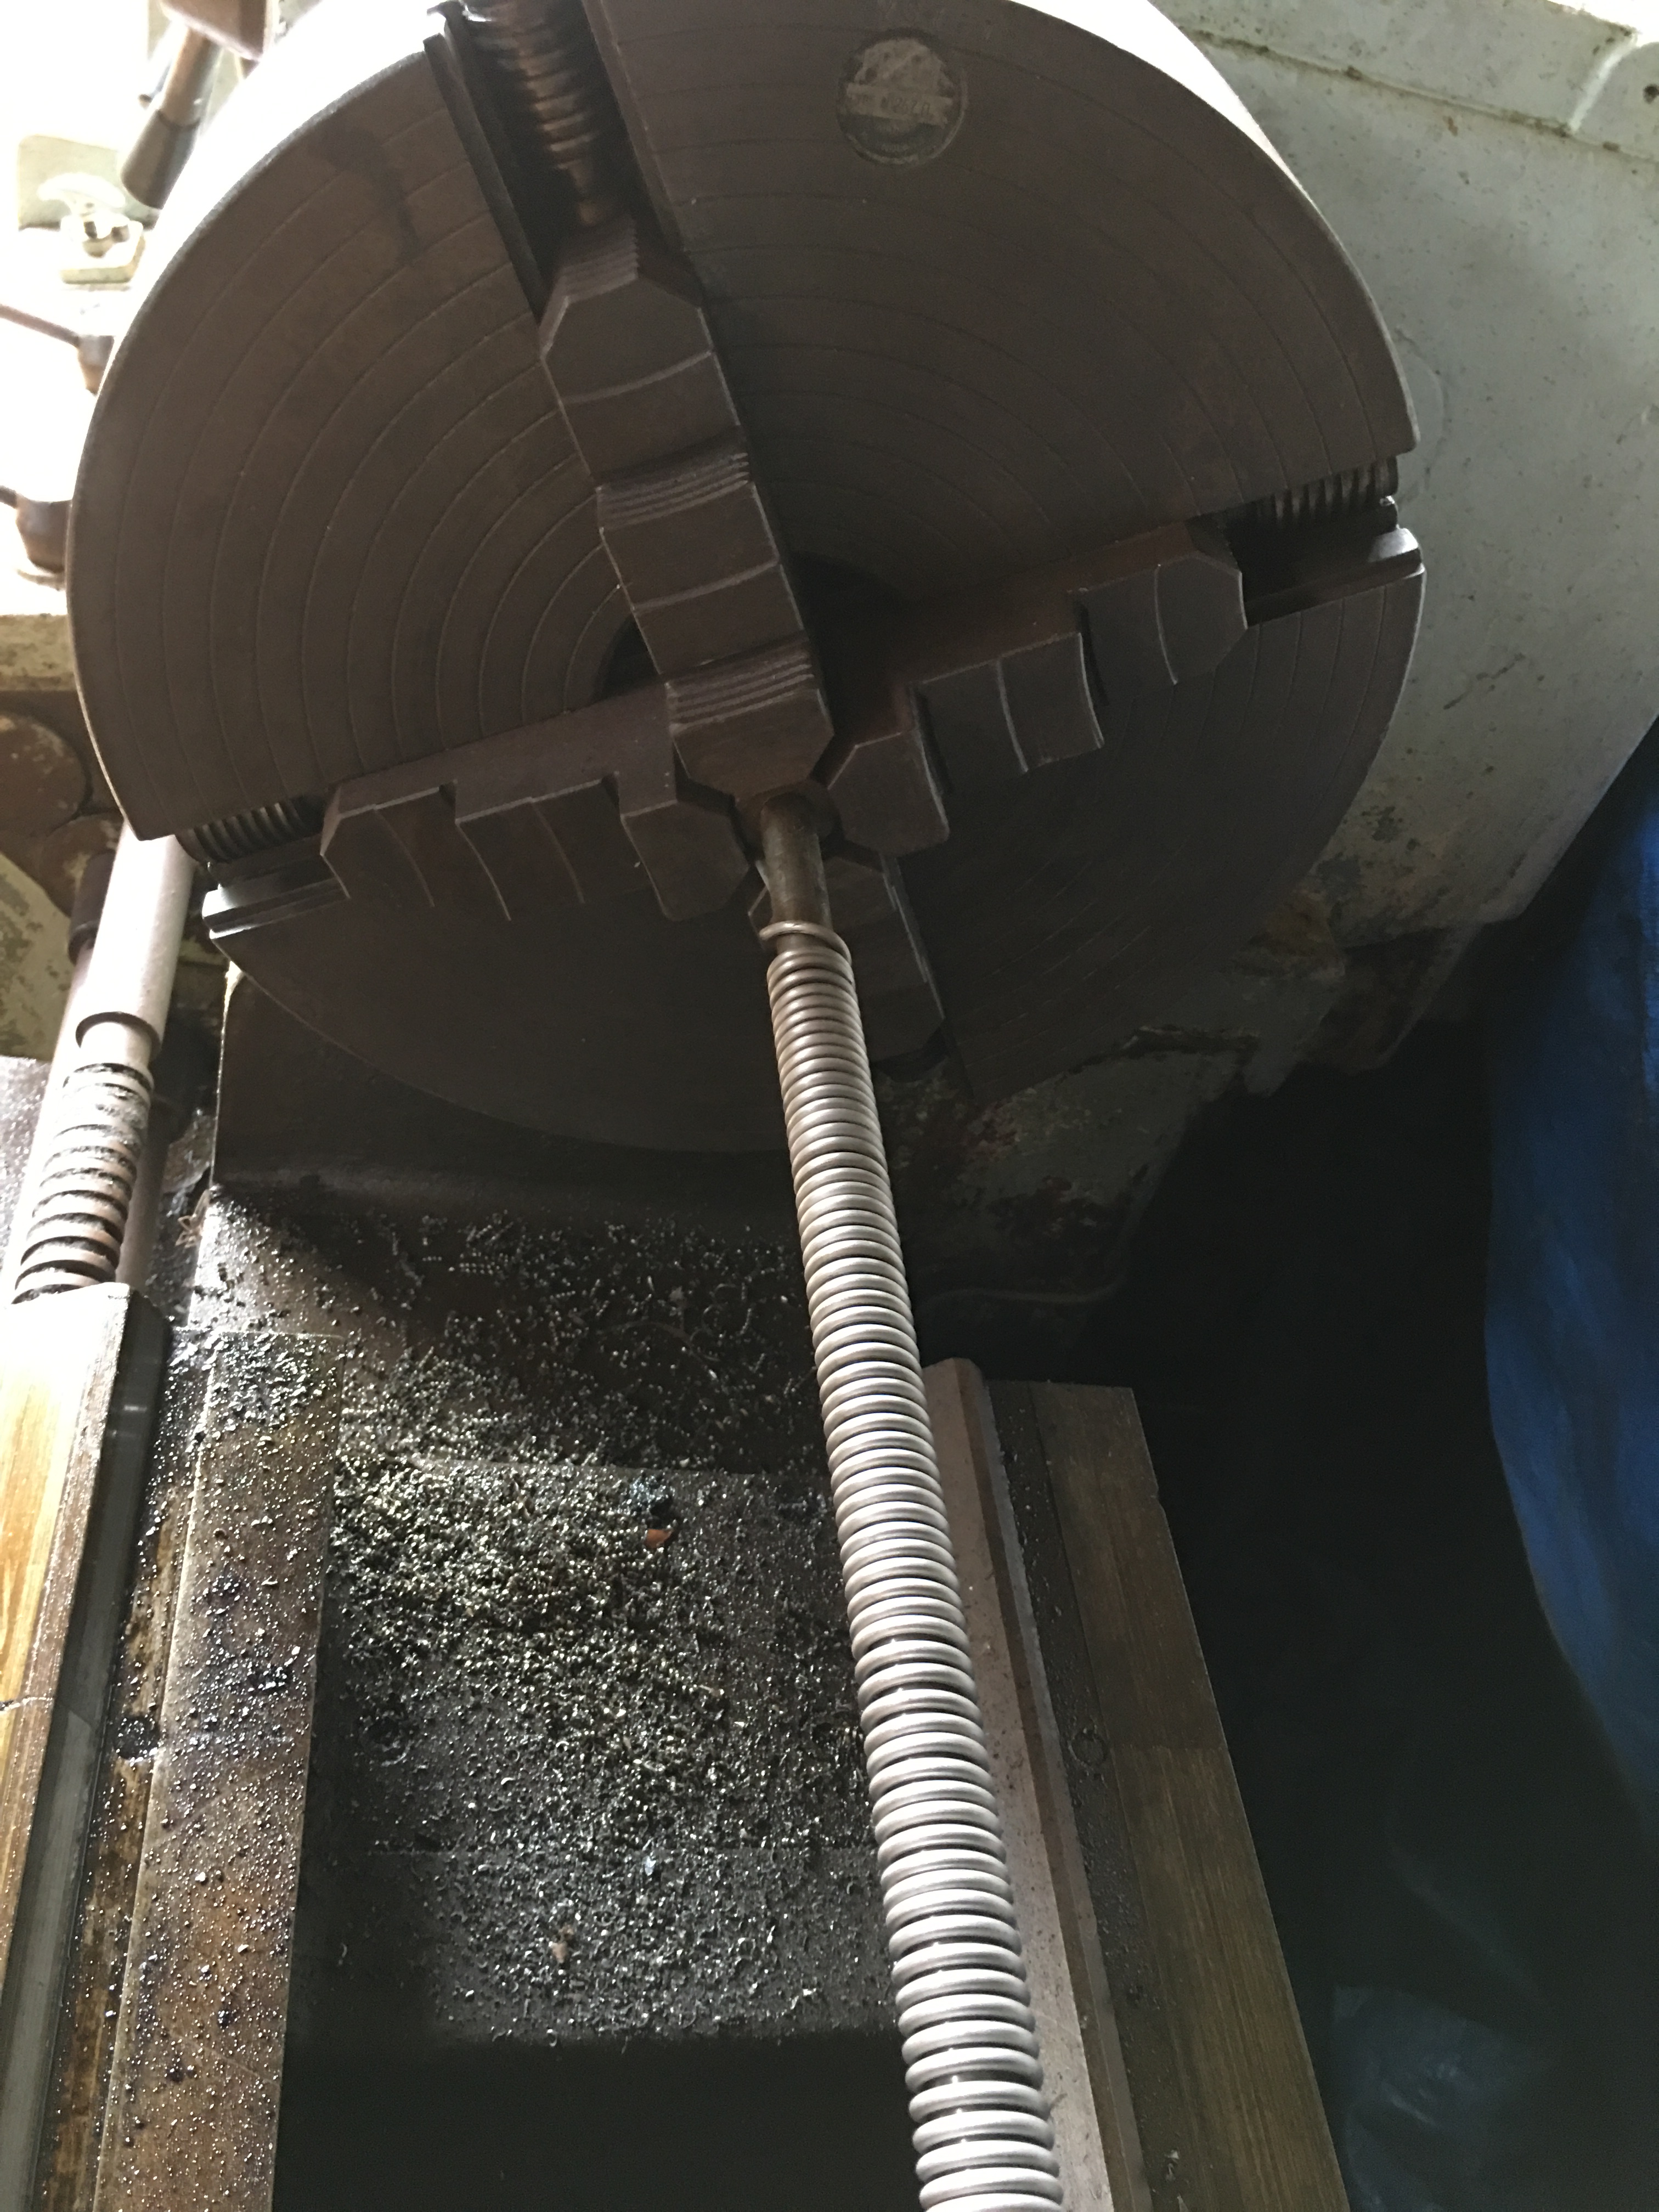
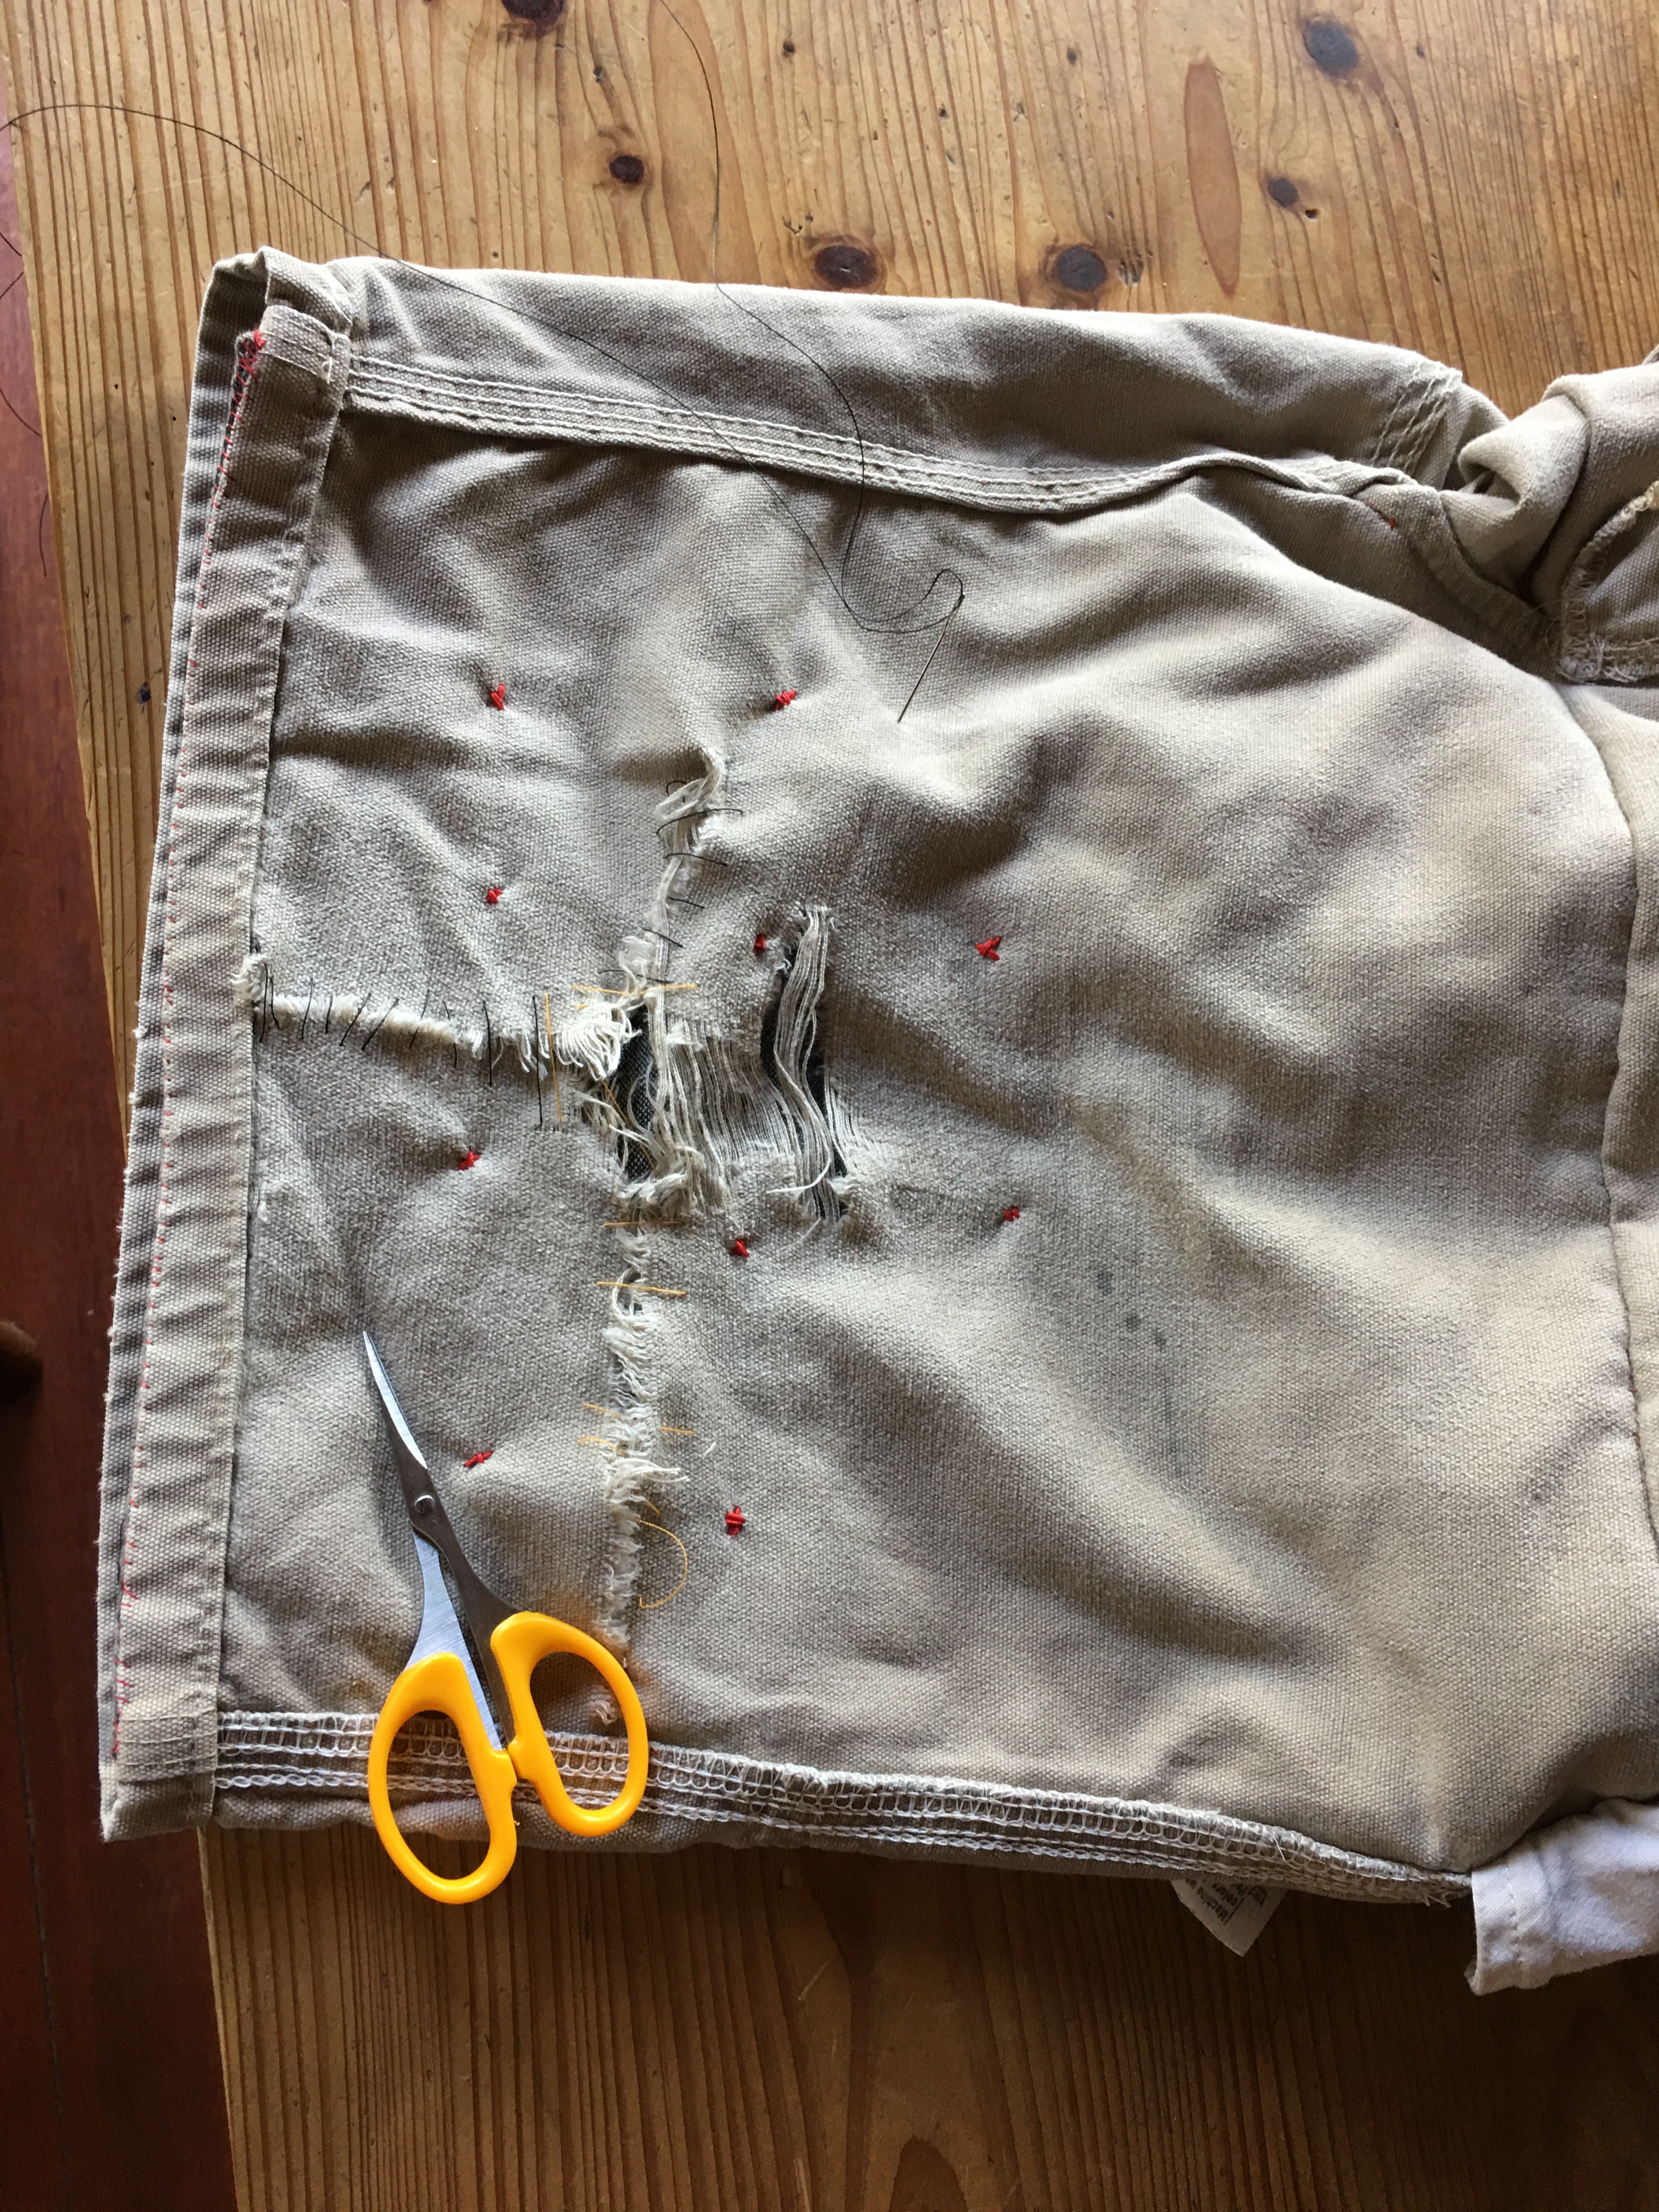
I want the things that I make to last a lifetime, or at least as long as possible. I want to, if not defeat entropy, then at least delay it as long as possible. I want to make and sell the sort of products that I would want to buy myself. I want the things that I make to last as long as possible without any maintenance. To this end, I make almost everything here myself. I make all my own heating elements. I only use the very best quality wire to make my elements. I use Kanthal A1 wire from Sweden. A few months ago, I ordered the Kanthal wire for this kiln from the local distributor, only to discover that there is none of this highest grade wire in the country. Apparently no one else uses this A1 grade in Australia any more.  I’m the only customer, so they don’t stock it as a regular item. Probably because it’s the most expensive wire, it’s rated up to 1,400oC and this makes it the longest lasting, most reliable, heavy duty wire. I’m prepared to wait the time and pay the extra money to get it, because I know, from my 30 years of experience of using it, that it will last. So I do.
img_4012 img_4015
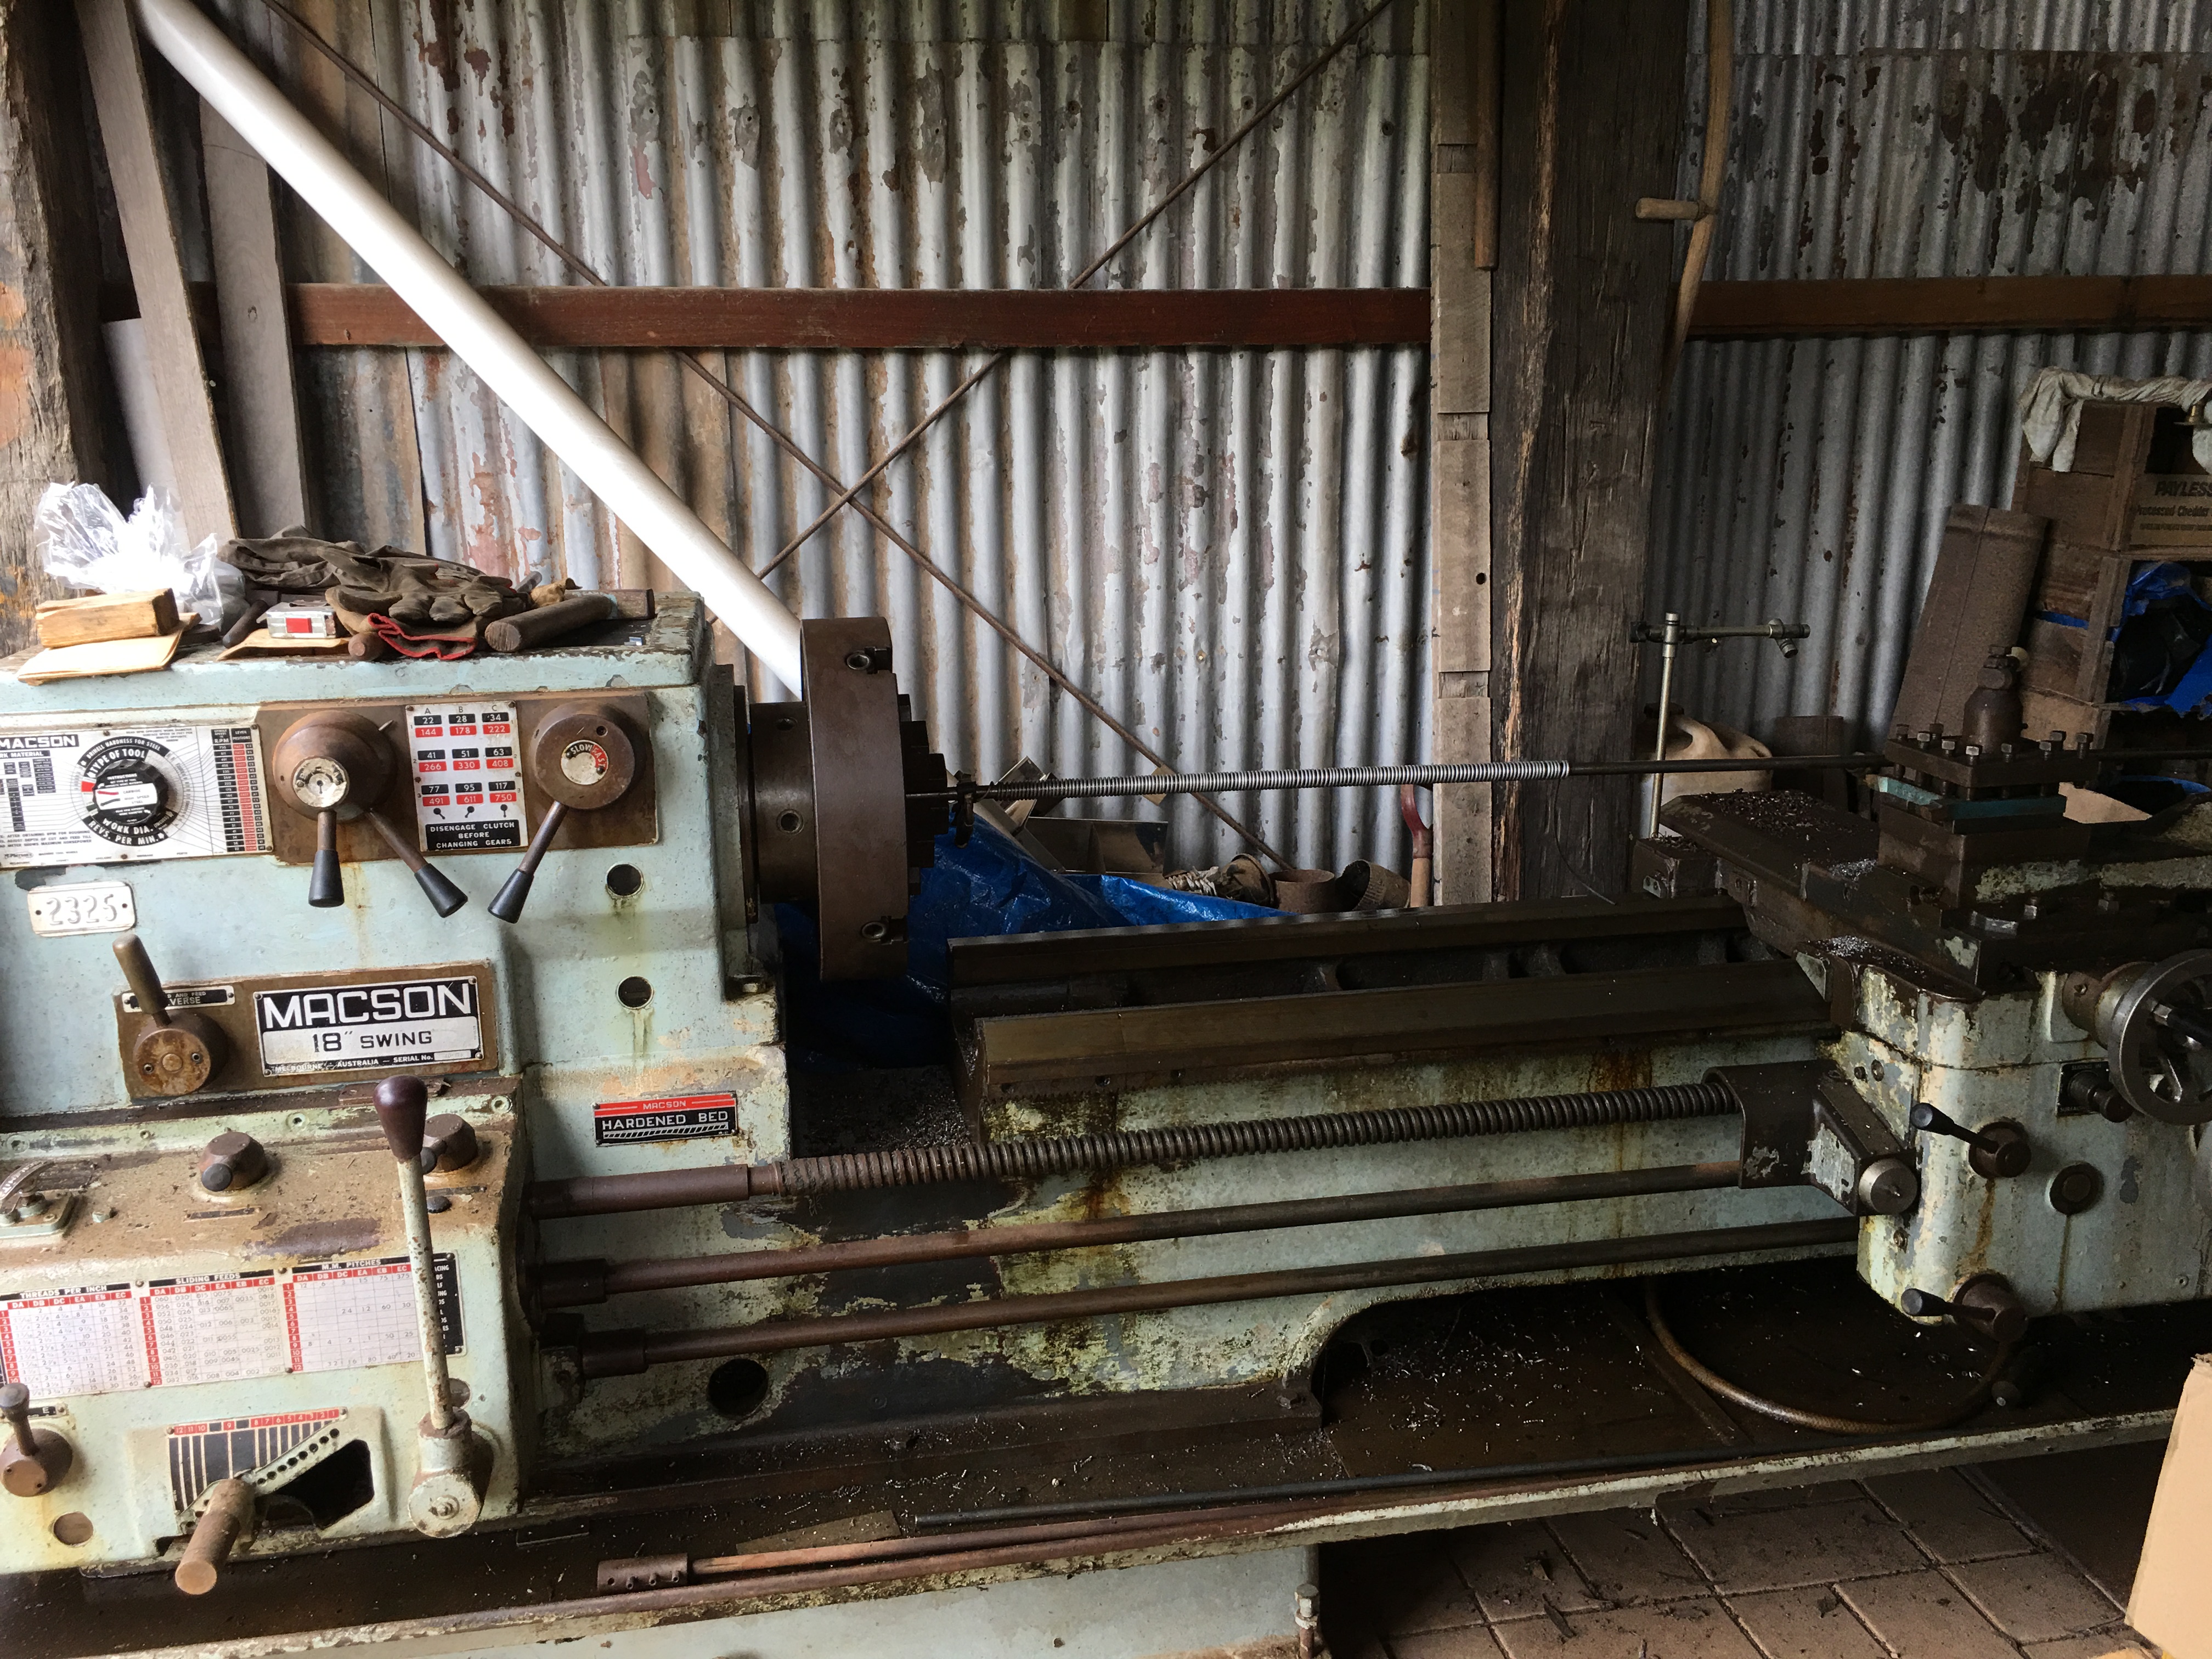
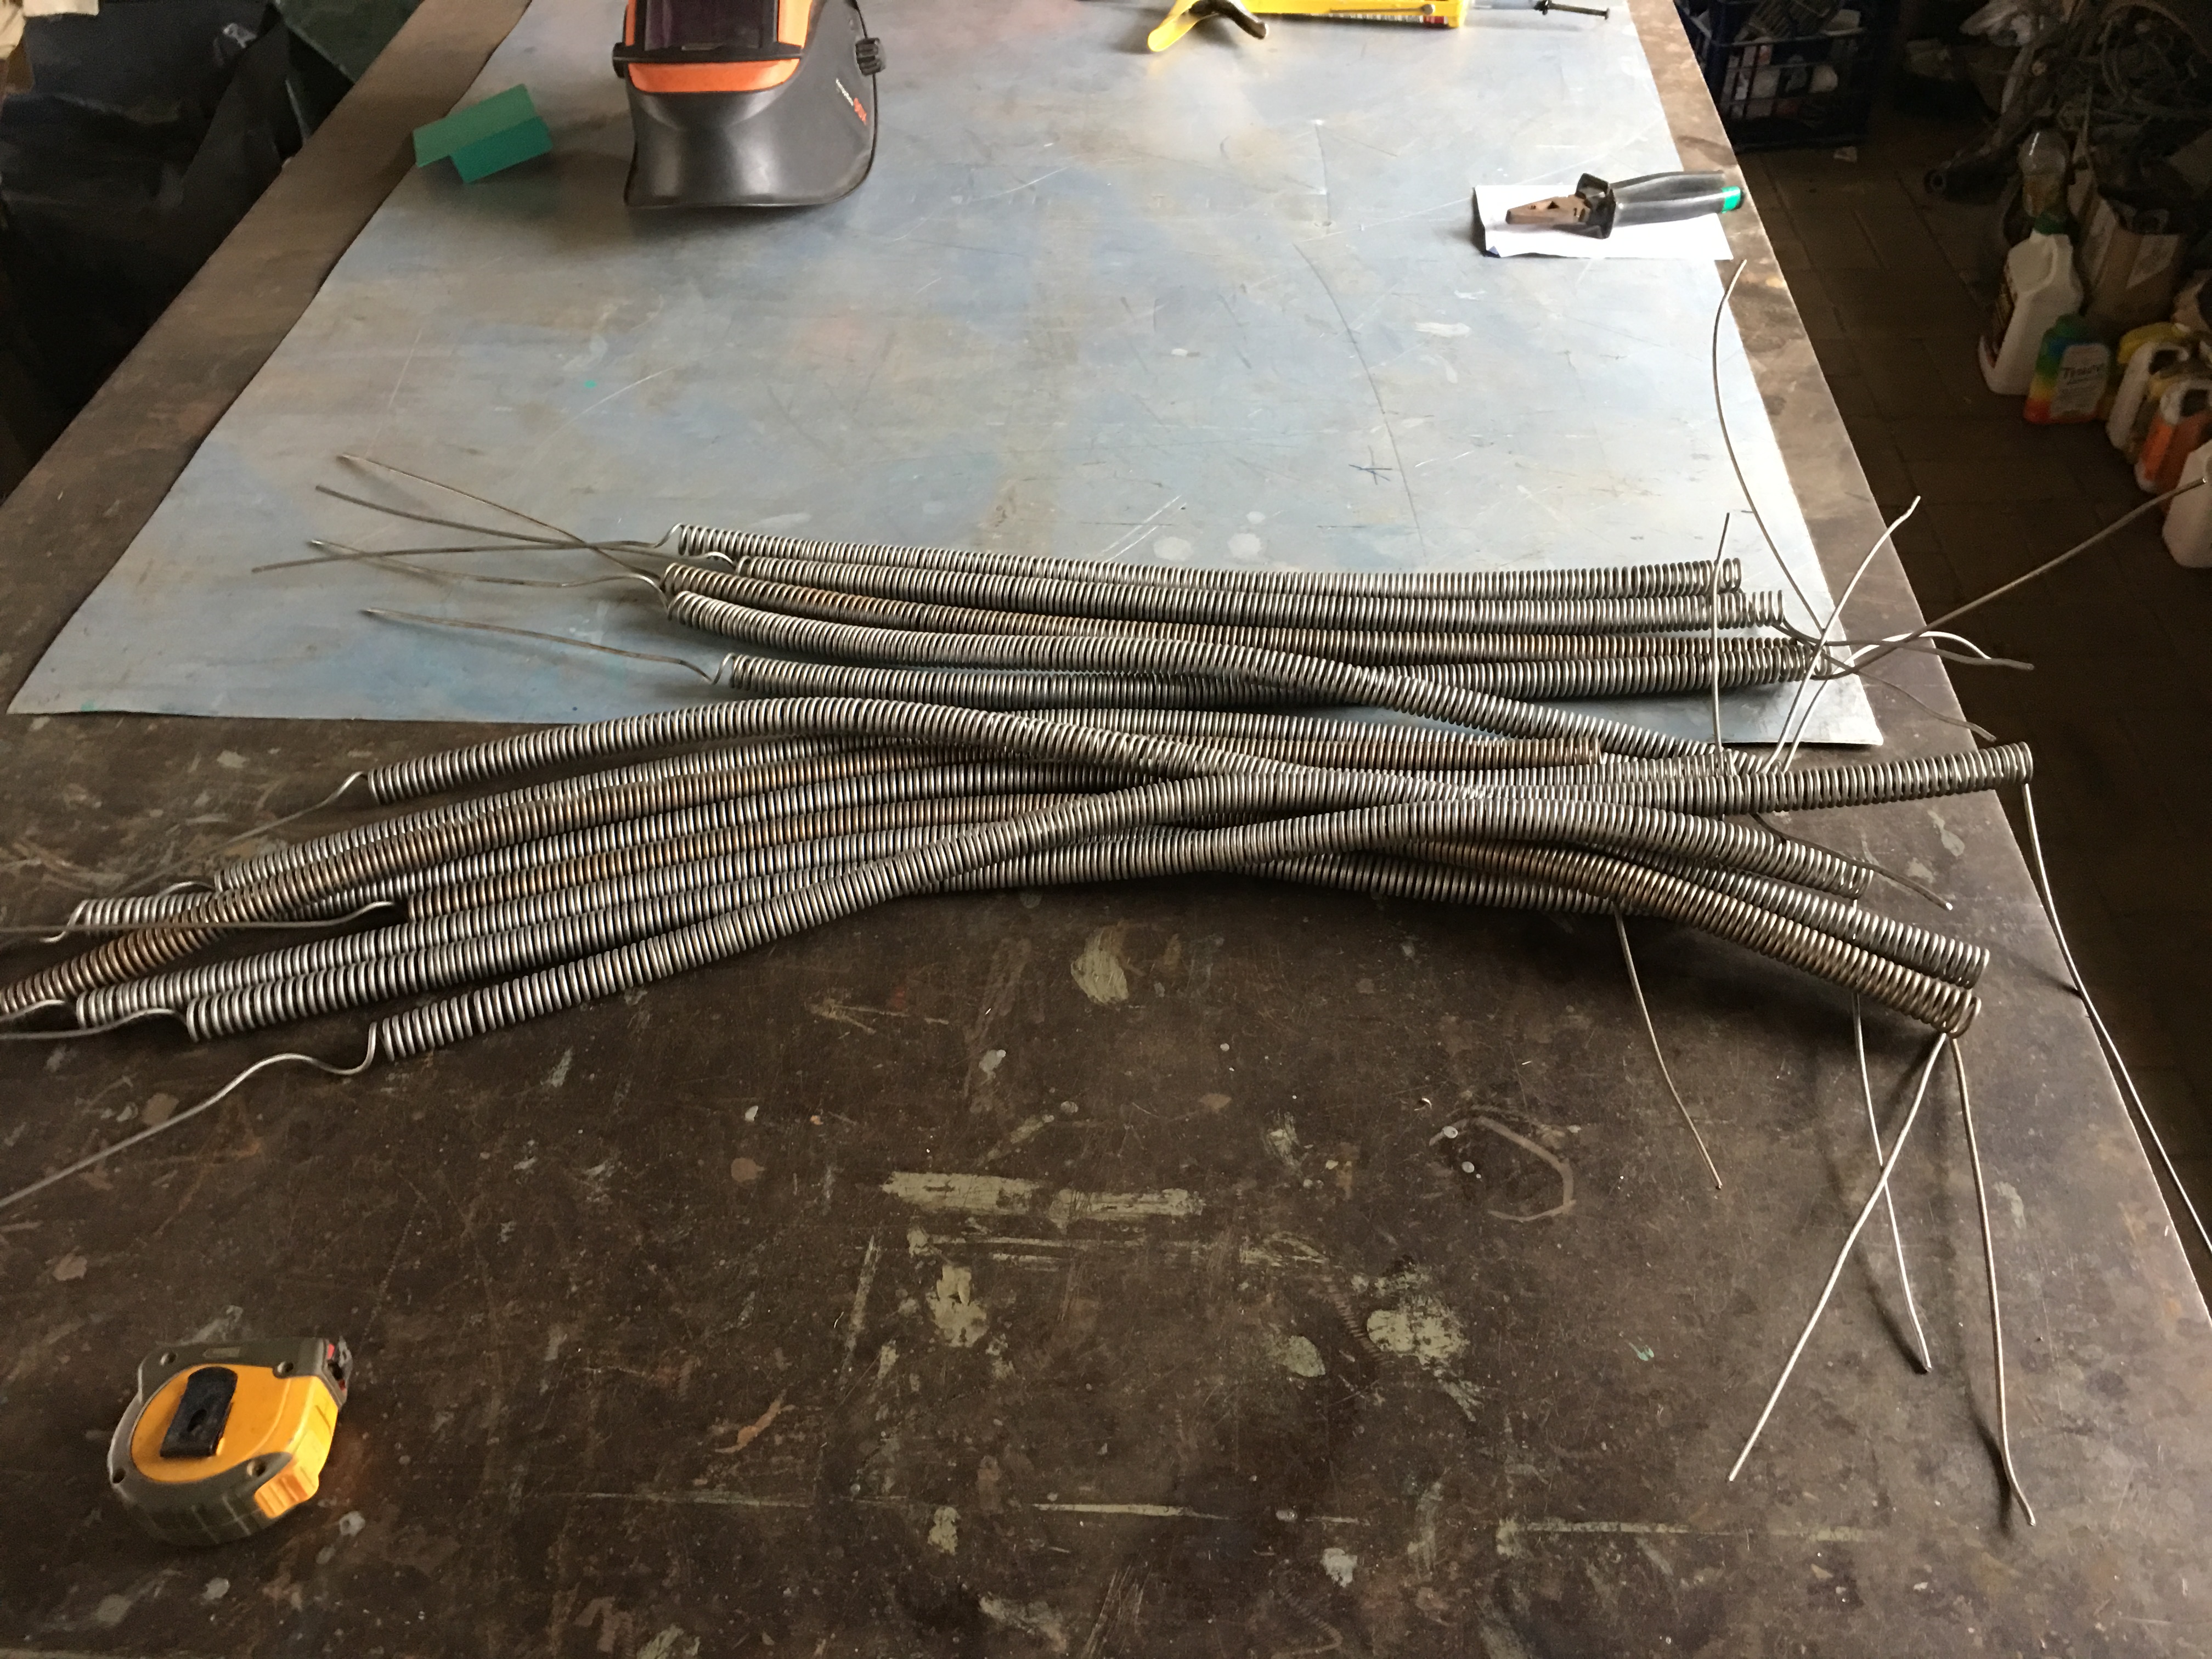
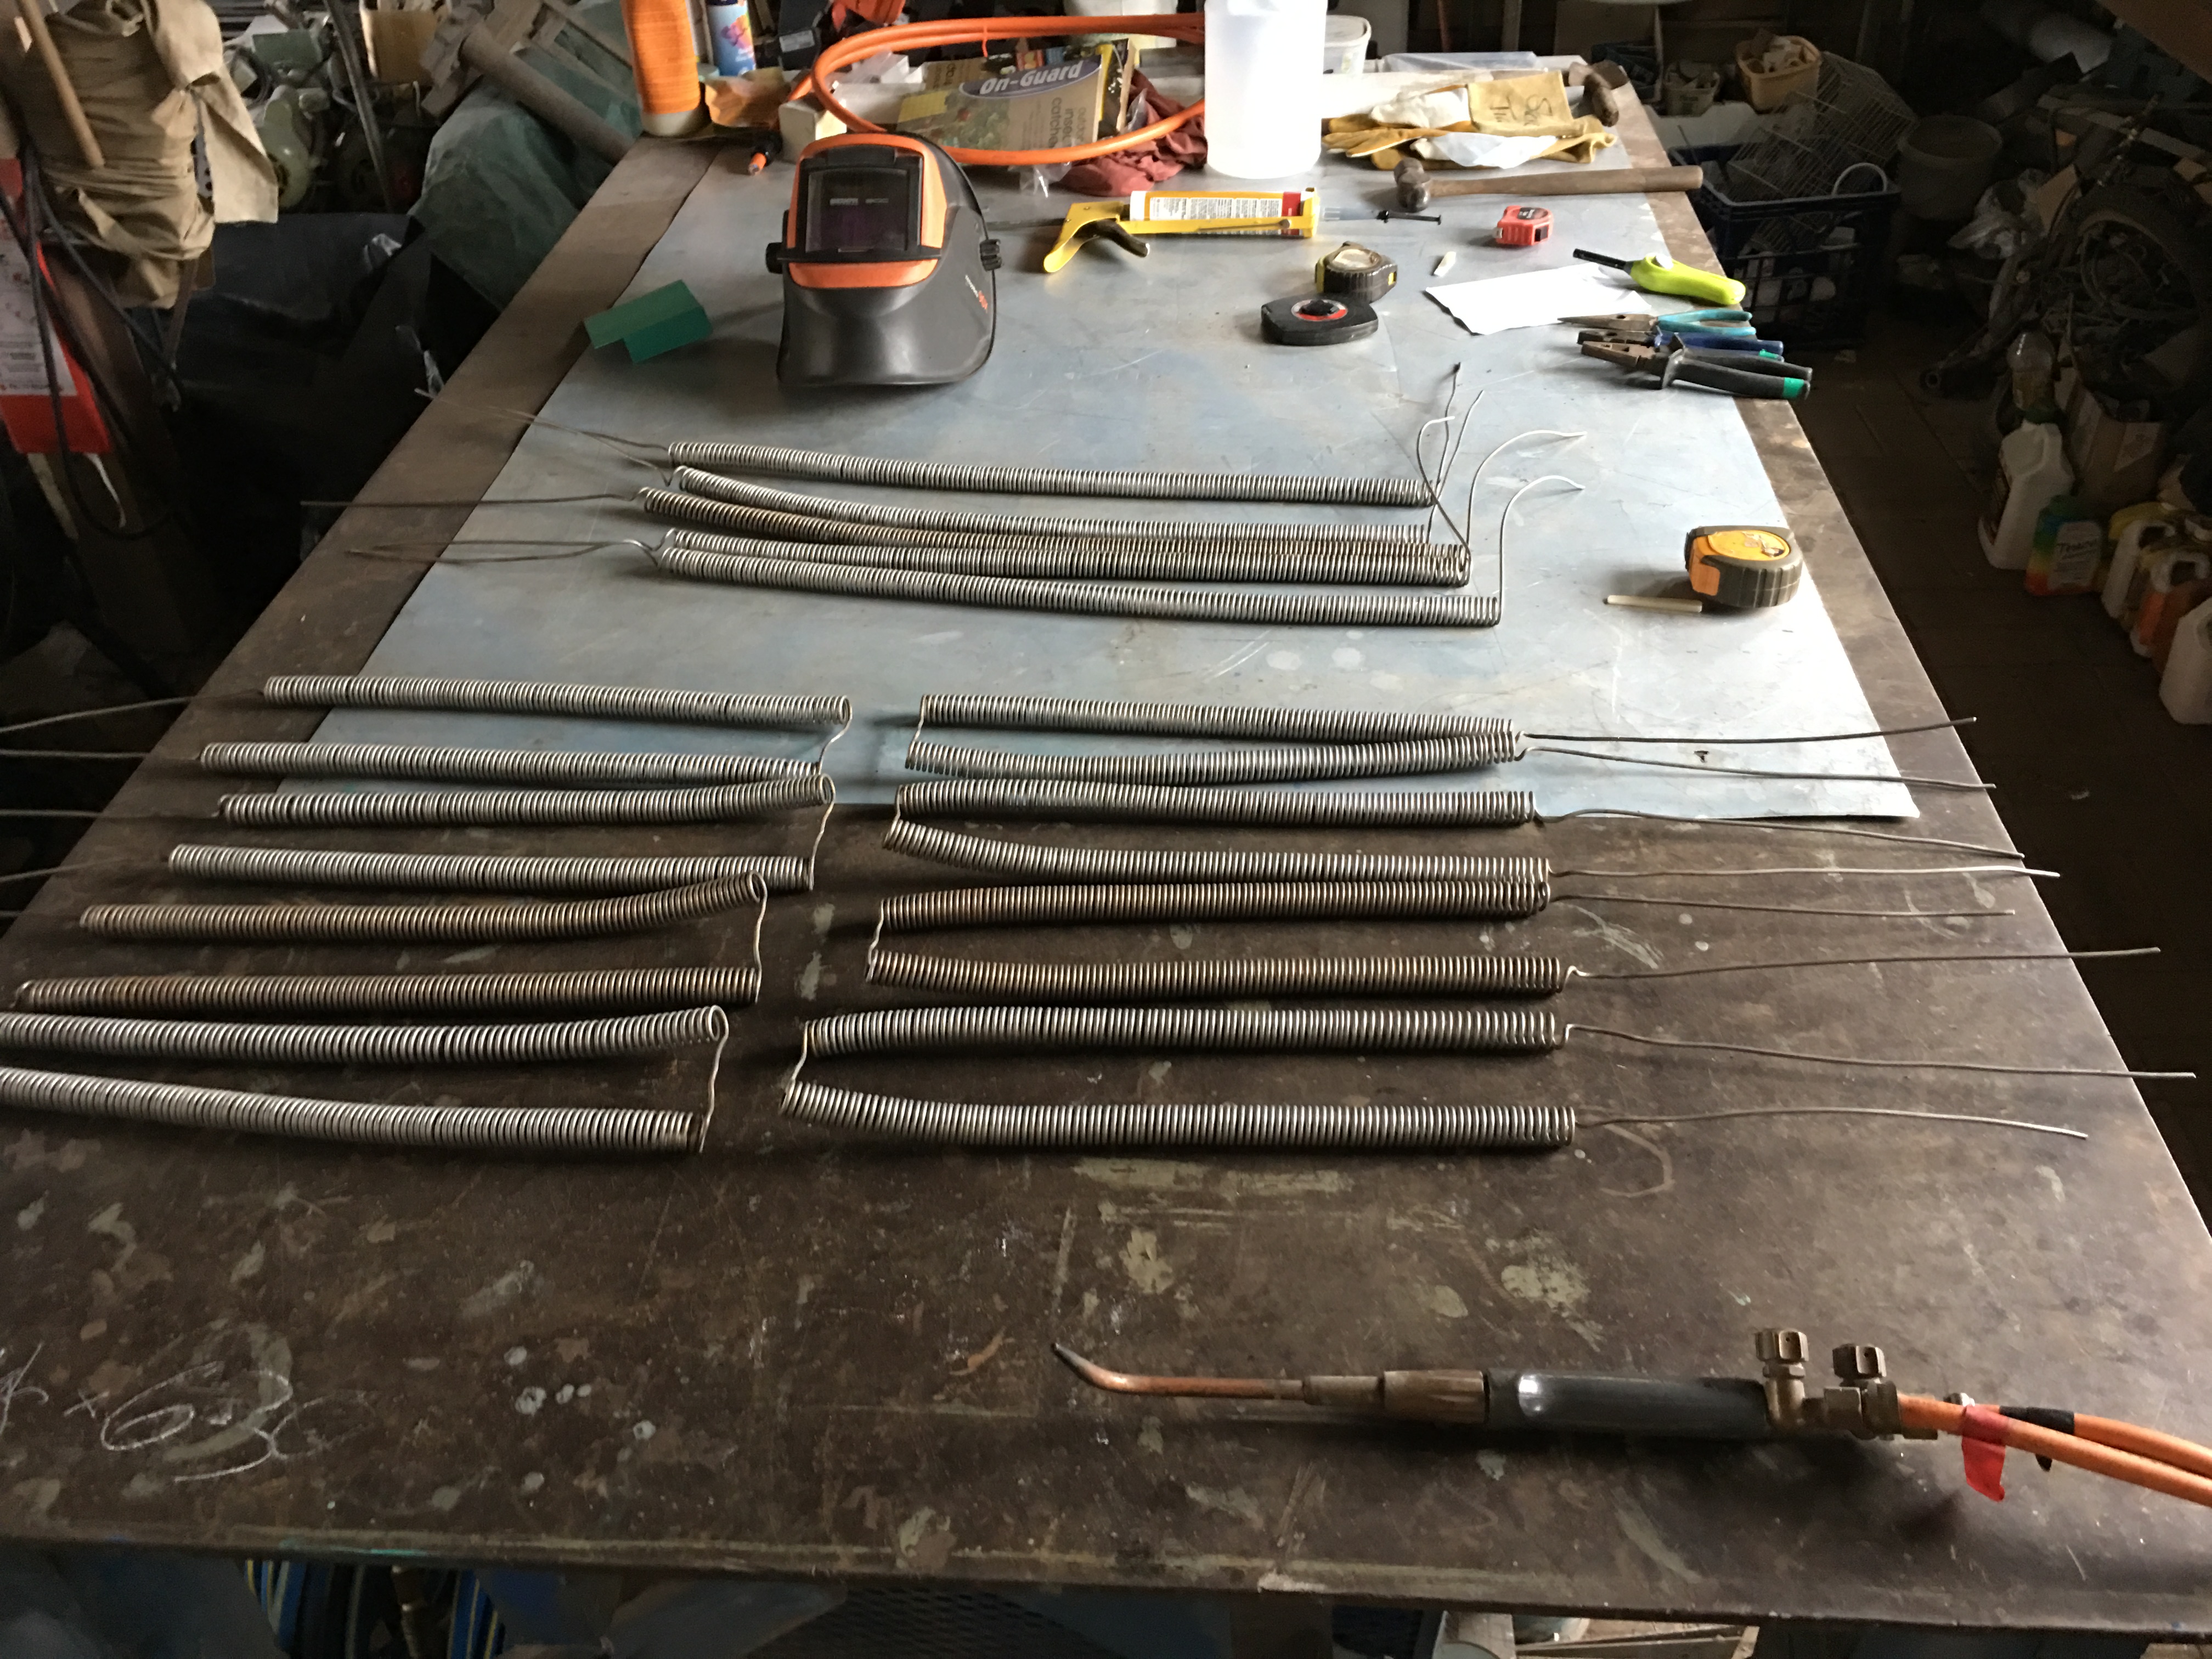
It will cost me just under $2,000 wholesale to buy the bare wire. Then I have to spend a few days winding it on the lathe to make it into coiled elements, followed by some oxy-torch work to anneal it and soften it so that I can bend it and re-configure it into dual hair-pin elements. It’s a lot of work, it requires a lot of expensive equipment and dexterous hand skills. No wonder quality, hand made, custom built product is expensive. I’m amazed that there is still a market for my kilns. I thought that I would retire when I reached 65, but apparently not, as I’m booked out well into next year with kiln orders.
img_4016 img_4020
img_4031 img_4048
If I’m going to work on a kiln like this for 6 to 8 weeks, from start to finish. I want it to be the best that I can make it. I don’t ever want to have to do any service calls or repairs if it can be avoided. I really hate the concept of built-in obsolescence. So I spend quite a bit of time thinking and planning how to make the things that I create, to be the best and most reliable that they can be. I look very carefully at my older kilns when I get to re-visit them on occasions when I go the the Art Schools and potteries where they are. I take notice of parts that get extra wear and tear and try and strengthen, or design out, or around issues that might need repair work in the future.
So I pay the extra money and wait the extra time. I put in the extra hours. I want my kilns to be a marriage of good workmanship and quality material.
If I want to build out obsolescence, I have to be diligent and really apply myself.
Best wishes
Steve

Something boro, Something blue

I have started to get stuck into the pile of shirts and jeans that need repairing. I have managed to wear out several pieces of clothing in recent weeks, all work wear items, worn through in the regions of highest wear.

The most critical was my welding shirt, which has worn very well for many years, possibly 5 or 6 years. It had become a bit threadbare and almost transparent at the front. To the point that I got a radiation burn on my tummy after spending a day welding up all the seams on the recent kiln. I didn’t realise at the time of it happening, that I’d torn a hole through it. I had a ‘T’ shirt on as well but it wasn’t enought, as you don’t feel radiation, but in the evening, when I showered, I got a nasty shock.
So my first job is to add some dense dark fabric to the front of my shirt. I also have a few pairs of jeans that have worn through in the front thighs and knees, but also suspiciously in the crotch? I’m guessing that this is from sitting on the Leach-style potters kick wheel wooden saddle? I’m hoping so, as I can’t think of any other reason.
These are some sort of stretchy jean fabric, so I steal the off-cuts from the bottom of the legs of Janine’s new turquoise stretch jeans, that she had to shorten, so as to get the same weight and stretch of the materials matched. The colours work OK too. Perhaps not in public? I’d feel a bit like one of those Japanese monkeys!
img_4017 img_4019
I have quite a collection of used, 2nd hand, Japanese indigo fabrics. I buy these off-cuts and old recycled pieces of clothing whenever I go to Japan. They are still plentiful and reasonably cheap in the markets. I really like them. indigo dyed fabric is so long-lasting because of the preserving effect of the indigo. I also just happen to love the colour. There was a time, when I was younger, when I couldn’t feel really comfortable in the colour blue, I preferred orange, then my favourite colour morphed into yellow, eventually into green, and finally I’m OK with blue and mauve, or even a bit of purple. I guess that this leads me to thinking that I’ll end up wearing red. Perhaps I’ll go full circle and wear yellow again? Or will I finally end up liking white? I doubt that. I lead a very busy life. I just can’t wear white. It gets dirty so quickly.
What ever the reason, I’m very happy to wear Japanese indigo fabric as patches on my clothes. The Japanese even have a specific word for this, and it’s called ‘boro’. The repair or mending of worn clothing with patches to prolong their life. It was always seen as something shameful in the past, when it was a sign of poverty, but these days, I’m starting to see Japanese patchwork clothing everywhere. It’s finally trendy. I don’t do it because it’s trendy. I’ve been patching my clothes ever since I learnt to sew. My mother taught me to sew on my own buttons, take up my the legs of my new jeans and hem them. So it wasn’t such a big step to add a patch or two as needed.
Next, I work on my worn out shorts that need a new front to one leg.
 img_3949 img_3950
then the jeans.
img_4021 img_4023
An earlier pair from the time when I was transitioning out of orange through yellow into green.
This activity fits in well with my philosophy of self-reliance and not throwing anything out until it is really worn out. For me this is not any statement of fashion, as fashion is just not on my radar at all. It’s a political statement. Not consuming stuff that you don’t really need and making things last, it’s cutting against all the advertising and market pressures. Over consuming is polluting the world with toxic landfill and adding to global warming. So much of what we are encouraged to buy is just not necessary. So I’ve decided to minimise my spending and as a result, I’ve found that I have more money left over for the things that I really want and need, when I really need them.
img_4452 img_4453
I spend my evenings these days sitting comfortably and listening to music or listening to the idiot box with half an eye to the screen, while I pin-up and stitch my patches. Some of these clothes that I’m working on go back 15 years and they are still going, and I believe becoming more interesting as they display their work life and history. I’m applying new patches over worn-out older ones. The layers just keep building. It’s an interesting topography of work, wear and repair. A 3D sculpture or installation that gently illustrates environmental activism as some sort of artwork.
img_4034  img_4035
I’m pretty sure that it’s not art, It’s not quite ‘boro’, it’s possibly interesting, maybe it’s beautiful? Maybe not?. Otherwise it’s certainly ‘creative’ and a nice piece of re-cycling, re-purposing and life-cycle extending handiwork. After-all, it’s just work-wear.
If nothing else, it’s a very rewarding evenings entertainment.
Best wishes
Steve