Driving on Sunshine – 3 month up-date

Driving mostly on sunshine is very fuel efficient!

We are just home from spending the Easter Long-Weekend in Canberra at the National Folk Festival. 5 Days of great music, camping out under the stars, catching up with old friends and drinking some very nice pear cider.

We drove down and back in our new plug-in, Electric car. The Hyundai Ioniq plug-in. Canberra is roughly 200 kms. away, so we drove the first 1/4 or so on sunshine and the rest on petrol. We get around 65 to 70 kms on a full charge of sunshine from our solar panels at home. This distance varies slightly, depending on how hard you push the car (I don’t ) and how much regenerative braking that you do, as regenerative braking re-charges the battery from the energy recovered from the braking system.
Instead of applying pressure on the brake shoes in the wheel hubs to slow the car. Regenerative braking engages the electric motor and uses it in reverse, so instead of using electrical energy to propel the car forward. The forward energy of the car is used to run the generator to charge the battery and this drag on the system slows the car. The disc brakes are only engaged when you press very hard on the brake pedal, such as in an emergency.
The car automatically swaps over to petrol when the battery charge gets very low, always preserving just a little battery power in reserve for when the car is just cruising and doesn’t need a lot of oomph to get along. Braking, when going down hill, recharges the battery, so the car is intermittently changing between electric mode from the battery and the internal combustion engine all the way along the trip.

Before setting of for home, I check the dash to see that we have a driving range of 111 kms, but home is 200 kms away, so I decide to buy some fuel.

IMG_5075
We have travelled 3,788 km in this car since new and we have put $50 in the tank so far. I can see that we still have 8% left in the fuel tank.
We fill up in Canberra before the long drive home and put in 36.95 litres into the tank, at $1.45 per litre.
On the way home Janine calculates that we have travelled 2,138 km on our first $50 tank full of fuel.
So this seems to indicate that we are averaging about 1.7 litres per 100km.
It crossed my mind when I bought this car that I would be able to achieve a bit better than 2,000 km on a full tank of petrol, and so it seems that we have done it.
We arrive home via the shops in Mittagong and are just short of 4,000 km on the odometer.
The first thing that I do when I get home is plug it into the solar PV system and re-charge the battery fully, ready for the next trip.
When we are driving locally, we mostly drive on 100% sunshine. The battery is sufficient to get us to the shops and back in any direction that we need to go.
We only use petrol when we go on long trips like this one to Canberra, or to Sydney, the South Coast or The Blue Mountains.
At the end of each trip, when I switch off the ignition. a small window in the instrument panel reports on the latest trip.
IMG_4815
This trip was 33 kms and I used 0.6 litres per 100 kms. Which means about 200mls. I’m not entirely sure as yet why the petrol engine fires up at unexpected times, even though I have chosen fully electric mode. I believe that it is something to do with charging up the 12 volt battery, that is used to power the dash, computer, air-con, head lights and other things that don’t involve moving the car forward.
We have achieved these very fuel-efficient figures in our driving, because we always drive steadily, and evenly, avoiding sudden stops and fast take-offs. The on-board computer tells me that we are averaging 390.64 kilometres per litre of fuel. This is because we usually drive mostly on sunshine.
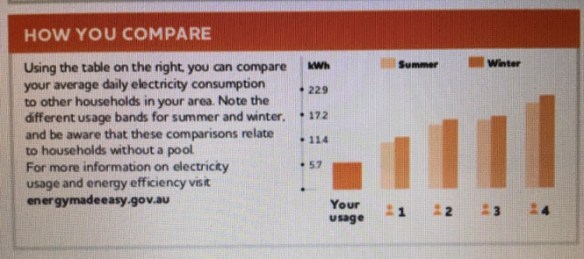
The info below is down-loaded to my phone on the 1st of each month. This report is for March and doesn’t include the Canberra trip.
It is a very rewarding feeling to be able to drive mostly on sunshine. It fits in with our philosophy very well. This isn’t about saving money on fuel. This is all about attempting to live an ethical life with a low-carbon foot-print. Extracting our selves from the coal/oil based carbon economy as much as possible. It started 30 years ago when we stopped driving our old, but reliable VW beetle and bought a small, 3-cylinder 900 CC. engined, fuel-efficient Daihatsu car, slashing our fuel consumption, and then 12 years ago when we installed our first solar panels. Two years ago, ordering the Tesla battery when it became available in Australia.
Now we are driving on sunshine – well mostly!

Improvised Cannoli

I have relatives coming to stay and I really like them. We don’t see them often enough. So to celebrate their stay with us. I try and make an effort. Something different for change!

My niece is of Italian heritage and so I choose to make my bastardised version of Cannoli de Sicillianna.
It sounds impressive, but I don’t have any of the ingredients.
The recipe that I use comes from a book about opera by Antonio Carluccio. It is all about foods that are suitable accompaniment for opera.
I remember seeing Rick Stein on the idiot box doing a special on food and opera. I didn’t get it. I thought that he was stretching a long bow.
Anyway, I saw this book by Carluccio in a 2nd hand book shop, maybe 20 years ago and bought it.
It has a recipe for cannoli (P76), but I can’t bring myself to follow it. Apart from the need the make the tubes from scratch and deep fry them in lard!
I don’t even have any of the ingredients except the ricotta.
The recipe calls for ;
500g. ricotta,
100g. super fine sugar
1 tbsp. vanilla sugar
2 tbsp. orange flower water
50g. candied orange peel
50g. candied lemon peel
50g. candied citron
50g. glace cherries
50g. candied angelica
80g.bittersweet dark chocolate
and icing sugar
I can buy ricotta at the local shop, only a 10 km trip, but have to drive the 50km into town and back to buy the glace cherries at the supermarket.
All the other ingredients look pretty exotic.
You get used to living in the country and making do, so I improvise.
I am only making one dozen of these little cakes, so I halve the quantities.
I’m not into deep frying in lard, so instead I make some little tartlet bases and blind bake them for 15 mins.
I use the few dried fruits that I have in the big stoneware jar in the kitchen for making our muesli. Then instead of orange flower water, I decide to use finely grated lemon and lime zest, plus the juice of half the lime. Janine has some vanilla paste in her cooking cupboard. Instead of all the exotic candied fruits, I use my dried fruits muesli mix and instead of bittersweet dark chocolate I substitute half a dozen tiny ‘Aldi’ dark chocolate easter eggs finely sliced. After all, it is Easter.
 
It actually works out really well. They look rough but they taste delicious.
Funnily, they didn’t turn out like the picture in the book!

Two Flans and Marzipan, from Two Music Fans

Janine and I have just enjoyed our first house concert of the year.

We spent an afternoon with Lindsay Martin and Victoria Vigenser – again!
We had them here with us in our home last year and they were terrific, such beautiful music. Lindsay is an amazing fiddler.
They work together so well.
A wonderful afternoon well spent.
IMG_4728  IMG_4731
IMG_4732  IMG_4733
We are starting to eat into our summer preserves. We have been enjoying sliced peaches, plums and pears recently.
We have just started to open our jars of preserved whole peaches. These were bottled in December and vacuum sealed into ‘Fowlers’ jars.
IMG_4769
IMG_4771 IMG_4779
Having been heated in a light syrup to seal the vacuum in the jars, then stored for 4 months in the pantry. These whole peaches are just starting to develop that wonderful marzipan flavour that they get from the stones.
We have also been cooking a few cakes to keep the colder weather at bay on dull days. Janine used our pears to make a flan.
She recalled reading the recipe in a book from many, many years ago. We had to go looking, but we found the book eventually, just where we though that it ought to be. I skimmed past it initially, as the cover wasn’t like I remembered it.
Larger-than-life home cook, turned TV presenter, Ian Parmenter used to present a 5 minute cooking program as a fill-in on the ABC TV, possibly in the 80’s or 90’s? Called Consuming Passions Consuming Passionsand he later wrote a book called ‘Sheer Bottled Bliss’.
IMG_4773
Janine remembered his recipe for pear and almond up-side-down tart. It was very nice as I remembered it and just as nice this time round. Page 143, if you are interested.
IMG_4772it’s quite rich!
I tried my hand at prune and almond flan that I saw Rick Stein make on the Idiot Box one evening when he was in the Dordogne region of France. It look easy and I thought that I’d have a go at it. What could go wrong? Ididn’t have all the ingredients, but what the hell, give it a go.
Soak a couple of cups of your prunes in brandy. I didn’t have enough brandy, so I used half Cointreau. I think that It might even be an improvement!
Mix one of your beaten free-range eggs with the drained brandy. Then add in a cup of almond meal and half a cup of sugar. More or less.
IMG_4819  IMG_4821IMG_4823
Blind bake a short pastry base for 20 mins at 180 oC. then pour in the filling over the prunes and continue to bake for another 45 mins or more as required
IMG_4824
IMG_4829
I liked it so much, I made another one.
IMG_4833

A Hand Made Efficient Home

As the days get shorter and the evenings cooler, we are lighting the wood fired kitchen stove most nights now. This old stove, that I have lovingly maintained and repaired for the past 40 or so years, cooks our food, heats our hot water, through its bronze firebox boiler, which is connected to our kitchen hot water system. It also heats the kitchen and us while we work, cook and eat.

IMG_4764

In the hottest couple of months of summer, we cook on the gas stove and rely on the solar hot water panels to heat the hot water. We have had to cover the solar panels with wire mesh, as we had a pine cone drop onto one of them shattering the tempered glass.

IMG_4796 IMG_4795

It may seem strange that we have our solar panels on the ground. I have a good reason. We have a full copper hot water system, with a copper hotter tank, a bronze boiler in the stove and copper solar panels, all connected in series, so that either or both heat sources can heat the tank depending on the weather and time of year. I used all silver soldered copper piping to connect the system, so there isn’t a separate heat exchanger needed in the system to eliminate electrolysis. A full copper system has no electrolysis issues. Eliminating the heat exchanger makes the system much more efficient. I designed the system so that the solar panels are on the ground, so that the hot water will rise up into the tank by natural thermo-siphon. No pump is need in the system to circulate the hot water to the tank. (as is necessary when the panels are on the roof.) This is another added efficiency and saving on energy. By designing systems like this and others in our hand-made home, we have managed to reduce our energy usage in our home to 1.7 kW/hrs per day for the house alone. If we add in charging the electric car and firing the electric kiln from the solar system, then our total usage rises up to 5.7 kW/hrs per day.

IMG_4797 (1)

When we add in our kiln and car, Janine and I still use only half of what a ‘normal’ single occupant household uses. Or just one-third of a ‘normal’ 2 person household. We are quite pleased with this outcome.

The Last of the Summers’ Tomatoes

We have reached the point where the tomatoes have lost most of their leaves. There are still loads of fruit on the vines. But the vines are looking pretty much dead. We pick all the remaining fruit for the last batch of concentrated tomato passata sauce. We have over twenty jars of the stuff from this years harvest, safely stored away in the pantry cupboard.

IMG_4622 IMG_4623

IMG_4692

IMG_4652

We pull out all the vines and compost them and remove the stakes. We pull out all the weeds. The beds are then ready for a load of compost and a new planting.

There are a basket of capsicums and chillies to harvest as well. I decide to roast them and pickle them to preserve them. They are sweated, peeled, de-seeded and then dressed with oil and vinegar. They will keep for a few weeks in the fridge treated like this.

We have only just finished the last batch of capsicums that I preserved in this way a week or so ago.

IMG_4704 (1)

IMG_4697  IMG_4698

IMG_4699

IMG_4702

This is all standard autumn fare.

After the Hail Storm

A month ago we had a hail storm. Not too bad as hail storms go, but bad enough. There wasn’t a lot of rain with it, – a pity.

A few weeks later we had a lot of rain in an hour. Quite a storm all told. We found to our surprise that we had a number of leaks appear in our old school classroom. We had to find buckets for the drips on the carpet, the computer table and other various places around the house. Having drips of water dropping onto the carpet in what is our lounge room, really concentrates your attention.

I’m fixing a hole where the rain gets in and stops my mind from wandering!

We don’t usually have leaks like this, so I had to investigate. However, I needed to wait for it to stop raining, then to stop blowing, waiting for a day when there was no gusty wind. I once went up on the roof on a windy day and the ladder blew away, leaving me stranded up there until Janine came looking for me, replaced the ladder and let me come down. She must love me!

I finally found a day that wasn’t too windy, glarey or wet and slippery. I got up onto the top roof of the old classroom of the school. I found that the hail storm had pummelled the 130 year old corrugated galvanised iron roofing. Where there was an over-lap of the old sheets the iron had rusted to a very thin state because of the condensation in the over-lap, creating a few quite large holes.

A hundred years ago, corrugated iron roofing could only be manufactured in short lengths, as it was rotary folded across the sheets to make the corrugations. This meant that to cover a long-span, a number of shorter sheets needed to be used and this required overlapping to stop leaks. All old iron roofs suffer from this same problem of rusting out on the overlaps. We are lucky to have a roof that has survived for so long without too much trouble. We live in quite a relatively dry environment with about 500mm of rain each year.

I worked across the roof systematically siliconing every split, crack and thin rusty patch. The overlaps needed special attention. In one place I had to cut a small piece of rustic, but structurally very sound, old roofing iron into a small square. I glued this patch over the worst section, that was too big to close with just silicon alone.

The big issue turned out to be the ridge capping. This is 130 year old lead! I wanted to replace it 35 years ago, when I was much younger, able-bodied and building the extensions on to the Old School Classroom. I didn’t want any lead on my roof. Unfortunately I struck one massive problem that stopped me in my tracks. The old lead was about 600 mm wide and the old wooden roofing battons were well spaced accordingly. Modern galvanised ridge capping is only about 460mm wide. Not wide enough to reach the old battons. This meant removing all the old sheets of iron and screwing on new battons, then replacing the roofing, then screwing down the new narrow ridge capping. A massive job. Not one that I could complete easily in a day.

Being basically lazy, I decided that I had enough to do with building the new extensions onto the Old School classroom to make it into a house, so I left the old flashing up there. It was just easier to ignore it and hope for the best. The old lead capping has developed cracks and splits here and there along its length over the years. I siliconed these splits and cracks 30 years ago, and 20 years ago and then 10 years ago, Now the cracks are just too big and too long for silicon.

Now my lead flashing chickens are coming home to roost. I will need to re-roof the whole school roof eventually. I hope that I can make it last long enough, so that it isn’t my job to do. I couldn’t do it by myself now. I’d need to employ someone to help me these days.

My creative solution was to lift the old lead flashing and slide in new sections of shiny galvanised ridge capping in underneath the old lead. Then I screwed the old lead down over the new galvanised ridge capping, through into the old galvanised roofing. A cunning plan!

From a distance, no-one can tell that I did anything at all. It looks exactly as it did before I fixed it, and that’s the way I like it.

Bruised Butt Cheek Bones

Over summer we don’t go far. We stick around the house, just in case of bush fires. We concentrate on cleaning the gutters, servicing the fire pumps and working around the house and in the garden. It’s a very productive time of year in the vegetable garden with so much produce to harvest, preserve, cook, dry, bottle, vacuum seal. In March the fire danger is mostly over and we can relax and catch up on some music concerts and the Writers Festival.

We returned from Writes Week and WOMAD to find the garden gone mad and a lot of work needed to be done to get it all sorted out, cleaned up, weeded, mown, whipper snipped and mulched. I have it back in good shape now and most of the winter seeds and seedlings are planted for the approaching cold weather. Over summer, we don’t get into the pottery very much. Instead, it’s a time to use the heat for making clay, crushing rocks and ball milling porcelain stone, then drying that porcelain slip.

Now in April, we can start to think about firing the wood fired kiln again. The summer fire bans will soon be over and we can fire the wood kiln without restriction. We have been doing some firings. I have been firing our solar-powered electric kiln and reducing it with a few hundred grams of LP gas to get the reduced colours.

We have been back in the pottery for the past few weeks and started throwing again. I must say that the first couple of full days on the hard wooden seat of the “Leach” style wooden kick wheel leaves me with a couple of sore butt-cheek bones. I don’t think that they are bruised, but they sure get very tender after that first full day. It seems to take a week or so for them to toughen-up. Then I don’t notice it again till this time next year.

IMG_4719

I bought some sericite stones back with me from my trips to the UK and Korea last year. These stones are now processed and aged sufficiently to be able to consider throwing them. I always think that this time it will be different. This time I will be able to throw something better out of this wet gravel. I can’t! Every time it’s the same, I start off so optimistic. I’m sure I will be better at it. I’m Not! The stuff is just wet rock dust, I shouldn’t be surprised. But I am!

I struggle with it as it is and refrain from adding any bentonite into the mix. I should just get over it and give in, but I really want to make something authentic. Something that has some meaning in this post-truth, bare-faced lying, compromised, new world order of shallow poseurs, where everything is The Image and The Selfie. I know that what I’m living here has no value to anyone else but me, I persist. It’s the life I’ve chosen. It’s a challenge to make a nice pot from these original porcelain stones. Picked from the ground, in-situ by my very own hands, carted off in my back-pack and then brought home here and processed in my own equipment. Maybe if I aged these bodies for a decade, then it would be easier? I’m certain that it would. I have already done those tests a lot earlier in my career. I know it works. However, I’m not too sure that I still have a decade left in me. I strike a compromise and decide to make some very small beakers and some coffee cups. Now, I can almost manage these OK.

IMG_4693 IMG_4718

Last year, my friend Len and I imported a tonne of Chinese sericite. I have been going to China each year and renting studio space, making work, getting it fired on site – with mixed results, and carrying the best pots back in my hand luggage, to show at Watters Gallery and elsewhere.

Last year I felt so guilty about my carbon miles, making work in this way that I decided to buy the milled sericite in bulk and ship it here, This way I can stay at home and the clay can log up the carbon miles. I feel that it ought to be less damaging environmentally to ship a tonne of milled sericite stone by sea, than fly my meagre 80 kgs to and from China in a plane. Any way, I buy my $400 worth of carbon credits, just the same each year, to appease my conscience for my carbon crimes.

Buying the material in bulk sounded like a good idea at the time, but like all the best laid plans…. The stuff that arrived was totally different from what we had thought that we had bought, or ordered at least. Back in the beginning, we purchased a sample of the sericite and tested it. It was difficult to work with, but OK. White, semi-plastic, just. It fired white and translucent. We ordered a tonne of that thank you very much!

What arrived was grey, short, very soft and soggy, difficult to throw with and split and cracked in drying. Totally different material. I couldn’t see us shipping it back. We had already paid in advance. I had to make it work somehow. I tried throwing it in the usual way that I have learnt to work, but I lost over 90% of my pieces. I took a while, but I thought it over and came up with what I thought was a cunning plan. I thought about the ancient Chinese and how they coped with the short-comings of their early sericite porcelains. This was just the same, only re-located over 600 years in time and 12,000 kilometres in distance. The old tried and true answers are usually the best.

I tried a small batch in a blend with something that I thought had exactly the right characteristics. Hey presto. I now have a way of making a unique white, translucent, Chinese sericite based, porcelain of my own making. It’s one answer. It works for me.

IMG_4661 IMG_4662

What I still find perplexing and inexplicable, is that Len has no trouble in making perfectly fine pots out of his batch of this stuff with no problems, while I struggle. Obviously this sericite stuff responds to the hands of a true master craftsman but dumbfounds and perplexes a blowhard wannabe like me.

Summer Wine

We are harvesting the last of the grape harvest. It’s been a long vintage this year, stretching over 8 weeks. We have been making dark grape juice out of most of the vintage. However, with these last few baskets full of rich dark red sugary deliciousness, we decide to make ‘Summer Wine’. We first came across this wonderful stuff in France, then Germany, followed by Switzerland and finally in northern Italy. As the season developed and the grapes ripened. We had to have the experience introduced to us by our hosts in Germany at that time. We stopped the car on the side of the road to buy vegetables and fruit from a farmers road-side stall. Our friend asked if we had tried ‘Niue Wine’ or ‘summer wine’? We hadn’t, so we did and it was a bit of a revelation.

We have been making our version of concentrated red grape juice for a few decades and always look forward to it. We manage to bottle 20 or so litres each year for us throughout the year. We pasteurise it so that it will keep and not ferment. Then sealed in sterilised glass bottles. It works well. But this was an eye opener.

We don’t make wine from our red grapes, because it is too much work for the reward. Good quality wine is cheap in Australia, why bother, but good organic red grape juice is extremely expensive. So thesis where we put our effort. What we experienced in Europe that autumn was just like our red grape juice, but very slightly fermented, possibly for just a few days. The outcome was a sweet grape juice with all the fruit flavour, but also enhanced with a little sourness and tingley, cabin dioxide induced spritzig. I might hazard a guess that it was fermented to about 2% or so of alcohol. It was a  light,  really refreshing and satisfying draft.

We have since  started to make a small batch of summer wine each year. It has to be drunk within a few days of the fermentation starting, while it still has plenty of sugars left in solution. We asked about the roadside wines that we saw and were told that it will only be available for a few days from each stall. Once the barrel is emptied, then that’s it. find the next farmer’s stall.

They might possibly use the wild natural yeast bloom on the grape skins, but this can be very variable. Because we don’t know what we art doing, and don’t have parents and grandparents on hand with generations of local knowledge about such home based, home-grown, organic production. We decide to pastures the juice as usual and then add a known wine makers yeast to get a more-or-less predictable and reliable outcome.

IMG_4609 IMG_4610

We wash and de-stem the grapes to make the juicing process easier. Either way it is a lot of work. This is just the way that we have got used to doing it over the years. After sterilizing by briefly simmering the juice, we let it cool over night and then add the yeast. , somewhere between 16 and 24 degrees C. We let it sit for a day to allow the ferment to get going and then bottle it. We start to drink it from the 2nd day. After the third day, or when we feel it has reached a good point in the sugar/acid balance, we bottle it and keep it in the fridge to stall any further fermentation. it keeps for a week like this. and then it all gone. If you try this at home, don’t screw the caps on. LEAVE THEM LOOSE.

IMG_4653 IMG_4666

IMG_4667

IMG_4668

One Thing Leads to Another

I’ve only just finished repairing the slow combustion heater in the Old School classroom in preparation for the coming winter, when Janine points out that the fire brick in the wall of the wood fired kitchen slow combustion stove is all cracked and spalled away. The metal casing of the cabinet is showing through. We can’t light it again like this. Being over 40 years old, there are no spare parts available. I will have to improvise – as usual.

I have no real options here. I don’t want to take the stove apart completely to re fit a new home-made fire brick into the wall, so I do a patch job. I use some of my homemade ceramic fibre glue and fill up all the cracks and spalls with ceramic fibre high temperature insulation.

IMG_4618

This will have no chance of surviving the intense battering of logs thrown into the fire box. But I have a cunning plan. I find an old piece of kiln shelf down in the pottery that is just about the correct size. So I cut it and shape it with the angle grinder until it fits the bill.

IMG_4619

I wedge it into place with a few off-cuts of similar ceramic kiln shelf material and it all locks into place. Only time will tell how long it will last? However, I am confident that it will protect the fibre insulation stuffed in behind until it cracks or breaks.

IMG_4621

On close examination, I see that he curved fire brick just inside the stoke-hole door is cracked in half. This is a home-made, hand-built, custom-shaped fire brick which we made from a hand-made mould that we cast back in the 70’s.  I made 3 spares at the time.  I can see that I will have to make a few more now, as we have used them all up over the 40 years of constant use. It needs to be special shape, with recessed corners that interlock with the other fire bricks, so that it can just slide into place and be held securely, but not too tight, to allow for expansion.

IMG_4690

Janine finds the mould after almost 25 years, stored away in the third chamber of the climbing kiln that we don’t use anymore. I knock one out with a rubber mallet to get good compression. One down two more to go. The first three that I made lasted 25 years or so. So this lot should last me until 2045! I’ll be well into my 90’s and won’t be cutting too much fire wood by then.

Last year I repaired the other side of the fire-box, the heat shield that protects the oven from getting too hot. That cast iron plate had completely disintegrated. I replaced it with a home-made kiln shelf that we made in 1976. We still have a lot of them left. I didn’t think that it would last very long, but gave it a go. It has one crack in it after 18 months of use and still going strong. Very pleased, but.

Nothing is ever finished, nothing lasts and nothing is perfect.