Another day, another problem solved

Before my summer ‘time-off’ ends this week, I need to get a few more jobs done.
The washing machine had started to leak a few drips of water from somewhere underneath. I moved it out and took the back off, but couldn’t see anywhere that it was leaking. It was just such a small leak. I checked all the hoses as best I could with a torch, laying on my back, but no insights were gained in this or any other way. I put it all back together and waited for the leak to get worse, so that I could find it. Now, 6 months on, it’s worse and a small trickle of water is emanating from somewhere underneath now. I manoeuvre it out from its snug position. It’s a heavy thing. Removing the front and back panels now reveals that the leak is coming from the water pump and not a perished hose, as I had suspected. This machine is 23 years old now and has proven to be very reliable. As a front loader, it uses very little water, good choice for us here on tank water. We can also use our own hot water, which we source from the wood stove or the solar panels, and which we have plenty of.
The water pump is a sealed plastic unit, so I can’t see the leak directly, but it appears to be from where the steel shaft passes through the plastic casing. I don’t think that I can do much about this very easily, so will enquire about a new replacement part. 23 years is a good life span for a plastic pump, so I’m not too unhappy. As long as the cost isn’t too excessive. I’ll just buy a new one and swap it over.
I replace all the panels and put it all back together. It will last a few more weeks the way it is, while I see about the cost of a new part.
The next job on my long list of repairs and maintenance is the wood fired stove. Purchased 40 years ago 2nd hand. It has served us well. I have done all sorts of minor repairs on it over the years to keep it going. This time it’s the cast iron heat shield in the fire box that protects the oven from the direct heat of the wood fire. It has corroded through and split apart in the middle.
There is nothing that I can do with it. It’s done a tremendous job over the years, but now its life is over. I don’t have any access to cast iron, and this is a custom made part. The Northburn company was already out of business when we bought this stove back in the seventies. We couldn’t get part then, so there is no chance now. But this isn’t a problem. I think that I can make something up that will do  the job.
I decide to try using one of my home made, refractory kiln shelves. I’m sure that it won’t last 40 years, but it may last a few more before it cracks. Ceramics are very brittle and are sensitive to heat shock, and there is plenty of heat shock in a wood fired stove firebox.
The refractory mix that I have developed to make my kiln shelves is based on very good quality kaolin and high fired refractory grog that we made by recycling our high alumina wadding after each stoneware firing. This sort of material will last as long as any ceramic. But ceramic slabs like this don’t like to be heated unevenly from one edge only. So I anticipate that this will be just a stop-gap measure.
It may not work for very long, but it will probably work for a while. I have another 30 or 40 of these old home made kiln shelves that I no longer use, so if it lasts a year. I have a life time supply already in stock. If it doesn’t work. I might try a sheet of mild or even stainless steel in stead. Mild steel will rust through fairly quickly, ceramics will probably crack and shatter, Stainless, apart from being very expensive, expands and contracts excessively, so will be hard to locate with sufficient leeway to get it to fit snuggly and yet stay securely fixed.
So I decide to go with what I’ve got and give it a go. All I have to loose is an hours work.
I have the challenge of adapting the flat slab of ceramic to the same profile as the original cast plate. It is fairly easy to cut the edge to resemble the original, but the locating lug for the other ceramic brick that is interlocked with it needs some thought. I decide to bolt on a steel lug using a recessed stainless steel bolt.
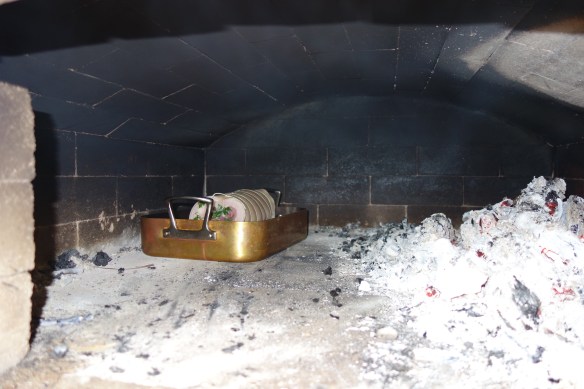
It all goes to plan and the new heat shield is soon back in place. The original top brick is totally shattered and spalled away, so I decide that the easiest solution is to cast a new top edge out of castable refractory. Simply because I just happen to have a small amount in a bag in the barn that was left over from a repair job for someone else a while ago. It doesn’t take long to cast the new section in-situ, all we have to do now is wait for it to set and then dry. A week should do it.
It is important to wear rubber gloves when handling castable cement. The cement is highly alkaline when freshly mixed with water, so it is extremely caustic on the hands. The essential ingrediant being quick lime. Once set however, it is no longer caustic and safe to touch.
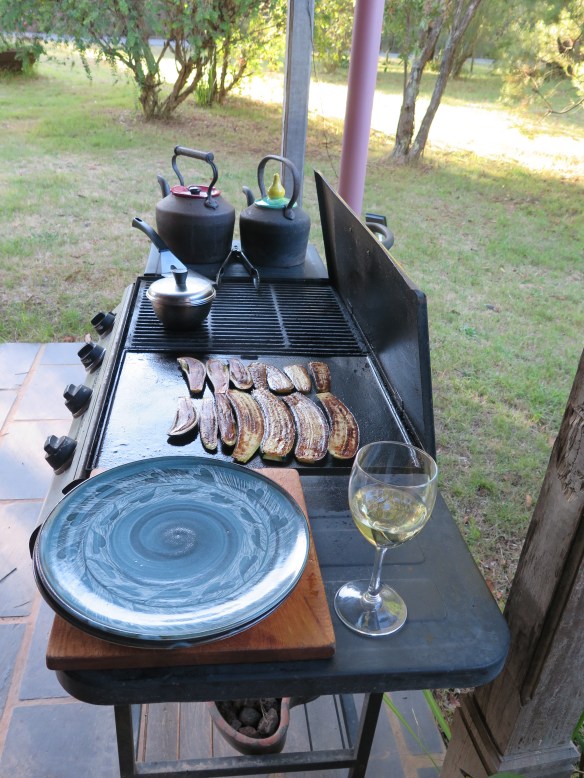
Not a bad day, all in all. We reward ourselves with our Australian version of Japanese pan fried okonomiyaki cabbage pancake, sans flour, just using egg.

 and then a Provenḉal inspired egg plant parmigiana for dinner, all from our abundant summer garden. BBQ’d egg plant and zucchini simmered in Janine’s fresh tomato sugo, made with lots of chilli in this batch and then finished under the grill with a bit of parmigano grated on top.

It’s a gas stove delight while our wood burning stove is out of action.
Another day, another problem solved, This is self-reliance.
Best wishes from the frugality twins.

Sour Dough Clay

We try to allow ourselves a little time ‘off’ over the summer from the usual on-going procession of jobs. This year we had two lots of relatives visiting, so that was a good excuse to not do any other work for a week or two. Then I taught a Master Class in fine throwing and turning techniques up in Sydney for a week. So now it’s back to work. The very real work of essential property maintenance and more clay making while the weather is hot.

I have been spending time over the summer to prepare ‘clay’ for the coming year. When I say ‘clay’, what I mean by ‘clay’ and what other potters understand from that term are completely different things. I have been crushing and grinding my local porcelain stone down to a fine powder and then ball milling it into a fine impalpable stone paste with a little bentonite to make my native bai-tunze porcelain body. It isn’t plastic and sticky like most potters clay. This wet rock dust is just that. Wet rock dust. It needs a long time weathering and souring to develop any sense of cohesiveness and plasticity. The 15% of illite clay mineral that is present in the stone, gives it some similarities to the weathered ’sericite’ mica bodies of the orient. Illite is closely linked to fine weathered mica minerals, so it does give it some plastic qualities after a few years of ageing.
IMG_2011
I’m constantly trying new ways to see if I can improve the workability of my local stone somewhat, but there isn’t much that you can do with non-plastic rock dust. Other than to add some kaolin and bentonite, which is what I already do and what I saw them doing in the porcelain clay factory in Arita.
Same problem, same solution!
IMG_2015
This last year I experimented with another approach to plasticising my rock dust. This time last year, I set aside one 50 litre batch of ball milled porcelain stone slip, and instead of stiffening it on the drying bed, then setting it aside to ‘age’ in a plastic state. I have tried to leave it to settle, flocculate and ‘age’ in the slip state. This produced a very interesting result. The slip developed some sort of ’skin’ on its surface, but below the clear water that appeared above the slip as it settled. This ‘growth’ of skin must be some sort of living material like algae or something similar? I’ve never seen anything like it before. It was quite strong, as I was able to depress a bulge down into it to get the bucket into the barrel to drain off the water from the top. The skin didn’t break and allowed me to recover all the surface water without disturbing the clay below. It even held together well as I lifted it up off the surface of the slip underneath. There was some greenish algae-like growth around the edges of the bucket, where light could get in. This isn’t unusual, as I get loads of green algal-like growth in my clay bags that are set aside to ‘age’. I make my bodies from natural stone powders that I grind myself and I use mostly naturally acidic tannin infused water from the water tanks connected to the pottery roof. Tannin is well documented to be beneficial to plasticising clay materials, as is maintaining an acid pH to counter the natural release of alkalis from the broken down stone fragments as they are ball milled. The overall effect of these natural ingredients is that there is no chlorinated water used in its production and no sterilisation of the powders or any heat treatment of any kind, so the clay is still alive with whatever organics there where in it in the first place.
I’ve kept the ’skin’ to investigate further. I may be able to use it like a sour-dough starter to inoculate the next experimental batch of porcelain body?
When I started to mix the settled and aged slip, it was very viscous and then when I poured it out onto the drying bed and scraped out the bucket, my fingers started to stick together with the extreme viscosity of the slip. I haven’t felt anything quite like this from porcelain slip before. I once had a bucket of porcelain glaze that I kept for special purposes, and then didn’t use for a few years. When I open the bucket and stirred it up. It had set to a stiff gel and took a bit of effort to stir. My fingers stuck together with the viscosity of the glaze at this time too. Ageing has this plasticising effect and is a good thing to do if you can afford the time. I’m 64, so I don’t have a lot of time to do these kinds of experiments over the very long term. I’m keen to see how this specially aged liquid slip batch of porcelain body develops and throws this time next year.
Only time will tell.
Summer is also a time of fresh garden salads and veggie BBQs. We have a lot of tomatoes, zucchini, aubergines and basil at the moment, so every meal is some sort of variation on ratatouille. Baked, poached, pan-fried, BBQ’d and/or grilled. I’m trying to keep it varied and interesting in lots of different ways.
IMG_1847


Best wishes from all-natural, sour-dough, clay-boy

East Meets West, West Eats Meat

Having not eaten any meat for 4 months, we have suddenly gone from sublime to ridiculous, famine to feast, from sashimi to steak.

Xmas has come and gone and we spent a quiet day together, as our son is the sous chef at Biota dining. The only 2 hat restaurant in the Southern Highlands. He did Xmas lunch for 160, so started at dawn and finally finished at 9pm.

We had our family get-together Xmas lunch on Boxing Day. We envisaged a small meal of vegetables from our organic garden with a little meat, almost as a side dish, cooked in the outside wood fired oven and enjoyed outside, under the shade of the grape vines. This wasn’t to be, as our son turned up with a barron of beef and half a pig, which he set about butchering into sections of ribs and pork belly.

He made a rolled pork belly roast stuffed with trimmings and herbs from the garden, with loads of roasted garlic and we roasted this slowly during the day at the back of the oven.

Geordie slowly roasted the 5 point rack of 90 day aged beef, very gently over an extended period. This became our lunch along with our usual BBQ’d garden vegetables.

The rolled roast and ribs, along with half a dozen pizzas, went to the village musicians who turned up later in the evening.

DSC01712DSC01708DSC01709

We braised the full rack of pork ribs in a mix of last summers preserved tomato sugo, red wine, cloves and star anise, onions, with garden herbs and bay leaves. This was simmered in the lightly stoked oven for a long time until very tender and then the sauce was drained and strained, and then added back to the pan with the addition of a few spoons fun of our fruit jelly to sweeten it and gell it up. This was poured back over the ribs to finish them to a sweet, fragrant, tender, sticky perfection. Yum!

I’ve never cooked a full side of pork ribs before, as there are only two of us here, there isn’t much need and we don’t usually eat so much meat. But it’s Xmas, the season of excess, and tonight we have the Village Musicians meeting here for their extended ‘session’. We hosted them here last month as well and they seemed to like it, so we invited them back. It just turns out to be the night of boxing day. So I stoke up the oven when they arrive and we sit under the grape vines and listen to their songs, while I bake 6 pizzas and finish off the ribs.

Now it’s time for a day ‘off’ and a little snooze.