We are past the equinox now and firmly in spring. I have planted out the summer garden seeds and even a few seedlings to get things started a little early. Things like tomatoes and squash. I’m never really sure when it will be safe to plant out those tender summer vegetables, just in case there is a late frost, but as the years go by, the chances of a late frost get more remote. Global heating is running rampant and no one seems to want to do anything about it. We seem to have some of the laziest and most corrupt and stupid politicians in the world. Firmly welded onto burning coal and gas as the solution to everything. Still refusing to commit to zero carbon economy by 2050. Pathetic!
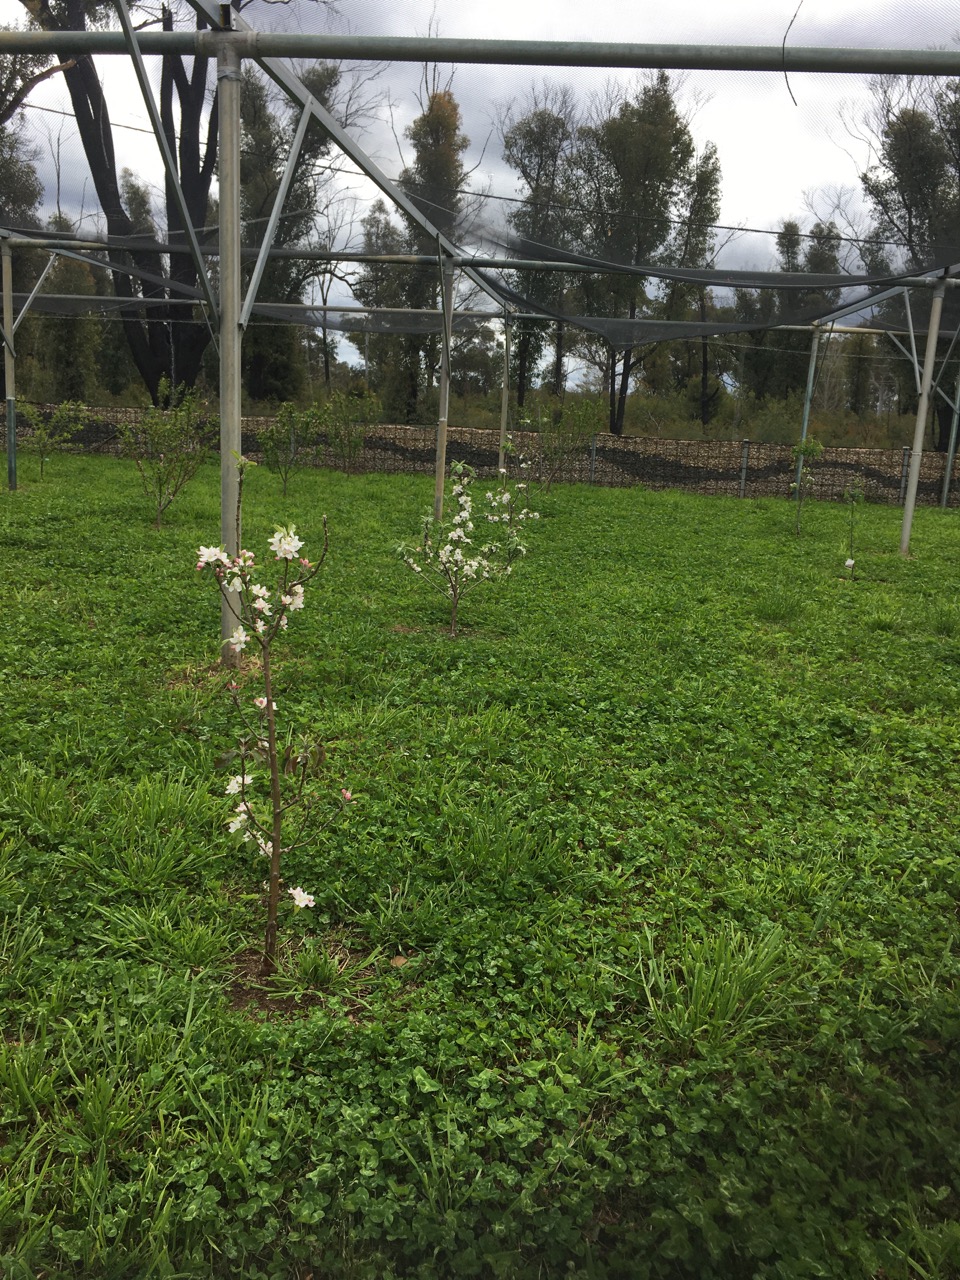
On the bright side. The cherries have started t flower, always a safe sign that I can plant to the summer veggies. I checked my diary and found that I planted out the first summer seedlings last year on the 11th of Sept. This year I got into the garden and planted the first seeds on the 13th. pretty similar.
The quinces are also flowering.
Even the young little apple trees, only I planted last year in the new orchard that we built after the fire, These are also flowering.
I pick off the small fruits as they form, so as to allow the tree to grow vigorously and develop a sound structure. However, I can’t help myself from leaving just one fruit on each tree to develop to maturity, just to see what the fruit looks and tastes like. It’s exciting to see the fruit swell up and mature. There is so much anticipation in the wait for them to become ripe.
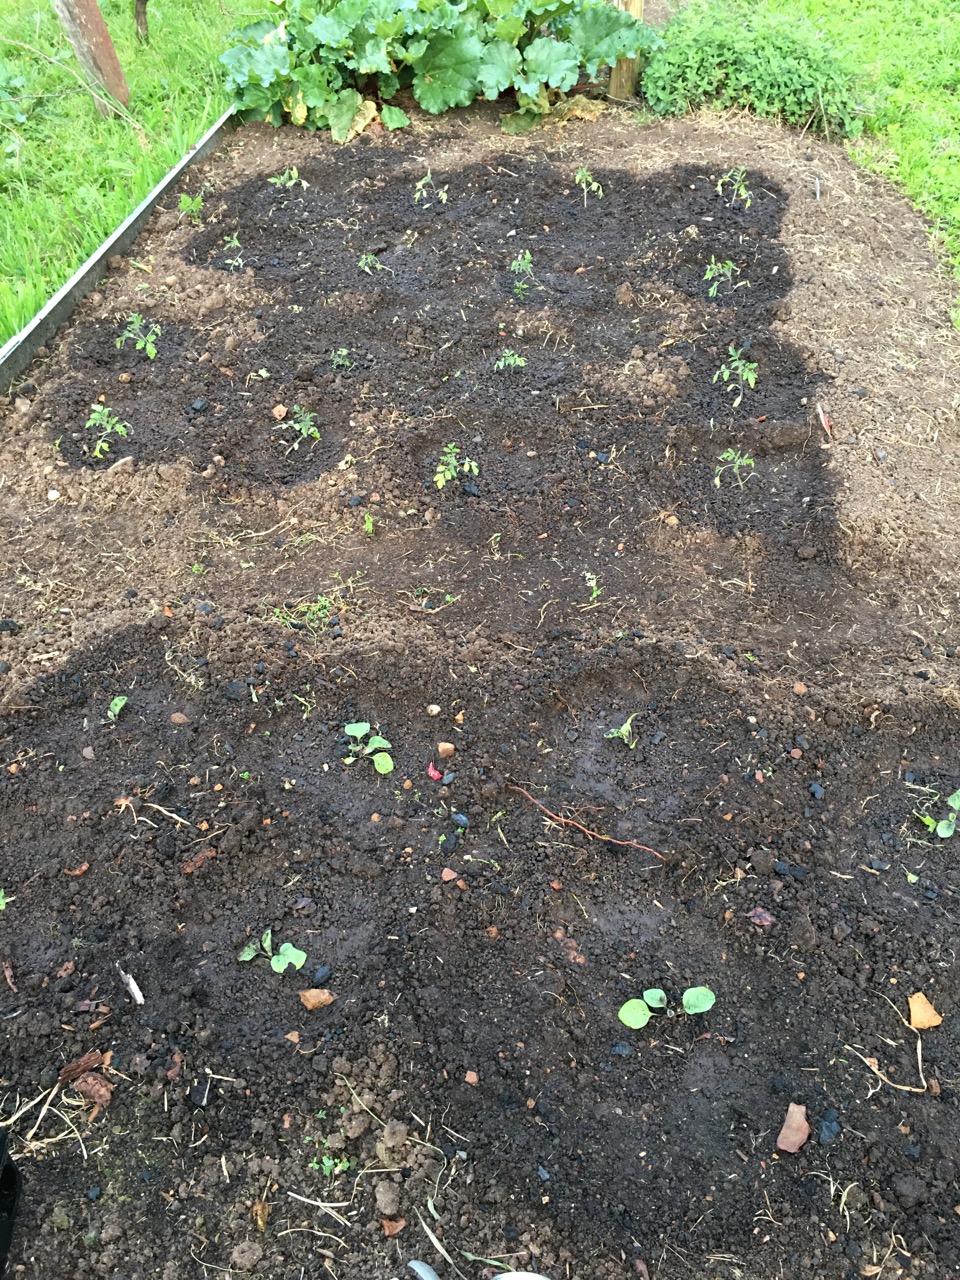
All the seeds and seedlings are planted out and watered in. Now we wait and weed.
I spent a few hours each day for the past week weeding the poor neglected vegetable patch. We have been so busy in the pottery making pots and glaze tests, preparing for our first glaze firing, that I haven’t spent very much time in the garden over winter. No its catch-up time. I really have to spend some time in there, or the weeds will taker over with the coming warmth and longer day light hours and all the vegetables will be smothered.
In the past, I used to be in the garden everyday. Whenever I got a bit bored doing whatever it was, I could just walk out the door and around the shed, and into the garden. I’d pick something to chew on and do a bit of weeding and watering, enjoy the creative and productive break, then go back to work refreshed. There is just so much to do these days, that the list is longer than the piece of paper I try to write it all down on. I work until I’m too tired to do more, and the garden gets forgotten. At least I’m smart enough to know when to stop. I don’t want to wear my self out. I know that I can come back to it the next day and finish whatever it is that I didn’t get done the day before.
This week I took time out and weeded the asparagus bed. I desperately needed to be cleaned out to allow the new season growth to get a chance to thrive.
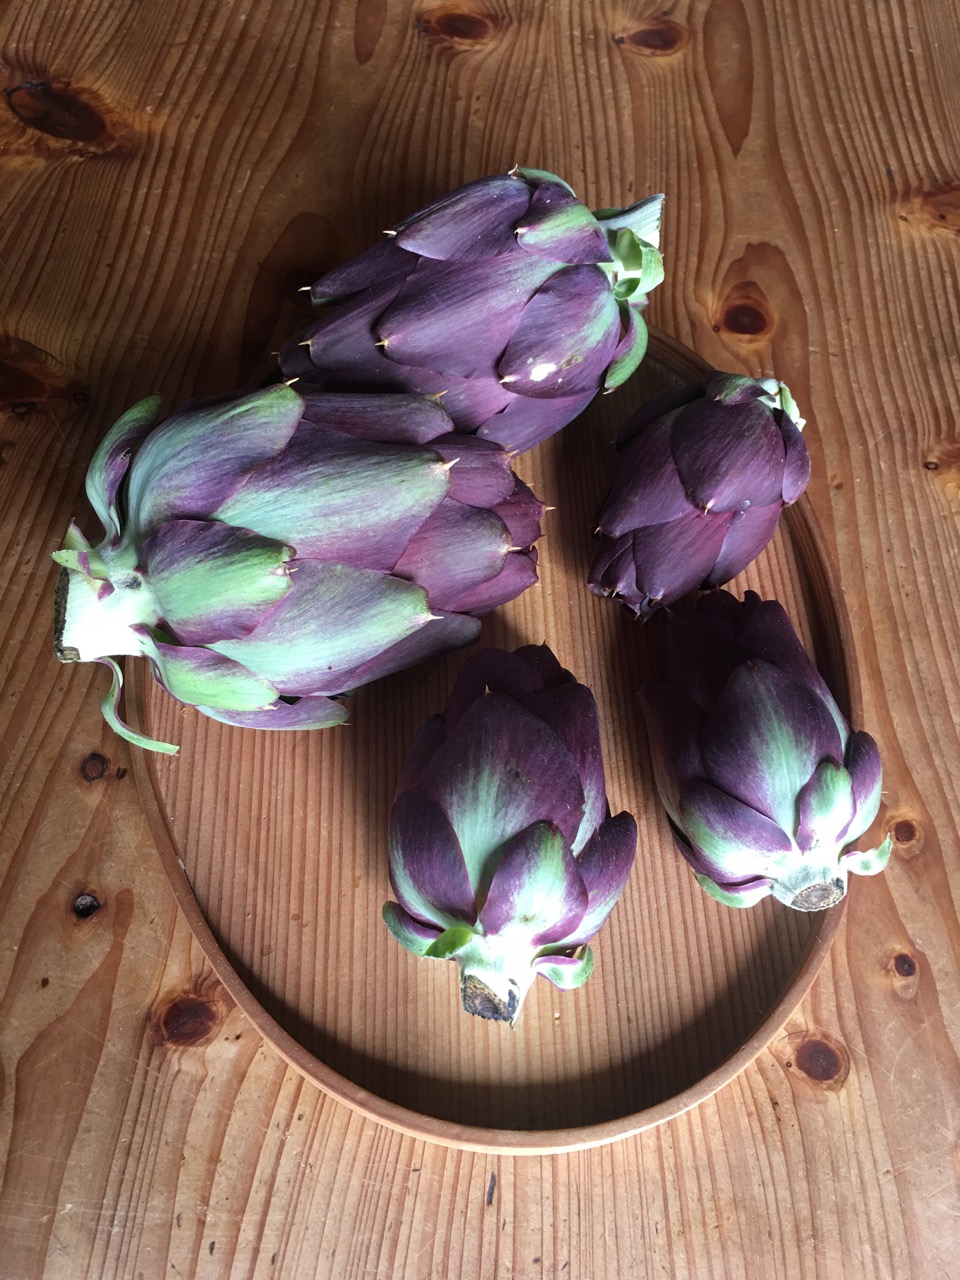
There are two beds, right at the bottom of the garden. They look great all cleaned out. I can’t wait for the new spears to come through. The artichokes behind them are just coming into head. The earliest variety is the early Italian purple. We ate them for lunch.
I grew these plants from seeds, they turned out to be quite spiky, it didn’t mention that on the packet! I just cut the top 1/3 off and peel the first row of outer leaves away, then there is no problem.
Janine and I have each spent a few hours here and there over the winter months weeding the garlic beds. Garlic doesn’t tolerate too much competition. it really impedes the development of good sized bulbs. So because it really needed t one done, we cancelled pottery work and did it – a few hours at a time, then 6 weeks later, we did it again. It has been a mild and somewhat damp winter, so all the weeds out grew the garlic. Now it’s done, it looks good and the garlic is pushing up and filling out. We may not need to weed it again before it matures in the next 6 to 8 weeks.
I try and grow all the garlic that we will need for the whole year, but rarely manage it. This year I managed to find the time to clear 5 beds and plant out about 200 cloves between March and May. Most of them came up, but not every one develops into a big strong knob. Some only grow to a small fiddly size that is rather a lot of effort to peel, but we work our way through them first. Janine doesn’t even bother to plait them, she just pours them all into a wicker basket that we keep on the kitchen work bench. Only when they are used up, do we proceed to bring down the bigger and easier to peel larger knobs. These plaits are hung up in the kitchen ceiling space where they are kept dry and well aired until we need them.
We have just one small bulb left of last years harvest, so I bought 3 knobs from the green grocers last week. These are imported from the northern hemisphere where they are in the opposite season. Janine also picked one very small bulb that had fallen over near the garden path. It wasn’t going to do well, so it’s our first bulb of the new season.
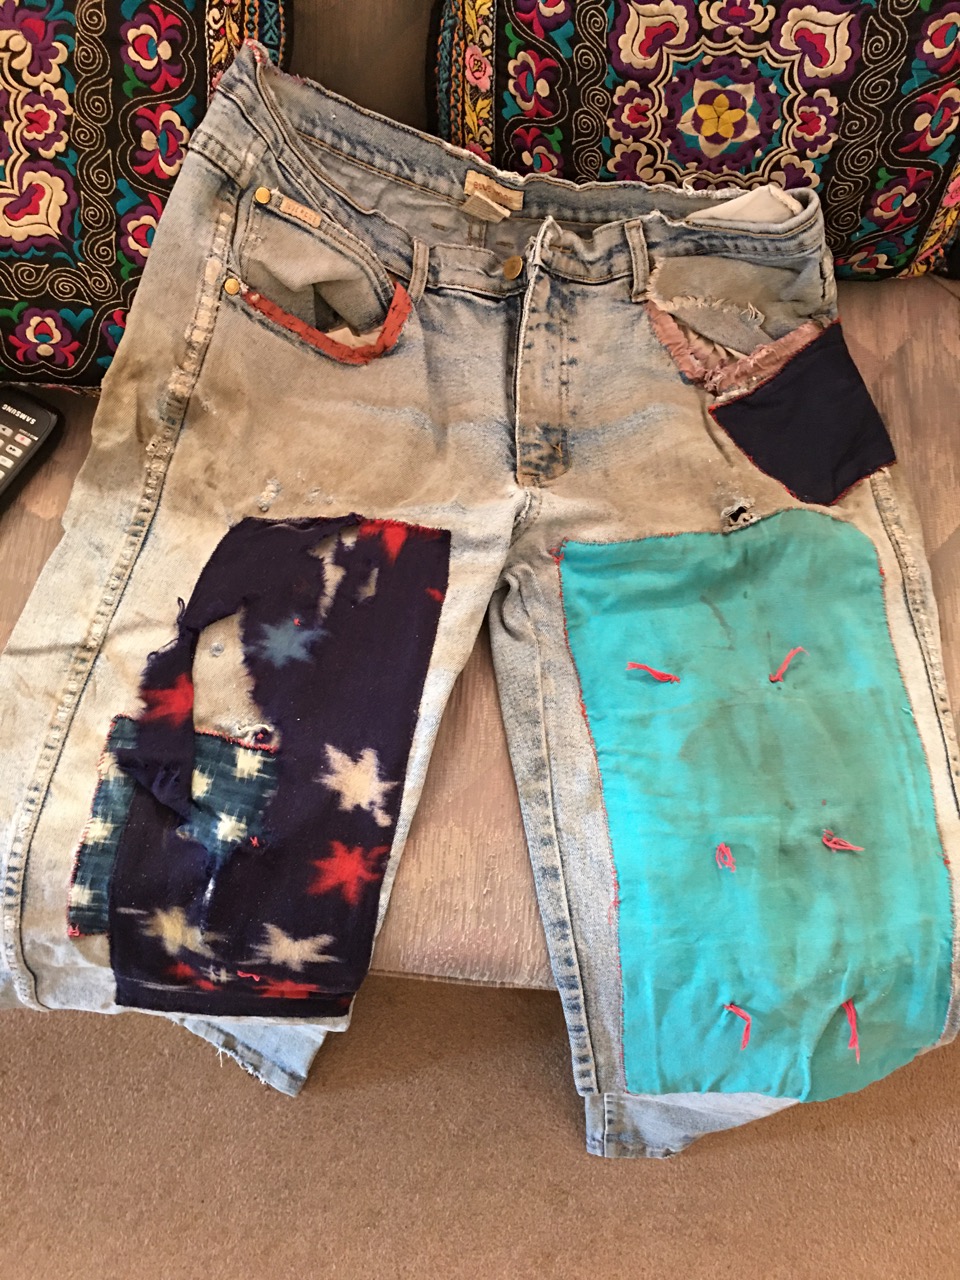
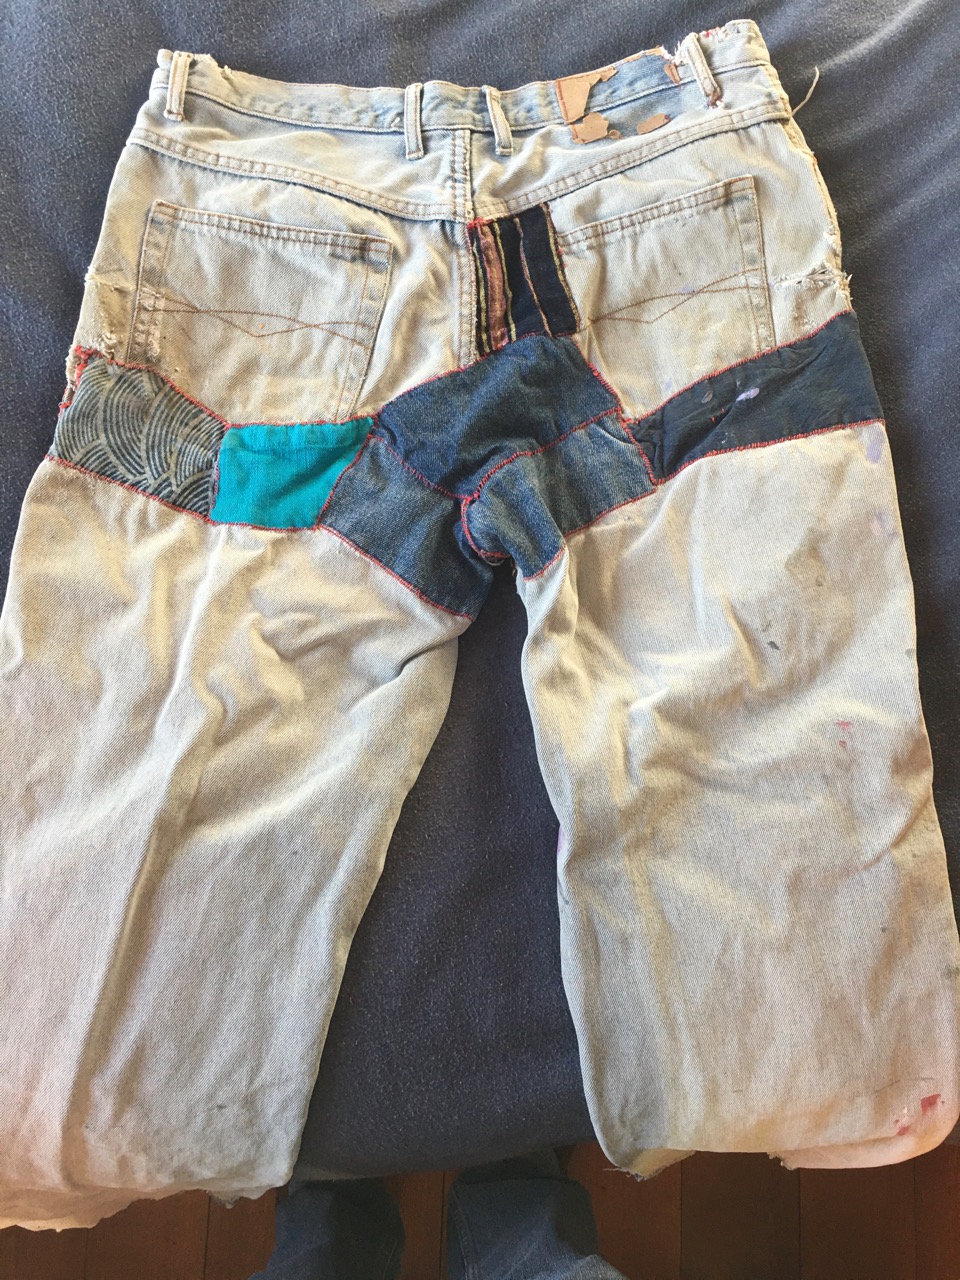
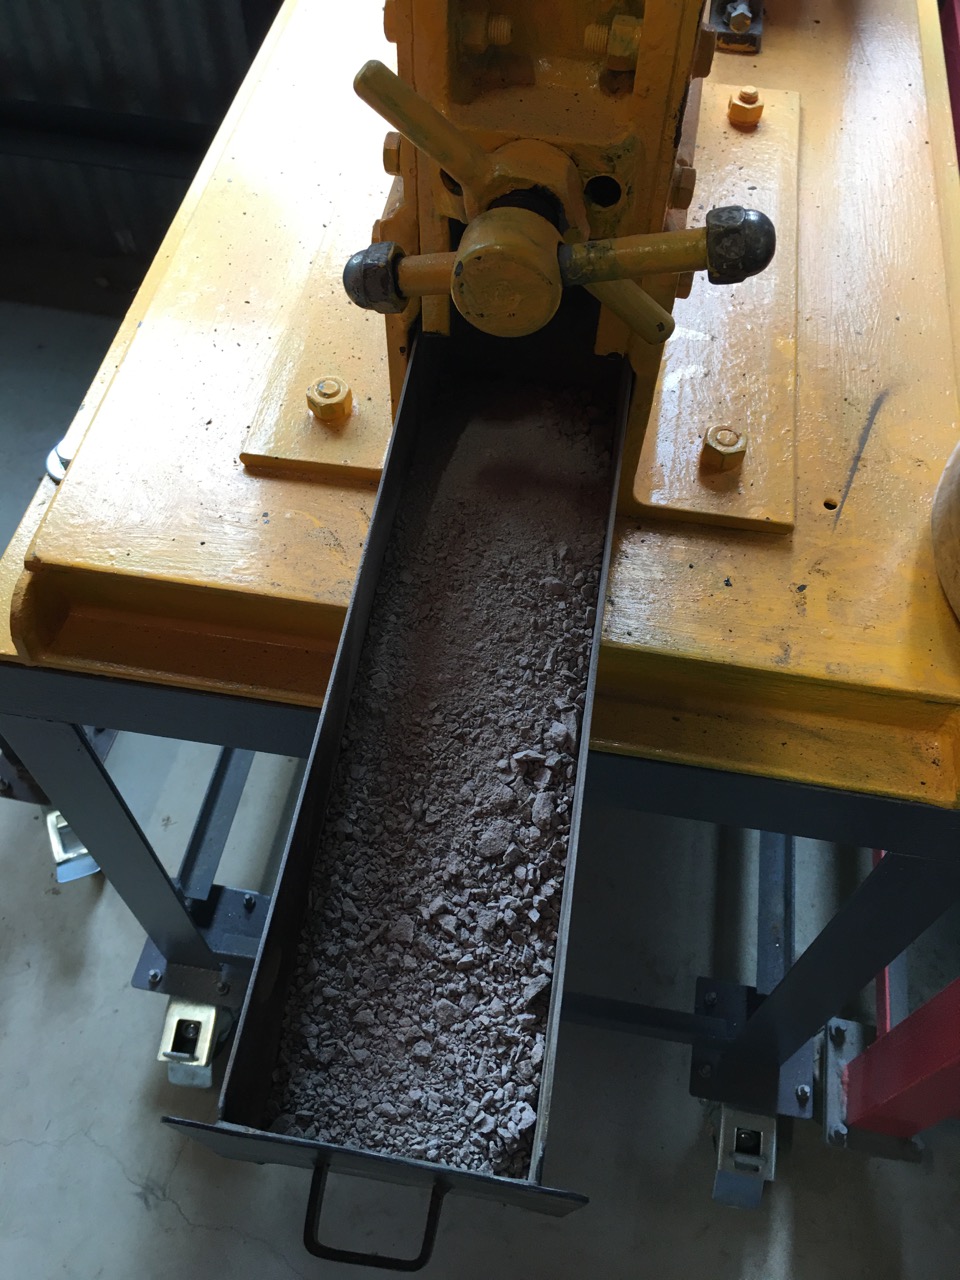
Each week I attempt to crush and mill another local igneous rock for use as a glaze ingredient.This week I stopped off on the way to Mittagong Post Office to collect another stone, on the hill behind the post office.I passed it through the rock crushers that I have pains-takingly restored after the fire. Luckily, all these machines are made of very solid steel plate or cast iron, but more importantly, they were situated in the breezeway between the two buildings. Being largely out in the open with very little flammable material around them, just a polycarbonate roof over them. So they didn’t get too hot.They weren’t warped or melted. This meant that I was able to restore them, not just scrap them.New motors, bearings, seals, pullies and belts were required. The metal work was largely saved because I poured used engine oil all over them, straight after the fire and before it rained on them. With the assistance of my friends Warren Hogden and Len Smith, Along with my friend Dave and his crane truck, we were able to lift them out of the rubble and up to a safe place, out of the way of the demolition crew and then tarp them in their oily state. This was just enough protection to stop them from rusting and flaking really badly. One very important aspect of my philosophy of self-reliance is never throwing anything out simply because it is no longer fashionable or is showing signs of wear. I keep working on my possessions, maintaining and repairing them, until they are really worn out, or past repair. In this regard, I have spent a lot of time patching and stitching my worn out work clothes and repairing some of my treasured pottery machines. Particularly the rock crushers. These things are as scarce as hen’s teeth and really worth working on. The Japanese have a word, ‘mortainai’ that means ‘making do’, I have written about it on this blog previously. It really sums up this repair and reuse philosophy.A year of part-time evenings has seen both my work jeans and the rock crushers back at work. These jeans are many years old and have patches over their patches, over their patches, especially on the knees.
My jeans mostly wear out at the knees and thighs, I have also had to reline the pockets, as the pockets are made from the lightest grade of cotton cloth that wears out in no time flat if you keep your car keys in there.
It’s just one more example of built in obsolescence. A product designed to fail. The retailers hope that i will just ditch the whole pair and buy another – in the latest fashion style! Well I won’t and don’t. I repair, re-use and re-cycle. I like to make them last me a decade. They start out as being for ‘best’ , going out etc. Then after a couple of years, they start to get a bit past their shiny best, they are worm in the pottery and for gardening. Finally after another 3 or 4 years, they are reduced to the welding workshop, rock crushing and angle grinding. This really takes it’s toll and they require more patches more often. In the past I have finally given up on them when I grew out of them and had to go up to another size. Then they became rags for painting and cleaning. These days I don’t get any bigger, so size isn’t the death knock that it used to be. Hence I a back log of three pairs of these patched jeans that just keep on being repaired and worn again and again.
But its not just the pockets, knees and thighs. They also wear out in the butt.
I think that ongoing hand stitched repairs like this are an important aspect of my creative expression. I exhibit my pots , but no one ever sees these creative endeavours. They are strictly utilitarian and for home use only, but this doesn’t meant that they are any less important. I kintsugi my pots and I patch my clothes. It’s the same thing.
After I had got the rock crushers going. I left it at that, as I wasn’t ready to crush any stones at that time. But the machines were ready. At least I thought so. I didn’t have the time to test them all out with rocks. I didn’t even have any rocks at hand to try out. I was satisfied when the new motors were installed and the new drive belts were fitted in place, just to see the machines rotate successfully. That was all I got to do. Now is the testing time.
Straight off, there was one casualty. The smallest laboratory jaw crusher just doesn’t seem to work at all. I got it 2nd hand from a junk yard. I tested it, the motor ran, the shaft turned, it whirred and clanked, but now that I go to use it, nothing happens when I put rocks in. They just sit there bouncing around. Luckily, I only paid $250 for it. I’ll need to pull it to bits and find out why. But that will have to wait till later, much Later… I have other machines that do actually work and they are enough to get me started. What’s most important is that I can get some local stones powdered so that I can get a glaze firing full of test pieces done.
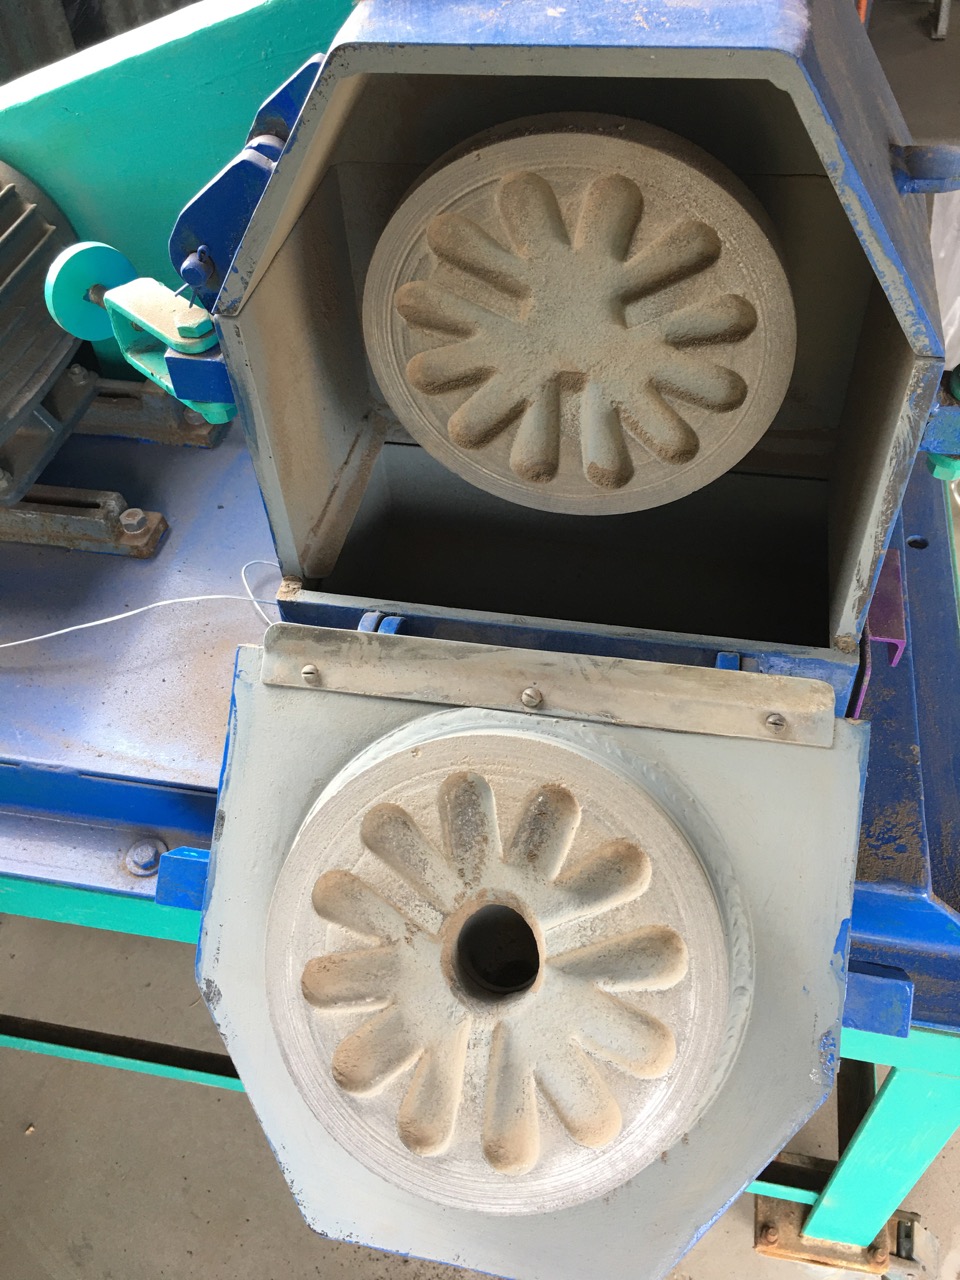
There were a few hiccups with the other machines before I got them all working. The big jaw crusher was found to be running back wards. I hadn’t noticed this when I first wired it up, as the degree of oscillation movement is very slight, but the first time I put stones in it, I noticed that it was very slow to engage with the rocks, it still crushed the chunks down to blue metal sized pieces, but very slowly. It was really only because I know this machine very well as I have rebuilt it previously over years and am familiar with it, such that I noticed its lack of performance. Luckily, it is a simple exercise to reverse polarity of a 3 phase motor. It works properly now.
The small jaw crusher, which I use as a 2nd stage crusher, takes the blue metal sized lumps and reduces them to grit.
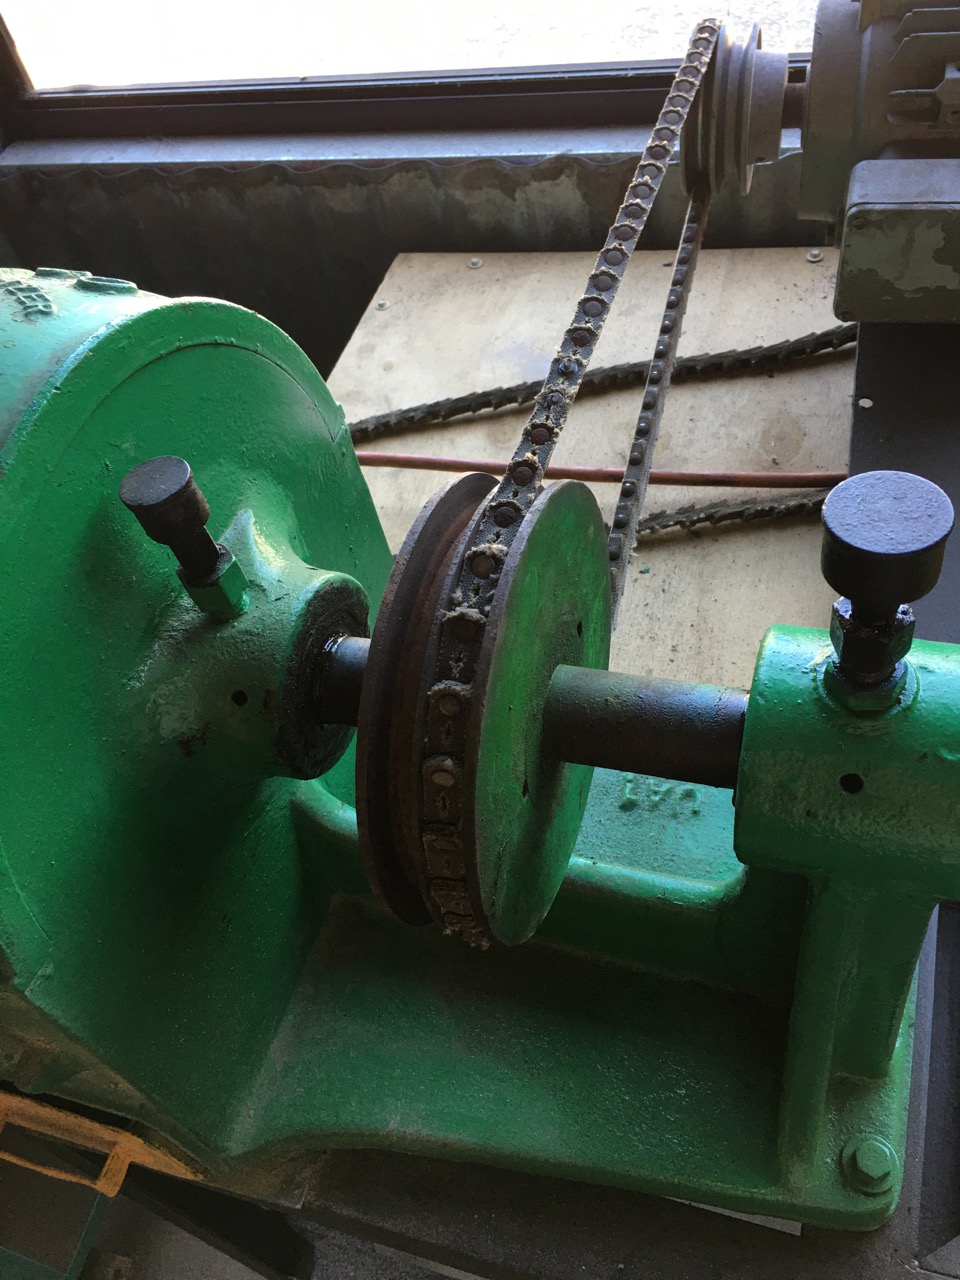
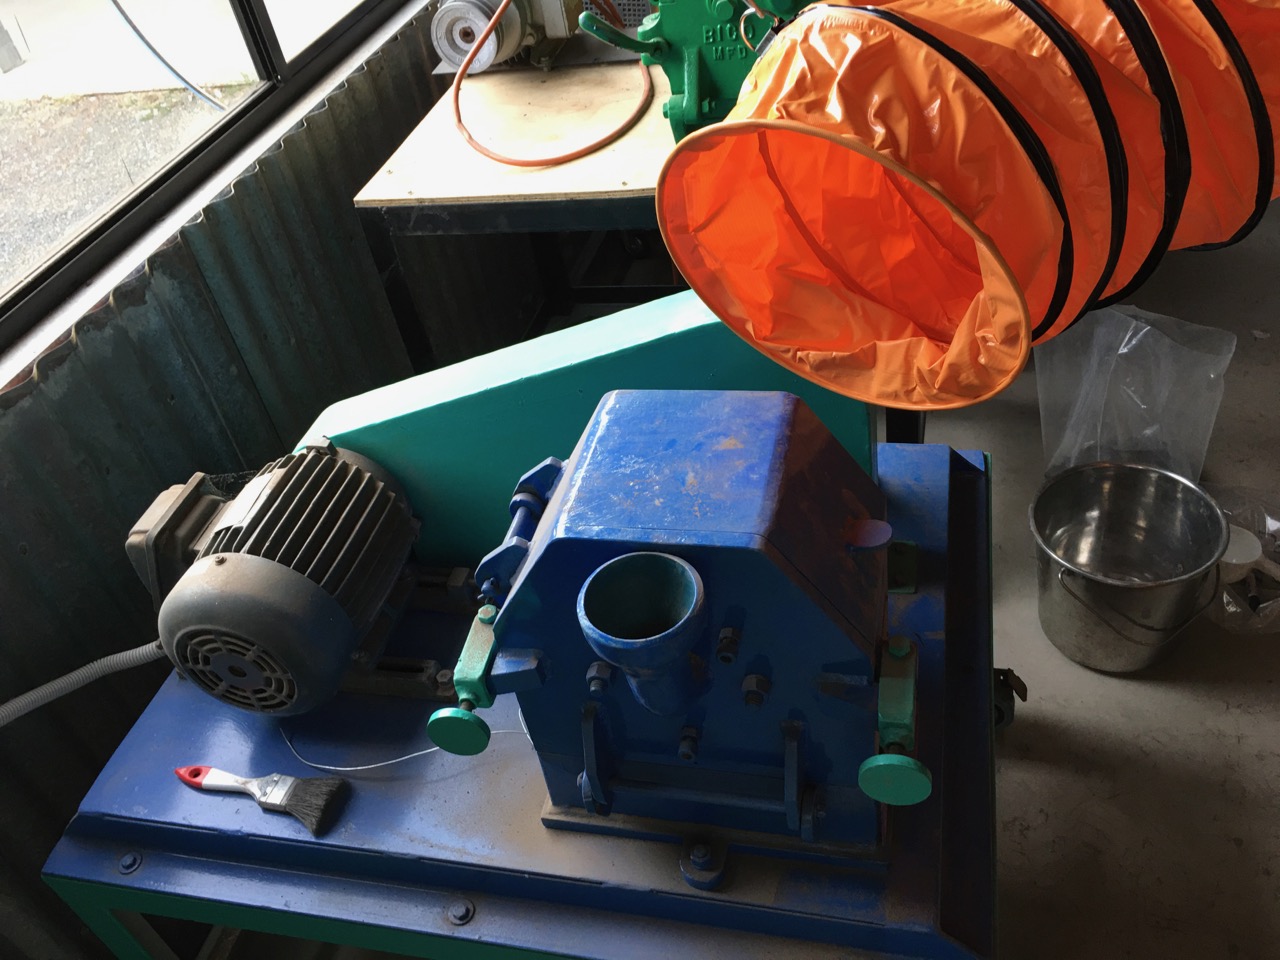
This little machine is now painted industrial yellow, but was formerly dark blue and orange in the old pottery. Me painting my machines a different colour is a bit like a lady dyeing her hair. A change is as good as a holiday. It cheers me up to see all the brightly coloured machines. Like big kid’s toys!
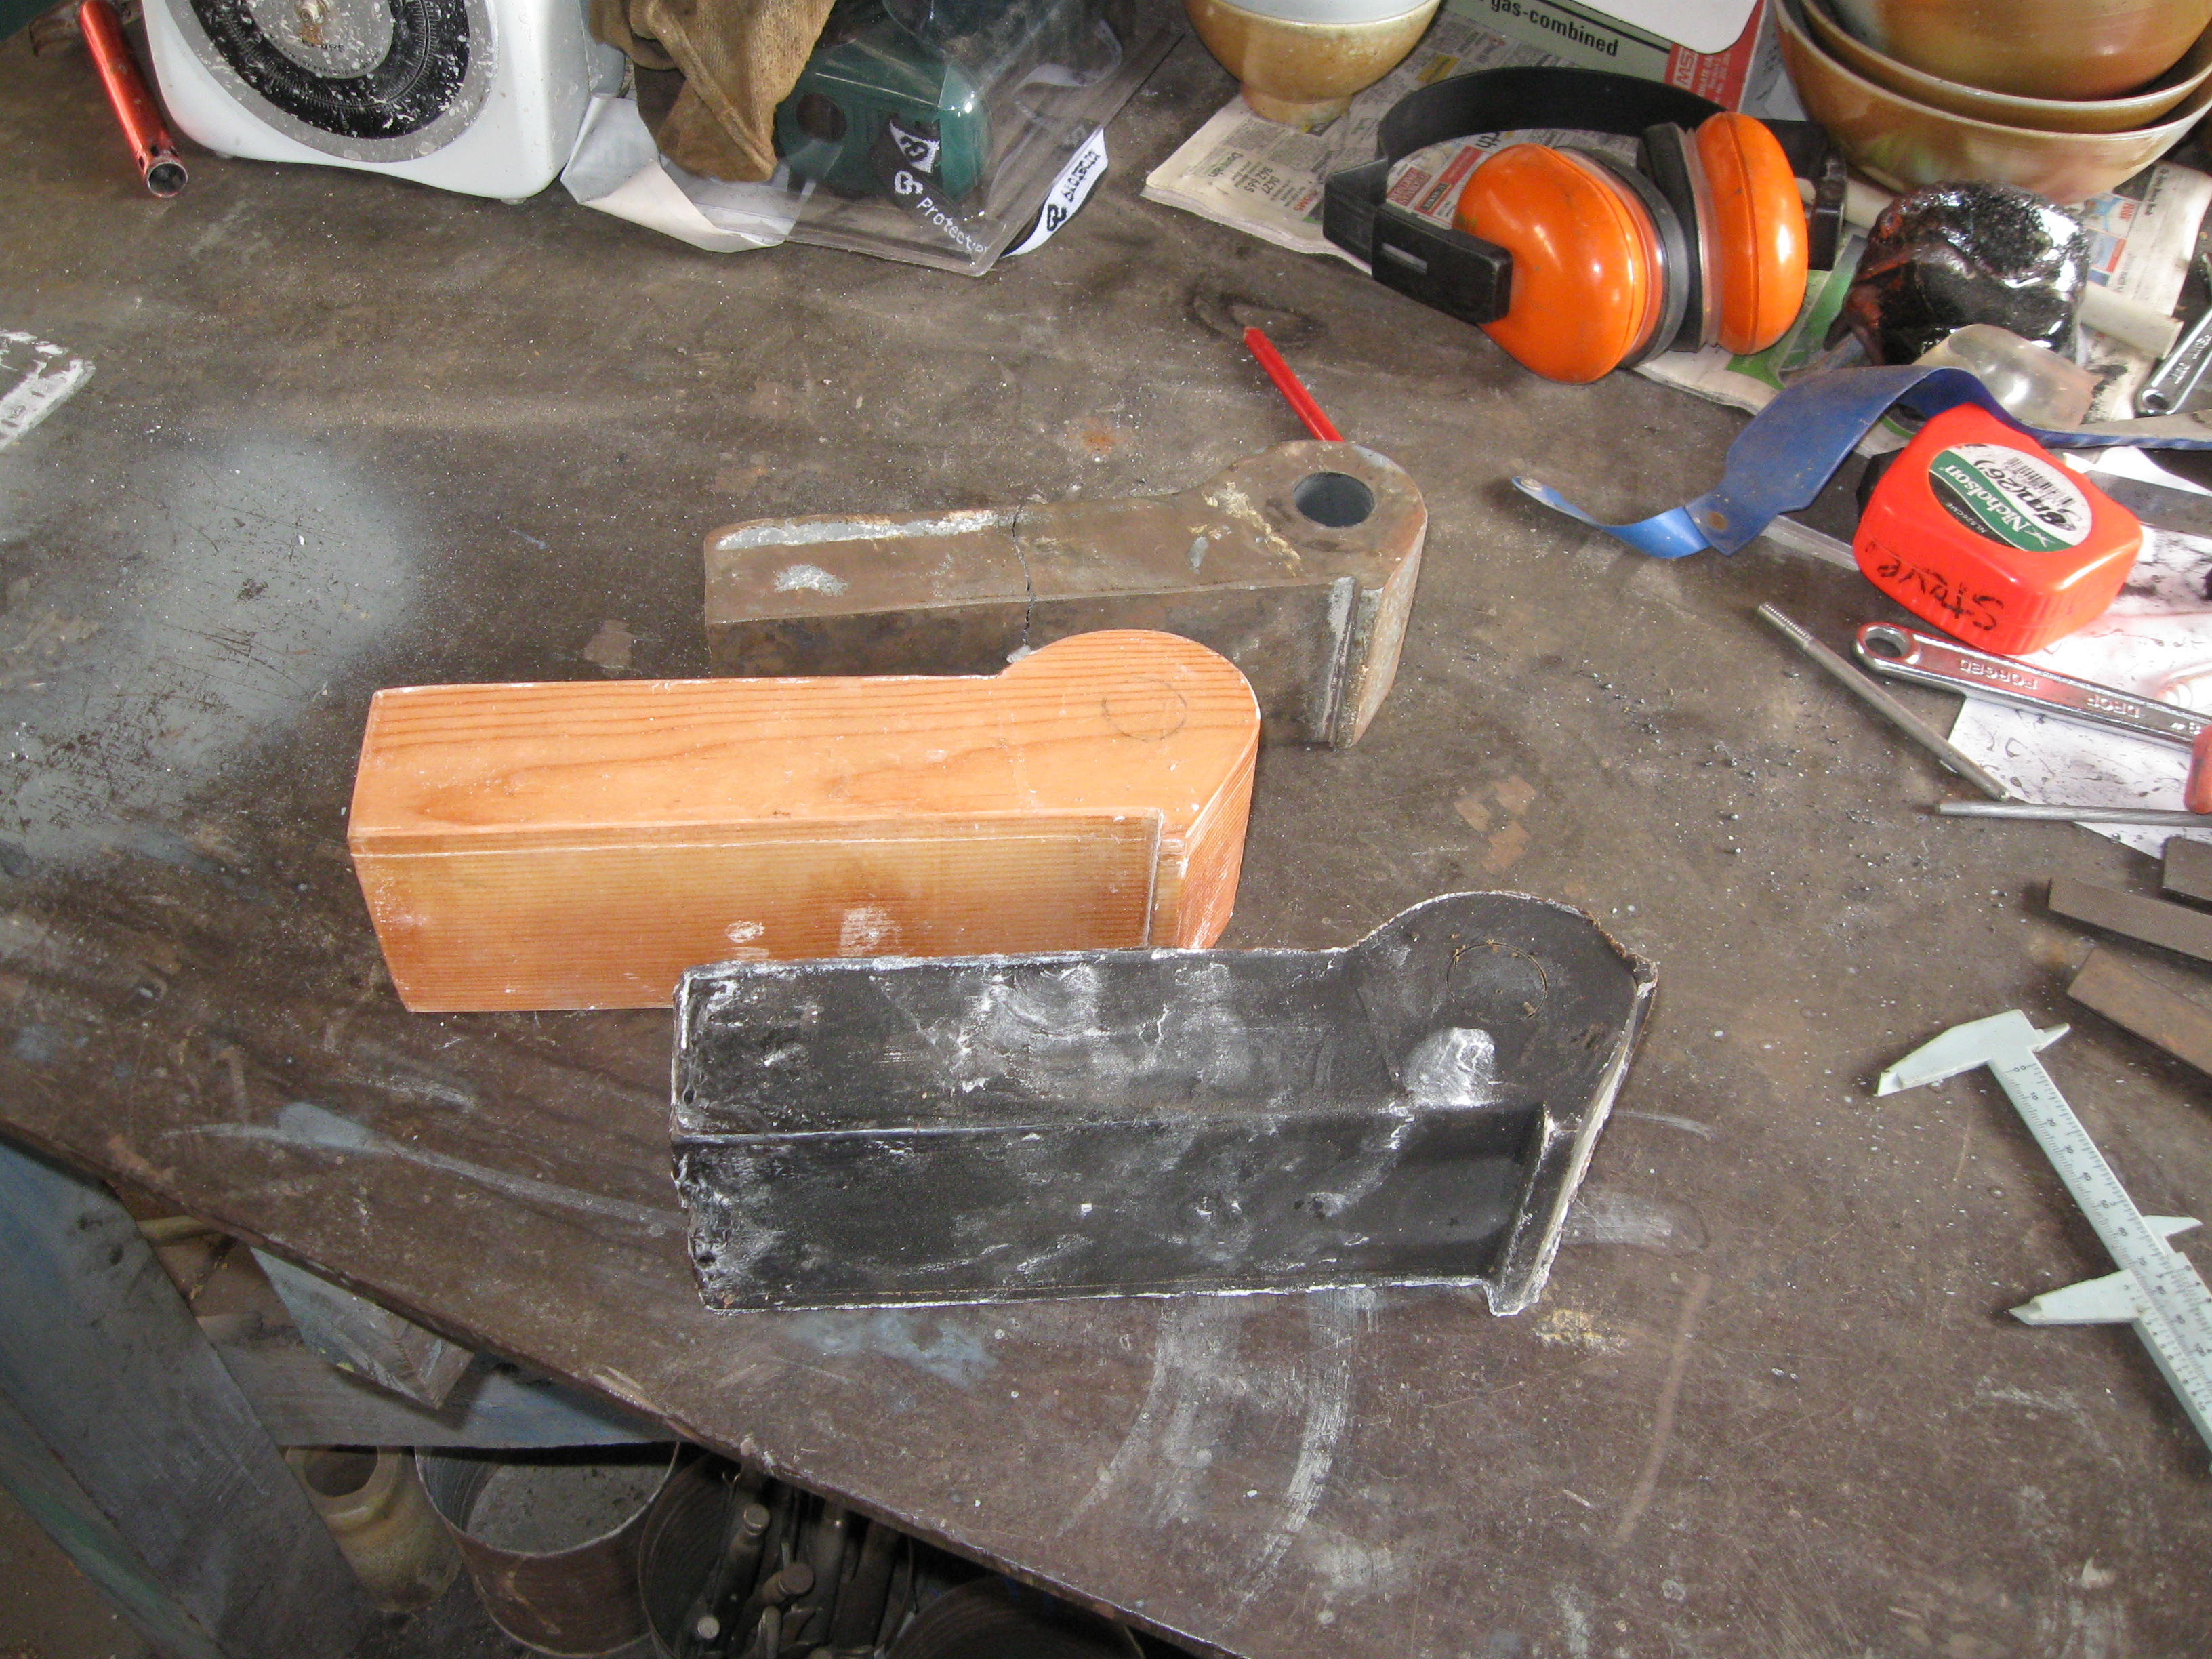
I move the negative-pressure ventilation, dust extraction hose from machine to machine. I have found that the end of the tube is quite friendly and affectionate. If I get too close to the end of the bright orange ducting, it attaches itself to me with the pressure of the suction. It’s not too strong and easy to remove from my shirt, but it is very friendly and persists in wanting to get attached to me. It’s quite amusing. It keeps on seeking out my shirt every time I get close while I’m working. I keep brushing it off, it keeps wanting to nuzzle-up and attach itself to me. Maybe it’s my pottery-workshop-cabin-fevor, after all these months of lock-down. Janine says that I need to get out more! But it’s nice to be wanted! 🙂 The output of this machine is from 6mm down to dust. I bought the little, now-yellow, crusher direct from the manufacturer, ‘Van Gelder’ back in 1983. When we used to make things here in Australia back in those days. This company has now gone to the wall. It’s a shame, as it was established back in the 1800’s to support the late gold rush and the follow-on mining activities here. They were located in Silverwater in what used to be Sydney’s industrial manufacturing heartland. The owner at the time said that they were just hanging on, all the workers were getting old and heading for retirement. He wasn’t sure how he was going to pay out all the retirement funds. He told me that he would probably sell the site and move out of the city to some where much cheaper. Before I left with my brand new crusher – which is still the most expensive piece of pottery equipment that I ever bought. He added my name and the serial number of my machine into his manufacturing log book. It was a quarto sized, beautiful old leather bound journal, that was showing a lot of wear around the edges. It contained a list of every machine that had ever been built by that company. I felt honoured to be on that historical list. It has occurred to me since then, whatever happened to that company’s records and in particular, to that journal? In 2009, the cast iron static jaw broke in half, presumably from metal fatigue? I googled ‘Van Gelder’ and found them up in Gosford. We had an email exchange, but the new owner was completely disinterested in helping me out by selling a new jaw. In fact almost rude. Such a different experience from the old owner! So I decided that I’d make my own – only better than the original. Cast iron is brittle and not the best choice for a machine part that is under constant impact. I decided to make a new one myself. I tried casting one in bronze. I started out by making a wooden replica that was 17% larger. Making a plaster cast of that wooden piece, then casting a copy of that wooden one in wax, so that I could do a lost wax bronze casting.
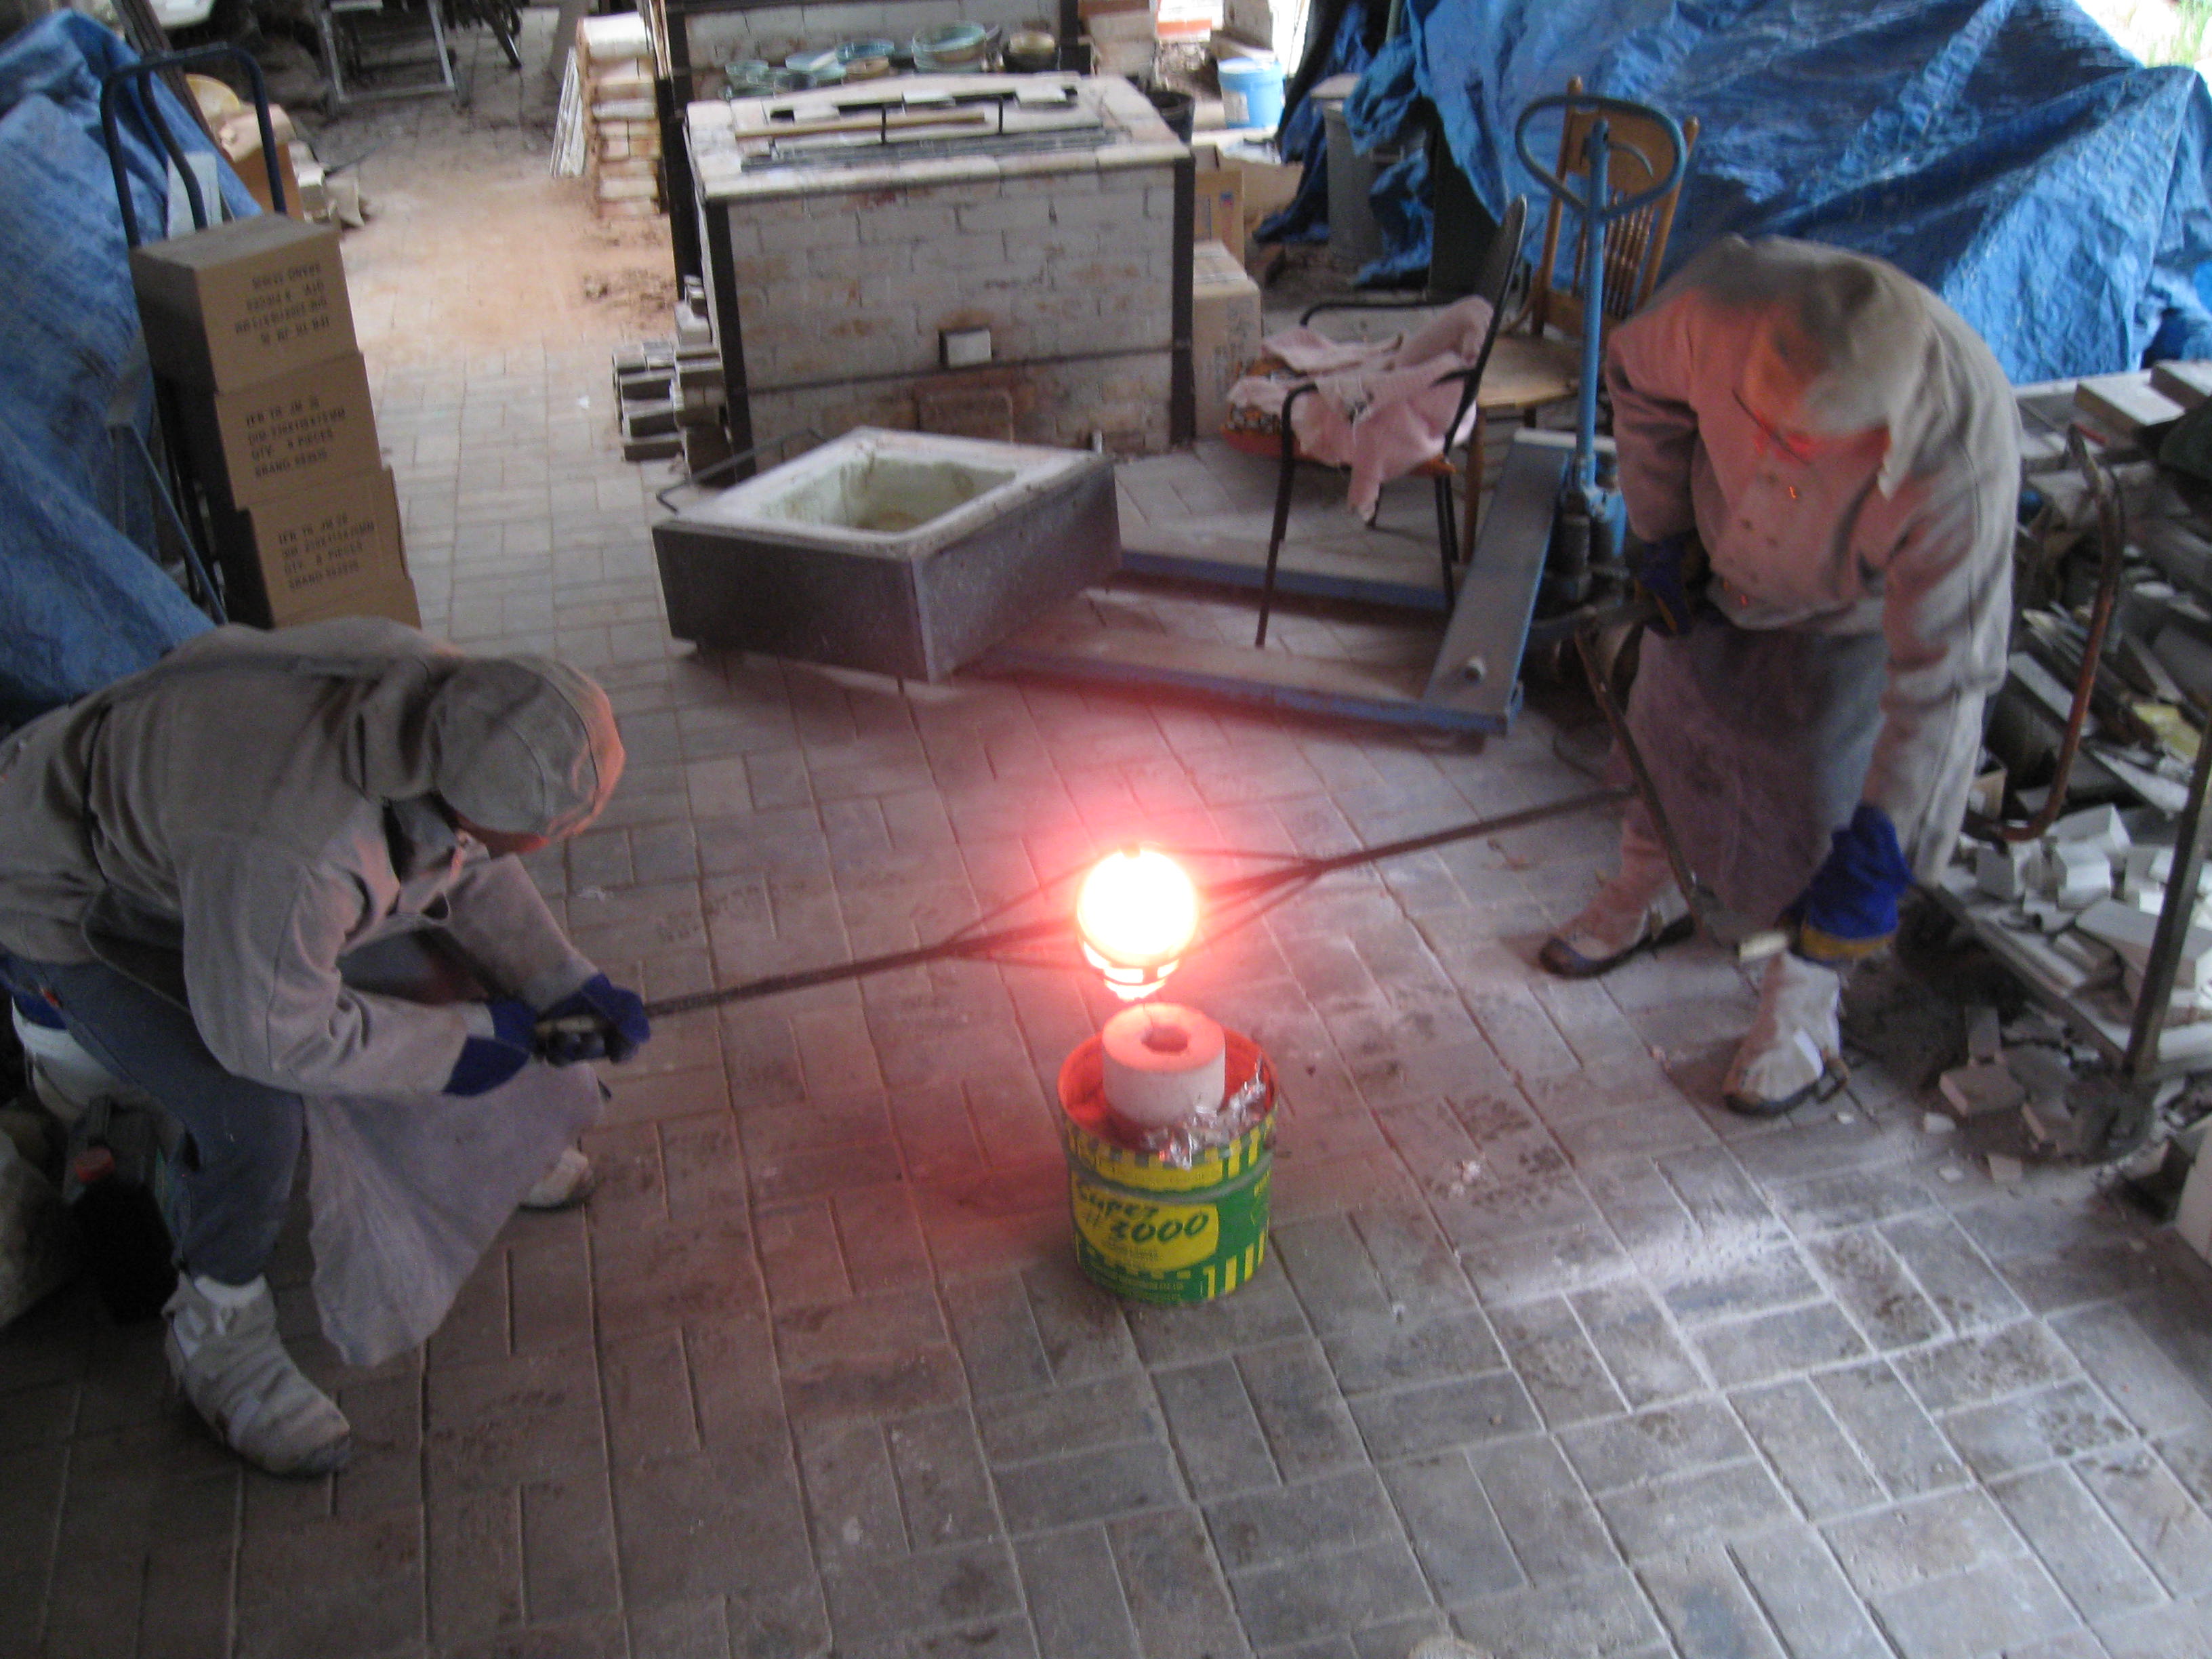
The original is at the top. the larger wooden model is in the centre. The cast wax model is at the bottom. I built a small foundry, and with the assistance of my good friend Warren, we cast a blank, which needed a lot of machining.
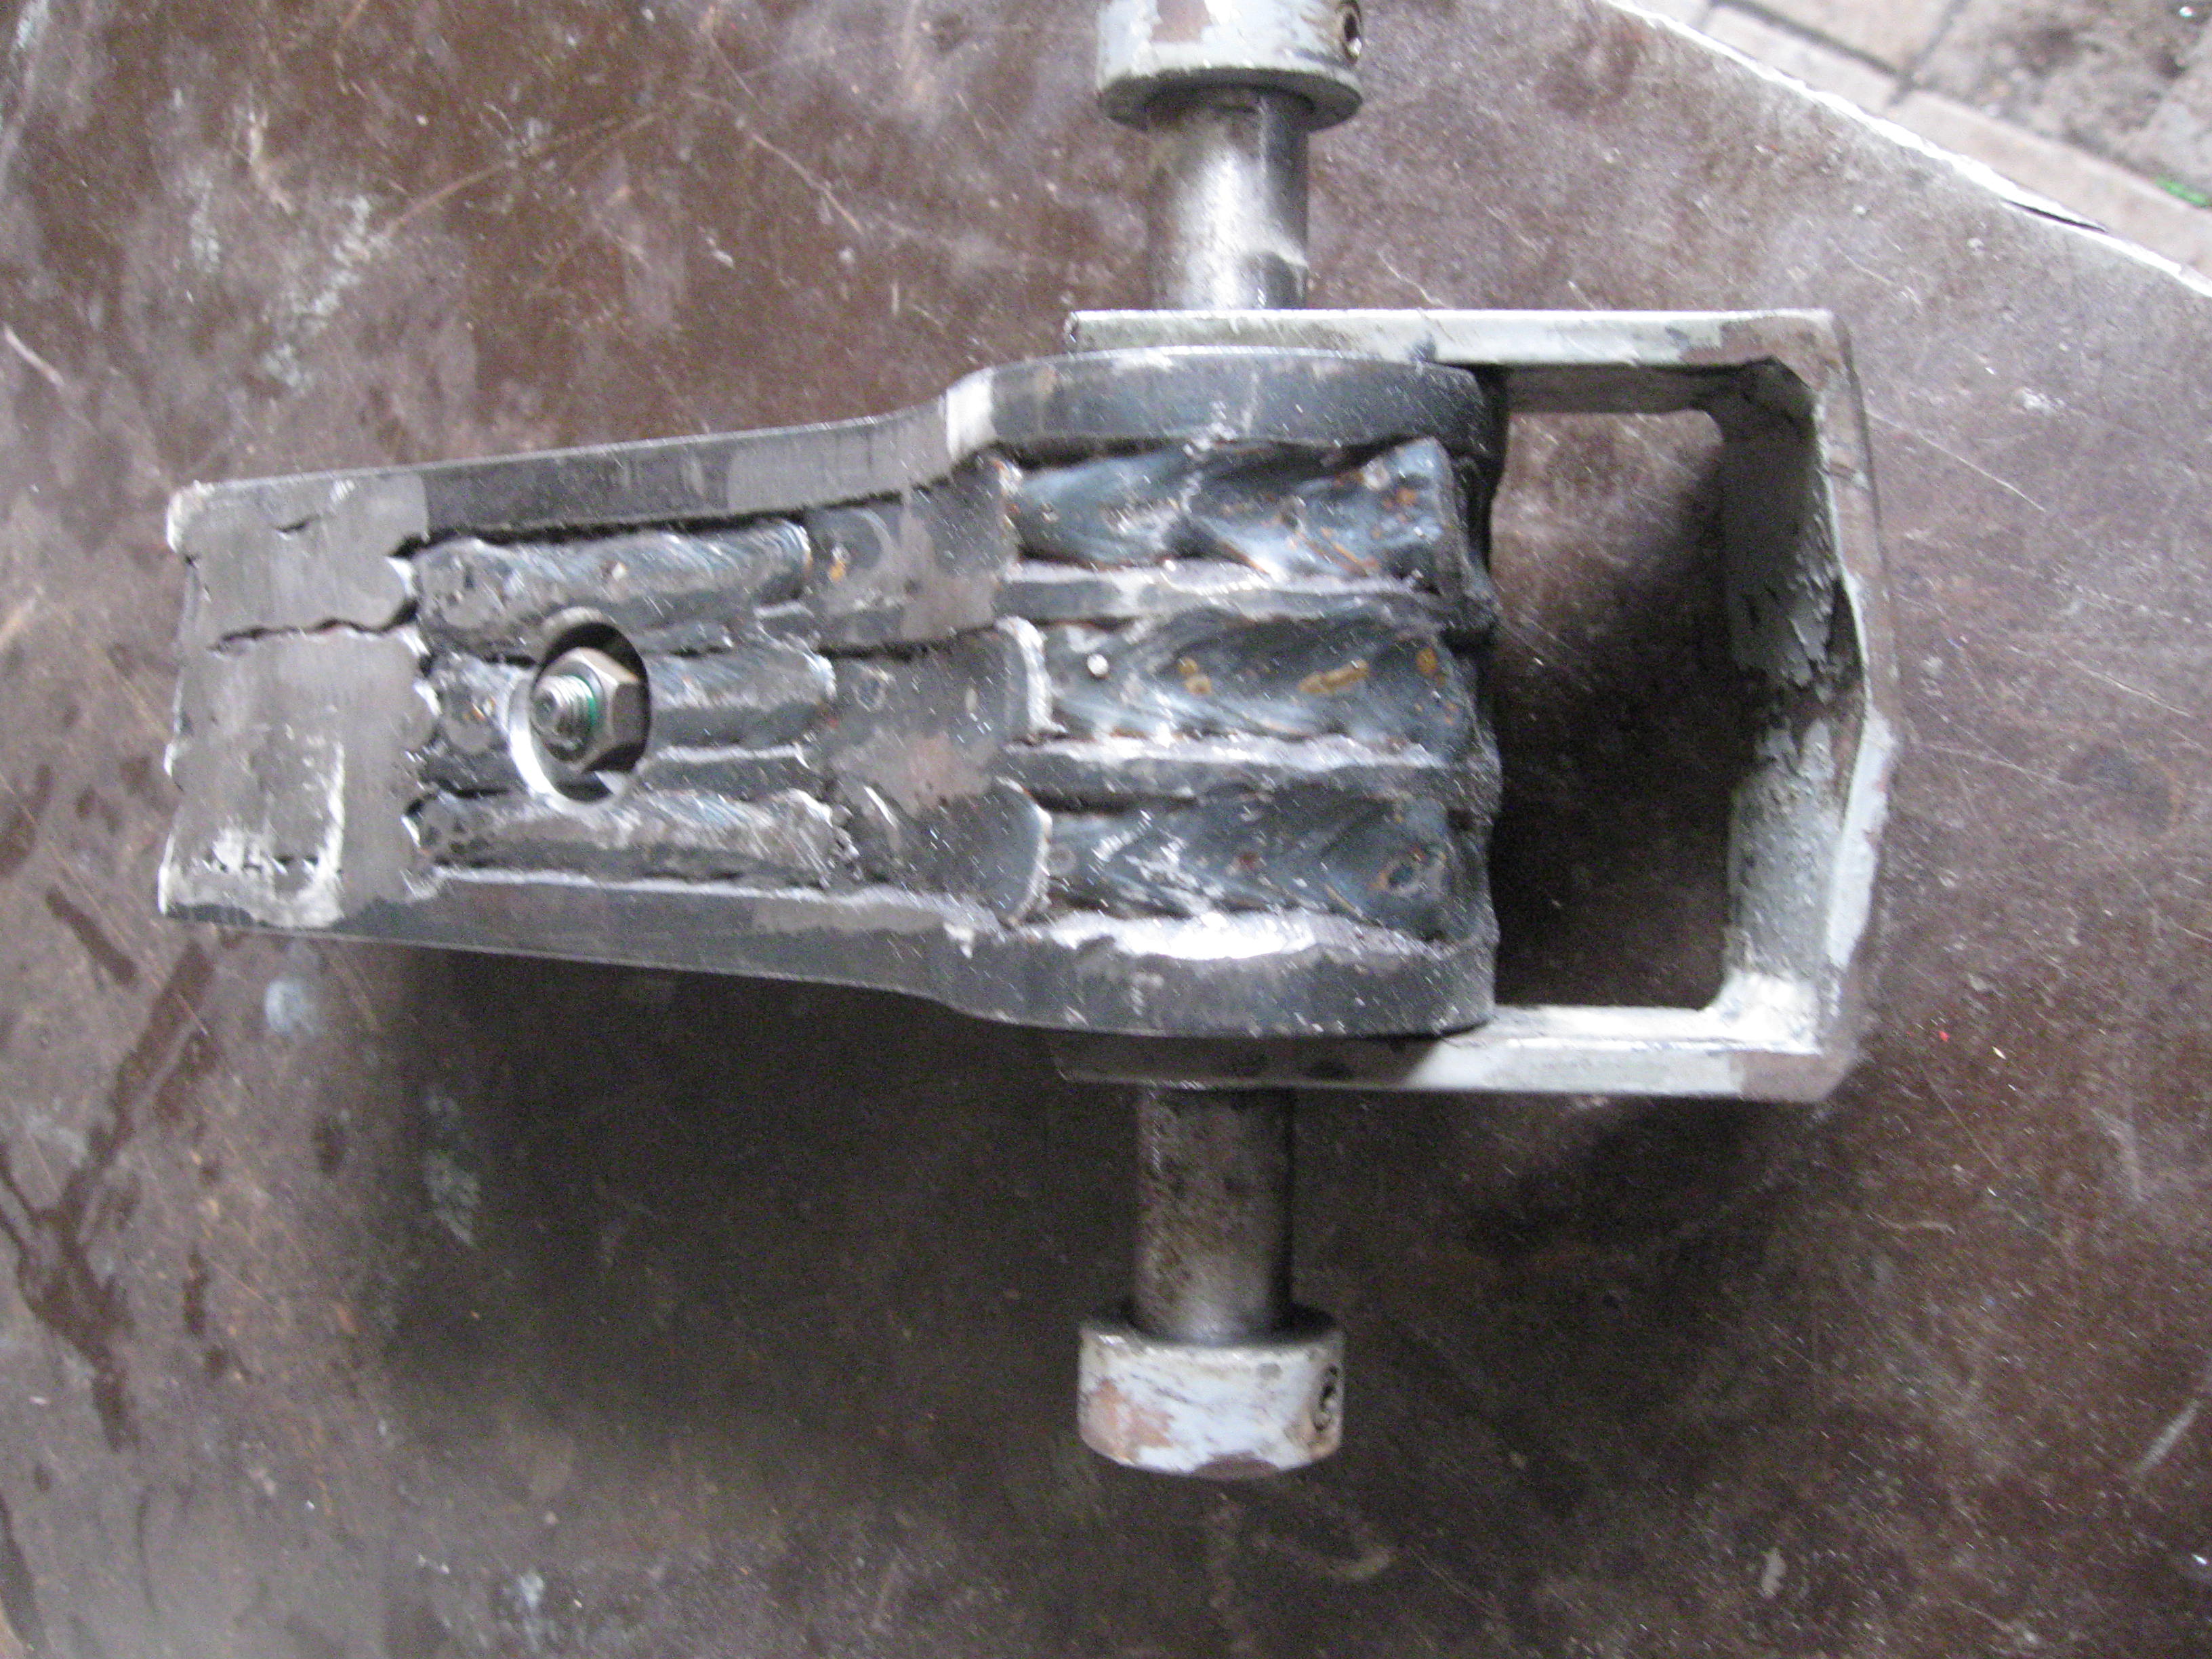
I decided to also make another jaw out of steel. I made the steel jaw out of a series of 3/4” or 19mm. steel plates welded together to make up the 3” or 76mm thickness of the jaw. I was able to drill out the hole for the shaft in each plate before I welded the plates together and then ground them down to a smooth finish where it was necessary to fit the housing. This was quicker and easier for me to complete. This new jaw is still going strong. I had never attempted to weld 3/4” steel plate before. I was really chuffed that it worked. I decided to go with the steel jaw instead of the bronze jaw.
So it’s working again now beautifully. Producing a grit that is suitable to go into the disc mill.
The grit from this small Van Gelder crusher is then reduced further in the ‘Bico’ disc disintegrator mill, down to something close to a sand-like size. Interestingly, ‘Bico’ crushers are still available in the USA. I googled them, they are still in business and the identical machine is still for sale on their web site in a slightly newer version. I bought mine many years ago 3rd or 4th hand, no history and unmounted. It obviously hadn’t been used for a long time and was seized up, but I managed to get it moving again after a bit of work.
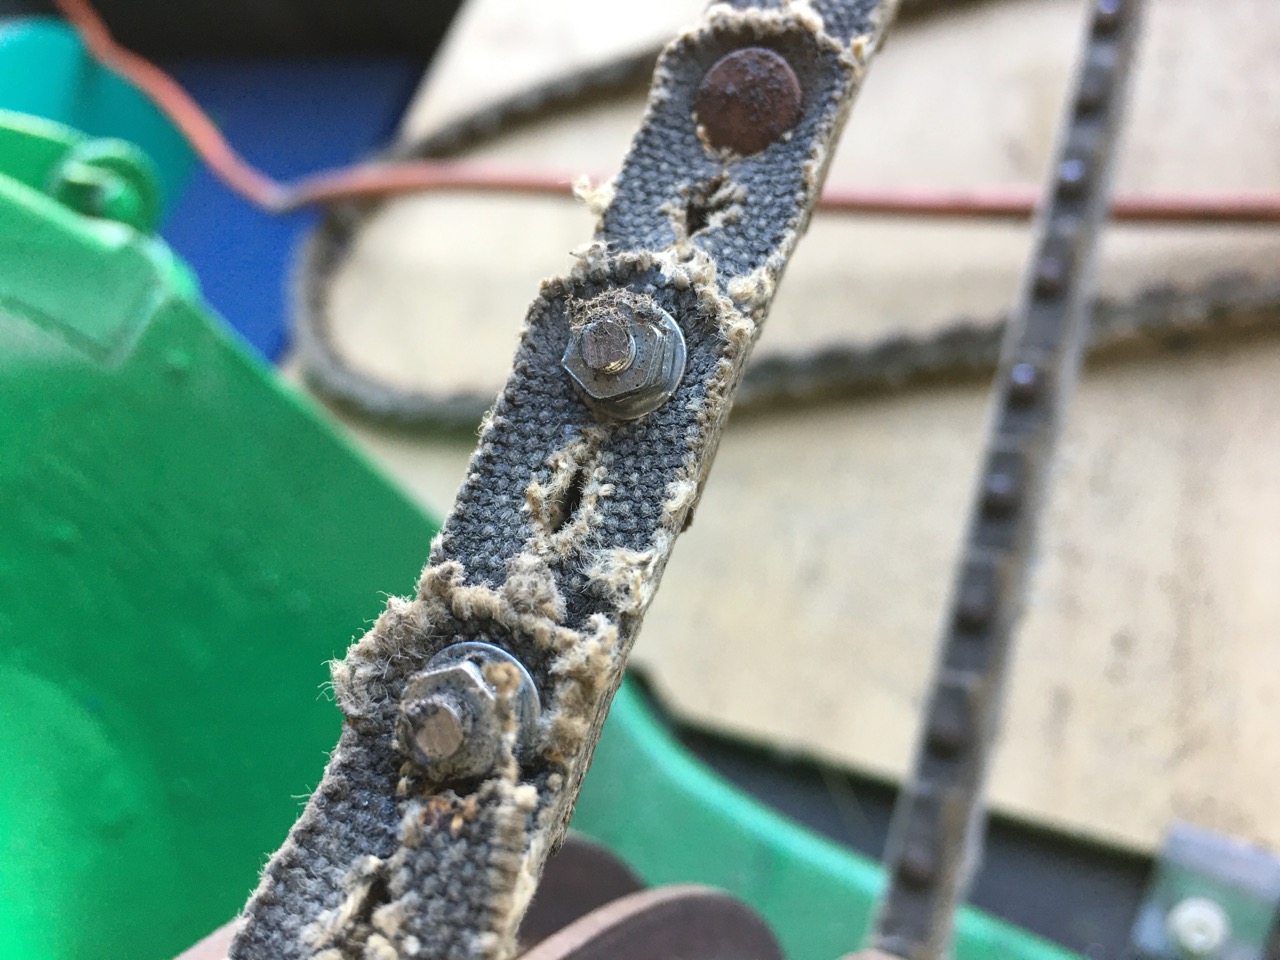
To get this disc mill working again, I also had to learn how to make, break and fit segmented leather drive belts, as the drive pulley is completely enclosed within the cast iron frame of the machine. I had to thread one open end of the broken belt through the frame and then rejoin the belt. I couldn’t find any way to extract the rivets easily from the segmented belt, so I just cut the head off two of the rivets and then replaced them with small bolts and washers. It seems to have been successful. It works! But I’m not too sure for how long?
I put ‘locktite’ on the threads, so I’m hoping that they won’t come loose during work.
This sandy stone grit then goes into the ball mill for 4 hours to be ground down to fine dust, ready to be made into glaze.
It’s quite a process and takes all day. And just like a time-saving kitchen appliance, it needs to be cleaned up after use. This cleaning and relocating of the ‘friendly’ dust extractor proboscis from machine to machine takes more time than the actual crushing.Such is modern convenience.
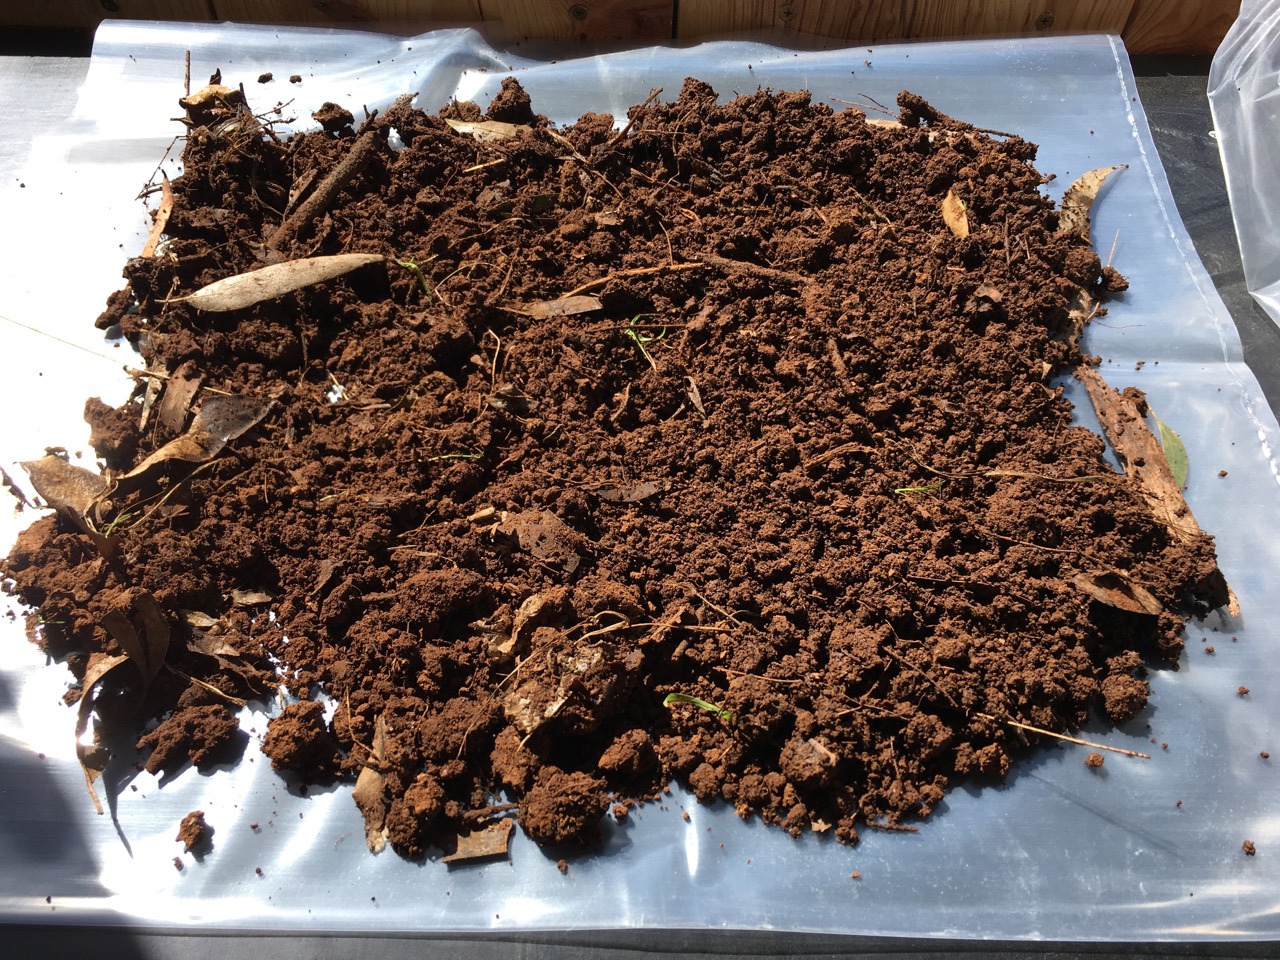
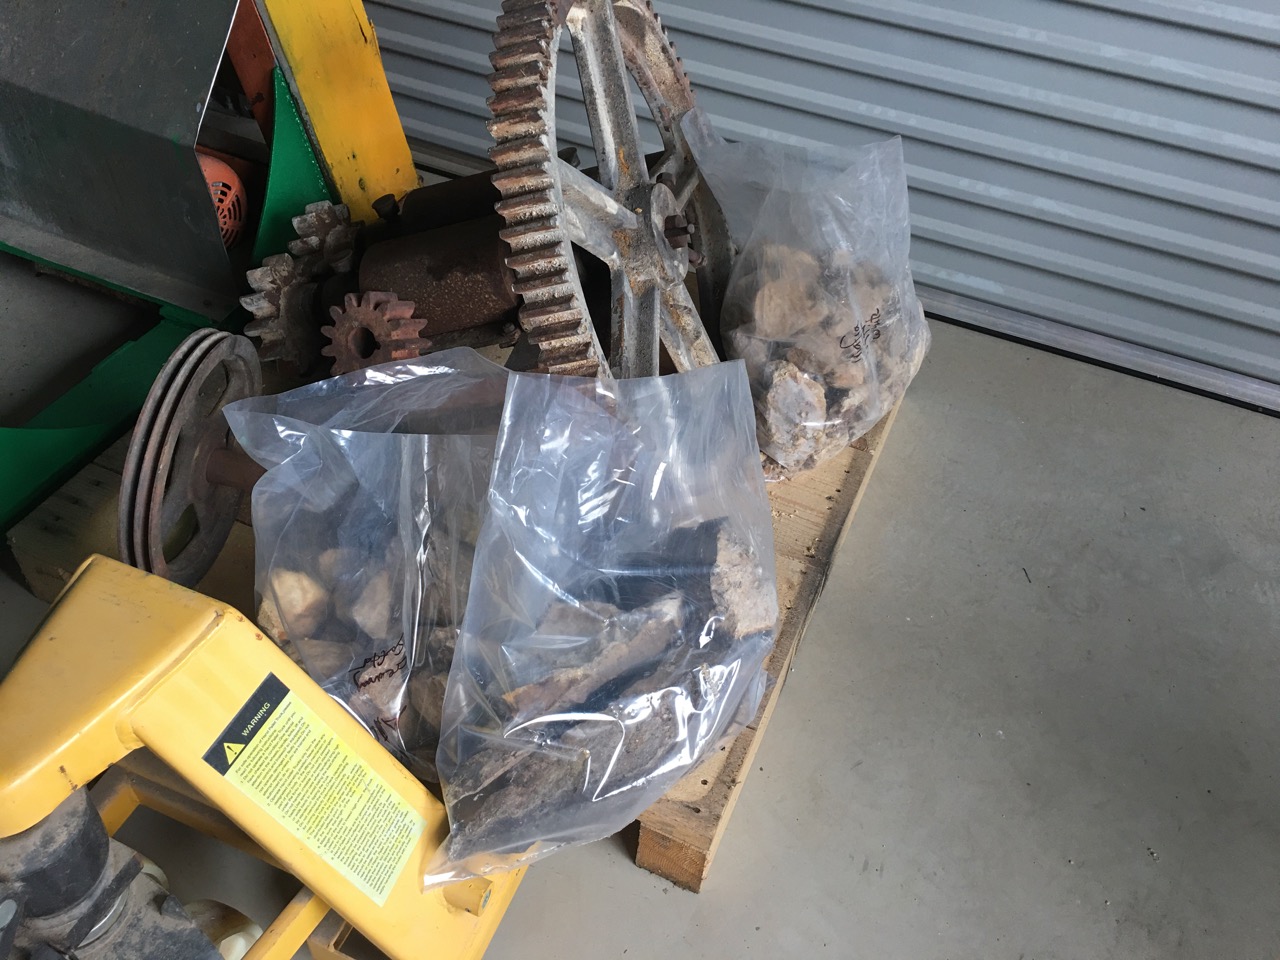
I have started to get out and collect some rocks, but because of the COVID19 lock-down, I can’t go driving all around my shire doing a full geology excursion.I’m suppose to stay within 5 kms of home. I can go to the shops or Post Office for essentials, but we don’t have a shop or a post office here in our little hamlet. So we have to go the 5km to the next village where there is a small shop and Post Office. Luckily for me, I have walked all this country around here over the past 45 years. So I know where to go within 5 kms to get some glaze stones. There is a small volcanic plug just a couple of kms away, but it is completely kaolinised and has lost most of its alkali, so doesn’t melt very well – in fact not at all. Also, the high levels of iron and magnesia that are left limit what can be made from it. It’s really just a brown soil and is only good as an iron pigment.It would be nice if there were some acid rocks nearby, but there aren’t. So I’m stuck with what is here. There are just 3 volcanic plugs within the 5 k limit around here. All basalts.
I called in at Werner’s house, just a couple of kms further along, on the way to the shops. Keeping my distance of several metres, I reminded him that I had called in there 20 years ago and he let me collect some of the basalt rocks that out crop from a small volcanic plug in his back yard. Werner is a very nice guy. He has retired since I was there last. We went for a well distanced walk around to his back yard. We are both double vaxed, so felt safe to do so.
Mid last century, this was a working quarry, it’s abandoned and quite over grown now, but there are lots of little, hand-sized, small stones that I can pick up from the garden bed near the top of the quarry wall. I can fit about 15 kgs in my back pack and thank Werner and prepare to walk back out. I tell him that I’ll be back for some more stones in another 20 years! He laughs, he will be 100 by then.
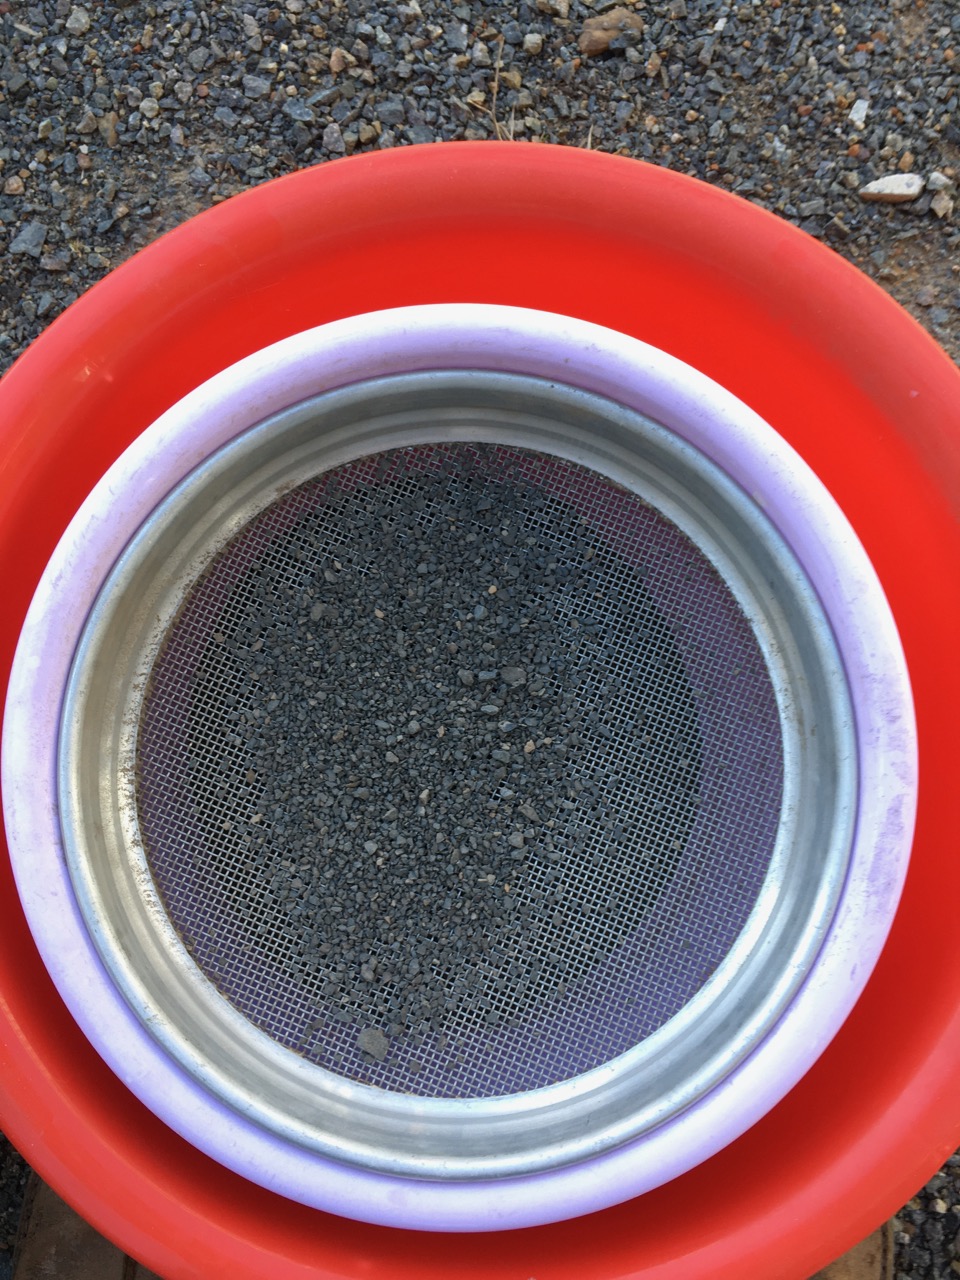
I put the stones through my rock crushers. First, I put the fist sized pieces through the jaw crusher to reduce the stones down to blue metal sized pieces.
Then they go through the disc disintegrator mill to reduce the gravel to grit.
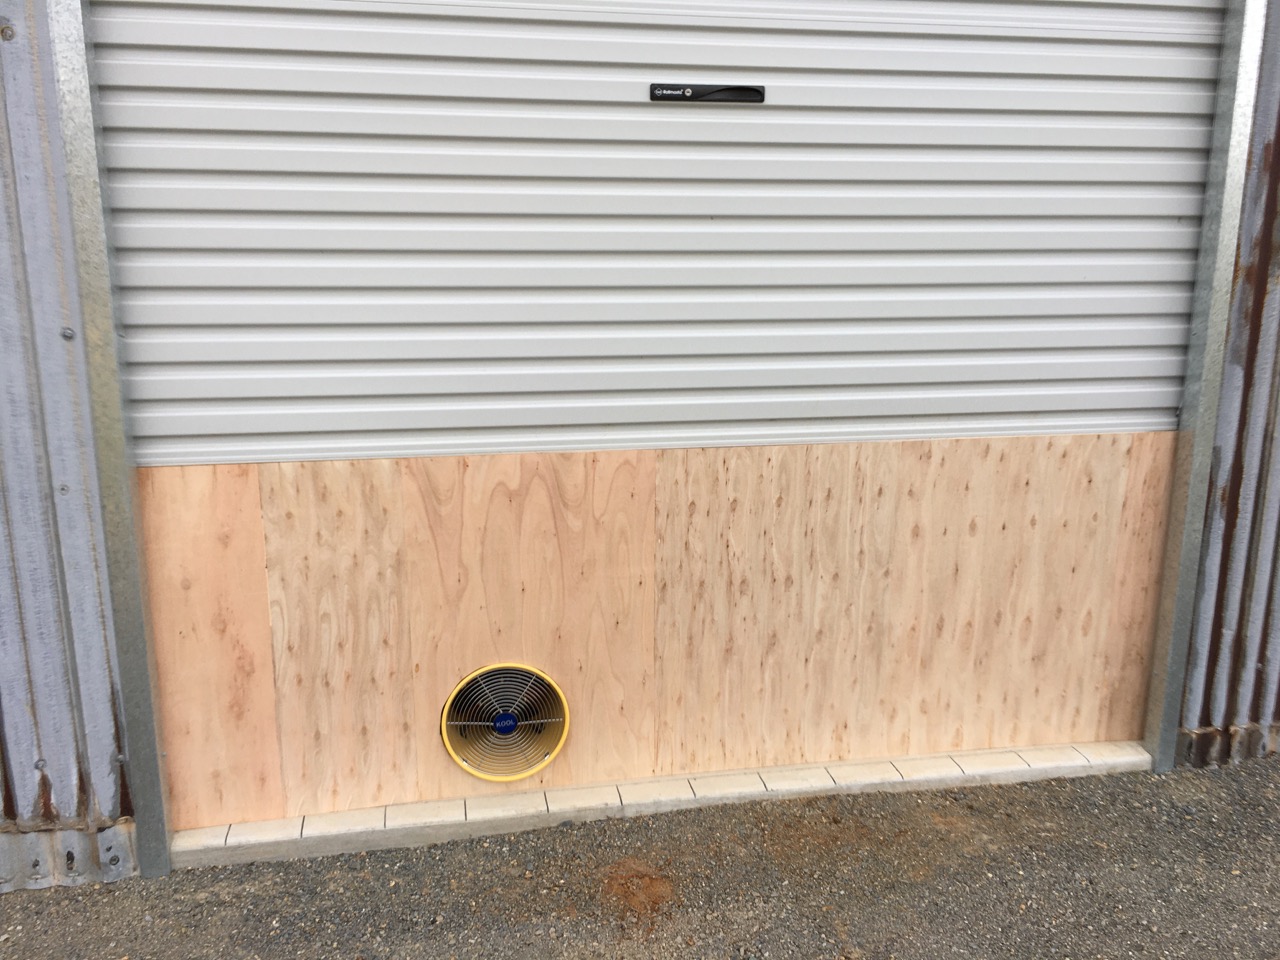
I have installed a flexible dust extractor system that sucks the dust from the machine out through a fan installed in a sheet of plywood that fits in the roller door space. It is quick to install and remove afterwards. This was the quickest and cheapest DIY solution to the OH&S dust problem involved in crushing rocks, as i had the sheet of plywood left over from the ceiling of the throwing room.
I sieve out all the over-sized bits, and put the rest into the ball mill. This reduces the grit down to dust that I can use to make a glaze.I know from my previous research that I can make a tea-dust and a tenmoku glaze from this dark rock. Basalt isn’t very easy to work with, as it doesn’t contain sufficient silica or flux to melt properly. It also has far too much Magnesia and iron to make anything other than dark glazes like tea-dust and tenmoku. Even then, it needs extra limestone and silica to get any usable, stable, glossy result at all. But the thing is, it can be done with a little bit of chemical jiggery-pokery using just what is available around here. In fact. It can be done with what is in my back yard! My initial test tile showed me that I can make a honey brown glaze, a black tenmoku, a green magnesia matt, a tea-dust green/black glaze and an opalescent dark blue/green glaze.
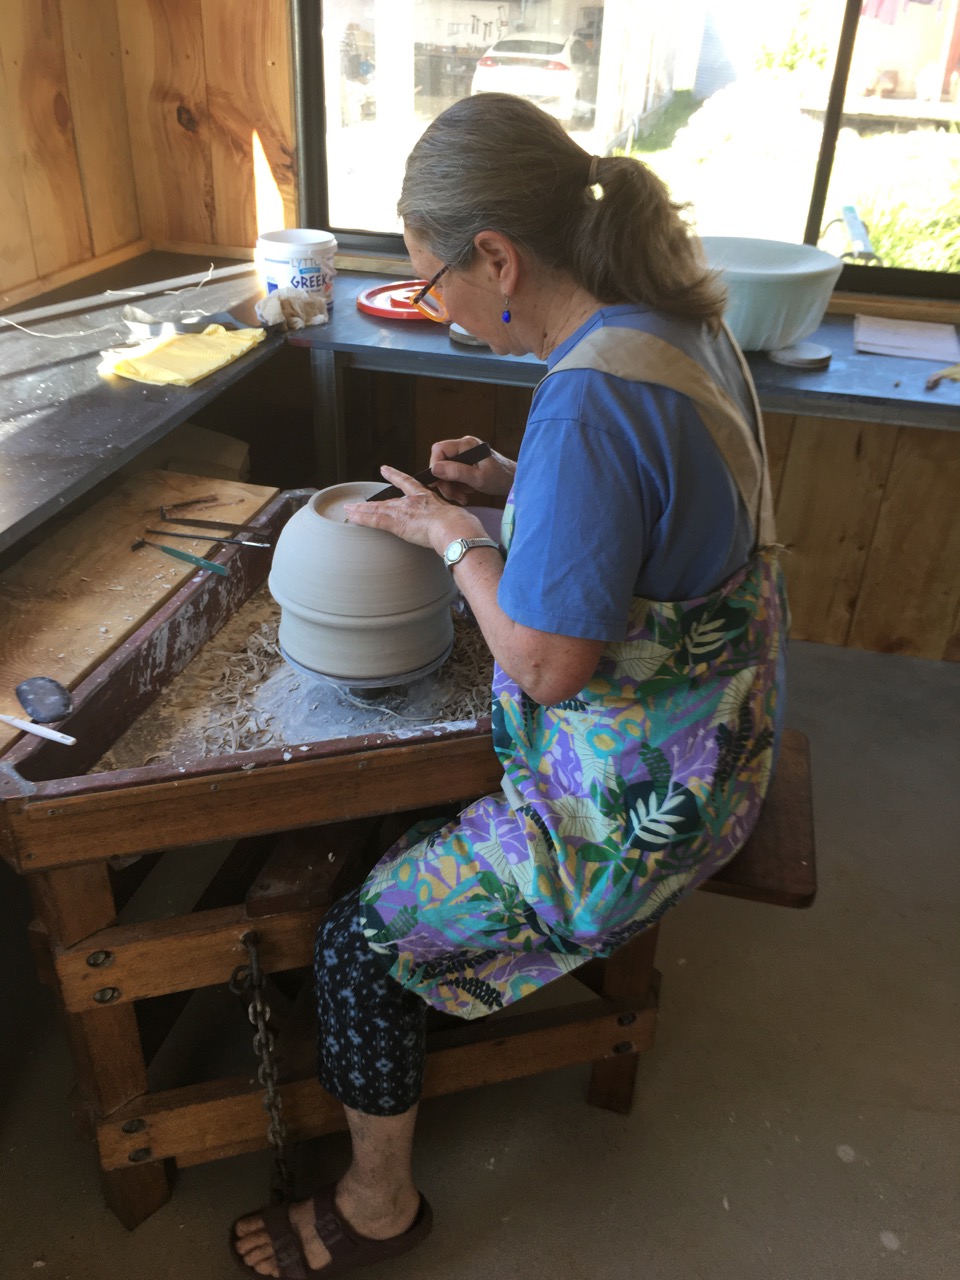
Meanwhile, Janine is at work making larger bowls on the ’Slatyer’ kick wheel.
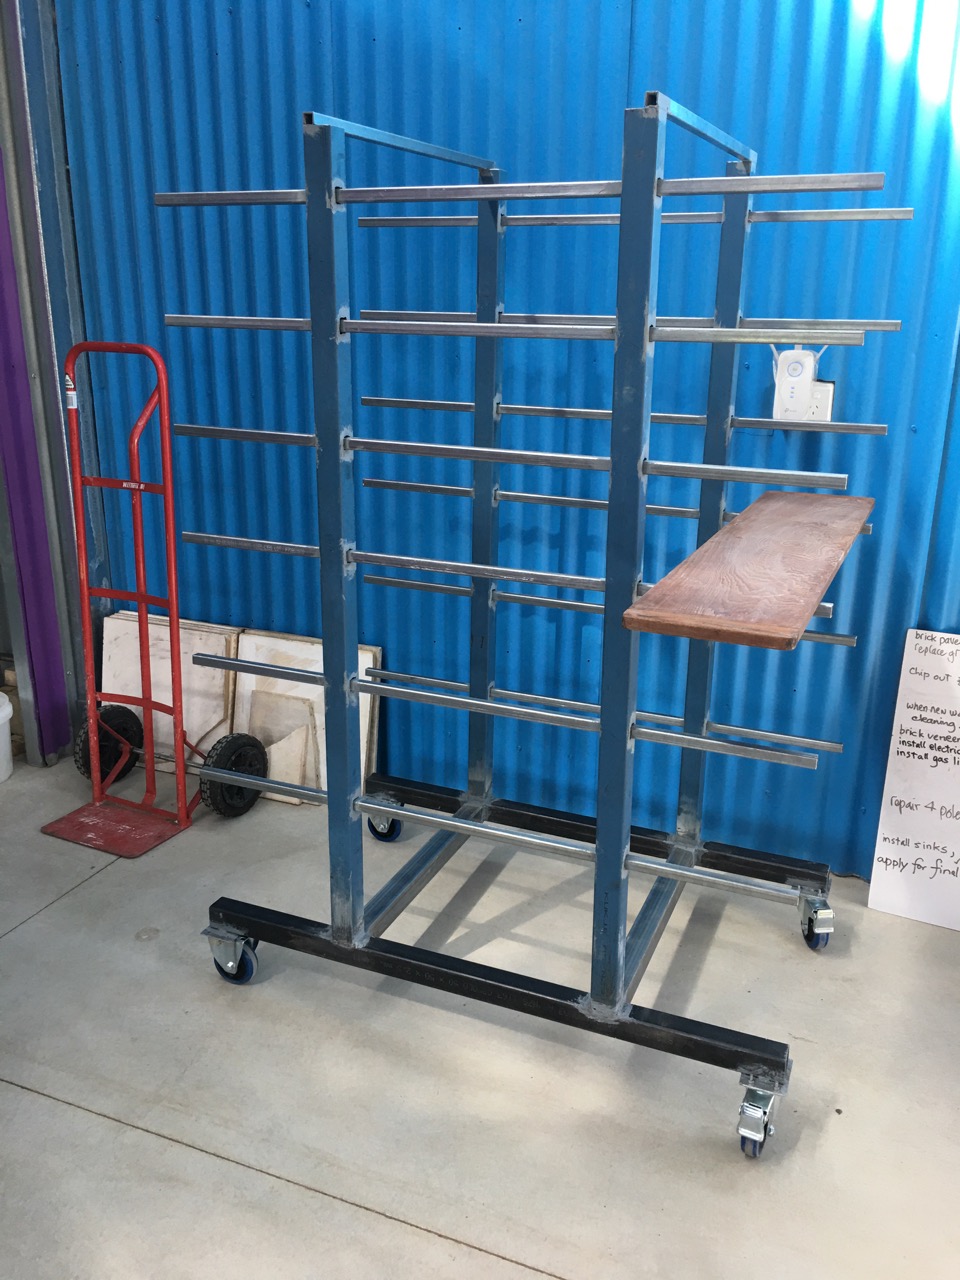
While the ball mill runs, I spend a bit of time making some new fibre cement pot boards. I use our own sawn and milled pine slats to reinforce and support the fibre cement sheet boards. Some of the advantages of the FC pot boards is that they are cheap, very flat, quite absorbent and light weight.
I made a couple of stillages on castors to hold the pot boards in a compact and movable form. The first set I made from leftover parts of the brickies’ scaffolding. I don’t like to see waste, so i kept the parts after i dismantled the scaffolding. The other set I made from steel, half of which was left over from the shelves and benches that I made for the Gallery and lab rooms. These shelving racks can hold 28 pot boards if they ever get filled. More than enough for us.
Now that we finally have a continuous, flat, level floor, we can wheel our work between the throwing room, kiln room and glazing rooms as needed. So easy and convenient now. What a luxury!
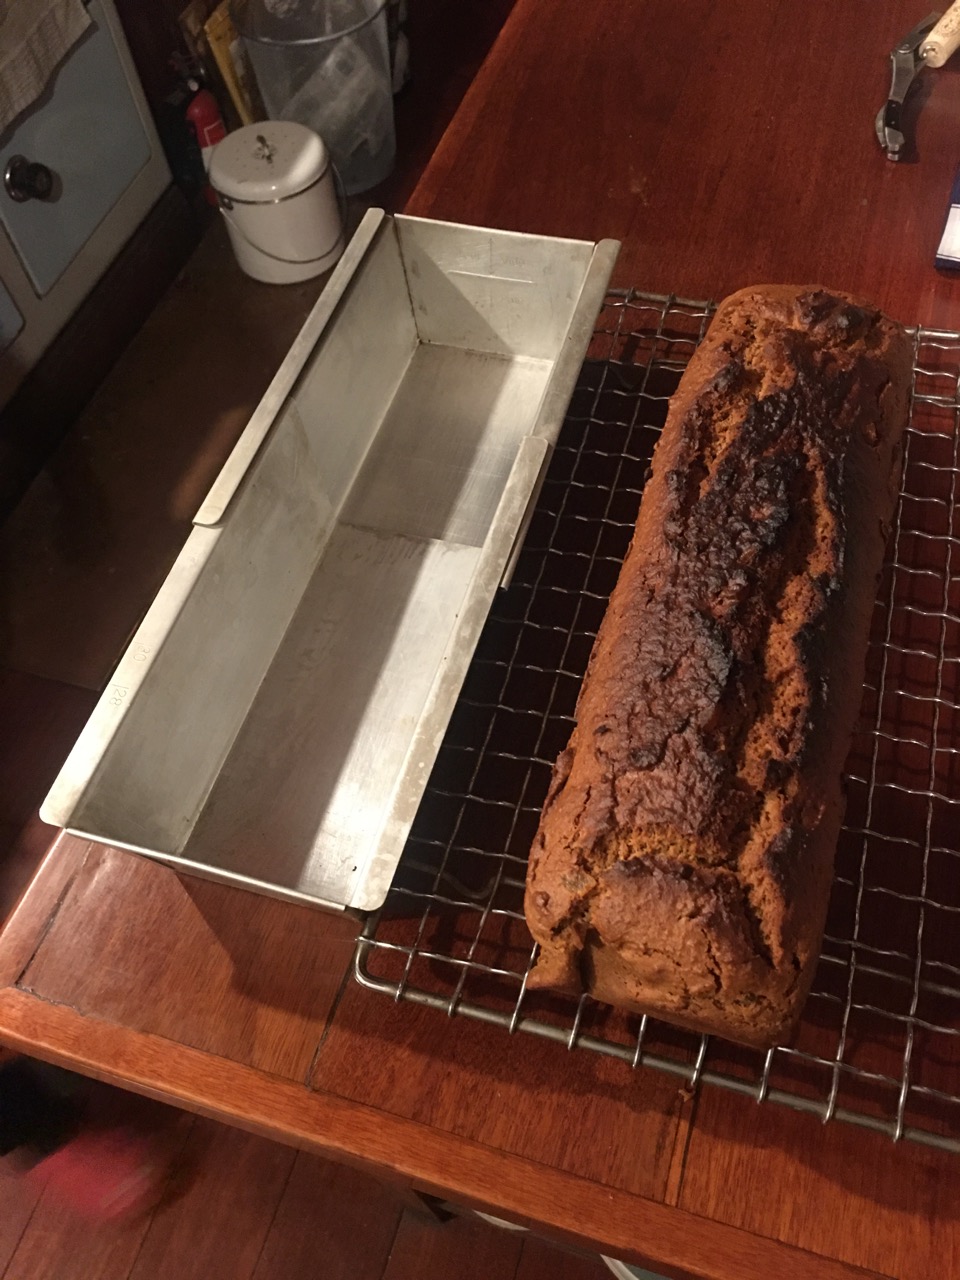
Last week, on the coldest, rainy and blusterously windy day, we had a half day off, lit the stove in the kitchen after lunch, and stayed inside and cooked.Janine made a ginger parkin cake in her very special Swiss expanding cake tin. This was a gift from Barbara, a potter in Switzerland when we were working there some years ago. It had been handed down in her family for some years. Barbara had cooked a cake in it and brought it along to the wood firing workshop that we were doing. I was so taken by its ingenious simplicity, I studied it and even did a drawing of it with the details and dimentions, so that I could make a copy of it for us on our return. I have learnt some very basic skill in sheet metal working. Barbara saw that I was taken by it, with me coming back to it several times and examining it and photographing it.At the conclusion of the workshop it was presented to me gift wrapped. I was really touched. I am still really impressed with this cake tin every time it comes out and Janine bakes in it. Most of all I still recall Barbara, Catherine, Stefan, Eric and the others, up in the Swiss Alps and the great time that we all had together. It brings back strong memories and feelings of good times. It’s a loaf shaped cake tin, but it has a madeleine effect.
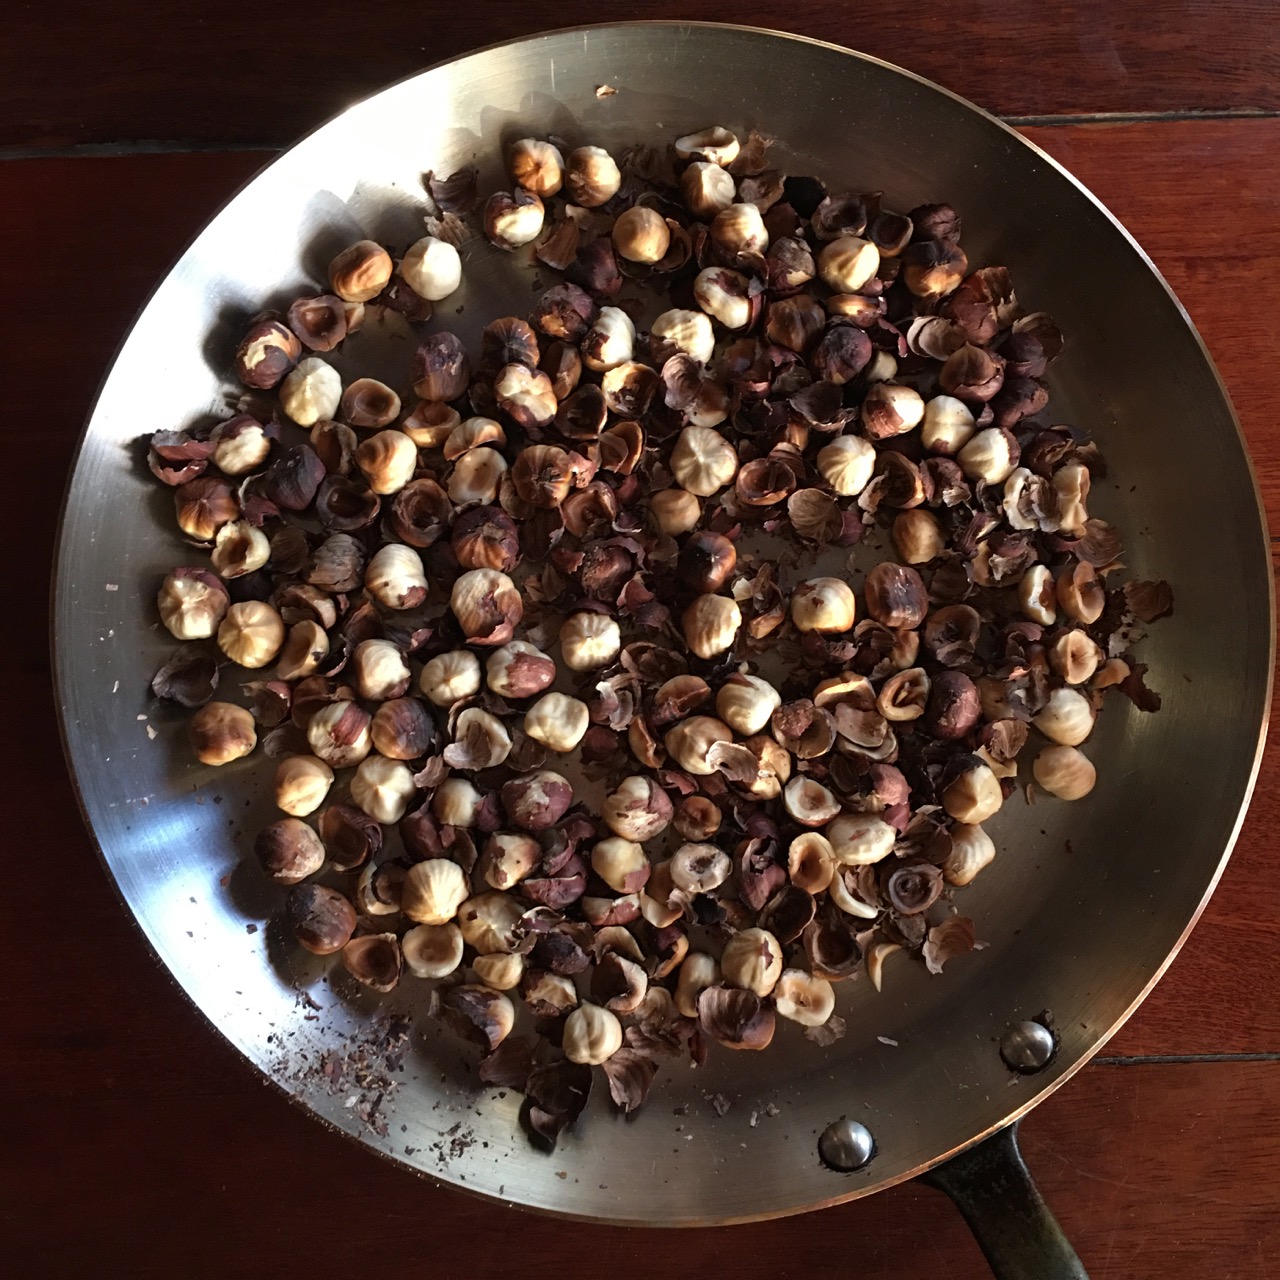
This two piece cake tin concertinas inside itself, so it is always the perfect size for almost any size recipe. While Janine was making her cake, I roasted hazelnuts under the grill, just enought to bring out a little colour and that amazing smell and flavour.We had spent the few nights prior in front of the idiot box shelling the nuts. I melted 2 blocks of cheap, no-frills, German, organic, supermarket 70% dark chocolate in a double boiler, made from a bowl suspended in a source pan of boiling water, I mixed the nuts into the melted chocolate, then poured the mass out into a square cake tin to cool. It is so amazingly delicious, tasty and fragrant, but not sweet, just nutty, melt in your mouth smooth, but with that special freshly roasted hazelnit crunch. Wow! We may not have any money, but we live a rich life. Imagine trying to buy this at DJ’s food hall?
It goes very nicely with coffee.
In the afternoon we made marmalade. A lovely, relaxing and rewarding way to spend a miserable day in the warm kitchen.
The next day, back in the pottery, I retrieved the anvil that had been through the fire and then sat out in the yard for 21 months waiting for some TLC.It should have been rescued much earlier, but I’m working to my limit and I don’t want to overdo it. I can’t do everything. So now is the time to retrieve the anvil. It is the worse for the weather even though I had it tarped, but fire does strange things to iron, and it rusts so much faster than if it had just be put outside. I cleaned a lot of flakey rust off the surface and then treated it with rust converter to stabbilise it. I remember when I bought it back in the 70’s, at an auction for $110. I was so much younger and I could lift it into the VW beetle back then to bring it home.I must have been mad! It’s somewhere around 100 kilos, if not more. I can’t lift it now!I had to use the little crane on my truck to pick it up, and then build a tripod and use a chain block to lift it onto its new block. It’s a thing of beauty and a joy forever! This anvil has an English maker’s stamp on it. I imagine, sometime in the 1800’s?
I cleaned all the loose scale off the surface and swept it up to use as an iron pigment in the future. I read somewhere that Hamada had said that blacksmith’s iron scale made the best iron pigment. I’ll give this a go. I’ll have to calcine it, crush it and grind it very finely first.
I have decided that the best way to use the small ball mill roller is to use it to make pigments. I have done a few experiments with it this week and found that as it overheated and shut down with the 4 litre jar that it came with. I tried my 1 litre jar and also added a small desk top fan to cool the motor. This was the combination that worked well enough, so that it can run for a few hours without over heating and shutting down. I made up a batch of a cobalt pigment that I developed over 40 years ago, just after I left Art School. It has a softer more ‘natural’ look, more like ‘gosu’, with an iron break where it is thicker. We used this recipe for 20 years until I found our local natural cobalt bearing stone.
Recipe;
Red basaltic soil 66%. – Red top soil is high in iron and silica and fuses readily.
Potash felspar 33% – The felspar helps to melt it into the surface of the glaze.
Cobalt oxide 1% – cobalt oxide is such a very very strong colorant, you only need a very small amount.
Cobalt is far too strong to use straight as an oxide. It is also rather grainy and spotty. It needs to be ‘watered down’ with something else to soften it out a bit and dilute it. I have read some pretty exotic recipies that use zinc and tin and manganese, nearly always iron and some with bone ash. Michael Cardew recomended a mix of;
Cobalt carbonate 20%
White Tin Oxide 20%
Black manganese oxide 10%
Plastic red clay 15%
China clay 20%
red iron oxide 5%
I tried this recipe when I was a student at Art School, but didn’t like it. A bit too much like fountain pen ink. My local red clay and cobalt recipe is simplier and it’s mine. It also has that lovely blue/black cobalt and iron break between thick and thin.
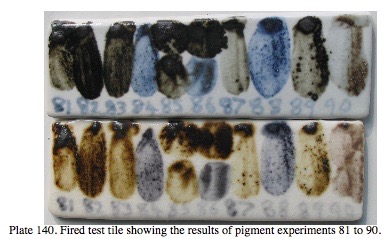
I found a deposit of natural cobalt south of here 15 years ago. It was a mix of silica, iron, manganese and only just a miniscule amount of cobalt, but it showed a pale blue when disolved onto a glaze as a brush stroke. I have always had an interest in fossiking for local materials, processing them and intergrating them into my work. As you can see below, I tested 90 different samples of precipitates from chalybeate springs in the area of my research around here, both active and ancient and dried out and solid stone-like deposits. Numbers 84, 86 and 88. showed a blue colour. Interestingly, the top row were fired in reduction atmosphere and were definitely blue with the cobalt showing clearly.The bottom row were fired in oxidation and the cobalt blue is diluted by the manganese showing a paler grey, purple/mauve blue.Sample number 90 appears to contain mainly manganese and iron with very little cobalt present, being a pale brownish, claret/mauve colour.
My samples averaged;
Silica 55%
Iron Oxide 1%
Manganese Oxide 16%
Cobalt oxide 1%
This equates to something like the ancient Chinese and/or Japanese ‘Gosu’ or ‘Smalt’ natural cobalt bearing pigment stones. If nothing else, I learnt that I must always test everything in both oxidation and reduction to get a true undersanding of what is going on.
Tragically, I lost nearly all my aged porcelain stone bodies, pigments, ores and minerals in the fire, and now many of the places that I used to fossick are now sterilised by housing developments. It’s going to be a different life now, with reduced access to the minerals that I used to use. We’ll develop a more restrained and refined palette. So I’m back to milling up a red soil and cobalt mixture to mimic the natural pigment that we used to use.
To make a glaze for my porcelain tests, I have collected and spread out to dry, some of my porcelain clay turnings in the window. I will calcine these and use them as a glaze material too. When blended with Moss Vale limestone, they will melt into a very pale, limpid porcelain glaze. – I hope! So much to do and so little time.
Janine made up our first bucket of glaze. She mixed up a 5 kg bucket of Leach’s Cone 8 glaze. We have used this glaze all our life. It is the reliable go-to glaze for testing all our clay bodies. A basic and reliable, no frills glaze that fits right in the middle of the spectrum. A great way to compare the various different clay bodies glaze fit characteristics in our first few firings, which will be nearly all tests.
It can also be an extremely beautiful glaze, a pearly, creamy white, surface. But this is only really true if it is fired just to cone 8 only and not higher. We also ball mill the glaze batch for a little while to get all the particles well mixed. Not too long, otherwise the already finely milled felspar granules will start to break down, releasing its alkalis into solution. Felspar does not have a chemically robust structure, so care is advised when ball milling rocks for glazing. To avoid this damage, I usually ball mill my stones dry after putting them through the rock crushers. I can then store the powder for use in making clay body or glazes, weighing them out accurately dry before wetting them down. The alkali is less likely to be released during dry milling.
I’m not trained or qualified in any way to do with mineral processing, but I have worked with locally found stones for my glazes for the past 47 years. Everything that I have learnt is self taught. I built my first ball mill in 1974. The first year after I graduated and I have built a few more since then. I will probably make another one in the coming years, when time permits. I have always kept a ball mill log to track my ball mill usage. I kept a record of what was milled, for how long and how much was in the mill, wet or dry milling and the date that I milled it, as well as any recipe involved. I lost that log book and all my other glaze recipe books etc. in the fire. Just as I did in the first and 2nd fires. I had two copies of my glaze recipe books, one in each building, but they both burnt down! I can remember that my most recent milling log, kept since 1984, I had clicked up over more than 1,000 hours of milling since then. but the exact number escapes me now. Somewhere around 1050 hours? With an average milling time of 2 to 3 hours, This is about 500 uses of that last mill. Thats a lot of hours of loading, unloading and washing out.
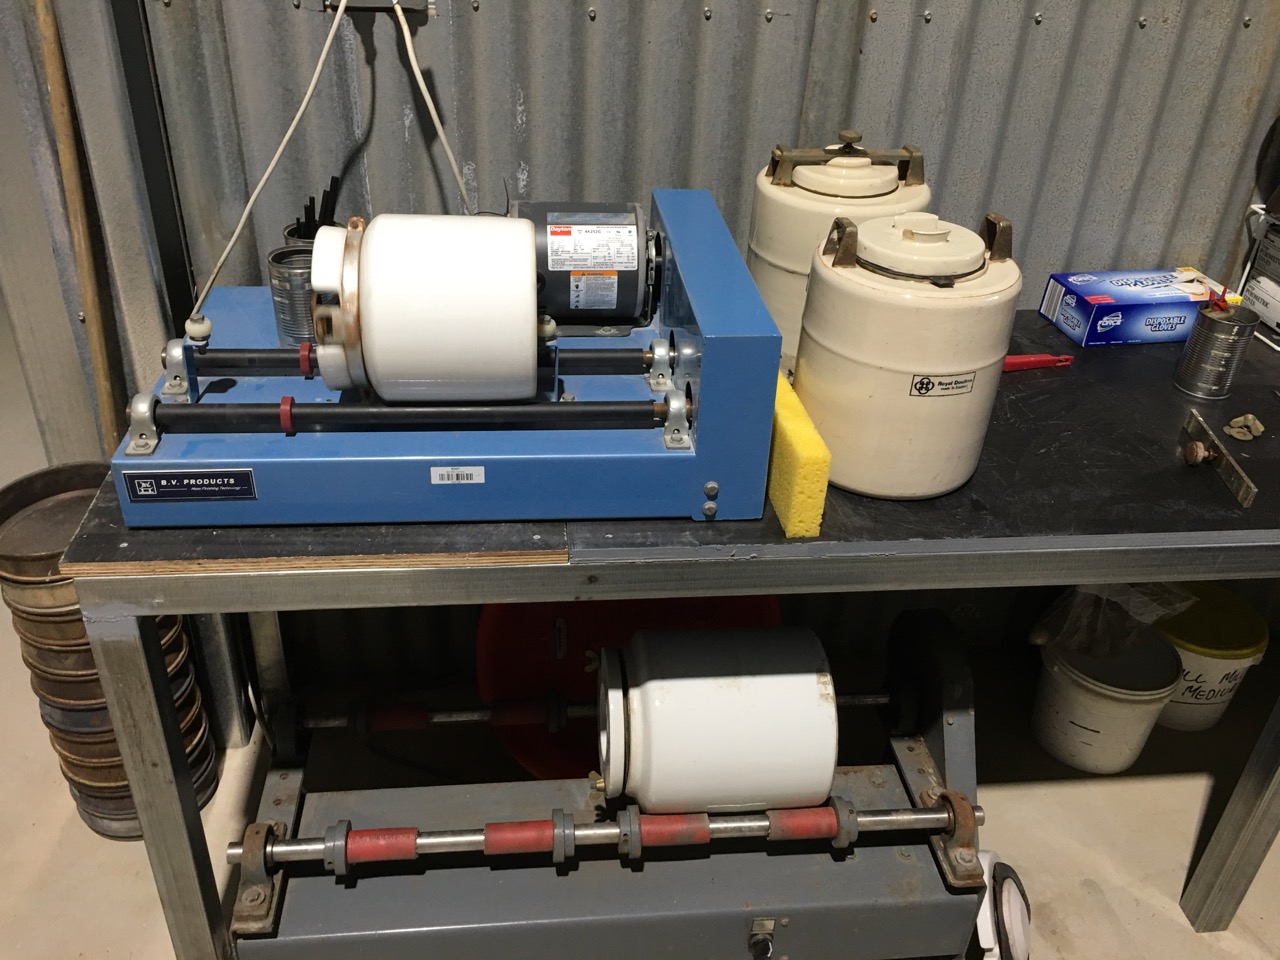
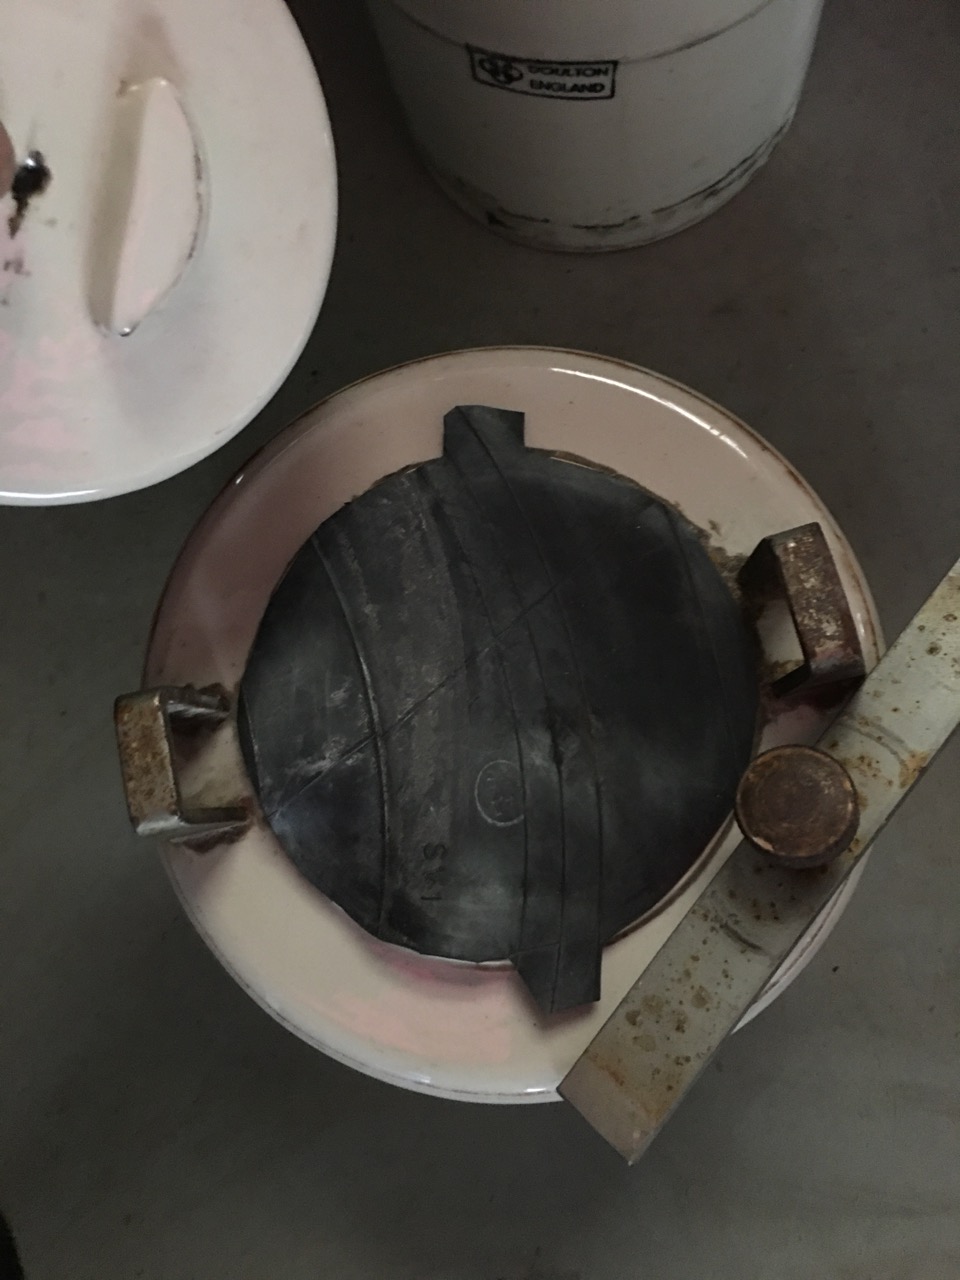
My friends have sourced some 2nd hand ball milling machines for me. Len Smith is always on the digital lookout for me for bits of equipment. He is so fantastically resourceful! He told me about a deceased estate of a potter. I turned up (before lock-down) and was lucky to buy what appears to be a locally made copy of a Shimpo ball mill roller and two 1 gallon, Chinese made porcelain jars. One was broken on the shoulder near the locking stud and the other has a brittle, seized rubber ring seal. Was able to prize the stuck lid off with a chisel. They both need some work. But I was lucky to get them. I made a new silicon rubber seal for the seized and a flat rubber washer type of seal for the other.
I vaselined the ground porcelain jar rim, then extruded a thick silicone rubber ring around the lid and placed it on the jar overnight to set.
This has created a new, soft and springy rubber seal that will keep it going for another 30 years.
My friend Simon Bowley, just gave me his 3rd hand Shimpo mill roller and a beautiful 15 litre Chinese jar. It has the brass wing nut and brass washers missing to secure the lid. This gadget was stored in an old shed for some years, and I’m not too sure if it has ever been used very much. As it still had the paper label from the supplier (Walkers) glued to the outside of the jar. This started to wear off as soon as I used it.
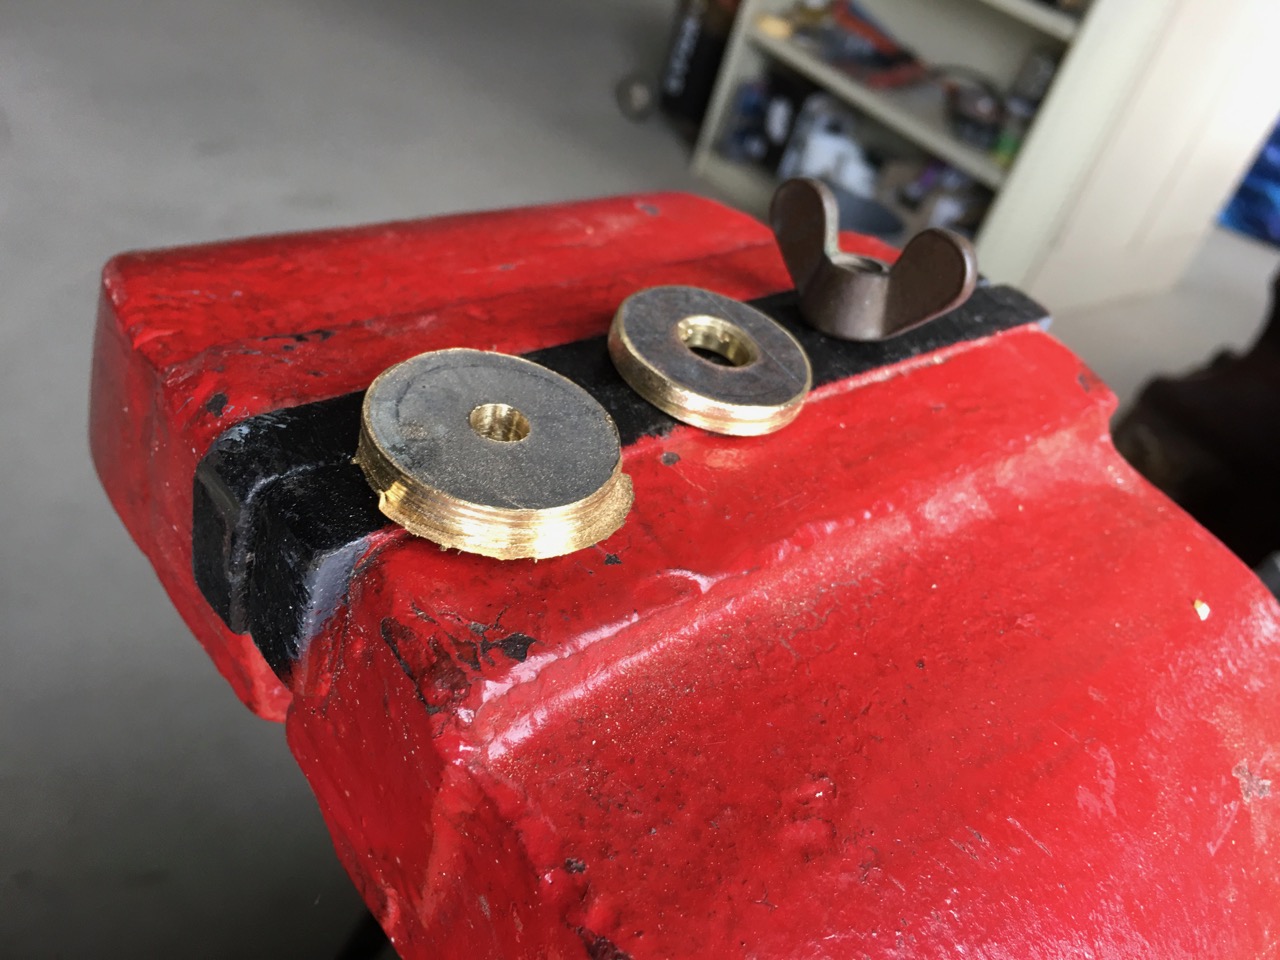
I made a couple of brass washers from the ‘hole’ pieces that I cut from the pottery sink splash-back to get the water pipes into the shed.
I hadn’t thrown them out, as I thought that they might just turn out to be useful some day. A good piece of thick brass like that, 6mm thick is too good to throw away! They came out of the hole saw pretty rough, but I was able to file them down to a smoother finish and drill out the centre hole to a clearance on 3/8″ BSW thread and they work a treat. Not many potters have the luxury of solid 6mm brass washers on their mill jar.
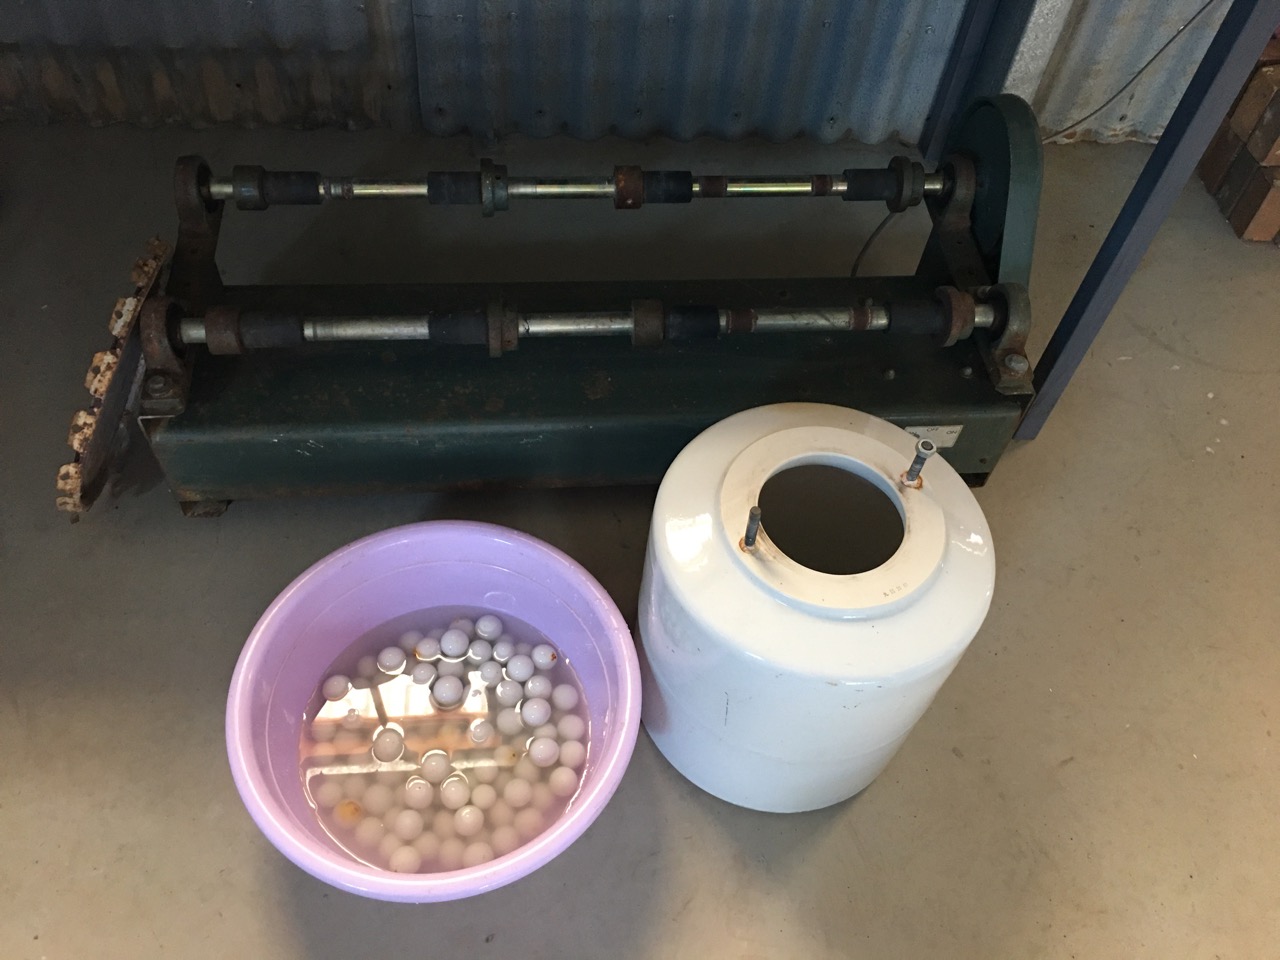
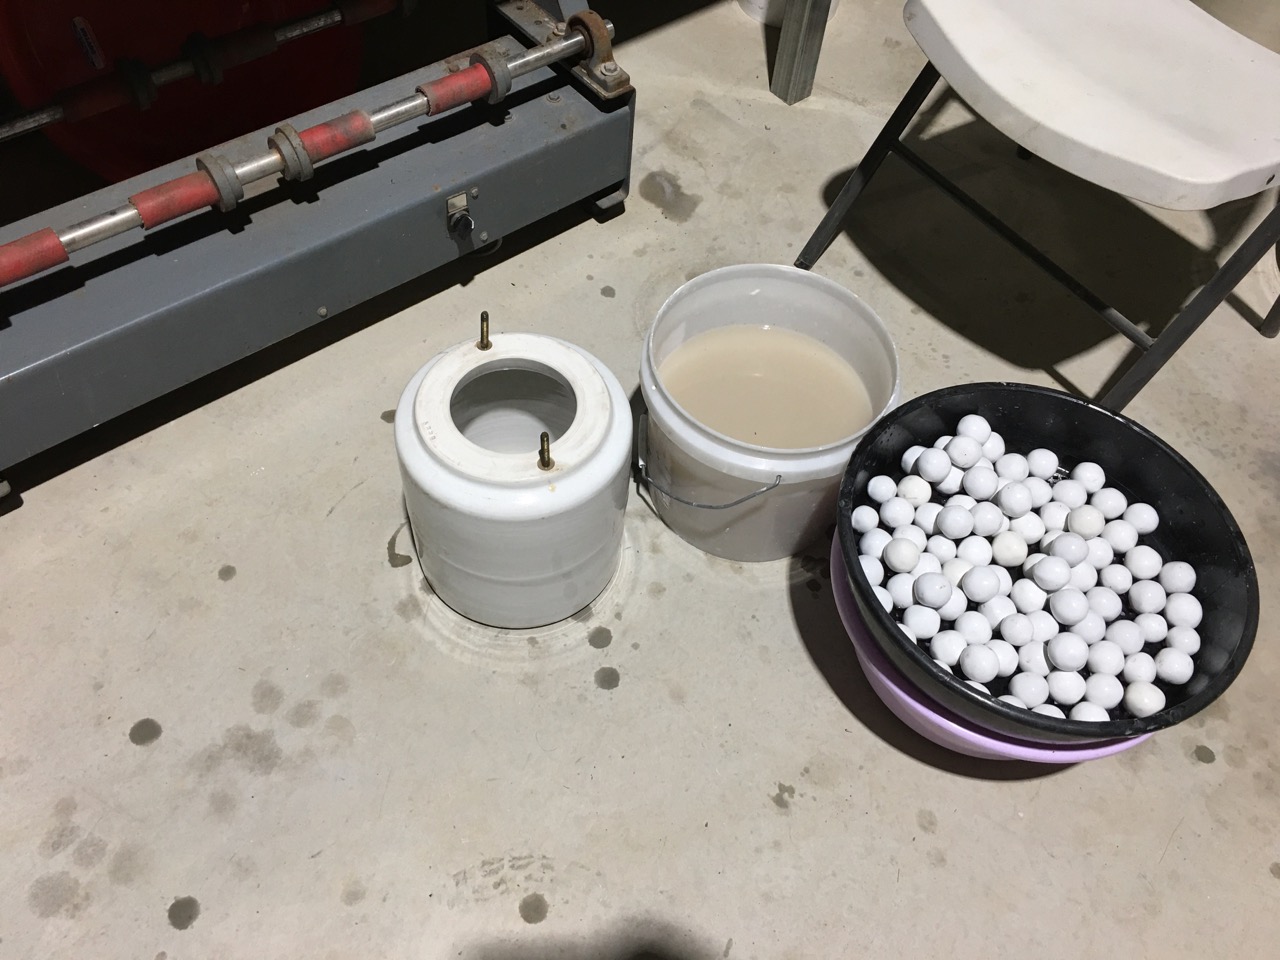
Len also located a very small ball mill unit in Melbourne that wasn’t being used and was able to be donated to me as a bush fire victim. It looked as though it had hardly ever seen the light of day. It came with 2 beautiful Daulton porcelain jars of about I gallon, or 4 litres, and a plastic bucket of small milling media to suit. The jars had some remnant brown dust in them, but looked as though they hadn’t been used very much.
When I tested the small mill roller with one of its Daulton jars loaded with balls and water to clean the mill. I found that the motor overheated and stopped after 25 mins. I can see why this machine wasn’t used very much. It doesn’t work! 30 mins is only long enough to do a bit of blunging, but a couple litres isn’t enough to achieve much. I will need to change the motor for a larger/stronger one. These Daulton jars will fit on the smaller end of Simons mill roller, so I can use them in this way.
My friend Tony Flynn gave me his shimpo potters wheel a few months ago, He also gave me a tiny 1 litre porcelain jar. This could be useful for milling pigments. I tried it on the RMIT roller the next day and it was small enough and light enough not to over heat the motor. It got too hot to touch, but didn’t trip the overload switch. so this will be a useful combination for small batches of pigment.
So now I have a 3 different jar roller mechanisms and by mixing and matching the different jars, I can use the Daulton jars on Simons roller, Tony’s jar on the small roller, Simons big jar on his roller and one of the smaller Chinese jars on the deceased estate roller.
Most of the jars needed new rubber seals. I had already been to the tyre business in Bowral and asked for a punctured inner tube from their rubbish bin, so I was prepared.
All the jars needed to be washed out and cleaned, then filling with balls and water and run for an hour or so the get the surface of the balls and mill all clean and fresh to start work. After milling like this the water turns cloudy, so the balls are rinsed in 2 buckets of fresh water, then placed in a plastic garden sieve to drain and dry out.
The volume of all these small jars added together just about equals the one bigger 25 litre jar that i used to own. The big difference is that to load all 5 seperate jars, run them on 3 different machines and then clean them is a lot of extra time and labour. But at least I can get some stones milled and local rock glazes made to get us going.
I stopped off at a few local sites on the way to the supermarket a few days ago. So I have a few bags of stones to work on. The next step will be to get the rock crushers going. The roller mill is still in pieces and needs some TLC


You must be logged in to post a comment.