I am desperately trying to keep away from the kiln while it is cooling. I have recently been asked to give a lecture about my life’s work in ceramics to the students at Seoul University. The professor is interested in my unusual DIY, organic, self-reliant, ecological approach to ceramics. Apparently, it’s the road less travelled here, and I can see why. Having spoken to all of the recent and current residents here, plus staff members, it’s almost impossible to conceive of what Janine and I do. Almost everyone lives in high rise apartments. There is no ‘spare’ space to put a potters wheel or a hand-building table, never mind a pug mill or re-cycling bucket and plaster tub for drying. As for a kiln! ?
So I’m not too sure what I can offer these students, other than an exotic glimpse into an almost impossible to conceive foreign world. Will it be useful to them? Showing them something that they can probably never achieve? Maybe they wouldn’t even want to live like this? Perhaps I can inspire them to live as sustainably as possible, within their societal limits? I’ve been told that I’m a phenomenological ecologist. Wow! I can’t even spell that, never mind be it. It sounds difficult!
Apparently I’m someone who explores the meaning and significance of my lived experience without trying to explain it?
I looked it up, and am no more the wiser. I read that Martin Heidegger proposed that truths are contextually situated and dependent on the historical, cultural and social context in which they emerge. That seems fair enough to me. Why not? The only other thing I know about Martin Heidegger is that he was a boozy beggar who could think you under the table! That is according to Bruce from the University of Woolloomooloo (who was also in charge of the sheep dip). The Philosophers Song in Monty Python! if you have lived on another planet, and don’t know it. Try googling it. It’s very funny.
Am I a phenomenological ecologist, or ecological phenomenologist? And there was me thinking that I was just living an honest life with good intent, and minimal disruption to the natural rhythms of nature, using home grown and hand collected materials from my local environment, to make my creative living as gently as possible. I call it being a Potter and Post Modern Peasant!
I have in the past, described myself and what I’m interested in, as being a gardener, potter, artist, a conservationist, practicing minimal consumption. ie making everything that I can by myself using home grown, or found materials and recycled stuff. I try to live like this, quietly, and without being a nuisance or being obsessively annoying.
For instance;
I built my own truck body, by myself, from recycled aluminium. It’s isn’t maybe the best truck body, but it is very strong and has proven durable over the past 22 years of use, and still going strong. I made it almost entirely from re-cycled aluminium off-cuts, that I had collected and stored for such a possibility. I think that it is an almost invisible triumph of creative re-cycling. No one thinks of a truck body as being sexy or even interesting, let alone being environmentally friendly. It all depends on its historical, cultural and social context. However, it exists and only Janine and I know its meaning and history. When I die, it will probably go to the wreckers, unsung!
I re-built our new pottery studio after the fire using steel rather than wood. A strange choice you might think for a conservationist? But as the last 3 workshops have burnt down in fires, which is a total waste of the world’s resources. I decided that steel, although energy intensive and polluting in its creation, will be longer lasting in the long run than wood and is also endlessly recyclable. In an effort to minimise my carbon foot print with this steel studio, I only used new steel in the frame, to comply with council and engineering regulations, and used all recycled steel roofing sheets to clad and line the building, taking a year to collect and sort all the steel. The excess that I had over after the building was completed, I gave to my friend Andy, so that he could build his wife’s studio, and so it goes around. All good outcomes. There is also an added benefit of using recycled iron. It can have a very beautiful patina of age about it. Something that the Japanese Zen Buddhists have words for, but which doesn’t translate easily into English. Words like ‘wabi sabi’. ‘The beauty of imperfection’. or ‘the nostalgia of age’.
We also used the recycled bricks that we collected from demolishing the old Mittagong railway station, built in the 1880’s from hand made, local, sandstock bricks. We built our house from these and the left over bricks from that project were used to clad the West facing facade of the new pottery to make it even more fire resistant. It also had the effect of uniting the two buildings, the house and the pottery, aesthetically. That and the use of the big arched window in the facing facades.
I have made all my own kitchen chairs and tables from home grown trees from our land, and lined the new pottery studio room with timber boards that we grew and milled, on site. After seasoning for a year, Janine and I planed and sanded them smooth before making the lining boards and also all the cupboards and shelving in the gallery. These trees were burnt in the fire and would have been destroyed, if we hadn’t intervened and saved them for a new life as furniture and lining. It was an expensive exercise, but cheaper than buying plantation wood, which is environmentally destructive. So win win.
We spent some time, making and seasoning our own red hardwood floor boards for the house, as well as the windows, french doors. Also the ceramic tiles for the kitchen, laundry and bathroom, as well as all the roofing trusses. It took a few years, but cost very little and allowed us to have a mortgage free home at the end that was not just sustainably built, but aesthetically unique and very beautiful.
One distinctive feature of our house is the big arch window in the kitchen. It would have cost an arm and a leg to have it custom made in the local window factory, but I made it myself over a few months for the cost of the wood and glass, still expensive to me, at the time, or so it seemed, until I met the window factory forewoman, who came to the pottery to buy some pots and enquired where the window was made. She was surprised that it was home made, and told me that it would have cost many thousands of dollars if she had made it. However, she hastily added that she wouldn’t have made such a good job of it, as to cut costs in the factory, she would have taken the fast track and routed the arch curve out of straight pieces of wood. Whereas I had steamed and bent each piece of the arch before glue-lamming it all together. The true craftsmanship way. That window is still working well after 40 years, and has recently just been given an up-grade when we installed double-glazed panes into the frame.
So in the end, a house like this would cost in the millions of dollars, but we did it on money saved from our part time job wages. ie, next to nothing, but with hundreds of hours of labour. I think that the house is the biggest artwork that we have created?
Phenomenological ecologist, or ecological phenomenologist? I don’t know! I’m far too busy being me and making a frugal living in a small, quiet, unimportant life, creating things that I think are both beautiful and meaningful, as well as growing my own food and creatively recycling. What more is there?
Thinking about how I will present myself and what I do over a 2 hour lecture at Seoul University has kept me busy. I’m thinking powerpoint with some add-libbed descriptions of my process? Even then, writing about all this stuff that I don’t really understand, that is to say that I haven’t planned my life, it has just happened in this way, but that is because of the very deliberate choices that I made at each turn and with each opportunity. Flexibly directing my life along this creative road less travelled.
Anyway, It has successfully kept me away from the cooling kiln for another day. I did go up to the site, to cart and stack some dry pine from the wood store to the kiln site for the next firing. I made use of a break in the rain for a couple of hours, I’m glad that I did, as it is hammering down again now, and I needed the exercise.
So now, although I’m no wiser. Still just me. I am not at the kiln scratching at the door bricks to get an early peek. Tomorrow is make or brake day. Will there be any work worth showing? I’m hoping for poetry – as long as it isn’t doggerel!
Please not doggerel. I’m hoping for something more akin to haiku. Deeply meaningful whilst also being elegant and restrained.
However, elegance and restraint are contextually situated and dependent on the historical, cultural and social context in which they emerge from the kiln?
I have been given an old electric kiln that is 44 years old. The frame is still in OK condition, but the ceramic fibre lining has collapsed, it is all cracked, shrunken, and falling to bits. The fibre in the roof and back wall has sagged, broken up and half of it has fallen in. Most of the element rods are also cracked and broken. It looks like it has had a hell of a life. I was told that it was once in use in a school, but I don’t know where it was originally from or it’s history before that. But it ended up being last used to slump glass. We were given the kiln when it finally became unworkable and the glass artist, (a relative of Janine), retired. And, I believe, spent its last years laying on it’s back and used as a top loader.
I’ve been given lots of things that don’t work in my time here, especially since the fire. I’m used to it. People say. “Steve, your handy. I’ve got this thing that doesn’t go, but I’m sure that you will be able to fix it. You can have it!” And occasionally, I can actually fix it! I surprise myself sometimes!
Most things only need a different way of thinking to get around the huge problem of built in obsolescence. To find the creative alternative. It doesn’t have to look like new or be perfect. It just needs to work. Our pottery is full of old gear that I have rebuilt like this. In fact, there are less than half-a-dozen items that were bought ‘off the shelf’, as it were, brand new. We just don’t buy new stuff very often. Even my recently purchased ‘new’ electric car, was actually a used car, but new to me.
That is how we survived financially all these years, we rarely buy anything new. Only 2nd hand stuff, that no one else wants, or is less desirable. Second hand car, second hand house, second hand tools and equipment, we were always being offered stuff cheaply, or free, because it needed repair or just didn’t go anymore. However, If nothing turned up, I just built things from up scratch, using recycled material, or re-purposed from another job. The first two pottery studios that we built here, were made from re-cycled and scrounged materials, mostly wood. Tragically, they both burnt in fires. So no more building with wood for us. It is only this last studio that we built using a metal frame, but we spent a year scrounging sufficient old recycled corrugated iron to both clad it and line it, inside and out. Along with 2nd hand fittings and doors.
I decided to include a big arched window for the South wall of the new pottery facing the house. I wanted it to reflect the arch window that I made for the house back in the 80’s. No chance of finding something like that on the side of the road, so I welded one up out of marine grade aluminium for just a few hundred dollars. It actually turned out OK. I’ve never done that before. And can’t see myself ever needing to do it again. I never seem to get any good at anything much, as I only ever seem to do these jobs once, or maybe twice, but a couple of decades apart, just after I’ve forgotten how to do it.
The first thing that I did to get this old freebie kiln on the mend, was to make some new element mounting rods. As far as I’m aware, no one makes these ceramic kiln rods anymore in Australia. They are not hard to make, just time consuming. But I guess that you do need to know what you are doing. And in this case I just happen to know just enough to to it. That is to say, that I have had a go at home made kiln furniture/home made refractories about 50 years ago.
I needed to get these rods made early, as the only kiln that I now own that can fit in 650mm long ceramic element rods, is the big wood fired kiln. I can only fire the wood kiln in the cooler months, avoiding summer for obvious reasons. So I needed these rods made back in March, last year, so as to be dried out and ready to fire in May/June. As I was planning to do the rebuild of the electric kiln over this last summer break. I got a lot done, but it has taken me a long time. Principally because I don’t really like doing kiln work. I’m over it!
I mixed up a small batch of 10kgs of refractory clay body suitable for use as element rods. I used some old refractory ‘Puggoon’ kaolin, along with 3 sizes of high alumina grog. For years, I used to make all our wadding for the big wood fired kiln out of ‘Puggoon’ high alumina kaolin from Gulgong. I still have one big jute sack of it left in the barn. This special High Alumina wadding (HA) that I made up, after firing to stoneware, wasn’t just rubbish to be thrown out, but instead, I had created very useful, high value, HA grog. Converting what would normally be any one else’s waste product into a valuable asset worth over $6,000 per tonne.
I can also crush a very good quality HA fire brick down to dust in the rock crusher to make excellent grog.
This is not just re-use, re-cycle, but rather up-scale and value-add as well! Over a year, it’s amazing how much wadding/grog you can accumulate. A very long time ago, way back in the 70’s. Janine and I managed to buy 12,000 mixed fire bricks for a few hundred dollars, from a metal bath tub enameling factory that was being de-commissioned. This meant that we were able to build a very large 3 chamber wood fired climbing kiln. The biggest problem we faced at that time was that kiln shelves were so incredibly expensive. Without kiln shelves we couldn’t fire the kiln, so I taught myself how to make our own kiln shelves and props. Most of which, I still have! I developed a reliable recipe using crude ‘Puggoon’ HA Kaolin 50%, mixed with our own home made HA grog 50%. Our own crushed wadding and fire brick grog gave us a range of sizes straight from the crusher, coarse, medium and fine, It proved to be a good blend of sized aggregate. I learnt this technique when Janine and I worked with Harry and May Davis in New Zealand way back in the early 70’s.
My recipes and pictures of me making the kiln shelves and props were all illustrated in the book ‘Handbook for Australian Potters’ published in the early 80’s. Pages, 206 to 212. Below, I’m shown in my youth, in these images, taken by Janine, of me making kiln shelves, fearlessly declaring my independence and learning to be self-reliant. I’m a lot older and fatter now, but nothing else has changed. I’m still enthusiastically practicing self reliance!
These home-made kiln shelves weren’t very good. But they worked, and were good enough to get us going and in business, because we certainly didn’t have the money to buy enough of them to fill such a big kiln. So I taught myself how to make refractories way back then out of necessity. Now I’m financially secure enough to afford to buy element rods, but as a Nation, we don’t make anything in Australia anymore. Such items may be available from China? But I know how to make my own, So I do.
The refractory clay and grog mixture is so non-plastic and short, that it doesn’t hold together much at all. The clay is naturally short, crumbly and non-plastic, and when mixed 50/50% with fine grog it is, not too surprisingly, totally short, crumbly, floppy and useless. A bit like working with sand castles. I can’t extrude the rods vertically, they just snap off under their own weight. I have to extrude them down an inclined stainless steel ‘V’ shaped ramp, lubricated with a little used engine oil brushed on to it to ‘lube’ the process. The clay has to be pushed down the ramp to keep it compressed and avoid hair line cracks. If it can slide easily, it will distort, stretch, weaken and break. The thick engine oil, allows the clay to slide, but is sufficiently viscous to stop it from sliding easily. I use the thin stainless steel ‘V’ angle slide to carry the soft rods to the drying table.
Once dry, the rods have to be carefully carried and placed in the kiln very gently. The clay body is so ‘short’ that they snap so easily. It has NO dry strength. NONE! I broke a couple packing them, even taking care. Once fired to stoneware, they are more resilient. The final strength is achieved when they are used in the kiln. Each firing to stoneware, helps to develop the matrix of primary mullite crystals in the body that gives it high temperature strength and thermal shock resistance.
Now, with the element rods in stock, I recovered 2 rolls of ceramic fibre that went through the fire, (completely unaffected, but just a bit blackened, and now without their cardboard boxes), a box of 2nd hand refractory insulating bricks, slightly burnt, blackened and box-less, and a box of recycled and charred ceramic anchors, that also survived the fire. I only needed to buy some new stainless steel bolts to hold the anchors in place.
The largest expense in rebuilding an old kiln like this is my labour, so I’m saving a lot of money there. The other big expense is the cost of the bulk Kanthal wire, so that I can wind up a new set of electrical heating elements on the lathe. I have done all the calculations and decided to design the new elements to use the best grade Kanthal A1 resistance wire, and run the whole thing at very low ’watts per sq. millimetre’ rating. This requires using more of the most expensive wire, but gives a set of elements that will last a very long time and make the kiln more or less maintenance free. The wholesale cost to me to purchase the bulk wire is close to $900! Before spending time to wind them on the lathe and form them into hairpin element units.
I once had a phone call from a kiln maintenance guy who’s job was to go around the Schools, Colleges and Art Schools servicing pottery kilns. He told me that he had been doing this job for over a decade and had seen my kilns sitting there in the various kiln rooms, and he had never been asked to look at them. Constantly working on other kilns in those facilities. Apparently, my kilns had never needed any servicing.
It’s pretty unheard of for a pottery kiln like that to go for 10 years, fired 2 or 3 times a week, and not need any elements replacing or other work. He asked me directly, “What are you doing?” “How come they last so long?” I was pleased to hear that he was so impressed. I told him that I simply used the best material available and plenty of it, and did the best good job that I could. I don’t want to be going out doing maintenance. I want the things to last forever. There was one brand of kiln that had the reputation for having a certain degree of built in obsolescence. Those were his bread and butter, he told me. He loved the fact that they were rubbish,
I built around 300 kilns in my time over the 50 years. When I started my kiln building business decades ago, and rang the ‘Kanthal’ wire distributor, to order their best quality A1 high temperature wire. I often got the message that they would have to order it in, “as no one uses that wire in Australia very much, so we don’t carry very much in stock!” I’d have to wait up to 2 months for the next shipment. It opened my eyes to the fact that other kilns being made here at that time, didn’t have the best grade of wire in their elements, possibly ensuring a certain degree of ongoing maintenance calls into the future?
I don’t actually like doing kiln work. I did it out of necessity. It was one of the ways that we found to earn the extra money that we needed to pay off the mortgage. Making pots was so much more fun, but financially unreliable. However, although I didn’t enjoy the kiln work. I found ways to make it more mentally challenging, by always looking to do things a different, or better way. I developed all my own designs. Got both a gas license and an electrical license to keep it all legal. Taught myself how to weld both stainless steel and aluminium, using a sophisticated solid state, AC/DC, pulse, TIG welder, and do all the sheet metal, as well as the electronics and learnt CAD design software. There was always something challenging to learn to keep it ‘alive’ and interesting. So although it wasn’t my first choice, it was better than all the other alternatives. Like packing the shelves at the supermarket, being a delivery driver, or becoming a full time ceramics teacher. I was happy to just go into town one day a week to teach my special subjects at the Art School. I really enjoyed that. But it was only one day a week. I could cope with the driving once a week. I couldn’t see myself doing it every day. It was a 2 to 3 hour trip each way. A waste of my life if I was to do it full time. I couldn’t bear the thought!
So we found half a dozen creative ways to cobble together a risky, uneven, slightly stressful, but fully committed and involved creative life. It turned out that we ‘got away with it’! We managed to get through life without ever having to get a ‘real’ job! I was never on the dole either! Completely independent. Most of the other potters that we knew had a partner who had a full time job to smooth out the economics. But we were one of only a few couples, who survived working together with no one earning a safe ’salary’. We were both fully involved in this erratic, ceramic based, artistic engagement with self reliance and creative mini-capitalism. It taxed our inner resources both physically and intellectually, but was ultimately very rewarding in exact proportion to the effort that we put into it! I’ve never been motivated by the desire for money in itself. It’s necessary for a basic level of comfort, but after that it consumes people. Someone once told me that money is like manure. It has a great fertilizing effect when spread evenly, but stinks when it’s piled up in great heaps!
So all this life experience has now come in handy in the refurbishment of this ‘free’ kiln that was destined for the tip. Is anything ever really free?
I laid the kiln over onto it’s back, so that I could take out the broken and collapsing roof fibre and replace it, without the whole brittle ceramic fibre roof collapsing down on me. I only replaced the hot face and the 1st of the damaged back-up layers of fibre. However, I changed the overall layout of the ceramic anchors to triple the number. It was the lack of sufficient anchors that lead to the roof sagging and collapsing. Next, I stood the kiln up and added another hot face layer of 1400oC ceramic fibre on top of the shattered and spalling existing back wall. Best not to muck around with old fibre where possible, so I just covered it with a new layer. I also added double the number of ceramic anchors to support it. Plus, the extra 25mm of hot face fibre that I added will make the wall more thermally efficient.
I made a set of tools to do the fibre work. I made a special little plunger out of fruit tree pruning wood, to hold the stainless steel bolts in place while being installed. Its a gorgeous little home made improvisation to make a fiddly job a lot easier. I took the trouble to make a tapered mortise joint to hold it together. Sweet! No one knows it exists, just me. I know how beautiful such an unimportant tool like this can be. I enjoy the fact that it exists, that’s enough.
I added another layer of fibre to the floor, but didn’t touch the side walls, as they are intact, and well supported by the element rod support brackets. They will last for a while yet. 3 of the element rod support hooks are broken off. As these where custom made, and are no longer available, rather than go back to basics and make a new set from scratch. I will make 3 small support blocks to hold the rods in-situ in those spots.
I was lucky that we found a few old re-cycled ceramic anchors in the ashes and rubble after the fire. Janine and our friend Trudie hunted around for them at some point when I was fully occupied doing something else during the chaos. She knew that they had a value and might come in handy in the future. Now 6 years later, they have. Thank you Janine and Trudie ! Some are chipped and have a bit broken from the rim, but still perfectly functional, if used with care.
I have wound the new heating elements on my old lathe. I bought it 4th hand. It was at one time in use at the naval shipyards in Sydney harbour – a very long time ago. It was actually made in Melbourne by McPhersons, most probably in the 50’s or 60’s? So it’s as old as me!. That’s old! But very solid and reliable. (it, – not me!)
The next job was to renew the door seal, to create a secure tight fit during firing to protect the metal around the door frame. Once that is done I will use the oxy torch to form the heating element coils into ‘hair-pins’, I get them red hot , so that they become pliable, then I can bend them over and double them up into ‘hair-pins’. I can then fit them into the kiln on the ceramic rods, with both terminal ends sticking out the back of the kiln where they can be linked up to make full circuits.
New door lining and door seal installed
Forming the ‘hair-pin’ heating elements from the straight coils.
Heating and bending the rear element ‘tails’ into paired ‘loops’, so that I can link them together to make heating circuits of pre-calculated ampage and resistance to give precise heating of the kiln.
I have all the stainless bolts that I need, but I realised that I didn’t have enough of the correct stainless steel washers to do the connections. So I made some! As you do!
I’ve cobbled together this refurbished electric kiln for a little bit over $1100 for parts only. It is a bit less than 400 litres with a packing space of 320 litres, or 12 cu. ft. in the old units. I’ve upped the power from 16 to 20 amps x 3 phase, and used the very best quality Kanthal A1 element wire.
I have seen new kilns of this size for sale online for over $20,000. Quite a saving. This is how we survive, by the generosity of others, to whom I am eternally grateful, plus some good luck and a lot of scrounging.
I consider myself so lucky to be given this ‘free’ kiln. I have had to dig deep into my past skills and recover them from memory. I haven’t made kiln elements since before the fire, maybe 8 years ago, when I retired from building electric kilns. I am very lucky that my ancient old lathe survived the fire! Lucky, because it was in the old barn that burnt in the fire. Fortunately, because I stayed to defend, I was there and able to put most of the fire out, and control it to some extent, so that only half of the barn burnt. I said lucky, because the lathe could have been in the other half. What I lost was a lot of dried ceramic materials in paper ply bags.
I can’t remember the last time that I made kiln elements. But it’s all coming back to me, bit by bit, as I think about what the next step is. Luckily, I haven’t made any drastic mistakes!
My last job was to link up the element tails at the back of the kiln with stainless steel bolts and washers to complete the circuits. That done, I was able to pug it in and give it a run. My ‘tong’ tester revealed that I made a very slight error in my calcs, as the ampage on each circuit turns out to be 21 amps rather than the 20 that I had calculated. No problem. The kiln will be 4% more powerful.
This kiln isn’t beautiful. It just has to work! And as of now it does. Time will tell. I have had this ruin for a couple of years now. I didn’t do anything with it for the first year and a half, as I didn’t really need it. However, Now that I’m keen to make big, round, fat, pots inspired by Moon Jars. I need a larger kiln. This kiln has a 600 x 600 floor, and 750mm high. So plenty of scope to make a larger, fat, round jars.
I’ve out grown the small 450mm x 450mm. cubed electric kiln that Len Smith gave me to help me get re-started. I have been using it for the past few years and it works just OK, but is worn out and struggles to get to cone 8. I have purchased new element wire for that kiln, but I haven’t got round to making the new elements yet. I had to re-wire the old lathe after the fire burnt out the barn, so I’m working on lots of projects all at once. But now that I have the lathe back in working order. I can proceed on to the next job, which is Lens old kiln.
Nothing is ever finished, nothing lasts and nothing is perfect.
Nothing is affordable, nothing stays new, and nothing does exactly what you were promised that it would in the add!
With the Middle East War, Everybody is worried about petrol!
Except us.It has been over 12 months since I last up-dated my electric car review. I’ve also added all the other electric devices that we have included in our life over the past 20 years, just to fill in the picture a little bit more.
We first installed solar panels back in 2007, as soon as we could. We had to wait for the price to come down to a level where we could afford them. That price point came for us in 2005, but there were no licensed solar electricians to be found around us here in the Southern Highlands. Our electrician was enrolled to do the course and up-date his license, but we had to wait for him to finish his course and get qualified. We were his first job!. We started with just 3000 watts. 3 kW. We chose to buy Australian made PV panels from BP solar, made in Sydney. It cost more to buy Australian made panels, but we thought that it was the ethical thing to do to employ other Australians. Simplistic, naive? but socially aware, environmentally engaged, optimistic, Greenie thinking. Call me stupid, but who else is going to employ (y)our kids if we don’t choose to do it ourselves?
We have since expanded our PV up to 17 kW in 3 stages over the 20 years, as the price came down we went from 3 to 6 to 12 to 17.5. BP solar is gone – turned evil and departed for the dark side. Our later panels we made in Adelaide by ’Tindo’ solar. Again more expensive than the Chinese options, but, as above, Simplistic, naive, socially aware…
We have been slowly converting our life over to solar electric power since then, replacing older worn out appliances with electric versions as it became necessary. 40 years ago all electricity was generated from coal, so we made sure not to use very much. When solar and wind power began to become available in the Australian market. We asked our supplier to sign us up. They told us that there was a waiting list that we could go on. We’d have to wait. Eventually we were allowed to subscribe up to only 10% of our bill to ‘green’ power. Which turned out to be a bit of a con-job, as a lot of that electricity was coming from Snowy hydro, which is actually coal power.
Water is pumped up hill over-night using excess off-peak coal power to top up the reservoirs, then dropped down during peak periods to supply the breakfast and dinner peak needs. The coal generators run day and night at a steady rate which meets the average needs of the system. The coal lifted extra water is used to top up the deficit during peak times.
As more wind and solar farms were installed. We were told that we could increase the green power percentage of our bill. I rang and spoke to a representative of the power company and asked to be sent out the ‘green’ contract to sign. They posted me a dirty, black, coal-power 100% coal contract! I rang again and repeated the fiasco. Again they sent out the cheaper dirty coal power contract. It was many percentage points cheaper than the expensive green option. I guess that most customers would see that and stay dirty?
I was told that the green power contract requests were over subscribed, so they were desperately trying to get people stay with the coal. As they were financially committed very long term to coal generation, and hadn’t seen the green revolution coming, then when it was biting at their heels, they then had to try desperately to dissuade people from changing.
We changed! And we paid.
We didn’t trash any working appliance or vehicle. We changed slowly as the need became apparent. One appliance at a time. To date we have change both cars over to electric vehicles. We now have an electric ride-on mower, an electric push mower, and an electric whipper snipper gadget for the edges and tight spots.
We have also installed induction cook tops in the house and pottery. There is very little here that still uses carbon based power. We do still have the petrol powered fire fighting pumps, for safety reasons to do with being totally independent with high powered pumps. The equivalent electric powered fire pump would need to be 3 phase, and that would mean digging a lot of trenches around the block to install underground power cables. But crucially, we don’t have a 3 phase battery, so we would be very vulnerable when the grid goes down in a fire. NOT an Option!
So the petrol pumps remain. However, we only ever put one, or possible two, litres in them each year. They don’t need very much petrol. Unless there is a fire! I start them up every now and then to do irrigation, just to know that they are in good nik. They just sit there as an insurance policy against disaster. It’s instructive to know that a 4 litre tank-full of petrol in one of our 6.5 HP fire fighting pumps lasts about 4 hours on full throttle. The fire peak of a bush fire lasts about 30 minutes. Having done this research in person in a real life(or death) situation. I can tell you that one litre of petrol is all you need to save your life!
So back to a review of our electric cars;
We have had our Hyundai ‘Ioniq – 1’, plug-in electric hybrid car for over 7 years now and everything about it has been a very good experience! It’s a very old design these days compared to modern standards. We were early adopters. The Ioniq series is now up to Ioniq 9!
This car has exceeded our expectations. We have settled into a routine with it now. We can drive anywhere locally on the battery, doing our local shopping and social visits very comfortably. If we need to go further afield, no problem, the petrol engine will bring us home. This car design is a decade old, so the battery is small compared to more recent arrivals. The battery takes us between 40 and 70 kms, depending on load and whether we are driving up hill or down dale. In comparison, the recently released Kia EV 4, does over 600 kms!
We have always charged the car at home from our solar PV panels. We have never been to a charging station. We have taken it on longer trips up the Queensland twice and down to Canberra several times. For these trips, we rely on the petrol engine. However, these trips are seldom done and are the exception.
For those interested in facts and figures. My log book tells me that by March 2026, we had travelled 67,400kms and spent a total of $2,143 on fuel. That’s about 1.5 to 2 litres per 100km, depending on how much you pay for fuel.
We are in the habit of putting $20 to $30 dollars worth of fuel in the car about 4 times a year. When we first purchased it. I filled the tank on the way home, as per normal practice with a new car. Big mistake! It took us almost a year to use up that fuel. It was sitting there going stale in the tank for most of the time. Stale fuel can be a big problem, so we have not done that since, unless we are planning a long trip.
When fully fuelled up with a full battery and a full tank. The fuel/trip computer tells me that we can go 1,150 kms! It’s so smooth, quiet and comfortable to drive. I love it. I’d have no hesitation in buying another.
I love Janine’s plug-in electric car, so much so, that in December 2024 I bought a used, fully electric Fiat 500e ‘bambino’. This recent electric version of the old classic ’50’s design is incredibly cute. It can go 300kms on a full charge, which is enough to drive to Sydney and back. It charges in 3 hours from 20% up to 80% on my roof top solar, but can also charge overnight from our battery if needed. I usually plug the cars in mid-morning, when there is plenty of sun that we are only getting 5 cents per kW/hr for when we sell to the grid. So it’s better off in my car. I charge it up about once a week. With the two back seats folded down, I can stuff an amazingly large packing case in the back. I surprised myself what I can get in there.
When you install solar, its like pre-paying all your electricity bills into the future all at once. In that way, my Solar power is completely free, but if you want to consider the price of the power I’m using myself instead of selling it, then the cost foregone, at 5cents kWh, that is $2 per fill. or about $100 per year for fuel, instead of buying petrol at who knows what price these days, as it goes up every week. That’s the new Trump price!
This little Fiat is the classic small, nippy car that I have always loved to drive, but now I drive on sunshine! Very tiny, very nippy and I can find a parking space anywhere. I like the engaged driving feel of this small car. So now, after a year and a half of ownership, I can say that it is fantastic, and does everything that I need to, and want to do. And, it has only cost me approximately $100 in solar electricity each year. Fuel Crisis! What fuel crisis? I think that Trump’s war in the Middle East might push a few more people who were thinking about getting an electric car, to now make the change?
One new development for us is the fact that our local mechanic is now a fully qualified electric vehicle workshop. So the once a year check up is only a few kms away. We also know Paul very well, as he went to school with our son Geordie.
We are very pleased to be a fully solar powered household. We can run the house, the pottery, 3 electric Kilns and 2 cars on our solar. We even get a small payment every 3 months from the electricity company, for all our unused excess. We have not paid an electricity bill since 2006/7, when we installed the first solar PV panels.
The middle east war disaster will definitely affect us, but not as much as it otherwise might have.
We are careful to manage our solar power each day, or week, depending on what we are planning to do in the coming days, and what the weather holds. I choose when it will be best to fire the kilns, as kilns chew up a lot of power, so we try not to charge the car and fire the biggest of the electric kilns at the same time. If there is going to be rainy or cloudy weather. I stagger our usage to minimise our wasted excess. I have learnt that I can fire 2 bisques at the same time, or just one glaze, same power more or less, or I can fire one bisque and charge one car. etc. Having the 2 batteries also helps us to manage the odd spot of poor weather, as we can use yesterday’s sunshine to top up what we are doing.
I find it an interesting challenge, to use all of our solar power, so I don’t have to sell much at the low price. But, at the same time, I don’t want to have to buy any power from the grid. Even though I have a 100% green power contract. When I buy in electricity it costs me over 40 cents kWh. That’s the cost of green energy these days. So I would have to sell 8 times more electricity back to the grid to cover my usage.
The quest is to get to be as close to break even point as possible, without going over at all. I don’t want to give any excess away if I can, but worse would be to have to buy some back in. So I juggle the kiln firings and the car charging to fit the available sunshine.
Even when the fire burnt down our pottery in 2019. With our first PV installation gone, we were without solar for almost 3 quarters of billing periods. However, we had such a good unclaimed credit on our bill at the time, that we were able to go that whole time just using up our credit. We had new solar panels installed before the end of the year, and we were back on deck before the credit ran out. Of course, we only had the one electric car back then and no pottery workshop. So no kiln firings!
We have always been very conscious of living sustainably, so have built a very energy-efficient household over the decades. If we were not potters, I think that we could run our house on 3kW of solar PV quite comfortably. But with 2 electric cars, that would be better at 6kW. I’ve seen adds for 6 kW of Solar PV for $3,000. Can’t say if the deal was any good or not, but the price of solar is always coming down.
This is a little story about how we came to be replacing our old 3mm plain glass window panes with new double glazing units.
Janine and I built our own house here in Balmoral Village, back in 1976. We were lucky to be able to find and then purchased the old derelict school class room, built in 1893. It wasn’t a house, just a single room school classroom. The last time that the school operated was during the 2nd World War.
When we discovered it, it had squatters in it. It was in a very poor state, but structurally sound, being built of very solid double brick construction. However most of the timber work had been eaten out by white ants/termites.
We lived in that single room for almost a decade, camping in there while we bought and installed new guttering on the roof and a water tank to collect our drinking water. Originally, we cooked on the open fire and heated our bath water on there too. We learnt to sponge-bath our selves in a galvanised metal tub, in front of the fire in Winter, but we had an outside bucket shower for the summer. We dug a deep pit latrine and eventually installed a small cast iron wood fired stove to cook our vegetables. All very romantic – for a while! But we were young and full of hubris, so everything was exciting and comfy enough. We planted a vegetable garden and started an orchard. That was our first year.
Not too much else really happened for some time as we were crippled by the cost of the mortgage. The interest rate at that time was an unbelievable 23%. per annum. We couldn’t get a housing loan from a bank. They wouldn’t touch us, because we were artists. Very unreliable apparently! We couldn’t take on anything else until we managed to pay off that exorbitant 2nd mortgage, which was the most expensive of the two. Our other mortgage was only 17.5%. So fantastic! we were so lucky to get that 5% reduction. It made our life so much easier!. As luck would have it, I earned a reputation for doing weekend workshops all over the state, so what started as an occasional weekend job soon became a regular event. I was also very fortunate to get intermittent teaching at 3 or 4 different Art Schools on 4 days and 2 nights a week. Janine worked two days and one night. That was how we managed the mortgage. For two and a half years, I had just one day at home each week during term time, it was quite exhausting. I had to get up before dawn to get the very early 6:00 o’clock bus down to Picton station for the early quarter to 7:00 am. train into Sydney. Then another bus up to the Art School, to arrive at 9:00. Then the return journey of bus, train, bus back home after dark at about 8 at night, Except for the nights that I taught the night class, in which case I didn’t finish til after 9 pm, so slept over on a friend’s floor on a camp stretcher. I am forever grateful to those beautiful people, Marg and Graham, who helped me to get started during those first years.
After a decade of ‘camping’ in that one room class room, we had paid off both of our loans. I gave up one of my teaching jobs, the 2 days at Alexander Mackie College, and the one night class at St George college. I also halved the number of weekend workshops that I took on.
We started to think about extending our single room house, adding a kitchen, a bathroom and a couple of bedrooms. It ended up taking us about 10 years to build, quite simply because we did everything ourselves, slowly, manually, to save money. We managed to do it all without extending the mortgage.
We did all the construction work on our own to save employing trades. I drew up our own house extension plans myself and got them through Council’s planning dept (after a few corrections). We dug the footings and cast the concrete. We had a wheel barrow brigade of friends and neighbours on that day to help move the concrete. In the 70’s we all pitched in together on each others building projects around the village.
I learnt how to lay bricks to build the footings. I wasn’t very good at it, but that didn’t matter, as all the brickwork below floor level was going to be cement rendered to match the old building. That design feature was such a stroke of luck, as it hid a multitude of my not so good bricklaying mistakes as I learnt the skills needed.
I taught myself how to construct a timber frame out of local hard wood supplied by the local Mittagong sawmill. Some of the eucalyptus trees were even felled down in the deep creek gullies behind the village here in Balmoral. We were lucky that Janine’s brother, who was a builder, came to live in Wollongong for a while, about an hours drive away on the coast. He would come up occasionally to help me lay out the footings, or level up and square the frame, then later help me to set the windows that I had made over the 6 months prior. Everything took time, but time was free, we had enough of it if we waited… Paying trades was prohibitively expensive. The only tradesman that we had to employ by law was the electrician. I managed to find a friendly one who let me run all the cables myself, leaving the tufts of wires hanging out where power points and switches were needed. He came back later and did all the connections and testing. Money was the one thing that we didn’t have much of, so we learnt to be frugal. Recycle, repurpose, reuse.
As we were both part-time/casual teachers working 2 days a week during the 36 week term time. That limited us to a total income of 150 days of paid income per year. Neither of us has ever had a full time job or earned a salary. Nor have I ever been on the dole either. These part time/casual jobs didn’t really earn enough money. So I kept on doing the weekend workshops all over the state, and even a few interstate, even in New Zealand! So as to make more money. Our income was so small and unreliable that we couldn’t borrow any more money. This meant that we had to build our house slowly, very slowly, using our meagre wages to pay for materials only. We would save for a month or two and then buy the concrete for the footings. Wait and save again, then buy the bricks for the footings. Wait and save until we could afford the timber for the bearers and joists. Bit by bit. Step by step. All the while spending the time in-between, whilst saving, using the materials that we had acquired to complete the next phase. So it went on like this over a few years, until the frame was complete and we had a roof on, but no walls! I wrapped the walls in silver paper to protect the timber from the weather, but the sisalation got blown to pieces in the huge winds that we experienced over the next couple of years. I finally had to nail plywood over the top of the sisalation to hold it in place.
We had a fantasy dream to build the house out of sandstock bricks to match the old school room. It would look best if it was in some sort of harmony with the original. Either that, or build a steel and glass cube box that was totally different, as is the modern way. But steel and glass cubes cost enormous amounts of money. Needing architects, engineers, cranes and structural steel ‘I’ beams and plate glass are priced like gold. All so far out of our reach, we didn’t even bother getting quotes. So we stuck with what we could manage on our own and could afford.
I kept buying small numbers of sandstock bricks here and there from garage sales and demotion sites where ever I saw them, but only in tiny numbers. What we needed was 10,000 bricks. The years dragged on.
One day we were down in Mittagong on a Friday afternoon doing the shopping, when we saw that a huge excavator was starting to pull down the old Railway Station building. It was being demolished to widen the platform for the introduction of the new ’so-called’ high speed train, the XPT. It wasn’t high speed! It was actually slower than the steam trains. I asked the station master what was going to happen to all the demolition rubble. He told me that it was going to be buried at the local tip! WHAT!
I told him that I would finish the demolition and clean up the site and remove all the demolished building materials for them free of charge. I’d even be prepared to buy the station off him. He asked how much and I said $10 ! He laughed. Said try again. I said $100 and he said OK. That was it. We shook hands on it. I bought the ruins of the old railway station that importantly for us was built out of the same old local sandstock bricks as our school. I paid a coupe of friends and we spent a week, sorting, cleaning, stacking bricks onto pallets and had them picked up and taken to our place each evening, so that no one would steal them from the side of the road. Each day our friend Robert helped Janine, who had just given birth to our son Geordie, to unstack the bricks on the side of our driveway, so that I could use the same pallets over again the next day to move more bricks. That is how we managed to build our house out of matching old sandstock bricks. So fortunate. So lucky, Such a fluke!
The house had laid idle for a year or so while we solved the brick problem. I had spent the time making all the windows for the house, including two quite lovely arched feature windows. It took the best part of a year to get all the windows made, as I had no idea how to make a window when I started. I didn’t know anything about glazing windows either. I had to teach myself how to steam wood and bend it to make the timber arches. I wanted to use double glazed glass, but it didn’t really exist here in those early years. I was told that it had to be imported from Germany at eye watering expense. So I settled for plain 3mm glass, and even that set me back a bit at the time. Glass was always so expensive.
The total cost of the house was $23,000 spread over 10 years. Made up of little quantities of money that we saved up in small amounts over months to buy the materials as needed. Our ability to save this money, set the pace at which we could build the house. The other limitation, was that I was doing all the work. I only employed my friends for a day or two here and there when the job at hand was just too heavy or difficult for me and Janine to manage alone. At the end of the decade, we had a more conventional house with a kitchen, a bathroom and 3 bedrooms, and we achieved this outcome with no extra debt.
Janine had come up with the final design concept that we used. The old school faces West, so Janine had the idea to add the kitchen extension on to the north side making the new kitchen/living-room/dining room north facing and therefore solar passive. She conceived of flipping the orientation of the new addition to the school 90 degrees on its axis, facing it north. It was a great idea. Thank you Janine.
After almost 40 years now, we are finding the kitchen is getting too hot in summer. We had to close the old heavy winter curtains during the day in summer to try and keep the heat out. I added a huge sheet of perspex onto the inside to try and create a poor mans sort of double glazing, It didn’t really work that well. It helped a bit in winter with retaining the heating, but summer is our big new problem here with the huge increases in global heating.
Last year I decided to replace the old single pain 3mm. glass with new argon filled, double glazing. There is now a factory in the local town of Moss Vale that manufactures them. I spent $1800 on 12 new panes of thick double glazed glass. The inner pane has a special metallic ‘low-e’ coating that reflects back the infra red wave lengths of light that used to carry heat into the room. I had to rebuild the old 3 metre high arch window frame glazing bars. I glued and screwed on new 30 mm x 10 mm. extensions to the glazing bars, using some old cedar that I had scrounged many years ago for nothing, sure that it would come in handy for something eventually. These glazing bar extensions made it possible to accommodate the new 20mm. thick double glazed glass units. That was 12 months ago. We really noticed the difference this last hot summer. The kitchen was really cool – without curtains. So different!. That month long, part time exercise of rebuilding the big arch window was spectacularly successful. I managed to do it all in-situ, so there was never a big hole in the wall. I did rely heavily on my friend Andy, who did the ladder work outside, while I did the inside work. Together, we got it all done in a day.
Going on the success of last summers window glass up-grade. This year, I decided to replace all the small panes in the multi-pane double hung windows all around the rest of the kitchen. I couldn’t fit double glazing in them, as there is no room in the double hung timber frames to allow for a 20mm thick argon-filled double glazed glass pane. I did a bit of research, some years ago now, and came across vacuum filled double glazing. (or should that read vacuum emptied, double glazing?) I kept my eye on the concept over the years, and as the price slowly came down. I was encouraged to take the leap!
The gap between the two glass panes is only 0.3mm., that is like the thickness of a human hair. The big difference is that the gap is filled with nothing. ABSOLUTELY NOTHING! It’s a vacuum! So its like having a thermos flask in between the glass. These 4mm thick hardened glass panes also have a ‘low-e’ infra-red reflecting coating on the inner sheet facing out. Being only 8.3 mm thick in total. I thought that I could fit them into the old, wooden, double hung, frames that I made 40 years ago, and they could still be lifted up and down in the same runner slots. Or so I thought. As it turned out, they certainly could fit – just. I’m thrilled that it was possible. I paid my friend Andy to help me again, as I didn’t know if it was going to be possible, and time was of the essence, as rain was threatening. Andy is great. He has so much building experience and he adds a sense of calm and professionalism to the situation. He is also younger than me and doesn’t mind working on a scaffold or a ladder. Thank you Andy!
We had to take out the old windows, leaving a hole in the kitchen wall while we figured it all out. As the panes were so much thicker, going from 3mm up to 8.3 mm. We had to carve out the seating groove in one place in each wooden frame to allow for the thicker glass. It all went surprisingly well in the end. So I consider myself very lucky. I thought about it a lot before hand and planned it well, but didn’t know until the day, if it would actually work. Such good luck! AND the rain held off too.
We’ll know this time next year if was as worthwhile as the argon filled double glazing was. We have completely re-engineered the thermal efficiency of the house now. Re-imagine, re-furbish and re-new!
I’m still somewhat amazed that we were able to carry it off without any serious glitches.
Life is a work in progress. We’re working on it. We have been very lucky all along the way, but I’m very aware of the old saying. The harder you work, the luckier you get! I’m also very aware that I’m incredibly fortunate to be living in a civilised, peaceful, first world country like this, where opportunities do arise. We are also very lucky to live in a land with no missiles or bombs.
I’ve been told that the most important choice that you make in life is to choose the right parents. Choosing the right country where those parents live also helps!
Nothing is ever finished, nothing is perfect and nothing lasts.
It’s been raining again quite heavily. We now have 4 different little streams flowing across our land, where the dams overflow, and the front lawn is under 25mm of water, like a slow moving shallow lake gently flowing across our kitchen vista.
We had 65mm of rain at one point. I thought about what to do for a while and came to the conclusion that it was probably best if I decided to do all those glaze tests that I had been meaning to do for a while. I certainly didn’t want to do any outside work. So I spent a day rolling out slabs and pressing out grid-tiles from my standard plaster grid-tile mould. This ensures that all my test tiles are the same size and shape, so that I can compare them at any time with tests made years before if needed. Tragically, I lost 3,000 glaze tests in the fire, so I’m starting again.
Weighing out glaze tests can be quite boring, especially when it goes on for days. However, it keeps me gainfully employed in the warm and dry pottery studio. I put on a CD while I work. It takes more than the length of a CD to fill one test tile with the infinitesimally small gradations of ingredients in the logical progression of the recipe. Each tile is 8 x 4 squares = 32 weighings and recordings.That’s 288 tests made in this sitting. Enough!
When I was doing my PhD, I did every test in triplicate, so that I could fine them in oxidation, then reduction and also in the wood fired kiln. As each kiln gives its own variation to the test. Having done that very thorough exploration, I’m over it and these days I only make the one series of tests, and fire them in the kiln that I think will deliver what I’m looking for.
It fills 10 pages of my glaze note book this time around. I have to keep detailed records of what I do and why I’m thinking that it might be a good idea. Sometimes, it takes so long to get the firings done at the temperature that I’m imaging will be best and in the atmosphere that I want, and in the kiln that will give me those ideal conditions, so that If I don’t write everything down in detail, then I can forget what I was thinking and why I went to all the trouble. Hopefully, it will help me to understand both the results and more about myself in a few weeks time, when they are all fired, and I can decode the results!
Each tiles takes about one hour to complete. After two days of this, I’m pleased to do the last one – for the time being
When there comes a break in the rain, I get out and pick vegetables for dinner. This time is leaks, broccoli, Brussel sprouts and carrots. I’m planning baked veggies with a mustard infused béchamel source for dinner. I make a quick and warming lunch of pasta. I tried to steal the spaghetti from the supermarket, but the female security guard saw me and I couldn’t get pasta!
🙂
We decided to try is years cider with dinner. We made this batch of cider back on the 11th of February and bottled it on the 11th of April. So now it has had 4 months to settle down. It will be good to see how it has turned out.
Janine thought that we should do a vertical tasting of the last 3 vintages. What a good idea!
As we still have a few bottles of the 2012 vintage. This was the last vintage from the aged 40 year old apple trees in the previous orchard. From 2012 onwards there was a severe drought, so intense that we didn’t get to harvest any apples from 2012 through until the fire in 2019. So no cider was made. In 2015, our friend Val had a good crop of apples on her trees in ‘Lagan’, 2 hours drive, south of here, so she drove up a couple of washing baskets full of her apples. We were able to make a small batch of cider from those apples. We re-planted a new orchard in 2020 with different varieties of apples.
We opened 3 bottles to see and compare the difference. The older 2012 vintage was still very lively with good spritz, but a darker colour from its age, more akin to a beer in colour. It has a medium nose of sultry notes and a good firm cider flavour, just as we are used to. Completely dry on the finish. The 2015 from Val’s apples is medium in colour and flavour, and similar to above.
The 2025 is very pale with floral notes, a delicate palette and a dry finish, however, not very effervescent, because, as it is the first vintage from all the new apple trees in the new orchard, all planted since the fire, and this being the first year that we had a decent crop. I made the decision to cut the amount of sugar added at bottling, to ensure that there wasn’t too much pressure in the bottles. I don’t want to experience any exploding bottles.
We make a completely ’natural’ cider here from our organic orchard apples. Nothing added at all except yeast. I have always used Moet and Chandon champagne yeast, as it has alway worked well for us. Back in the 70’s, you couldn’t buy cider yeast here in Australia, so i chose champagne yeast, as it is closest to what we wanted to make – a sparkling cider. These days I can buy any number of cider yeasts form the brewers supplies shop, but I stick with what works.
I always leave the cider in the fermenter for 2 months to make sure that it has completely fermented out all the available sugars and is ‘dry’. Over the past 4 decades, I learnt to add one spoonful of white sugar to each bottle at bottling. This is the standard champagne bottling technique. This is to allow it to re-ferment, just enough to make a sparkling cider. Because these are all new trees and therefore an unknown fruit. I played it safe, and only added half a spoonful of sugar at this first bottling. So this batch has only a gentle spritz, but this is better than too much.
After this test run, next year I’ll be brave enough to add the full amount of sugar.
I’ve never been brave enough to go with the wild ferment of naturally present yeasts that are on the skins of the fruit. When we had a small vineyard of 100 cabernet and 30 shiraz vines. I tried making one vintage of a macerated, whole bunch ferment. The wild yeast that was dominant on the skins at that time was very vigorous and resulted in a rather unpleasant distasteful wine. I didn’t like it at all and threw the whole lot out. So I lost a whole vintage. it’s nothing to do with money. It’s all about the investment of time and effort, and the expectation that there will be something interesting and delicious at the end, even if the amount is very small. For instance, we only make 30 to 36 bottle of cider each year, just enough to fill one fermenter. It’s enough.
Nothing is perfect, nothing is ever finished and nothing lasts. Good cider doesn’t.
We have just harvested the first cabbage and first broccoli of the autumn. I planted a range of brassica seeds on boxing day. The first batch were all dug out by the blackbirds, so when I re-planted the 2nd sowing, some time later. I also covered the bed with bird netting to stop a repeat of the blackbirds scratching out the seeds. Blackbirds don’t want the seeds, they just like to scratch into freshly worked and composted soil looking for worms. This little hiccup set me back a few weeks, so our first cabbage is a bit late arriving.
I have now repaired all the melted sections of the plastic netting over the vegetable garden. Almost total replacement at both ends that were worst hit by the fire, then applying patches to the large holes in the other walls, and finally stitching together the small 50mm to 100mm holes that are scattered all over the enclosure walls and roof. I purchased a commercial size roll of 100metres by 10 metres of netting over 30 years ago to cover the vineyard at harvest time. The netting that is over the veggie garden now is all that is left over from that time. It had a 10 years warranty against going brittle with the ultra violet light. So I’m very pleased that it has lasted so long. However, it is getting very brittle and the galvanised steel netting is all rusted through in places. So a total rebuild is in order, but I’m not too sure that I can manage that big a job these days, or if it would even be wise to attempt it at my age, having just turned 73, I shouldn’t be up and down ladders for days on end.
I made an Australian version of oka-nomiyaki pancake. Of course it is not really an okonomiyaki, as I don’t have mountain-potato starch, or almost any other authentic Japanese ingredients, but I do the best that I can with what I have. The super-fresh garden ripe cabbage makes it really fresh, crisp and delicious. The broccoli goes into a veggie stir fry along with all the other garden delights of the current season and some tofu for protein. Vegetable gardening, which mostly involves a lot of weeding, mowing and watering, suddenly becomes so worthwhile when you are harvesting such beautiful produce each afternoon, freshly picked ready for dinner. Our food has carbon metres, not miles!
I have also planted another 4 different varieties of seed garlic in the garden, just to see if any of therm are well adapted to grow here in the future.
In the pottery, I have been throwing some sericite porcelain stone bodies. This stuff is so short that I have to make the wall bases thick to hold the form up. That then means a lot of turning to get the pot thinner again. This weird stuff tears and rips as the turning tool cuts into it – unless it is turned quite firm and almost dry. But then there is the dust to contend with, so I like to do it while it is still a bit damp, but then it chips a lot. It becomes a two stage process. Roughing out the mass of extra thickness, drying some more, then final turning. I get to do a lot of slaking and re-cycling of turnings.
I have built an extra-large tray for my shimpo, but with this porcelain, I still fill it very quickly. This image is of the trimmings from just 15 small 150mm. bowls.
It all goes into the mixer pug and is recycled, ready for throwing again the next day, although leaving it to age a little bit and ‘recover’ would be even better, but because I use a dozen different mixtures and recipes, it is easy to loose track, with too many small packs of different clays hanging around. So I prefer to use up each batch all in one go as soon as possible.
The tyre on the old wheel barrow went flat last week. I took it to the tyre place to get a patch or a new inner tube, but they told me that the tyre wasn’t worth working on and I’d need a new tyre and a new inner tube – at a cost of $78! As the old metal rim is quite rusty, I decided that I might just as well buy a whole new wheel unit from the big hardware chain for $32! But then I remembered that I had a complete wheel off a buggered trolly that I picked up off the side of the road on council clean-up day. It is 25mm smaller in dia. but still holds air pressure well, so I had to change the shaft size and make some new brackets to hold it on, out of scrap tin plate. 20 mins later we are all back in business and good to go. It’s not perfect, but it works. Recycle, reuse, repurpose!
The Japanese have a word ‘Mottainai’ – too good to waste!
A botched up job that will keep all of this useful material out of the waste stream and land fill for another decade. I actually picked this whole wheel barrow up off the side of the road in the village some years ago on Council clean-up day, when the owner decided that it was just junk, because the tyre was flat. I took it home and just pumped it up. It worked! And has been working hard here for all those years of reprieve since then – and now still continues to be useful. Waste averted, Mottainai!
Nothing is ever finished, nothing is perfect and nothing lasts.
It’s March and autumn is supposed to be here, but it has been delayed by Global Heating! We are having some of the hottest recorded days for this time of year. We are used to the long ‘Indian Summer’ season transition, but this is the heat that we used to expect in the middle of summer.
The cherry trees have lost all their leaves. They are the first to bud-up in the spring and the first to drop their leaves in Autumn.
March is the month to plant garlic. The small cloves that we missed picking 6 months ago have shot up in the places where we left them invisibly underground. Their tender, slim, green aromatic shoots are a very good sign that it’s time for garlic to grow again. They have decided! I planted 5 rows of our own, best-of-crop, home-grown garlic, the largest knobs from last year.
I planted about 15 cloves to a row, that’s about 70 plants, if they all do well. I left a gap, for a place to stand while weeding the crop as will be necessary several times over the next 6 months.
Then I planted 4 rows of commercially grown varieties of seed garlic. This year I’m growing ‘Rojo de Castro’ ‘Dynamite’ and ‘Spanish Roja’. Just to see if they will do well or even better than what we already have.
I left another walking gap for weeding and watering, then another 3 more rows of other bought seed garlic varieties. ‘Dunganski’, and ‘Festival’. Our very good friend Anne, organised a bulk purchase for a few of us in the ‘seed-savers’ group. I’m always interested in trying something new. Thank you Anne!
I always plant the best of last years harvest, whatever variety(ies) that is, very often a mix of what grows best here over the decades. All self selected, simply by growing well with large easy to peel large cloves. These new varieties all have a red, or pinkish hue, simply because I like the look of them when hung up in the kitchen drying and waiting to be used.
Whatever does well and grows best will be added to our localised crop for the following season. Life goes on. All the same as before, but with small changes and additions and hopefully improvements.
In the pottery I have been collecting, crushing and ball milling a few new local rocks for testing as glaze material.
As soon as the heat subsides, I’ll be firing the small portable wood fired kiln, filled with test bodies and glazes, to prepare for the firing of the big wood kiln over the winter months.
After the ‘big-pot’ throwing Summer Schools that we held here over January and February. I had about 80 kgs of the special course grained/textured clay left over. So I decided, rather than store it away somewhere, I would be better off to use it up making a few big jars for myself. I have always liked the traditional Korean ‘Moon Jars’, so I decided to have a go at making a few Korean inspired big round jars. They are NOT Moon jars, but my interpretation of the big, round, pale glazed form.
Janine decorated some of them for me using her carved/sgraffito through slip technique.
I have continued planting brassicas since Xmas day, when I planted the first seeds. I have planted 8 to 10 plants of mixed types each month to ensure a continuing crop of cauliflowers, broccoli, cabbage, Brussel sprouts and kohlrabi through out the autumn/winter.
I noticed today that the first broccoli head is forming on one of the first plantings.
I have to grow them under protective netting for the first few weeks to a month, to stop the black birds and bowerbirds from digging them out and eating the tops off them. The vegetable garden was completely covered in a mix of galvanised and plastic netting. But in the catastrophic bush fires of 2019 the heat of the fire melted the plastic netting on the west and east faces. All the birds were burnt in that fire, so there was no immediate need to repair the netting. EVERYTHING else was so much more important, like rebuilding.
Now the birds are recovering and breeding up in numbers, coming back into our area. They have figured out that they can squeeze in through the gaps in the melted areas. So I have booked a friend to come and help me next week to get up on our tall step ladders and re-cover the burnt out sections with new netting. A big job that in the past I would have thought nothing of doing by myself with the occasional helping hand from Janine in the difficult areas, pushing up from underneath with a broom to get an even cover. Luckily, a very nice couple donated a huge amount of plastic bird netting from their farm, when they took down their orchard cover and moved into a smaller holding. We are very happy to use this re-cycled netting, both galvanised and plastic. Nothing wasted. Recycle, re-use, re-purpose.I may be old and stupid, but still just smart enough to know that I don’t want to do this job all by myself anymore. It’s just one of those endless series of jobs that we have to tackle everyday to keep on living here in this self-reliant, low-carbon, organic, minimal consumerist muddle.
Nothing is ever finished, nothing is perfect and nothing lasts!
Todays big job is to harvest all the remaining apples and pears, then juice them all and make a big batch of cider/perry. Then it will be back onto the tomatoes and passata.
There will be sure to be a lot of weeding needed after all this rain clears and the heat returns.
We haven’t been able to make cider for over a decade now, as there was the terrible drought culminating in the 2019 bush fires that took our pottery, yard, gardens, fences and orchard trees. We replanted a new orchard in 2020 and this is the first year that we have had sufficient fruit on the new young trees to be able to make a batch of cider.
This morning, I managed to get out there into the orchard and strip the trees of all the remaining fruit and get it indoors before the rain started. I used the wheel barrow as my basket on wheels. a good measure of fruit volume.
We are due for a whole week of rain – if the forecast can be believed. It usually rains less here than is forecast on most occasions, but it will still be a wet week by all accounts.
So today was excellent for inside jobs like washing and juicing apples and fermenting cider. It took us all day to process all the apples and juice them, then get the fermentation started.
We have a really big, heavy duty, industrial grade, juice extractor. The sort of machine that you need if you are going to be juicing apples for 8 hours straight. Before we bought this one many years ago, we burnt out 3 small domestic sized ones.
While extracting the juice, we filled 30 litres of pulp into buckets for the worm farm and compost. The juice is now in the fermentor. We can leave it for a week at least now while we get on with other jobs around the garden and pottery.
We managed to slip in a small bisque firing in the solar fired electric kiln while we were making cider. That’s one very nice thing about electric kilns, they fire automatically on a pre-programmed schedule. This allows us to get on with other jobs, like making cider, recycling clay slip/slop/slurry, pugging recycled clay, doing a bit of kintsugi? Possibly even start throwing those new ‘test’ clay bodies that I have had ageing since November?
Those first two big-pot throwing summer schools took all of our time and effort to start the year. Since we finished them, a couple of weeks ago, we have had time ‘off’, playing catch-up in the garden and orchards.
We have been mowing, watering and harvesting, for the past two weeks. We have been dealing with that harvest since then, picking fruit, bottling tomatoes, making passata, roasting pumpkin cubes, bottling pears and making pear and apple juice, then picking and drying prunes.
Diced pumpkin cubes, roasted with olive oil, garlic, salt and pepper.
Everything comes on in earnest in January. There is a lot to deal with all at once, so we are eating very well. I really look forward to that first ripe pear. Just like I do that first ripe tomato of the season. The kitchen is a busy place every day. We spaced out the gap between the two pairs of workshops to give us time to do all this ’self-sufficiency’ work. I had also booked in a couple of other jobs that were needing to be done. So our two weeks off, has really been ‘full-on’!
Pears poached in a little white wine, cinnamon and sugar, served with fresh picked passionfruit and a little ice cream. These are the tangible benefits of self-reliant living and gardening. 50 years in the planning, execution and nurturing. 5 minutes in the eating.
I ordered some double glazed, argon filled, metal coated, low energy, toughened, window panes to replace the 3mm. plain glass that is in our big arch window in the house. That fancy energy efficient glass arrived just before Xmas. The big window has been working well, letting light in, but keeping the rain out for almost 40 years, since I built it, and glazed it myself all those years ago. At the time, I tried to find double glazed glass for it, but to no avail. I also tried to buy special ‘stick-on’ glass coating mentioned by Amery Lovins, when he was here giving a lecture tour back then. But no one seemed to be aware of any such product here in Australia, not even ‘3M’ who I was told made it.
So we just lived with it as it was, eventually adding a huge sheet of thin perspex to the inside to create a semi-sealed air gap, but although that did work to some extent. There was room for improvement, and the unsealed gap always fogged up in wet weather, causing the wooden sill to get very wet and start to rot on the surface, so something had to be done.
Luckily, there is now a factory in town, that makes these fancy window panes. There was a one month wait while they were made to order. Back in December, I spent time rebuilding the structure of the glazing bars to make them deeper in preparation. We have managed to install 7 of the new double glazed panes so far. 5 to go. Interestingly, I have spent over $200 just on special window glazing silicon and wooden glazing beading to complete the job.
I booked a few days of help from my friend Andy, who is a local architect and environmentally conscientious builder. A rare breed! He has been very kind in offering us loads of assistance since the fire. He also offers good council and advice on environmental/building matters. I asked Andy to help me install two louvre windows up in the big pottery shed loft. I bought some louvre mechanisms and the ground glass panes online, then I built a couple of hard wood window frames to mount them in. I also made all the custom flashings to go around them. Andy did all the outside ladder work on the day, cutting the hole in the wall and we installed them without too much trouble. It gives plenty of ventilation up there to take the heat out of the loft, but also brings in so much light and the view is good too.
We haven’t quite finished setting it up again yet, but it has been transformed into a lovely, light and airy, comfortable place now.
I have to ‘fix’ a kiln for a friend, even though I am retired, this is a special favour, then it will be back into the workshop for the next two summer schools. I’m looking forward to getting back into making pots for myself again. I have a few batches of experimental clay bodies that have been ageing for some months now. I’m keen to try them out. Especially to see how they will look in the wood fired kiln.
Summer has arrived. and we are ready for all those lazy, hazy, long, hot, relaxing day and balmy evenings with a G&T on the lawn.
But first.
We have to deal with the fruit flies and possible bush fires, but dealing with them is interrupted by the rain.
We have had sudden down pours and thunderstorms, followed by a week of wet weather. It’s a bit like the 70’s, when we used to get sudden summer storms that only lasted an hour, but dropped an inch of rain. That’s 25mm these days! Then it would go back to being hot and humid again, but it gave us sufficient water in the dam to get through the summer with water for the garden, orchards and possibly for fire fighting.
Before this last week of wet, the little top dam had dropped down to just 600mm of water in a little puddle in the centre. Not Good! As we have been pumping water out of it every day for watering the vegetable garden and one day a week in rotation on each of the orchards. Luckily, there was still water in the bottom 2 of the 4 dams that we had built in a ‘key-line’ system across our land, so as to harvest and store as much of the rain fall as possible.
I get a little bit edgy when the top dam is almost empty like this at the start of summer. We may need 50,000 litres of water in a hurry if a bush fire breaks out near us. I like to be prepared. So I have already gone around and started up and tested all the petrol fire fighting pumps to make sure that they are in good condition and working well. Particularly that they start on the first or second pull of the starter cord. There is no time to be messing around with an engine that won’t start in an emergency.
I use 1 of our 4 different petrol driven fire fighting pumps to pump the water up from the lower dam, up to the little top dam closest to the house. The pump is built in a carrying frame and is not too heavy, so I can lift it into the wheel barrow and walk it down to the dam bank, then drag the lengths of plastic piping into place. It’s all set up with the various fittings already attached to the ends of the pipe. I keep the pipes sealed at both ends with screw-on caps, so that small animals and ants don’t build nests in there during the long periods of non-usage over winter.
The little top dam is closest to the house and was the first dam that we got built back in 1976. It has the solar powered electric pump on it that we use for most of our watering and irrigation. I have kept the long lengths of 50mm dia polythene pipe that I bought after the fire to do this transfer. This is the 2nd time that I have used it.
This works well and gives us plenty of water for the next couple of months of summer. But then, before I can congratulate myself. I rains for 5 days and on one of those days, it rains hard enough for the water to flow down the street and into the culvert drain and into the dam, topping it up just a little bit more. It makes me feel more relaxed about our capacity to cope here when there is water in the dam.
With the heat of summer comes the fruit, and with the fruit comes the fruit fly. Nearly all the the new dwarf fruit trees in the stone-fruit orchard have a crop on them this year. We have gone around and tip pruned all the trees. This summer-pruning keeps the trees in good shape as they grow and develop. We also pick off a lot of the small developing crop to reduce the load on the branches, as a really heavy crop can snap the branches due to the weight of the fruit. There are only two of use here, so we don’t want or need a heavy crop. I fill two wheel barrow loads of small fruit and prunings.
I have been spraying the trees every two weeks or so since October, – when it isn’t raining, with organic approved sprays for both fruit fly and codling moth. I missed a couple of months while I was away working in Korea, but got back to it when I returned. However, the recent rains have played havoc with my ability to spray, as these are all water based organic sprays, they simply wash off in the rain. They aren’t cheap either at $25 to $35 per packet, which yields 4 to 5 sprays.
I have also infected the apples, pears and quinces with parasitic wasps eggs of ’trichogramma’ wasps. These are bred to hatch out and predate the codling moth and other caterpillars. I haven’t used them before, so have no idea how effective they are.
I also built a few steel triangular housings for codling moth pheromone lures. These work by attracting the codling moths with the scent and then catching them on sticky paper inside the lure. These are working. I can see half a dozen little coding moths inside the lure stuck to the sticky paper. I’ve also been tying hessian bandages around the tree trunks, but so far I’m yet to find a caterpillar in there. This definitely hasn’t worked so far. I also added a ring of sticky bandage around the trunks as well. This also hasn’t yielded any results – so far. My last approach has been to hang empty milk bottles in the trees with cut-out windows, and spreading ‘Spinosad’ fruit fly attractant jelly inside. I use it inside the milk bottles to stop it being washed off in the rain.
Lastly, I re-filled the old ‘DakPot’ style female fruit fly lures with new hormone baits. When I emptied the old ones at the end of winter, there were 50 or so dead fruit flys in each of them. So this does work. It doesn’t stop the female fruit flys from stinging the fruit, but it reduces the numbers of flies by eliminating a lot of the males out of the system.
We still have fruit fly problems, but I presume that it has been significantly reduced by my efforts. Well, I have to tell myself that don’t I?
Otherwise, why am I wasting my time like this with all these organic techniques, when I could so easily just spray the whole orchard with dieldrin or some other horrific poison? All the fruit for sale in the big supermarkets is sprayed with chemicals. S what are my options? Buy poisoned fruit, or try and grow clean, organic fruit? We are trying to live a pesticide free, low-key, creative, organic, carbon constrained, Post-modern peasant lifestyle. Everything costs more and takes longer and needs constant attention, but we are committed to living it.
Nothing is ever finished, nothing is perfect and nothing lasts.

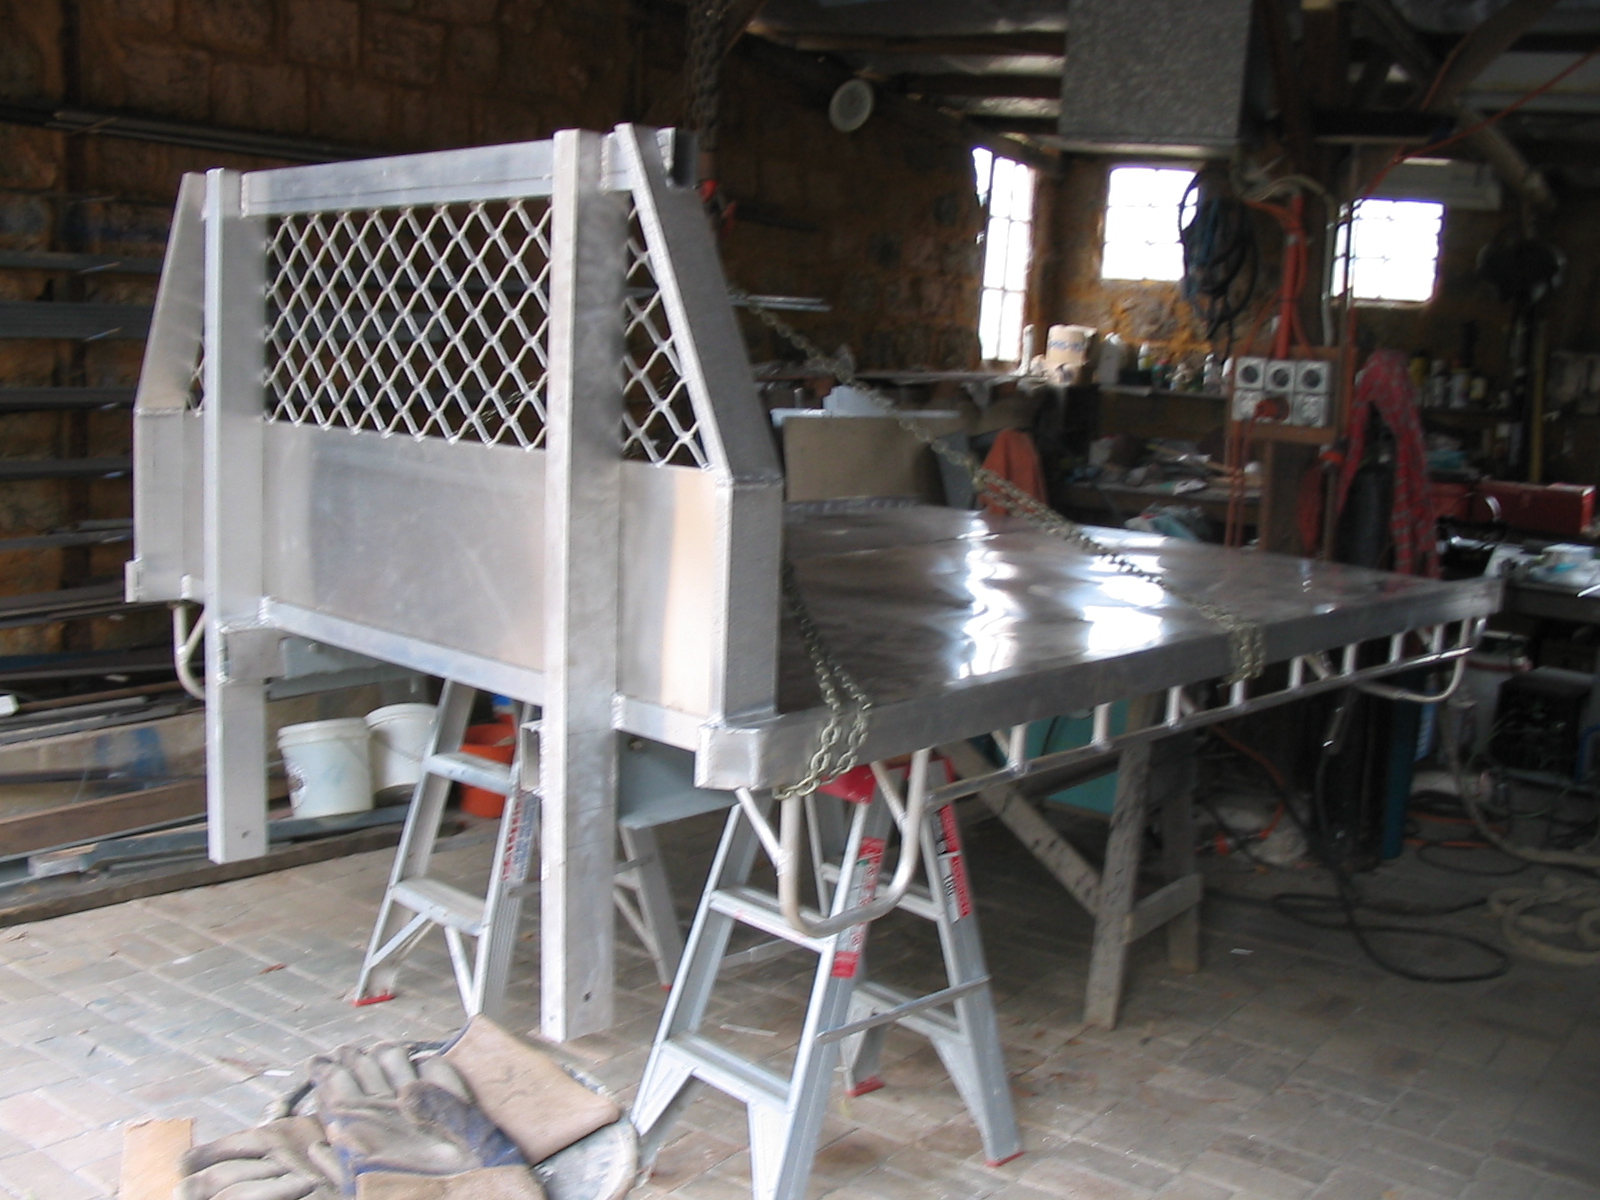
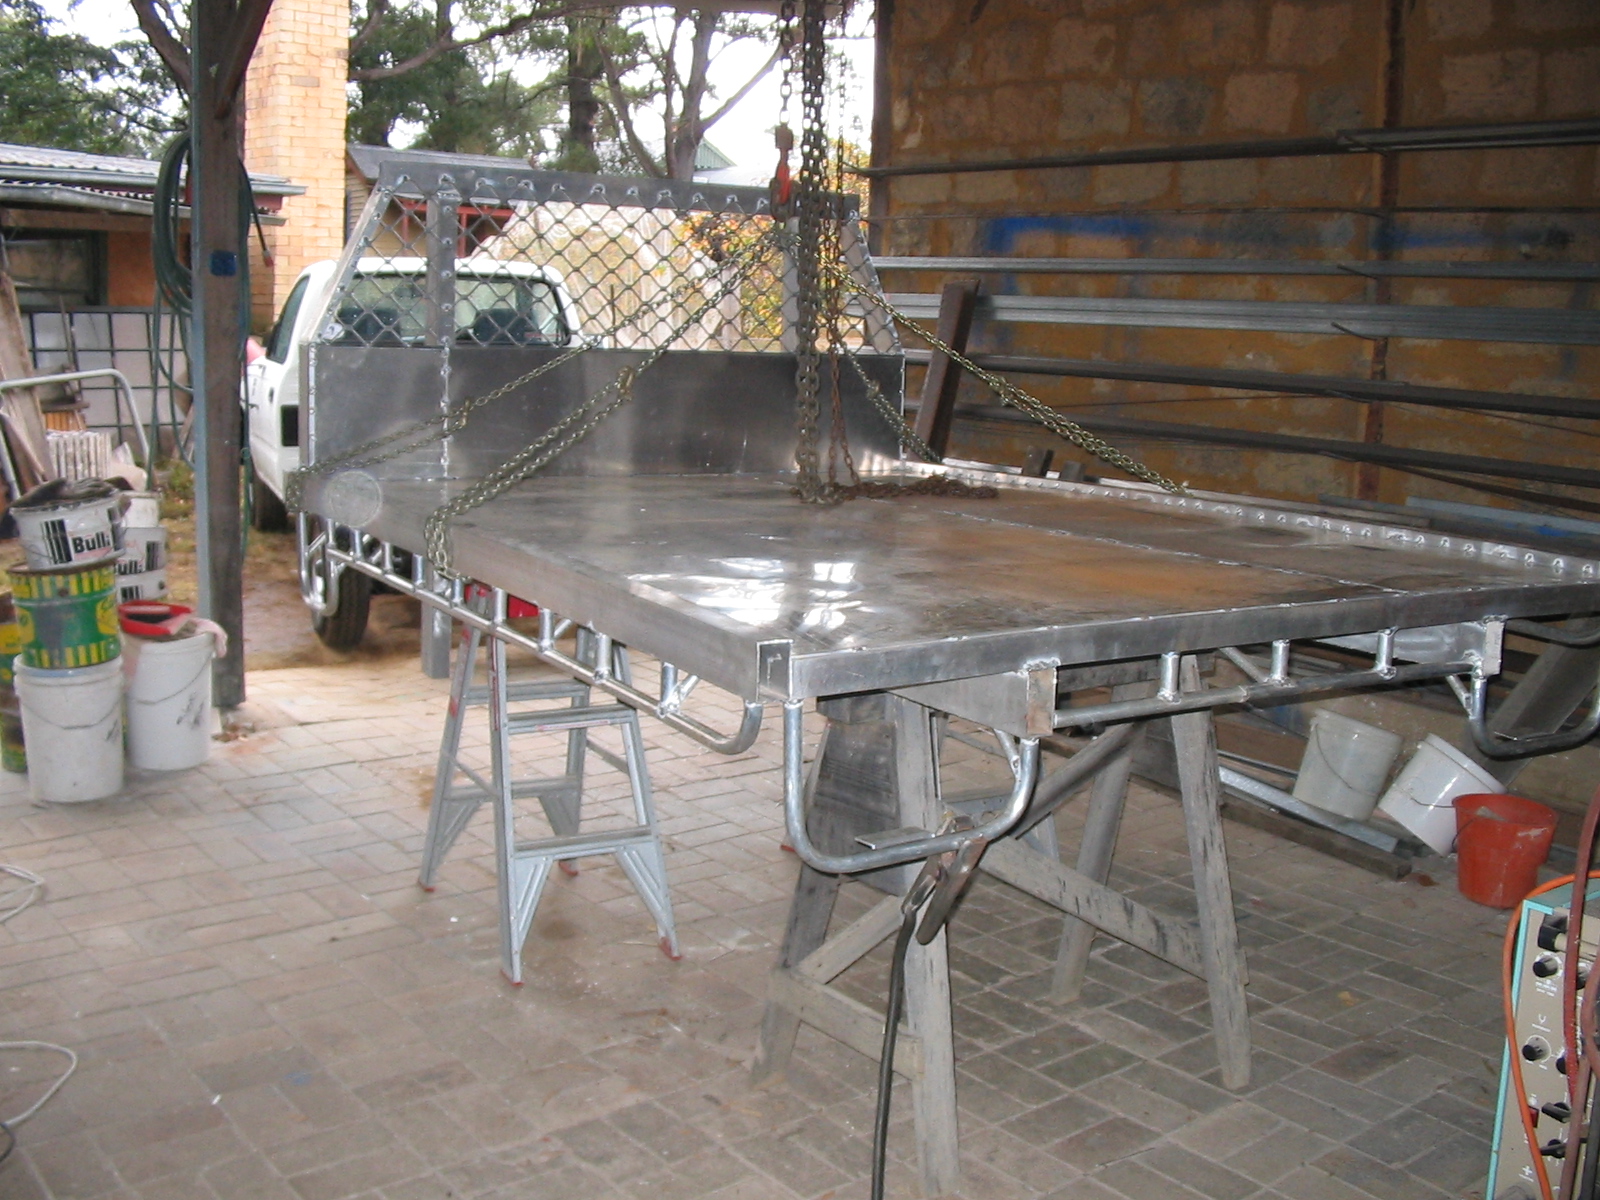
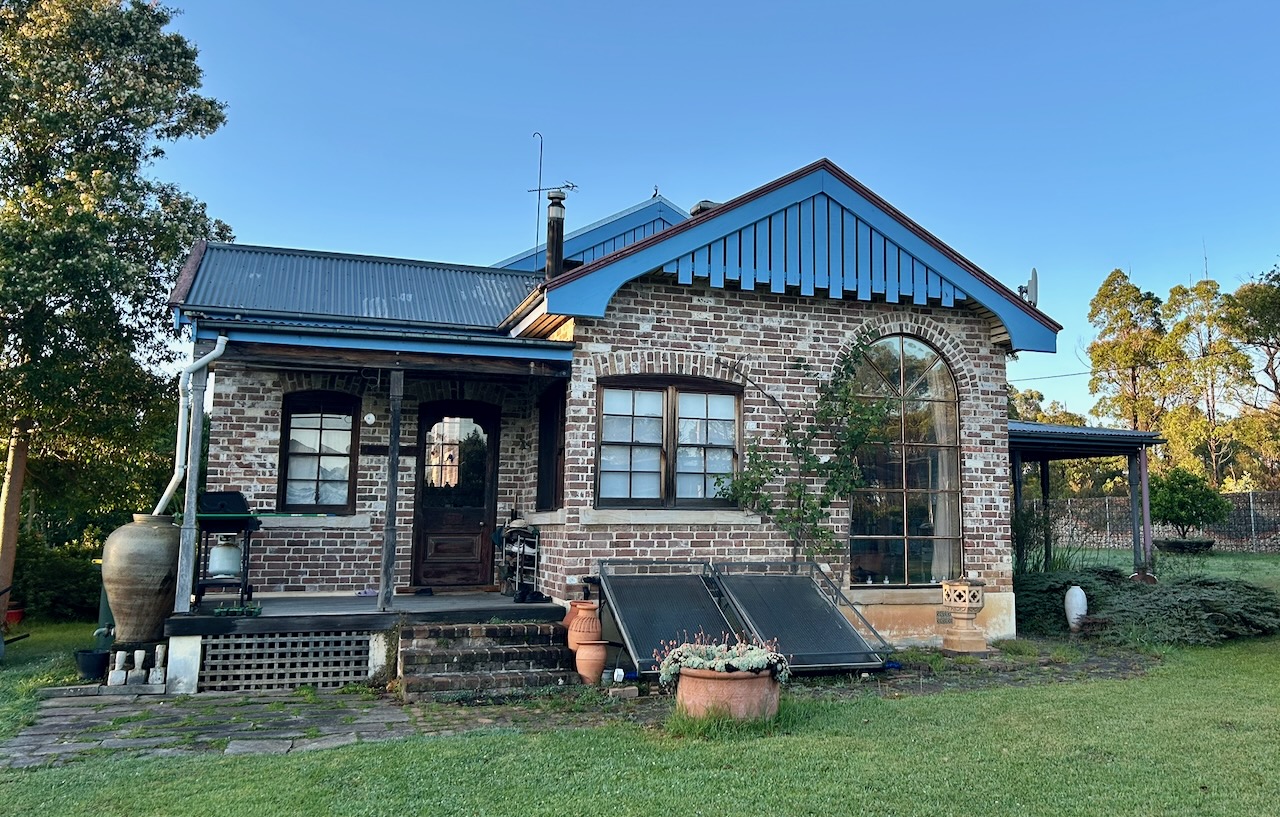
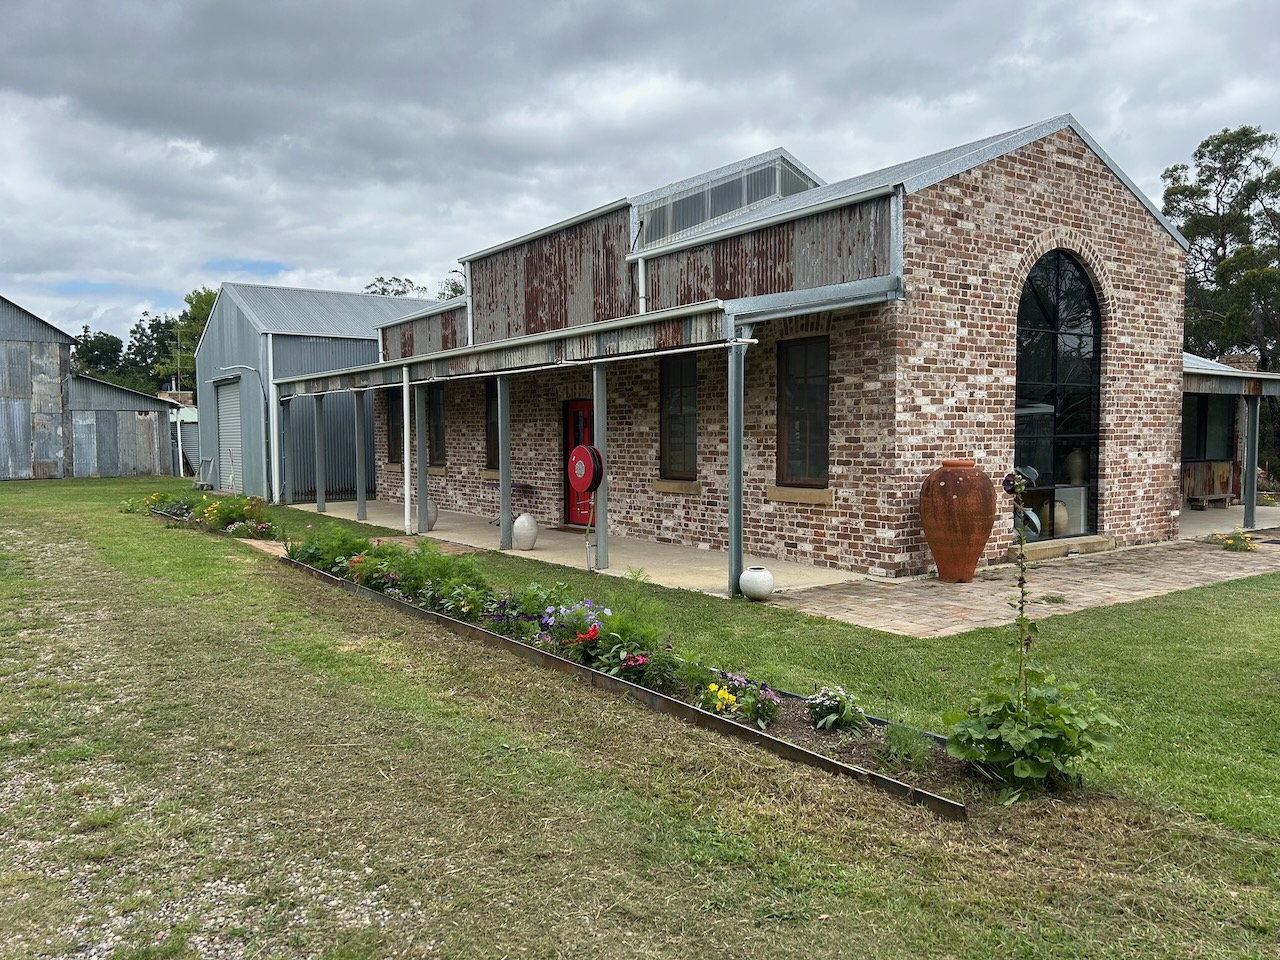


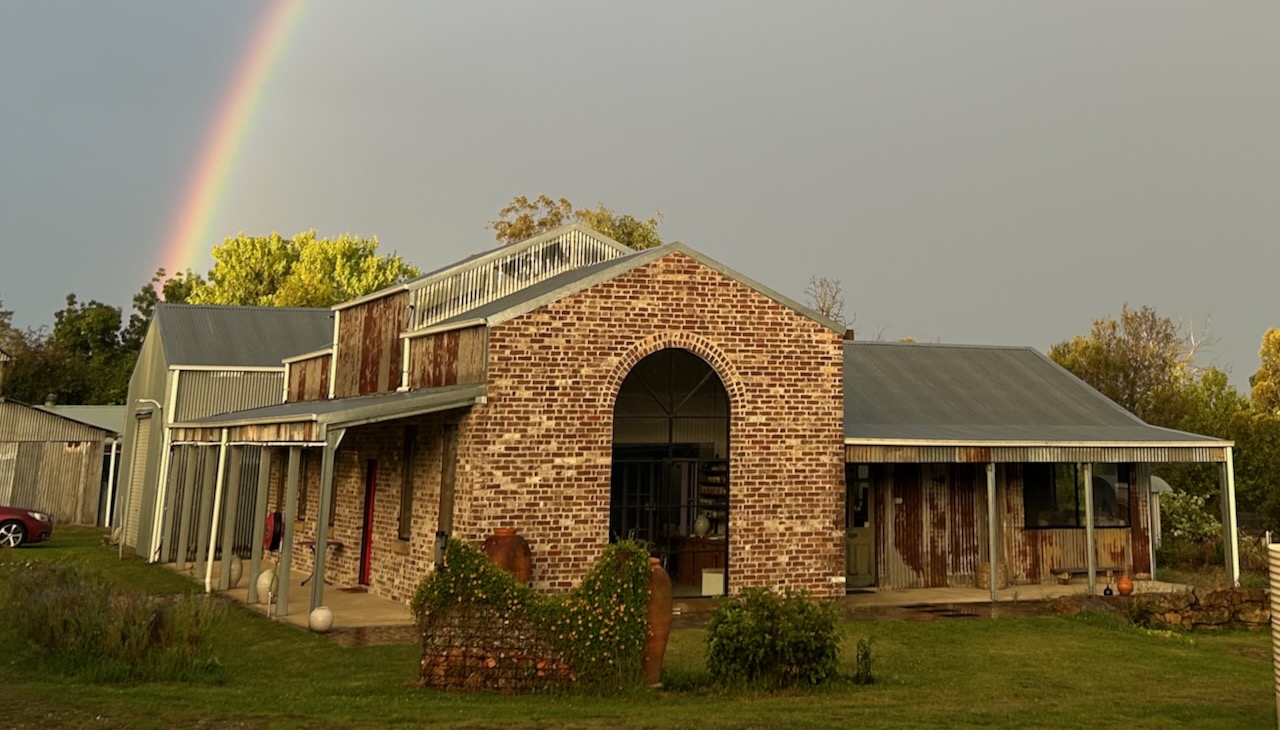
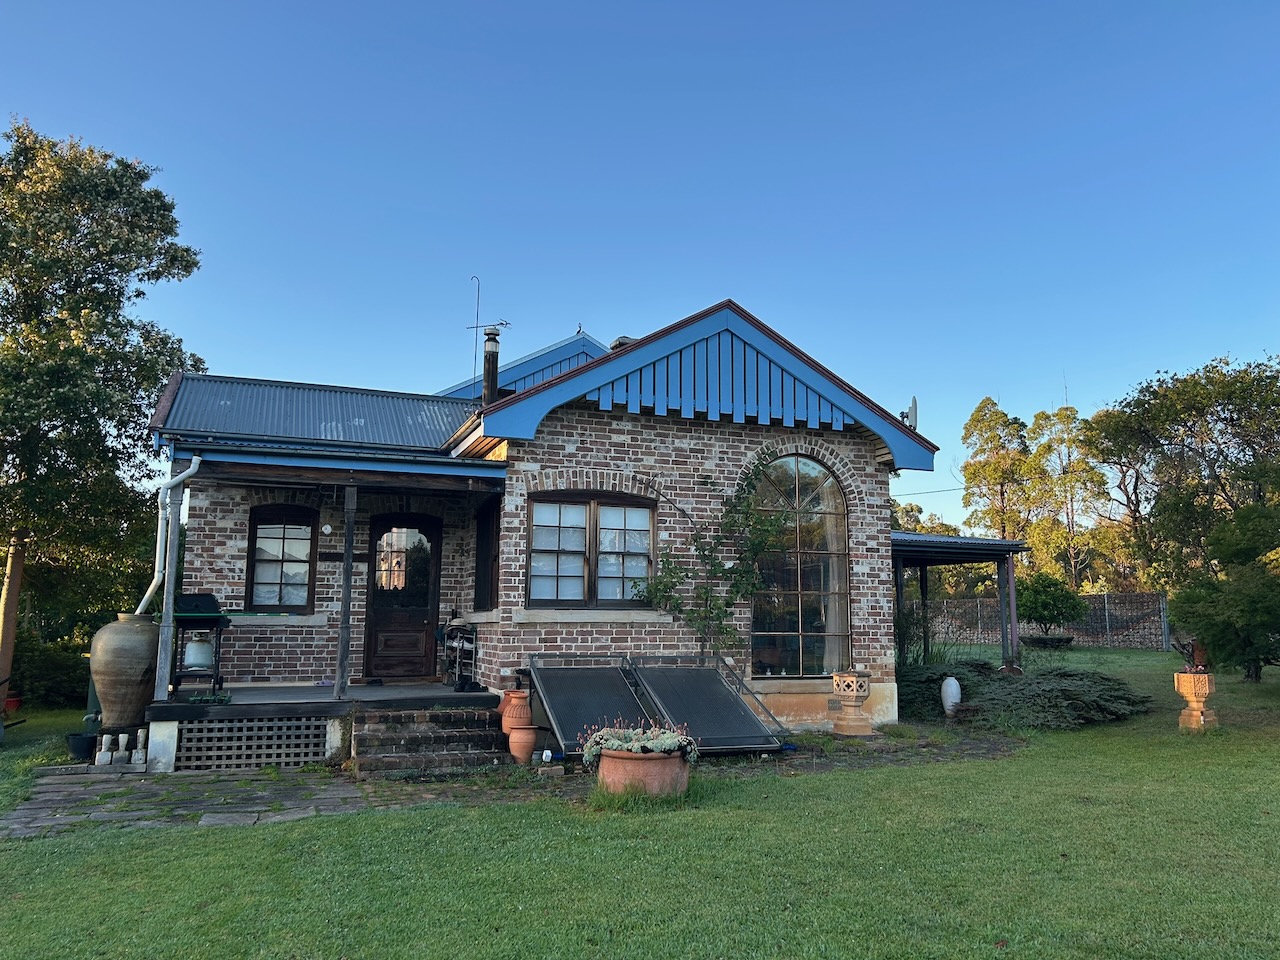
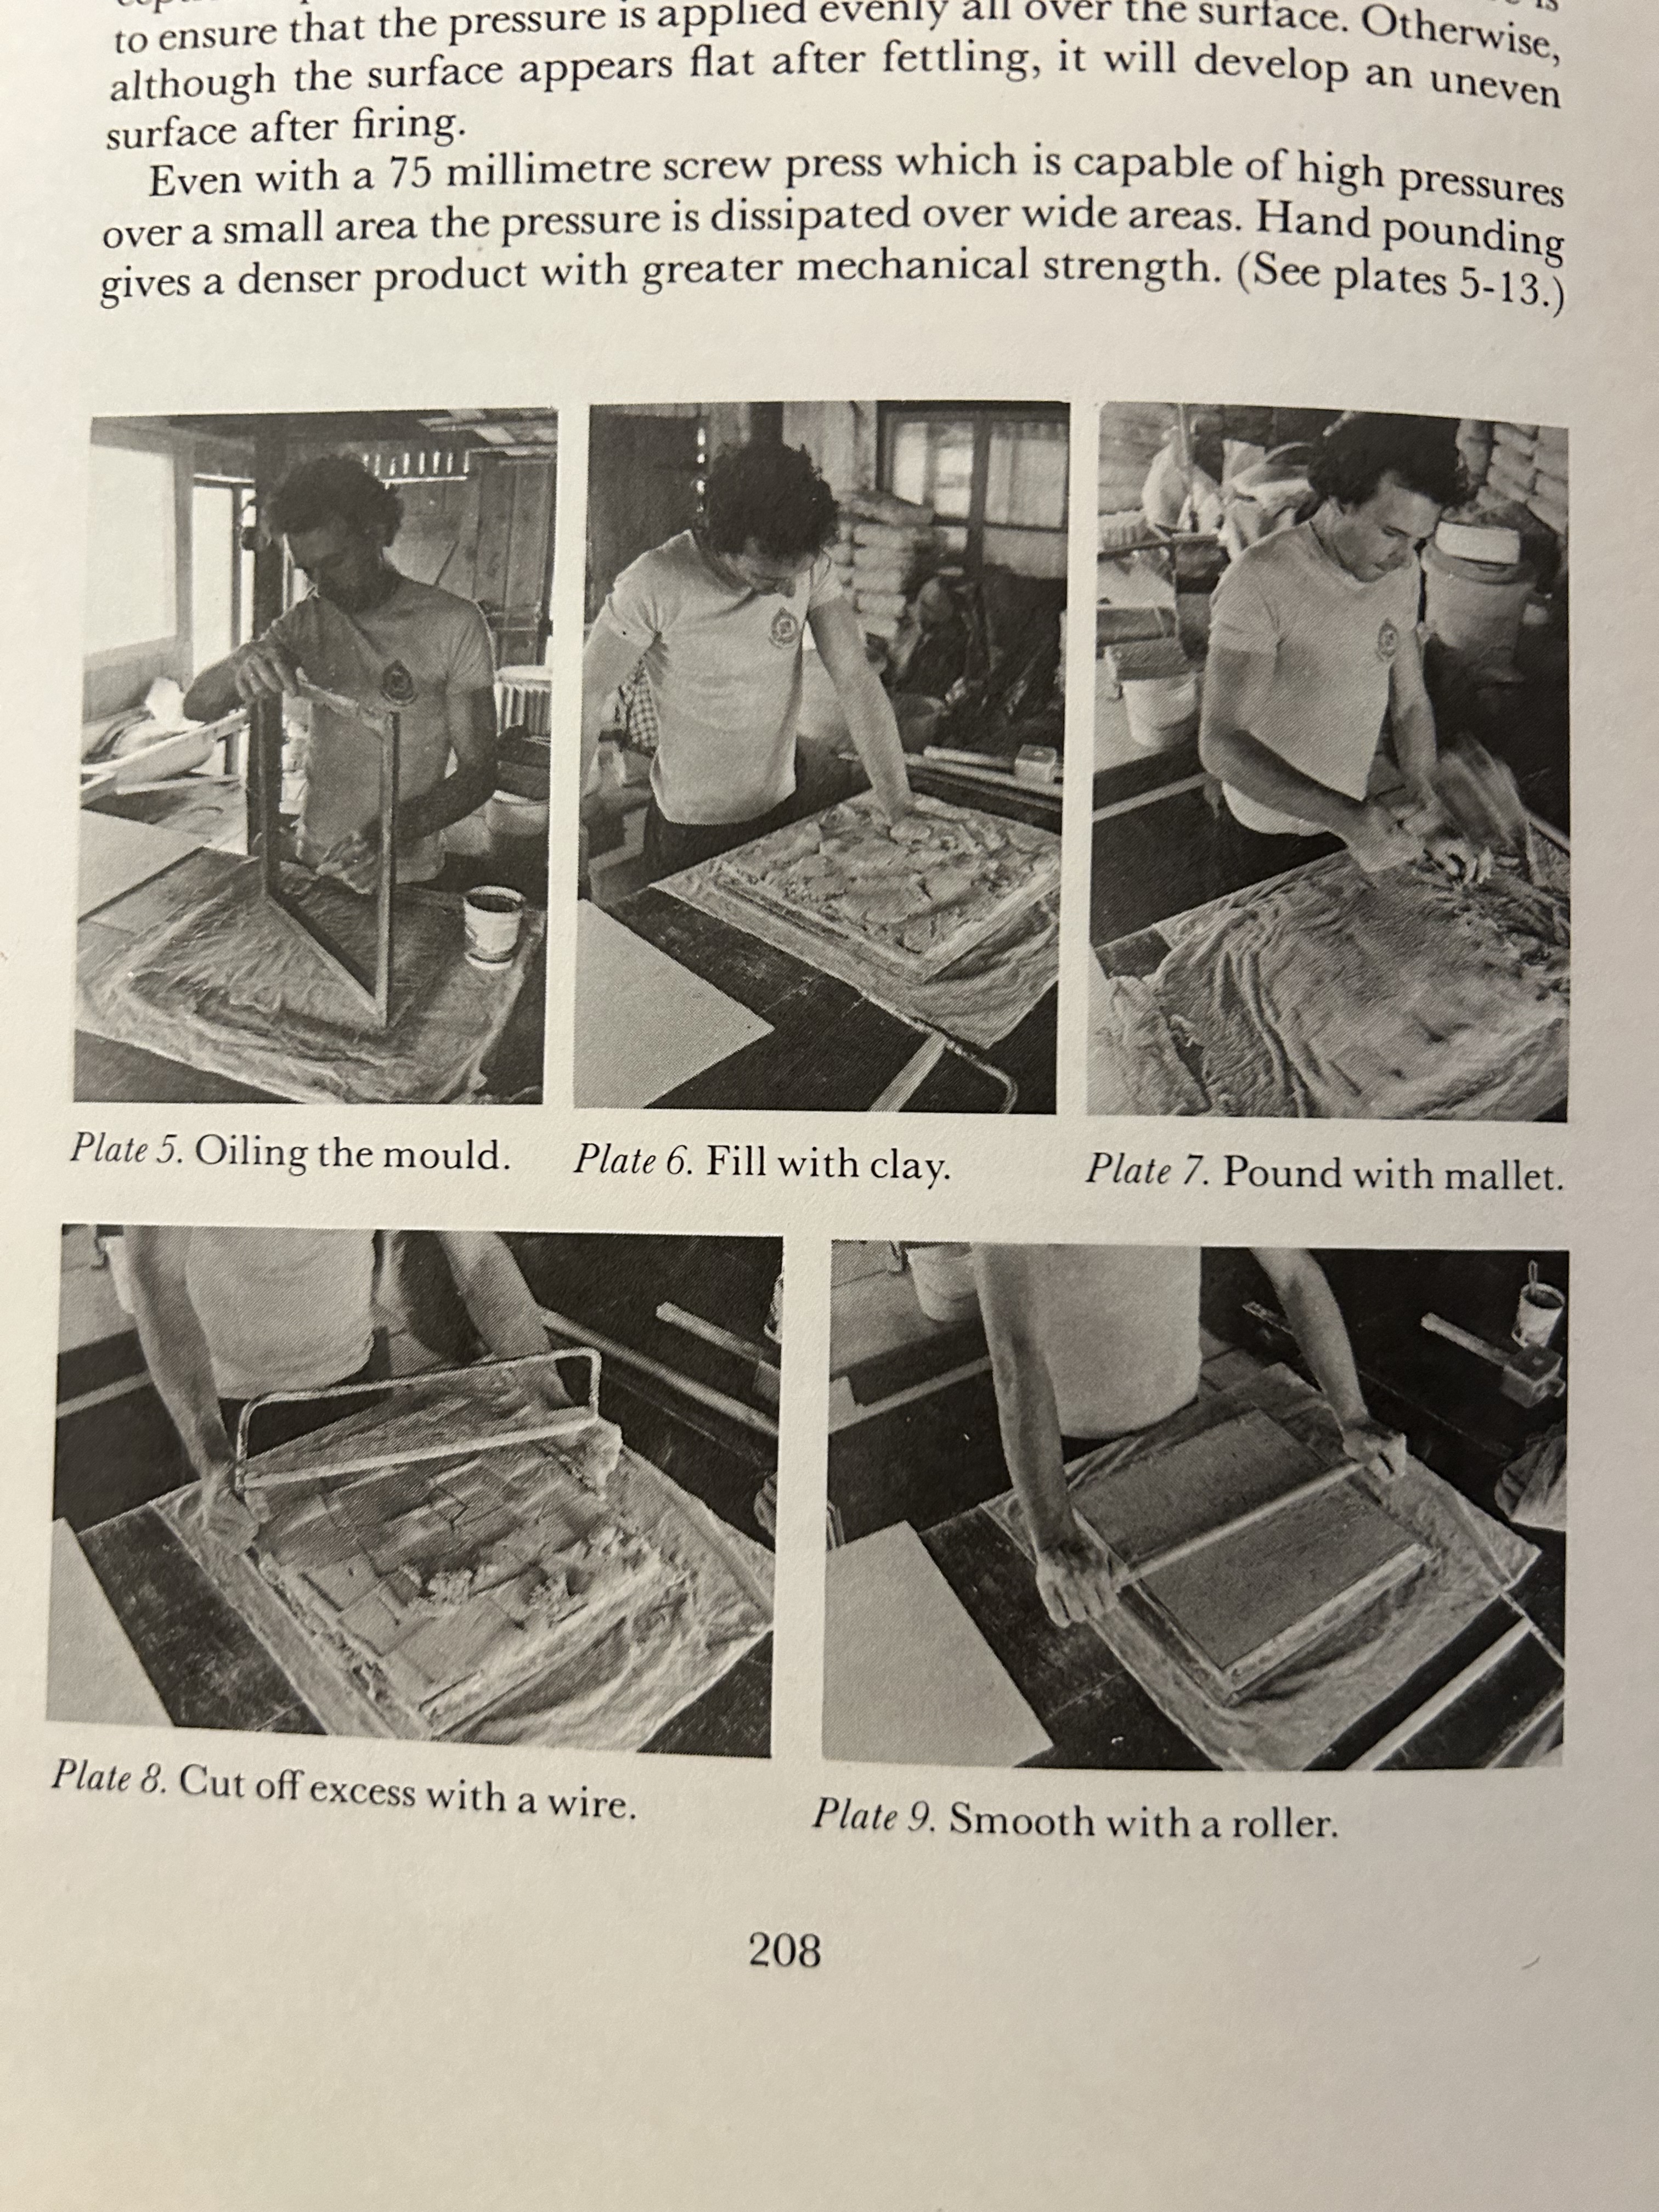
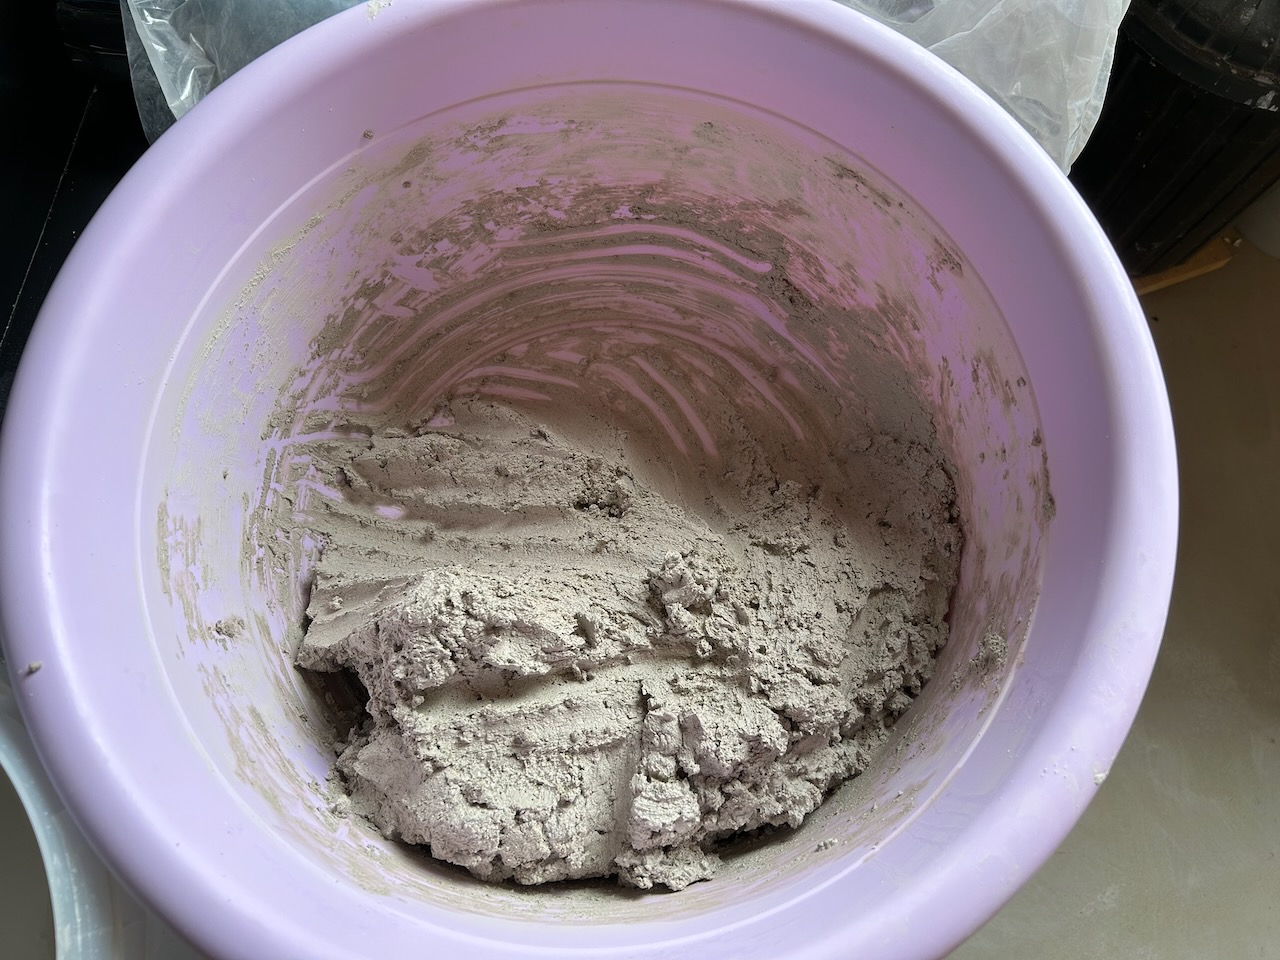
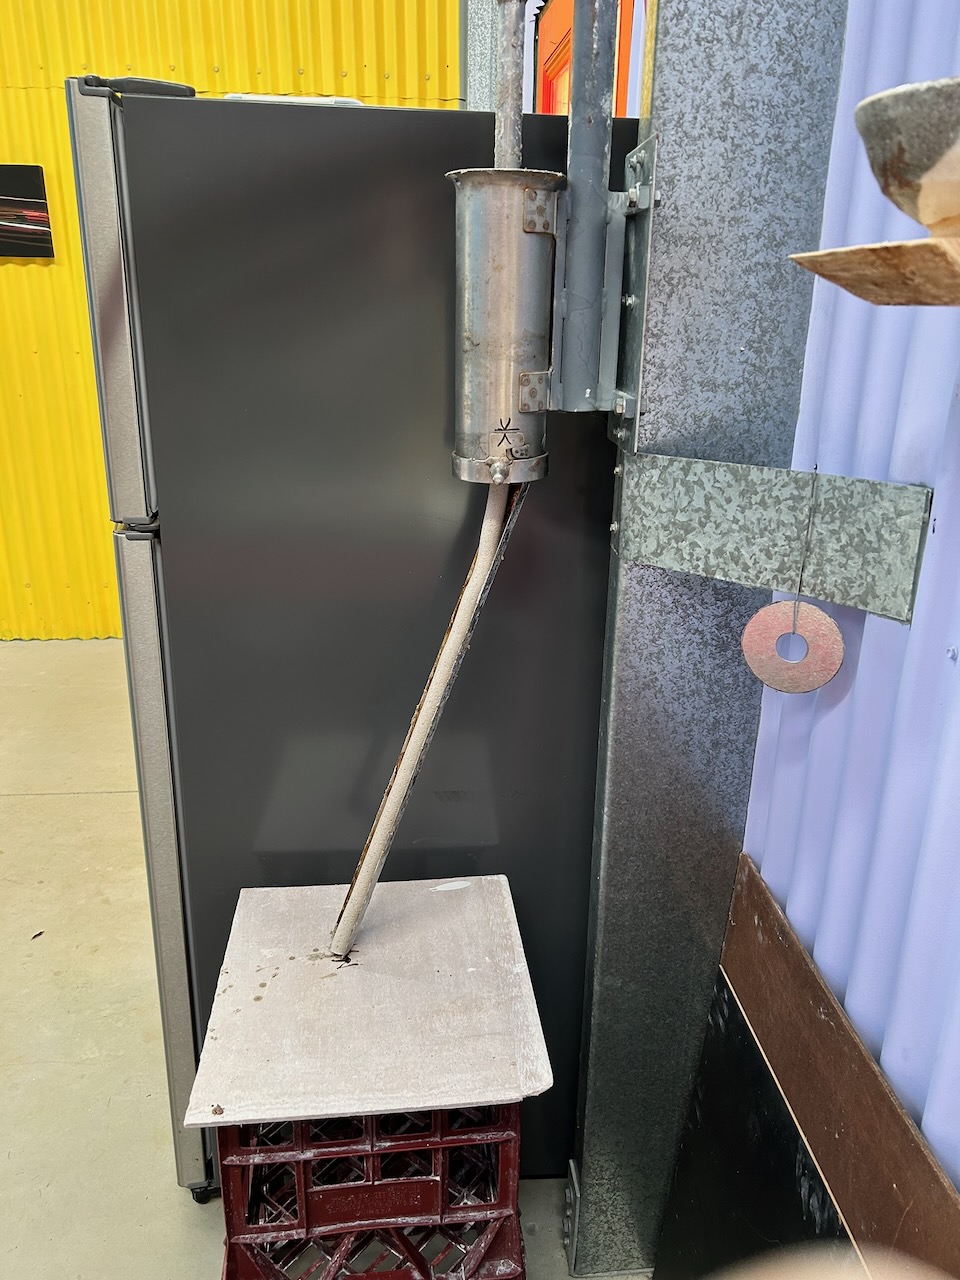
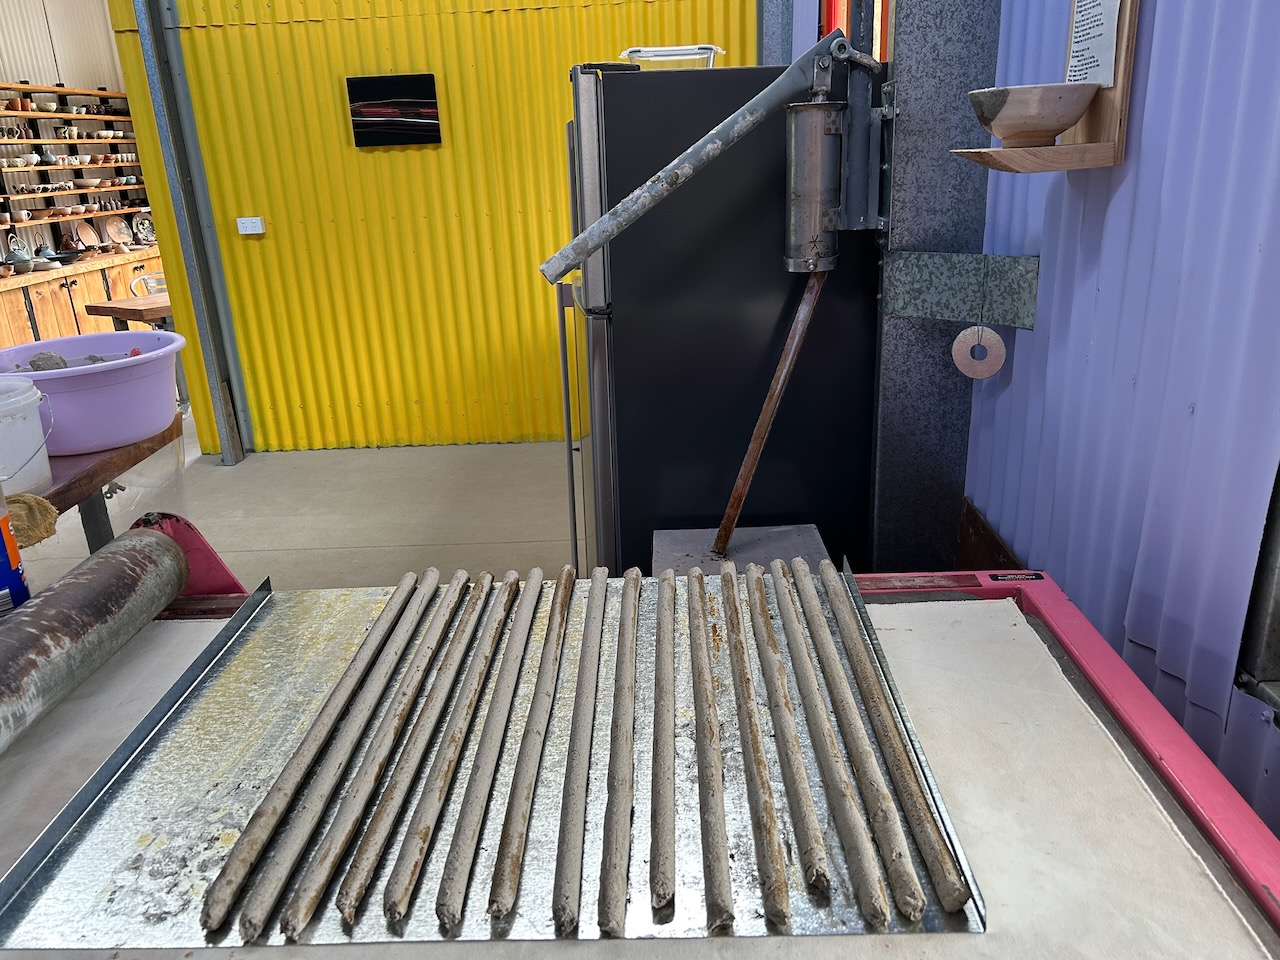
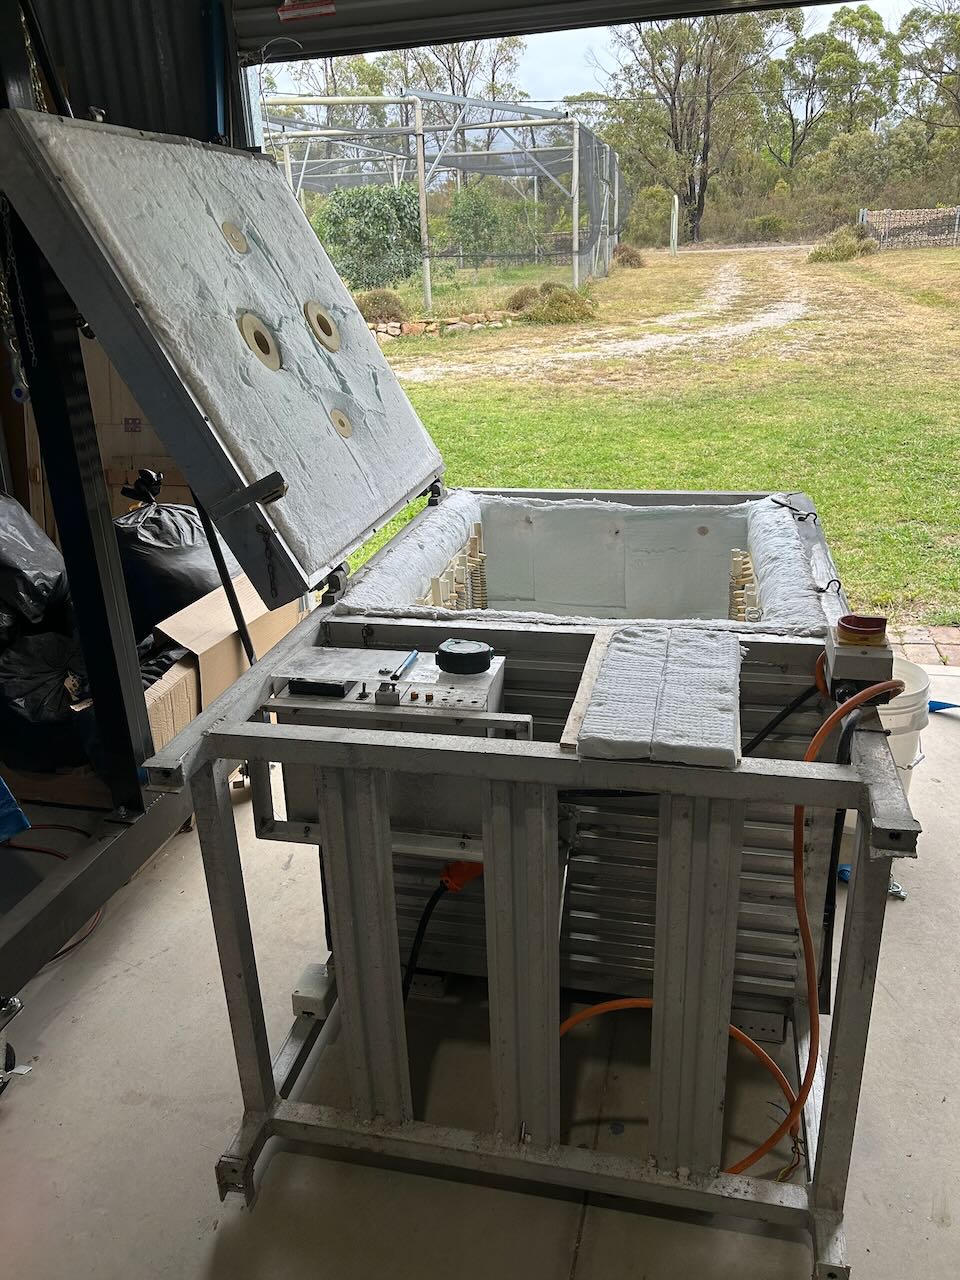
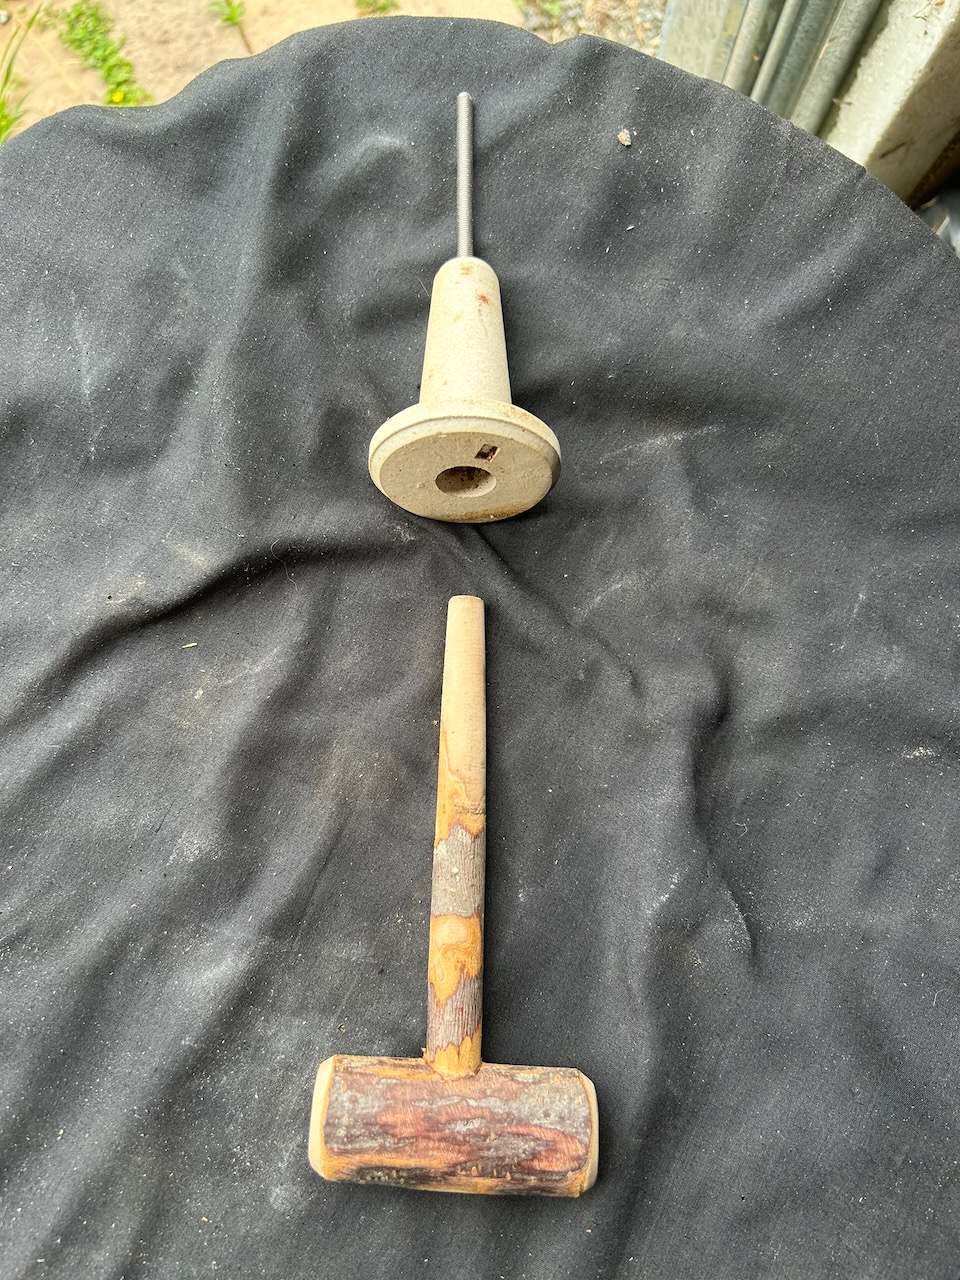
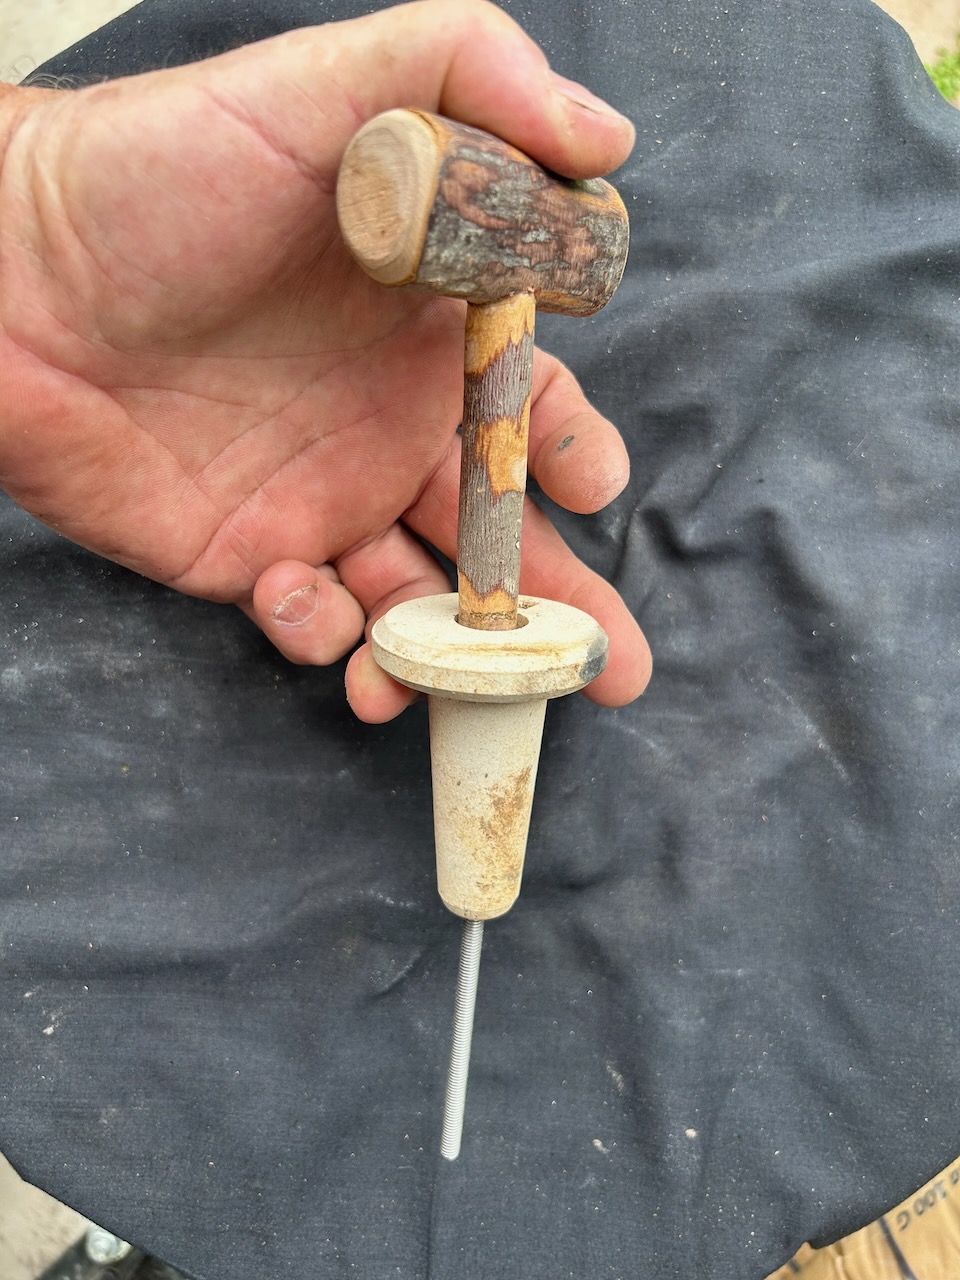
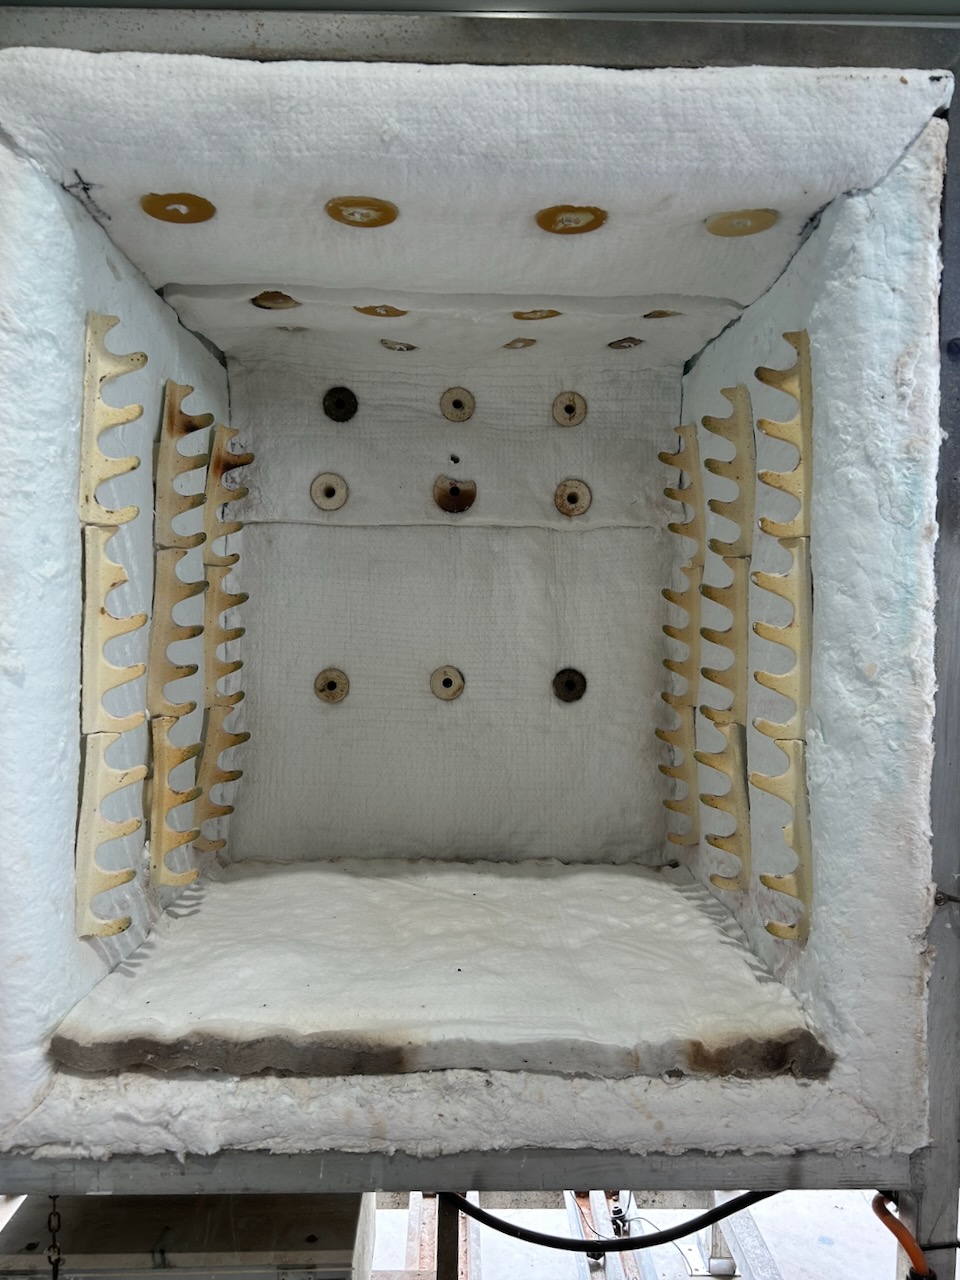

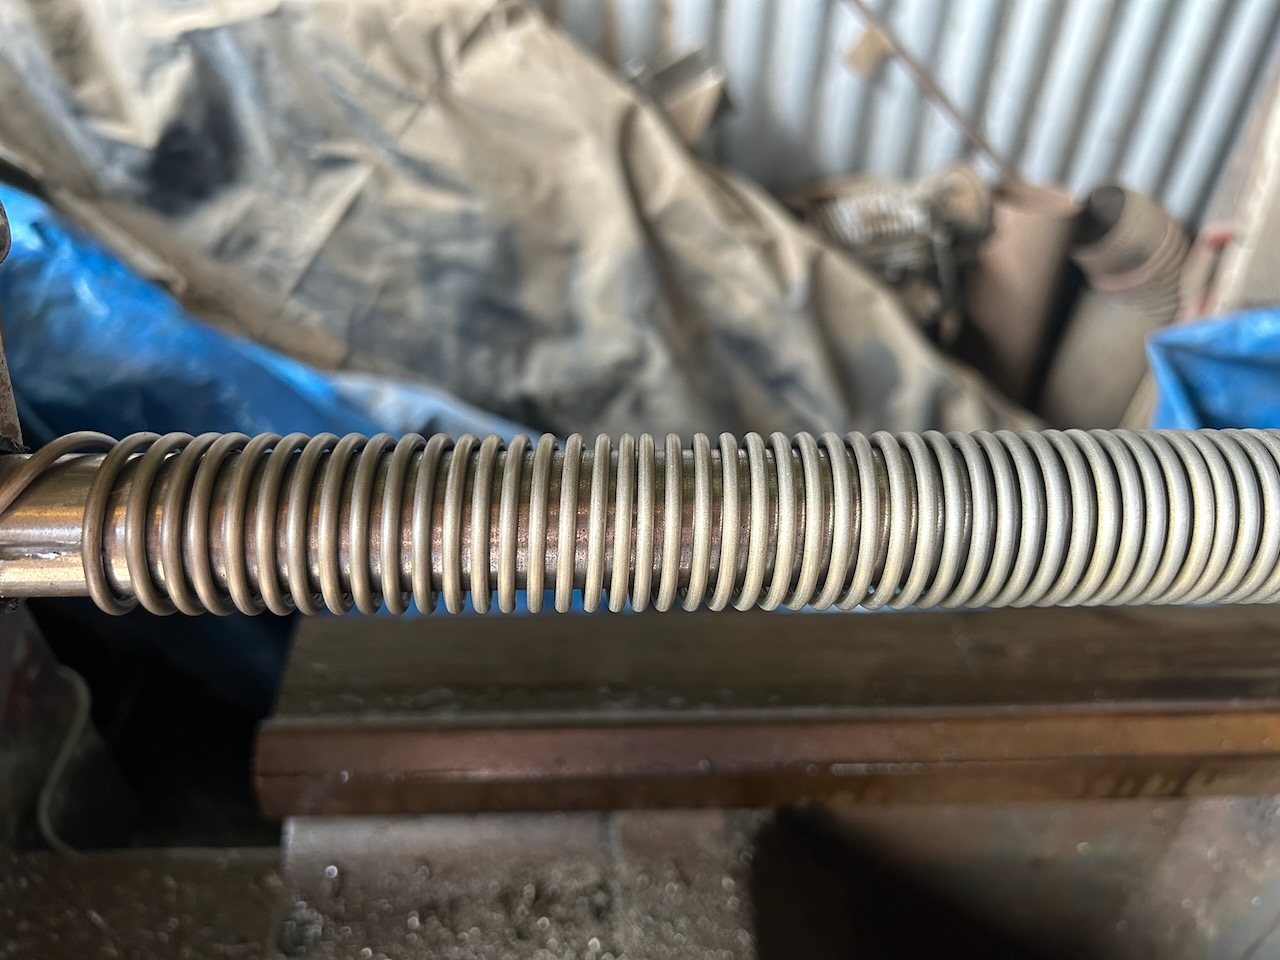
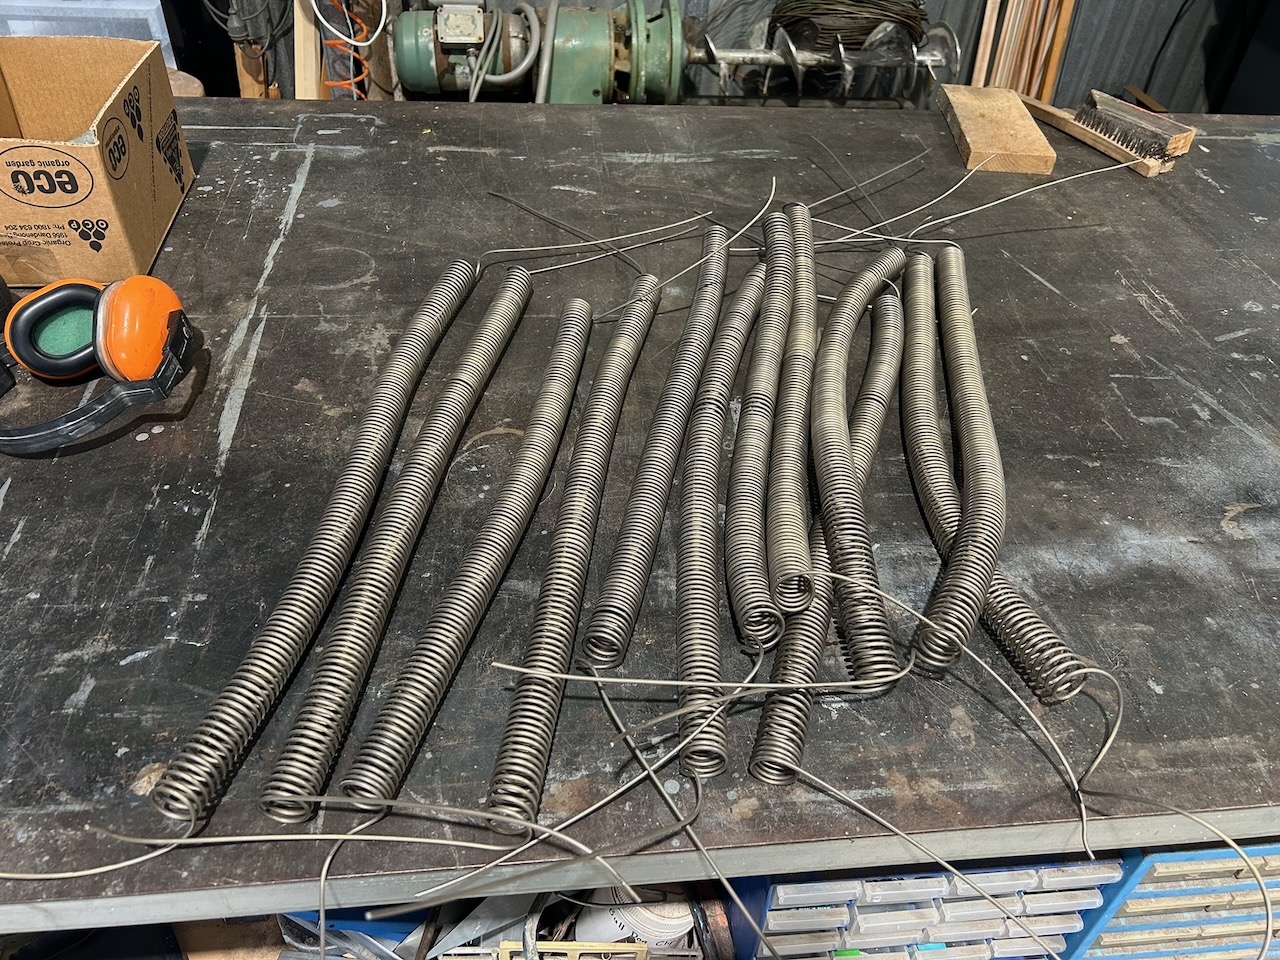
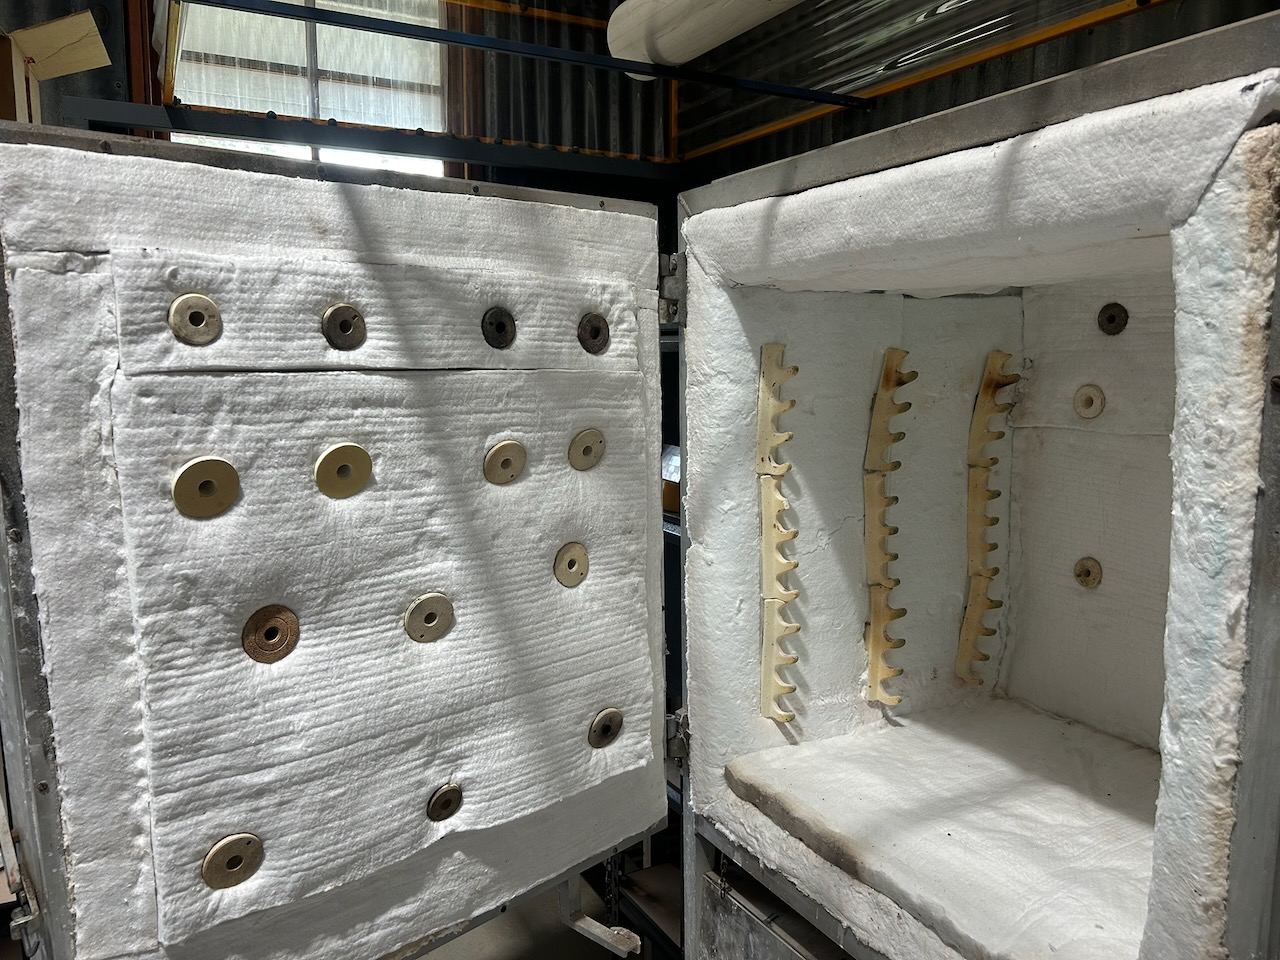
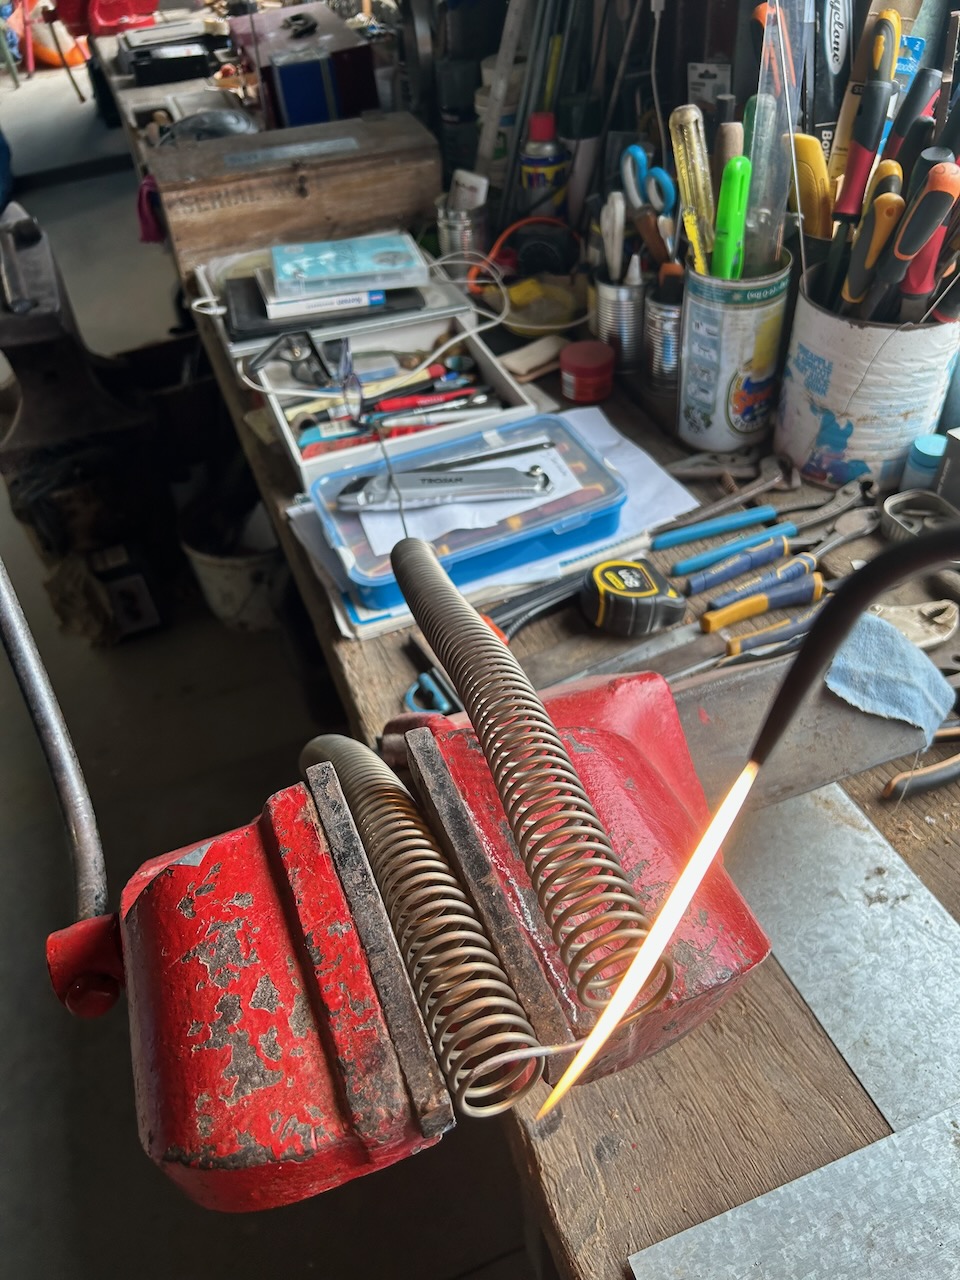
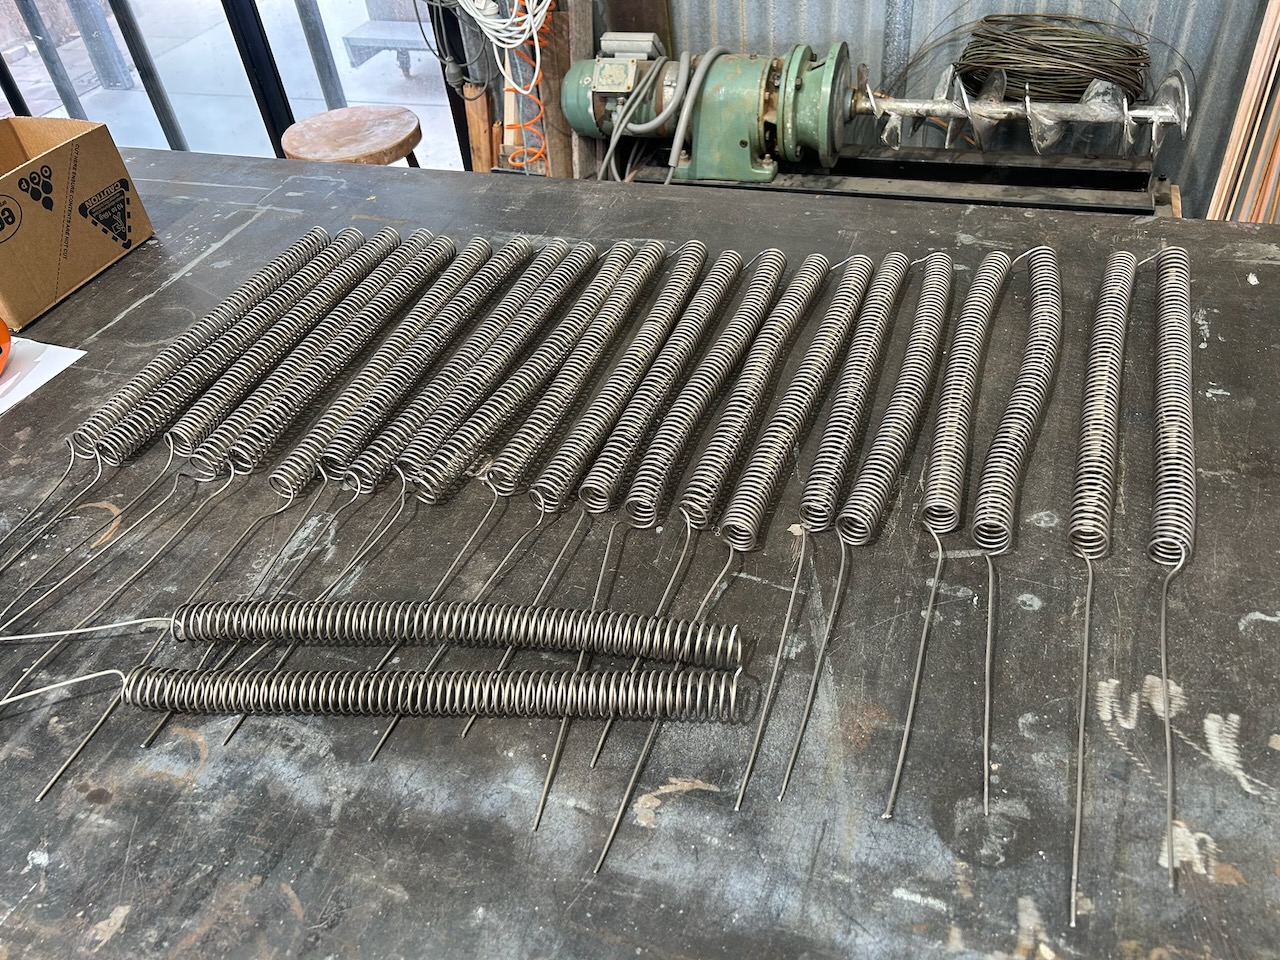
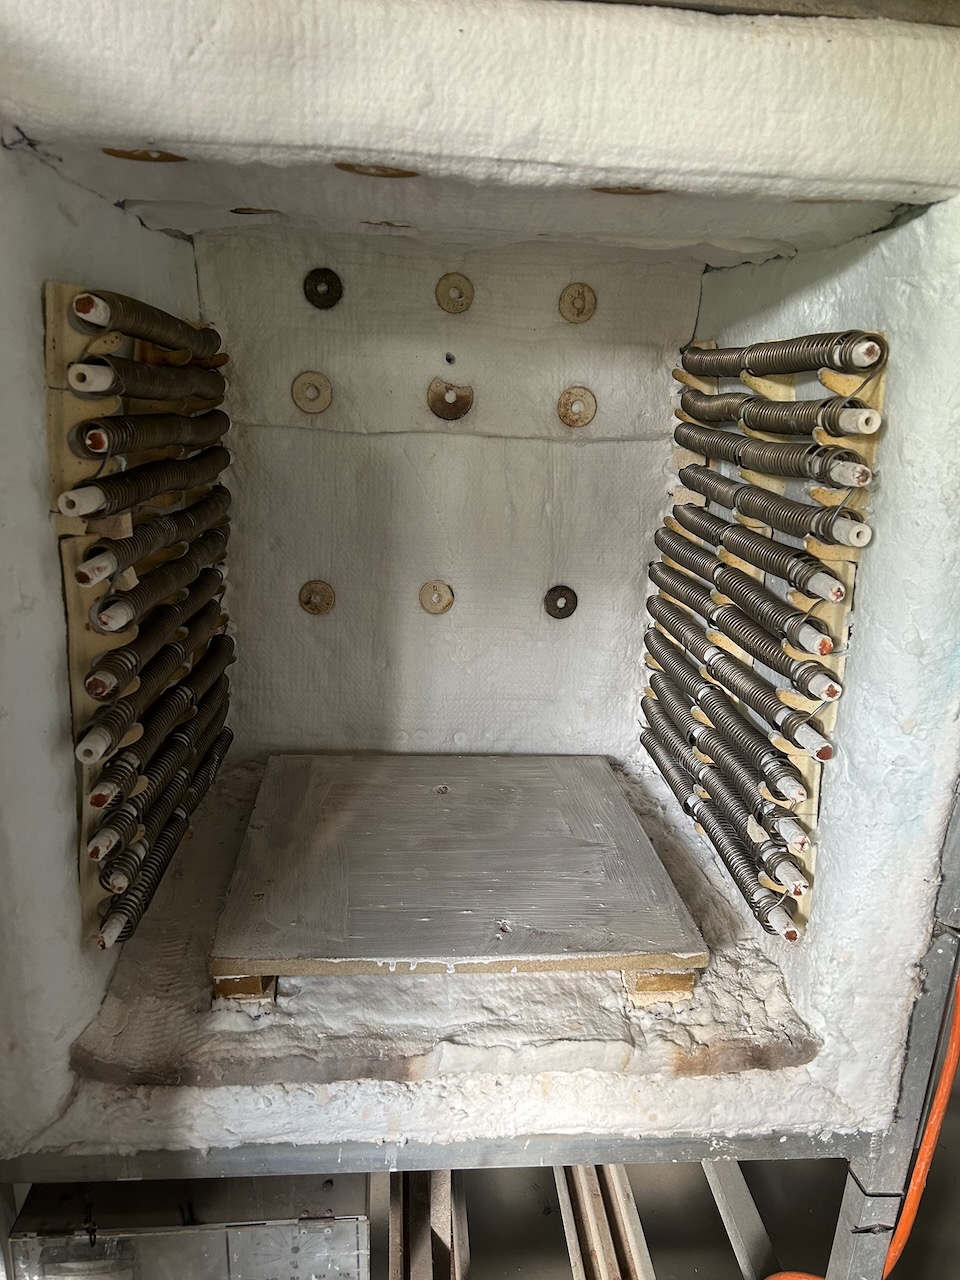
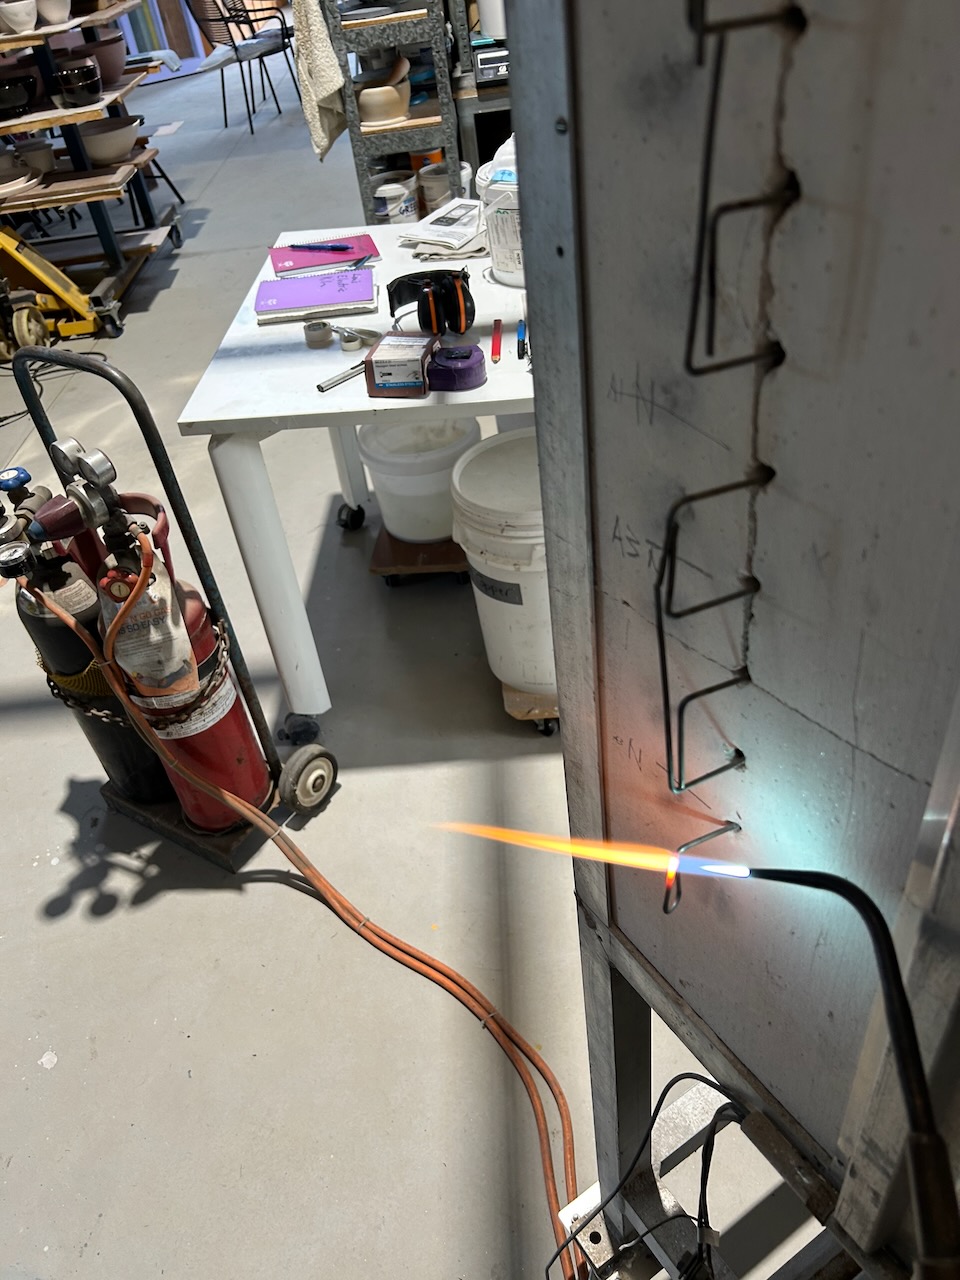
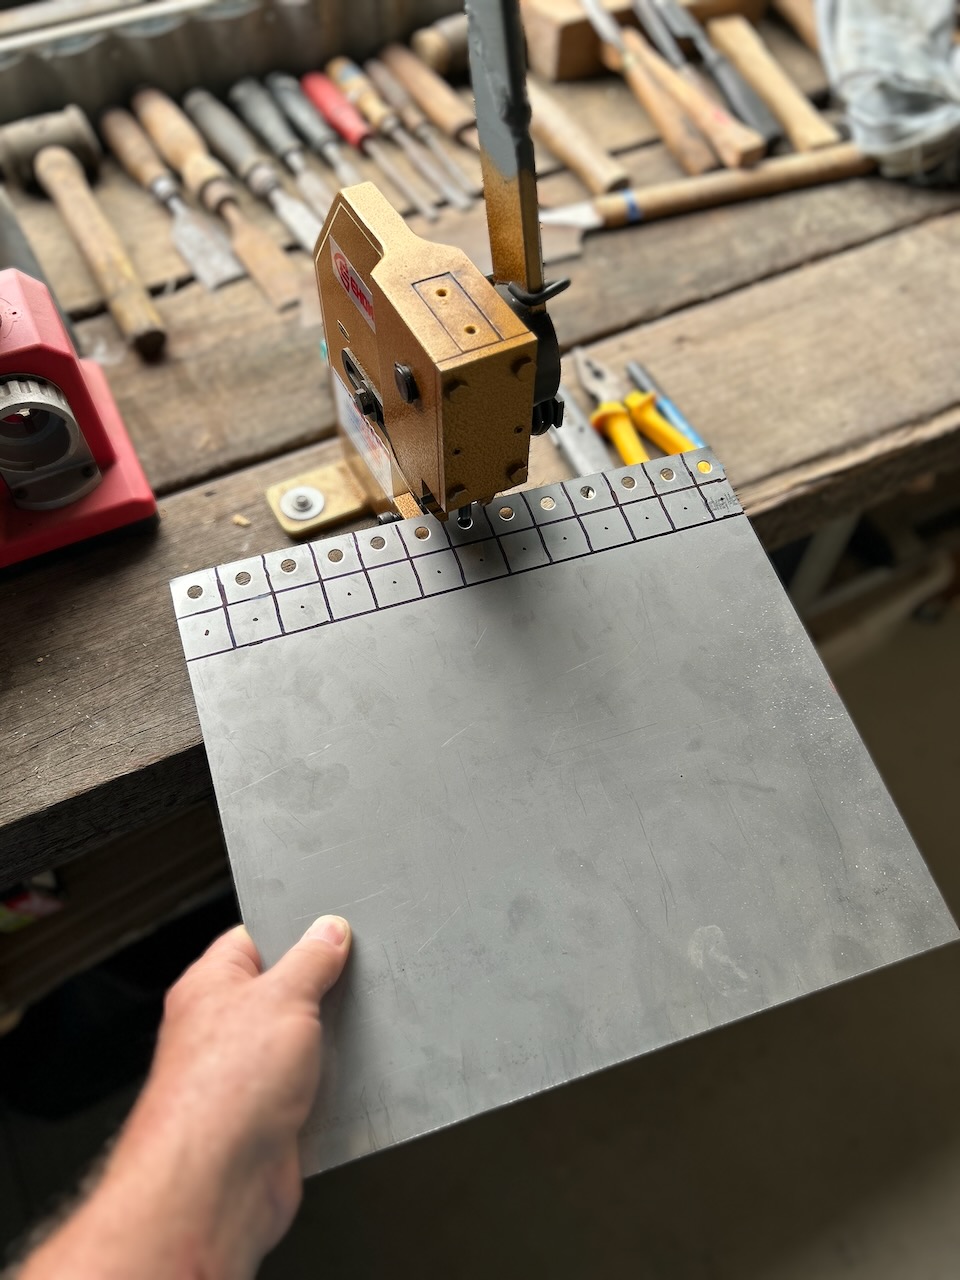
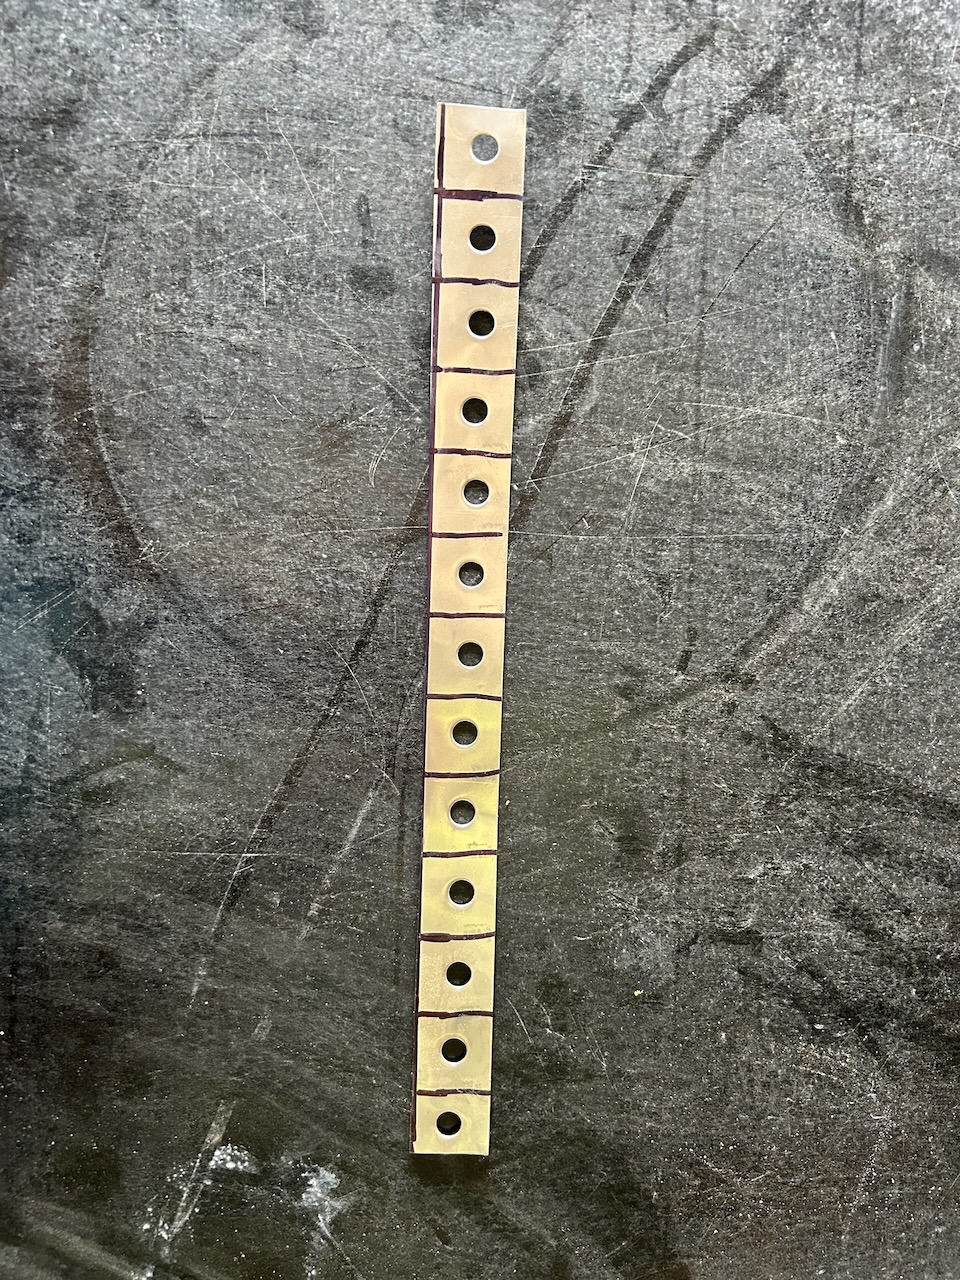
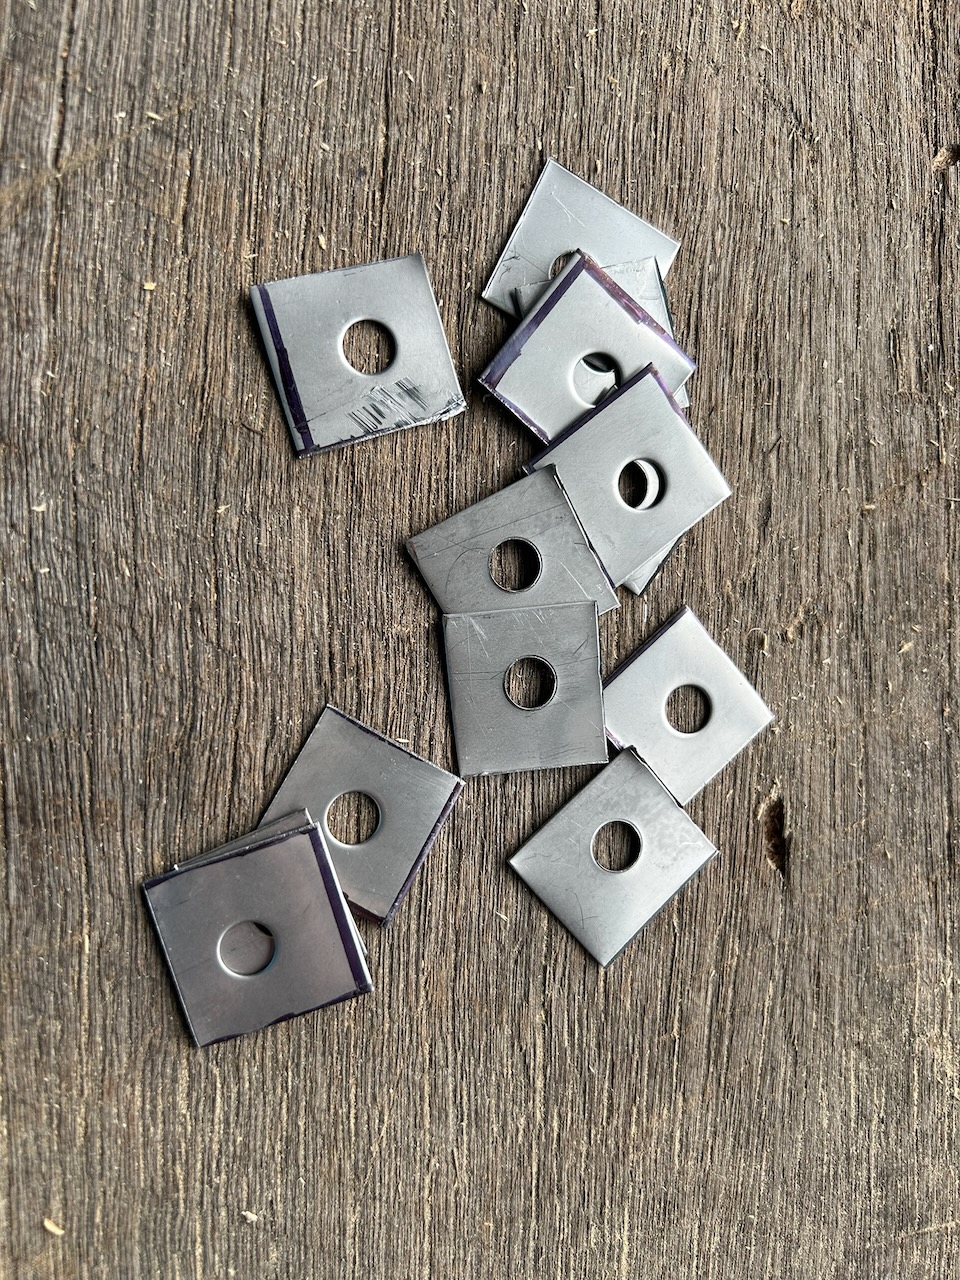
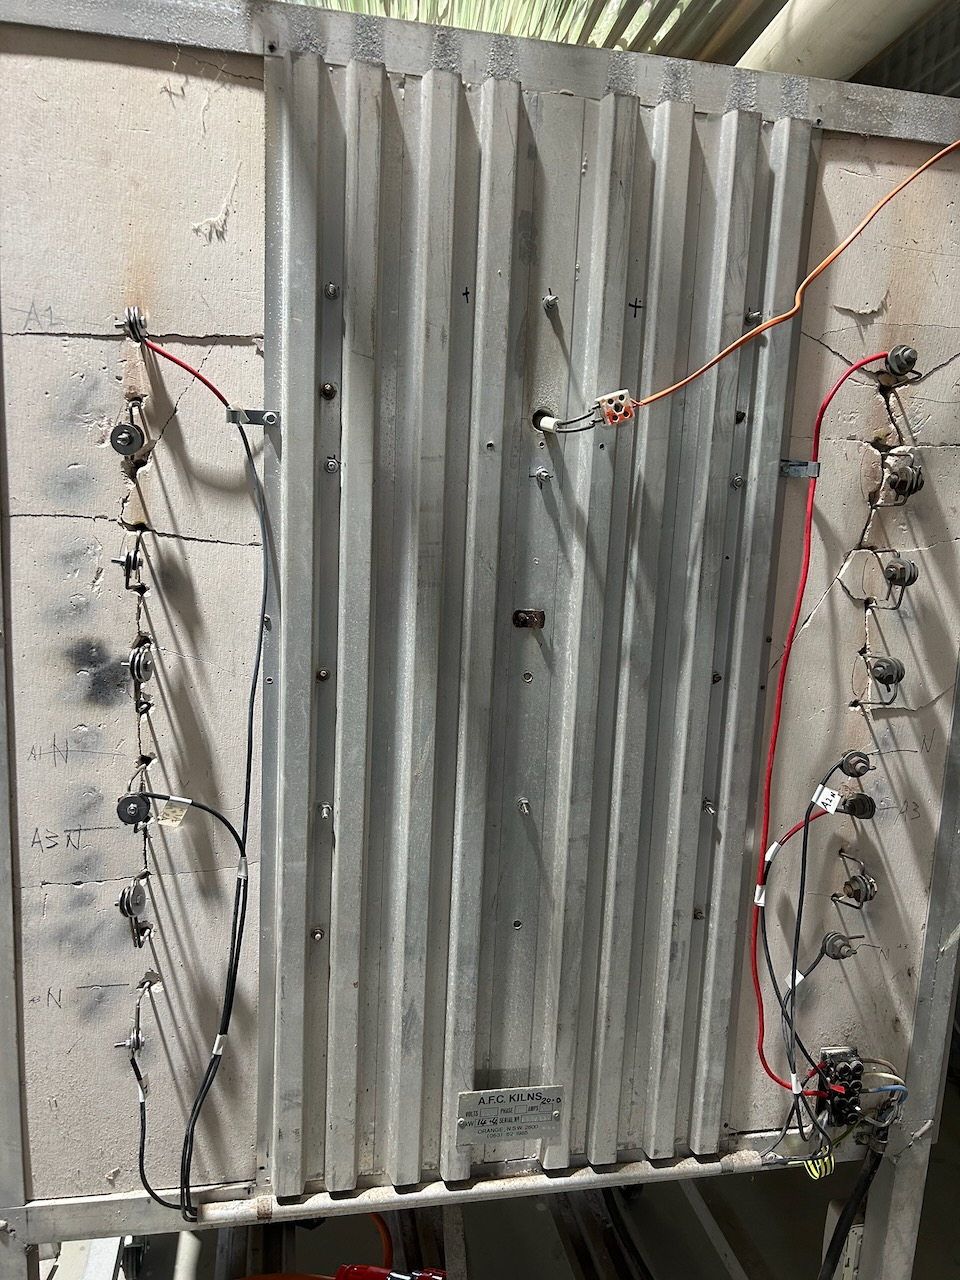
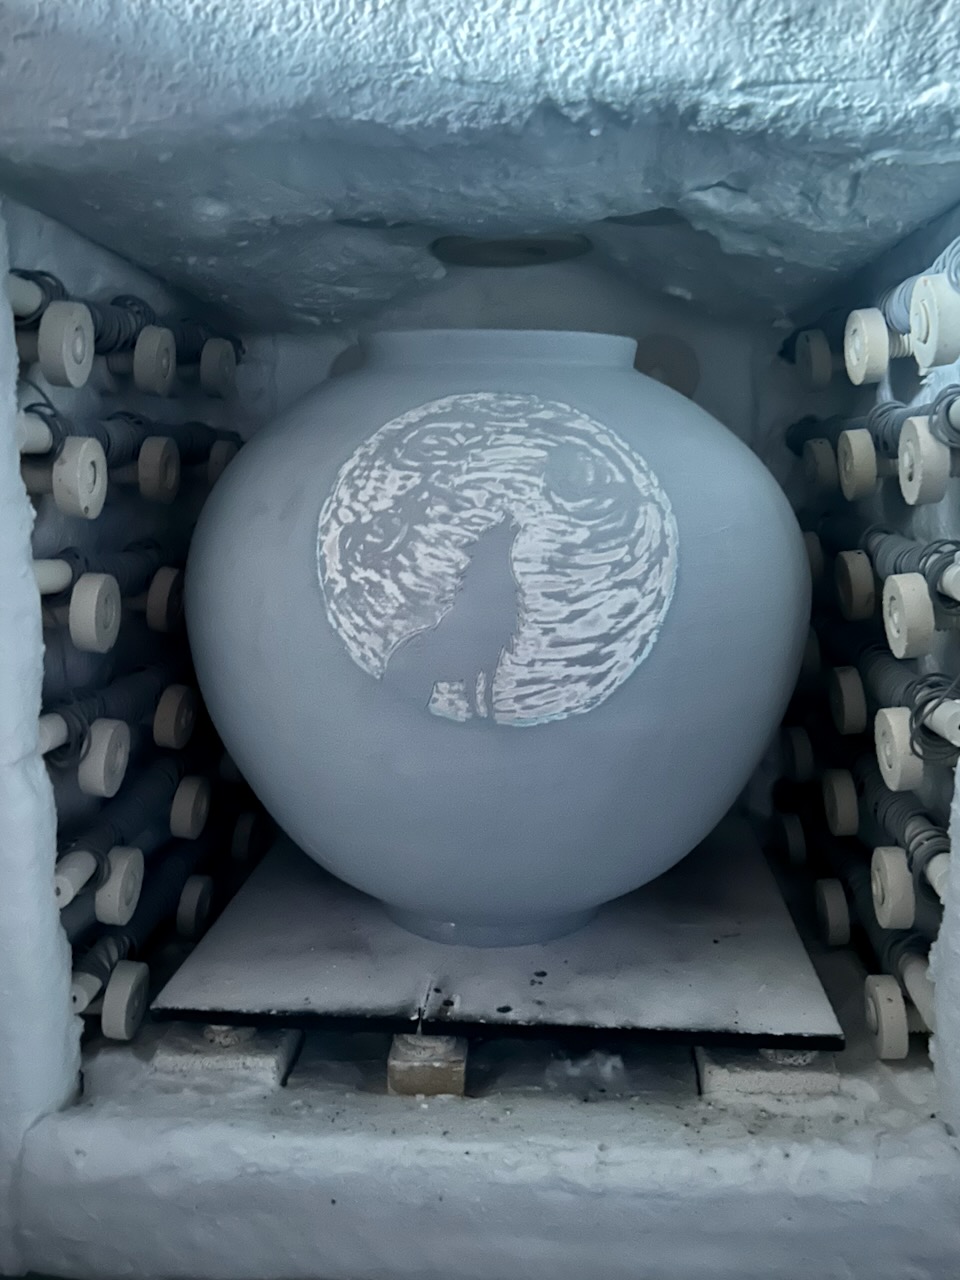
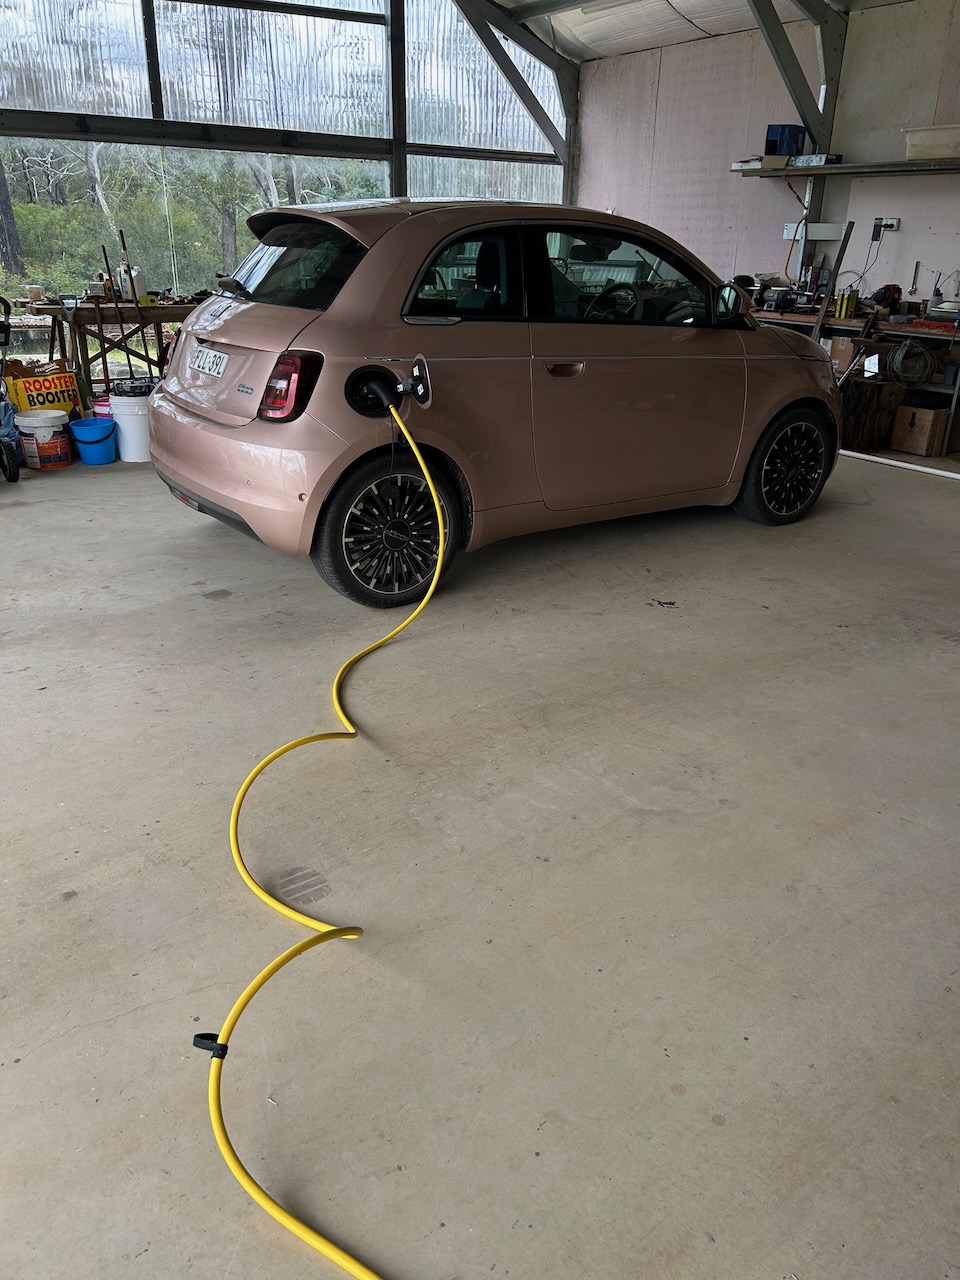
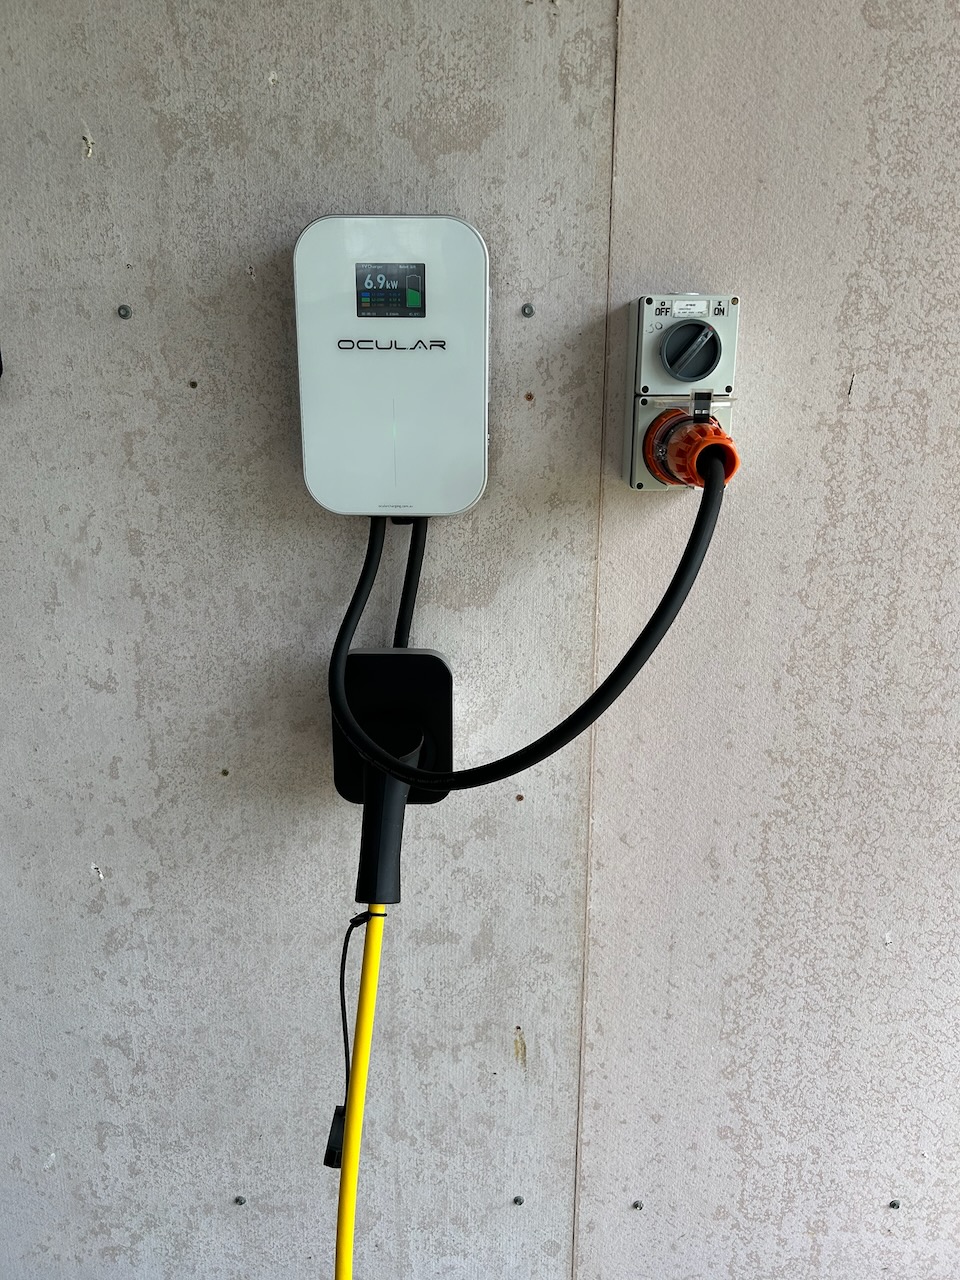
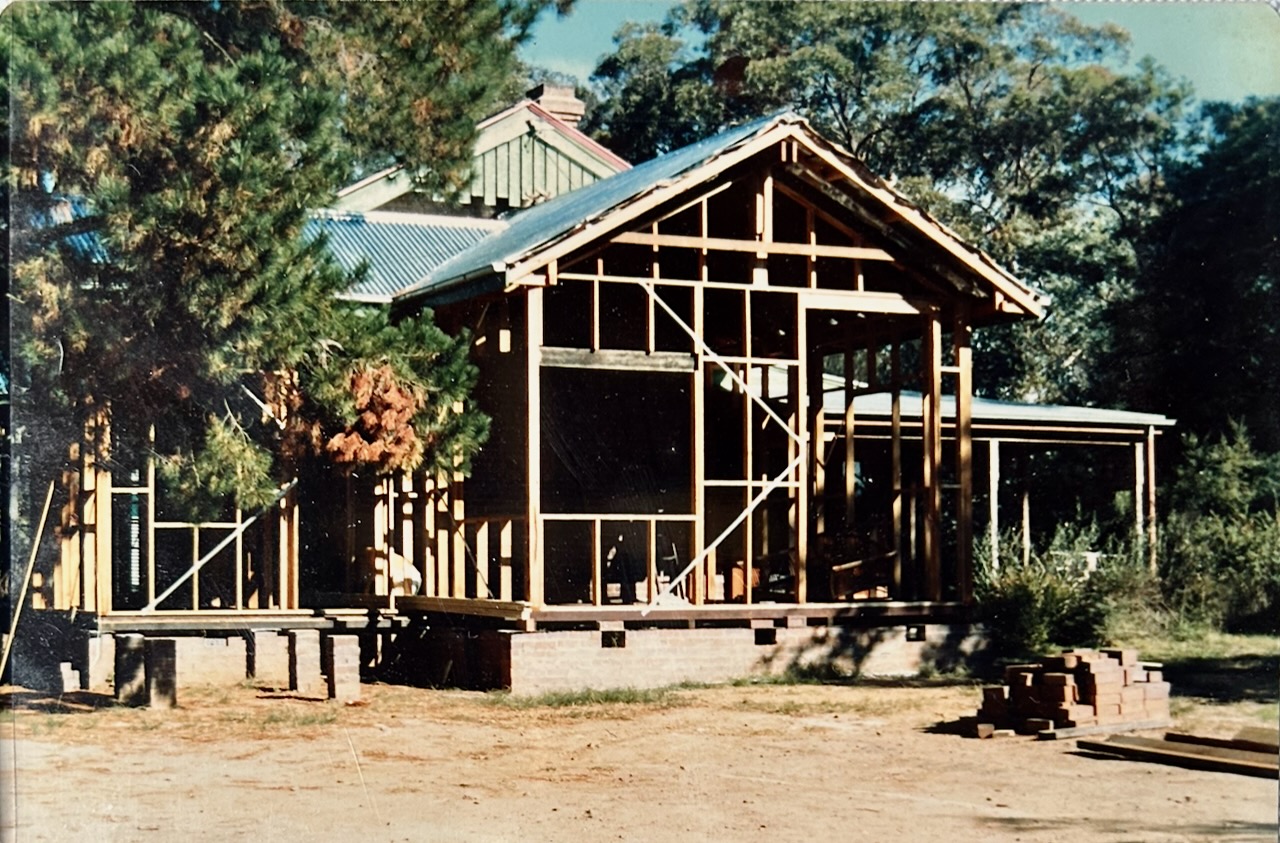
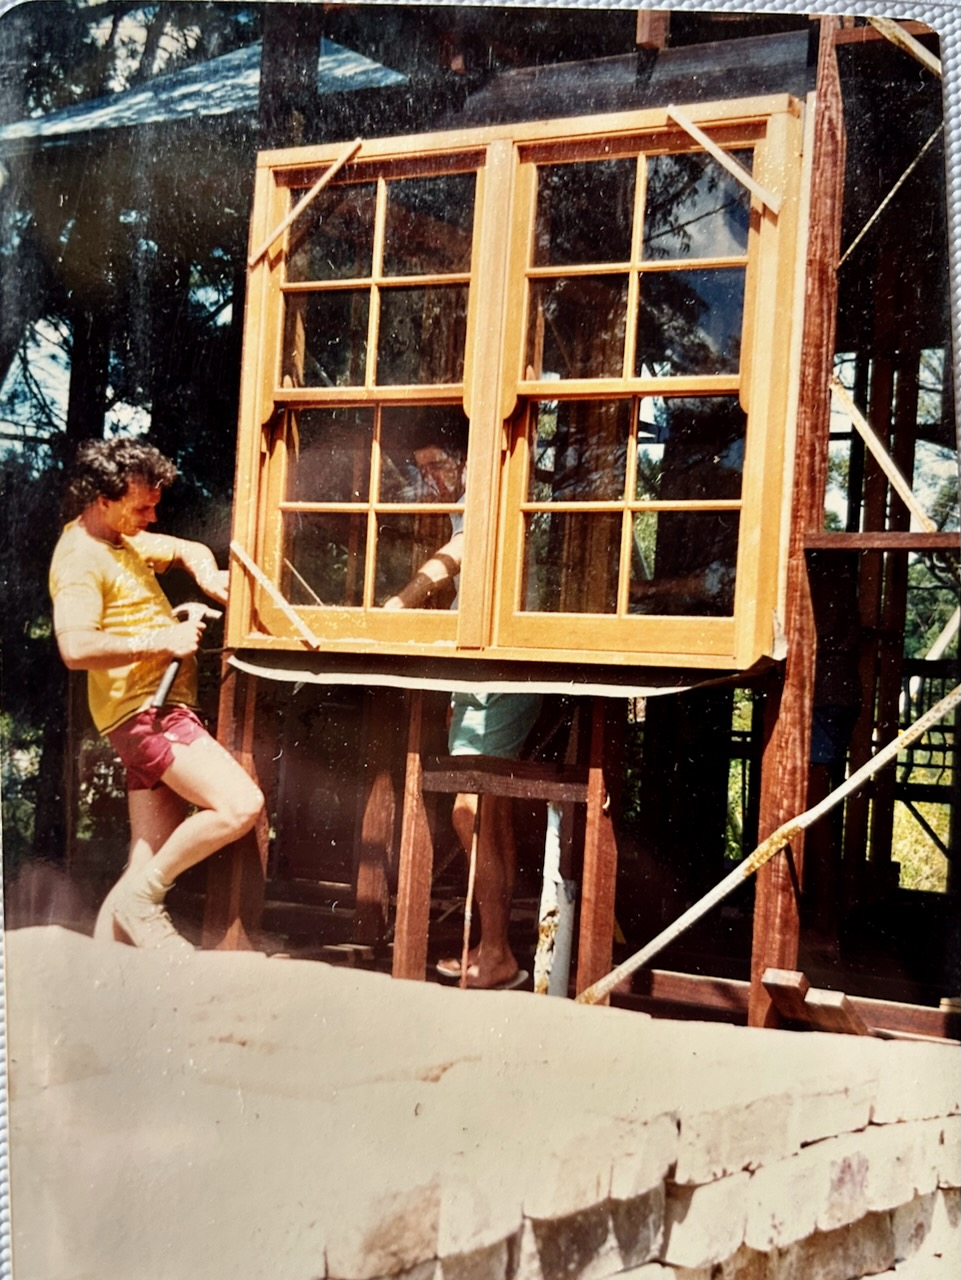
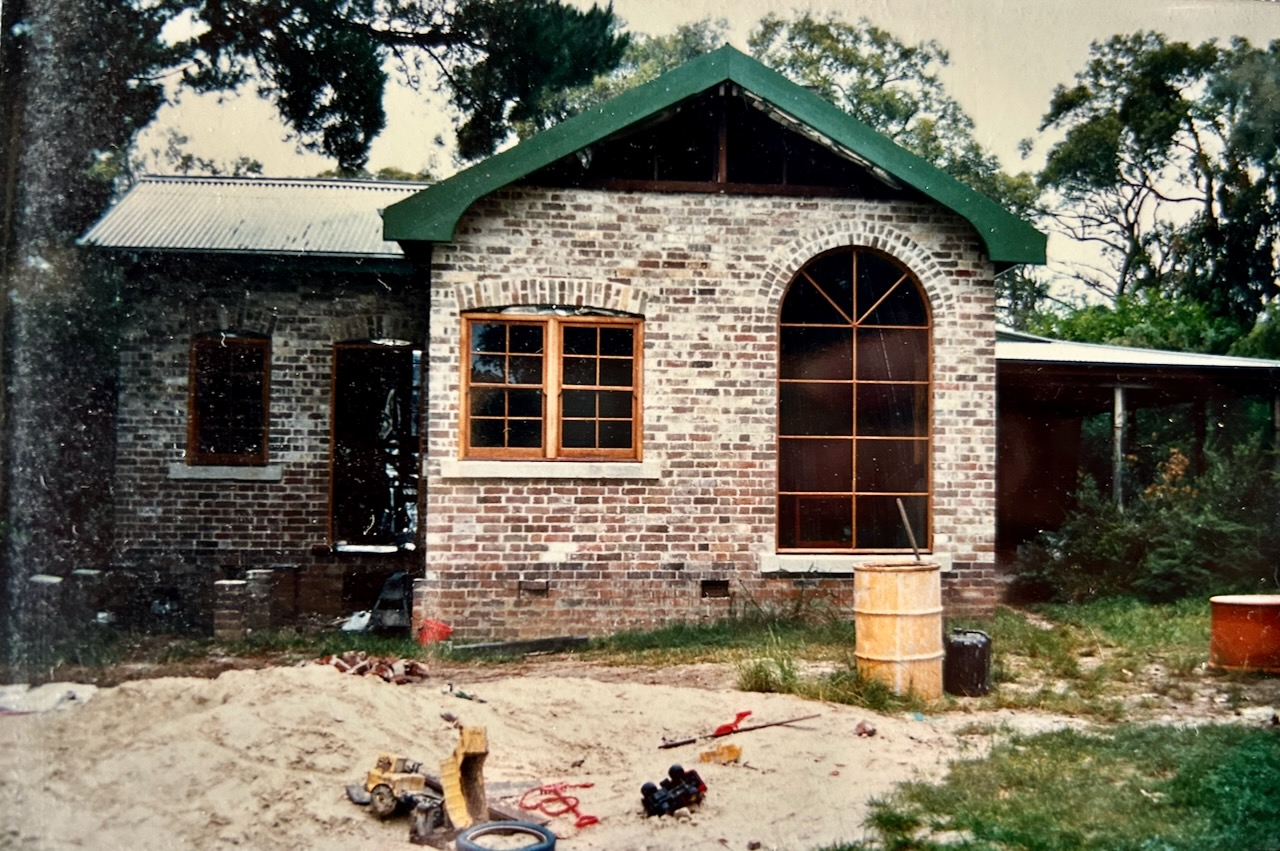
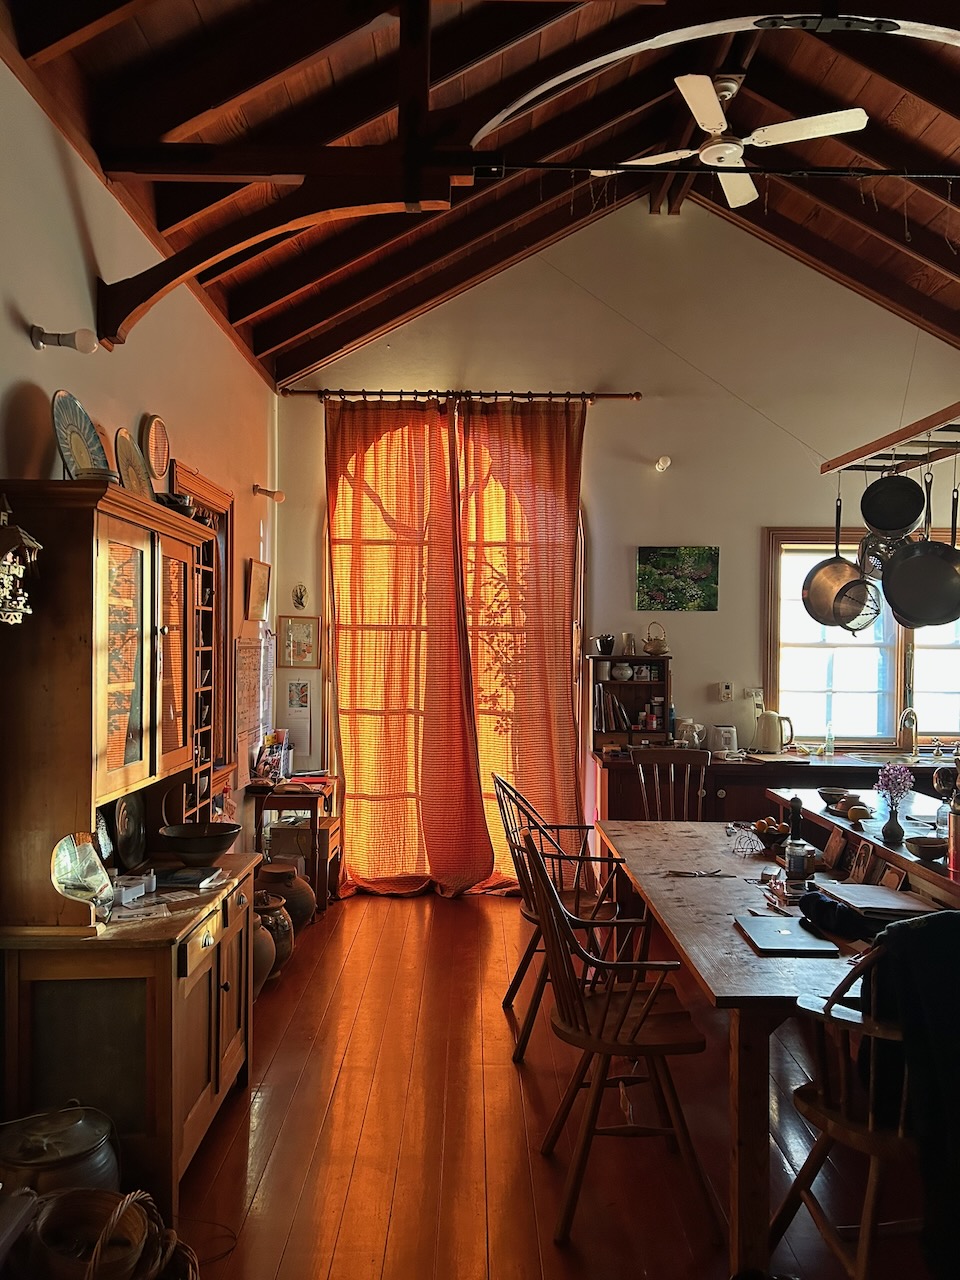
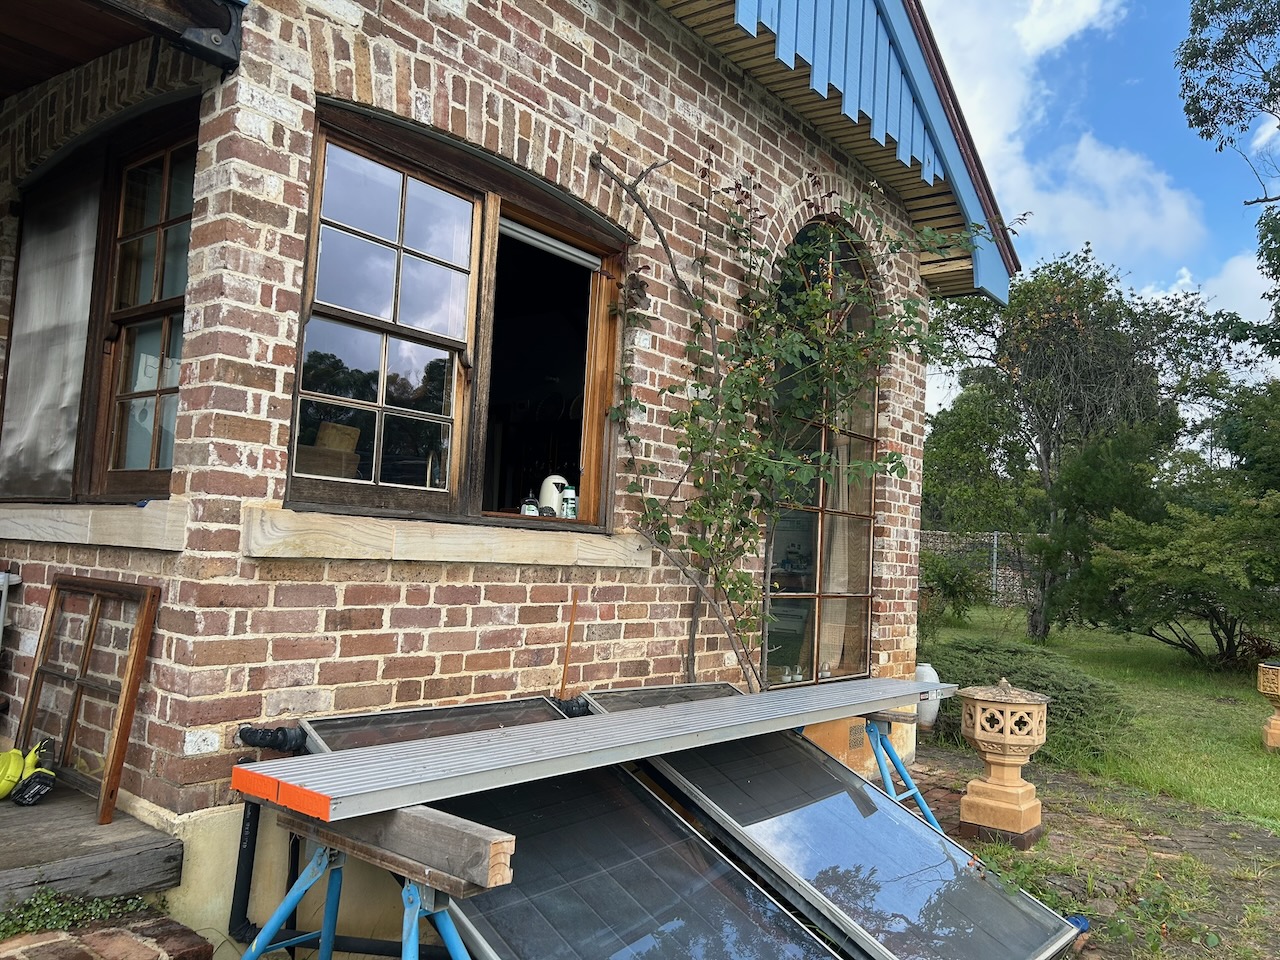
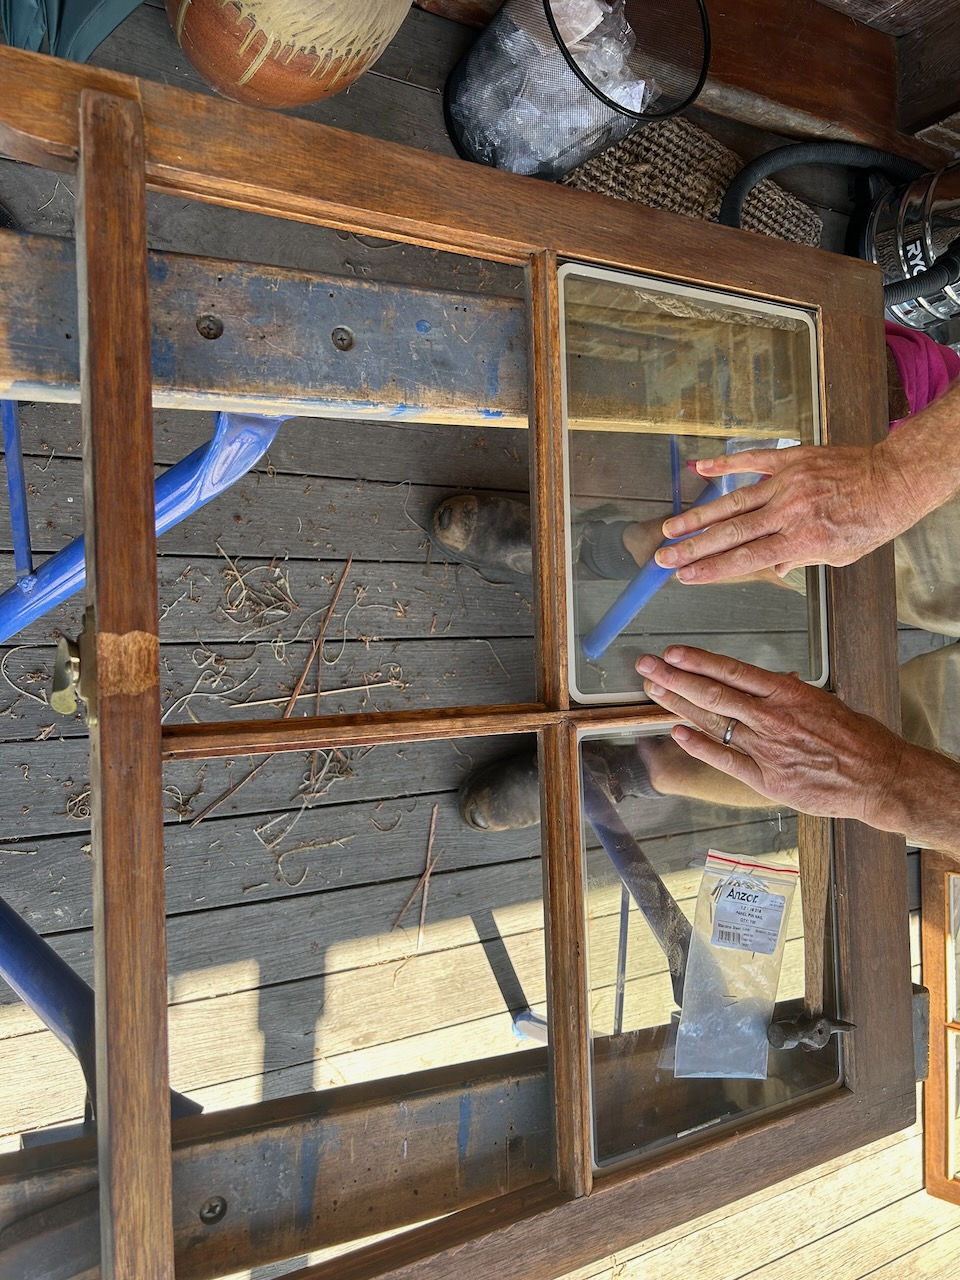
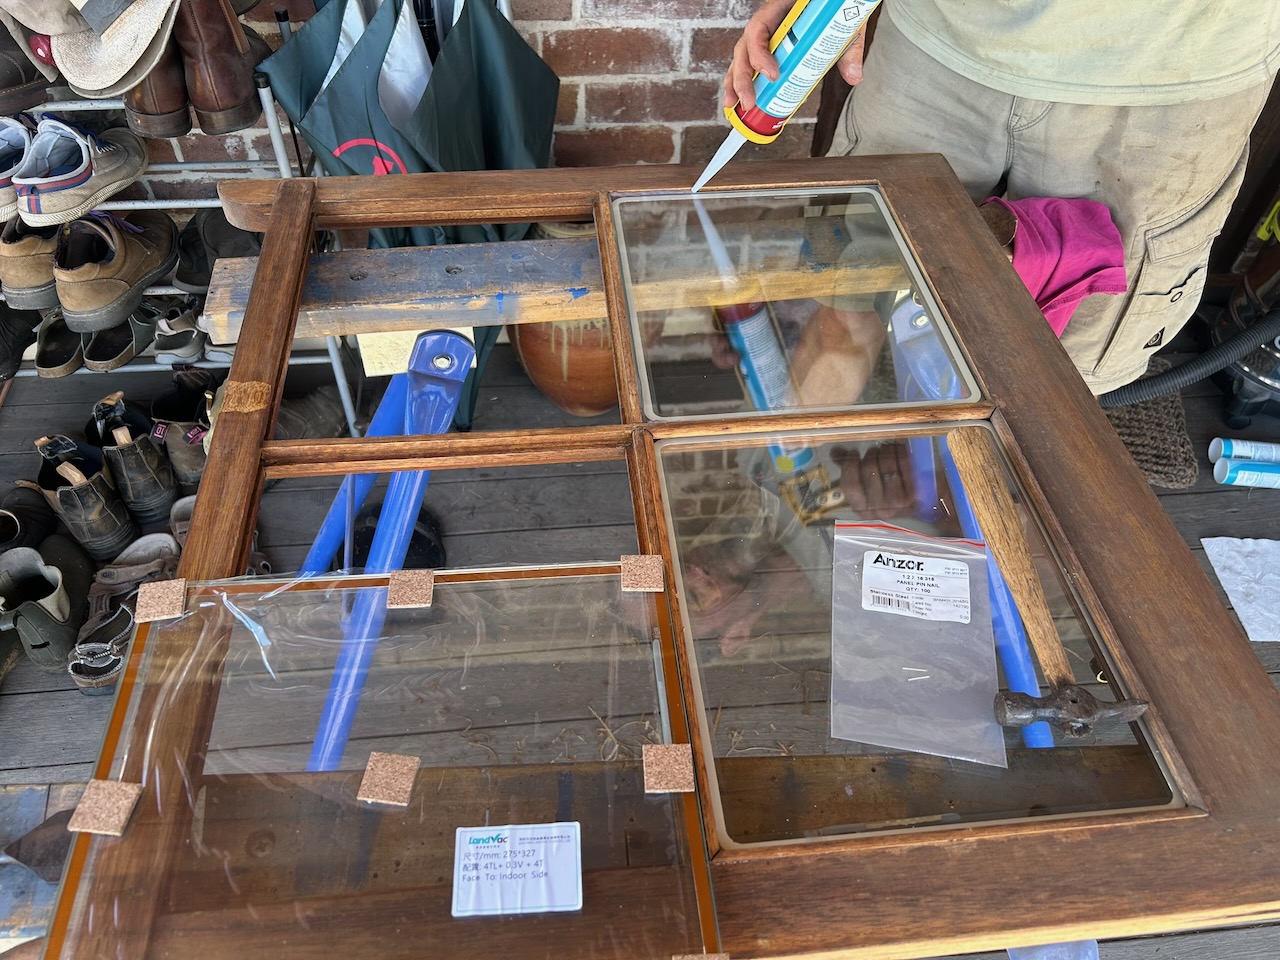
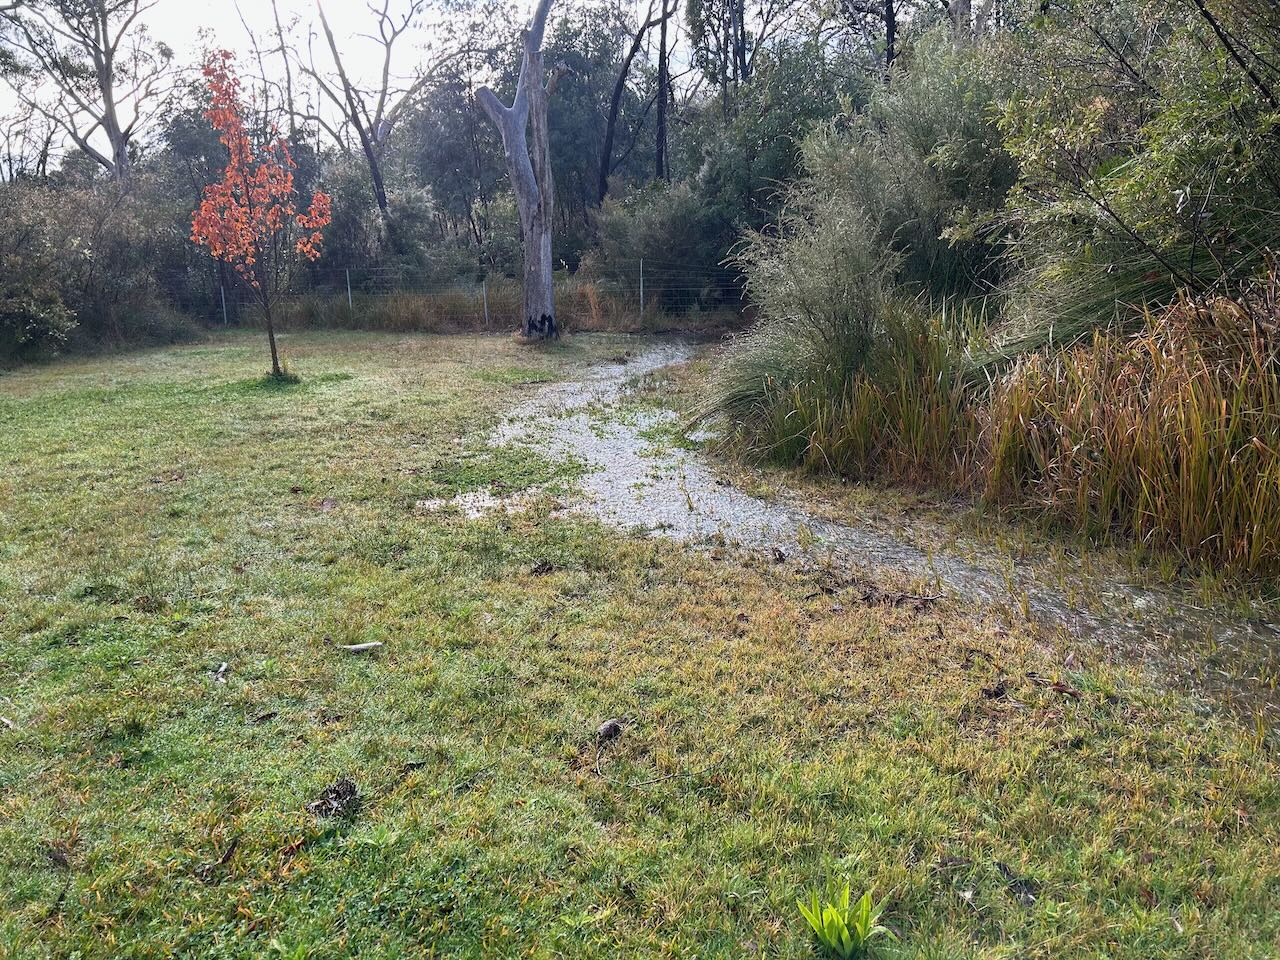


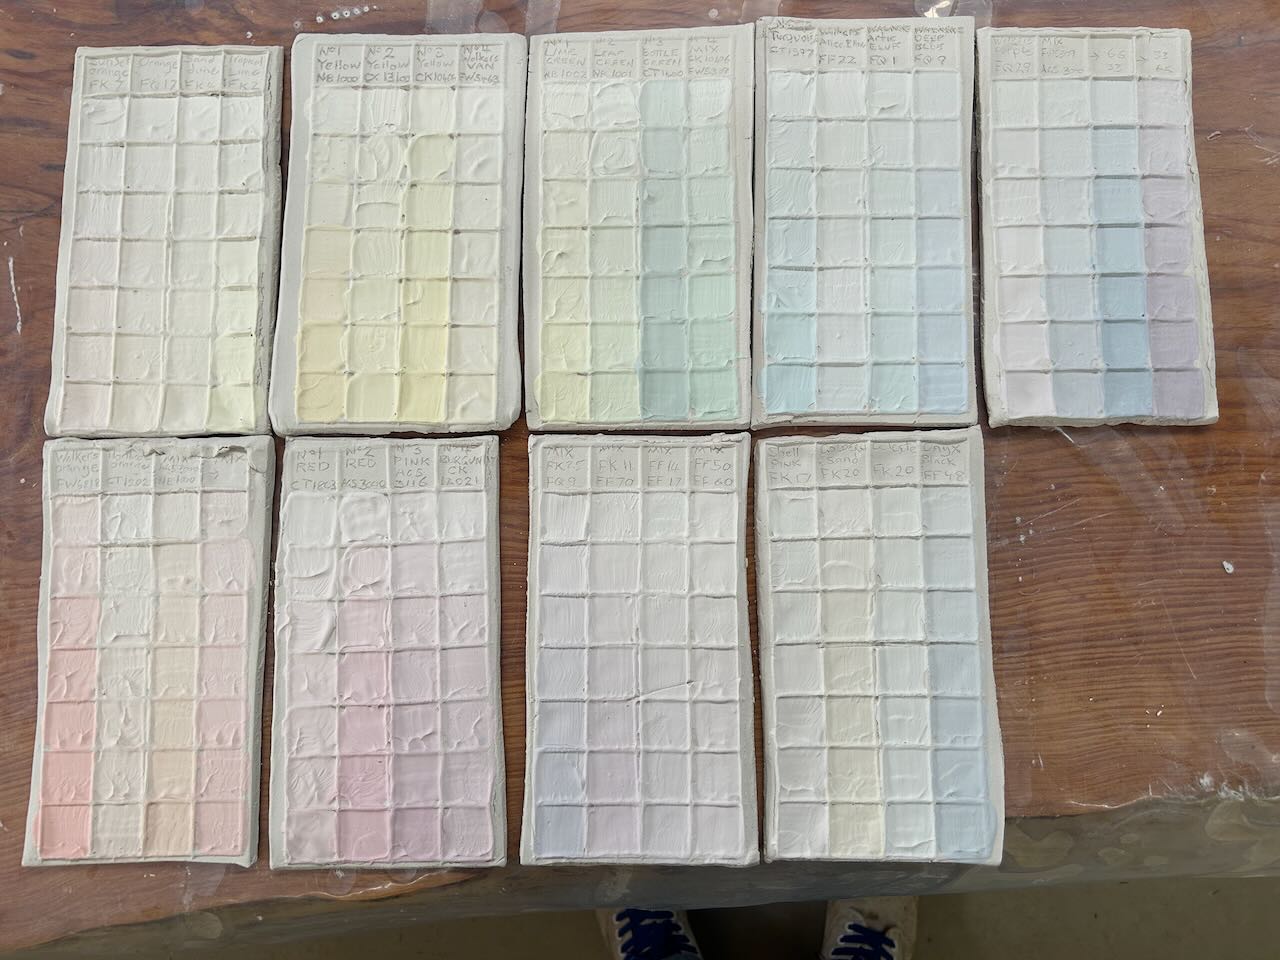
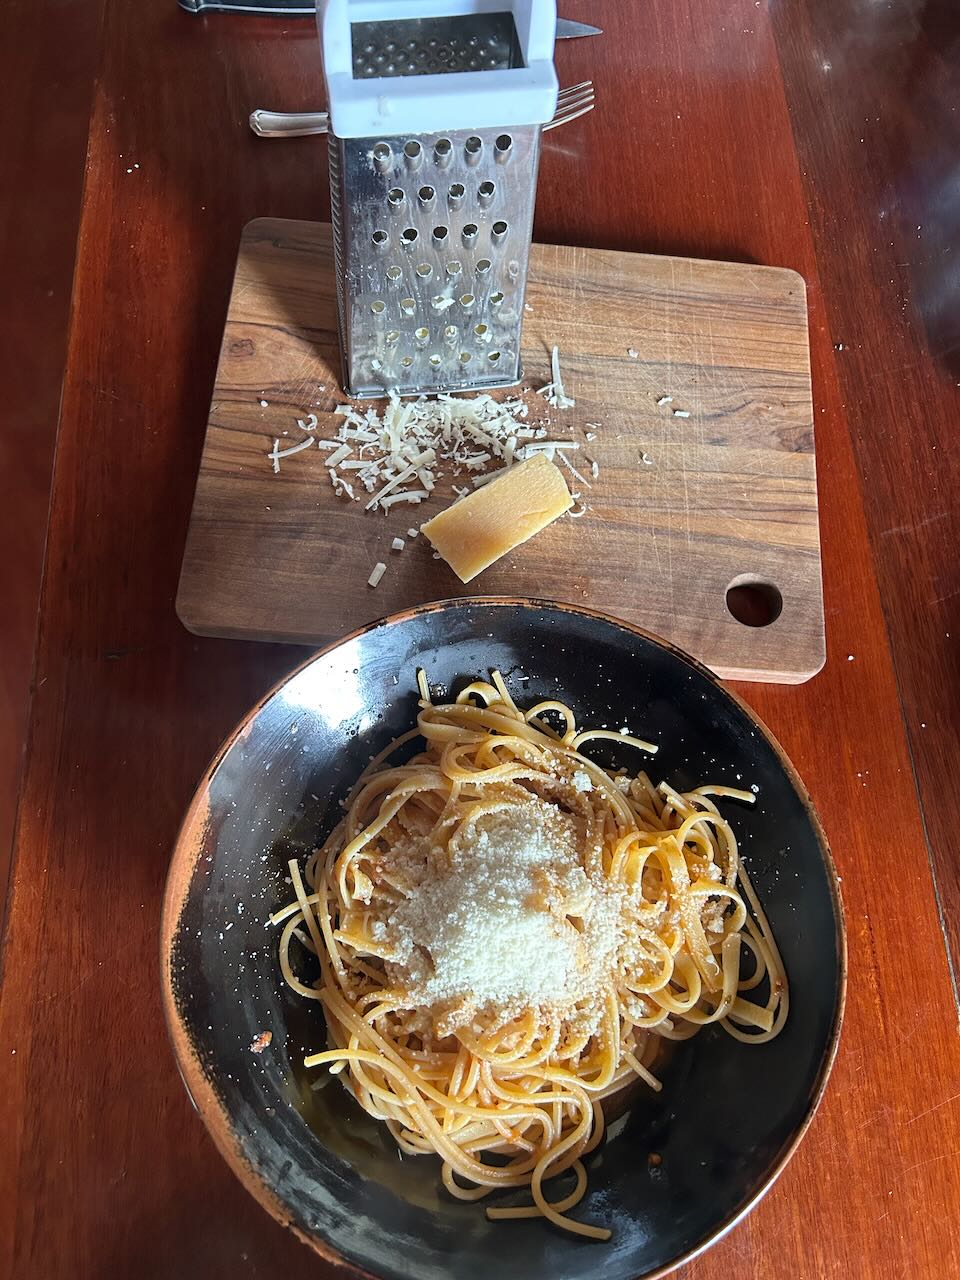
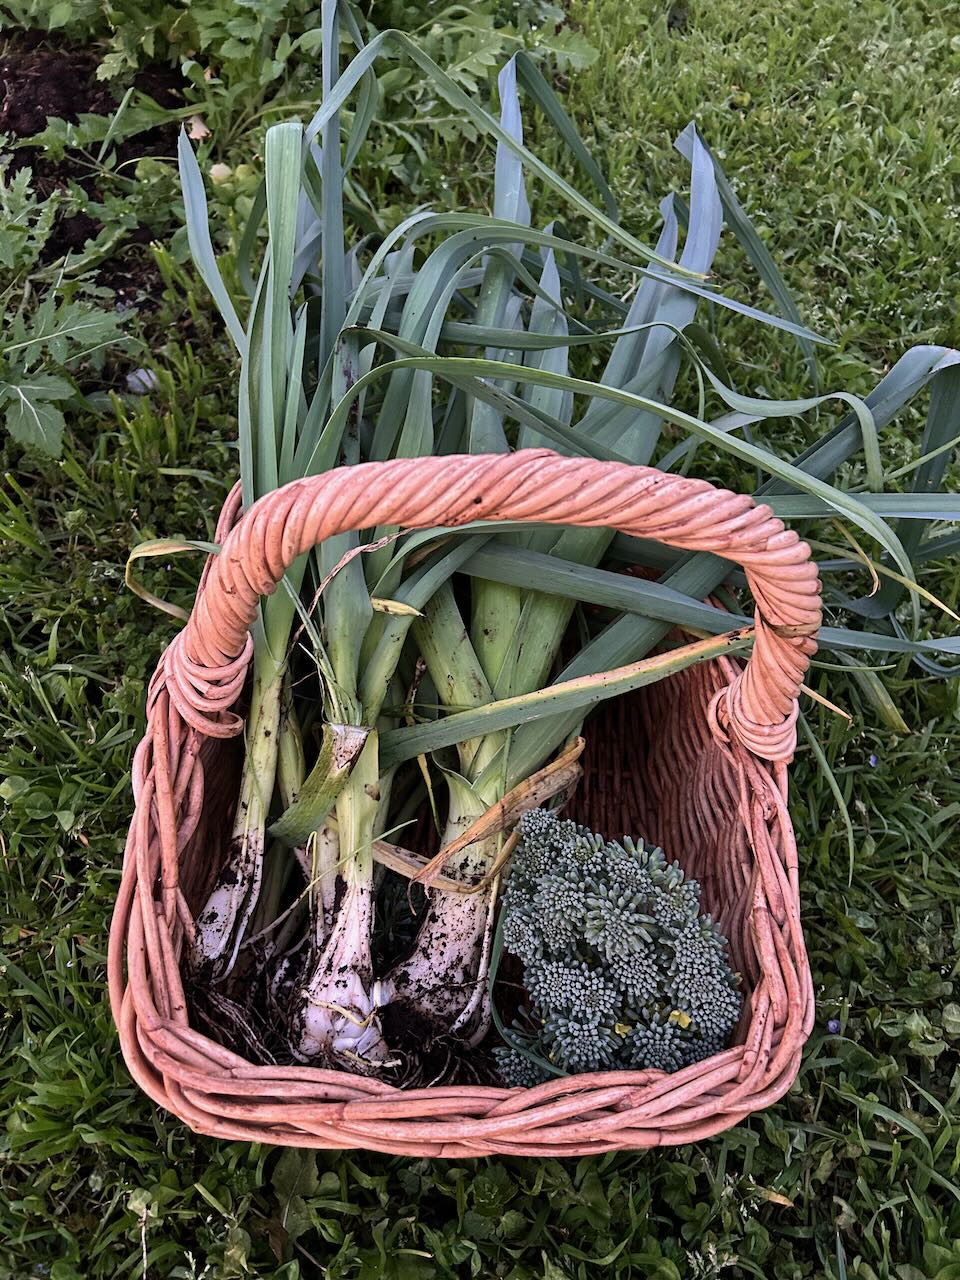
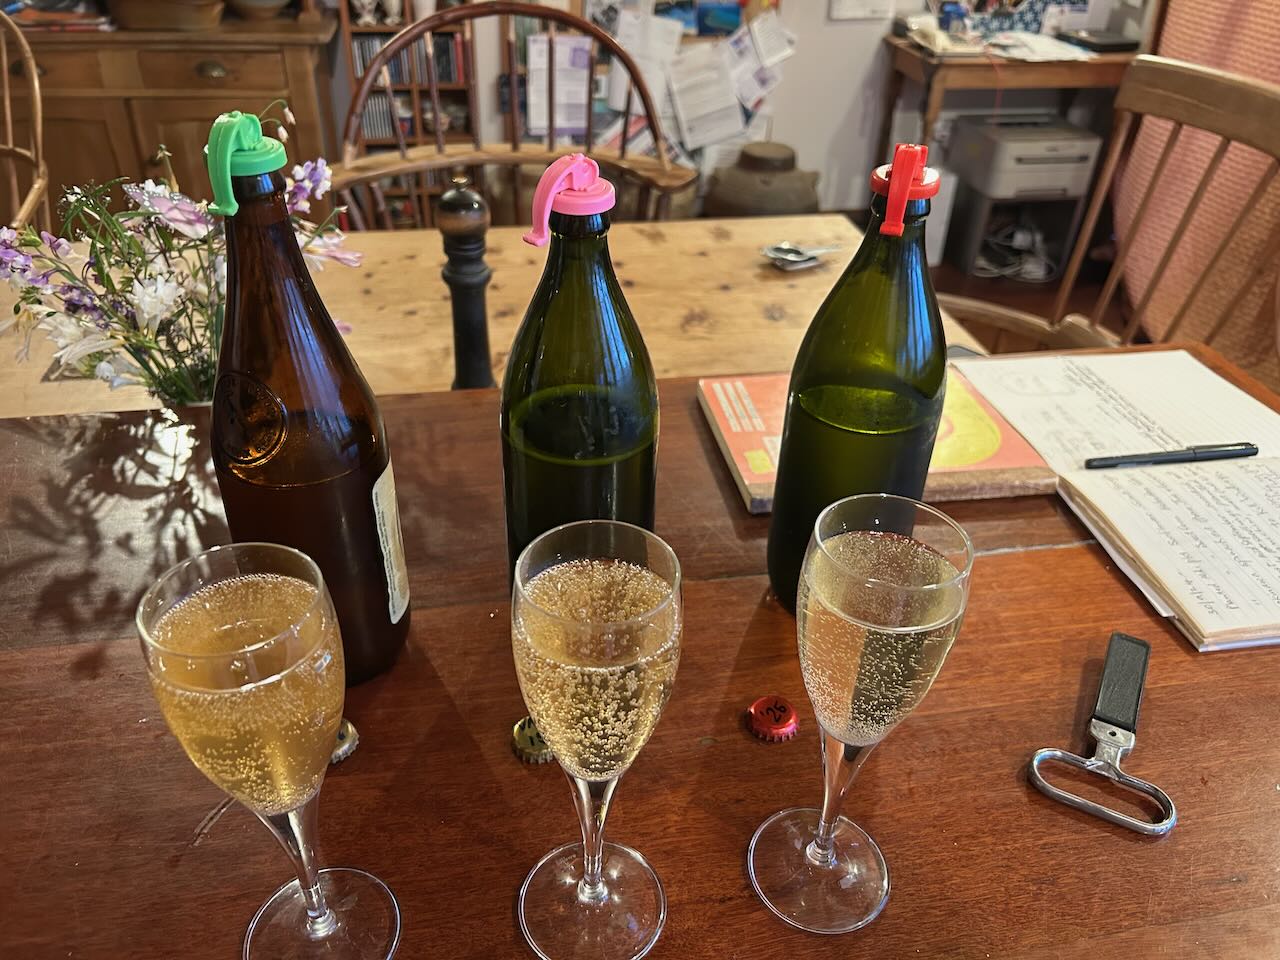


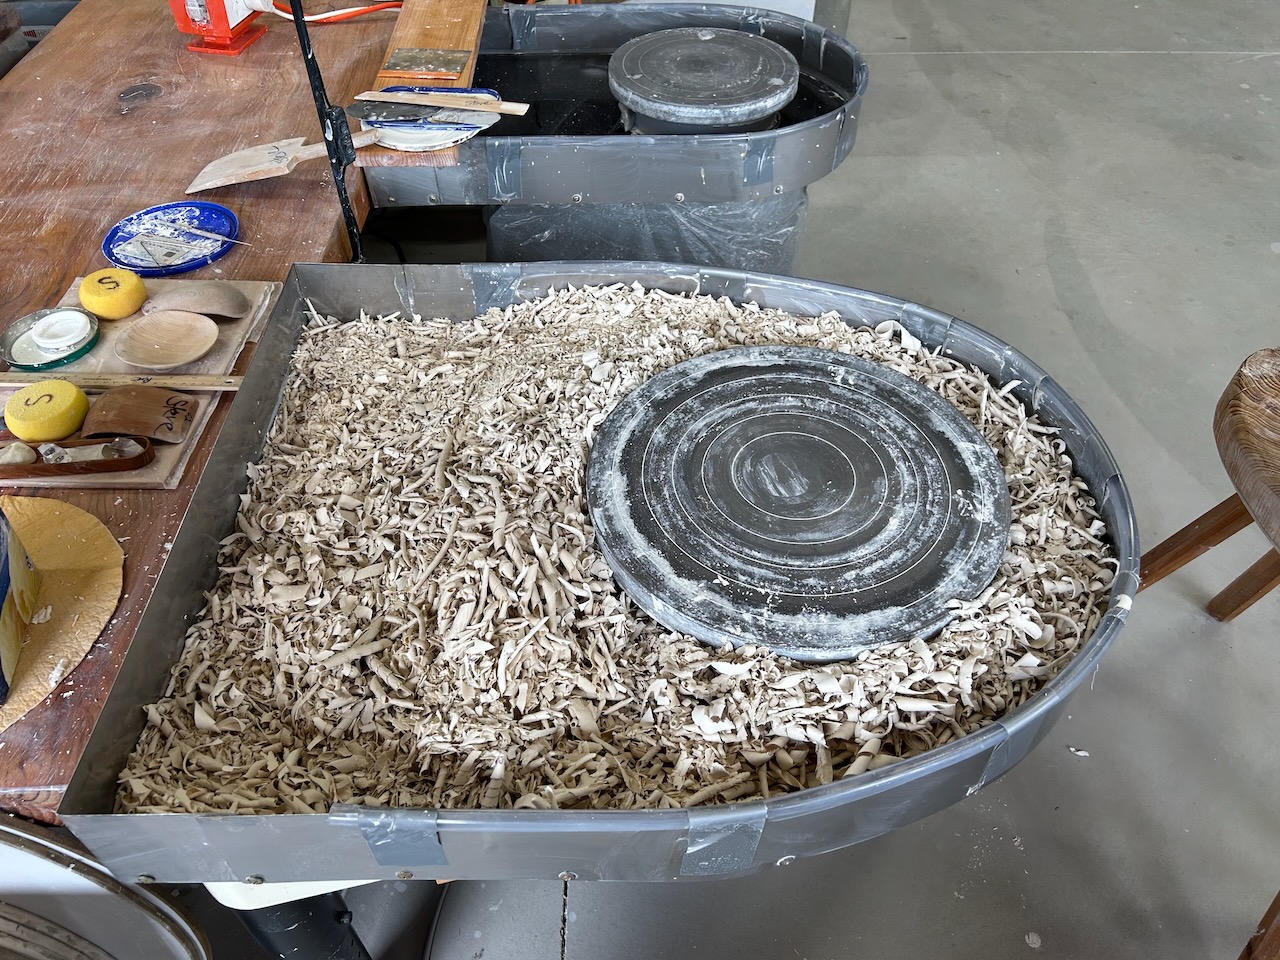
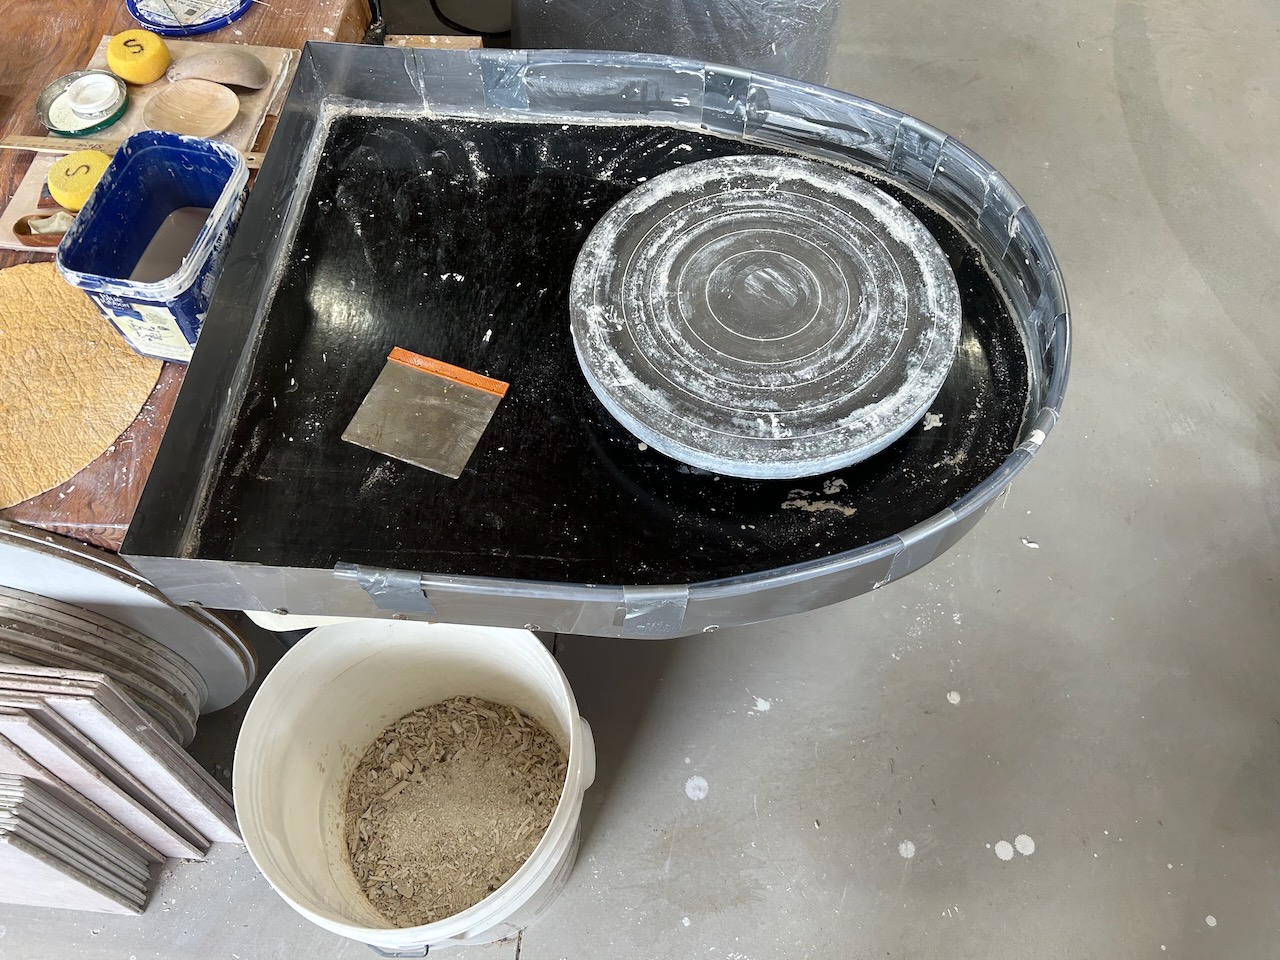

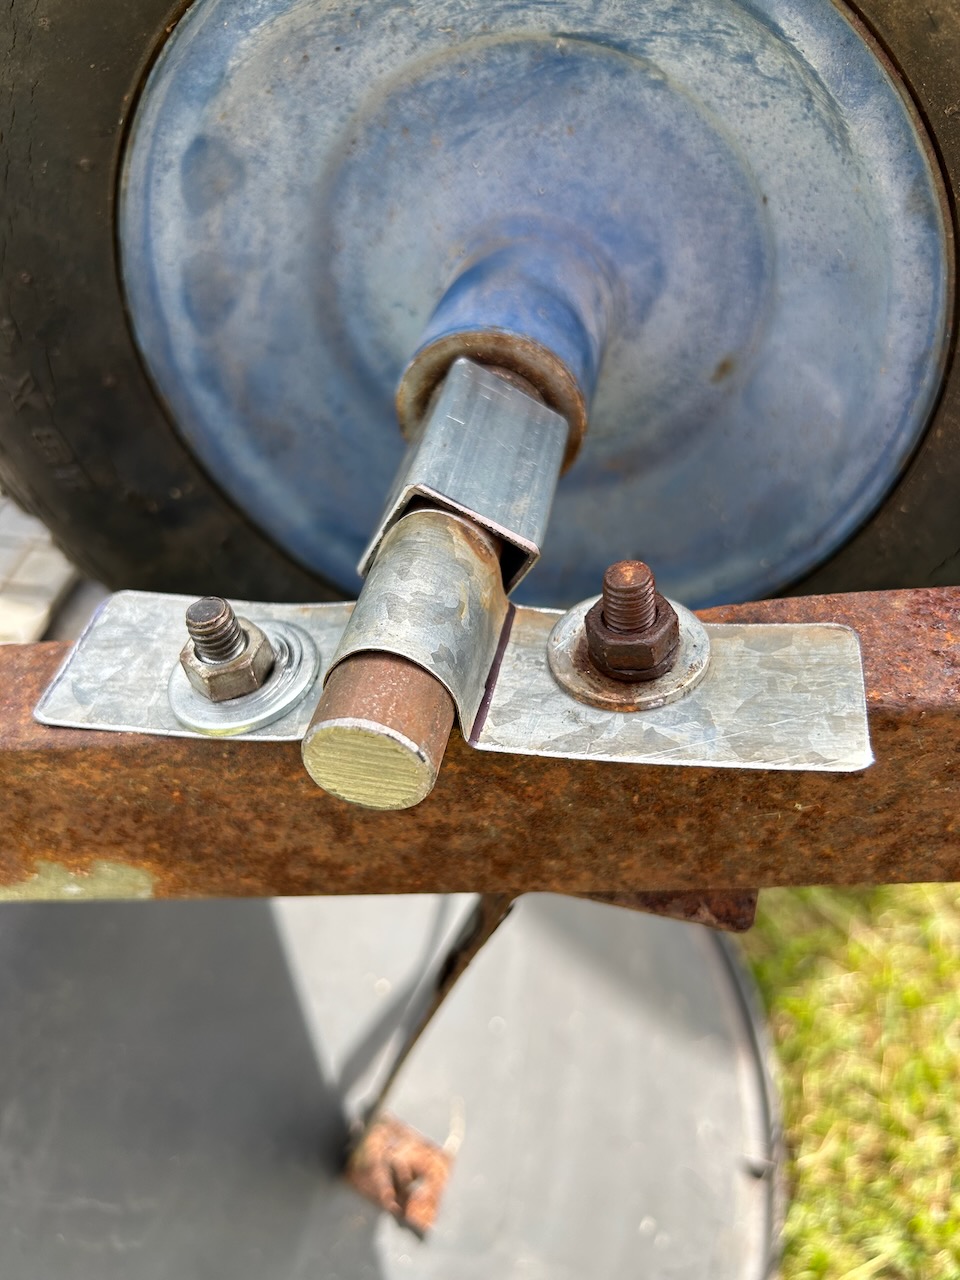
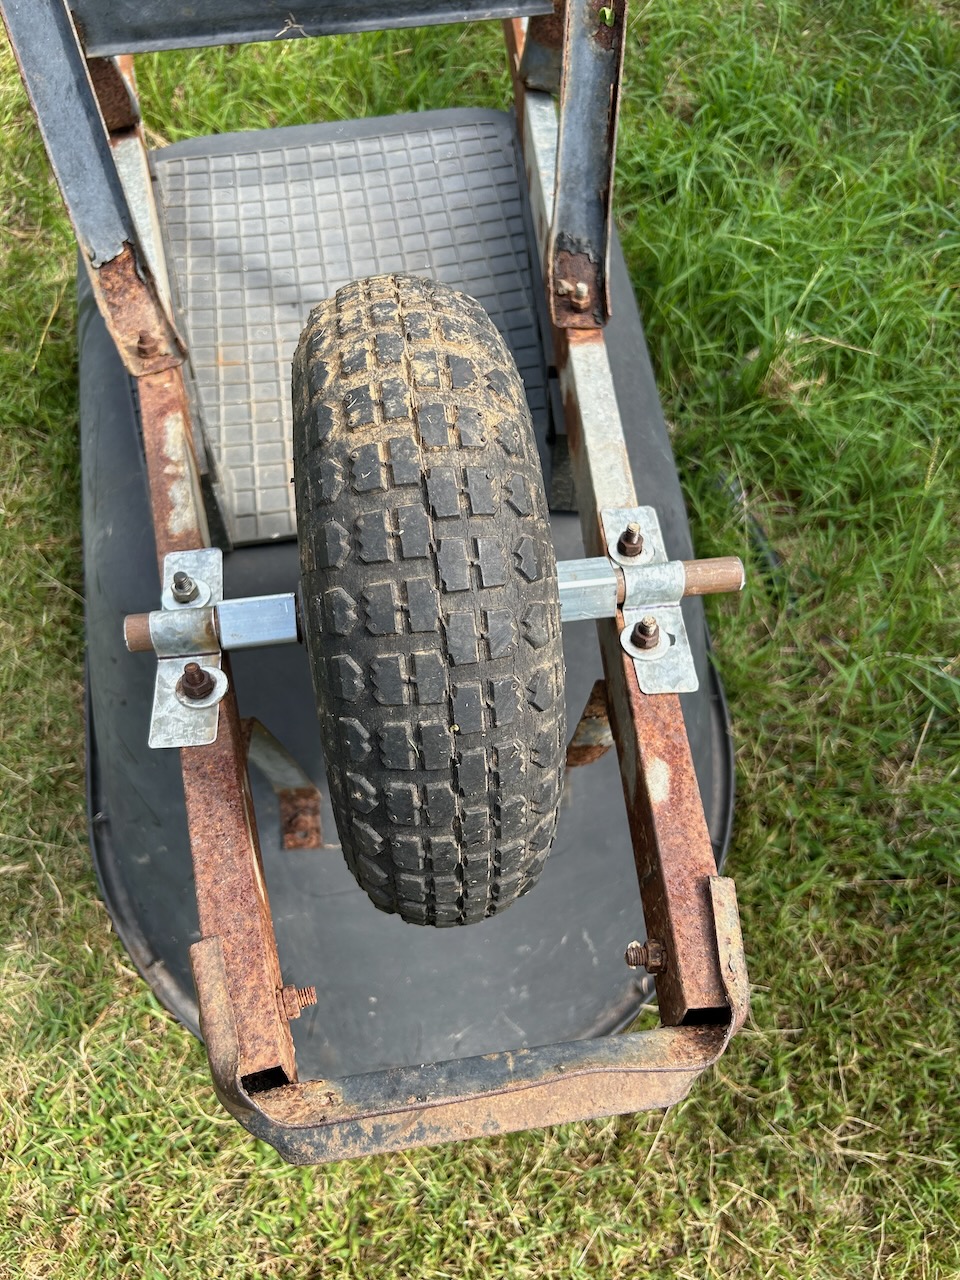


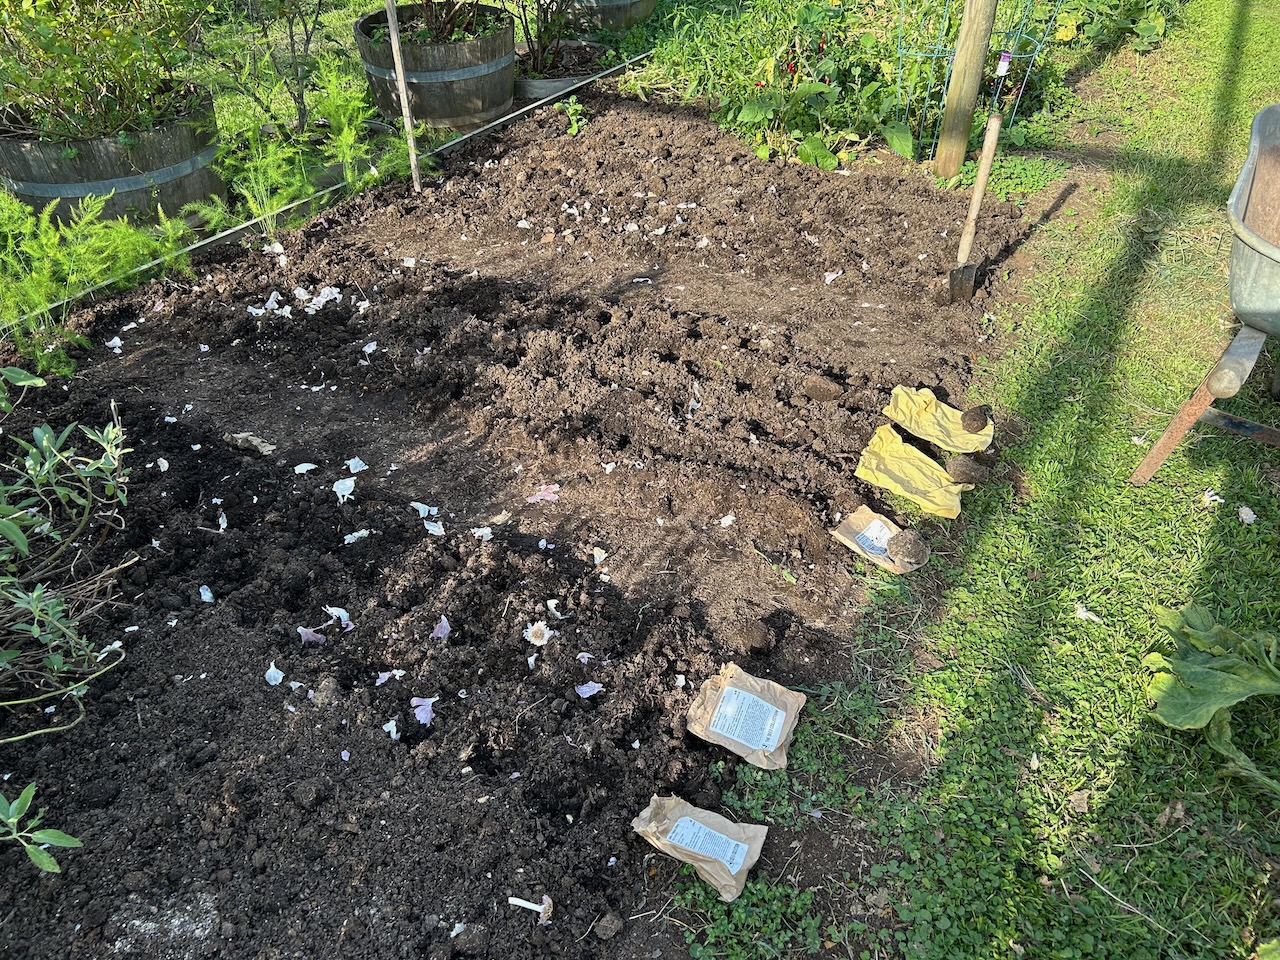


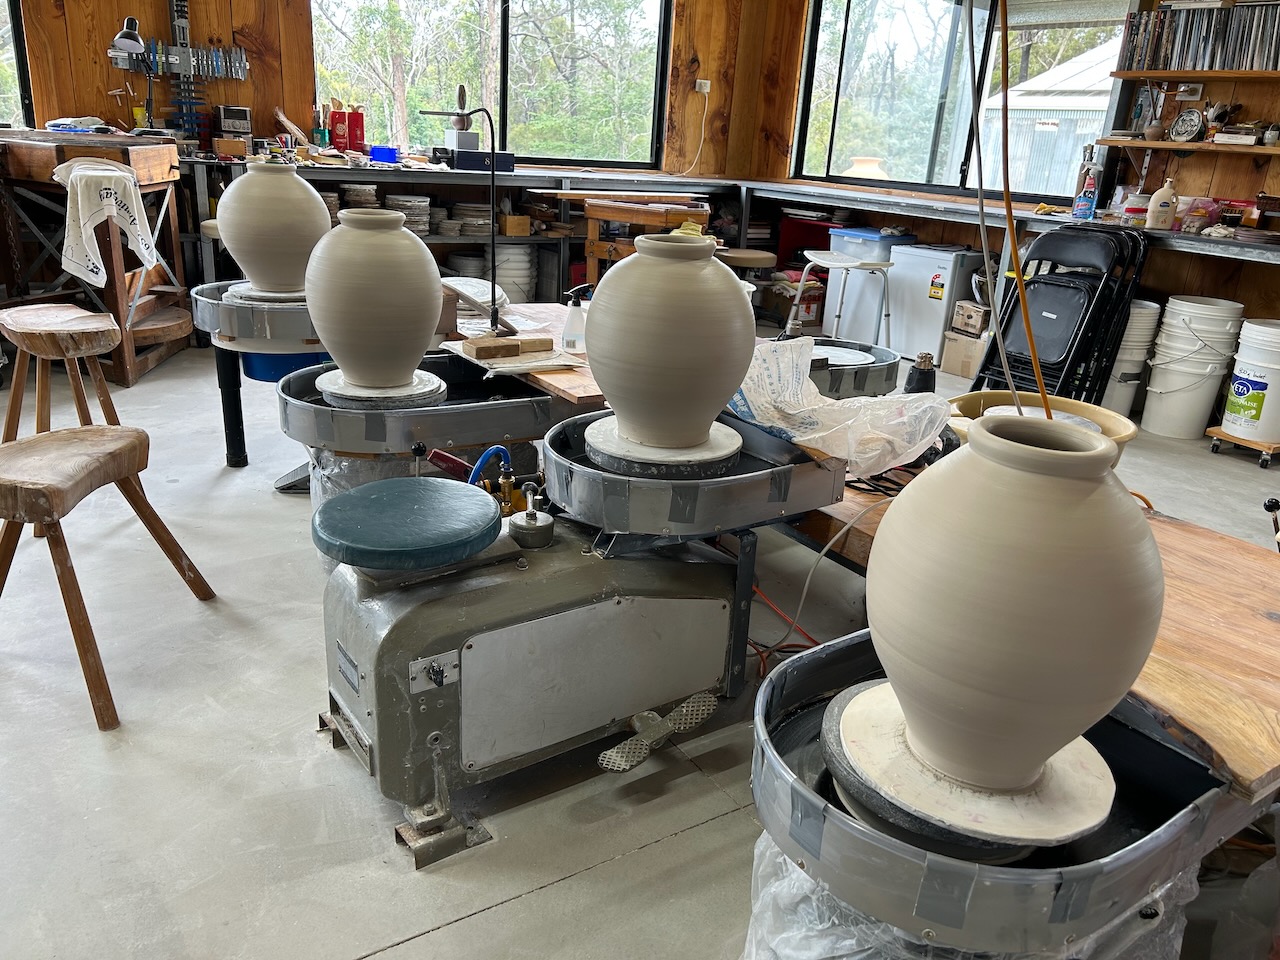


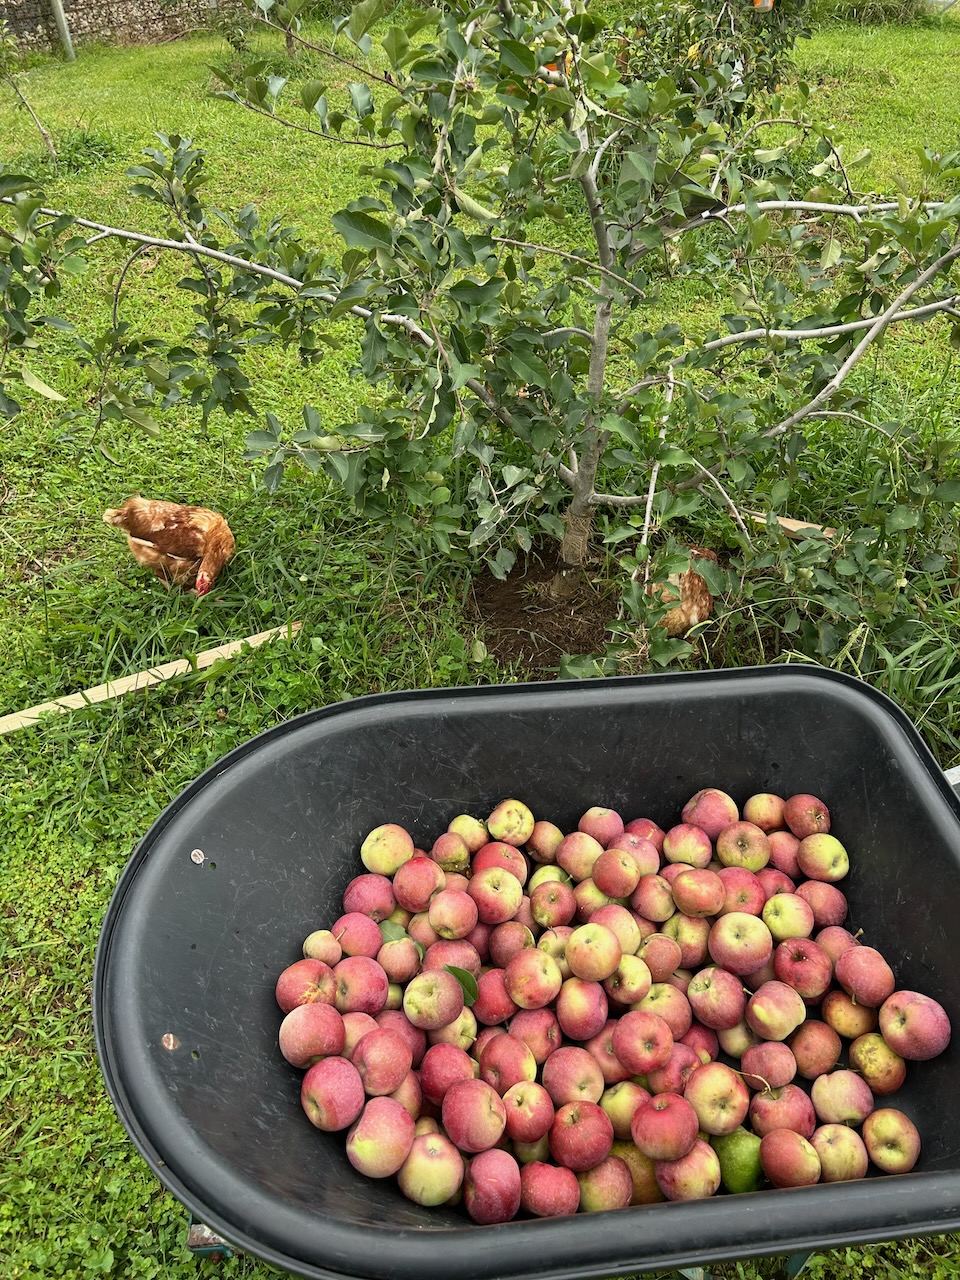
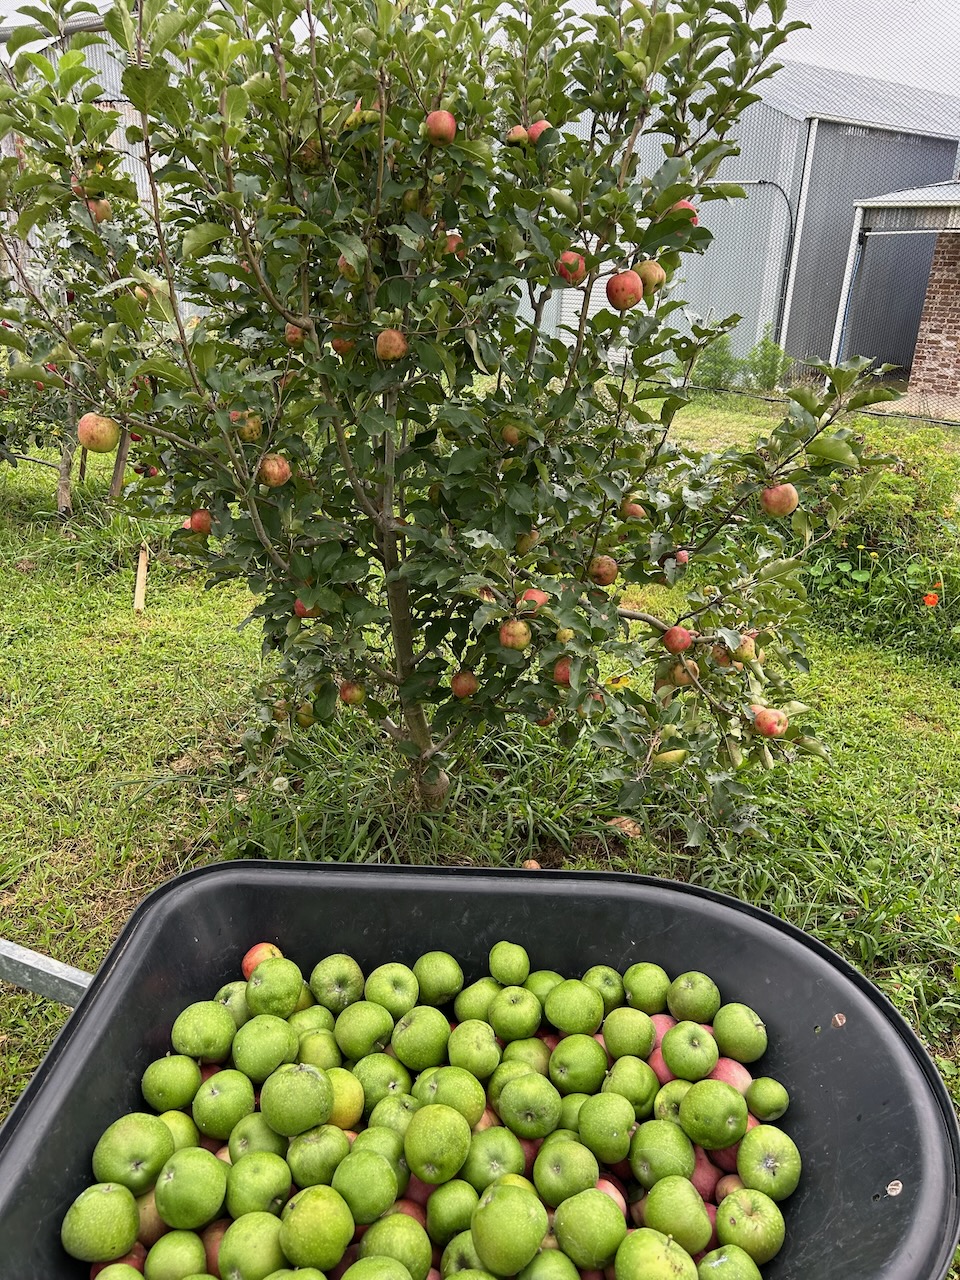
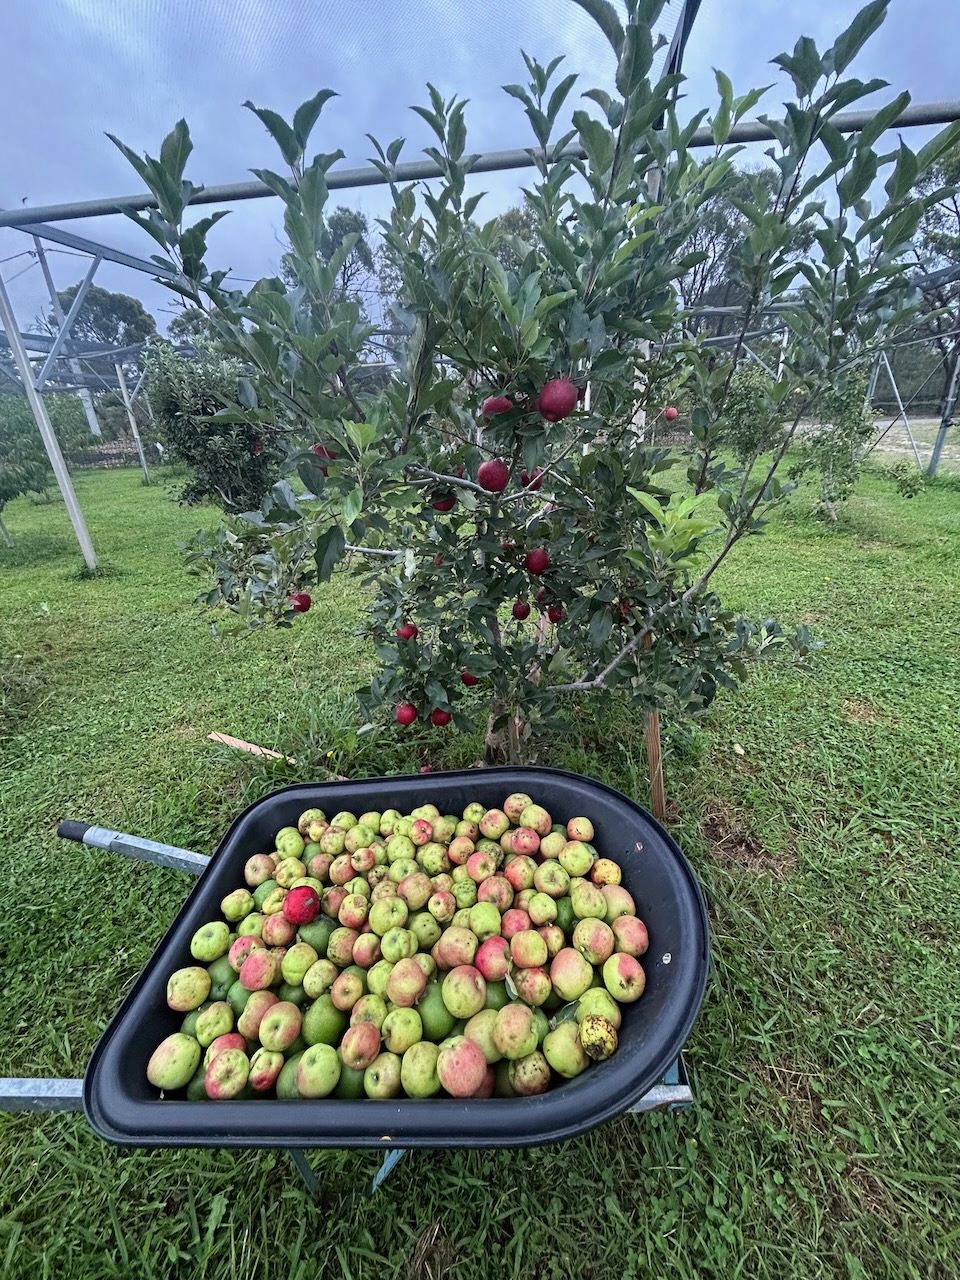
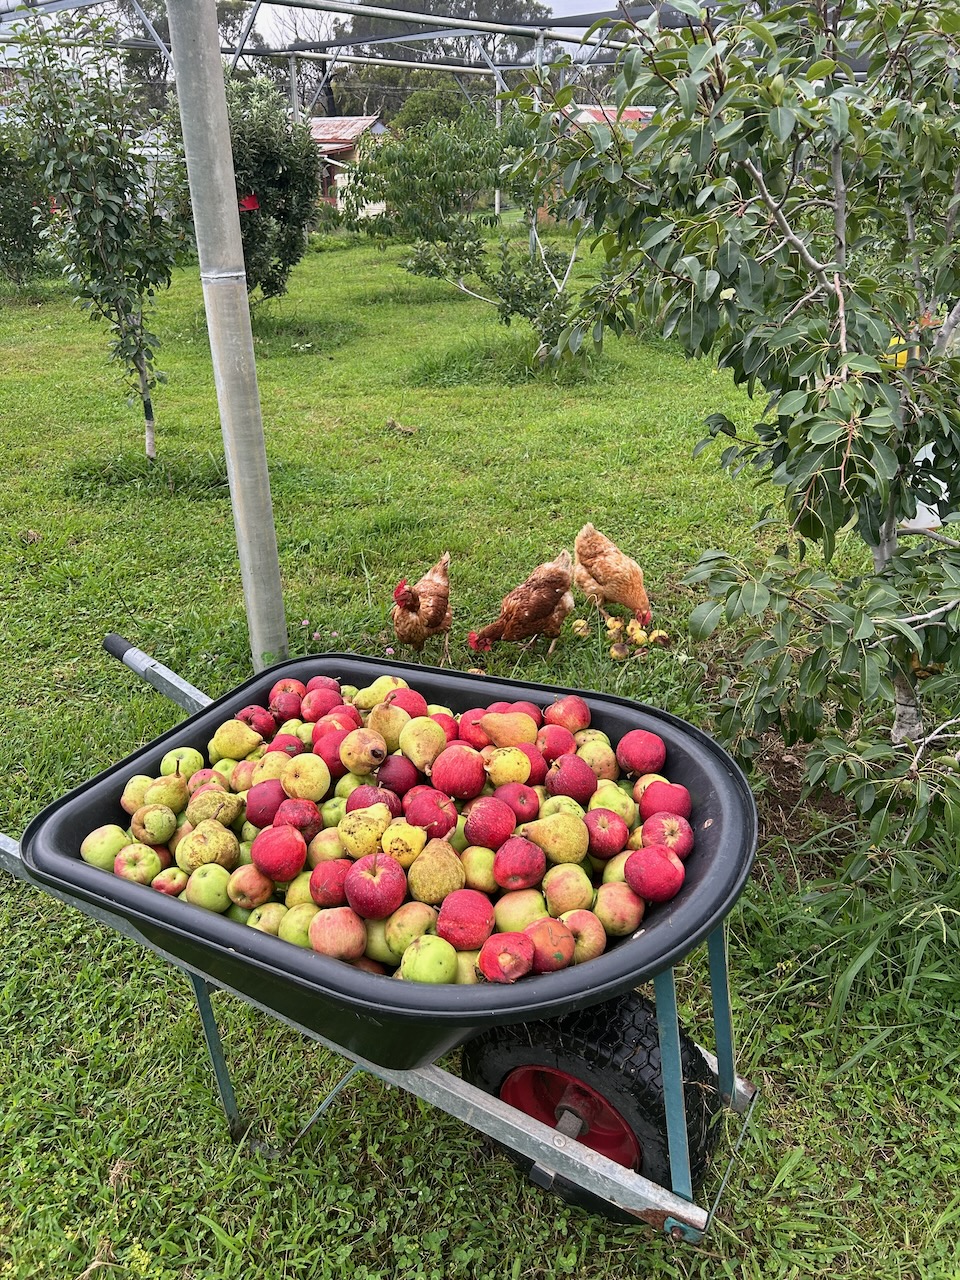

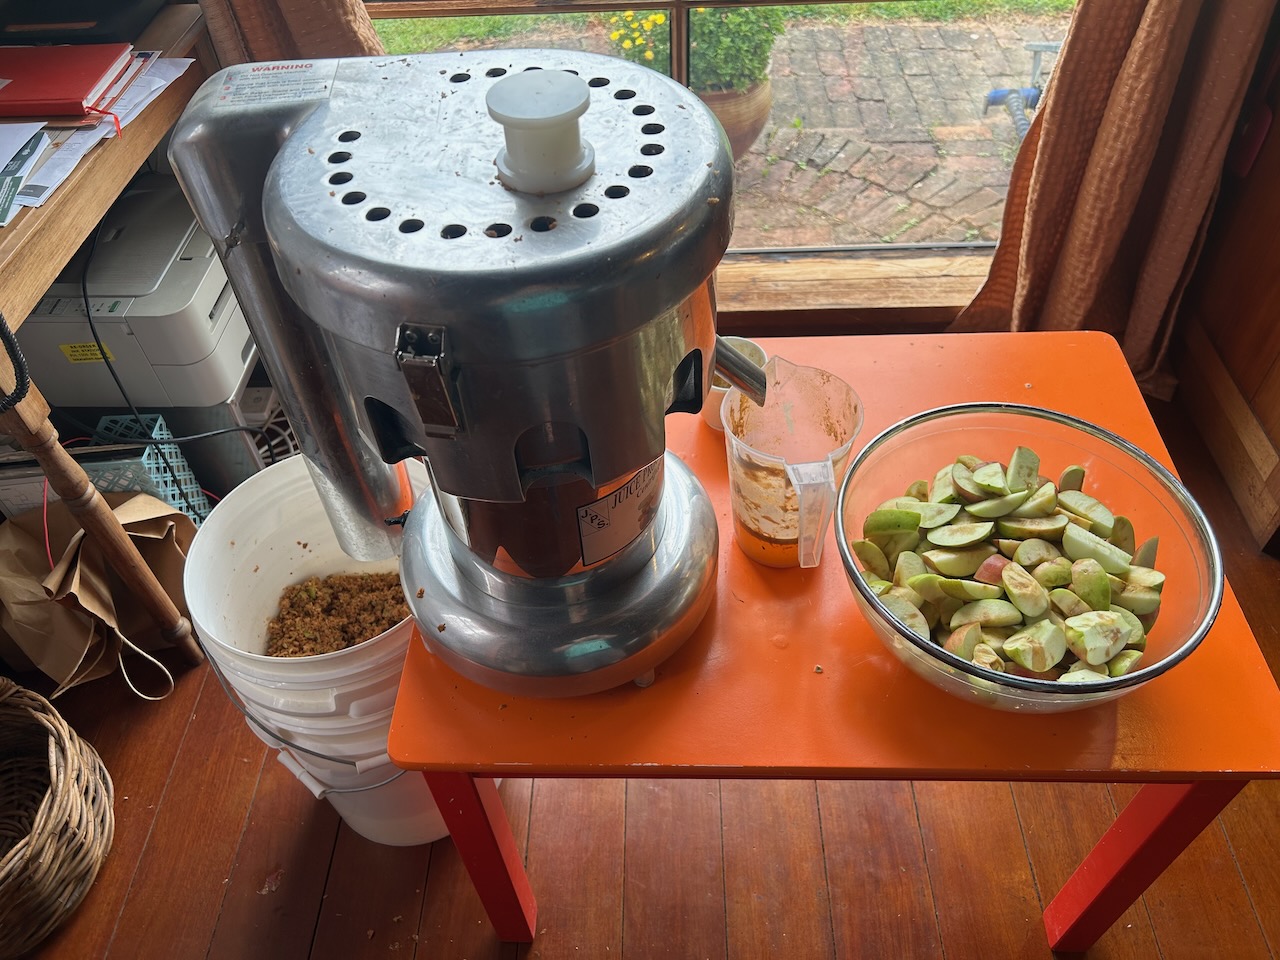


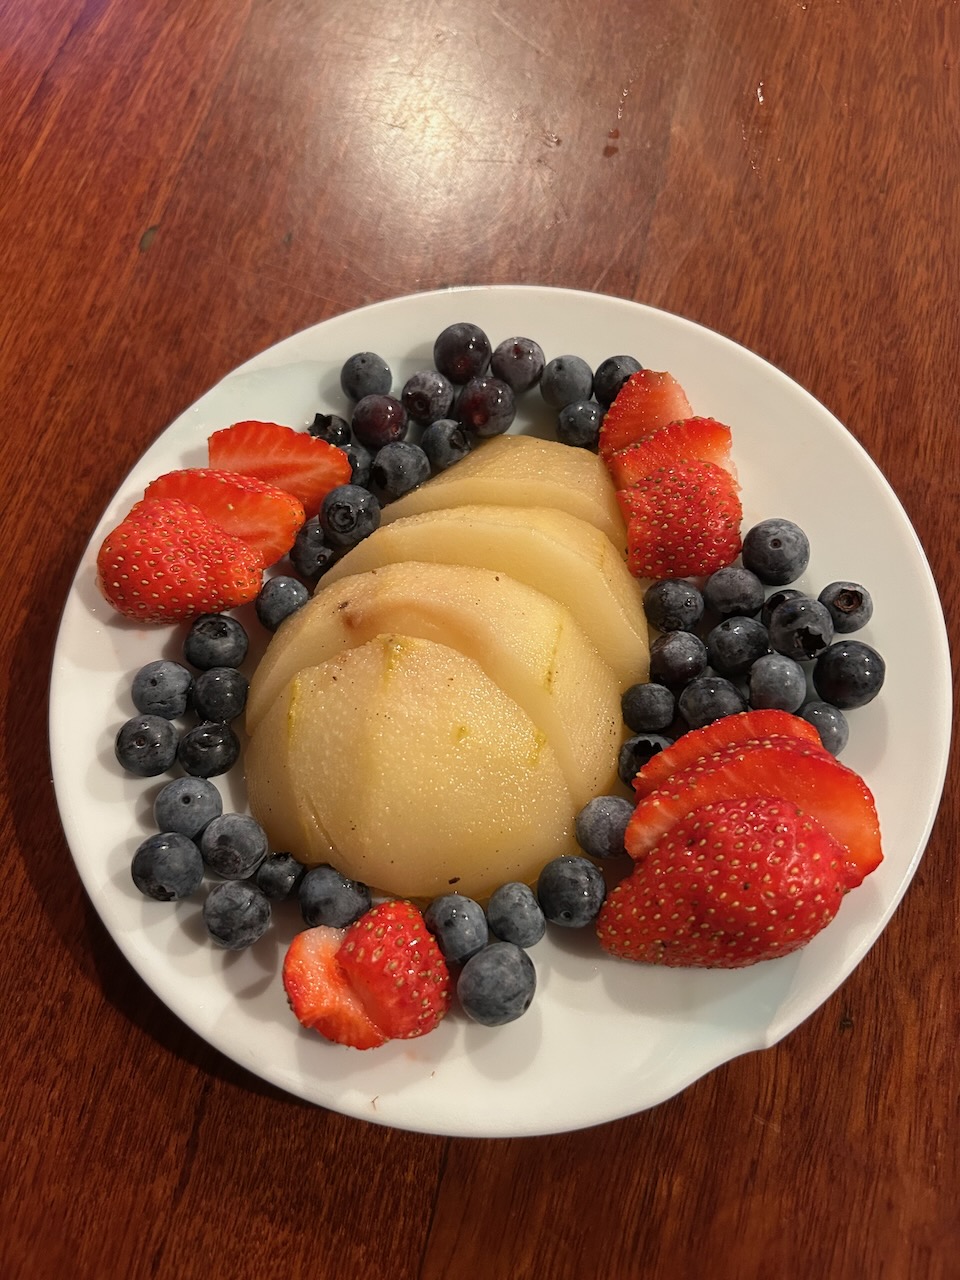

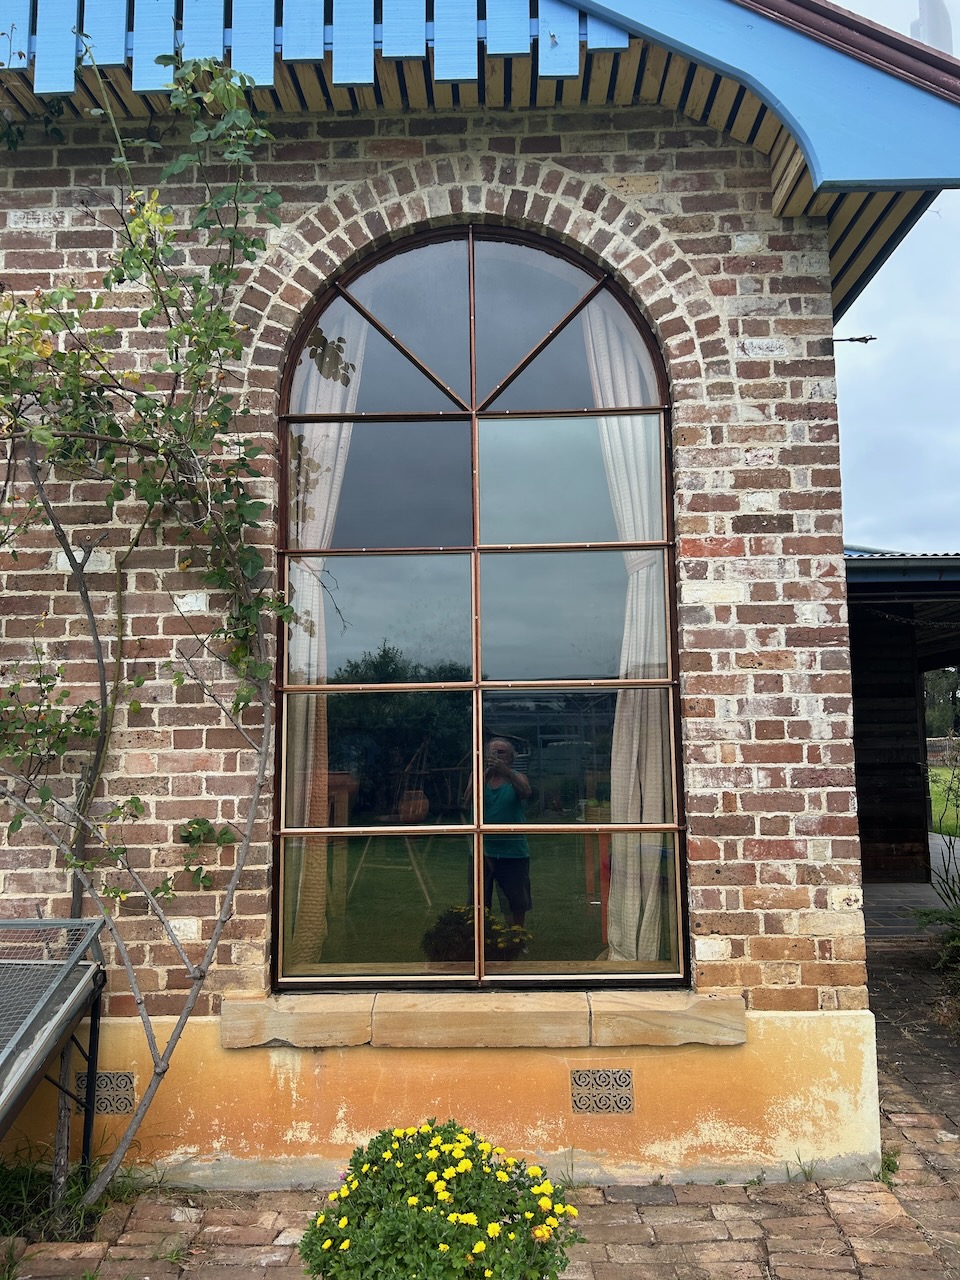

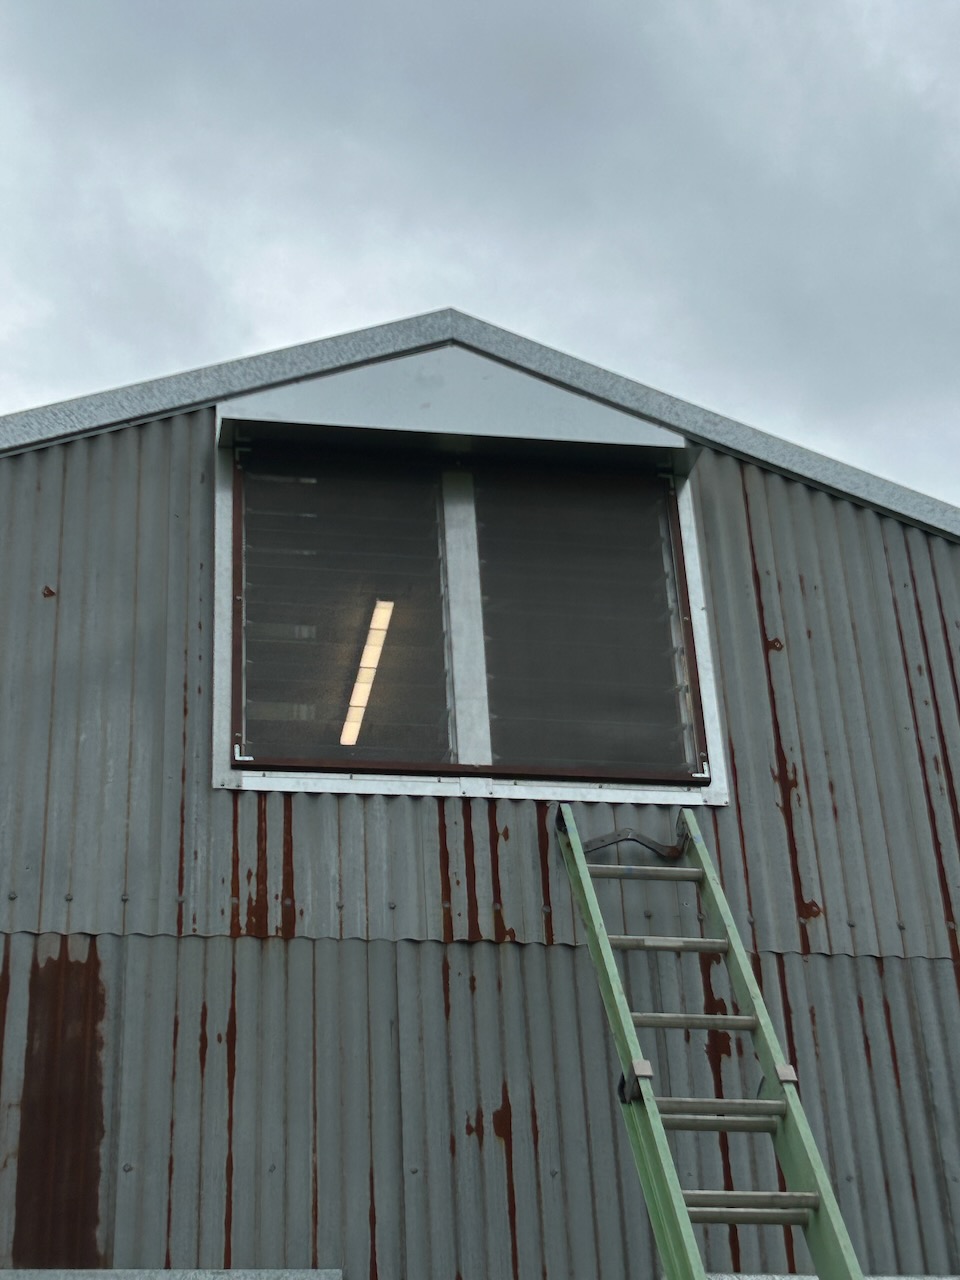
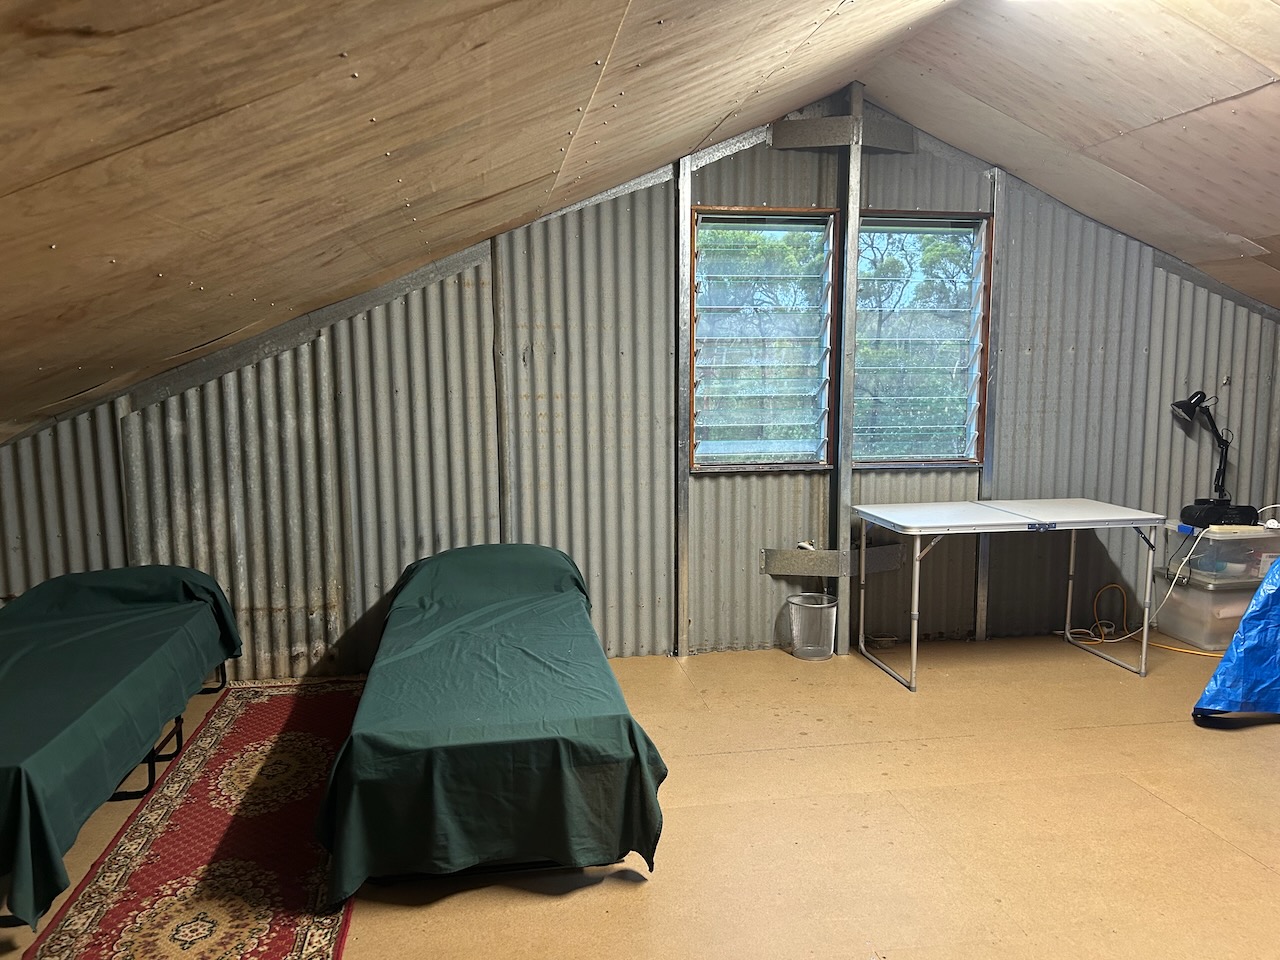
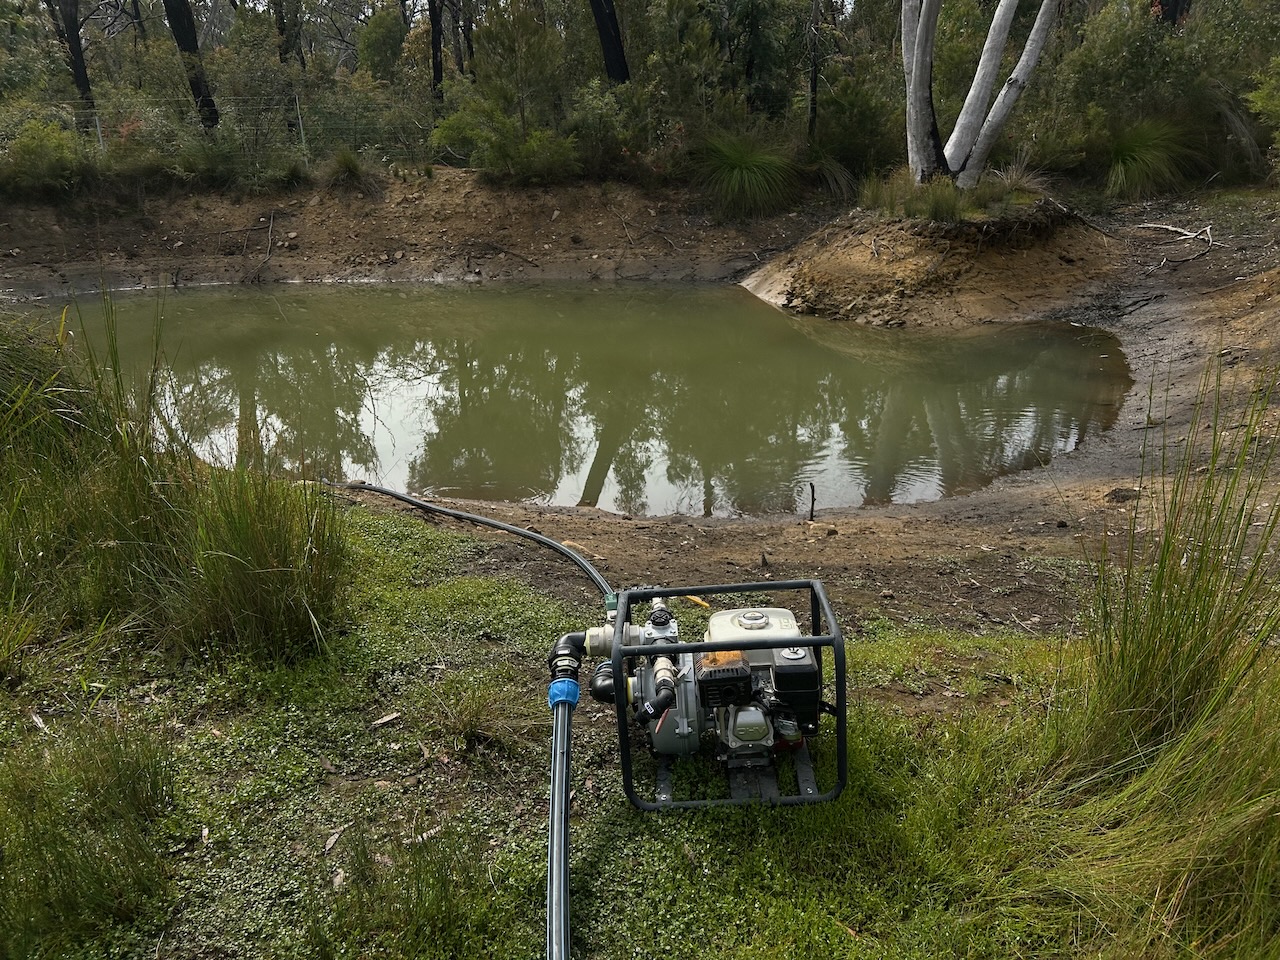
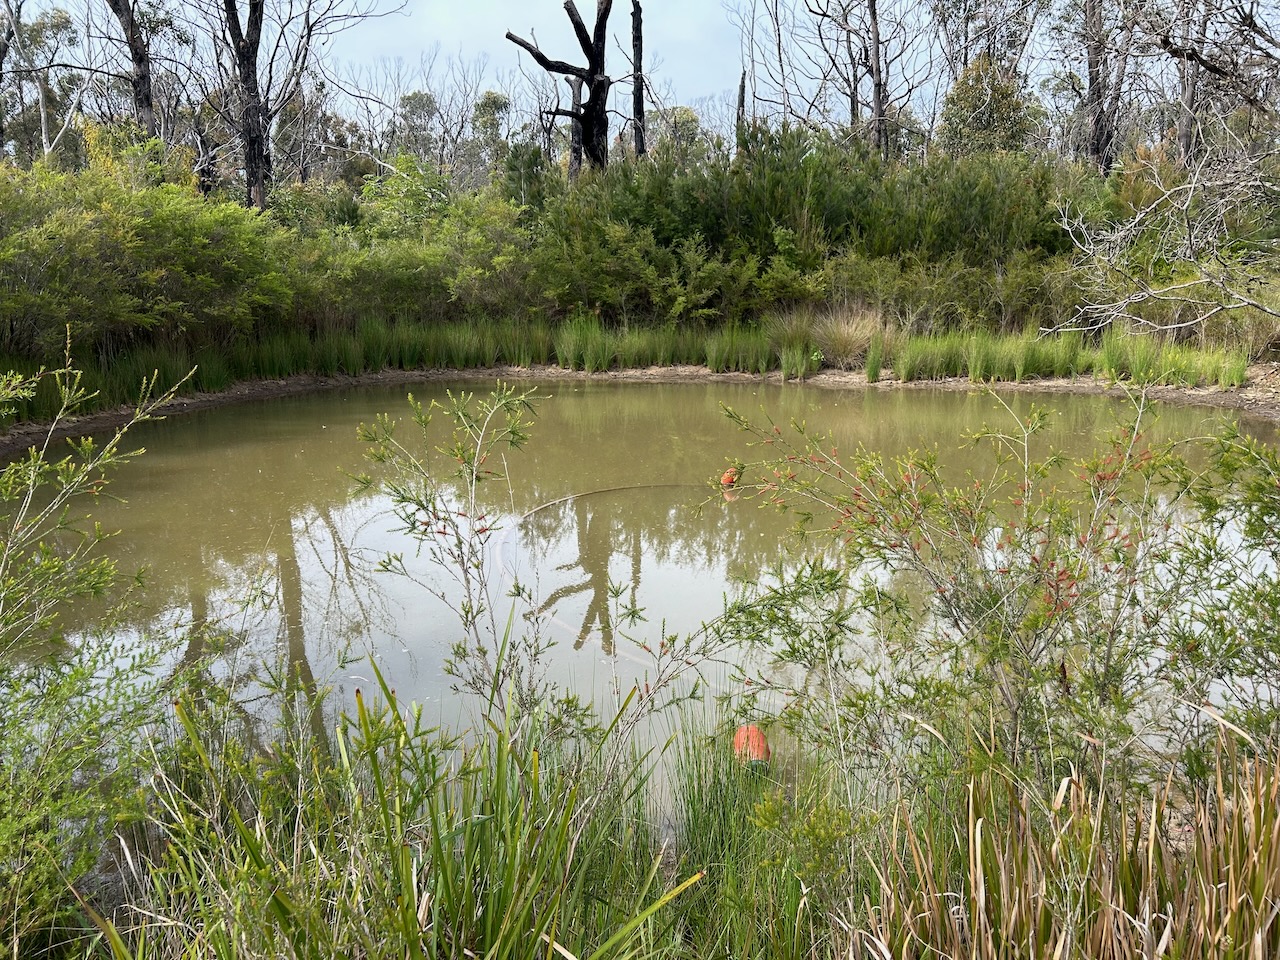


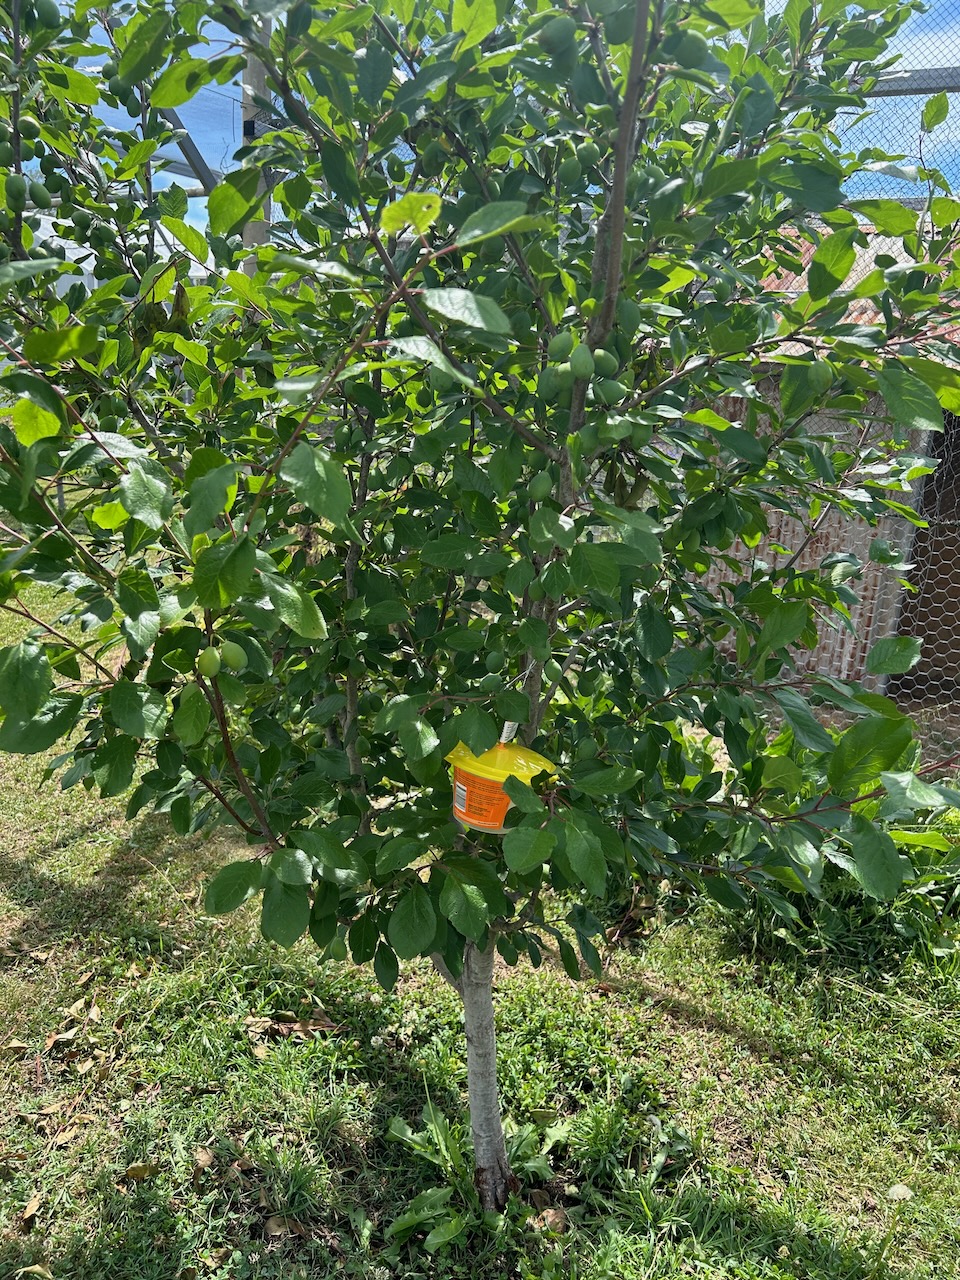

You must be logged in to post a comment.