Cottage Garden

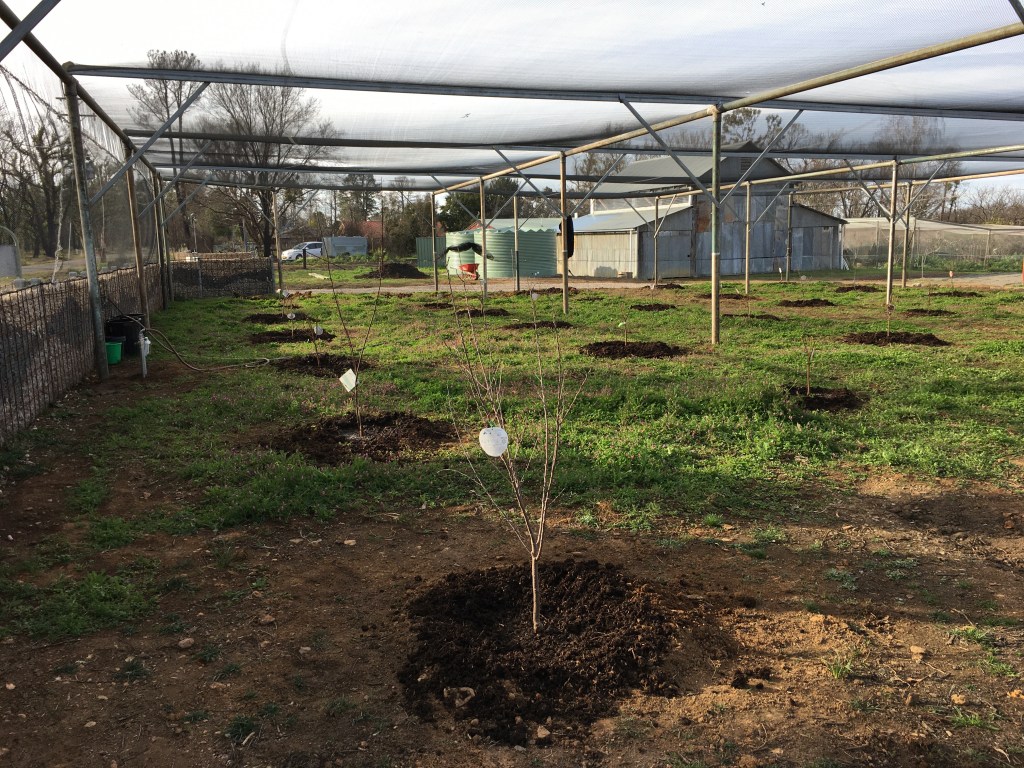
While we wait for the steel frames for our new pottery building to be delivered. They have been delayed twice now. I decided to build a small herb garden inside the new orchard. This southern end of the covered orchard frame is quite close to the kitchen. Much closer than the actual vegetable garden, which is a good 100 metre walk away. It’s a long way to go and get a sprig of parsley or a pinch of thyme leaves.

This took very little effort or time, just a few barrow loads of compost and a low wire netting fence to keep the chook out from scratching all the seeds and seedlings out of the ground.

This is the ideal spot, so close to the house, and totally enclosed, a herb border along the fence line. It got me to thinking… It would be quite pleasant to have a bit of colour here too. Directly in line of sight from the kitchen window. I decided to build a small cottage garden full of flowers, just a little something to lift my spirits. Flowers bring joy to the heart. I feel that I’m in need of some joy just now.

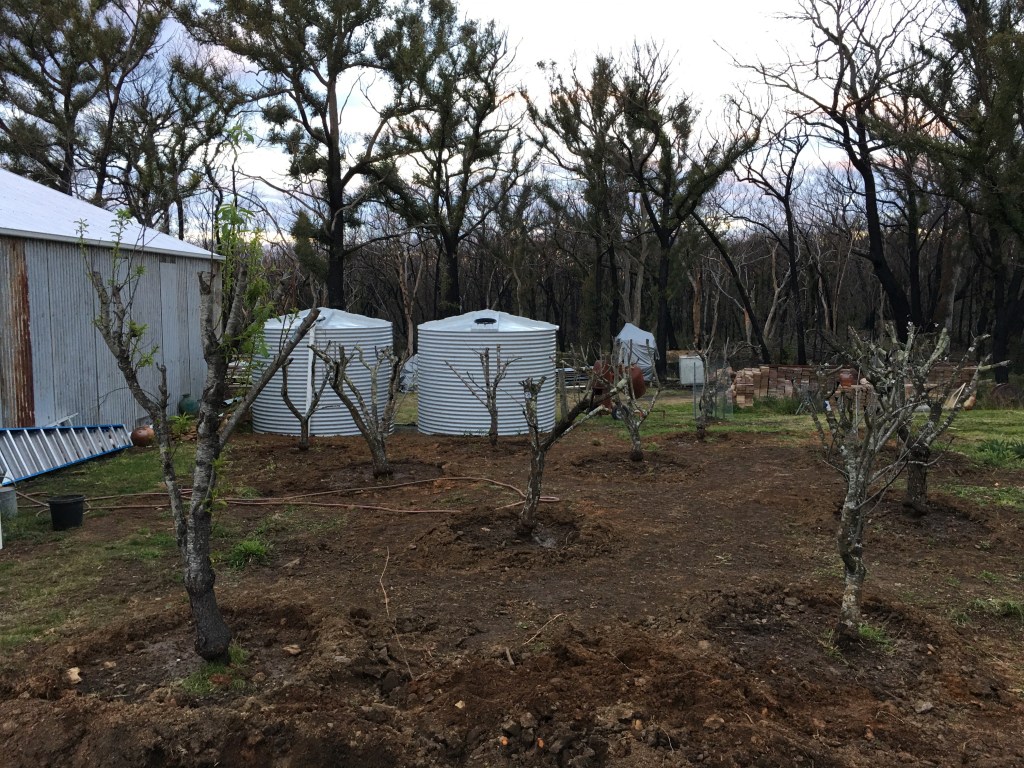
My friend Adrianne Ades sent us a lovely gift of several packets of flower seeds last year straight after the fire. I broadcast them into the orchard site in autumn, along with some red and white clover seeds. The clover came up straight away. I got it in just in time to get some growth before the winter set in. It’s still doing really well. So well, that the clover is smothering and out-competing the flowers. I keep looking around as I walk through the orchard while watering the newly planted bare-rooted fruit trees. But as yet nothing that I can recognise. I’m ever-hopfull that something will show up in the spring/summer.

I’m hopeful that this will eventually become a meadow of fruit trees, clover and flowers.

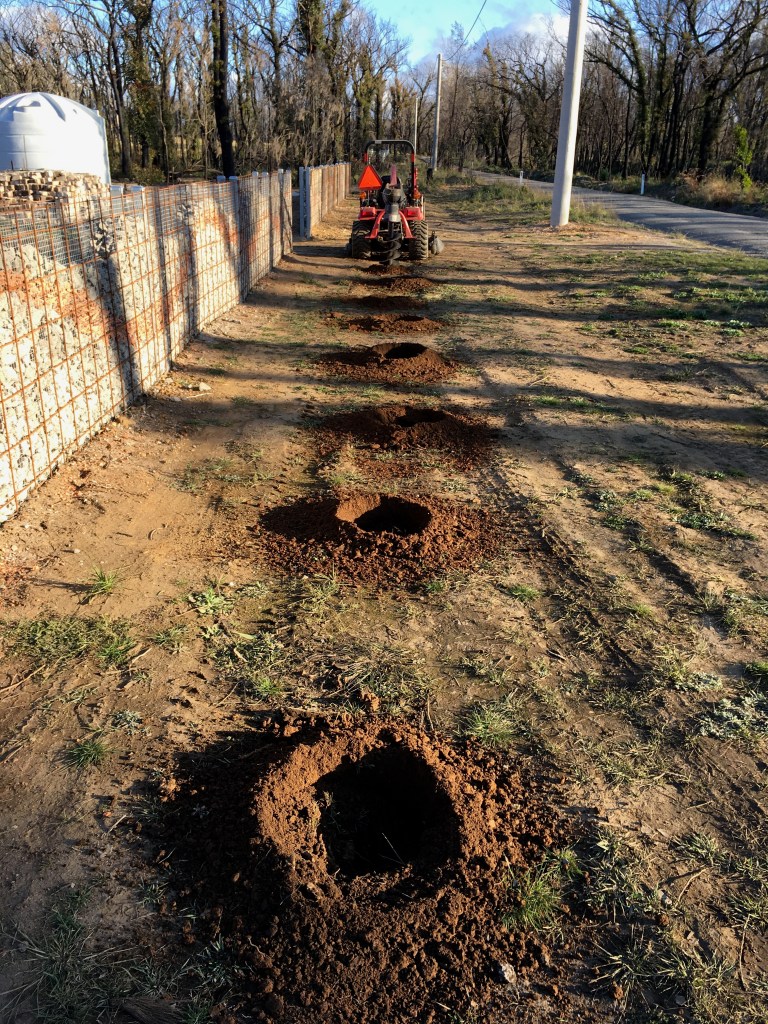
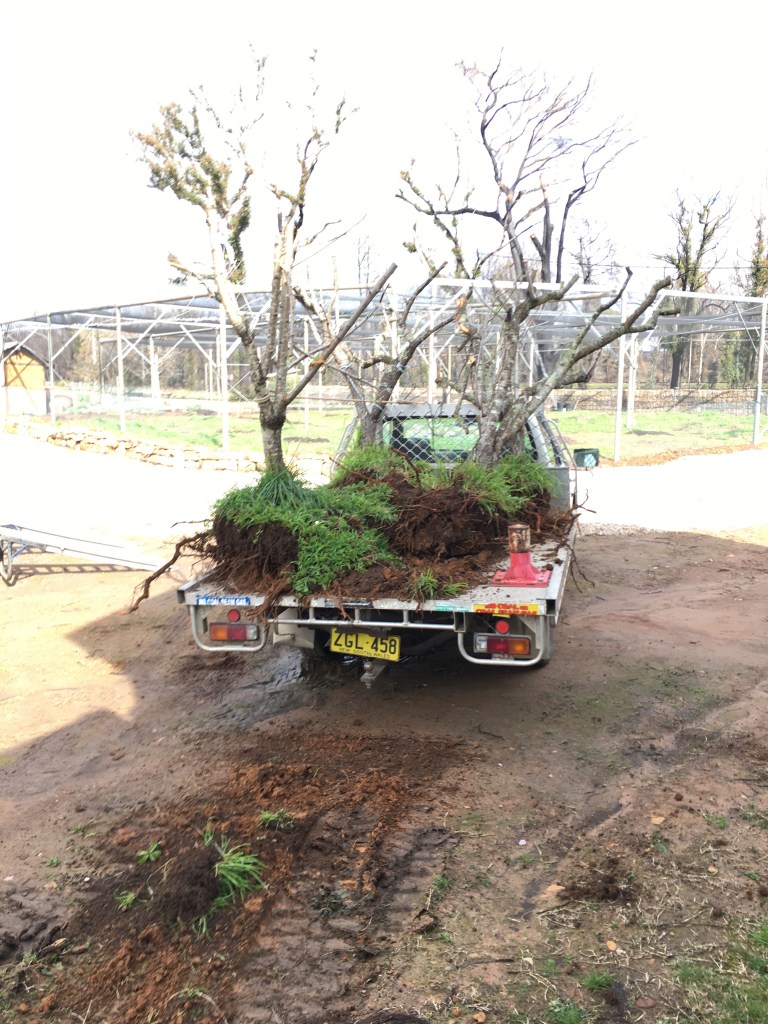
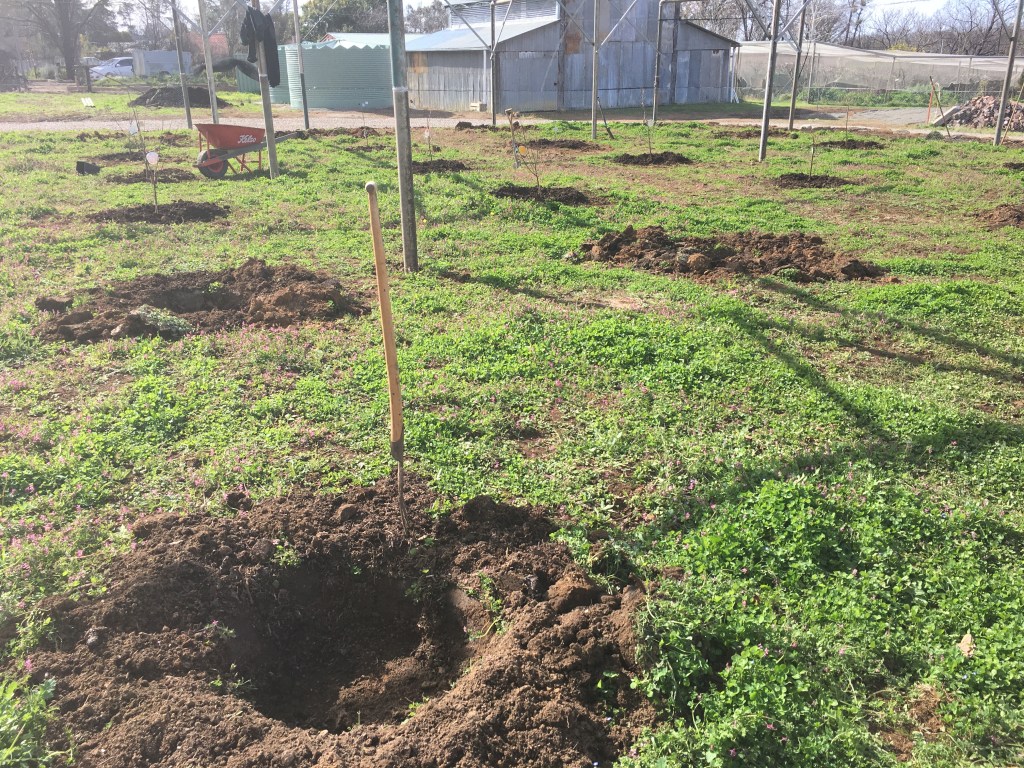
So to this end, over the weekend, I ploughed up a small patch of weeds, bare earth and some stragling grasses. It’s an area that hasn’t recovered at all since the fire. It got pretty hot there in that spot. Janine has been wanting to plant a hedge of natives for herself, plus for the birds and bees, so we merged both ideas, planting the hedge of boronia, mint bush and a bunch of other small flowering natives along the orchard fence and my flowers out further, so that we can see them both in a scaled, tiered effect.

A row of herbs inside the fence, then the native hedge and then a bed of cottage garden flowers.

We got it all done in one day, but needed to spend another day to get the fence built, so as to keep Hillary the chook and the rabbits out. The longest time was spent with the crow bar and post hole shovel digging the post holes. I was given some 2nd hand galvanised pipe fence posts that were just about the right size, so that is what we used, waste not, want not. In the past, I might have preferred to see some wooden posts, but not now! Everything has to be steel or other non-flammable materials.

I made the fence out of left over bits of re-cycled chook wire netting and the old orchard gate that survived the fire. Now we water and wait.

Creative, interesting and cheap

We have been continuing to work on our ceramic wall along the front of our property. We have 120 metres of frontage to the street. It’s my intention to replace the old fence with something that is more fire proof for when the next fire comes, sometime in the next decade? The original fence was the old style post and lintel, but being timber and being 127 years old, there were only 3 substancial morticed posts left in the ground when we arrived here in 1976. We know from these relics that it was a 3 rail fence. The very last post burnt in this last fire and smouldered all the way down into the ground leaving a perfectly round hole where it once stood.
This new fence is designed to be as fire resistant as possible, hence the steel posts welded in pairs to seperate the front hot face from the back cooler side, to stop the metal bending over in the heat. I have also filled each post with sand and rammed it solid to give the post a solid thermal mass, so that it wont heat up to deformation temperature in the short time that a fire front passes. I looked at all the ruined fences around here, post fire, and timber completely disapears, it’s also very expensive. Cliplok metal fence systems just buckle and collapse and arn’t cheap. Full masonary walls are OK, but are the most expensive in both labour and material. There is also the drawback that a masonary wall needs an engineered footing of reinfored concrete and steel, all more expense.
I have been trying to think of very cheap/cost effective solutions to all our rebuilding problems/opportunities, solutions that we can live with aesthetically and also aford. As well as this, everything has to be as fire resistant as is possible. I decided on my poor man’s imitation gabian wall idea, as it met all my requirements of cost and fire resistance. I also need everything that we do to be as beautiful, or at least as interesting as possible. To this end, I decided to fill the gabian sections with re-cycled building agregate in a moving wave pattern, as this is the cheapest ceramic fill available and this makes up about 50% of the wall. We also used 30% of black ballast rock for contrast, as this is also relatively cheap at $70 per tonne. The black wave runs as a countrepoint to the grey concrete wave. We crushed up some old terra cotta to make a colour change and a bit of detail. This is about 5% of the wall and is free, but took some time as we smashed it all up by hand with hammers, as all my rock crushers were burnt in the fire. The terra cotta is placed in ‘lenses’ in some parts of the wall, to hint at a sedimentary reference in the landscape here at the edge of the Sydney sandstone basin. To finish off the wall, we bought a small amout of round, water-worn pebbles to fill up the last 10 to 15% of the wall volume, to cap off the wall. These pebbles are the most expensive part of the wall at $90 a tonne, but we limited our use of these to just a few tonnes to minimise the cost. These pale pebbles accomodate the sweeping wave of energy in the wall pattern and bring it back to equilibrium and tranquility. The dark energy sweeps and undulates through the stoney medium, it represents my dark times, it’s always there, but rarely breaks the surface, the steady, even, bright whiteness nearly alway prevails over the dakness.


We have now completed all the 1200mm high wall sections, about 90 metres, at a cost of $1200 for the fill, this was possible because the steel yard where I have bought all my steel for the past 40 years, donated $2000 of credit into our account to help us in our re-building.  We now have 90 metres of interesting and fire resistant fence. The real cost is in the labour that we, and a lot of friends, have put in to make it happen. One very good thing about building such a fence as this is that we can turn up and do a bit when ever we have a day ‘off’, and time to spare. The last 30 metre section of the wall will be built 1800mm high in front of the house to give us extra protection from the ground fire in the next fire event. 
We have also planted a lilli-pilli hedge all the way along the wall to give somewhere for the little birds to live. Lillipillis are reasonably fire tollerant. They don’t add to the spread of flme. They have small leathery leaves that tend to just shrivel instead of burning. We hope that they will act as an ember filter in the next fire event, as well as acting as a safe bird habitat in the mean time.


Other than that, we have been continuing to burn off the piles of burn trees, twisted branches and clayey root balls that are left over from the 16 truck loads of fire debris that we dumped  on our spare block next door. This is where we used to stack all our fire wood, well away from the house. We very good strategy as it turned out, as all 50 tonnes of wood that we had stock piled ready for the kiln and house use in the coming years was all destroyed in the fire. Not one stick of wood was left on our land after the fire had pased through. As we cleaned up after the fire, we cut any straight sections of tree trunks into kiln sized lengths and stacked them. All the twisted, forked and nasty bits have been burnt in 10 tonne piles over the winter. Each pile left a few ugly root balls that didn’t burn, so the last time we had the excavator here, we had Ross collect all these remnant bits together and make a new, last pile. We needed to get this burnt before the spring and the new fire restrictions period begin. We lit it last week and it burnt for 3 days. We now have only two ugly clay and stone packed root balls that didn’t burn. I may be able to knock them about with the tractor to shake off some of the soil and rocks to get them seperated, so that they can be burnt at some later date. It has been a mamoth task to get all these piles burnt and cleared away over the winter, while also getting the orchard built and planted before bud burst. We have run to a tight schedule.


Everything is starting to come together now. We have a delivery date from the steel rolling company for delivery of our steel shed frames on the 19th of September, so just 3 weeks left for us to finish all the fences and garden. before the building work commences. I have worn through 4 pairs of heavy leather gloves, two pairs of light gardening gloves, ruined one straw hat and worn though 3 pairs of jeans, patched the knees and worn through those patches and re-patched them from thigh to knee, ready for the next onslaught of hard work. I hate to throw out anything that still has life left in it. I like to get at least 5 years of hard wear out of a pair of jeans before thay are relagated to kiln factory rags. I am very grateful to be able to live this life of frugal creativity.Nothing is ever finished, nothing is perfect and nothing lasts.

When is the best time to Plant a tree?

When is the best time to plant a tree? So the old saying goes.20 years ago, is the answer.
We planted a new almond grove yesterday. We now have a dozen almonds in the ground. but planting new, bare rooted, whip-stick sized, grafted trees takes some years before they will bare fruit, and many more until they reach a mature size to bare a good quantity harvest. So, we trans-planted 20 year old almond trees that I had been growing in our veggie garden. They were planted right over on the north side of our land along the boundary fence-line. Later we moved the vegetable garden over there because there was a lot of space to have a larger garden. We had run out of space in the old original site, especially since we extended our house into part of the site and shaded some of the rest.Then we netted over the garden to keep everything out and we had the best crops ever, with no losses to opportunistic critters.
Tragically, the almond trees wanted to grow up to their full height of 5 or 6 metres, unfortunately, the wire netting ‘roof’ was only 2.7 metres high. well tall enough for any vegetables, so I have spent the best part of the last 20 years tip-pruning and then regular summer pruning the vertical shoots to stop them growing through the mesh roof. It was a constant job all summer/autumn months.
Since we have had to re-think everything that we do since the fire. We are basically starting almost everything here on the block from ground zero – year one! I decided to relocate the almonds out of the vegetable garden and out into the space behind the house where the chook house once was and more recently a big patch of native garden. Now all gone. This brown field site needed something doing there, we decided that it will be an ideal spot for the new almond grove.
The long row of almond trees were planted next to a hedge of native shrubs. These burnt during the fire like they were doused in fuel. They all burnt to ash. The heat from this hedge burnt all the smaller branches off the almonds nearby. However, the trees were well established with thick trunks and protected from the main fire front by being planted behind the barn. This shadowed the garden a lot from the intense heat of the main fire. I watered the trees well after the fire and this week many of them managed to flower. Almonds are some of the earliest stone fruit trees to flower. 

I pruned them back hard and we dug them up with a little mini excavator that was hired from the local hire place. This is a really compact machine and could just fit in between the garden beds and in under the mesh ‘roof’. We transplanted the entire dozen trees in one day. I’m hoping that they will survive. It would have been better to have done this job a month ago. But I was flat-out building the new stone fruit orchard frame and netting cover, to be ready for the new, bare-rooted fruit trees. That’s all done now, so the almonds were next on my list.

  My friend Ross drove the excavator and I drove the ute and the shovel. We moved them in 4 truck loads on my ute, 4 at a time.So, when is the best time to plant an almond grove? 20 years ago, and I did! So now we have a new 20 year old almond grove, that I hope will be productive next year.

Instant 20 year old orchard!

New Orchard

We have put in a couple of very long weeks lately. The result being that the new orchard netting frame and cover is now complete and the trees are now planted. Three of the 30 trees had already bud-burst and started to flower by the time we got to plant them. But they are now safely planted and watered in. It’s a very good feeling to see them under cover and starting to grow.

A pile of rotted chicken manure dumped on the original orchard site a few months before planting, then allowed to weather and rot down, back in 1976


44 years ago this month, I was out there digging holes, wheel barrowing compost and planting bare rooted whip sticks. I had put in some very long hours back then too. Getting a dam built, installing a pump, laying 100 metres of poly pipe across the block and fencing off the orchard paddock before I could think of planting my fruit trees.

I did all of this work on weekends, as I was working 4 days and 2 nights, doing 3 different part time jobs teaching Ceramics in Sydney. 2 1/2 days at East Sydney Tech, two days at Alexander Mackie College (COFA) and one night at St George TAFE.  It left me quite tired on the weekends, as I had to catch the 6 am bus to get into Sydney and didn’t get home till 11pm at night after the 2 night classes.

Digging in manure and compost into each fruit tree hole in 1976. Every hole dug by hand back then, just as we did yesterday. 


Not much has changed over the 44 years. Except my back!  The little grafted sticks are so small that you cannot make them out.
I had to work hard to keep up the 23% mortgage interest payments that was common at that time. I was determined to get the orchard planted before the winter was over that first year. Not too different from the situation I find myself in now, while I wait for the metal kit frames to turn up for the new pottery building. As it has turned out it’s veggie garden first, then orchard, and finally pottery shed, in that order each time we have a catastrophe and start to make a recovery. Garden beds are quick to plant out, orchards take longer and must be planted in the winter. Finally, pottery buildings need a lot more money, time, planning and Council Approval before they can be built. 
It fits the same pattern. Everything has to done in a particular sequence for it to work out smoothly. For instance, I had to get the front fence built, as the orchard is up against it, then a metal frame had to be built to hold up the bird proof netting. I was very lucky to be able to buy a truck load of 100mm. dia. irrigation pipes and was also extreemely lucky to be gifted a lot of galvanised wire mesh fencing and also a couple of very large pieces of nylon bird proof orchard netting, along with a lot of other usefull materials from a couple from up north who had de-commissioned their back yard orchard. Thank you to everyone who has helped us along the way with this by actually turning up and lending a hand, or by donating money into our ‘Go-fund-me’ account. We wouldn’t be here now in this much better place, if it wasn’t for you!


The sequence of jobs that brought us here now involved ordering the new frut trees way back in February and March from 3 different suppliers. Then digging out the old burnt out orchard trees. A very emotionally difficult decision at the time, as we had raised those trees from tiny bare rooted whip sticks, watered, mulched, pruned, tended and nurished those plants for 2/3 of my life. The soil from the old orchard site was trucked across the drive into the former front garden area to improve the soil for the new trees. I found one spare evening to seed the area with both red and white clover, plus poppy and other cottage garden seeds, then plough the soil and wait for rain, which did eventually come while there was still some warth in the soil. The clover has been improving the soil structure and adding nitrogen while we have been waiting.

Now all the required steps along the way are complete, so we can pull it all together and finally step back and admire our handiwork. We had our son Geordie and our friend Warren here over the weekend for the big final effort to drag the huge 30 metre x 20 metre spinnaker of netting up and over the frames, then tie it all down to the wire mesh, A huge job. We used over 3000 metal ring clips and all ended up with blisters on our hands.

I laid out string lines to set the planting distance between each tree.

This time, the orchard trees are being planted into better prepared soil.


24 trees were planted in one mamoth effort on Monday. They are all in neat orderly rows and well mulched and watered. They are so small that you can hardly notice them, except for the mulch and the plastic tags that show where they are.


I managed to shread 3 pairs of jeans over the past two weeks. I tore the bum out of one pair and tore through and around last months repairs and patches on the other two.

This will keep me busy for the next few evenings.


My last job on this new orchard cover, is to weld up a couple of metal framed gates to keep everything secure from all the critters that like to eat fruit trees, kangaroos, wallabys, rabbits, wombats, cockatoos, etc.