6 New Bowls

The Xmas show at Watters Gallery opens on Wednesday night at 6 pm.

I have 3 of these new bowls in their end of Year show. I have been developing the Balmoral Blackware body that I make by washing rotten basaltic gravel in water then throwing away the gravel to obtain the micron thin film of hydrated ceramic dust off the surface of the rotten stone fragments.

It takes a long time to prepare, as it takes quite a while to get enough sediment to settle out, so that I can stiffen it up into a plastic state and pretend to throw in on the potters wheel. I throw on an old fashioned, handmade wooden ‘Leach’ style kick wheel.

I ‘throw’ the inside of the form and the rim, leaving the outside and the lower form quite thick, so that it supports the fragile, non-plastic material.

After the forms have stiffened over night, I ‘turn’ away all of the excess material that was necessary to support the form from underneath, then shape the foot ring. Turning away all the excess clay and revealing the form, the way that I had conceived it.

DSC_0050_075DSC_0050steve Harrison 2

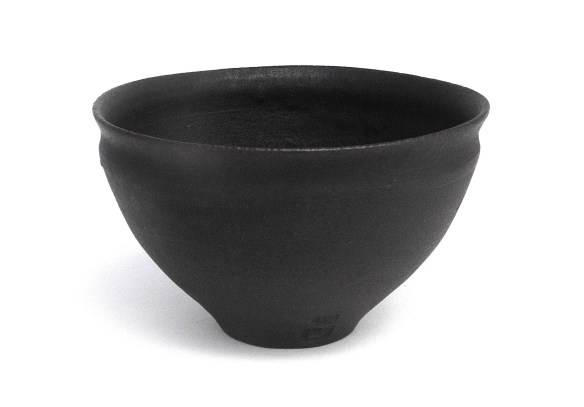
I fire these forms at the front of the 2nd tier of kiln setting. If they are fired too close to the front, they melt. Quite literally, the extra heat is enough to make them turn to liquid sludge. i quite like it when they are just caught at their liquid limit, when they are just starting to melt. I particularly like the pots that are very slightly warped in the firing. Their endurance in the contest of the fire sometime brings about a lovely quiet, natural distortion in the precision of my original form that is very appealing. This piece below, has developed a gorgeous satiny surface of deposited natural ash glaze during the firing. The ash has soaked into the body and started to run down into a rivulet near the foot. It is almost invisible to see, but lovely to feel. The ash has also turned the mat black clay surface to ripe plum reddish brown.

DSC_0053

In developing the blackware forms, I have managed to achieve a couple of exquisite  pieces that really exemplify the potential of this material. I have also been spending a lot of time in working on my native bai tunze stone materials. I spent time both in China and Japan this year trying to extend my understanding of single stone porcelain. These initial results are very encouraging , and I feel that this work is starting to pay off.

DSC_0054_077DSC_0054steve Harrison 2

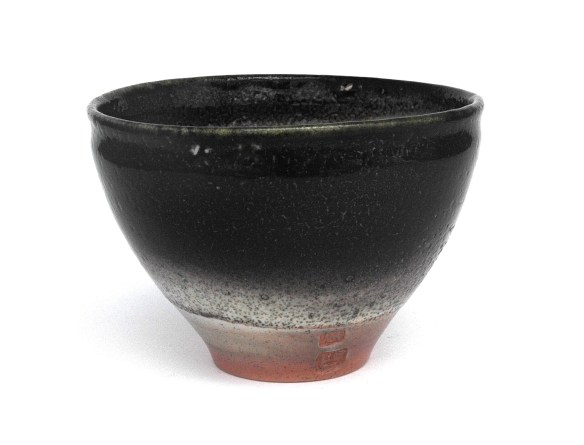
This form above shows a build up of natural  ash glaze deposit that was built up during the firing. It is slightly greenish in colour where it is thicker and there is a very delicate grey/black carbon inclusion trapped around top of the rim. It defines the rim and completes the form.

I have two pieces of single stone white, unglazed porcelain in this show, they are quite subtle and delicate. I have explored both high footed forms as well as seemingly footless forms like the traditional ‘tenmoku’ forms. I was lucky enough to spend time in China earlier this year, studying both single stone porcelain as well as a trip up-river, in China to study the ancient ‘tenmoku’ ware sites.

DSC_0056

These pieces are are both translucent and made from 97% ground native porcelain stone pastes. The remainder being 3% sticky bentonite clay. This helps ‘glue’ all the stone fragments together so that they can be ‘thrown’ on the wheel. What I do isn’t really ‘throwing’ as most potters know it, but rather a soft, gentle, patient, kind of coaxing the ceramic paste into the  bowl form.

I also brought out some ‘archival’ batches of iron stained porcelain stone body. This time I have used a batch of body that is made from all the iron stained fragments of bai tunze that I hand sorted from the larger batches and threw aside. After a while I realised that I had separated enough yellowish, iron stained material to make a 5 kg batch of irony body. This clay is still translucent, but only just so. It has a lovely warm, mellow reddish/brown blush to it that is so warm and inviting.

DSC_0058

I have made some experiments this year with adding some salt to my feldspathic glazes. Instead of turning out the usual, yellow, orange, pink, brown colours, these recent firings have resulted in a few pieces that are defined by their total carbon sequestration, turning the glaze almost totally black. Except for a small area of grey/white down low near the exposed clay foot. This carbon glazed tenmoku form has turned out better than I could have imagined.

DSC_0055


New and Old

We are in that interesting time of year that used to be called the hungry gap. We don’t have any concept of the hungry gap any more these days. Food is continually shipped, back and forth, all around the globe, all year round. This is the age of globalisation. Foods that used to be seasonal are now ever present.

In Australia, we can have all the available foods from the supermarket at all times of year, but Janine and I choose not to subscribe to this paradigm. We stick pretty strictly to eating what we grow ourselves. Here in the Southern Highlands of New South Wales, we find that with global warming, there are so few frosts, so we can grow a whole range of seasonal vegetables that are suitable for this climate. From the coolest Brussels Sprouts, to the warmest avacados.

Tonights dinner is a combination of new and old. Fresh vegetables, zucchinis, onions and garlic from the garden, spiced up with some dried tomatoes from the fridge. These are the old component of the meal. Harvested late last summer from the garden, dried and preserved in oil.

I slowly soften the onions over a low heat in some good olive oil, then later when they are glowing and translucent, I add the garlic, then the sliced zucchinis and finally the preserved, dried tomatoes. I cover the pan and let it sit on a very low heat for some time to let the zucchinis sweat out their juices and slowly soften into the oily, intensely tomato flavoured mixture.

IMG_1526.JPG

While the vegetables are sweating down and softening, I cook two lovely pieces of sword fish. Pan fried in olive oil, turned once and allowed to crisp up a little then steamed in their own juices under a lid for a few moments. while I serve up, I deglaze the pan with a little chardonnay, because it is open, and reduce the sauce a little, then serve. Sword fish, with new and old vegetables from the garden.

IMG_1527.JPG

For a desert, The lovely One has stewed a few of the mid season peaches. All the early peaches are long gone now. These midseason varieties are a little hard to skin, so she blanches them in a minimum of water for a couple of minutes to make them easier to peel. It also preserves them, when they are frozen in the freezer, for later breakfasts.

IMG_1528

She is about to discard the stewing water, when I take it and add a little sugar, then proceed to put it on a very low heat, at the back of the stove, to reduce it down to a near toffee-like thickness and concentration. it is really delicious, poured over the blanched peaches.

Reduced stewing liquor, poured over blanched fresh peaches. An old idea, bringing out the best of the new fruit.


Aioli

As we have an excess of fresh garlic just at the moment. I decided to make aioli sauce as the accompaniment to the steamed fish and new potatoes that we are having for dinner.

Aioli is a very ancient form of sauce, a bit like mayonnaise, but flavoured with garlic. It’s a great addition to lots of meals. Tonight we are having fresh ‘Ling’ off the fish truck that comes up to the Highlands from the coast, 3 days a week. He arrives at 6.00am and is sold out by 1.00 or 2.00 pm. I get there just in time to get the last piece of ling and some fresh mussels.

I decide to steam the Ling with a few drops of olive oil, to stop it sticking, then add a few fresh leaves off the Kaffier lime tree on top. I deglaze with a crisp white wine and serve it with our steamed new potatoes and  zucchini, picked fresh from the garden.

IMG_1512

We have both green and yellow zucchinis at the moment. They are the first of the summer vegetables to come into full production so early on the  the season. It’s still late spring. It isn’t even summer yet, but we have just had our first 40+oC day for the season. It forces us to be out watering both morning and night to keep the young summer vegetables from drying out and being set back.

IMG_1513IMG_1509

I peel and then crush the cloves of one small knob of our fresh garlic, then add the juice of half a lemon, one egg yolk from our son Geordie’s chickens and whisk it all up together into a mucilarge. I then proceed to add just a few drops of olive oil to the mix, a few drops at a time while whisking with the other hand. This continues until a thick white, bulked-up consistency is achieved. It takes quite a lot of oil to bring this about.. Don’t worry if it takes a long time, just keep on adding a few more drops of the oil at a time. Don’t get frustrated and add too much in one go. To make a mayonnaise-like emulsification sauce, you need to be patient. Just add a few drops at a time and keep whisking. It will eventually emulsify.

IMG_1510

This is a very ancient recipe, dating back into prehistory. It is to be found all over the south of Spain, France and northern Italy. It was apparently, originally, just a mix of garlic and olive oil to begin with. It was later found that the addition of a little egg yolk, stabilised the emulsion and thickened it considerably. It benefits from the addition of a little salt and some freshly ground pepper to taste.

IMG_1511

Rick Stein has suggested that the garlic be crushed with the side of a large chef’s knife and then chopped fine, crushed again with the side of the knife and very fine chopped and worked into a paste. A rather nice craftsman-like way to do it. I like it. For those without the patience or the knife skills, a garlic press works well enough. I actually like  it to be a little chunky and rustic. I also like it to have a lot of garlic in it.

Anyone can buy that anonymous, mild, made not-to-offend, finely milled, bland paste from the supermarket. It has too much salt and is loaded with preservative. What I’m making here is real life food, home grown, home made, organic, rough, chunky and strong flavoured.

However it is made, it is just right NOW at this time of year, when the garlic is so fresh and oily. Later in the year when it dries out and goes rather leathery, it just isn’t the same. At this time of year, aioli is a great accompaniment for lots of things that we grow and eat. It goes very well with fish and potatoes.

IMG_1514

Aioli probably lasts quite a long time in the fridge, but we’ve never managed to keep it long enough to find out. It’s deliciously piquant.

We haven’t had any red meat since August, I’m starting to think that it would be nice to have a couple of lamb cutlets with aioli.

Panforte

During our open studio weekends, I made Panforte to serve to guests that stayed on for coffee. Sometimes, however, we were so busy that I didn’t get time for chat and coffee, being constantly engaged in discussing pots,  glazes, forms and firing techniques at the wrapping bench. So two cakes lasted the whole weekend, instead of the usual ten minutes.

I was taught to make panforte with a very simple recipe. It isn’t really a cake, it’s something closer to a bread, but with lots of spices and a little sweetness. The ones that are commercially available here from Italy are a lot sweeter and much softer than this rather traditional version.

I suspect that there are as many different recipes for Sienna cake as there are housewives that cook it in Sienna. However, after watching a recent cooking show from Italy with interviews with some of the locals, it was teased out that in the new/modern Italian household of 2 parents and 1 child, with both parents working, there isn’t a lot of home cooking going on any more. That has been left mostly to Nona. The microwave and pre-packs reign supreme these days in modern busy households , just as they do in Australia.

So here is my variation on an old fashioned, not so sweet, rather chewy, recipe for Panforte. It’s not so surprising that I think that it is a little like a sweet kind of bread, as the name panforte means ‘bread-strong ‘. I think that the strong part refers to the fragrance and flavours of the spices?

I was originally taught to use;

1 cup of flour

1 cup of almonds

1 cup of dried fruit

and one cup of honey – So easy to remember!

What could be more wholesome, natural and simple? Well, that is what attracted me to the recipe, but I found it a little lacking in dried fruit and way too sweet for my taste. So I altered it over time, a little bit at a time, slowly arriving at the following recipe, which I currently use.

1 cup of flour

1 cup of almonds, crushed with the side of a large knife or roughly sliced

1 cup of dried apricots, roughly sliced

1 cup of glacé cherries

1 cup of tiny dried currents

1 cup of other mixed dried fruits and candied peel. I made my own dried candied peel. It keeps really well in the fridge and last for ages. see;

Fruits of the Solstice

1/4 cup of honey, which is then topped up with hot water and dissolved. I use local bush honey. We used to use our own when we had the bees. Sometimes I use Tasmanian ‘Leatherwood’ honey, as it is particularly fragrant and compliments the other spices.

There is a concoction of dried spices added to the mix, and these are not weighed or really measured. I suppose that they may have been once upon a time, but I’ve completely lost track of what that might have been.

These days I add a generous shake or small spoon full of some or all of the following;

Cinnamon powder. This is the most important, so more of this. Maybe 2 level tea spoons. Then there is powdered cloves, also important, but very strong, so a lot less is added. Maybe half to one teaspoon, then there is ginger, nutmeg and mixed spice. Mix and match as you think fit.

All the dry ingredients and spices except the honey water, are dry mixed together in a large hand made pottery mixing bowl.

As soon as the warm honey water is mixed in, stir it all together well to incorporate all the dry fruit and flour, so that it is homogenous. Do this quickly because as the mixture cools down, it starts to ‘set’ as the honey become more viscous, then it becomes harder to pour it out in the the baking ring.

I made a few stainless steel baking rings, some for my sons restaurant, and a few for us. I keep giving them away and making more. I use a ring that is about 200 mm dia and 20mm high.

IMG_1454.JPG

Grease a baking tray and the rings. I use olive oil to avoid using butter. I like butter. No! I love butter, but I’d rather enjoy my small allocation of butter in other ways. Olive oil works well in this way and the strength of the spices masks any minimal olive flavour residue.

I sprinkle a 50/50 mixture of flour and icing sugar, mixed with some cinnamon and clove powder onto the tray and pour the soft cake mixture into the ring onto of the flour mix. Use any left over mix to sprinkle on top.

IMG_1455

Bake for about 40 minutes at 180oC. Check if it’s done by inserting a knife. Allow it to cool on a wire rack, then wrap it up in lunch-wrap paper. It keeps for ages in the fridge, but only if you forget about it. Otherwise it gets eaten very quickly, as it is very popular.

IMG_1457

IMG_1459.JPG

It’s a lovely special treat that I make a couple of times a year, so as to keep it special.

IMG_1505


Buckotto

We have had a couple of very good week ends of Open Studio, with lots of visitors and good sales. This is the best Open Studio that we have participated in. The Open Studio Trail has been operating now for about 10 years and we have participated in 5 of them. We would have been involved in more of them, but they fell on times when we we’re away or unable to take part for one reason or another . So this has been good for us to see a strong response to our domestic pots.

It has been frenetic, but very good. we are looking forward to a slightly easier and quieter time for the next little while. We have a lot of other small, deferred jobs to catch up on, as well as a kiln to finish building. It has been sitting in stasis for the past two weeks while we concentrated on the pottery.

IMG_1466IMG_1472

The Lovely has been busy dealing with the new garlic. We have had it spread out to dry all over the place from in the sun on the front verandah to the kitchen floor in front of the big window. The best of it is all peeled and plaited now and hung up in the kitchen to finish drying. We have 10 plaits holding anything from 15 to 20 knobs and another equal number of knobs that were too far gone to be able to plait and they are currently stored loose in wicker baskets in the kitchen window to finish drying along with the last of the broad beans.

IMG_1471

I love the fresh, oily, new season garlic. It just pops out of its soft skin so easily. I have been eating garlic sandwiches, made with heavy, dark rye bread. A dusting of veggie salt and freshly ground pepper and it’s all I need. There is only a month or so where it stays like this, so fresh and wet and oily. Once it dries out and the skin becomes papery, then the magic is gone and it becomes just plain ordinary garlic for the next 6 months, until it declines into its older, leathery dried out state with green shoots. This is when it is time to replant the next crop.

We save the largest and strongest bulbs for planting out for next seasons supply. These go back into the ground around about March, as soon as there is any sign of a green shoot. I usually see a few wild shoots appearing in the garden at this time. Some rogue cloves that have escaped captivity. They set the agenda, when they shoot up out of the ground, it’s time to replant the next years crop. We can still keep on eating the remainder of our stock from the kitchen plaits until it is all used up. We rarely last out the year, usually falling short by a month or two, but this year we made it right to the end by buying a plait from one of the members of our local ‘Seed Savers Group’.

We have had a few changes in the weather with a few warm days following some rain and the first of the spring crop of Safron milk-cap mushrooms (Lactarius deliciosus,) has appeared in the garden. They grow in conjunction with pine trees, and as we have some magnificent Caribbean pines growing beside our house, we get a good supply of these lovely wild mushrooms all through the year, but mainly in spring and autumn. This one may end up in a risotto for dinner.

IMG_1483IMG_1484

I have recently been experimenting with making a variation on risotto using buckwheat. I bought a kilo of organically grown buckwheat and have been finding ways of using it. I originally bought it to make my own ‘soba’ noodles. However, ‘buckotto’ has turned out to be my favourite use for it.

IMG_1469

We have plenty of beetroot, carrots, broad beans and zucchinis at the moment, so tonights dinner will be pink veggie buckotto. I make it just like any other risotto, by first slow heating some finely chopped onion in good olive oil and later adding some of our garlic. Cooking them though for some time so that they are soft, translucent and glowing, but not browned or burnt. Add a cup of the small triangular buckwheat grains to the mix and stir till coated with oil. I add a cup of white wine and add in the various sliced up vegetables in order of required cooking time, stirring often. Today, I have a pan of fish stock on the go to keep the mixture lubricated. I also have a few jars of our own preserved tomato passata left in the pantry from last summer, so I add in half a small jar of this and a slab of frozen basil pesto from the freezer.

IMG_1474

We only have a very small freezer attached to the top of our small domestic fridge. We have chosen not to own a separate freezer to save using electrical power unnecessarily. When we preserve our summer excess from the garden we do it by cooking and vacuum sealing the produce in glass ‘Vacola” jars. Basil pesto of course, isn’t cooked, so it is one of the few things that go in the freezer. I made 7 tubs of the stuff last summer. It’s great to be able to go to the freezer and grab a chunk of distilled summer garden essence and add it to a meal so much later in the year.

I keep the dish moving, so that it won’t stick as it thickens up. it’s a beautiful, rich vegetable flavour with a creamy texture and some chewy vegetable chunks.

IMG_1476IMG_1478

A great meal for a late spring evening. Ever so simple. Quick and easy and very tasty.

I believe that it is even quite healthy.

Tonight My Fingers Smell of Garlic – Again

The first of our open studio weekends is over and we were quite busy all day, each day, with only one 10 minute gap between visitors all day each day. Not quite enough time to be able to make and eat a sandwich. We had to take it in turns to eat and go to the loo.

IMG_1390

Now that the pressure is off. It is time to lift the garlic crop for this year. As I got them in early, they were ready to be lifted and dried a couple of weeks ago. Now is the first clear space I have had to be able to get into the garden and spend a couple of hours digging over the plot, weeding and sorting them all out.

Janine had managed  to get into the main garden last week and dig up the small plot that I planted out up there. I planted about 100 cloves from our larger knobs in the kitchen. A mix of all the different types that we have collected over the years. Red, white and pink varieties in both hard and soft stem types. She managed to find the time to preen them and spread them out to dry, before plaiting the largest of them and hanging them up on the kitchen wall by the wood stove chimney to finish drying. We have 3 plaits of about 15 knobs each. With another 50 smaller knobs all cleaned and dried and placed in a large colander on the kitchen bench top for immediate use over the next month or so.

IMG_1430IMG_1428

While I dig the garlic, The Lovely gets stuck in at the other end of the plot, up by the patch of English cottage garden flowers that I planted for her as a surprise 2 or 3 years ago. They take a while to get established, but are flowering well now. It bit past their best, but still lovely. A very nice back-drop to our work today. At some point in the future, I am going to reverse these two garden beds and lift all the cottage garden flowering plants and move them to the vegetable end, and vice versa. This will refresh the soil and the vegetables and flowers will both benefit from the change. Janine starts to harvest the last of the broad beans. Pulling out the spent plants as she finishes stripping the last of the beans off each one. It’s nice to be able to spend this time, working together in the garden.

IMG_1424

I bought half a dozen ‘new’, named varieties of organically grown garlic and planted them out in serried rows, down here in the Pantry Field garden. They had grown quite well, with some being obviously much stronger growers than others. I bought 3 knobs of each and planted out the individual cloves. These have now grown up into about 150 knobs of differing sizes. It would have been best if we had managed to find the time to harvest them a week or two ago. They had started to dry out and the tops had begun to lean over. Then we got so busy and it started to rain. We had 3 inches or 75 millimetres of rain last week and this was enough to reduce the dried tops to a liquid mush. The earliest varieties had lost their ‘paper’ coating and are starting to ‘burst’ or spread out. They’ll be fine for eating, but without any substantial stem. we won’t be able to plait them and hang them up. So more individual knobs for use directly from the bowl kitchen bench top.

IMG_1435

I’m not too sure how this will affect their ‘keeping’ capacity? We’ll find out during the coming year as this hasn’t happened before. I’m glad that we have had this fine, sunny day today, combined with a day ‘off’, so that we could get the crop in and start it drying out. There is a certain sense of achievement, satisfaction and security knowing that we have to years supply of garlic safely in hand.

IMG_1440

Some people have asked me what we do with so much garlic. Well, we eat it. We seem to get through the 200 to 300 small knobs pretty easily during the year. What we grow isn’t the largest or most presentable garlic. Not like what you might see for sale in the green grocers. But it is our own, organically home-grown produce, clean and free from any sprays, pesticides or preservatives. That is the kind of self-reliance that our enterprise here is all about, and a day ‘off’, spent in the garden is a good day indeed. This is fun for us. It doesn’t involve going out, driving anywhere, or spending any money. What more could you want?

IMG_1441

Our friend Annabelle Sloujetté has turned up from the south coast, bearing gifts of oysters and a couple of beautiful blackfish. I steam them with some of our fresh little garlic cloves, a little olive oil, a couple of sliced large dark field mushrooms, two sliced zucchinis, some pepper and a squeeze of lemon juice. A splash of white wine finishes it off.

IMG_1443IMG_1450

These fish are a really good size for blackfish, so I choose to cook them in the big rectangular copper baking pan, but it doesn’t have a lid. In the past I have used a sheet of al-foil to cover the pan on occasions, but I really don’t like to use aluminium cooking foil. It’s an environmental disaster, so we rarely use it. I decide to run down to the kiln shed and quickly make up a folded stainless steel, custom-made, lid for the pan. I’ve been meaning to do it for a long time now. So now is the time.

IMG_1445IMG_1449

I choose a small piece of stainless off-cut, that is almost the right size. I measure it exactly and use the guillotine to slice off a few centimetres, I use the pan break to fold a slight return on two sides to help keep it flat when it is heated, then hand-file and smooth the edges. I measure it so that it will fit exactly between the two handles and sit snuggly on the flat rim.

It takes me 7 1/2 minutes to get it done and I’m back in the kitchen before the others have  finished cleaning the new potatoes that we harvested today along with the garlic and broad beans.

I lift my hand to my face to wipe my brow after I have run back up from the workshop. Ah, Yes! I remember that smell. I have been digging and cleaning garlic all day, so tonight my fingers smell of garlic – again!

Spring and The Man for All Seasons

The broad beans that I planted before leaving for Japan have come to fruiting. They have been slow arriving, but now they are in full fruit. We have had 3 picks from them so far and there will be more, but with the increase in heat and day length, there are no more flowers, so as we pick the last beans from each plant we pull it out and add it to the compost pile.

There haven’t been quite enough of them to get tired of them yet, we have managed them quite well. I don’t think that there will be many left at the end of the season to dry for later use. only just enough to save for next years seed.

The garlic that I planted in March is wilting now and drying off, so it is time to harvest it and lay it out for drying. This will have to wait for next week, as we are flat-out busy cleaning up the pottery and setting out our pots for the Open Studio Weekends coming up. We are pretty much ready now with only minor adjustments left to do today. I did all the lighting and most of the pricing yesterday.

IMG_1382

Next to the garlic I planted a long row of peas which The Lovely enjoyed while I was away in Japan. They are all over now, so I planted potatoes in that spot a few weeks ago. They are all starting to show their first leaves now. They went in a month late, but I was so busy when I got back that I just couldn’t do everything at once. Pot making, kiln building, wood splitting, kiln firings, studio cleaning, weeding, mowing, planting and harvesting.

IMG_1216IMG_1217

IMG_1363IMG_1346

IMG_1352IMG_1359

I have been back a while now and just about caught up. The garden is pretty much fully planted out with the summer vegetables and we have already picked our first cucumber, zucchinis, picked our first sprigs of basil and had a couple of meals of artichokes. Janine lifted some of the earliest garlic that had self-sown on the edge of the path, a few knobs that we missed last year, that had grown into splendid plants. They are all dried, plaited and hung up next to the stove in the kitchen. It’s so nice to have fresh garlic again. I forget just how juicy and oily it is when it is this fresh. This is the first year that we have had our own garlic last the full year. We had just 2 little dried out knobs left in the colander on the kitchen bench when Janine picked that first plant.

IMG_1365IMG_1384

I have managed to make progress on the big new gas kiln for Sturt Workshops. It is all panelled and bricked up now. I had my very good friend and right hand man Warren down for a few days to give me a hand, as there is just too much to do at this time of year and I’m only one man.

Warren is an amazingly creative person. So skilful at so many things. He was apprentice of the year in his trade course. For two years in a row! Then he worked as a stonemason in Canada for a while, then as a fencer on his return, a panel beater, and a potter/sculptor, this was when I first met him. He worked in the sculpture department of the National Arts School for some years and then studied horticulture and set up his own business. An amazingly creative, restless spirit.

I taught Warren in the ceramics course at The National Arts School, back in the 90’s. On the first day of the year, I started my class by getting the students to make some good, basic, pottery tools. I took them all over to the sculpture workshop, where there were woodworking and metal working tools and vices. They were encouraged to get to know how to use these simple tools, so that they could make and sharpen their own tools. A little bit of self-reliance, that I had decided to inject into the course syllabus.

I handed out some small pieces of thin stainless steel sheet and a pair of tin snips to each of the students, so that they could cut out a small kidney-shaped profile tool. By the time I had turned around, Warren had cut out a perfect kidney shape. He held it up to me and said,

“Do you mean like this”?

I said “Yes! Exactly like that. Do you want a job”!

He replied, “Maybe, it depends what it is”

We have worked together on a casual basis ever since. When I have too much work on, it’s great to get Warren down here to give me hand. Apart from being amazingly skilful, he is great fun and we laugh a lot. Working with Warren puts a spring in my step.

Having been a panel beater, Warren is excellent with sheet metal and with the State Medal in MIG welding under his belt, he is a very useful man to have in a kiln factory. He has a great eye for detail and is very careful and accurate with his hand-work skills. This in conjunction with a few years as a mason, makes him ideal at the very fine and precise type of brick laying that I do in my kilns. It’s great to have The Man for All Seasons here in the Spring.

IMG_1323IMG_1337

IMG_1342

Open Studio

Janine and I invite you to visit us at our home, pottery and garden for our annual Open Studio Sale. We can also offer a walk around our organic vegetable garden and orchards.

We have been busy working at all sorts of activities over the past year including making some new domestic wares. Please feel free to call in and visit us if you are in the area. Keeping it in the family, Why not consider making a day of it and travel down to Bowral and have lunch at Biota Dining, the only 2 hat restaurant in the Southern Highlands, where our son Geordie is the sous chef.

<http://www.biotadining.com>

image001 image002IMG_1370

IMG_1143

Janine King and Steve Harrison invite you to their Open Studio Weekends at Balmoral Village

As part of the Southern Highlands Arts Festival we will be opening our studio on the weekends of, Sat 7th and Sunday 8th of November, and again on the Sat 14th and Sunday 15th of November, open from 10.00 am till 5.00 pm

We are studio No.3 on the top right hand corner of the downloaded map page.

The program and the map of the studios is available from the website below;

Follow the festival on Facebook  www.facebook.com/SHAFAST

There will be yellow flags and yellow and black Studio Art Trail signs from the entrance into the village leading to the 3 open studios in Balmoral Village.

Hoping to see you here,

Best wishes

Steve and Janine