With the success of my first larger, extended, new Shimpo tray experiment on the metal framed model, I was encouraged to try and add a new larger tray onto the 3 legged RK-3E whisper model.
The original factory tray was just so small and cramped, just like all the other Shimpo potters wheel turnings and slip trays.
I have followed the same archetype that I used yesterday for the metal framed model. I used the same waterproof plywood for the base and the same stainless steel rim all around.
Two down and one to go on this side of the studio.
Now that my work in the group show at Sturt Gallery is up and running.
I have time to do a bit of catching-up on all the jobs that I wasn’t able to get done while I was working hard to get all the pots fired for this show.
One of the first jobs is to make a new turnings and slip tray for one of our potters wheels. The turnings tray on Shimpo wheels is slightly only just above pathetic.
They are so mean and cramped that if you do any amount of turning whatsoever, you need to stop work to take the tray to pieces and empty the turnings out, then re-assemble it to keep working!
It is so pathetically small, it is completely un-professional. I’m so surprised that they haven’t managed to come up with something more appropriate after all this time.
I’ve been using shimpo electric potters wheels since 1972. I first started with an RK-2 ring-cone wheel. The model with the sharp, pointy drive cone. Later I bought a 2nd hand RK-2 ‘super’. The model with the short, blunt, rounded cone. These were the best wheels on the market at the time. I really enjoyed using them.
After the fire I was given a couple of RK-10 metallic traction drive wheels, but these were from a school, where they were not well looked after and the small plastic trays were possibly allowed to be over-filled with clay slip water that found it’s way into the top bearing, grinding them out, such that that they sound and feel very rough and noisy.
I now have an RK-3D and RK-3E whisper wheels, but the tiny, cramped, plastic trays are still an embarrassment.
In the old pottery, I installed the RK-2 and RK-2 super shimpos in wooden enclosures, so all the turnings went straight onto the floor around the wheel, as is the Japanese accepted practice. However, in this new pottery studio, all the wheels are situated in a row either side of a central bench. This isn’t so convenient for allowing the turning to spill directly onto the floor.
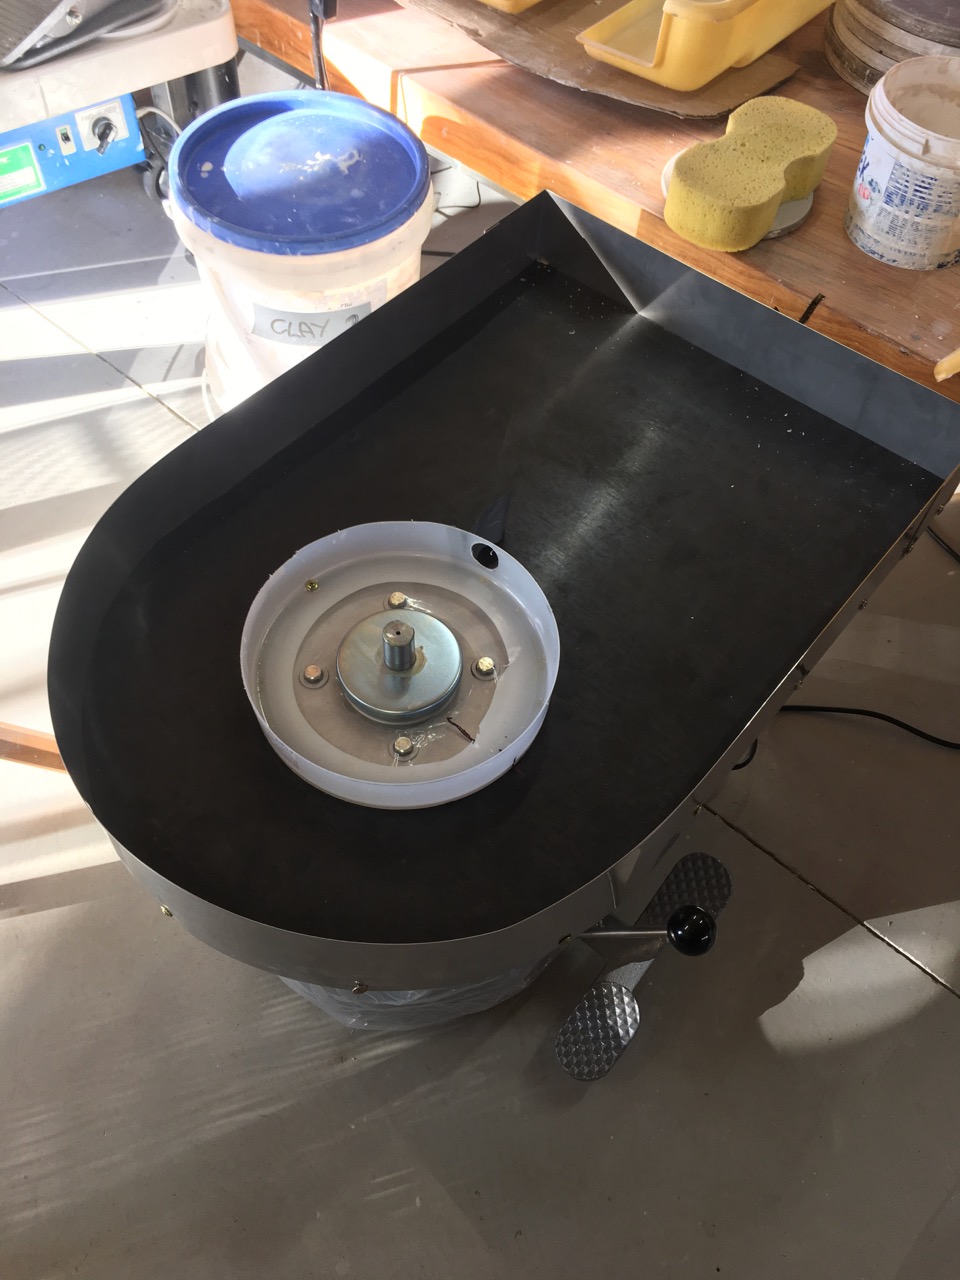
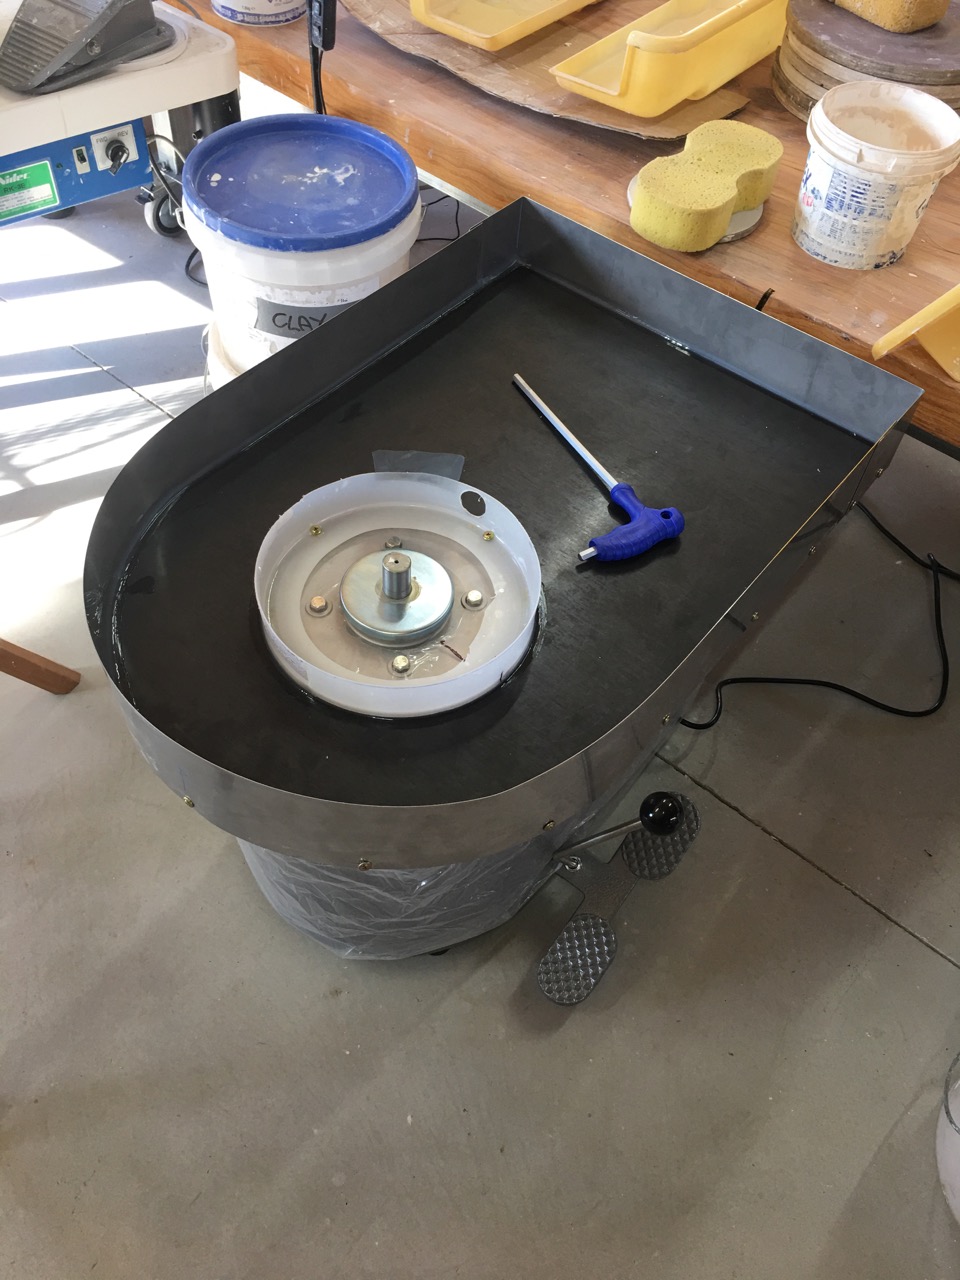
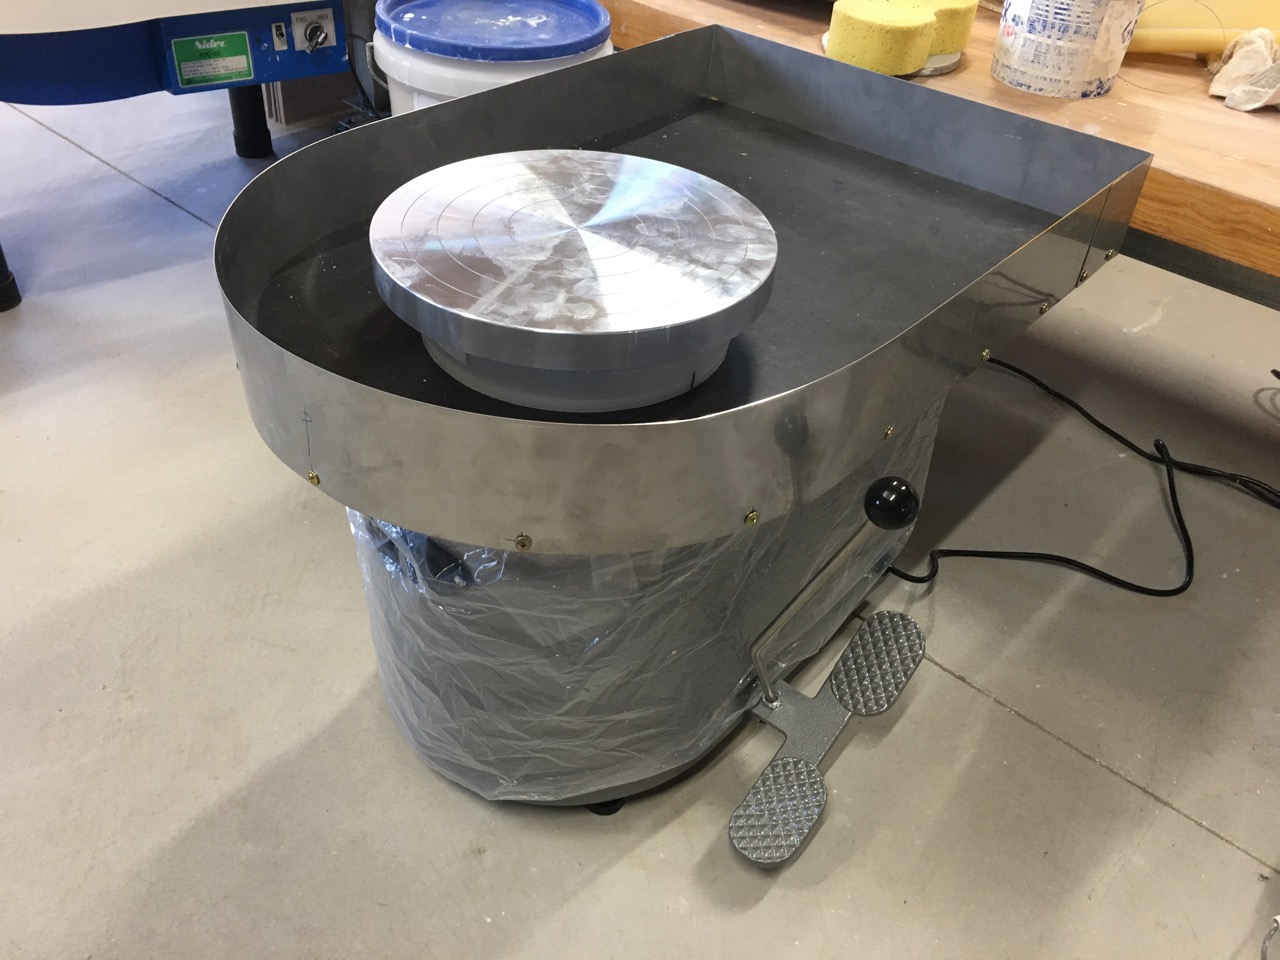
So today, my first new job was to build a large, very spacious, turnings tray for the RK-3D shimpo. It has worked out very well, or so I believe. Time will tell if it is any good. If it isn’t, I’ll take it to bits and redesign it.
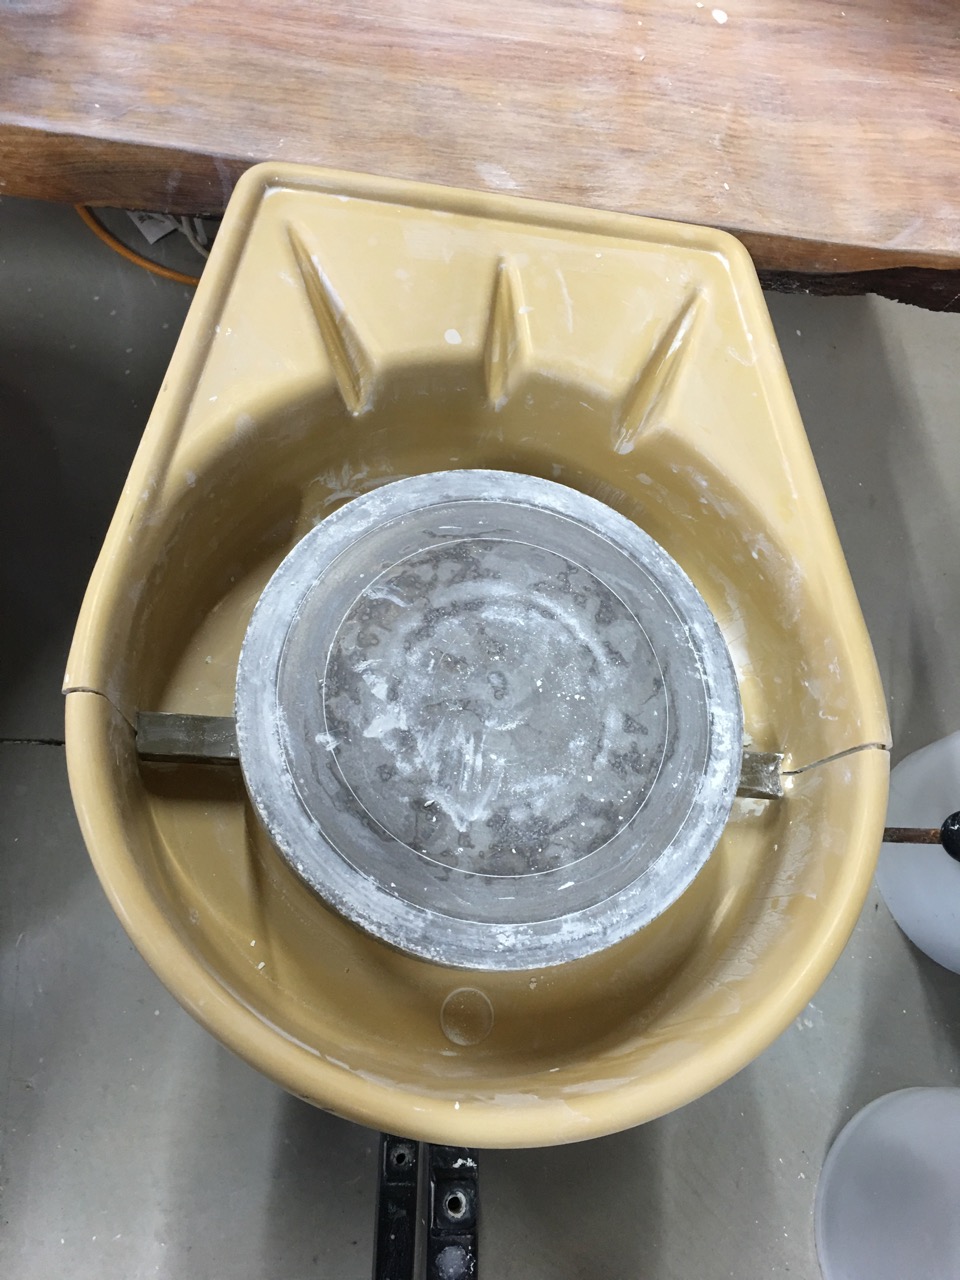
This is the miserly factory supplied plastic tray on the RK-10. It desperately needs to be 3 or 4 times larger. The space between the wheel head and the tray is so small that I can’t get my fingers in there to lift out the turnings.
Trying to do it, just seems to push some of the turnings over the inner edge of the tray onto the top of the inner bearing mount cover. When this happens, I have to take the tray apart and brush out all the turnings from the metal frame and bearing cover, then re-assemble. It’s a very slow and painful process that needs to be repeated every few minutes. When I work with sericite porcelain, I need to do a lot of turning to get the shapes just right. I really need a better designed tray.
I decided to make the new tray out of water proof plywood 750mm. x 500mm. It is designed to just clip over the top of the wheel frame, using wooden cleats to jamb-fit it onto the top of the metal frame.
I cut the bottom out of a plastic bucket to make the circular wall that stops all the turnings and clay slurry ending up on the top bearing. I ‘TEK’ screwed this to the wooden base and used silicone rubber to seal all the edges and make the tray water proof.
I decided to fit it with a strip of stainless steel off-cut as a curved wall, all the way around.
This tray should be able to be cleaned out of turnings easily and quickly, without having to stop work to dis-assemble it.
There is even room at the back to get a hand broom and dust pan in there to sweep out the last of the turnings.
I’m hopeful that it will make working with sericite a whole lot easier and quicker.
Time will tell. Watch this space.
If it works well, I’ll be fitting trays like this on the other wheels.
The Burning Curiosity Exhibition opens this weekend at Sturt Gallery in Mittagong.
I am in this group show with both Sandy Lockwood and Megan Patey. This is my first show of work that I have made in the new re-built pottery studio.
Not too surprisingly, My work in this show is all about my experience of the fire and my recovery from it.
I have a few pieces of blue and white sericite porcelain in the show. These are my first experiments in blue and white in this new workshop. I have experimented with a few different recipes of home made ‘smalt-like’, cobalt based pigments. This homemade pigment is related to the Japanese ‘goshu’, or natural ‘absolute’ or ‘wad’ based mineral pigments. I have developed 5 different recipes that provide me with different intensities of blue. It’s not too sophisticated as yet, but it is a good start and just one step on the long path to a more sophisticated result.
Everything worth doing takes time.
Nothing is ever finished, nothing is perfect and nothing lasts.
The show opens tomorrow on Sunday 24th of July and runs until the 11th of September at Sturt Gallery in Mittagong.
Last weekend we fired the new wood kiln for the first time. Not the best firing that I have ever had, but OK for a first firing. There is always a bit of a learning curve getting to know how a new kiln works. Becoming familiar with its particular traits and ‘personality’. We are also using pre-burnt wood from the bush fire. Burning in the kiln, what was recovered from the trees in our front garden. It’s strange and burns quite differently from the trees that we are used to burning from our forest that were unburnt.
This image taken by Warren Hogden
We fired for 14 hours through the day, and into the night. A very comfortable time frame and just about standard for the sort of firings that I have developed over the decades in this style of kiln.
There were a few losses. Two of my large 450mm dia. porcelian platters dunted on cooling. There is always a possibility of this with very large flat ware, and especially so with glassy, dense porcelain bodies.
Despite these couple of losses. I managed to get a few more nice pots out for the show at Sturt Gallery next weekend.
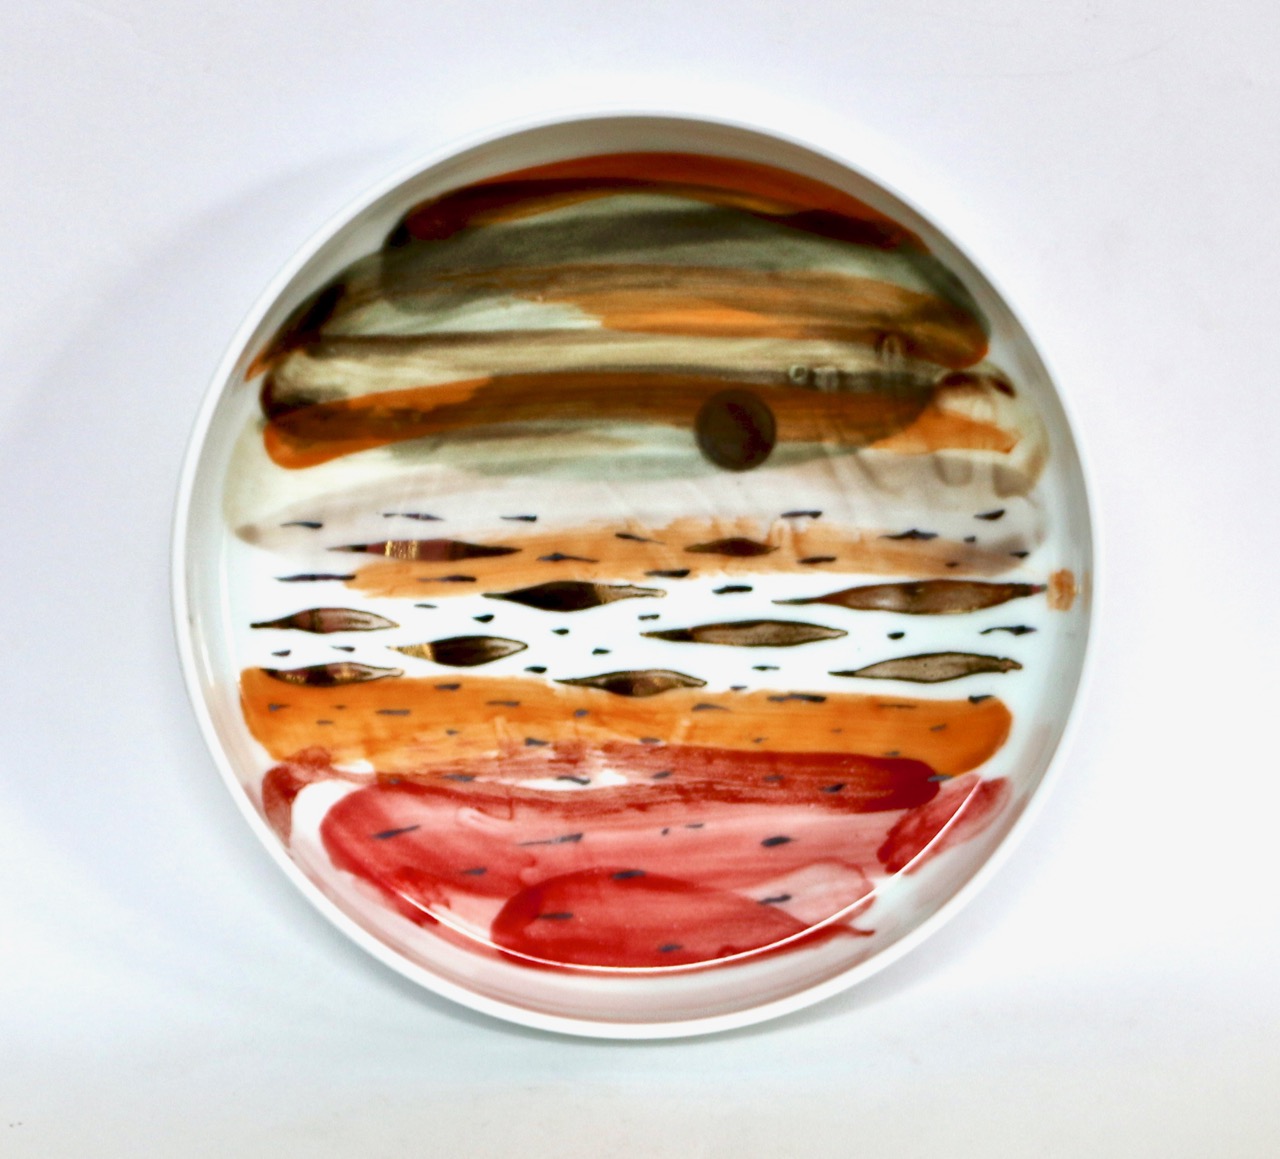
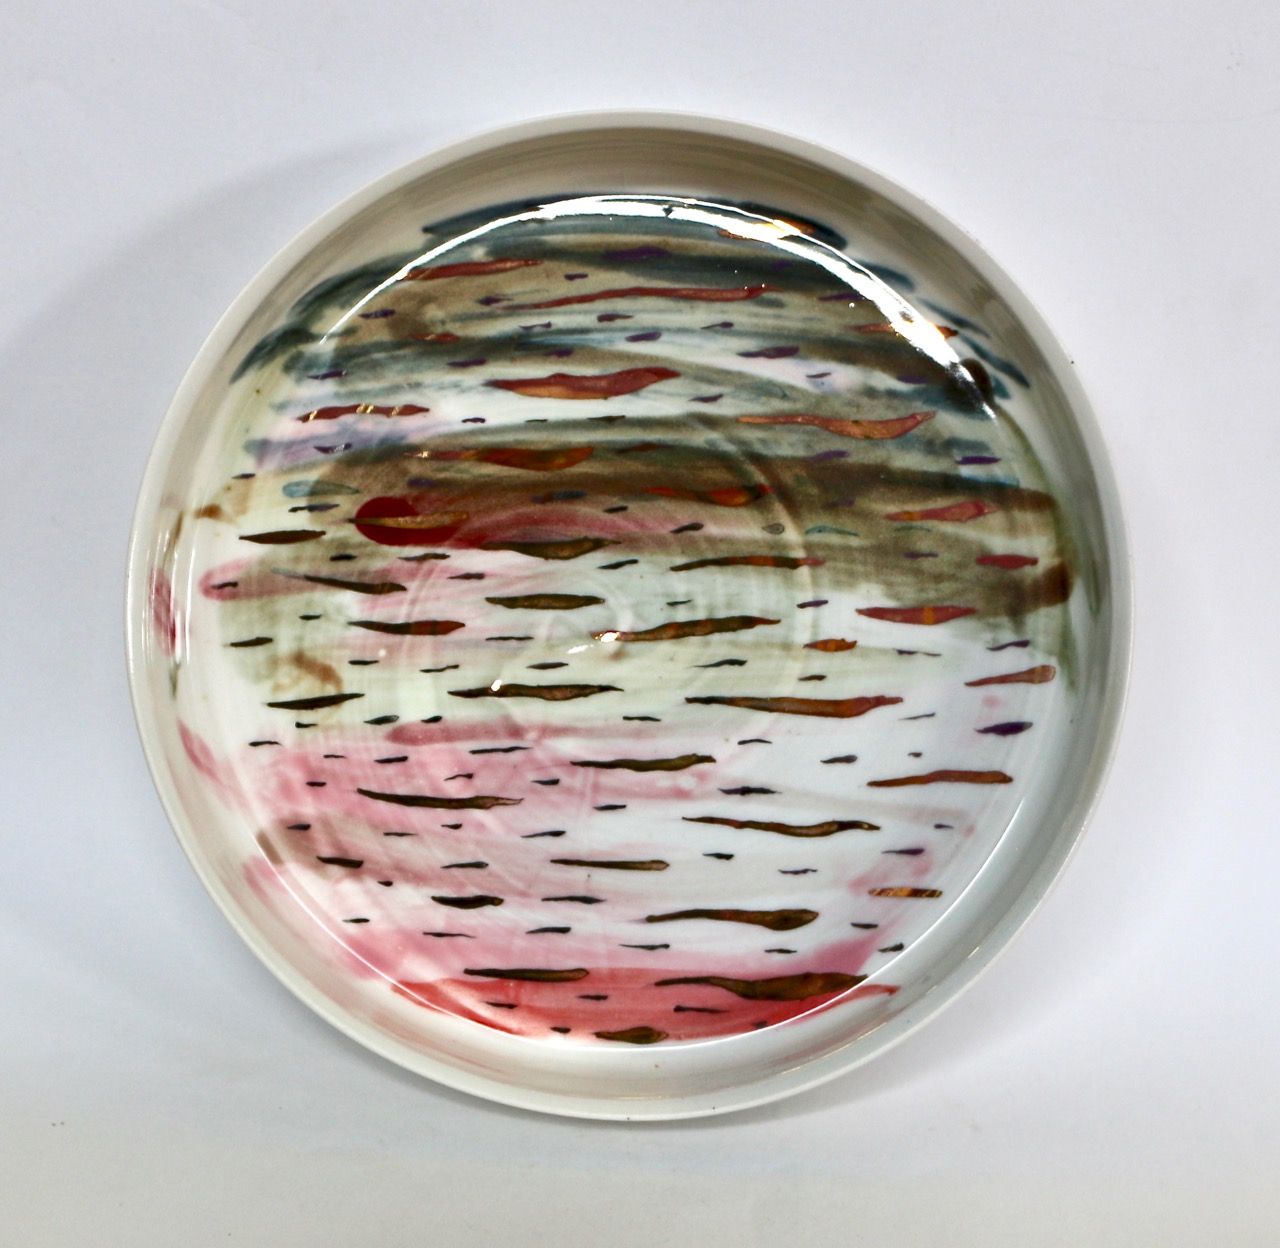
Inside and out shots of this deep dish. I have been using 5 tones of home made cobalt pigments and washes
I used the iron rich soil from the side of the road off the top of Mt Gibralter near here in one mix. This moderates to inky blueness of the cobalt.
I also made another batch of smalt-like pigment with local iron rich ochre with metalic flakes of iron oxide that I scraped off some of my burnt machinery that I was recovering for re-use. The mild steel parts that got burnt in the fire and then left in the rain for a year before I could find the time to get back to them, had rusted badly.
I flaked off the worst of the rust and collected it in a container for use as pigment. It’s a nice idea to re-use some of my old ruined equipment and incorporate it into my new work creatively. I think that this flakey iron oxide is probably mostly FeO and some Fe3O4, with very little Fe2O3.
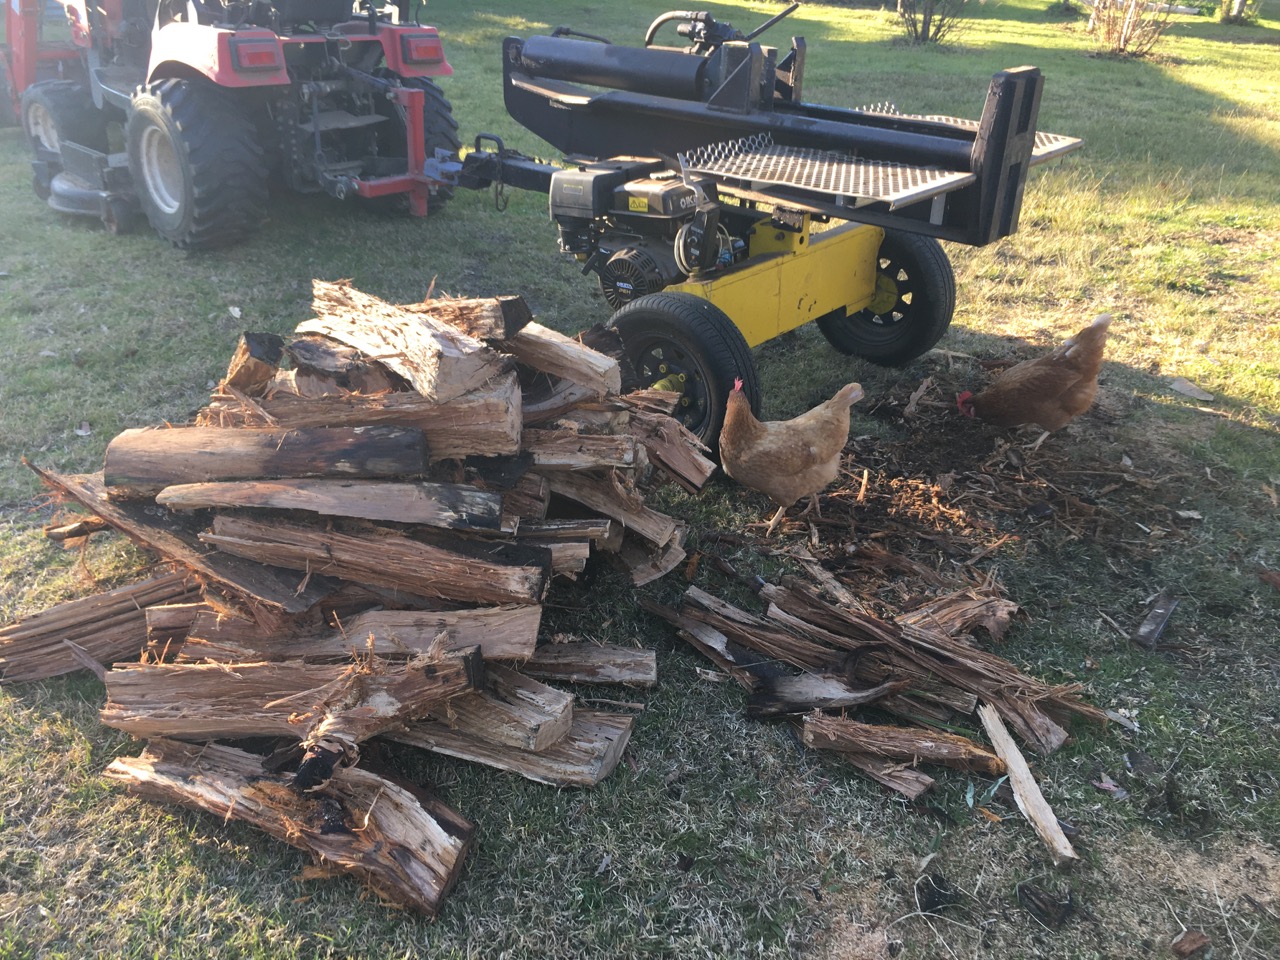
Since the firing, I have been out splitting more wood for the next wood firing, helped by the chickens of course. They even followed me into the workshop where I had 2 girls in a man shed!
We have been eating our way through a magnificent crop of spinach that has lasted since last spring, all through summer into autumn, and now into winter. However, I can see that it is getting taller and thinner, and is starting to bolt and will be all flowers and seed heads as soon as the days get just a bit warmer and the day length longer.
So I have planted a row of new seeds to get a follow-on crop. These have been a bit slow to germinate, as it is a little too early and the ground is still very cold. We are past the solstice now, so the days are getting longer and they will get a good start for the next summer season. That is if they don’t bolt straight to seed – which is a distinct possibility.
I have also planted broad bean seeds for a spring crop. They are quite particular about their flowering and bean set requirements. If I plant them too early, they will come up and flourish and flower, but not one single bean will set on those prolific flowers, not until the weather is warm enough and the chemical enzymes switch on. Then and only then will they set fruit. They can flower for a month or more waiting for that chemical trigger. Then they set beans for about a few weeks only and suddenly stop as soon as the weather gets too hot for them.
I should have also planted some peas, but I have been too busy making work for my joint show with Sandy Lockwood and Meg Patey at Sturt Gallery in a couple of weeks. I‘ll get round to it as soon as the show is up and running. I have put so many things on hold for this show. I’ll be flat out busy for some weeks catching up. But then, I’m always a bit busy. I’m that sort of bloke.
I picked an arm-full of spinach for dinner, about 30 or so leaves. I finely chopped the stalks and sautéed them in a little EV olive oil with onion and garlic. Janine came into the kitchen and stopped dead in her tracks. “That smells delicious! What are you cooking? Just smelling that makes me hungry! What is it?” I tell her that it’s just olive oil, onion and garlic so far, but it sure smells like every great meal that you can remember. There is something so essential and flavourful about it. I’m starting to make a simple spinach and 3 cheeses dish for dinner. I don’t want to see any of that wonderfull spinach go to waste. it’s a simple, quick and healthy meal. I gently fry the onion mix for a few minutes to get it soft, then add all the roughly chopped spinach leaves and a tiny dash of water, turning them often to steam them and sweat them down to a soft state. Once softened, I add 100 grams of gorgonzola dolce for the delicious sharpe tang and a little sweetness, some grated cheddar which melts out into the sauce and finally, I add half a block of fetta, as small cubes, this is for some texture in the finished dish, as fetta doesn’t really soften. It also adds the only salt in this dish. It all mellows out into a lovely creamy sauce all through the sweated spinach.
I served this with a few steamed potatoes dressed with a little olive oil. A simple and quick evening meal.
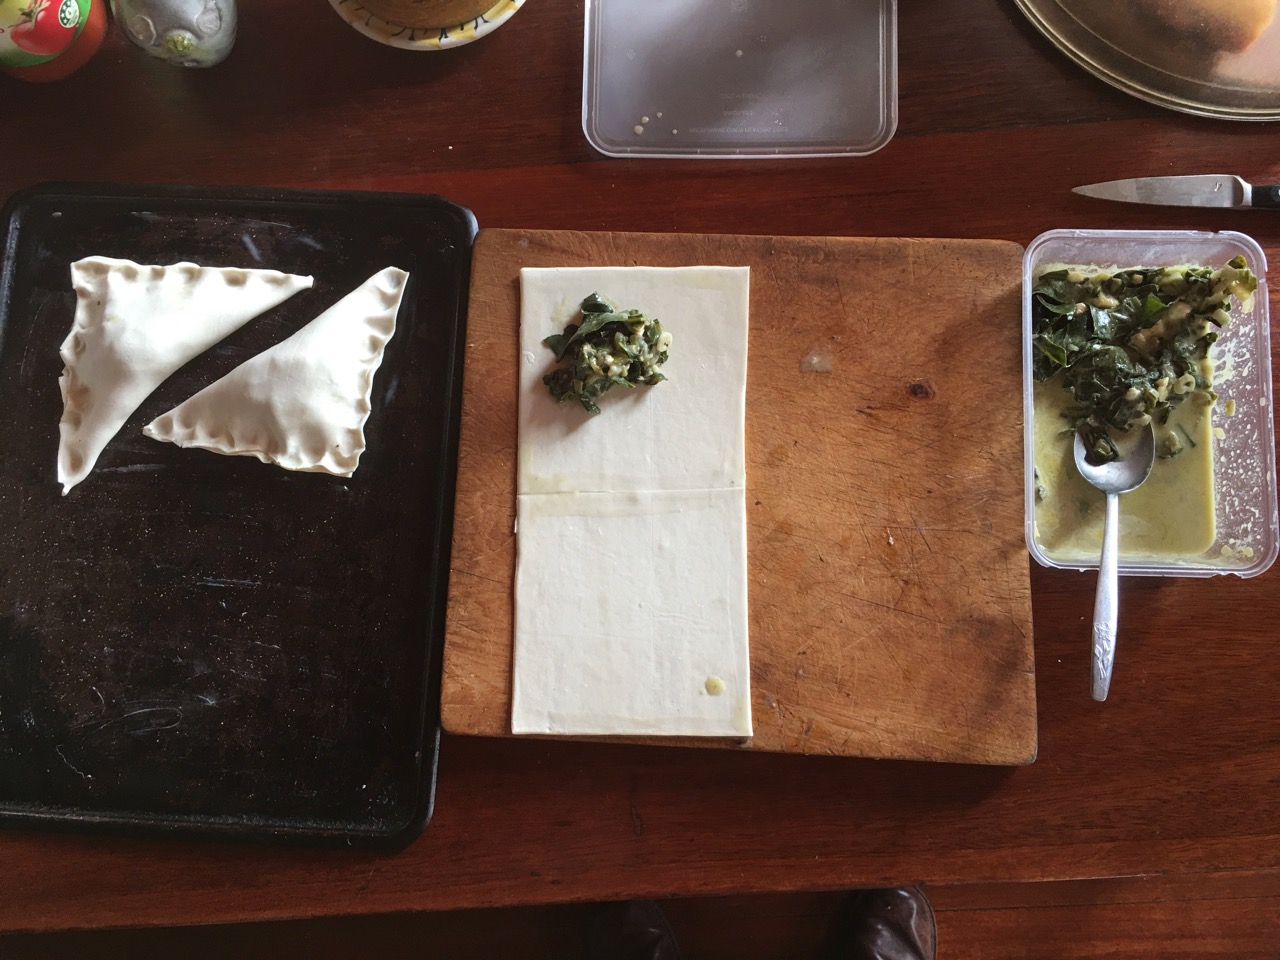
We have a little left over that I put in the fridge for lunch tomorrow. I take one sheet of puff pastry cut into small squares, add a dollop of the spinach mix and fold over diagonally, then bake at 180 for 15 mins or until golden. These little traditional parcels make a warming and easy lunch instead of a sandwich. Nothing left over and nothing wasted.
While I wasn’t cooking lunch and dinner, I have been making pots for my show at Sturt with Sandy and Meg, opening on the 24th.
Sericite porcelain dishes with pigments and on-glaze gold, platinum and copper lustres


You must be logged in to post a comment.