Just like everybody else on the east coast of Australia just now, we have had a lot of rain.
Luckily, we only had 165mm. Some places had double that. But ours came all in a short sharp deluge over night. It fell onto saturated soil.
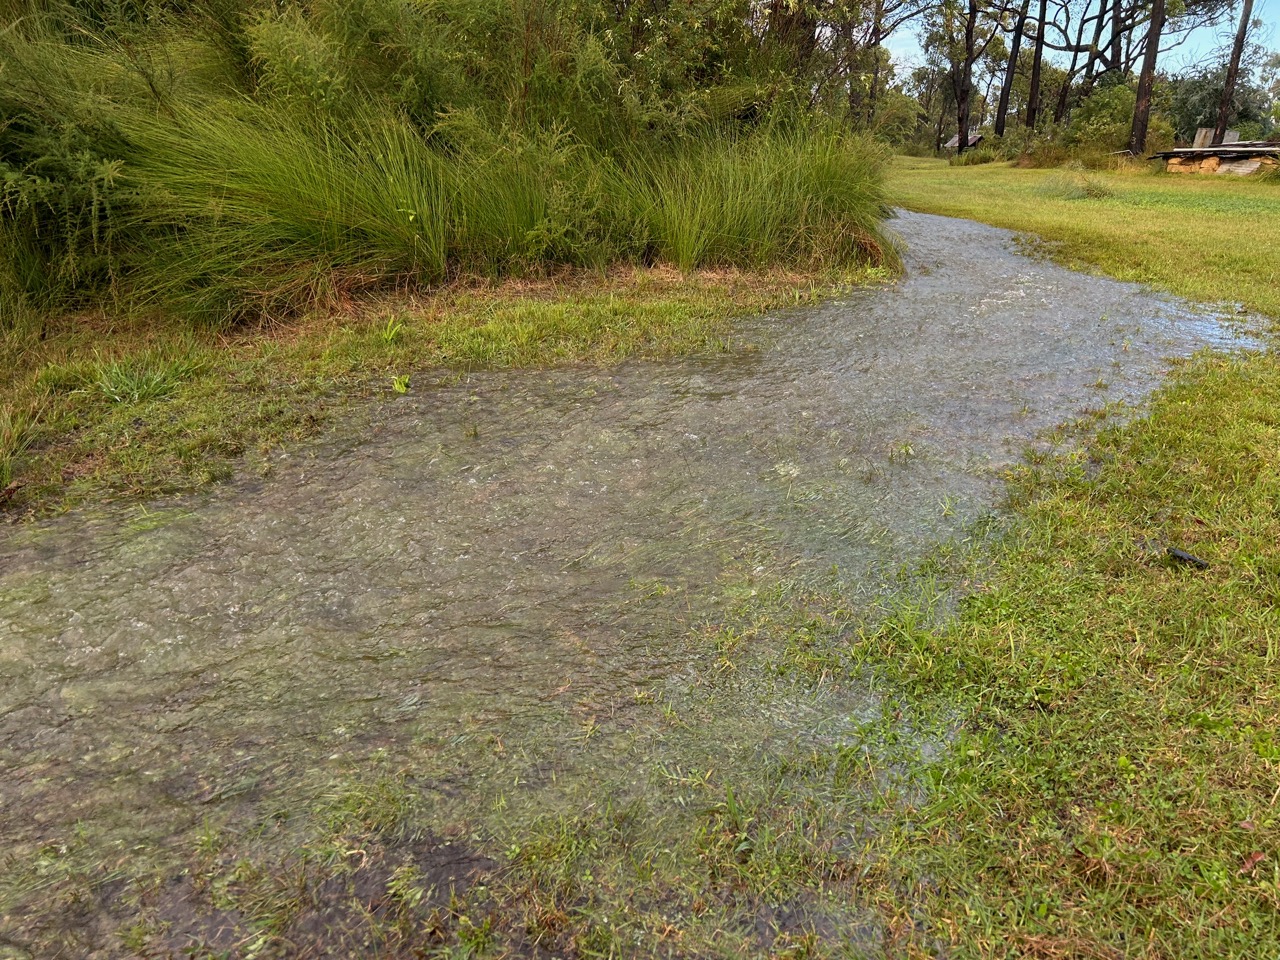
So the water flowed freely across the ground and down the slope into our dams.
The dams soon filled and overflowed. We now have 3 new streams flowing across our land. They will not be permanent. All this water will soon drain away, but we will not be able to drive a vehicle, or even a ride on mower down there for a very long time.
Because we can’t work out side at the moment. I have been prepping for the up-coming sericite porcelain weekend workshop.
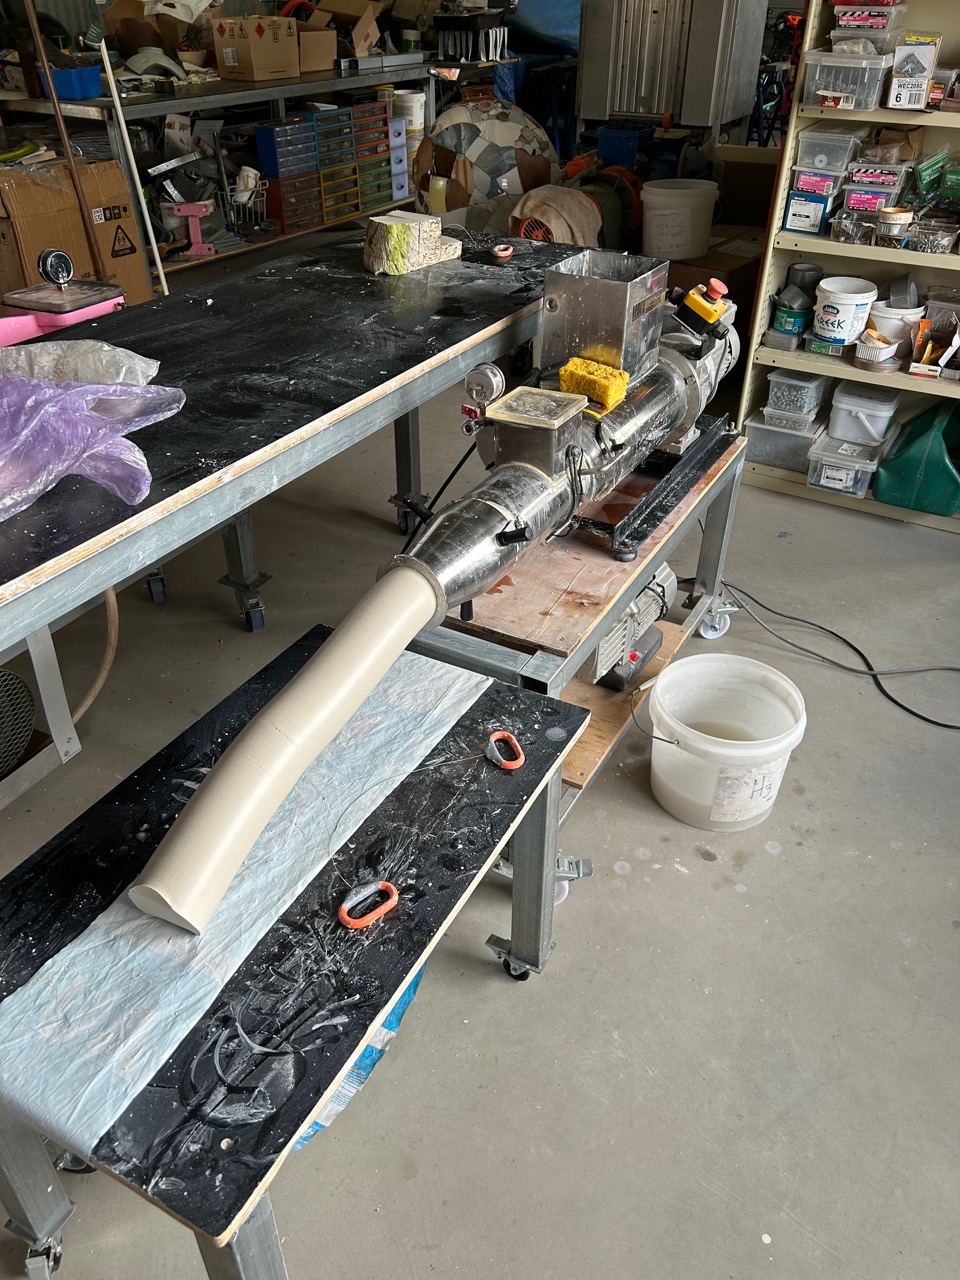
I stripped down the stainless steel twin auger pug mill and cleaned out the previous porcelain body mix. The Venco twin auger pug is very quiet and very fast at processing clay. I really like using it, but I don’t like having to clean it out! It is one of the slowest pugs to take to bits and clean out.
Twin auger design pugs are very good at mixing/puging. The sericite that I am working with now is 8 years old and although it was well wrapped, it had stiffened a little bit over time. An excellent feature of the twin auger design is that you can just dribble in extra water in with the stiff clay to soften it up. Normal single auger pugs that I have don’t handle this very well. I’ve tried it. The clay/water mix just slides around and no mixing takes place. However this is not the case with the twin auger design. One other very important feature of this pug mill is that it is entirely fabricated out of Stainless steel, so very suitable for use with porcelain bodies.
I spent half a day getting it working and puging the 1/4 of a tonne of porcelain, ready for the workshop next weekend.
I bought this pug mill 2nd hand after the fire. It came from a deceased estate. I was dying to own one of these stainless steel twin auger pug mills, and was lucky enough to find someone was dying, to sell it to me.
The first Open Studio Weekend is over. One more to go!
We had a very slow day on the Saturday, as it was raining hard on both sides of us in Picton and Bowral. So visitors were reluctant to leave home, and few and far between. We had just a few brave people venture out. One visitor from Picton had gone to an Open Garden event, but it was so miserable in the pouring rain, that she gave up and decided to come and visit us for some indoor, dry and warm, entertainment.
The Sunday Open Studio was much better, quiet in the morning, but it picked up after lunch and we were almost busy dealing with a steady flow of visitors in the afternoon. We hope for better weather and more visitors next weekend. However, if it is going to rain, I’d prefer it to pour down, flood the gutters and stream down into the dam.
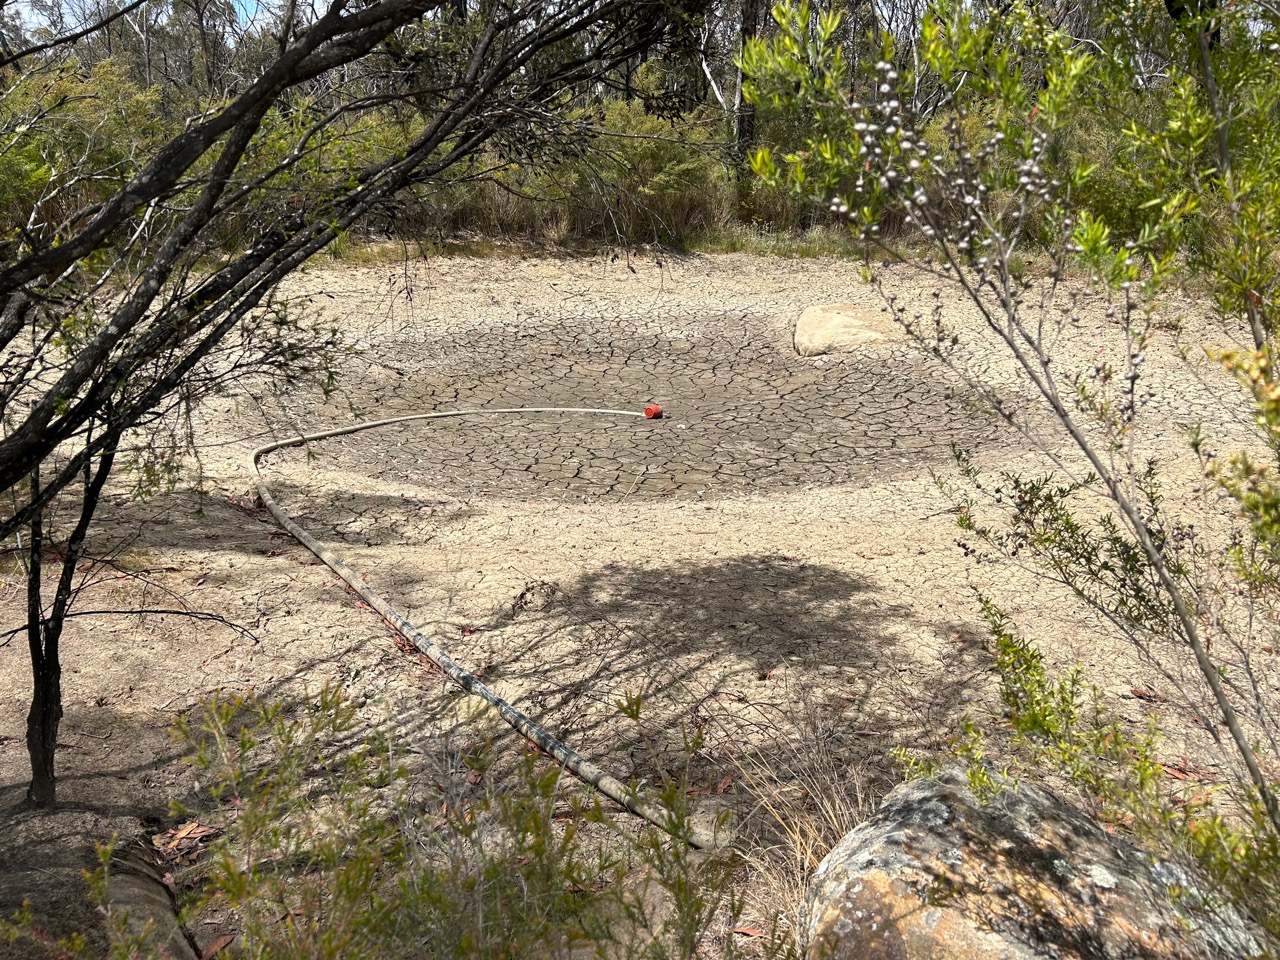
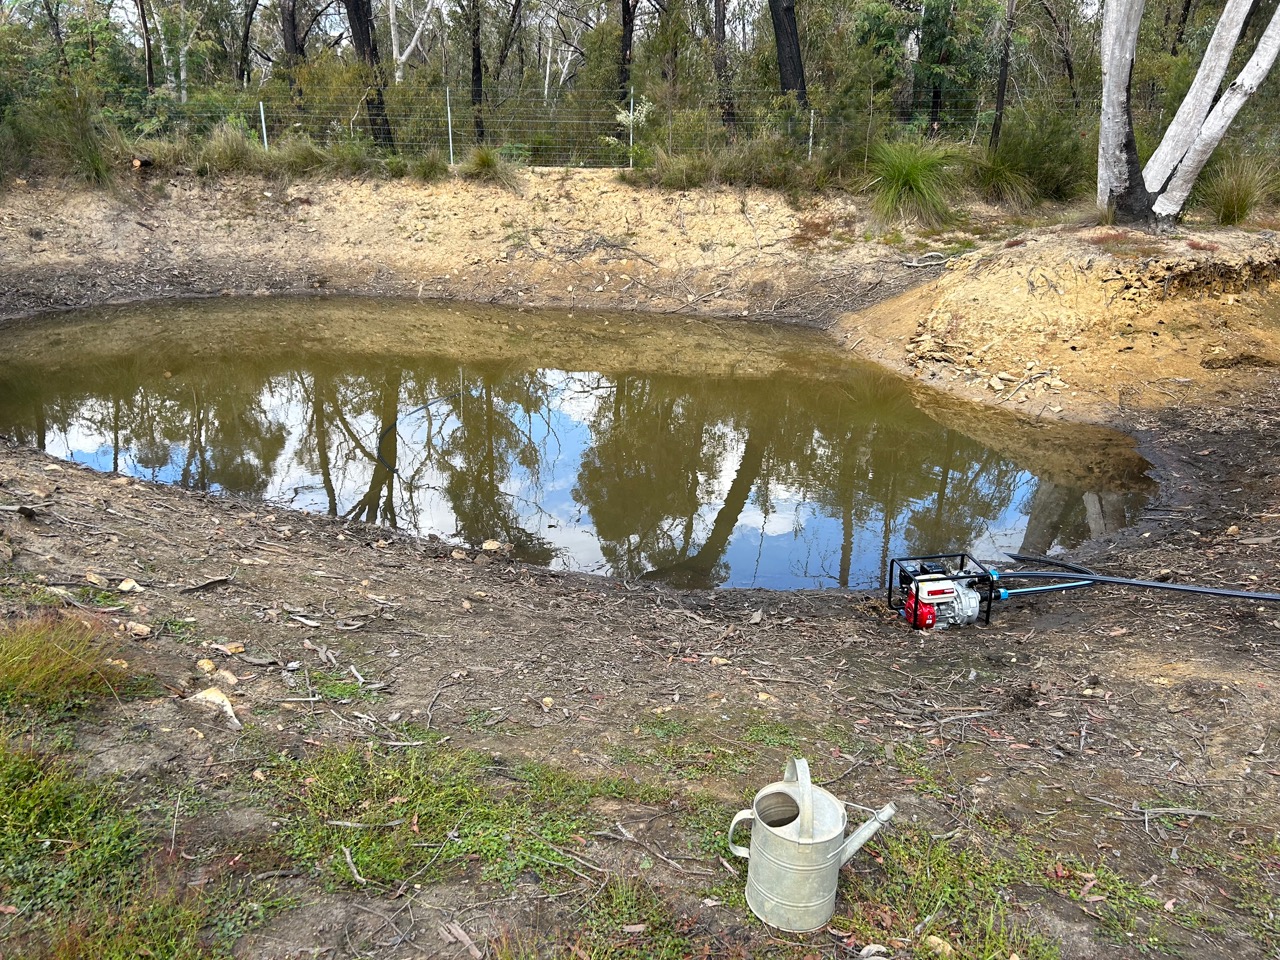
Of course, as usual, it didn’t rain here at all, just a few light passing showers throughout the day. Our top dam, the one closest to the house, that rely on for irrigation and fire fighting water is bone dry. The foot valve for the pump is sitting high and dry on top of the caked and cracked mud. This dam still had a very small amount of water in it when we left for our time away in New Caledonia and then Brisbane. However, we got a call from our lovely neighbour one day to tell us that she had tried to water the garden for us, but no water was coming out of the hose. I knew knew why. I expected it to run out and dry up at any moment. but there was nothing that I could do at a distance.
Starting on the Monday morning, with the news of so many houses burnt down in the north of the state in the terrible bush fire there. I wasted no time in preparing ourselves for the next bushfire – whenever it happens. Maybe sooner than later? With the bushfire season now upon us in earnest. I was straight into action working on all those jobs that I had put off during the recent three wet years.
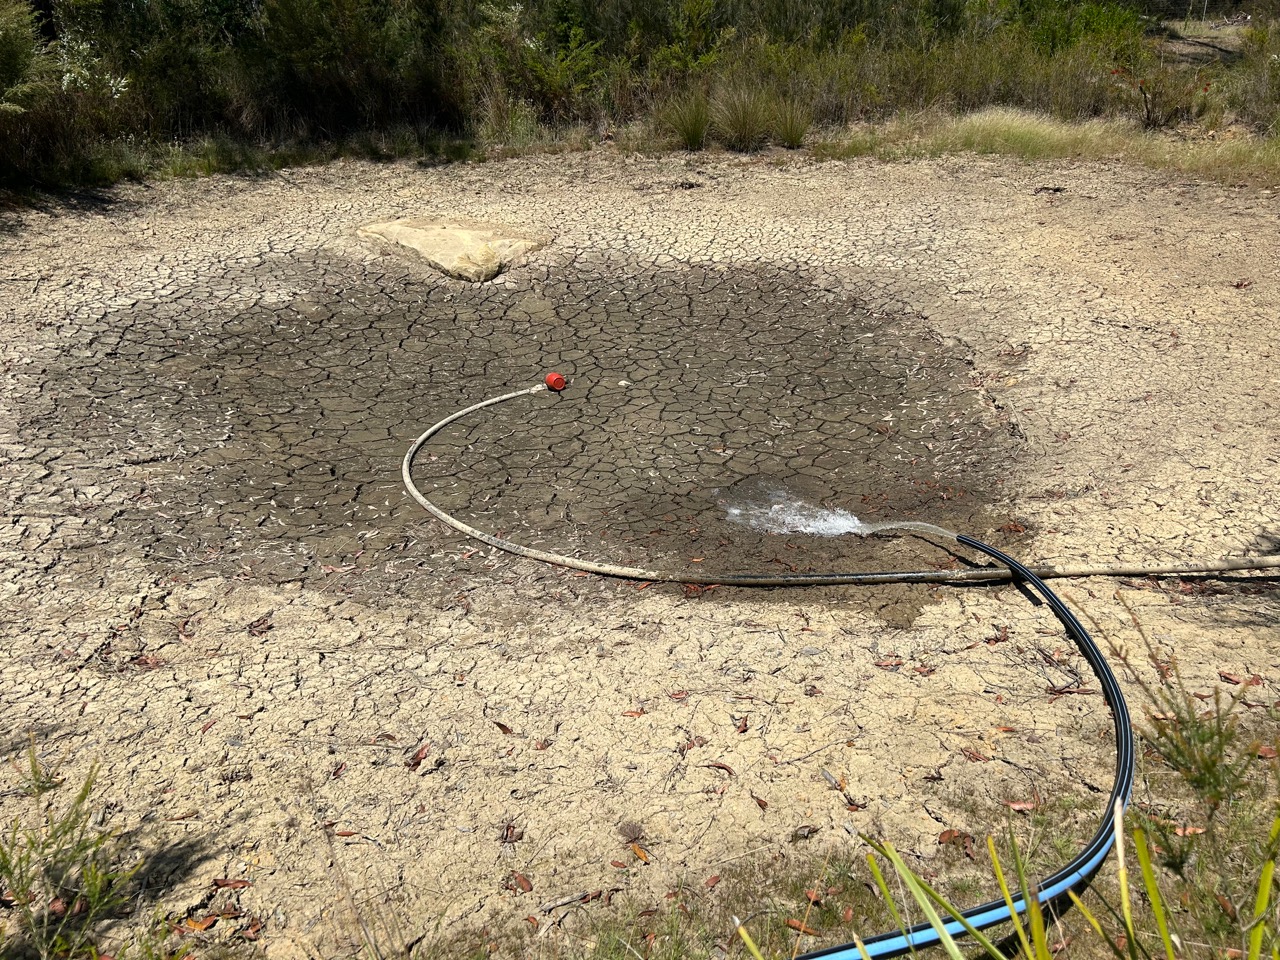
We have 4 dams, built in a key-line system. I moved the high pressure, petrol driven, fire fighting pump, down into the bottom dam, which is nearly empty, but still has some water in it, right at the bottom. I built a jerry-rig, improvised system of poly pipe lines to convey the water from this little bottom dam, up to the larger, middle dam. A day of running the pump moved most of the water up the hill to the next dam. I left just 300 mm of water in the bottom of that dam for the yabbies, to keep them safe over summer. If it does dry out completely, they will bury them selves in the mud.
From the bottom dam, up to the middle dam. This larger middle dam also has next to nothing in it, just 300mm deep in the middle, but every drop counts in summer. Especially when a bush fire is in the offing.
Neither the bottom dam or the middle dam, has a functioning pump on them at the moment, so moving all the available water up to the top dam, where I have both petrol and electric pumps installed gives me access to whatever water is left to us over the hot dry summer for fire fighting. Also, concentrating all our water in one place minimises the losses from evaporation.
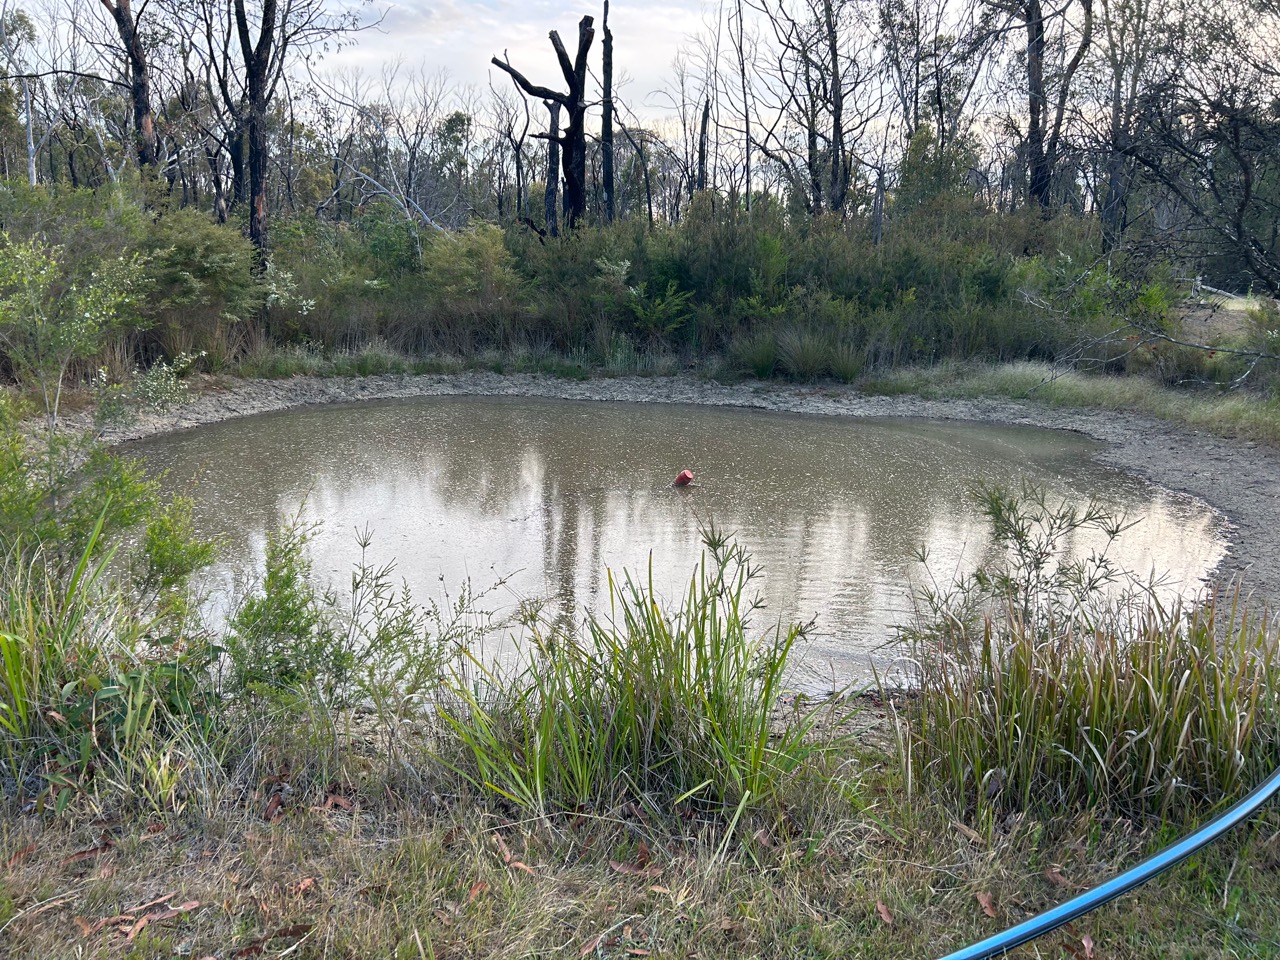
Once the bottom dam was more or less empty. I carried the petrol pump up and into the middle dam, re-arranged all my Heath Robinson, improvised piping and began pumping from the middle up to the top dam. I’ve been on my very own personal, localised, ‘Snowy Hydo 2′ project here for two days now and all the water hasn’t been relocated yet. It’s a slow job, moving thousands of litres of water, up hill through a 40mm dia pipe. I hope to finish it off tomorrow.
From the middle dam up to the top dam.
The little top dam is now half full with all the accumulated water from the other dams, it will keep us safe into January. Then?
While all this was going on. I was also working on the new fire fighting sprinkler system along the verandah and roof of the new pottery building, and also rebuilding the burnt out sprinkler system on the barn. It worked perfectly during the fire, and saved the barn for burning, but when the power failed and the electric pump stopped, the plastic pipe system melted. I will be installing a petrol driven, high pressure, fire fighting pump in this system when I’ve finished pumping all the dam water uphill.
The roof and wall sprinklers all rebuilt and up and running again now.
Nothing is perfect. Nothing is ever finished, and nothing lasts.
However, I feel safer knowing that I have water in the system available to use to fight the next fire,
and a reasonably functional system in place that I hope will be able to cope with whatever nature throws at us
I make sure that I use the fire pumps often over the summer months to irrigate the garden and orchards.
In this way, I always know that the pumps are in reliable working order, then if one of them gives some trouble with the irrigation, I can step in and fix it well before there is any emergency, when there is no time for fixing things. Everything must work perfectly and immediately.
Since the last fire 4 years ago, I have installed 45,000 litres of tanks in front of the Barn, dedicated to the fire pump for the pottery and barn system. I have also installed 30,000 litres of new water storage tanks on the old Railway Station and car port with its own fire pump.
We are much better prepared now than we were 4 years ago. This is self reliance!
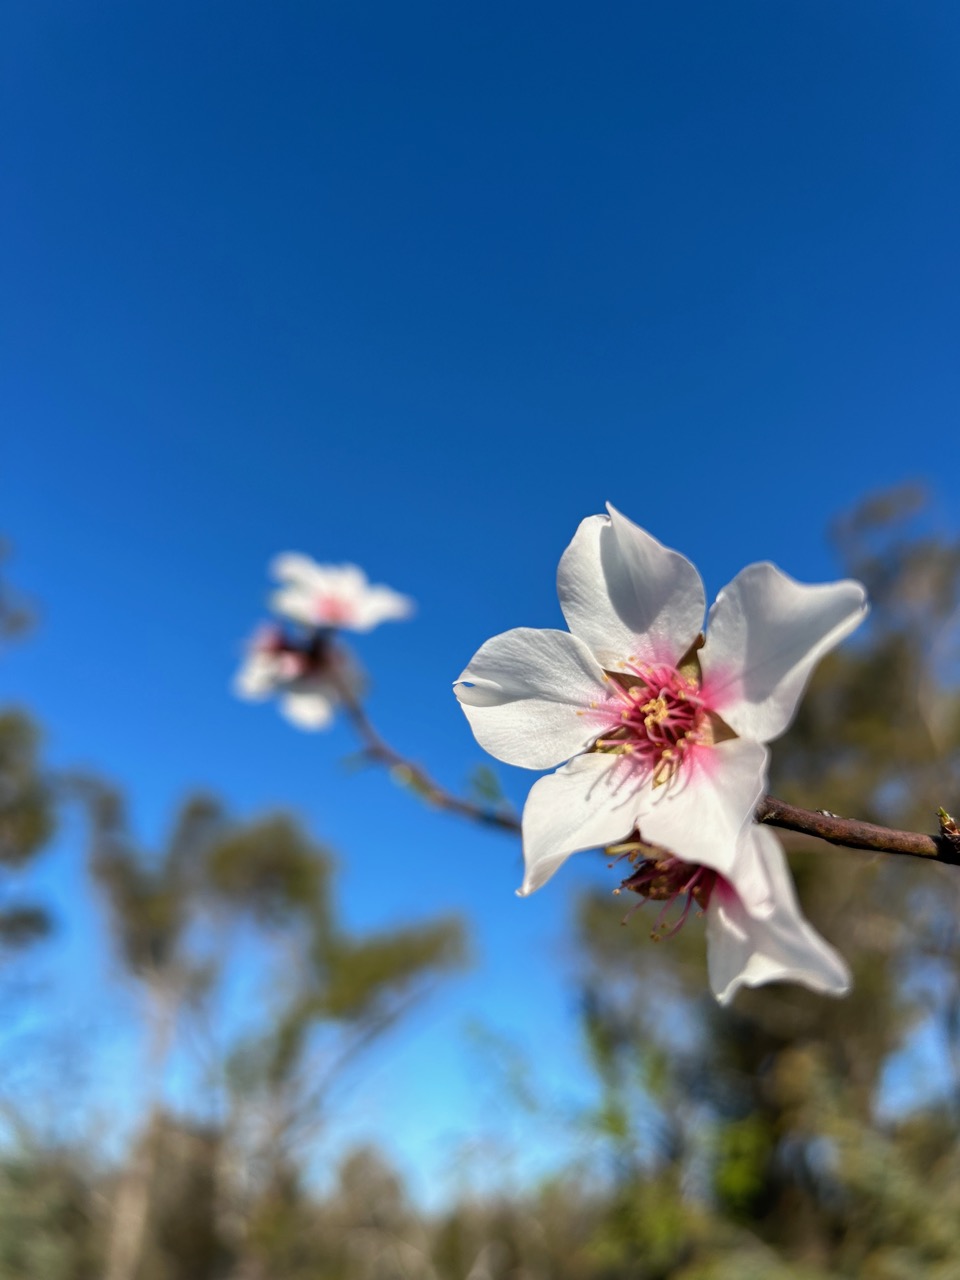
Right on schedule, it’s the beginning of September and therefore Spring, and sure enough the orchard trees are breaking into blossom.
Someone recently said, “spring has come, I’m so excited that I wet my plants”. I liked it, it made me smile, so I’ve stolen it.
Right on cue, everything has burst into bloom.
Blueberries
Nectarines
Peaches
Apricots
Almonds
Cherries
Even the hazelnuts are flowering. However, they are almost invisible, unless you get right up close, very close indeed.
Their tiny red flowers are only a couple of millimetres across. Obviously, being so small, they are not relying on bee pollination, like the showy stone fruits. Those floozies are big, brash, colourful and full of rewards for bees. Hazelnuts on the other hand are fully wind pollinated, so don’t need to expend any energy of showing off.
Hazelnuts
The weather is predicted to be hotter and dryer in the coming years as we slip back into El Nino again. We have had 3 wet years of La Nina, that ended the drought and the bush fires, but now we are heading back into the old hot and dry years again.
It hasn’t rained properly for months. The dams are already down to below half and we haven’t even started the summer. I can see that we will be relying on our tank water storage for the garden and everything else as well.
Fortunately, Janine and I invested heavily in large water tank storage over the past decade of our working life. It was that water that I used to save the house and whatever else I could during the fires.
Every roof that can catch water has a water tank attached. We have about 1/3 of a million litres of storage capacity in hand now. Since we have rebuilt the pottery and other sheds after the fire, they are all now connected back into the water storage system with independent, petrol powered, high pressure, fire fighting pumps. They haven’t been used in anger since the fire, so will need to be serviced and tested before the real heat sets in. I feel that we are in the best place possible to deal with the coming dry.
Now the garden needs some TLC and water. I’m so excited, I wet my plants.
Over the solstice break, I’ve been having a bit of time off.
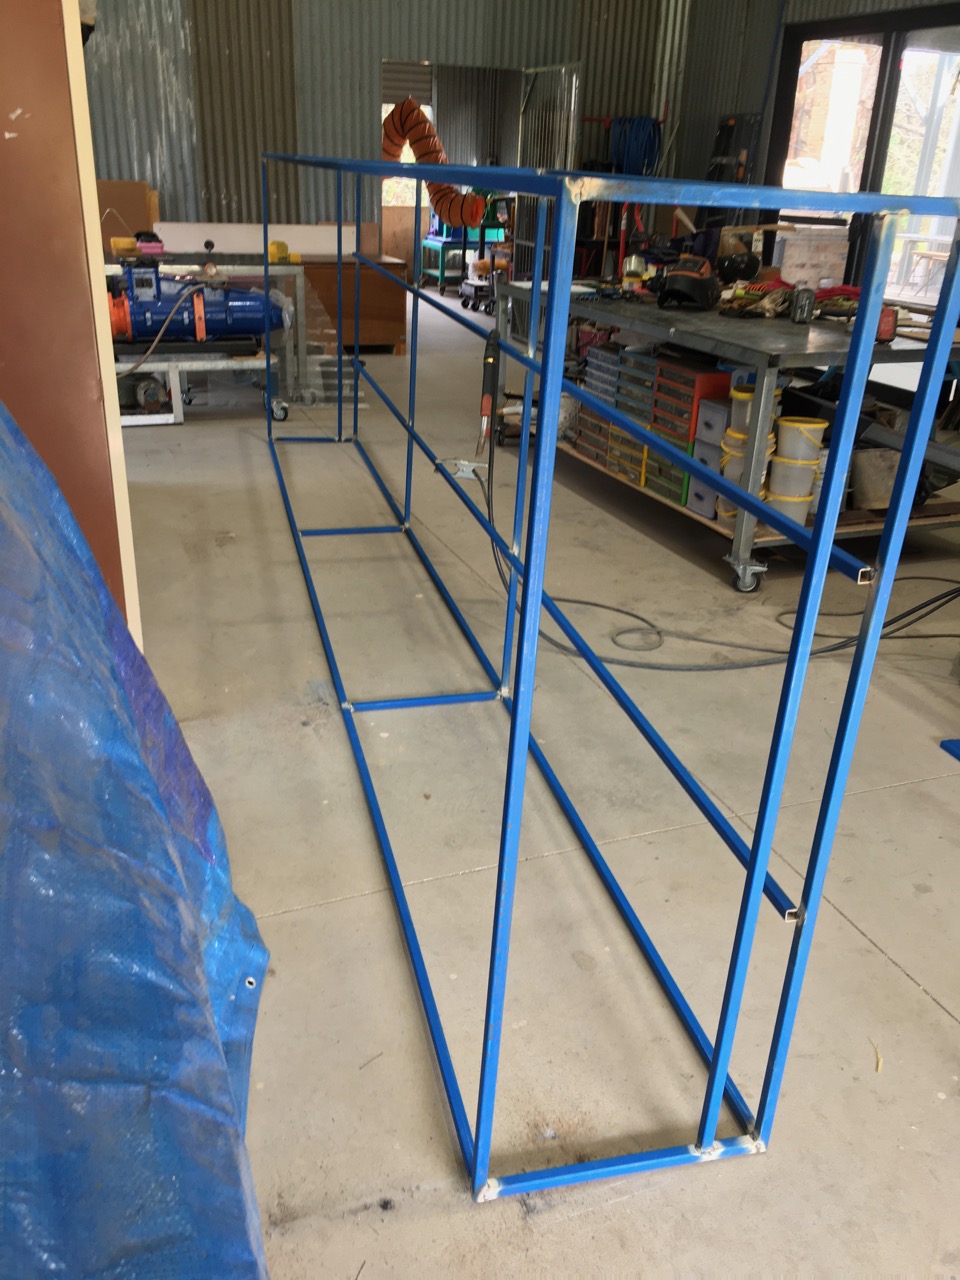
A change is as good as a holiday I’m told. So I took some time out to weld up a steel frame to make a fume extraction hood to go over all the electric kilns.
I have been ‘making-do’ with a bathroom exhaust fan set into the kiln room window, but it doesn’t catch all the fumes.
So we now have a ‘proper’ hood that covers all 3 kilns and there is room for a 4th kiln at the end, if I ever get round to building it.
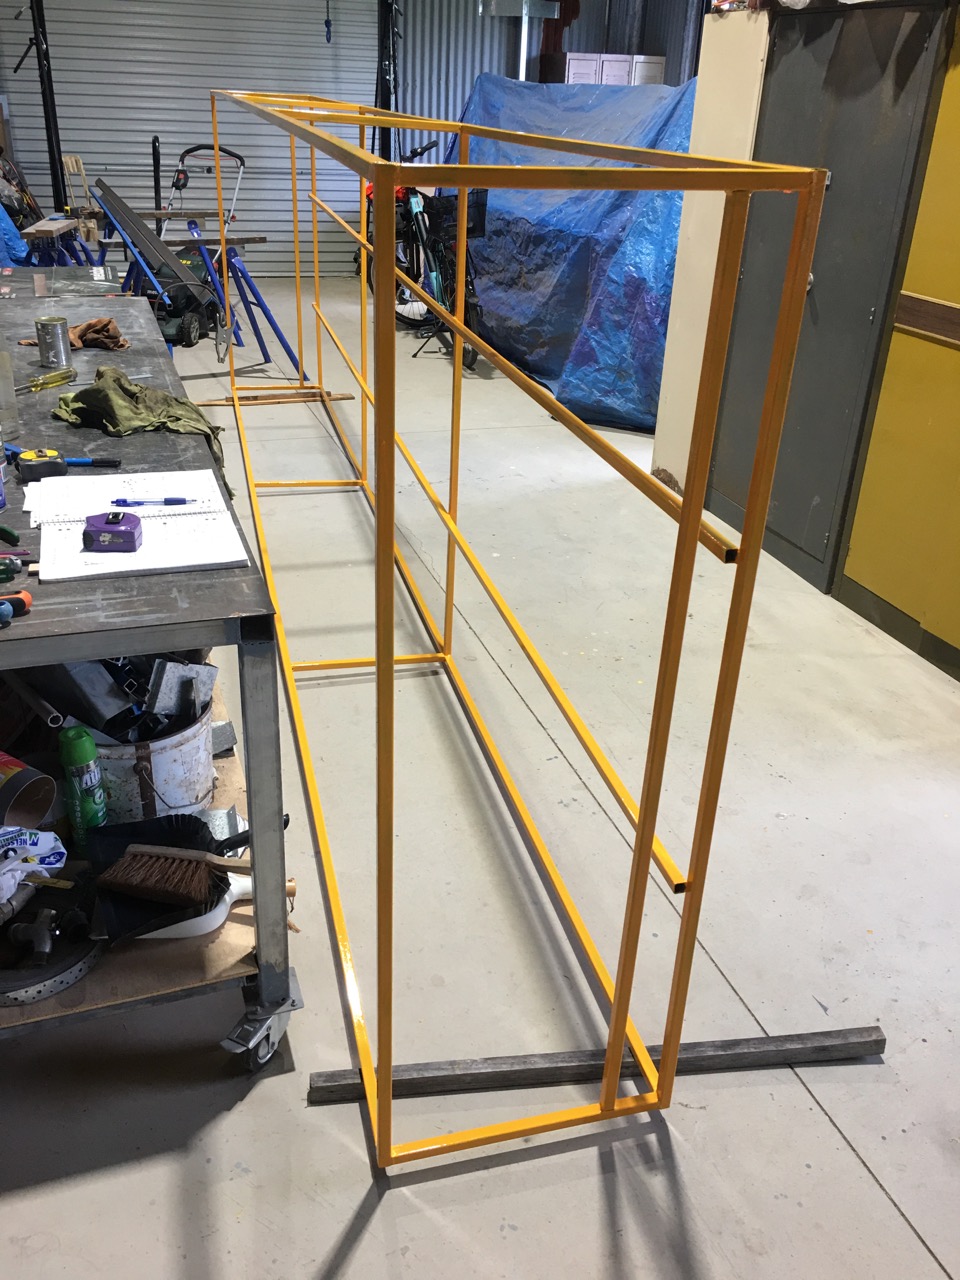
The frame is welded out of 20 x 20 RHS sq. section tube and then primed, undercoated and top coated with a strong yellow industrial grade paint. Something resembling ‘CAT’ Yellow, just to give it that heavy duty industrial look. Actually, I was thinking of the sort of colour that big factories have to paint over-head cranes, gantries and such.
It has turned out to be a massive edifice measuring 4.5 metres long by 1.5 m wide and 500 mm. high.
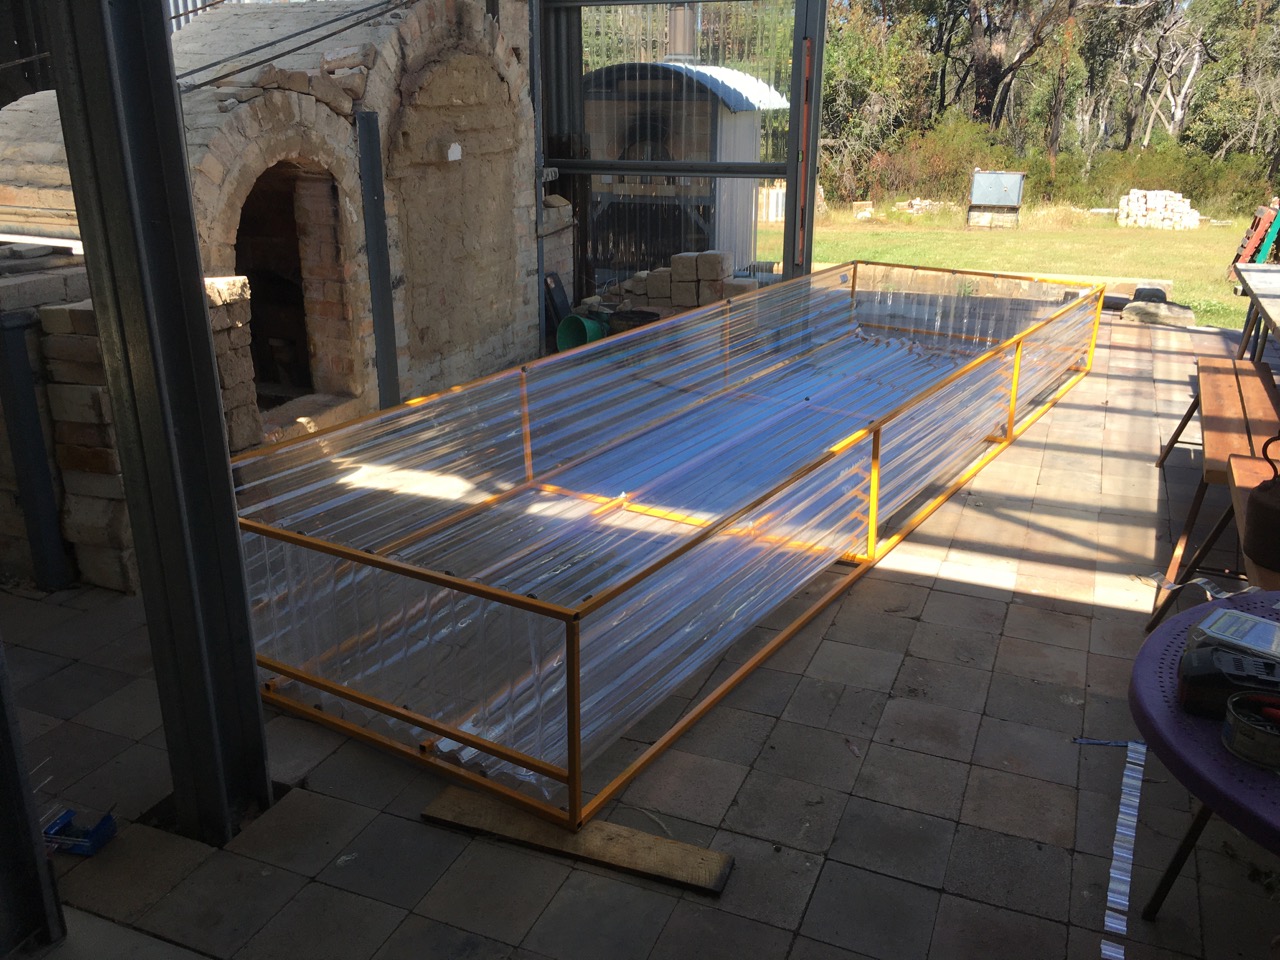
I had to build a special little trolley to manoeuvre it out of the welding area and into the court yard, where I could rotate it so as to allow me to screw in the poly carbonate lining.
I decided to use light weight RHS construction and poly carb sheeting because of the weight factor. I have to lift it up into the ceiling. But I also noticed after the fire, that poly carb doesn’t burn. It just melts, even at really high temperatures. So I thought that I’d give it a try as a fume hood lining. It wont get too hot, so shouldn’t melt. It is very light weight. It lets the light through, adding to the ambiance of the kiln room. It is cheap compared to any other sheeting. BUT most important of all, it doesn’t rust. The big killer of overhead hoods is the condensation of acid gasses and the rust that they create. This could be a solution?
Time will tell.
My son Geordie and my friend Warren came over for our Solstice lunch get-together, so before we ate, we did the install. It took all of 5 minutes, because I had every thing planned out and ready.
Now, the bathroom fan will be more effective at removing all the fumes from the kilns, and there is room for expansion.
Hopefully, a cheap and effective solution to the kiln vent fume problem.
While we had both Geordie and Warren here, I got them to help us move an exquisite old Japanese cupboard into our bedroom.
We were given this gorgeous old Japanese cupboard by my lovely friend Anne, who I have known for a very long time, getting on for 58 years in fact. Where does the time go?
Thank you Anne!
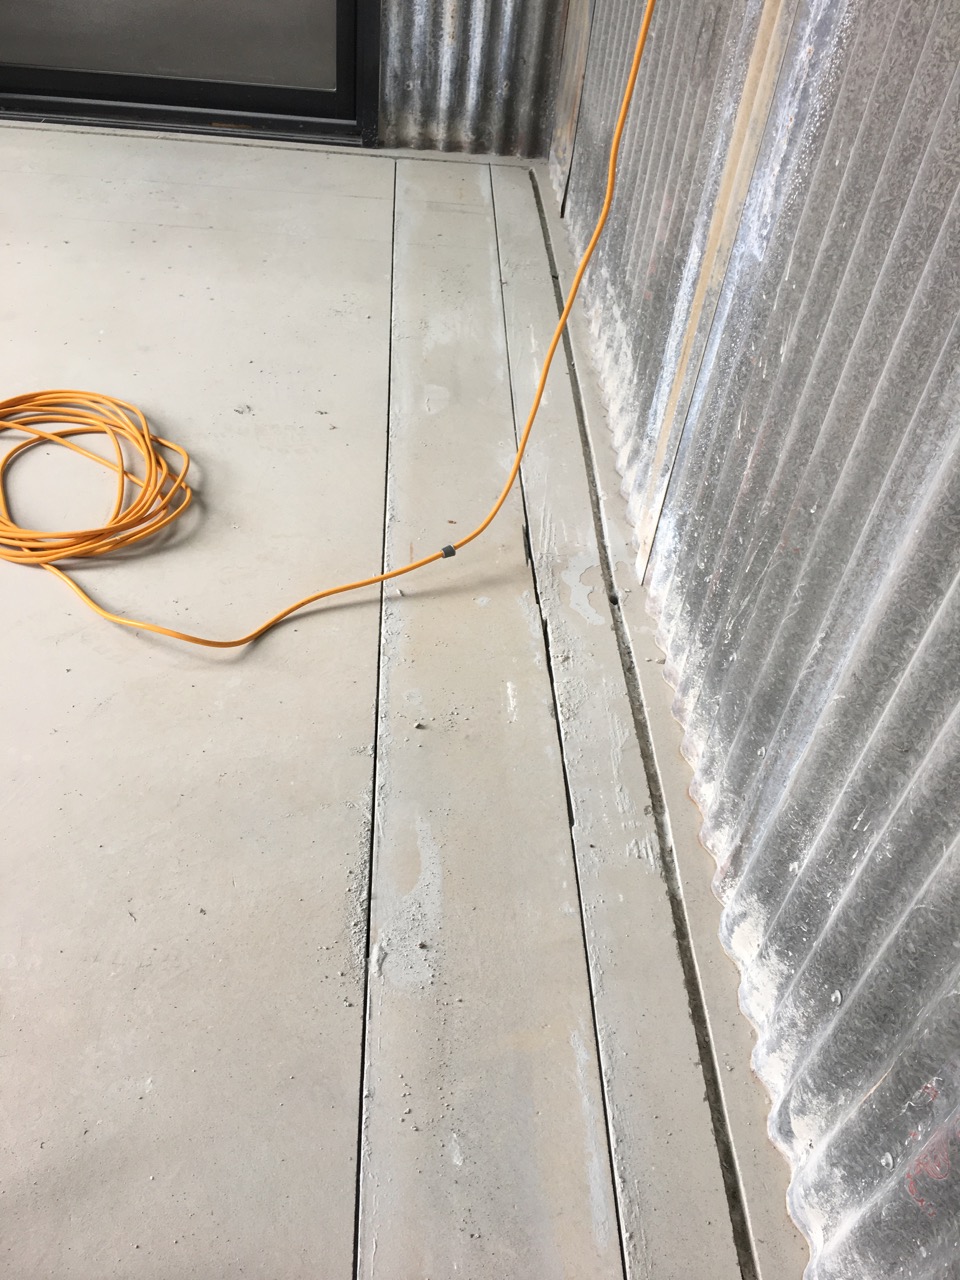
Somewhat disappointingly, we had another flood in the new pottery shed this week. Each time it happens, I look at the causes and find a solution and fix it. This time we had a brief, but severe storm of just 25 mins, but we got 25 mm of rain come down in that short time. It caused the gutters to over flow into the court yard around the kiln. However this time the rain all came it, not from the open wall leading into the courtyard, but deep in the enclosure against the kiln room wall from the gutters that couldn’t cope with the intense volume of water.
It has become apparent that the builders were pretty sloppy with their levels, such that the concrete slab is high at the edges and low in the middle of the kiln/glazing rooms. The result was that all the water flowed in under the gal iron wall and pooled in the centre of the kiln room, with some seeping into the glaze room.
There is absolutely nothing that I can do to change to the contour of the slab to stop this happening again. So my only option is the make a drain that can intercept the water before it reaches the wall and enters the building.
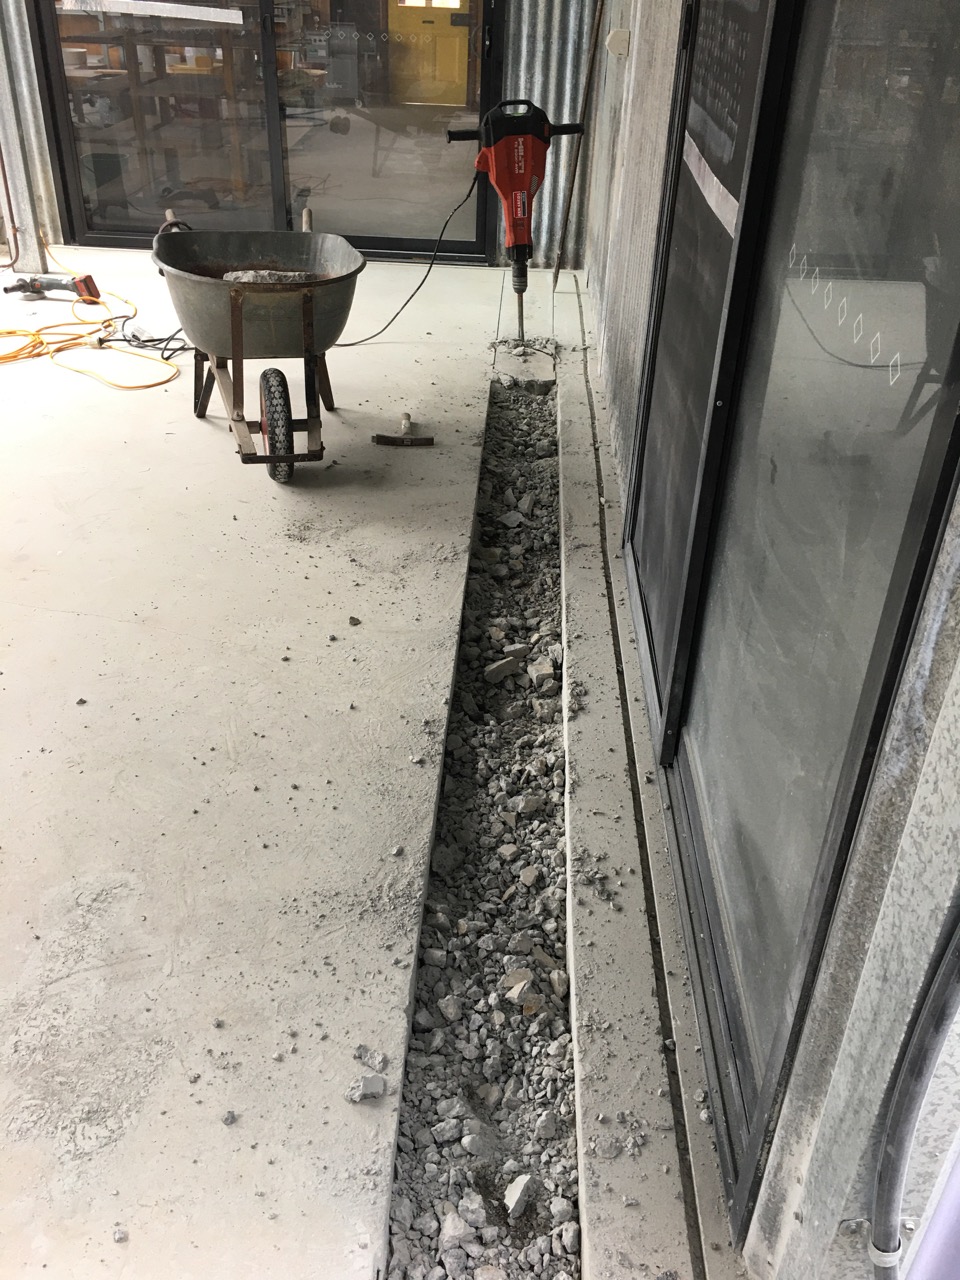
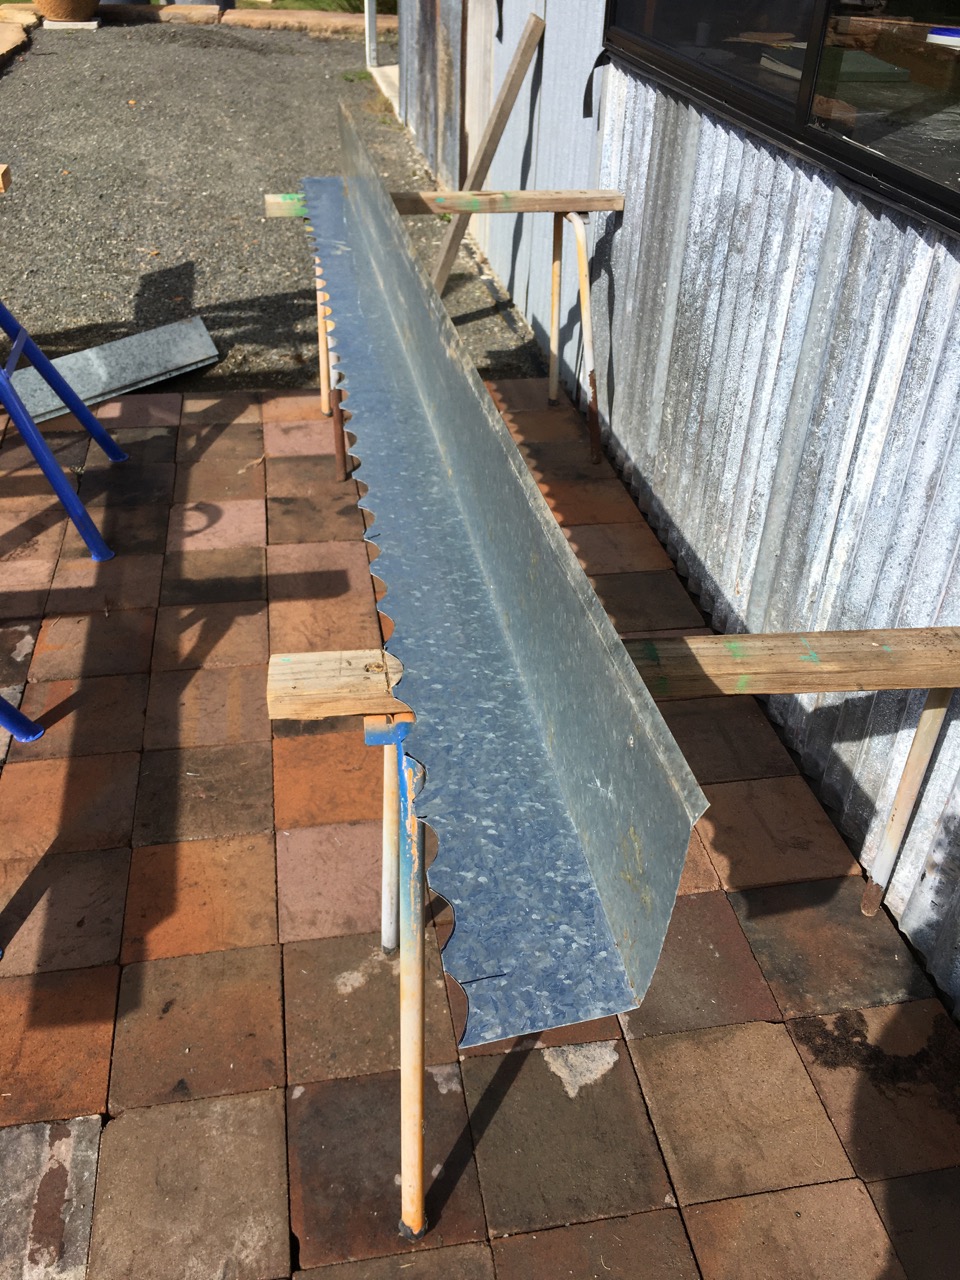
To this end, This morning I used a diamond saw blade to cut two 8 metre long slices through the 115 mm thick concrete slab down to the substrate of compacted rock dust and gravel. It was one of those nightmare jobs that nobody would ever want to do. But someone has to. Meet muggins.
You can see in this image, where I had initially tried (unsuccessfully, as it turned out) to create a small diversion channel around the wall using a circular saw and a friction disc. This wasn’t deep enough to cope with the flood of water from this last storm. I realised that the drain needed to be substantially larger and deeper.
Then, I hired a jack hammer to break up the concrete into rubble. That was another big job.
Finally, I removed the broken ‘rio’ bars and the strip of black plastic waterproofing membrane, and then shovelled out all the larger pieces of crushed concrete and re-installed all the finer gravel.
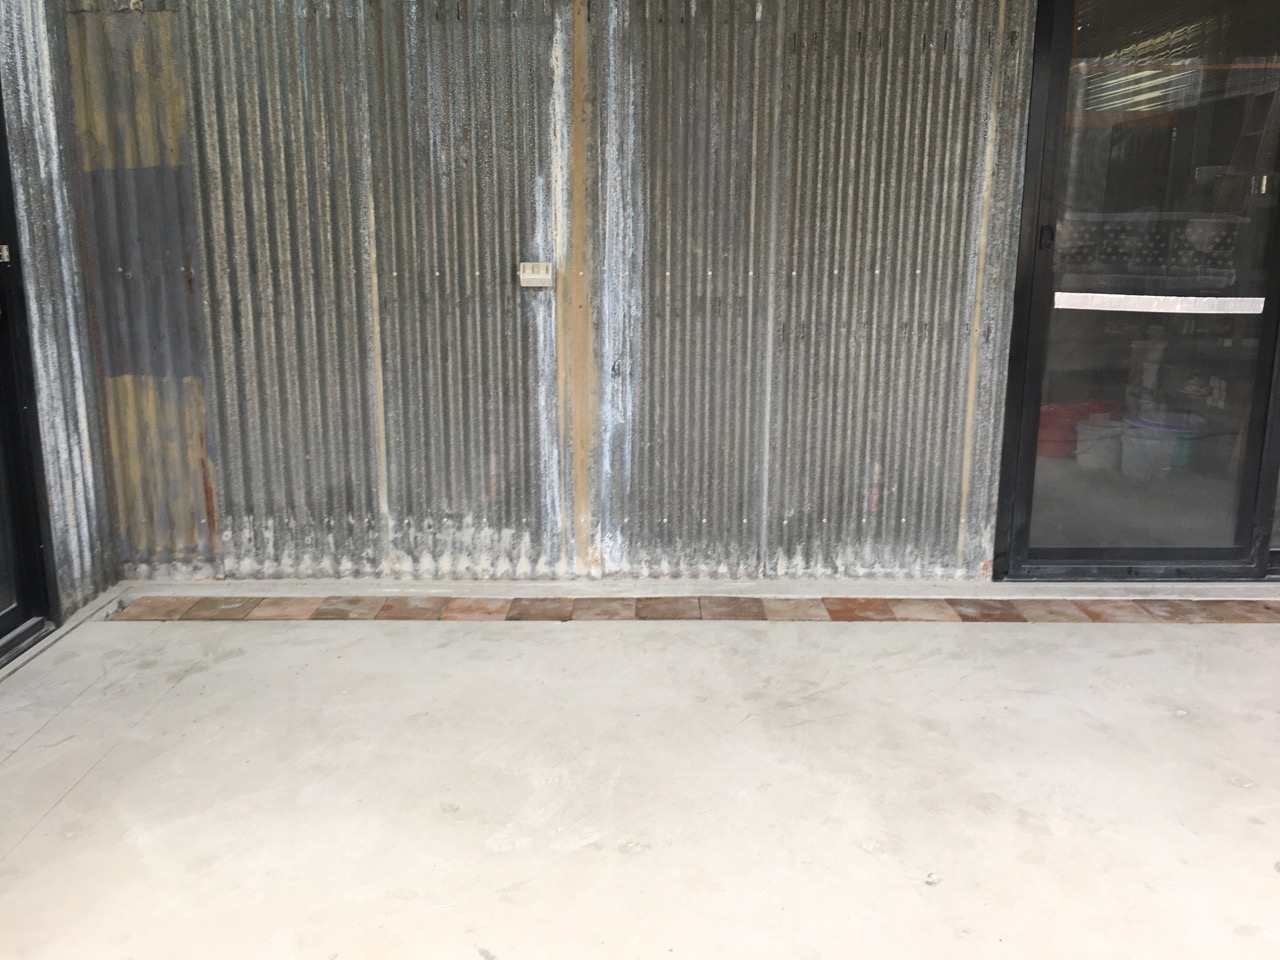
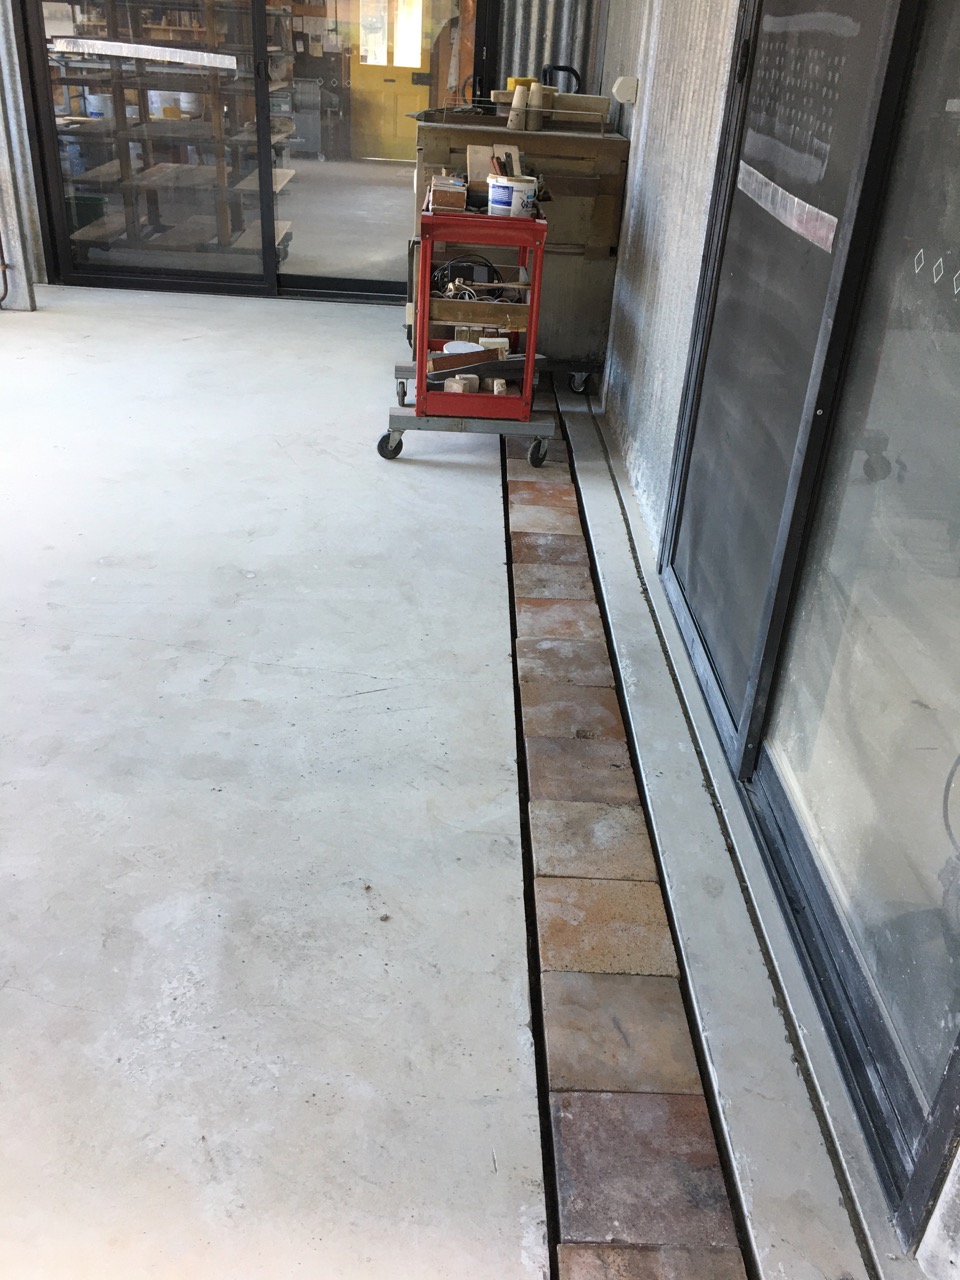
This allowed me to then lay pavers over the rubble to make an ‘agg’ drain.
With my remaining energy, I completed the job by laying a line of terracotta pavers to cover the scar, but leaving a gap all along the trench to allow any future flood water to flow down into the rubble drain and seep out along the alley way between the two sheds. Hopefully a simple and effective solution to yet another problem left by our slack and seemingly incompetent builders. ( who have now gone out of business I’m told). I have noticed that any rain that is driven into the courtyard by the storm, just sinks into the porous pavers and their gravel bed. That paved part of the kiln shed/courtyard never holds any water. It’s just a total bummer that the slack builders cast the slab with the fall in the wrong direction.
It’s been a hard day. I’m pretty worn out from the effort of jack hammering, crow-barring and wheel barrowing all the broken-up concrete out of the trench, but very happy with the out come, now that it’s done!
I’m hoping that it will work. I’m getting too old for all this strenuous high energy stuff.
We are in our own very small and insignificant flood recovery mode
Now that the rain has eased. I can get out and start to repair the leaks that have become apparent in the pottery.
The tin shed builders were pretty basic, almost sub-prime. We have had so many leaks in this building.
The builders chose to use metal sheeting screws without any rubber seals. This must have saved them $10 bucks! So all the walls leaked in the first rain months ago.
I had to go around the whole building and seal all the screws. I had a few options. Firstly I could go around and take out every screw and replace it with the correct type 17 climaseal screws.
Or, I could go around and take out every one of the 3,000 screws, add a small rubber ‘O’ ring washer, then replace the screw. In the end I took the quicker and cheaper option of going around and siliconing the head of every screw. This turned out to be quicker and cheaper. But it still took me days to go around and seal every one to water proof it.
During this prolonged rain event we’ve had a lot of rain compared to our normal. At one point we had over 300mm in 2 days. I know that this is nothing compared to what other places have had to deal with, but it is more than our annual rain fall during the drought years. It became apparent that a couple of the windows were not installed correctly, so that water was leaking in around them. The builders must have been very sloppy with the flashing.
Rather than take the shed to bits to find and seal the problem. I decided to put an awning over the problem windows to keep the rain from getting in behind them.
I had to custom cut and fold some fancy flashing to fit the corrugations and keep the water out.
I cut them by hand using old fashioned ‘curved’ tin snips. Once screwed to the wall above the window and sealed with silicon, they look pretty neat. I’m hoping that this will solve the issue?
We were busy last weekend with a bunch of friends paving the court yard area around the new, almost finished, wood fired kiln.
I still need to finish laying the last of the floor bricks in the chamber, I would have finished this small job a couple of weeks ago, but when the court yard flooded with 70mm of water sloshing around in there. It wasn’t very appealing to be kneeling done and doing the bricklaying. Then all that water was sucked up into the floor bricks like a wick and they became saturated so that any new mortar wouldn’t stick in place. Finally, they have now turned green with algae. I’m sure that they will dry out – eventually!
This severe weather event, although not life or property threatening for us, like it has been for our friends and relatives up on the North Coast. It has been a good warning and trial run for what we can expect in the future as Global Heating increases unchecked. No one in government seems to be taking this seriously, so what can we expect for the future? Well my guess is more of the same, only much worse. We’ve been warned.
So this extreme weather event has been a great warning to us as to what we can expect in the future. I have learned from it and and I’m taking actions now to limit the sort of damage that very heavy rain fall can cause. To start with we have paved the kiln area with a significant fall away from the kiln and out into the open. I have also ordered some more steel batons and some more poly carbonate roofing sheets to wall in half of the courtyard directly behind the kiln. With contour drainage to take the water to the edge of the retaining wall. Although the pottery didn’t flood, it has become obvious that we need to create a dish drain around the front of the building to carry all the excess ground water away from the front of the building, because another event will eventually be worse.
This is a start
Back at the kiln, I also need to fabricate a stainless steel firebox lid and a stainless steel chimney flame tube incorporating a spark arrester. I planned to have started this job already, and 3 weeks ago, I ordered the Stainless steel sheets and some Stainless steel wire mesh for the spark arrester. The sheeting is here, but the couriers have lost the SS mesh. The supplier won’t replace it until he knows what has happened to the first order. The courier company won’t pay out to replace it until they know what has happened to it. So I’m stuck in a catch 22 situation. I can choose to wait it out until the original order is found and delivered, or buy a second sheet of stainless steel mesh and get on with it, but it’s not cheap stuff, so I’m waiting and continuing to write emails of enquiry.
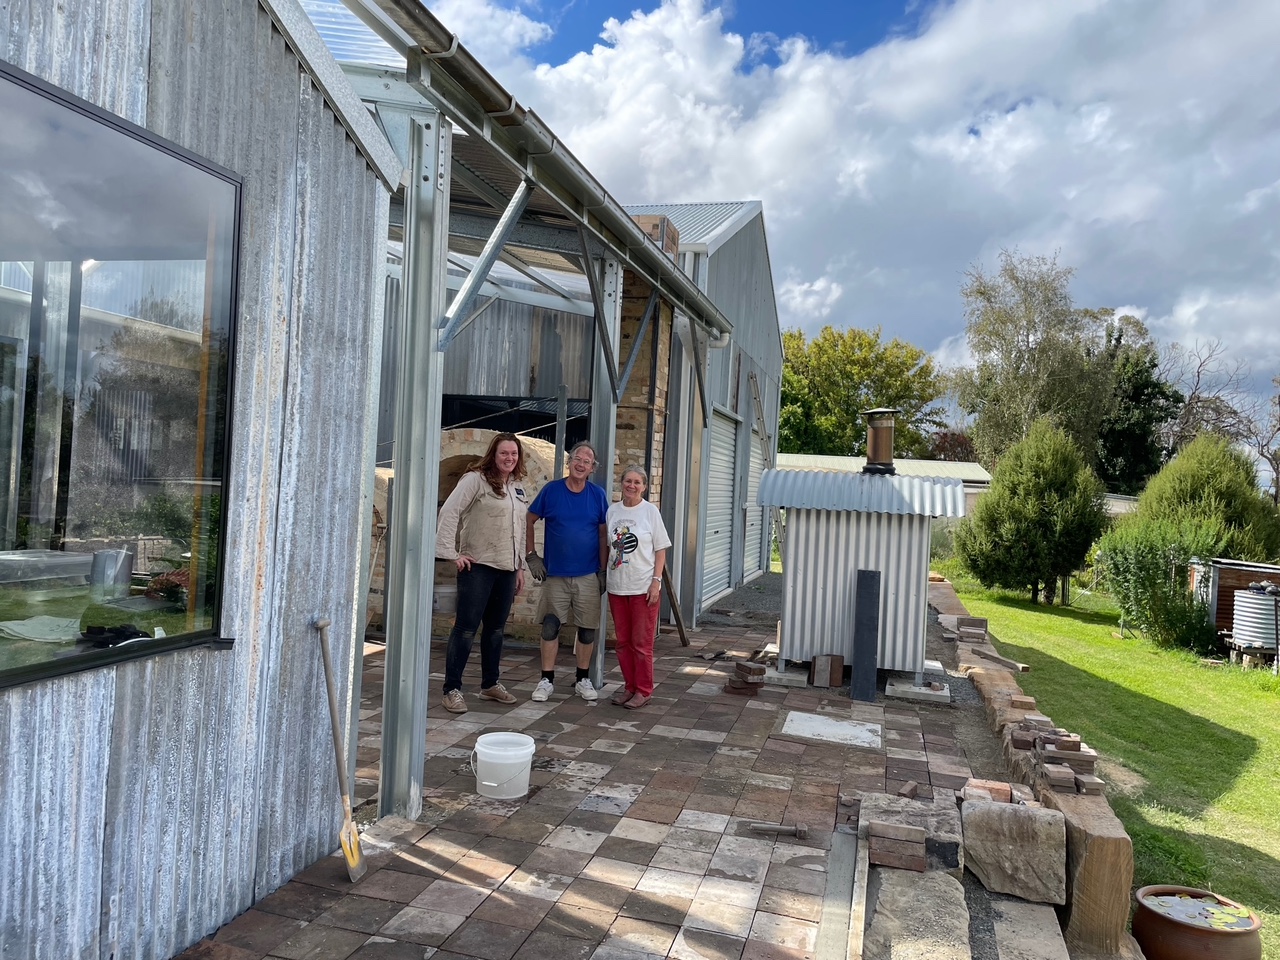
We had a great weekend with our friends laying the paving tiles. We also met two new people who volunteered and turned up all the way from Newcastle, who will surely become friends now. They were a great addition to the group. The stayed over night with us and we got to know each other over a home grown meal from the garden. I had previously made a big pot of tomato passata from the last of our tomatoes, so we had an easy meal of pasta. Dan and James are environmental campaigners and organisers, so we shared a lot in common. James took this image of Dan, Janine and me standing on the new paving.
Dan, Steve and Janine. image by James Whelan
This is all great progress and I’m really happy to see so much getting done.
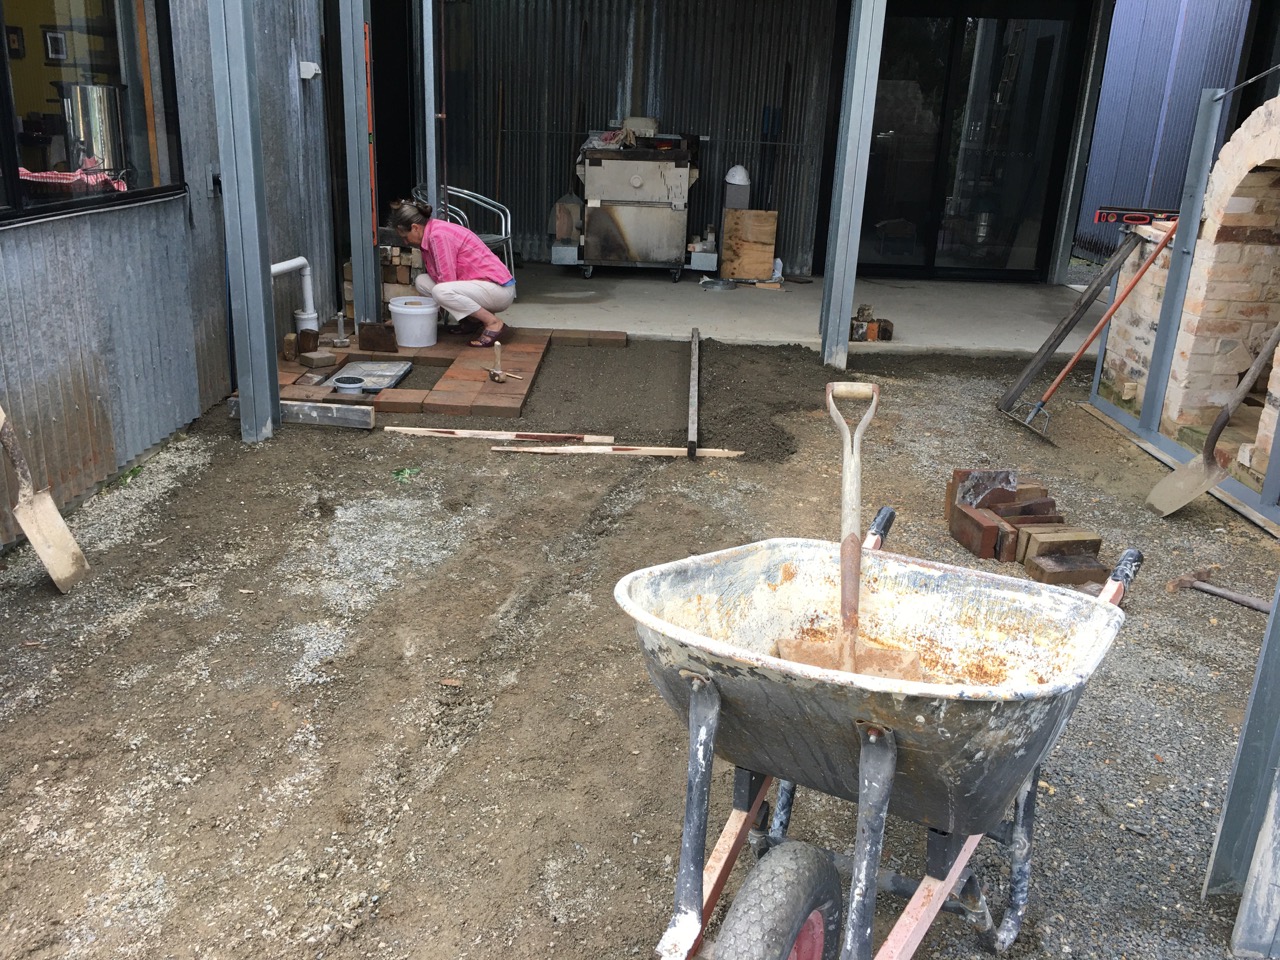
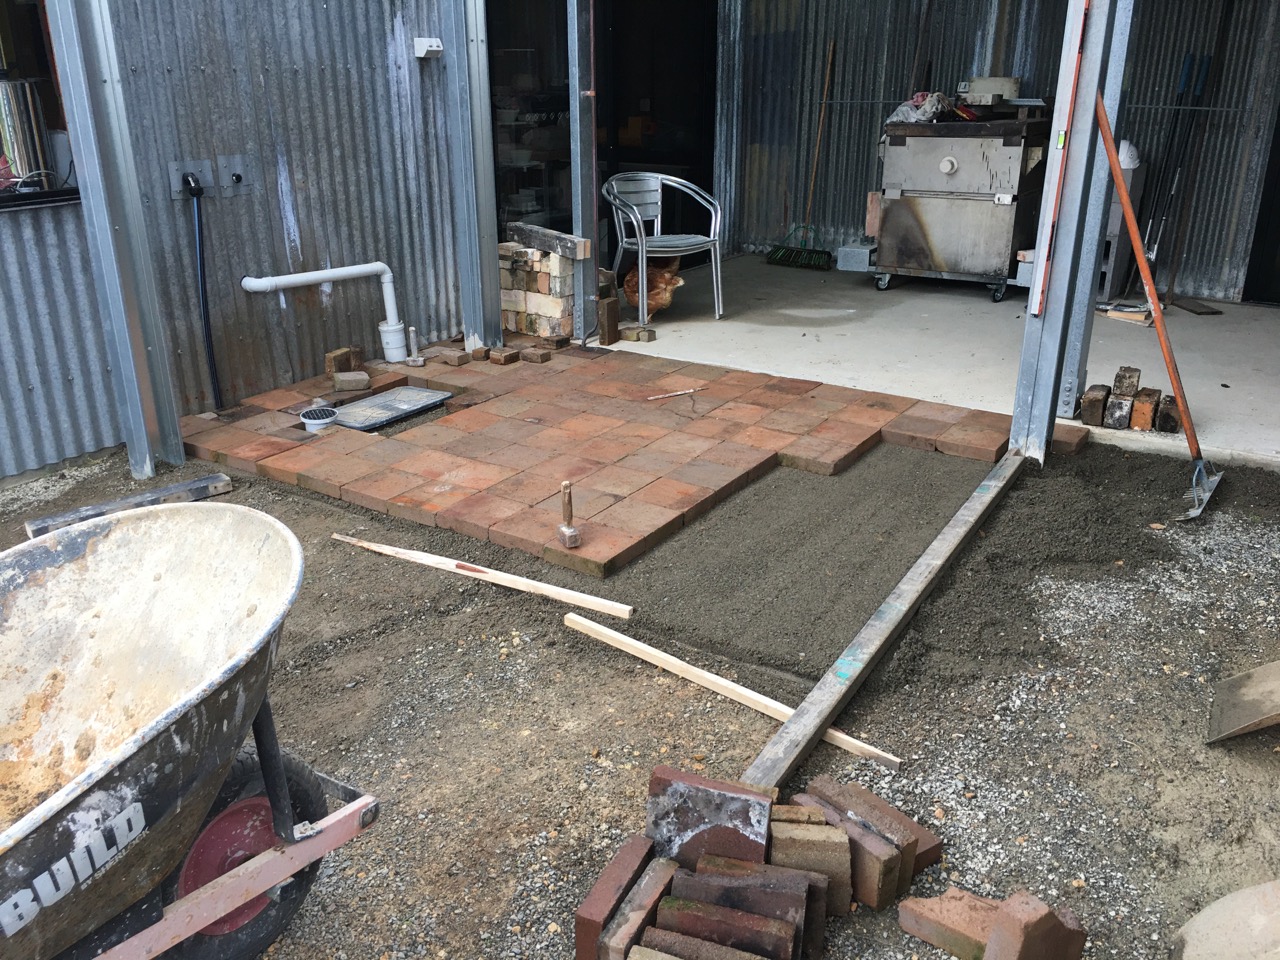
Janine and I started the levelling and paving earlier in the week. As a trial run, to make sure that everything would work out the way that I planned. As we haven’t done any paving since we built the last pottery shed in 1983, I’d completely forgotten what to do and had to re-educate myself and get my skills back up to date. It’s not rocket science, but does need concentration and quite a bit of back bending work. I decided that at my delicate age, I should not do so much bending and instead get the knee pads on and work down on my knees to keep my back straighter. This worked out much better. But then getting up became a bit of an issue.
Starting the paving, getting our levels sorted out and learning how to space the pavers to allow for all the different sizes to fit together evenly.the courtyard paving complete
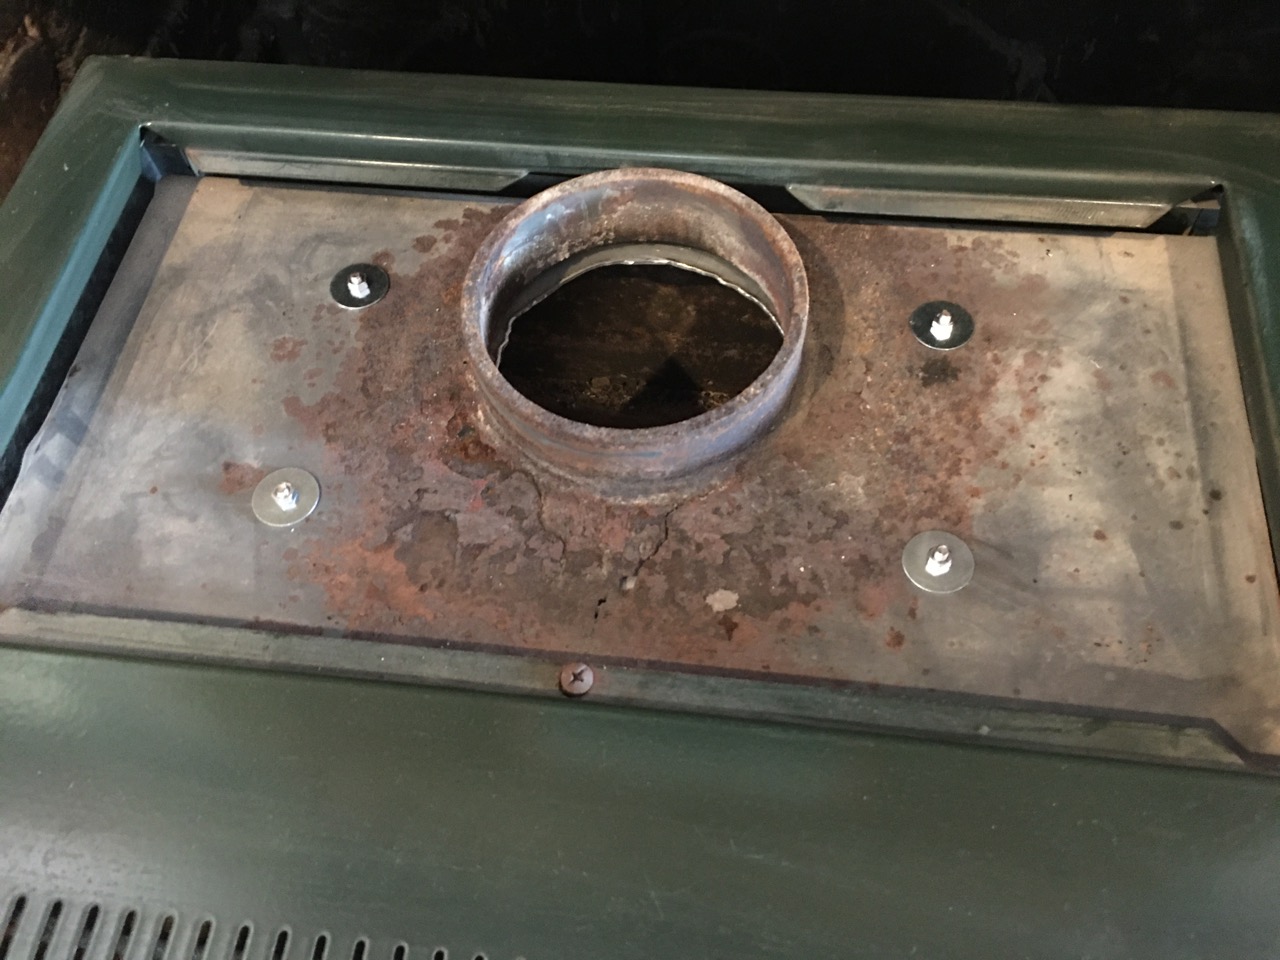
As we are in Autumn now and the weather is getting cooler and the days shorter, we have thought that we may need to light the fires in the kitchen and lounge room soon. The slow combustion heater in the lounge has started to wear through and rust out in the top fire box steel sheet. A crack started to appear at the end of last season, so I made a mental note to repair it once it cooled down, during the off-season, well that time is running out now, so it has to be dealt with as a matter of urgency. I decided to attack the problem by fabricating and new roof for the firebox out of a scrap piece of 2mm thick stainless steel sheet.
The new Stainless steel fire box roof sheet ready to installThe new firebox top bolted in place
Rather than try and weld it in place, which wouldn’t really work very well , as stainless and mild steel have different rates of expansion and contraction. I decided to bolt it in place with stainless steel bolts through over size holes and oversize washers. This should allow for the differences in expansion. The 2mm thick stainless roof should last as long as the 4 mm mild steel walls and whats left of the old top sheet. Time will tell. The stove is about 30 years old, so it has proved it’s worth. I’ll continue to work on it and preserve its life for as long as I can. We bought our slow combustion kitchen cooker over 40 years ago now and it was 2nd hand then. I’ve managed to keep it going all this time with home made adaptations and ingenious improvised repairs. I’m proud of that achievement and I’m hoping to extend it to 50 years if I can.
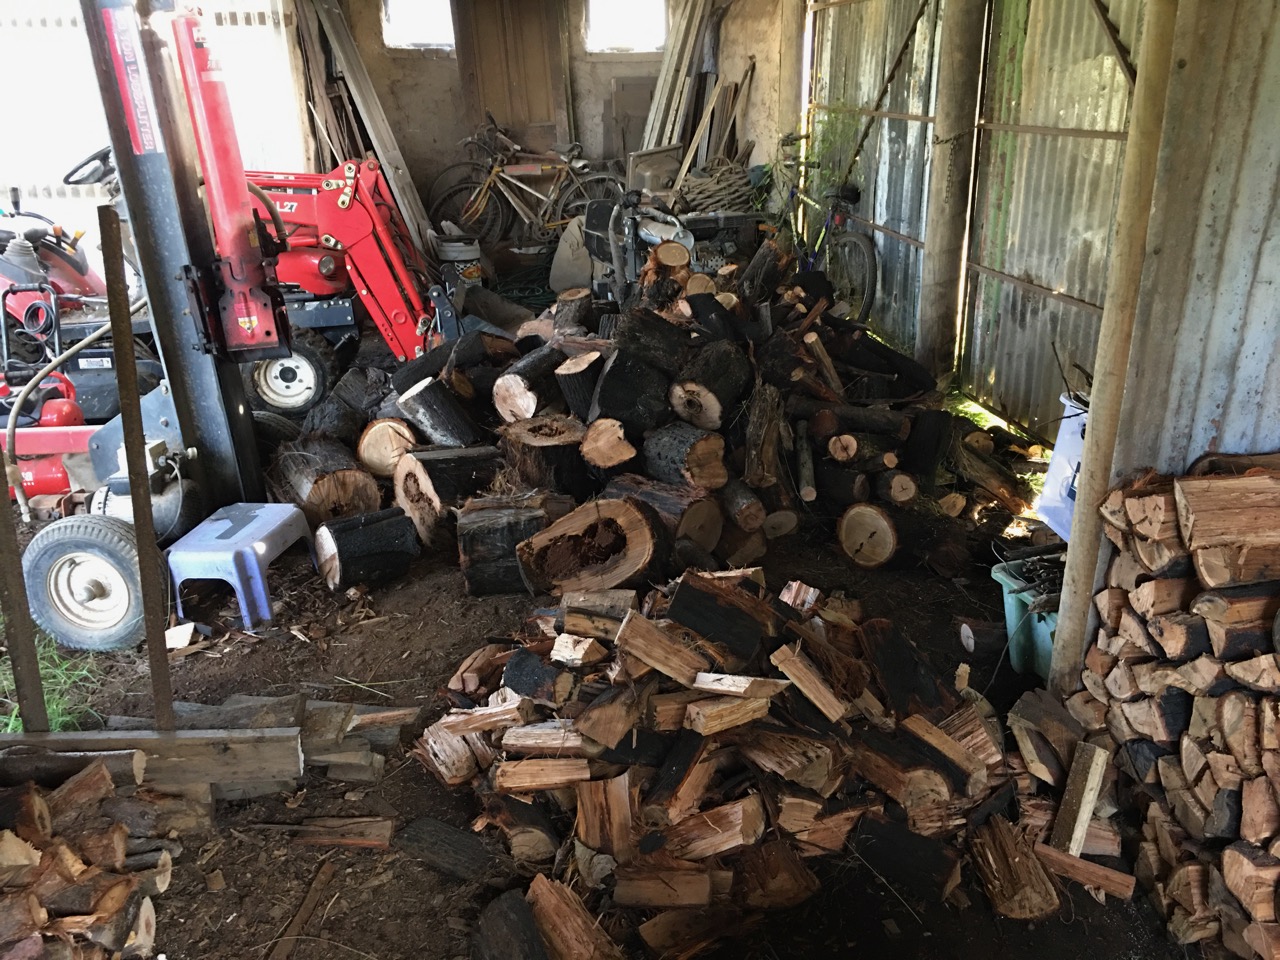
While I was at it, working on the lounge room heater. I also made a new front door frame seal. Afterwards, we went out into the paddock and spent an hour together with chainsaws cutting bushfire devastated and blackened logs. We cut them to stove lengths and stacked them in the wood shed ready for splitting. This will be about 1/4 to 1/3rd of the fire wood that we will get through the coming winter months.
Like everyone else on the East coast of Australia at the moment we are experiencing a lot of rain.
We are very lucky here to be situated up on top of a line of hills, on a ridge where the water table falls away on both sides. We at very unlikely to get flooded here. So our thoughts go out to all those who have been flooded and lost there homes and property. We’ve been there ourselves, but in a totally different way.
My partner Janine, who is from the North Coast area were the flooding is worst just now, has experienced this kind of flooding in her youth. She points out that at least after a fire everything is left sterilised. After a flood, everything is left putrid and stinking. Although the clean up takes just as long in both cases.
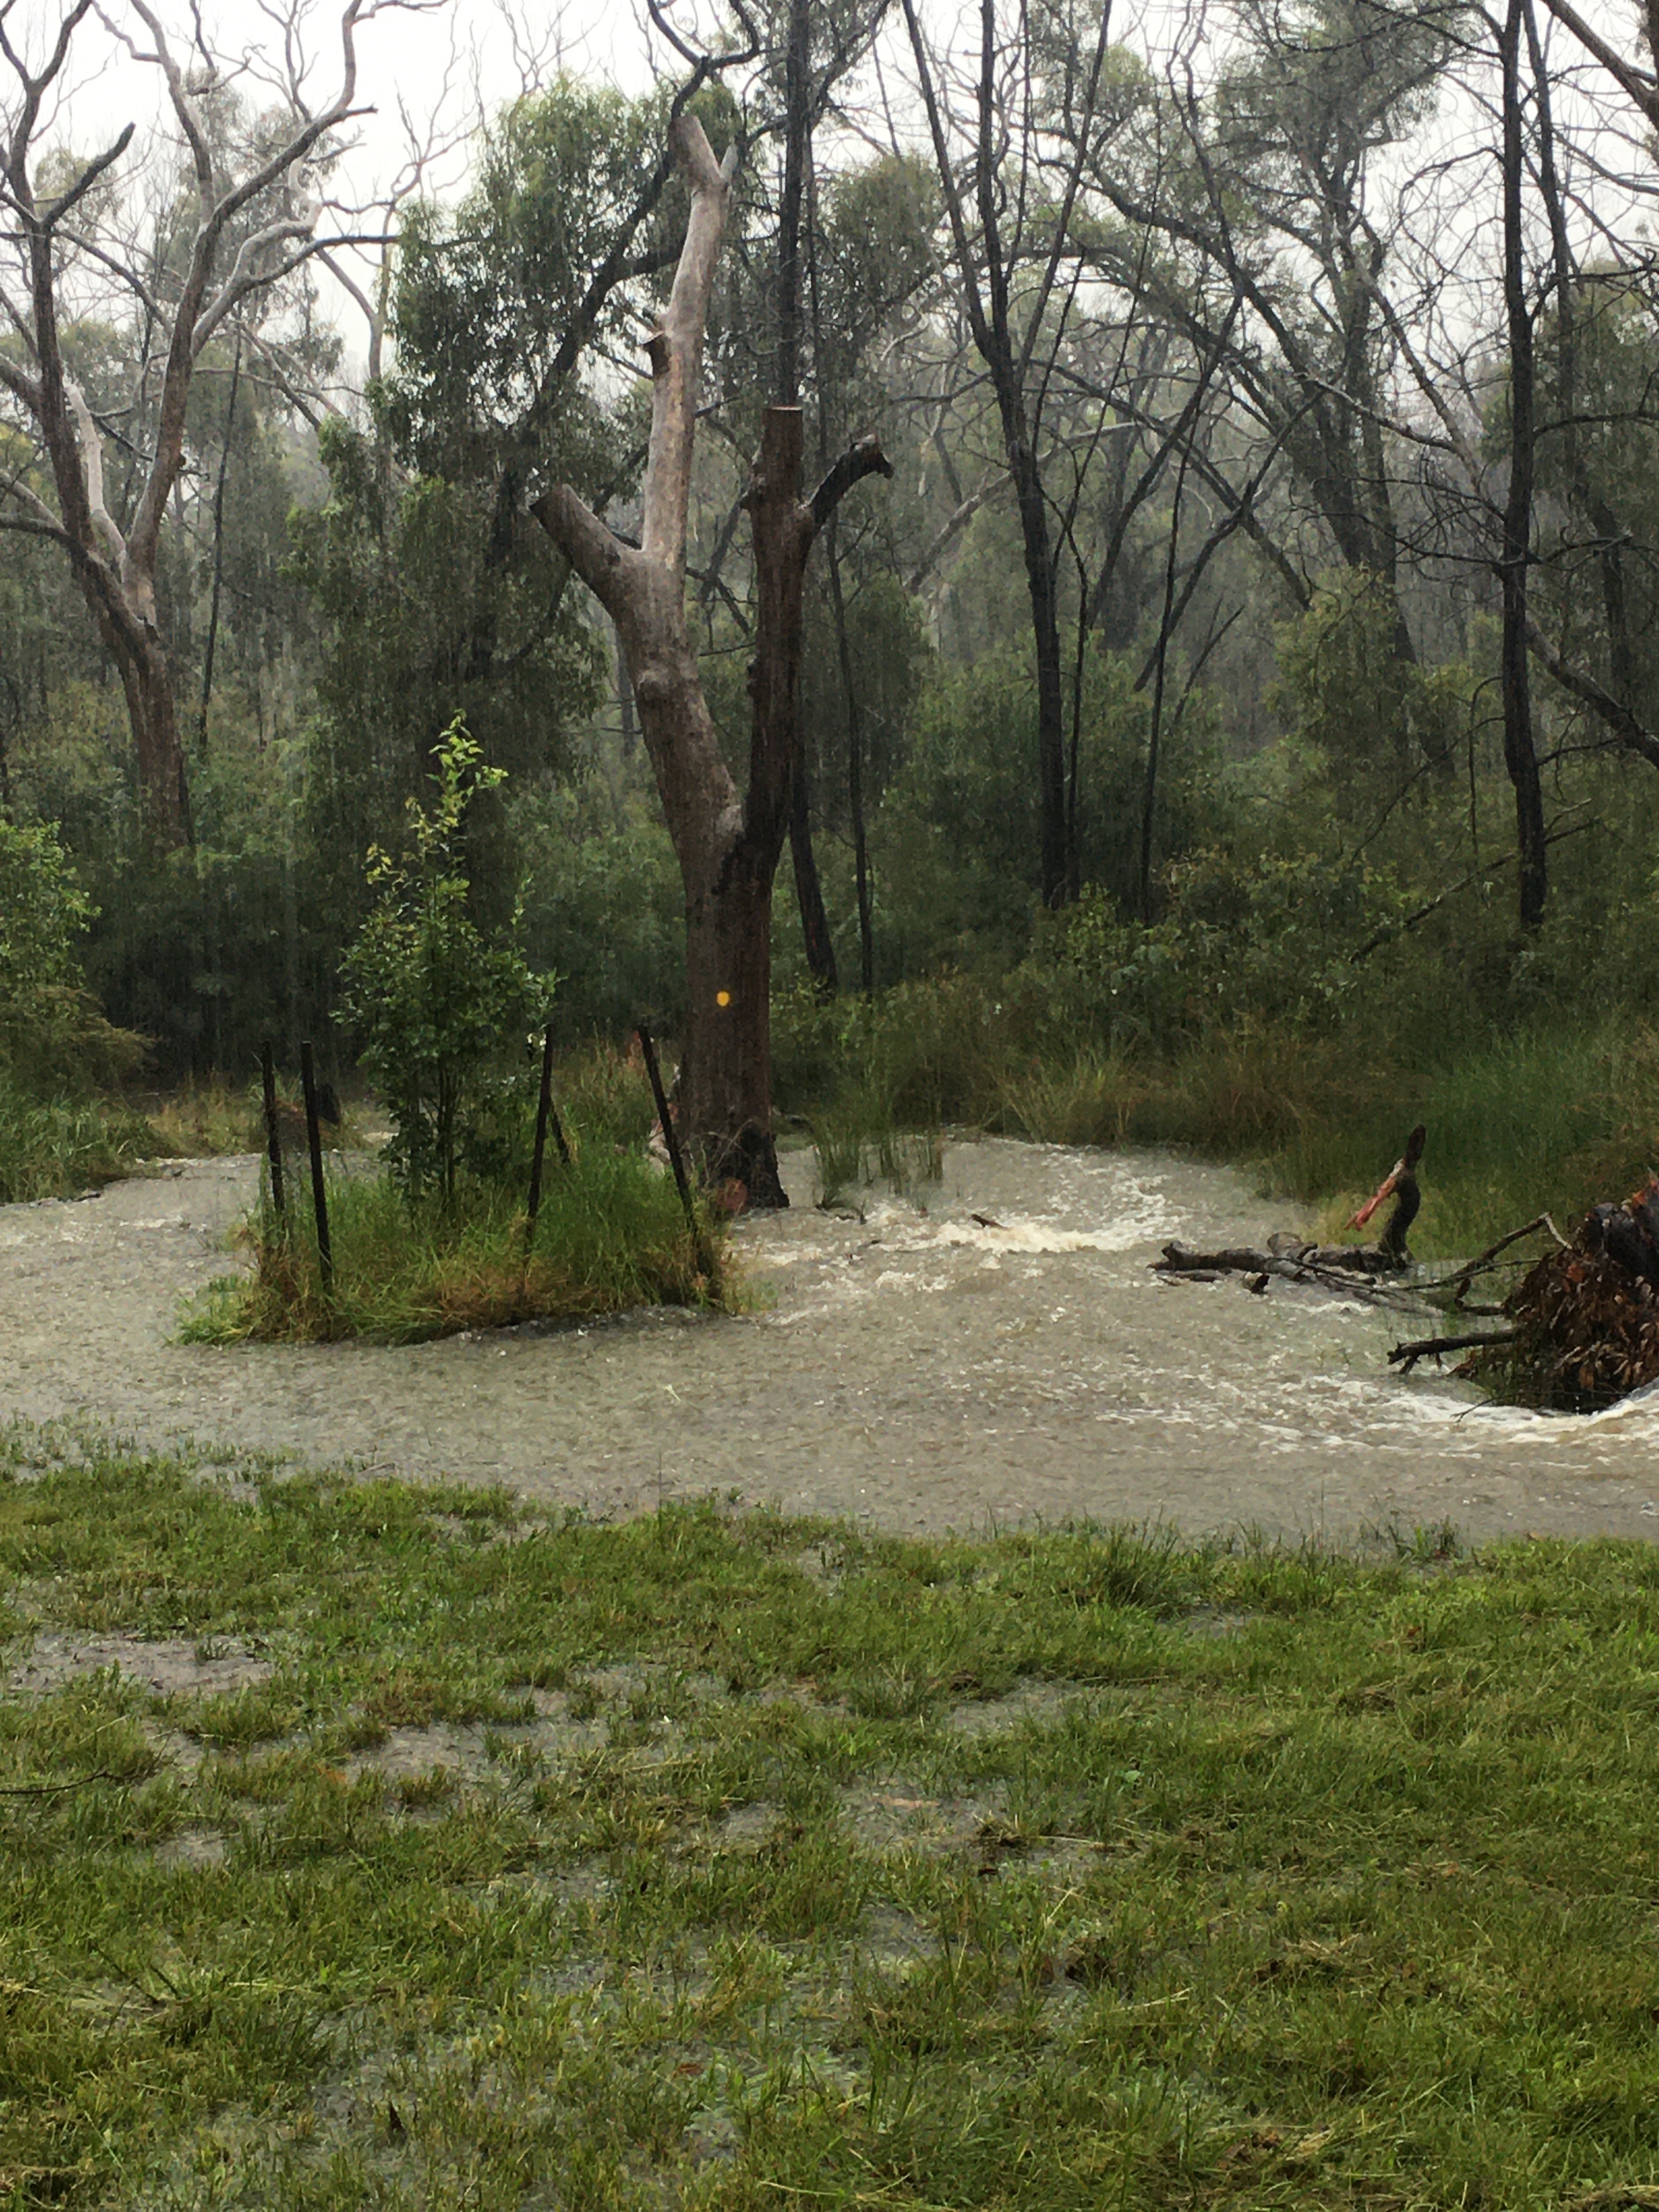
The rain came in horizontally and blew straight into our new kiln shed area through the open Eastern wall. i had to dig a drain to help ease the flow of water back out again.
If this is an insight into the future, then I will probably have to enclose some of this wall with polycarbonate sheeting. To let the light in, but keep the rain out.
Before
I’m somewhat amazed that water managed to build up like this here in the kiln courtyard, as it is elevated up on 1200mm. of crushed blue metal gravel behind the big stone retaining wall. At least it does drain well over night once it actually stops raining.
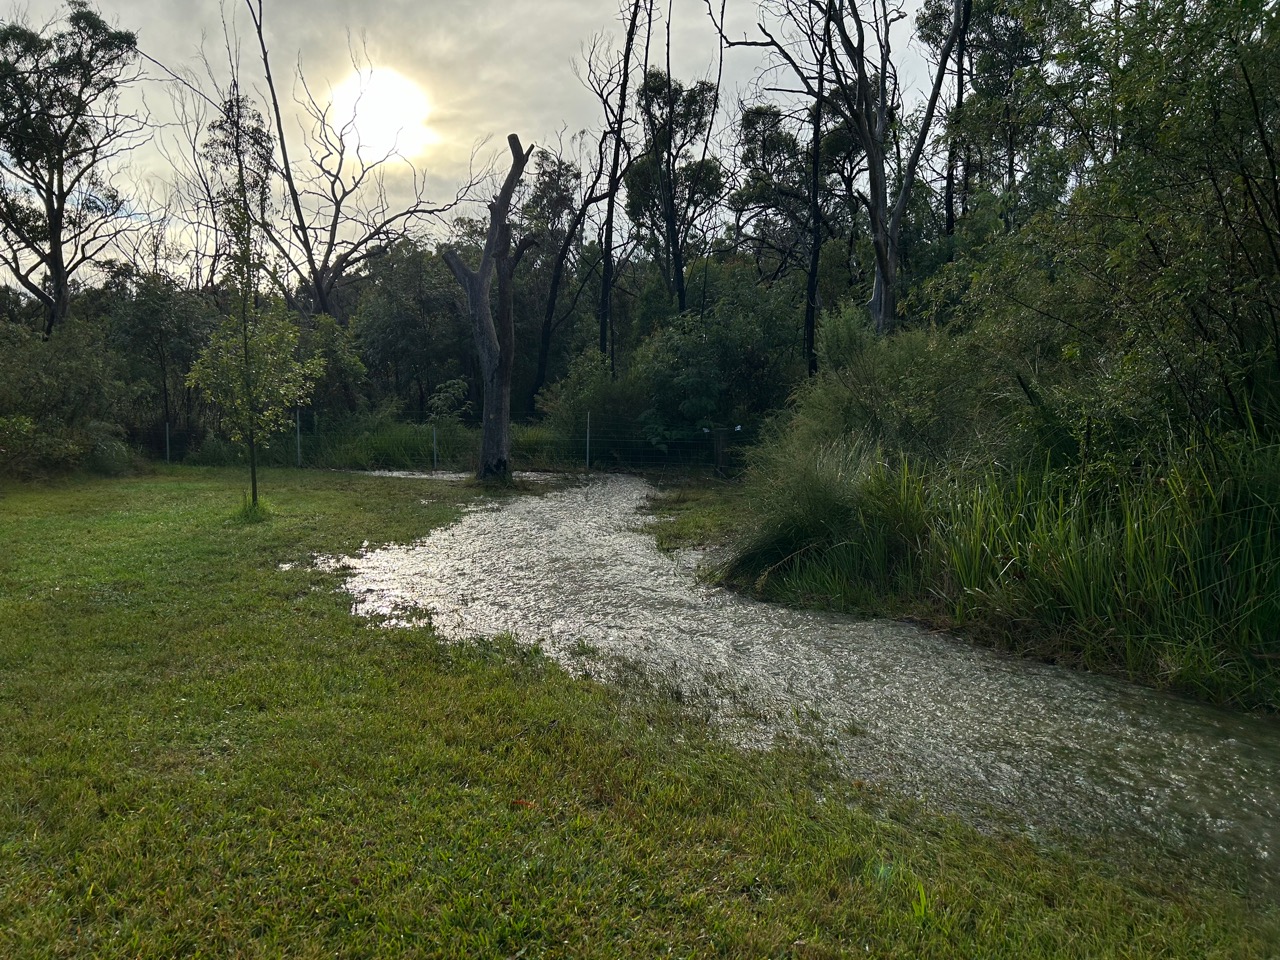
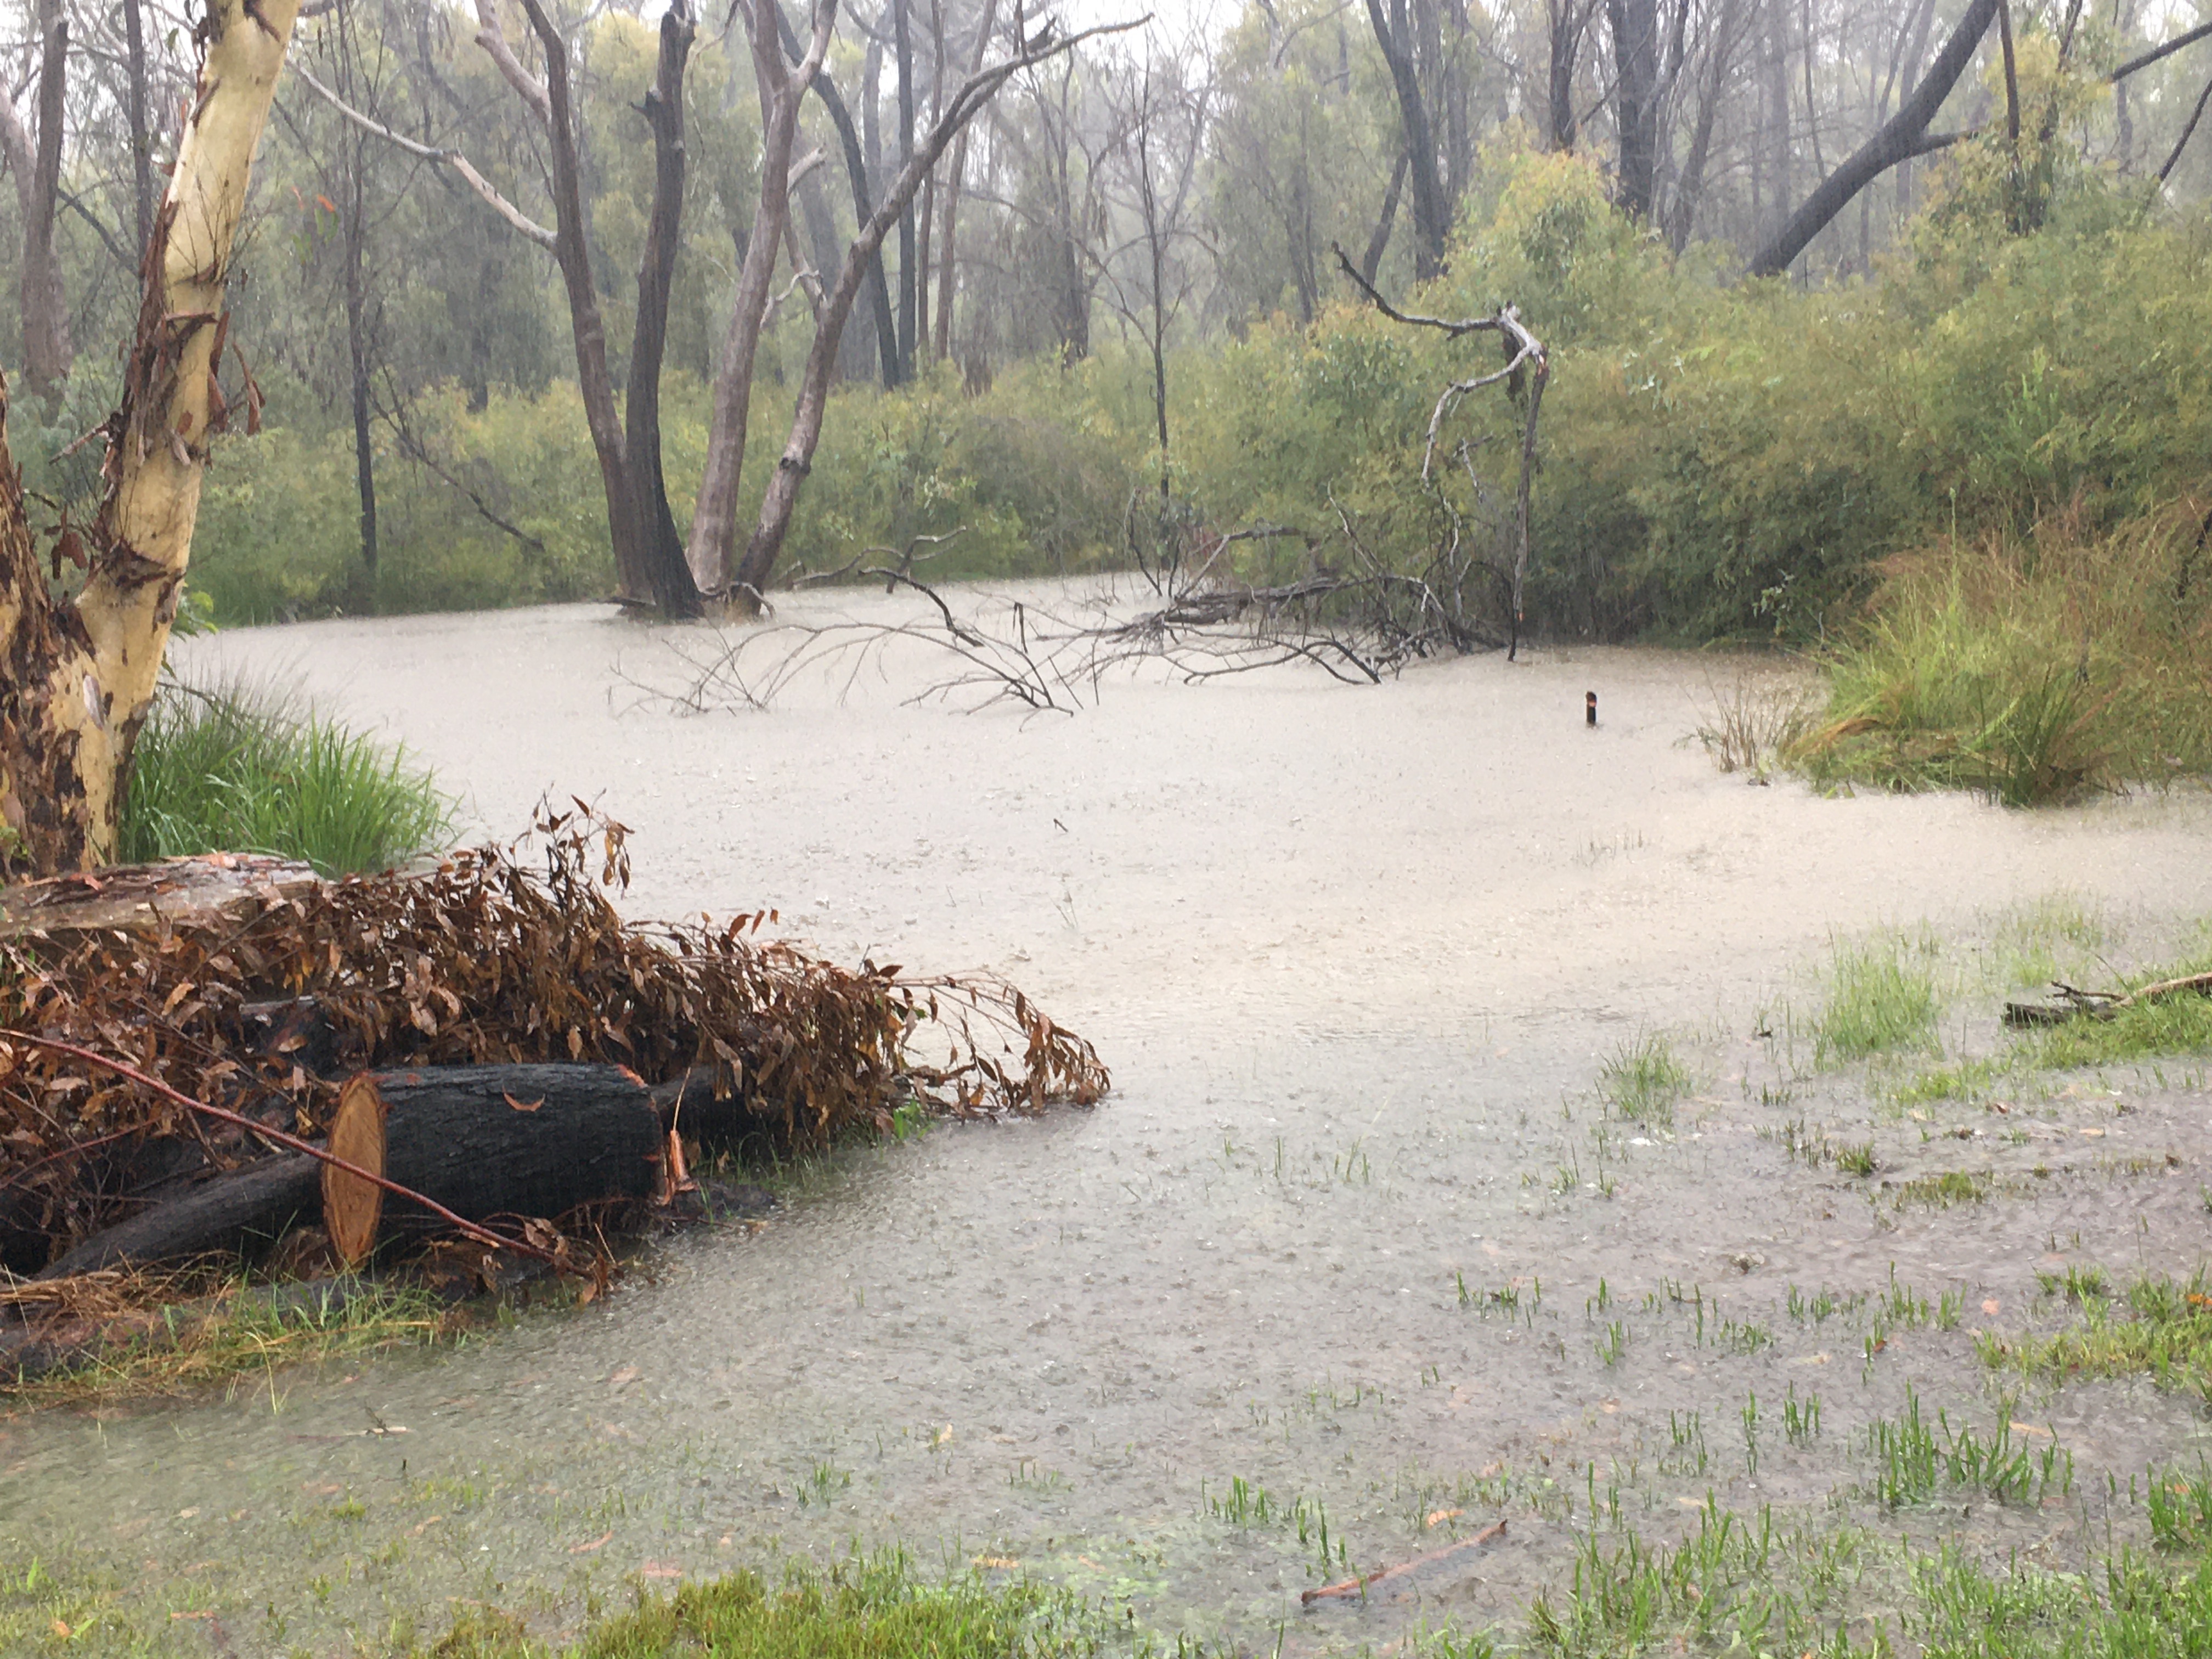
Our normally dry and sometimes barren back yard is now a small stream, with a creek running through it.
Here the small top dam overflow channel is not able to cope with the deluge and the dam is over flowing across the whole dam wall.
We have only ever seen this happen a couple of times before in our 46 years here.
We had over 185 mm of rain. We’ve had this much rain before. In fact the recent bush fires were put out finally when we had this same amount of rain 2 years ago.
But last time the rain fell onto, and soaked into, a dry parched landscape. This time it has fallen onto a saturated and sodden catchment and so instantly started flowing off.
We are fine and have plenty of home grown and preserved food in the pantry, and because we have solar power and a battery, we don’t know whether the power went off or not.
These extreme events are exactly what we have been warned will eventuate with the increase global temperatures due to carbon in the atmosphere. But our politicians refuse to do anything about it and those on the right are still denying that it is even happening. A pox on both their houses!
With 1 in 50, and 1 in 100 year weather events happening every other year now, I fear for the future of our kids and grandchildren.


You must be logged in to post a comment.