Truffled eggs, a once a year special treat

Take two eggs stored in a sealed container of carnaroli risotto rice with a big fat truffle. Wait a few days.

IMG_2502 IMG_4004 IMG_4005

I made risotto out of some of the rice for last nights dinner. served with a good sprinkling of truffle and a side of steamed broccoli.

IMG_4006 IMG_4007

When the time is right for a special breakfast. Crack the truffle infused eggs into a bowl with a good dollop of fresh cream, add some real salt and freshly ground pepper. Then grate a generous amount of truffle into the bowl, whisk it all up and pour it into a moderately hot pan greased with a knob of butter and keep it all moving gently until it starts to firm up a little. Pour it over toast and take the time to savour it all in its sinful richness and mouthwatering flavour and aroma.

IMG_4009 IMG_4011 IMG_4012

For a second course, we had freshly home made seville marmalade and a bowl of hot milky coffee.

IMG_4014

We might just want to go back to bed. but we have 10 potters coming to pack and fire our wood kiln for a weekend workshop. So there is no time to dally.

Truffle Risotto

We have our truffle safely ensconced in the fridge in a tub of rice and a couple of eggs. They will absorb the flavour of the truffle. Even though they are all tightly sealed in the plastic tub. The smell of the truffle gently wafts out every time we open the fridge door.

IMG_3990

I decide to make a mushroom and truffle risotto for dinner. I have a couple of big brown mushrooms and I pick a few hot red peppers from the garden to go along with it. I have an ancient porcelain soba cup that I use to measure out the rice. One soba cup of dried rice is the correct amount of rice to make a risotto for the two of us. I bought this old soba cup at the Toji markets in Kyoto. My old cup is repaired with gold kintsugi and lacquer. It really deserves a bit of respect, because it is a beautiful thing. It was made in an important family workshop at the turn of the last century.

IMG_3991 IMG_3992

I still have a small amount of my marrow bone stock left in the freezer. Made before I went to Japan. It’s a beautiful, rich concentrated block of flavour. I do all the usual things, coating the rice in oil, browning the onions, deglaze with a cup of wine and then stir the carnaroli rice constantly in the stock until it cooks down and goes all thick and creamy. I finish it off by melting a good dollop of butter into the pan and stirring it through. It gives a lovely soft and creamy mouth feel and rich taste. Towards the end I grate a lot of truffle into the mix, little bit of very good cheese and then after plating-up, I grate a lot more truffle on top. A little bit of salt and pepper completes the dish.

IMG_3993 IMG_3997

Know that it is good when Janine asks if there is any more.

Mussels for lunch

I have managed to get into the pottery briefly. In between building all the new sheds that we need and organising the weekend wood firing workshops. I want to have my own firing in-between the winter wood firing workshops, if I can.

IMG_2417

The fish-truck man has some nice fresh mussels, so that is what we will have tonight. We have everything else in the vegetable garden or the pantry. I don’t attempt anything weird or out-there. Mussels in white wine and tomato sauce. Simple.

IMG_3960

IMG_3961 IMG_3962 IMG_3963

Onions, garlic and chilli in olive oil. White wine, mussels and tomato passata. A few minutes on high heat. Presto!

It’s so delicious, quick and simple. We have no trouble in finishing off a kilo of mussels between us. It’s a fantastic, warming and fortifying lunch to get us back out there  in the cold and miserable weather to get everything ready for the weekend workshop.

IMG_3968 IMG_3969

Before and After.

Truffle Season is Here Again

Now we have past the solstice, we are in the coldest part of the year and that means that the French Perigord black truffles will be ready for harvest from our local truffière. Janine and I planted 8 inoculated truffle trees 2 years ago, one, a holly oak, didn’t like it here and turned up its toes pretty quickly, but the other 7 have survived for two years now. The 2 stone pines inoculated with Italian white truffles are growing strongly. As are the hazelnuts carrying the black Perigord truffle spores. The remaining holly oak is not too happy, but the English oaks are doing OK.

IMG_2496 IMG_2494 IMG_2493 IMG_2490

3 Perigord Hazels, A very tiny holly oak, a thriving Italian stone pine and an English oak that has trippled its height and is growing very well..

We don’t expect much from any of these trees, It’s just a fun project on the side. If one day we find a truffle, say in 5 to 10 years time, then it will be a bonus. Growing truffle trees is quite a bit of work and to achieve success, you have to take it quite seriously. I don’t, so our chances of success are greatly diminished.

We live in a suitable climate here, with just the right conditions of light winter frosts and hot summer days, but our rainfall, especially in the hotter summer  months is rather on the low side in most years. Although who can say what will happen in the future, as the climate seems to be changing quite a lot for us here. We are stating to get less winter frosts and more summer rainfall.

Rainfall is not a problem for the serious grower, as piped irrigation is cheap and easy to install. We have dams and pumps and could do this, but for a marginal hobby activity like this it’s still a lot of extra work, not just to install, but to maintain and to remember to put it on when it’s required. I have enough to think about already.

IMG_2451

So, all in all, it’s somewhat easier to go and visit the local truffière and buy a nice plump, black, fragrant truffle right now while they are in season. Geordie is going out to pick up the order for the restaurant and he takes us along. It’s a beautiful place. The trees are young and only just coming into harvest in the last few years. Each year the harvest is doubling. I’m a bit dismayed to hear that the holly oaks are the best producers in this area. Regrettably, it is the hollyoaks that are doing the poorest for us in our garden. Not an auspicious sign for us. One dead and the other not even able to grow up to the level of the rabit proof tree guard.

It turns out that we have met the truffle grower many time before in another place. He picks me out. “I know you”. At least he knows my hat. It’s a cold wintery day with light showers blowing in and we are all rugged up. I have on my distinctive large Basque beret. He says “I know that hat. You are a regular at The Royal Society Meetings!”

It’s true, I am. I suddenly recognise Ted, It’s one of those occasions when a face is out of place and suddenly snaps into cognition at the mention of a key word. Ted is on the door at the meetings and we speak regularly, if only superficially. I often wear my Basque beret to the Royal Society meetings on the cold winter nights.

Ted has the record for the biggest truffle ever grown in Australia. 1.173 kgs! The world record is around 1.3+kg for a truffle found in Croatia. The French record is also around 1.3 kg.

He has just harvested and there a quite a few nicely sized truffles to choose from. They don’t do retail sales, so we are lucky to be tagging along with Geordie. However, they do take booked, guided tours on selected weekends through the harvest season.

IMG_2437

I pick a nice lumpy, mid-sized one that smalls exotic and deliciously fragrant. What is the aroma of a truffle? I can’t define it. I’ve seen it written that it is like “Old socks and sex. Open the spice cupboard and take a deep sniff. Crush an unpeeled clove of garlic. Find some damp leaves and dig your fingers into the earth underneath (oak leaves are best). Then go for something floral, lilies for penetration, roses for sweetness.”(Australian Truffle Growers Assn.)

Now, I didn’t write that, I lifted it from the Australian Truffle Growers Assn. Website, but I can see what they are getting at. I get the old sox and sex bit. Forrest floor compost and some higher floral notes. I can’t come up with a better description, so this will have to do.

We get our precious truffle home and store it in the fridge in a bed of rice along with 2 eggs. The rice will absorb the flavour of the truffle as will the eggs. We’ll be having lightly scrambled eggs for lunch with a little bit of truffle grated on top. Simple, elegant and amazingly flavoursome. The rice will be used to make a truffle risotto for dinner. That’ll be half of our truffle gone. We’ll replace the rice and eggs while we consider our other possible menu options.

IMG_2423 IMG_2456

I opened the fridge this morning and the even though the truffle is buried in rice in a sealed container. I can smell that distinctive aroma as soon as I open the door. it’s fabulous!

IMG_3977 IMG_3978

IMG_3979

We decide on the simplest of scrambled eggs for lunch and I grate a load of truffle onto them. I feel generous now while the truffle is still so large. In the past when we have bought a very small 20mm, thimble sized truffle, we have used it all in one meal. No reason to be mean with it. Grate it on and really enjoy it. This is the first time that we have had the luxury to think about other meals to follow.

It is fantastic. This winter treat has been a long time coming. The only thing that can improve on this very basic recipe is a little butter to grease the pan and some real salt to help bring out the flavour.

Truffles really make the winter worth waiting for. One of the great joys of seasonal local cuisine.


Delivering a Kiln, What Could Possibly go Wrong?

I have just finished refurbishing an old 2nd hand kiln for a friend. It’s one that I built 20 years ago and although has suffered some neglect. It is in remarkably good condition. We  delivered it to our friend in some very inclement weather. Fortunately the sleet cleared just before we arrived and the frost and ice was melted by the steady drizzle that set in, so the drive was uneventful. The driveway into the property was a bit wet and mushy after all the rain, so it was a slippery slidey reverse up the wet  grassy driveway and up onto the concrete slab.

IMG_3919 IMG_3920

As we are way out into the country side here, there are no facilities to call on. Any sort of assistance would have to come a long way and at great expense. So we are on our own. Two ladies and me.

So, if all goes well, it should only be a matter of lifting the kiln up off the truck and then driving away. What could possibly go wrong?  The kiln should then be able to be gently lowered down into the exact position on the slab. A builder has been commissioned to come along later and build a garden shed over to the top of the kiln in-situ.

I think that I have thought of everything. I have lifting gear, slings, chains, shackles, gloves, pallet truck and crow bar. All the parts to built a tripod and a chain block to do the lifting.

Amazingly, it all goes exactly to plan. The rain stops. I take the wooden poles off the truck and build the tripod, walking each leg inwards towards the centre, raising the chin block to a height, high enough to clear the kiln when it is on the back of the ute.

I manage to position the truck with the kiln on the back, more or less in the correct position on the site. Directly under the centre of the tripod and we are ready to lift.

IMG_3927 IMG_3929

This technique only works on soil or gravel. I have learnt from bitter experience that the legs of the tripod tend to slide outwards from the centre as soon as the load is applied, when they are sitting on concrete, or other flat , smooth surface. On soil, then settle in and dig down, locking them firmly in place. My only concern here is that the soil is so saturated, that they may just keep on sinking in. The soil is absolutely saturated here.

I try a slight test of the gear. The chain block takes the weight and the tripod settles in. I lift a little bit more and the ute raises up on its springs. A little bit more and the kiln starts to move a little and swing to one side a fraction as the weight comes off the legs. Finally its hanging free in mid-air. Just as it’s supposed to, success! While I steady the kiln and keep a hand on the lifting chain. The Lovely releases the hand brake and the ute suddenly zooms off….!

IMG_3932

We are all a bit surprised at the speed. The slope was sufficient to allow the truck to freewheel away quite fast. Without the engine running, the power assisted braking doesn’t work and Janine had to press very hard on the truck’s brake pedal to bring the ute to a stop. Nothing went wrong, but no matter how much planning you do, there is always something else that you haven’t considered.

We wrap the kiln and I load all the gear back onto the truck just as the rain returns.

Perfect!

Low temp wood-fire w/shop

We are all prepared for the first of our winter wood firing workshops. The early morning sun shines obliquely across the site. Everything is ready. We have spent the weeks beforehand preparing the wood, the kilns and the glazes.

IMG_2354 IMG_2356

Yesterday, we had our friend Susan down here for some last minute help with prep. While I was handing out HTV cards for The Greens and the local polling booth. Janine and Susan had their own test firing of their own work. A bit of quiet time to have some fun together, but also a chance to test all the new glaze batches to make sure that everything will run as smoothly as possible on the day.

IMG_2372 IMG_2376

The day goes smoothly, A credit to Janine and Susan, for all the hard work and preparation that they have put in. Everyone seems happy and they are kept busy with glazing and firing all day. The kilns perform well and work starts to accumulate in the saw dust trench.

IMG_2391 IMG_2387

The firings proceed all throughout the day, as once the kilns are hot. They can be unloaded, reloaded and re-fired easily all day.

Glazing, firing, unloading and reloading, smoking and more glazing and refiring. It’s a busy day.

IMG_2358 IMG_2378

IMG_2383

The day ends with a lot of happy potters going home with boxes of glazed pots. We clean up and put everything away again. I go to the garden and pick arms full of veggies. This will be our dinner tonight. Baked vegetables with a small piece of steamed fish.

IMG_2393 IMG_2396

IMG_2402

We light the fires and settle down in front of the idiot box with a glass of red wine to hear some analysis of the election turmoil.

Interesting times!

Midwinter days – & Nights

IMG_2335 IMG_2336 IMG_2338

It’s quite frosty these midwinter mornings, now that the rain has cleared. I wander out in the frost to see how the gardening is faring. Especially the small new seedlings and emerging seeds. Everything looks pristine and bright. The frost crystals fringe the leaves and make the foliage look so delicate. My fingers are cold, but I go back and get the camera to take a few images.

IMG_2343 IMG_2339 IMG_2342

These cold winter days are so appropriate for minestrone. The Lovely picks carrots, cabbage, leeks and celery from the garden and browns an onion in good olive oil. She gas to climb up onto of the kitchen table to reach for another plait of our garlic that is hanging high in the kitchen ceiling curing. We are more or less half way through the garlic year and a bit more than half way through our supply of last years garlic.

IMG_3798 IMG_3808 IMG_3814

IMG_3817

I pick the last of the summers dried beans, still in their pods, shell them and soak them overnight. They make a great start to a wholesome soup base. With the Lady’s magic touch, it all comes together into a warming and nourishing couple of meals.

IMG_3871 IMG_3904

IMG_3905 IMG_3906

IMG_3907

We are enjoying all the usual winter greens. The Brassicas are doing well just now in this cold weather. We have broccoli, cabbage, Brussel Sprouts and cauliflowers all on the go. A typical meals just now might be fish with 3 veg, but otherwise it’s just 3 or 4 veg.

 IMG_3918 IMG_3933

Tonight we have a piece of fish with twice cooked home-grown dutch cream potatoes. Twice cooking starches converts the starch from instantly available high GI starch and sugar, into slowly digested resistant starch, which is very low GI. I Serve this with Brussel sprouts and kale.

IMG_3951 IMG_3953

I’ve been trying to find a way to enjoy kale, but it is rather limited in what can be done with it. I persist because kale and all the other older fashioned brassicas. The ones that still have their bitterness still in them, The ones where it hasn’t been bred out yet. These are thought to be very good for you.

Prof. Mark Mattson, of Johns Hopkins University has written a few articles about this. I read one in New Scientist magazine last year. “Whatever doesn’t kill you makes you stronger”. To summarise. The bitter principal in these veggies stimulates your immune system and tones you up.  So, I keep trying to make it more enjoyable. I’ve decided that the best that I can do is to slice the leafy material away from the stem, slice it finely and simmer it in it’s rinse water and a little olive oil with loads of garlic. Then serve with a squeeze of lemon and some fresh ground pepper and a little of my fake salt substitute. It’s almost enjoyable. Once I mixed in some Ethiopian Cabbage and red mustard leaves with the kale. It must have been very good for me, because I could only just eat it. It was so bitter.

IMG_3949

The best way that I have settled into wit kale now, is to simmer the peeled leaves as above and mix in 100g of diced feta , before serving with the seasoning and lemon juice. Have no more fear of kale. This is lovely. The feta makes it all the more delicious and balanced. The fat content dramatically improves the balance, mouth feel and taste.

IMG_3952_01

The Solstice Approaches

Here we are almost at the solstice. It’s dark until late in the morning and dark early in the evening. A few months ago, I booked one of my best friends, Warren, to come and help me do a lot of work. Now, the appointed weekend is here and it is pissing down. We can’t change the dates, we are both fully committed in other work for months ahead. We have to do it now – in this weather! We had the flood last week and have almost finished clearing up from that heavy rain and now it is raining again, almost constant drizzle to annoy us while we work.

Warren has come to help me build a wood shed for the kiln wood. We have a small shed for the house wood for the kitchen stove and heater, but the kiln wood is so much bigger and there is a lot of it when we do the weekend workshops. So, we have needed another woodshed for some years now. Last year was terrible for us. So stressful, as it always seemed to rain the week before the firing and we spent the year trying to work with wet wood. Sometimes I could store the wood in the kiln shed/factory. But if I was building a kiln in there at the time as well, there just wasn’t room for both. So, the wood was out in the rain. We tried tarping it, but there was loads of condensation under the tarp in the prolonged wet weather and sometimes it would blow off in the really heavy storms.

IMG_3874 IMG_3886

So, we’re building a dedicated shed to store the long lengths of bourry box hob wood. At least that is the plan. The rain comes down in waves, so its jackets on for a while and then we start to steam inside them as we work hard, digging holes and ramming in the poles, lifting beams and climbing ladders, so then it’s jackets off until the rain comes back again. We are cold and damp by the end of the weekend, all our clothes are saturated with either sweat or rain. We finish off the shed by screwing the wall sheets on the outside, while the rain trickles off the new roof down our necks. We just happen to be working directly below the drip line. Who designed this thing?

IMG_3888  IMG_3913

To make it worse, by the end of the weekend, with us two tramping about in the rain, all the ground is mushed up into a slippery slide quagmire. We find it hard to keep our balance towards the end. We finally finish in the dark, using the LED focussed torch beam on the battery drills to find the correct places for the last few screws.

IMG_3915

It’s lovely to be able to strip off and have a steaming hot shower heated with our own firewood and the wood fired kitchen stove. We change into a clean set of dry clothes. It’s such a luxury, I’m so lucky to live here. I’m suddenly thinking of Syrian refugees transmigrating across Europe from one country to another. displaced by war and nobody wants them. They have no hot showers or warm house. I really am so lucky to be here.  The Lovely has got the fires going and the house is toasty and warm. We enjoy an amazing bowl of Janine’s warming ossobuco and a glass of red wine. We are all ready for an early bed.

IMG_3892

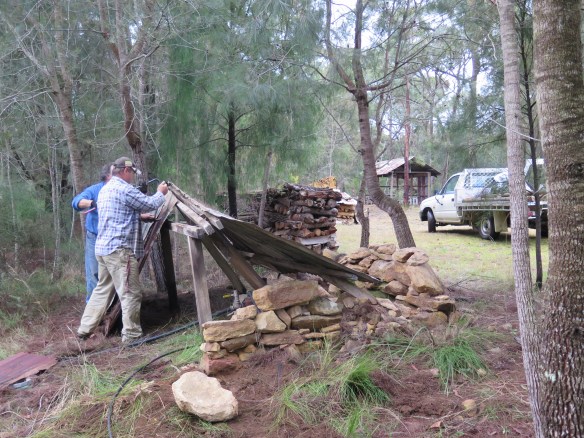
The next day it’s the pump house on the dam bank. It has been there keeping the rain off the old electric pump for 40 years now. I built it out of scrap everything on a zero budget in 1976 when we first arrived here with few prospects and no money, with a double mortgage to support. I built that first shed out of scrounged material. It was rough as guts, just designed to last a short while until I could get around to building a ‘proper’ one. It’s finally falling over and the posts have rotted off at ground level and the dry stone wall is slowly pushing it over with the unbalanced weight of the moving stones. We demolish it in a few minutes and find that the eucalupt hard wood timbers from above ground, are still in excellent condition, even though they were salvaged 2nd hand 40 years ago. So is the roofing iron for that matter. It was worn out and rusty, and dumped at the local tip back in 1976, where there was no supervision at the dump. I saw it there abandoned, all bent and rusty looking. It went onto the roof the next week and has been there ever since. It’s still all bent and buggered, but no more rusty than it was and is still OK for re-use.

IMG_3896

I check out what we have to work with and everything is in good nik, except the hard wood poles in the ground that have rotted off, broken and are falling over. I get 4 poles that  have been re-cycled from grape-vine trellises. We remake the old shed just as it was, but just a bit higher, using the taller poles. I need to put walls on this little shed, to keep the  rain off the electric pump, but that can wait. I put a plastic tarp over it for now. It may end up lasting another 40 years? Temporary things have a habit of doing that around here.

We discover through necessity, that it is OK to use electric power tools in the rain if you put them inside a plastic bag, with just the chuck sticking out. It works really well.

IMG_3903 IMG_3901

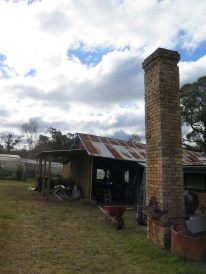
The next job is the  verandah on the kiln shed to store the kiln wood when I have both a planned firing weekend and a new kiln job on the go in the kiln shed. There isn’t really room for both very comfortably. So we add an extension to the shed very quickly in just one day using what we have. A lot of 2nd hand timber and roofing iron. The common denominator for all the sheds is new poles in the ground. This time around I’m using ‘green treated’ poles to deter the white ants and the damp soil rot. Almost everything else is recycled. I have even found a bucket of pre-loved roofing screws, that I have salvaged from somewhere. It was so long ago, that I can’t even remember collecting, sorting and cleaning them. But there they are in my salvaged screws and bolts section of the shed, just waiting  to be called on for a second life.

IMG_3916

I have no idea how much it would cost to pay to have all this work done. Obviously, quite a lot. Even the cost of materials would be excessive, never mind the labour cost. I’ve made all my own galvanised steel plate ‘triple-grip’ hardware fasteners. I have all the machines in the kiln factory sitting waiting to be used. We knock out a few hundred of these home-made brackets and then get to work framing the sheds. Everything is held together with roofing ‘TEK’ screws and these steel brackets. It makes for a very quick and seriously strong series of joints.

All of the 100mm. x 75mm. (4×3″) hardwood timber used in the roof trusses was salvaged from the old pottery tank stand. It stood out in the weather for over 30 years with a 13,500 litre (3,000 gallon) galvanised water tank on it, until the tank rusted out. Now it has been de-nailed and cleaned up and has found a new lease of life as roof trusses. I’m amazed how good the local hardwood from Mr. Blatch’s Mittagong saw mill was. It just doesn’t rot. I’ve bought hardwood since, obtained from down the coast, that only lasted 4 years out in the weather, before it rotted. It was largely sap wood. Very disappointing. I re-cycle all the large size 2.4m. x 1.2 m. (8′ x 4′) pallets that the stainless steel sheeting used in the kiln factory comes on. I use this wood for all the knee braces inside. It’s a very valuable resource, and much too good to burn.

IMG_3917

We clad each of these three sheds with recycled galvanised iron that we have been given or scrounged over the years. I never turn down a pile of old roofing iron if it is offered. You never know when you might need it. Today we do need it and we manage to work our way through half of our reserve stack. It’s a great feeling to make very good use of someone else’s cast-offs. Giving them a new useful life, forestalling waste and avoiding earning a lot of extra money to buy these otherwise very expensive building products. I’m so pleased to be able to live this thrifty life of re-imagined waste.

Recycled wood, recycled roofing iron, recycled bolts and screws. It’s a triumph of frugality and re-purposing. I’m very proud of it all. These new old sheds have some of that hard to describe special quality of wabi/sabi. The old, lonely, quiet, rusty, well used, weathered quality of use and nostalgia.

A shiny new, zincalume clad, metal framed, mecano-set-style, farm shed, just wouldn’t do here. It wouldn’t fit in. I love the patina of age of these re-cycled building materials and constructing my sheds so that they have this special ‘weathered’ quality is important to me. They look just right in this setting that we are creating here.

I’m tired now. Actually, I’m a bit wabi/sabi myself – I’m old, well-used, rusted out and weathered, but otherwise very pleased.

Now for a big sleep.

The simple pleasure of a dull job

It’s that time of year again. I need to make some more wadding for packing the kilns. Making wadding isn’t fun. It isn’t even interesting really. If truth be told, it’s a rather dull job. It just has to be done. So, to make it as bearable as possible, I make it up in a monster size batch, so that the pain is all in one go and then there is the relief of knowing that it won’t need to be done again for another year.

Wadding is used to seperate the pots from the kiln shelves and the kiln props from the kiln shelves. It has to be refractory and remain crumbly and friable after being fired to stoneware temperatures, so that it can be removed easily, even allowing for the deposition of the fluxing effect of wood ash during the firing.

I make it up in big batches of 120 to 150 kilos. Every wood-firer has their own ‘secret’ recipe. I don’t have any secrets. They’re all up here on this blog. Some potters use various mixtures of silica and clay, but I don’t want to use fine silica dust anywhere if  I can help it, because of the risks of silicosis. Others use alumina powder and clay, which is very refractory, but expensive and in my opinion it is overkill. There is too much of an embedded energy debt tied up in aluminium and alumina processing. It takes massive quantities of electricity to extract aluminium from bauxite, most of which comes from burning coal, so it is rather unethical to use alumina powder, unless it is absolutely necessary. We use a small amount in shelf wash, but it amounts to just a kilo a year. I can live with that.  The other thing that I really dislike about alumina in wadding is that unless you are particularly careful, you end up putting stark white finger prints on the pots that are being packed after handling the wadding. You really have to wash your hands after every time you touch the stuff.

IMG_3862

I have decided to make this batch of wadding out of ‘fat’ sand. Fat sand is also called ‘bush sand’,  ‘brickies sand’ or ‘bush loam’. It’s a coarse quartz sand with a fair amount of clay in it. It also contains some limonite or hydrated iron oxide, so it looks a bit yellowish. I mix this with some powdered kaolin. This is a great use for powdered kaolin. I don’t use a lot of it, but is is very useful for this purpose. I mix it in the ratio of one 25kg bag of kaolin to 4.5 buckets of damp washed sand and one bucket of water. When I can get clean saw dust I also add two buckets of saw dust, but this is getting harder to find these days. The last time I visited the local timber yard, they had been cutting some synthetic wood products that were a rich canary yellow. This stuff looked like it was loaded with resin glue. I thought that it might be particularly toxic if it were burnt in the kiln as wadding. So I didn’t collect any.  So, this batch of wadding is just going to be sand and clay.

IMG_3867

Adding saw dust is great for wadding that use on new pots that are once fired, as it can leave an interesting charcoal grey to black shadow mark. It doesn’t work on bisque, only once fired work.

When it is freshly made wadding like this is rather short or non-plastic, being so sandy, but after ageing for a few months it develops quite good plasticity and after a year or so, the last few bags are plastic enough to throw with. Not that you would want to, but I think that it might be possible. I’m down to my last bag of the old batch now and it is very easily worked into coils and small balls. This new batch will have a month or two before I need to use it.

IMG_3870

I make it up in a couple of batches in the dough mixer and then bag it up into 15 kg packs and store it away.

Security is a years supply of wadding.  Now, when I look down on my stash of wadding I get the simple pleasure of knowing that I won’t have to do this job again for another 12 months. It’s a nice feeling!

fond regards from the well wadded potter.


After the flood

The rain has eased off and we can go out and check the damage. We have had 350 mm. of rain in 36 hours. the rain gauge was over-flowing one morning, so we don’t know how much we lost. That has never happened before. We have emptied 350 mm out of it, so perhaps there was another 50 mm that we missed measuring? That’s about 14″ in the old imperial measure. It was certainly a very heavy and prolonged rain storm.

IMG_3819

We go out to survey the damage. Not too much thankfully. Just a  few small trees blown over or snapped off. We sprang a few more previously undiagnosed leaks in our 123 year old tin roof, but I can fix those. I always do, I’m used to it. There is a lot of maintenance in owning a hundred+ year old house. I just don’t know where the leaks are going to be in advance. I have to wait for the big storms to be able to find them. So, we sat through the evening with buckets on the floor, dripping and ‘plonking’ away.

Out side everything is still seeping, teeming, running, gushing. Everywhere you look, the ground is so saturated and oozing water. All 4 of our dams are full and overflowing. As I walk around, I make a mental note of all the jobs that will need doing. The kiln shed is a tragic mess. The water has forced itself up and out of the floor in one corner where the shed is cut back into the hill. The new spring has flowed straight through the middle of the  building, washing away all the small items that were left on the floor and making a trail of patterned tidal sand ridges and depressions like you see in the sand beds of creeks.Now a day or two later, everything is starting to turn green with a mossy/lichen sort of growth. The kiln shed has an earth floor with ceramic paving. It’ll take months of dry warm weather to evaporate all this water from the floor. That is once the earth has stopped seeping.

IMG_3821

I walk down along the old lane it has been swept, or rinsed, clean of loose brush and other light materials. All swept away. The water from our big dam higher up overflows down along here. It looks really peaceful and beautiful here now after the event. The grass and undergrowth has all been swept over and ‘combed’ by the torrent. there is still a steady stream of water 100 mm. deep flowing down along here. It’s hard to believe that this was once the main East/West artery for the village. It’s particularly beautiful, right here, right now. I’m brought back from the moment into another reality. My feet are wet from standing in the water and it’s cold. I chose to wear sandals for this walk, as I knew that it would be too wet down here for shoes.

All the dams are brimming full and over-flowing. It’s a very nice sight and it only ever happens like this once every decade. We are so lucky to have put in all this ground work and infrastructure over the past 40+ years. If everything all goes to some sort of plan, like it has in the past, we will have water now for at least another year and possibly two.

The dams don’t stay full for long as seepage and evaporation steadily take their toll. That is why we have paid extra money to have all the top soil from the dam sites kept and then returned to the tops of the dam banks instead of the usual practice of burying it under the wall. The top soil allows the native bush to re-seed into the bank and grow up into a sort of wind break, as it is the wind passing over the water surface that causes evaporation. If you can slow down the air movement, evaporation is reduced. This seem to have worked well for us over the years. Our dams are all now enclosed in native bush and not sticking out like scars on the landscape. We are so lucky and I am grateful.

IMG_3836