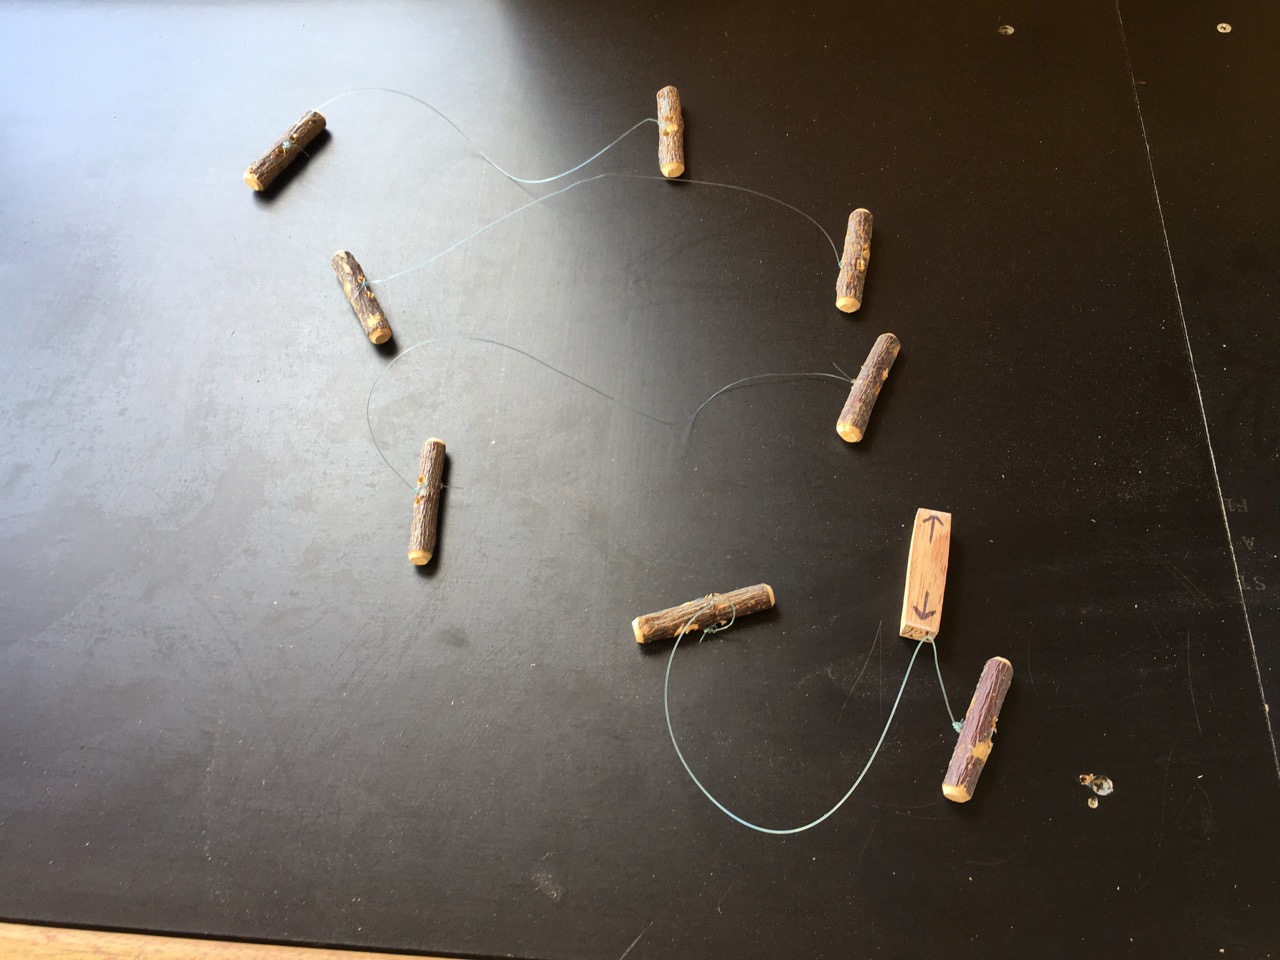
We are finally back at work.We have finally got off our lazy bottoms and are back at work on the wheel – albeit only after a long morning pause while we made cutting wires and I carved us each a name stamp.
I started by making a few chucks. These are clay tools used to support pots while they are being trimmed and need to be made first so that they dry out to be stiff enough to support the pots when they are trimmed. I have learnt to keep my chucks damp, wrapped up in plastic and dunked in water after each use, so that they last for several years, kept constantly in a firm but damp state. Janine started her day by making door knobs for the cupboards in the gallery room.
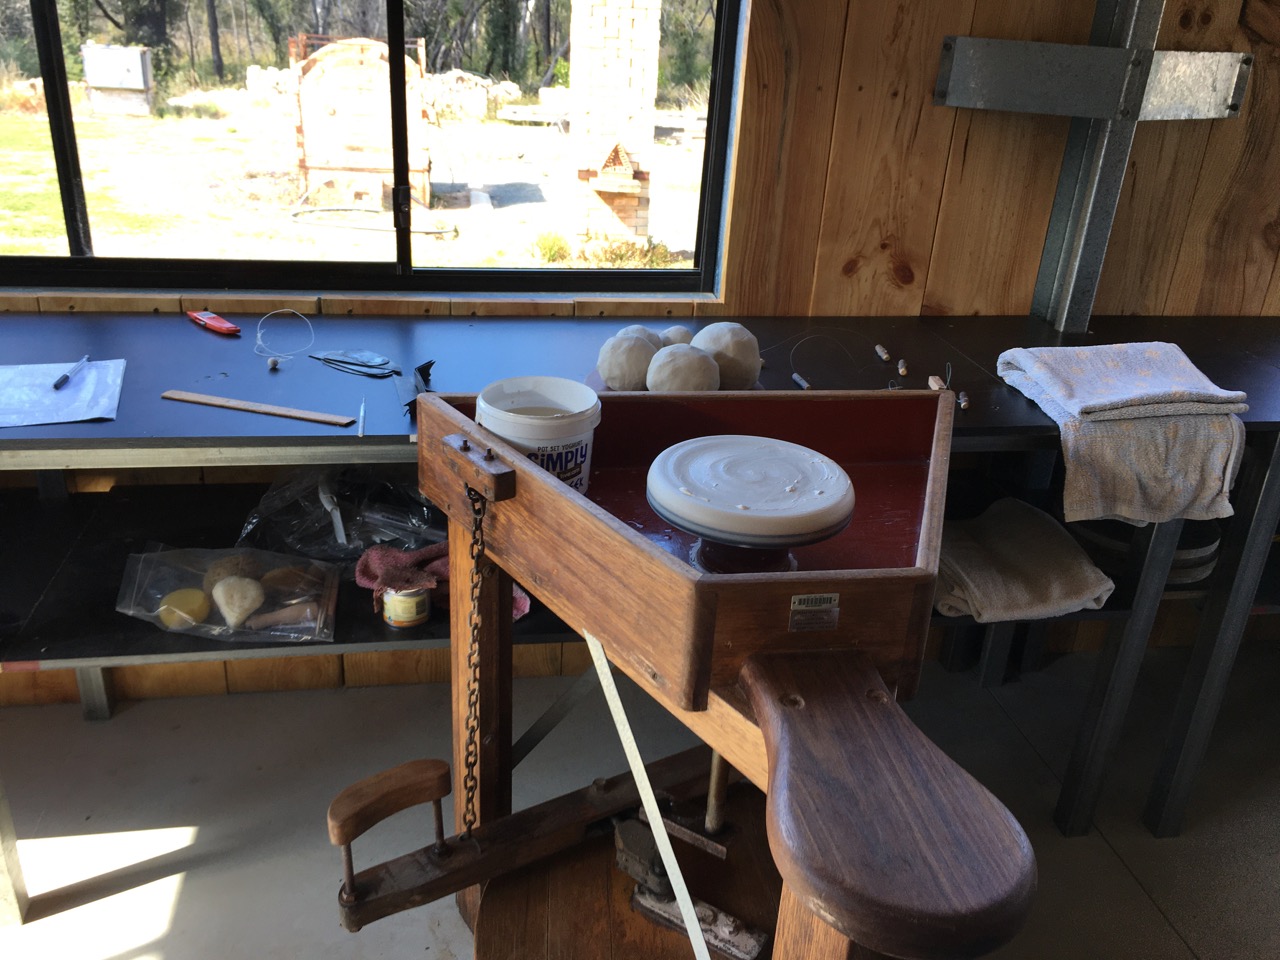
The batch of clay that we made a month ago is working OK. It’s a little soft, but easy on the wrists because of it. I started out using the hand-me-down wooden ‘Leach’ kick wheel, which has always been my favourite style of wheel. but this one is completely worn out. it creaks in all the joints – like me, and needs new bearings, as someone filled the entire tray with water till it over flowed down the inside and poured through the top bearing , filling it with clay dust. I’ve tried twice to get the wheel head off, so that i can replace the bearing, but it stubbornly refuses to budge. I have owned 6 of these wheels in my career, all 2nd hand, and have replace bearings in some of them. I have found that there have been 3 different methods of attaching the wheel head over time. They appeared to have changed the design to make manufacturing cheaper. The earlier models had the wheel head screwed on with a large format thread cut onto the shaft and wheel head, the second method involved a ’T’ section fitting with a pin through the head and shaft, and the last one was just a simple ‘Morse’ taper that relied on friction.
I’ve tried tapping up and twisting sideways, but this one is very stubborn. The frame was so loose and wobbly that i went down to the ‘spare parts’ pile and found some heavy gauge gal strapping and made a series of diagonal bracings for the creaky wooden frame. That stiffened it up, but it still growls.I gave up on it for the time being, as today was all about throwing some pots. I migrated over to the Shimpo wheel that was a gift from Len Smith. What a wonder this wheel is! completely silent and totally smooth. this is my new wheel of choice now.I need to make a proper stool that is the right height for me. So many jobs still to do!
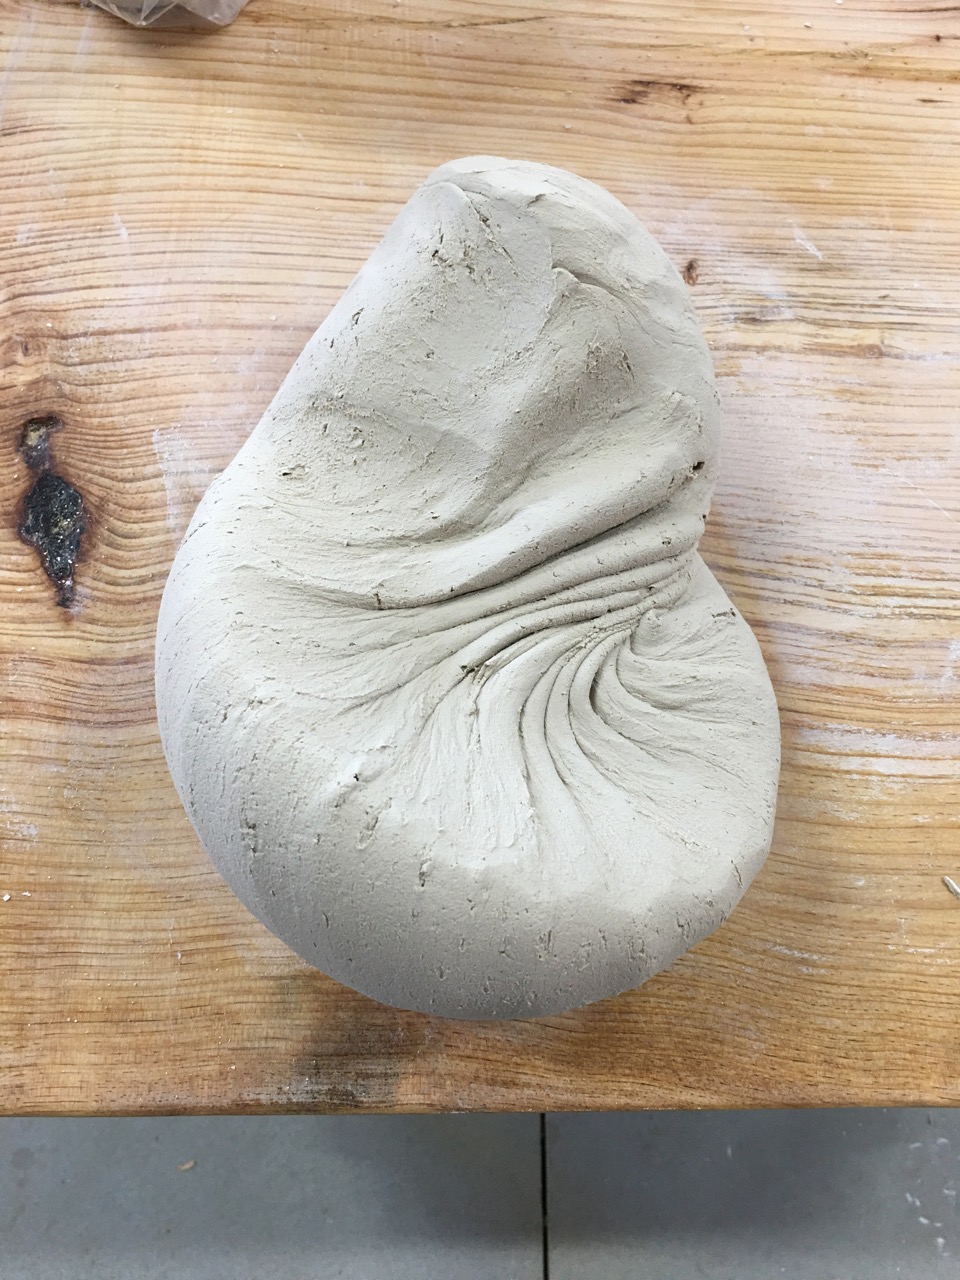
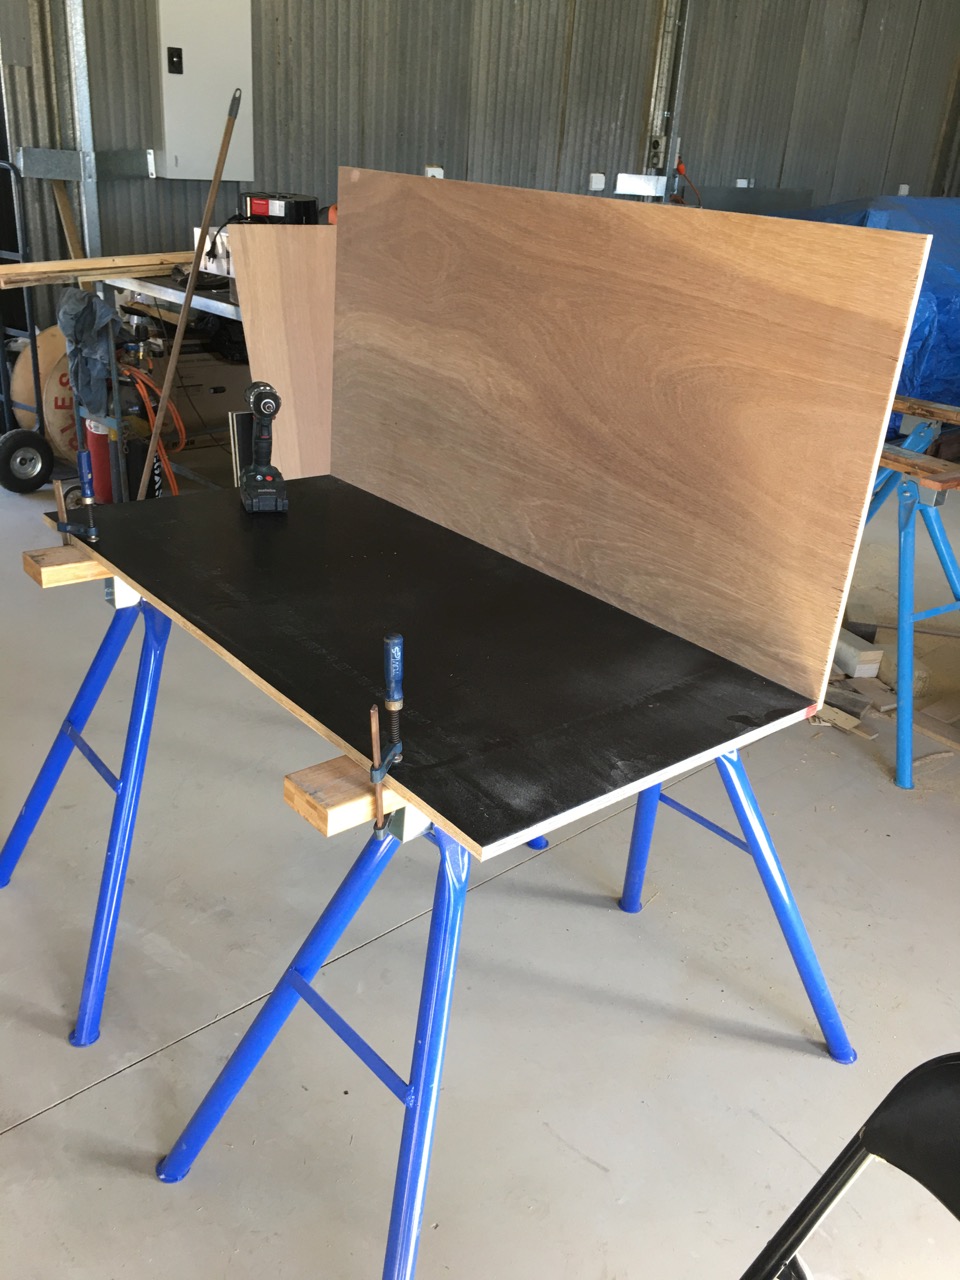
I have become so used to using beautiful clay straight from the Venco vacuum pug mill, that i had forgotten how long it takes to prepare clay from scratch by spiral kneading. It takes ages to get all the air out! But at least the new timber wedging bench is just the right height.
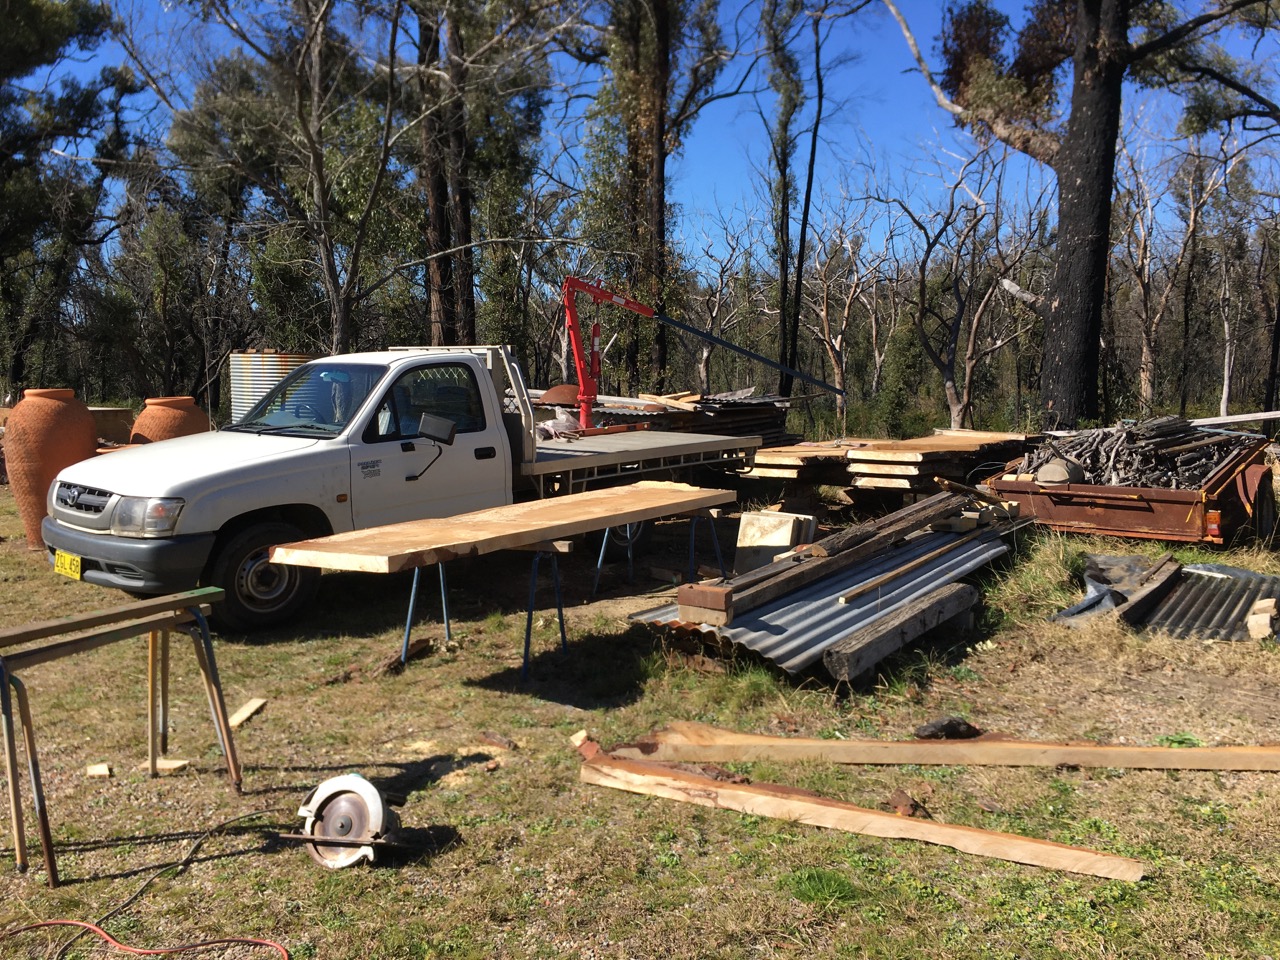
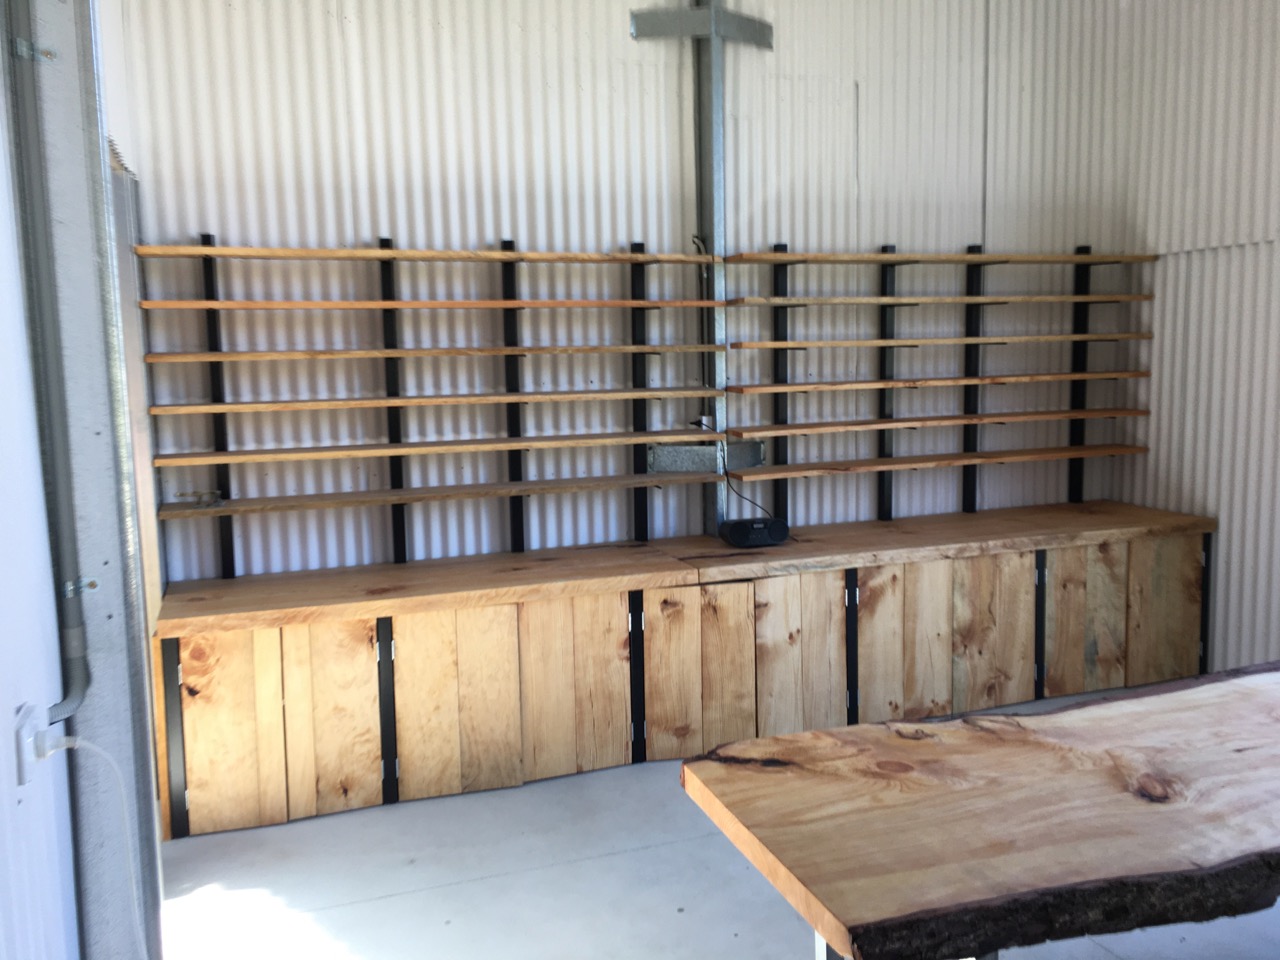
This last week, we have been working on getting the gallery room finished. This is the last big dirty job to get out of the way. Once this is done we can really start to clean the place up and get ready to make some pots. There is of course loads of other jobs to complete before we can fire anything, but they can wait. They will get done in good time while our first pots are drying.Some of these other jobs will include getting the kilns ready for firing. However, in the meantime we have cut the huge pine slabs that we milled 20 months ago. I have sawn them into rectangular planks 3 metres long and 750 mm wide and 80mm thick. Not too many people can afford to use timber like this in their gallery. We can’t! It would be completely out of our reach if we had to buy it.
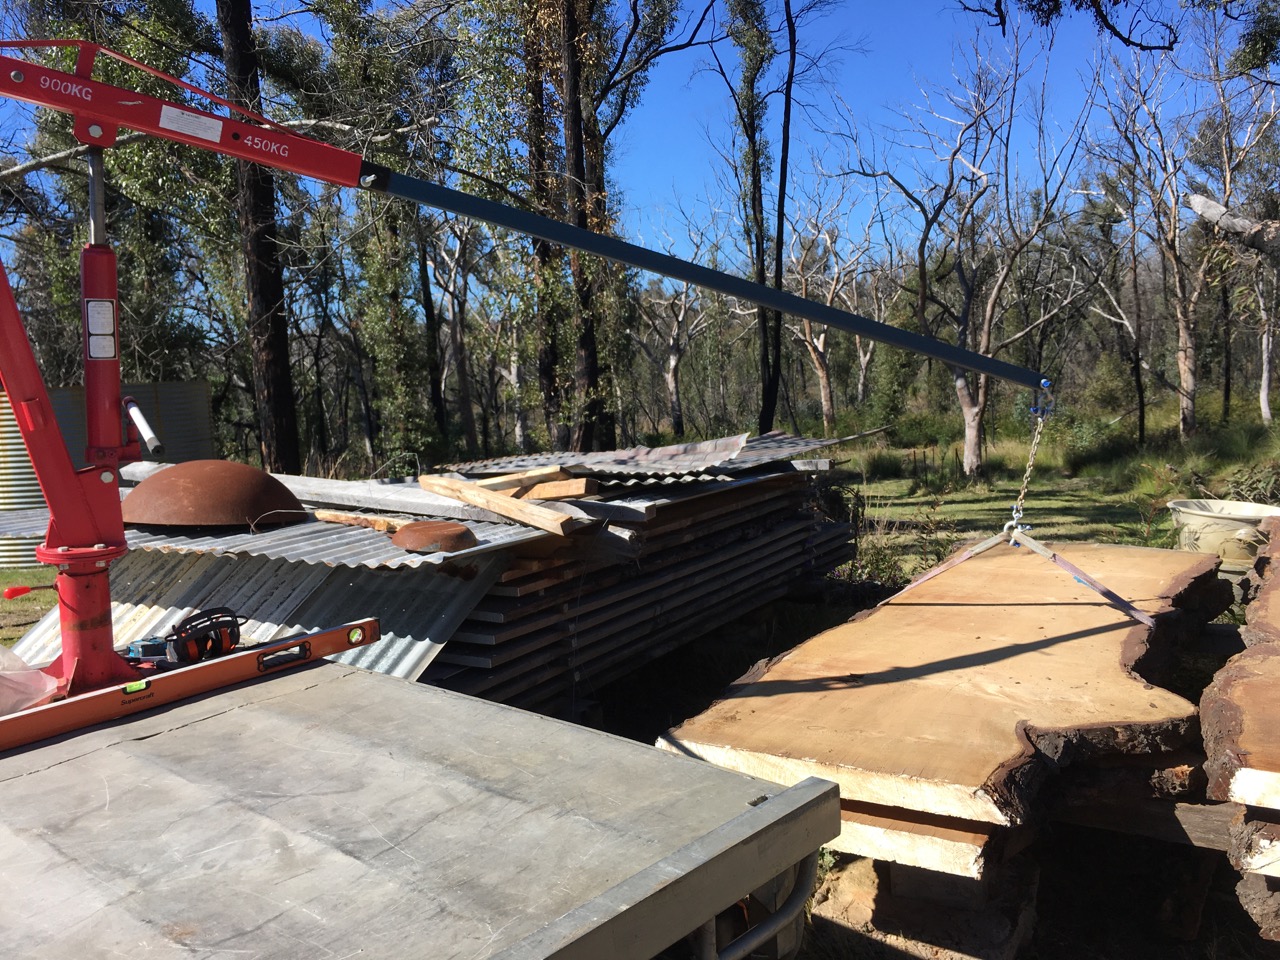
We can only do this because we grew the trees our selves. We got the dead pine trees that were killed by the fire, felled professionally, as they were right up against the house. We then hired a portable saw mill to cut them up into big slabs for bench tops and planks for lining boards. They have been seasoning for the past 18 months. I had to build an extension bar for my small hand pumped hydraulic crane on the truck. An extension of 3 metres is a bit far, but it worked quite well. I took the first lift very slowly to test that it wouldn’t bend under the load. A few weeks ago, I had a friend come and help me lift and shift these massive slabs onto the ute. But we are now in total COVID 19 lock down statewide, so another solution had to be devised. This way, I can do it all myself.
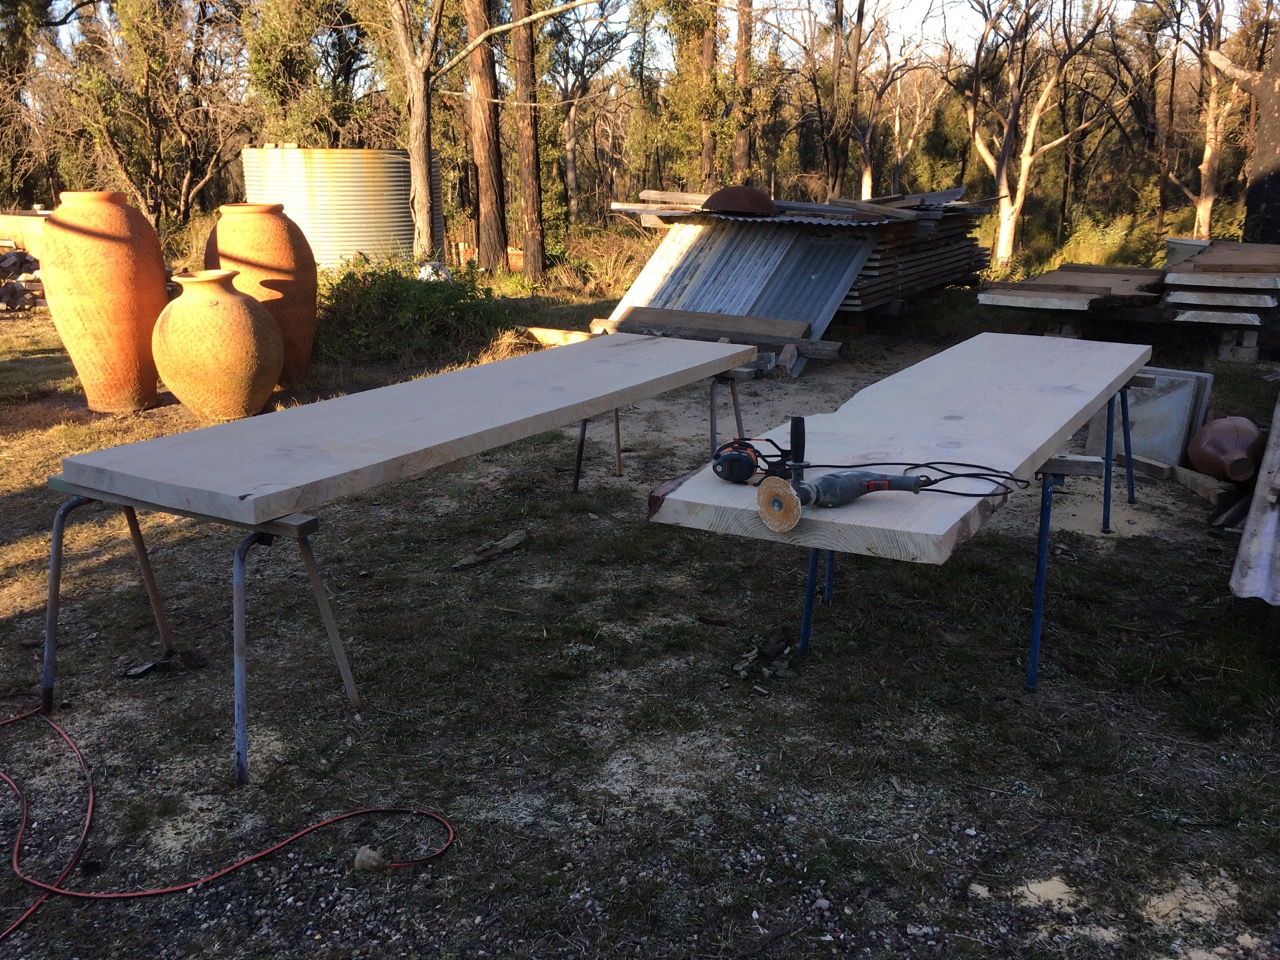
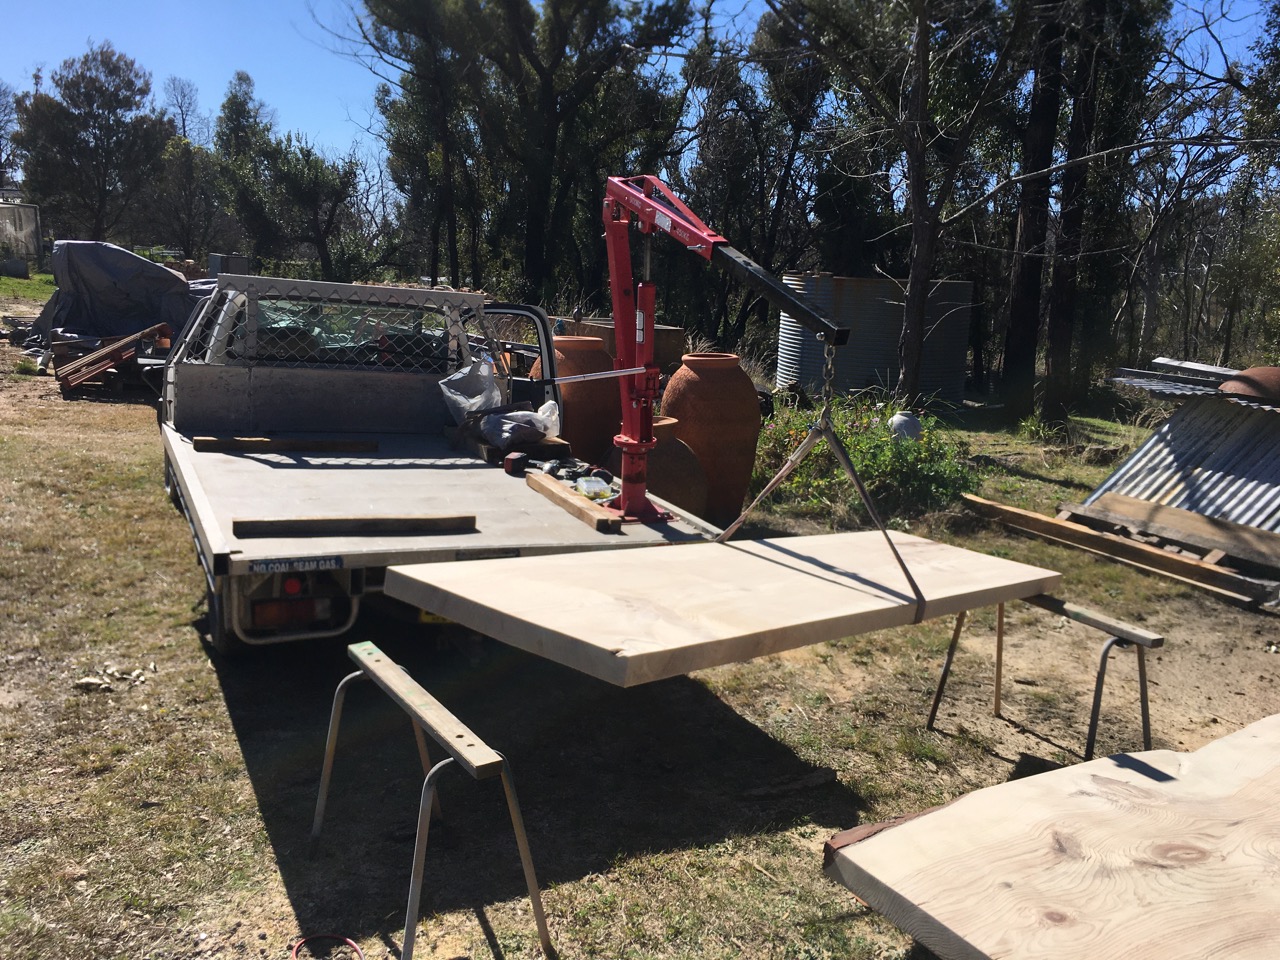
The huge slabs needed to be cut to have parallel sides and squared off ends, then planed, and sanded a few times with ever decreasing grit sizes of 40#, 60#, 80# and 100#, finally washed to raise the grain. After drying, the rough raised grain texture was again sanded with 80# and then 100# to get a fine finish. There are so many hours of work in getting a massive surface like these slabs from a very rugged chain saw finish, to glassy smooth. I’m not a wood worker, so I don’t have access to any large wood working machinery. All this had to be done with hand held tools. I have to thank my very good friend Len Smith for giving me all his Makita power tools. I need 4 big slabs for the bench tops and 24 planks of 2.4 metres to be dressed like this to make the shelving. It’s taken me over a week. Once the slabs were finished, I needed to shorten the crane arm to lift them onto the truck to drive them up to the pottery.
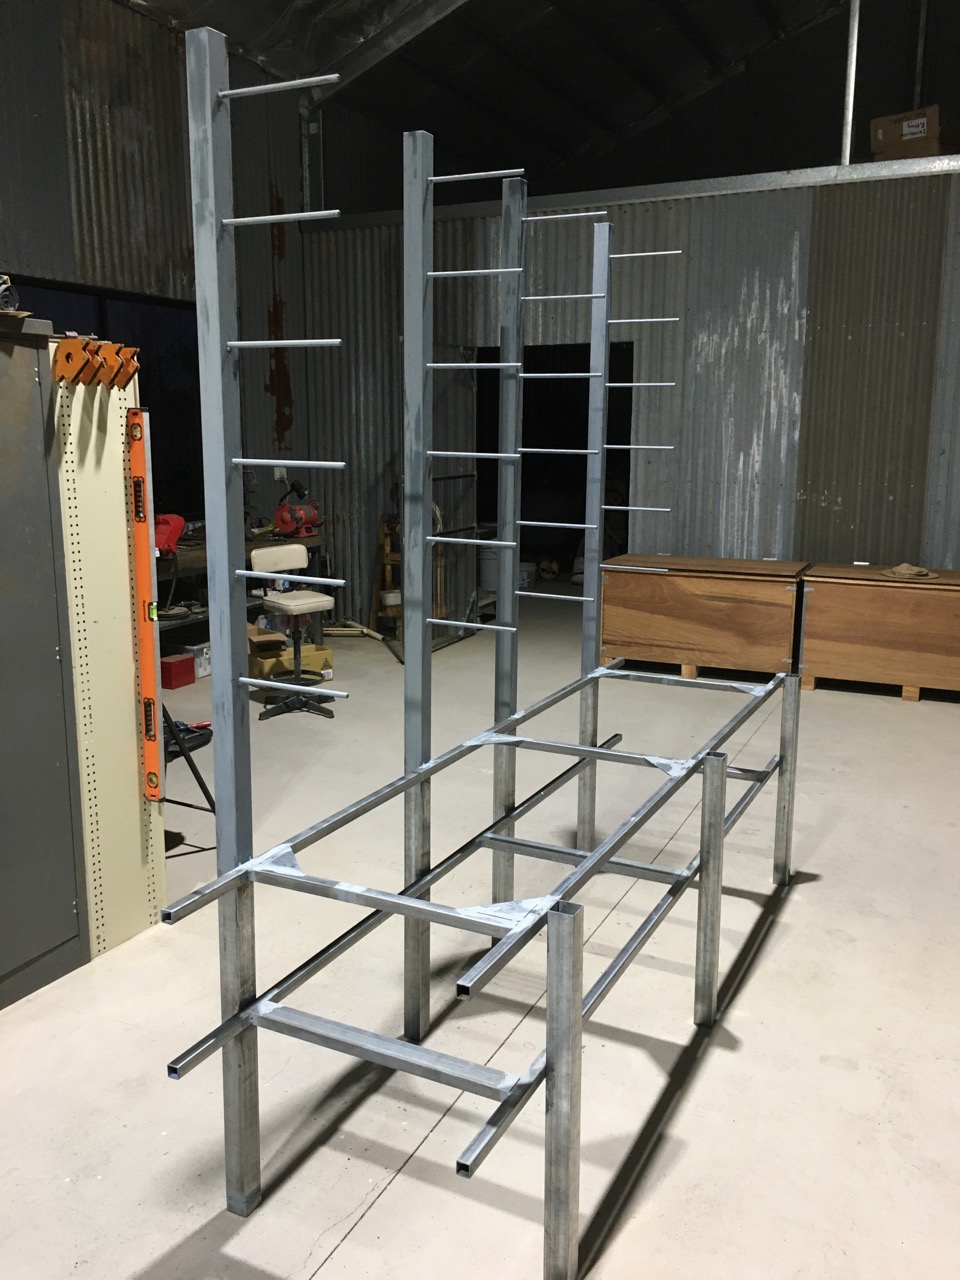
I needed to weld up a suitable steel frame to support all this wood.
We’ve ended up with something that resembles a massive kitchen dresser. One on each side of the room, with another huge slab table in the centre. This gives us plenty of storage space in the cupboards and a lot of flat display space. We spent today sweeping, vacuuming and generally cleaning up all the saw dust that ended up coating everything in the place. That is all now done. This was the last really messy job. We can now relax a bit and look forward to making some creative work.
Tomorrow I will start by making some throwing and turning tools. My first job on the wheel will be to make some clay ‘chucks’ to get them stiffened up so that I can turn my pots once I start to make them.
Work has continued apace this last week or so. I got a little bit of a shock last week when I realised that the earliest nectarine tree in the new orchard had already had the first bud burst. I have been so busy that I hadn’t been spending much time in the new netted stone fruit orchard. I realised that I needed to take a couple of days off working in the pottery to prune all the stone fruit trees in the netted orchard, and then the transplanted almond trees. There is also the cherry orchard too, but it can wait another week, as they won’t have bud burst for another few weeks.
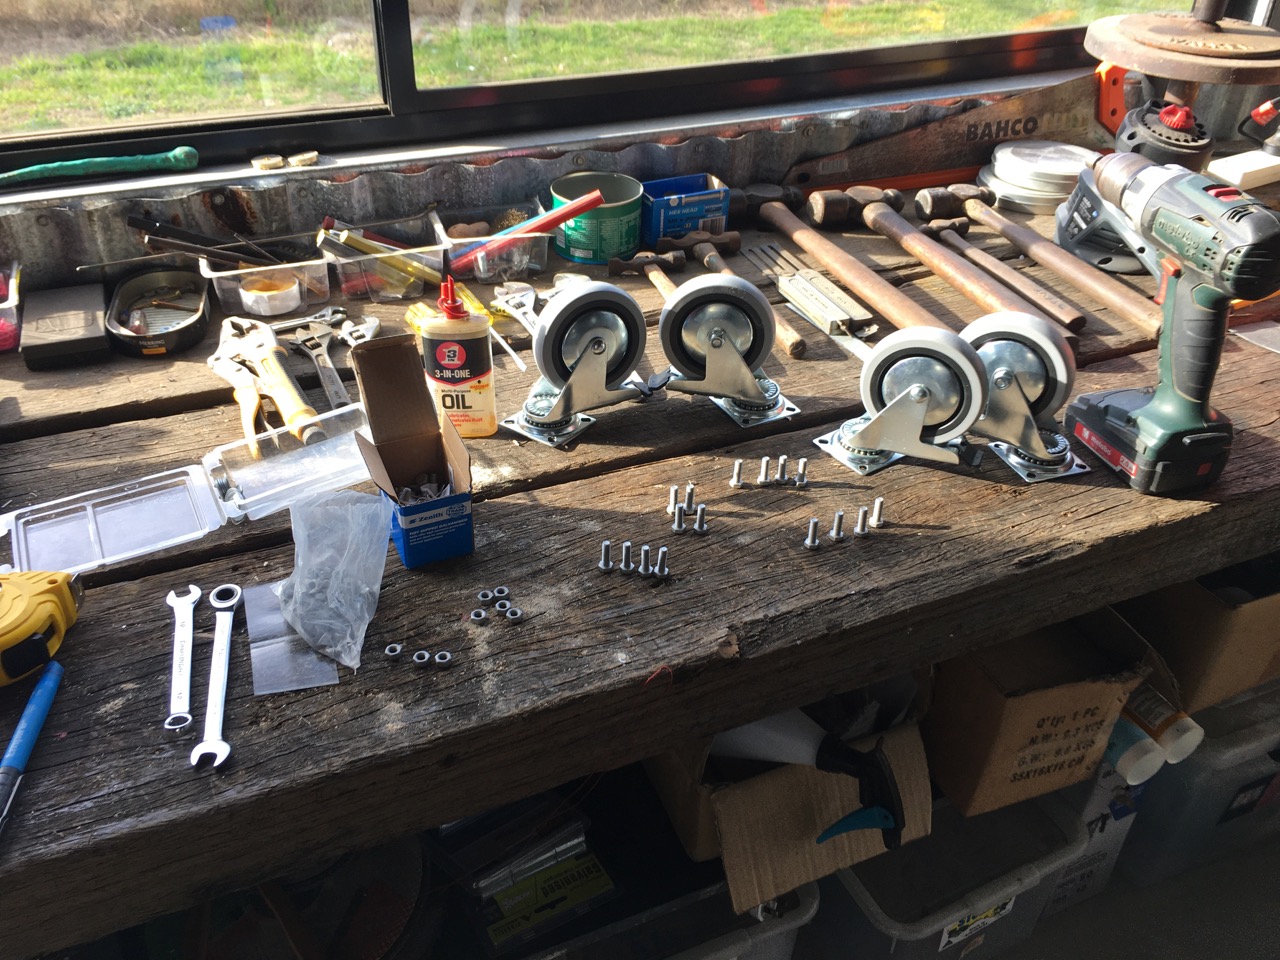
As soon as I completed the pruning, I moved back into the studio to build the tables for the pottery. I welded some steel frames on castors and then mounted some huge home-grown and milled pine wooden slabs on top as the bench top.
My very good friend Len, gave me all his power tools that he wasn’t using. A Planer, sander, drill and circular saw. This has made this part of my job so much easier and faster.
I made a wedging table, a low throwing table for the shimpo wheels, a taller table for display in the gallery and a glazing bench. All on steel frames and castors to allow for easy relocation in the future. Len bought two new Japanese made, Shimpo brand, ‘whisper’, potters wheels for us. I was so moved. That was so amazingly generous! Thank you Len! Len has done so much for us – along with so many others who have passed on spare equipment. We have been so lucky to have such generous friends. One of my past students from the early seventies who had retired from pot making 15 years ago rang me to say that he had got rid of all his pottery equipment, but he had retained his shimpo potters wheel that he bought in the late 60’s. It is an RK2 version. This was the first major purchase that he had made and confirmed his commitment to a life in ceramics and away from his career in the law.
I had an RK1 Shimpo wheel, 1 x RK2 and and 5 x RK2 ‘super’ Potters wheels in the old pottery, but really only used two of them, as we didn’t really teach any throwing classes. But we probably will in the future. As we have a better space for that kind of teaching now in the new improved space. Tony, The Barley Broker, had kept his Shimpo, as it was so dear to him – so much attachment, even though he knew that he would never make pots again, he kept it. The Barley Broker rang me last year to say that he had his Shimpo in a shed and wanted to give it to me. He was finally ready to part with it! It was a big deal for him, but he knew me well and knew that I would both use it and value it – look after it. I hadn’t seen a ‘Volvo’ style, ‘burnt-orange’ 60’s, shimpo before in its original paint job. This wheel is over 50 years old and still goes well. I’m honoured, and I will look after it! We have also been given another old Shimpo that was being de-commissioned by an Art School. It is from the mid 90’s and is over 25 years, it is a ‘Century 21’ ‘metallic traction drive’ version, and still works well.
Len also found Janine a 2nd hand ‘Slatcher’ kick wheel, just like the one that she used to have in the last pottery. I had bought one of these special kick wheels back in 1973. It got burnt in the pottery fire in 1983. I managed to find another one in 1984, and Janine used this wheel for the next 36 years. These hand made kick wheels are extremely rare. Mr. Slatcher didn’t make very many of these wheels, so we are so lucky to find another one. I have always used the Australian made version of the ‘Leach style’ wooden framed, kick operated, potters treadle wheel. I was gifted another 2nd hand ‘Leach’ style wooden kick wheel recently, It was pretty dried out and desiccated. I cleaned it up, washed all the clay off and sanded the rough, dried wood and oiled it back into life.
The bearing are shot, so I will need to spend a bit of time on it to dismantle it and replace the bearings. The frame is pretty creaky, so i will probably add some metal bracing to the frame to strengthen it. I had done this to the last one that I owned.
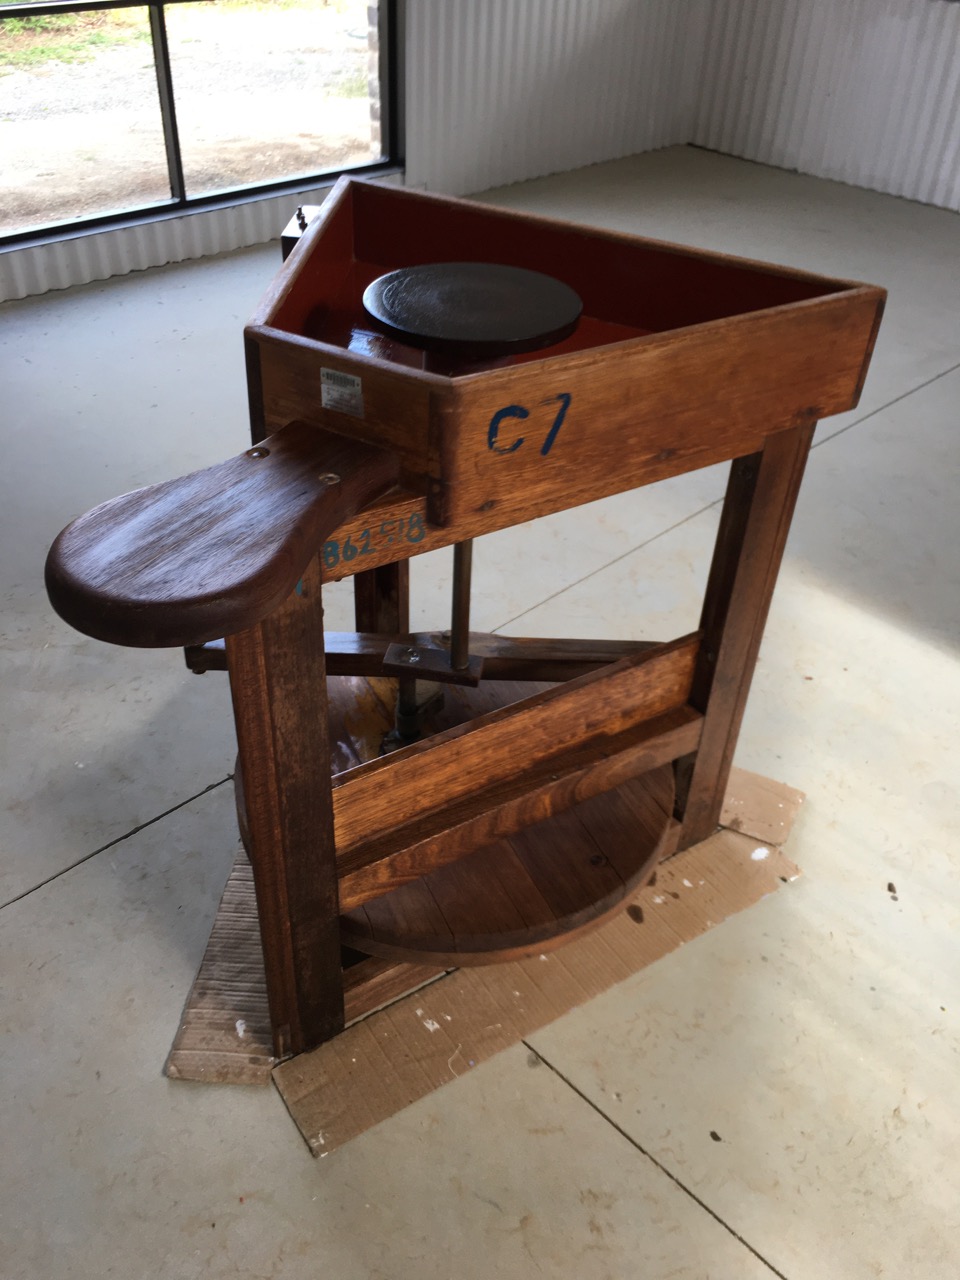
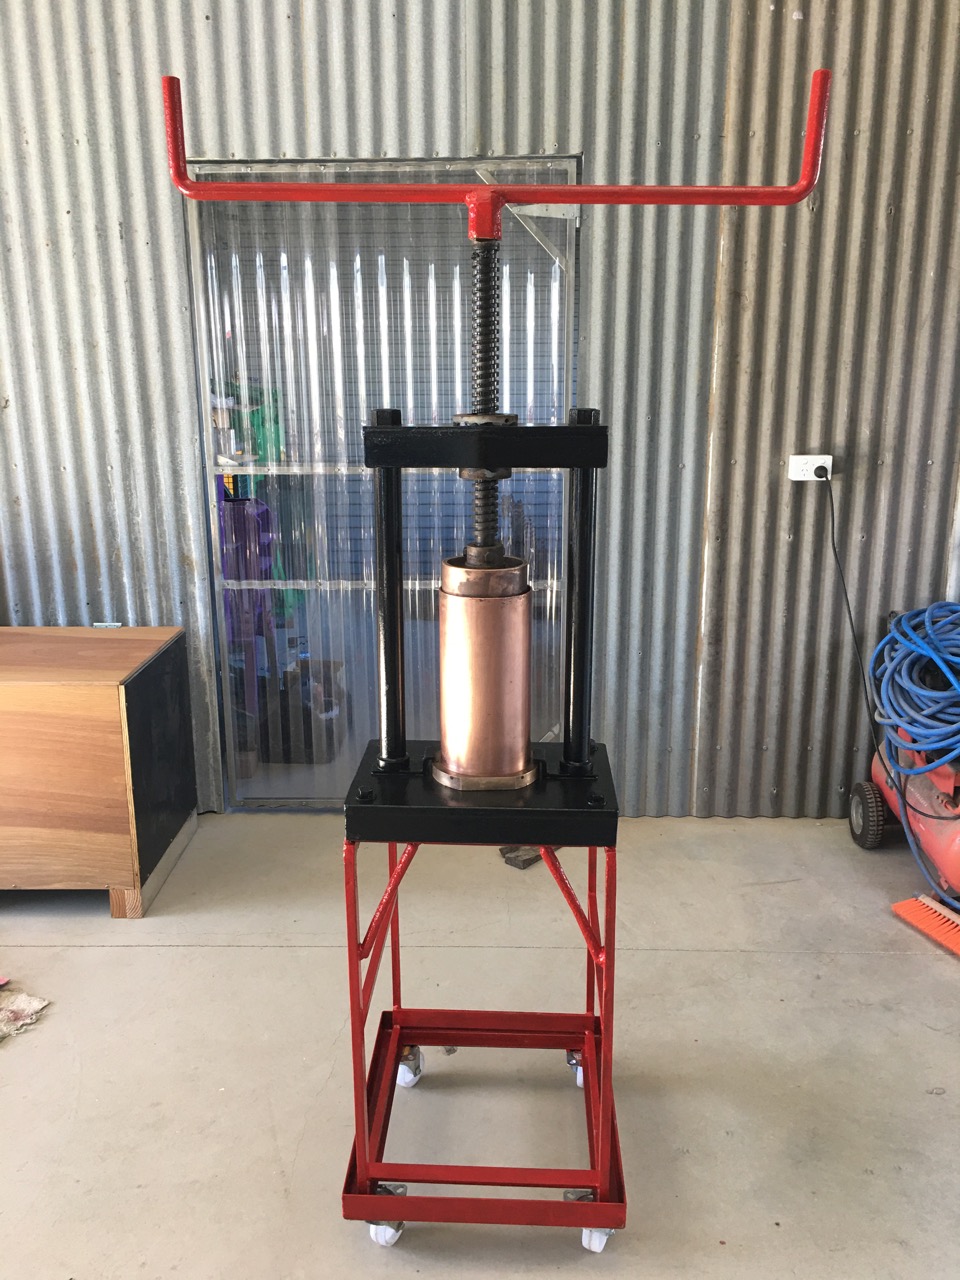
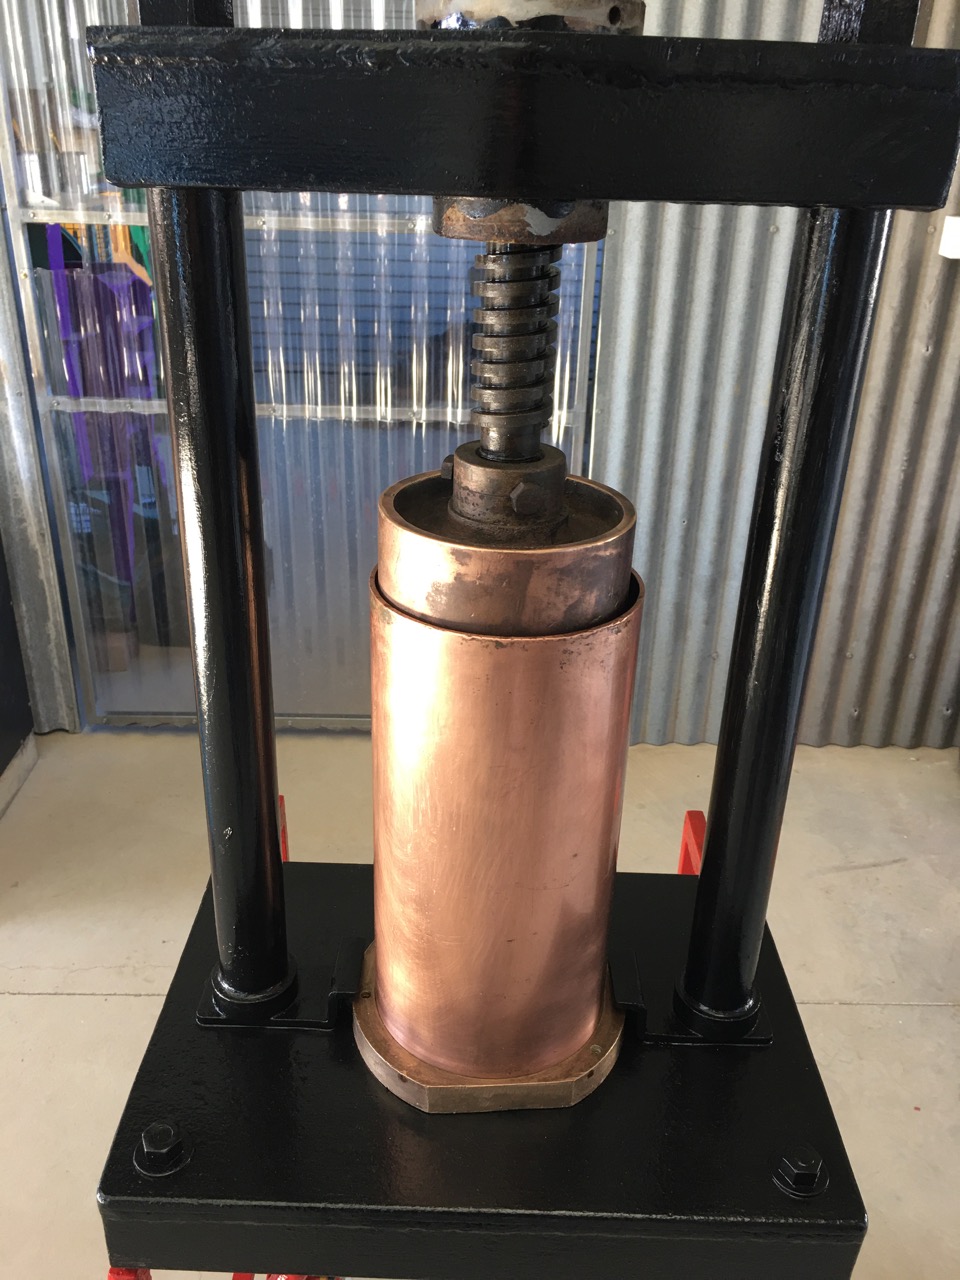
We have been so lucky and grateful to receive all this hand-me-down, passed-on, equipment from so many people. We really appreciate all this generosity. This means that we will be able to get back to work soon and later, to offer some weekend throwing classes sometime in the future. If there are sufficient pottery students who want to come and learn here from what we have to offer. We were also offered some other equipment from our late teachers studio. We were contacted by his widow and were given his old screw press and an old square thread, screw-driven, extruder. They were both worse for wear and needed some attention. I have spent a bit of time in the evenings working on the extruder. It turns out that it is made from an mixture of copper, bronze or brass parts. It’s a beautiful old thing, and an honour to look after it for the next little while.
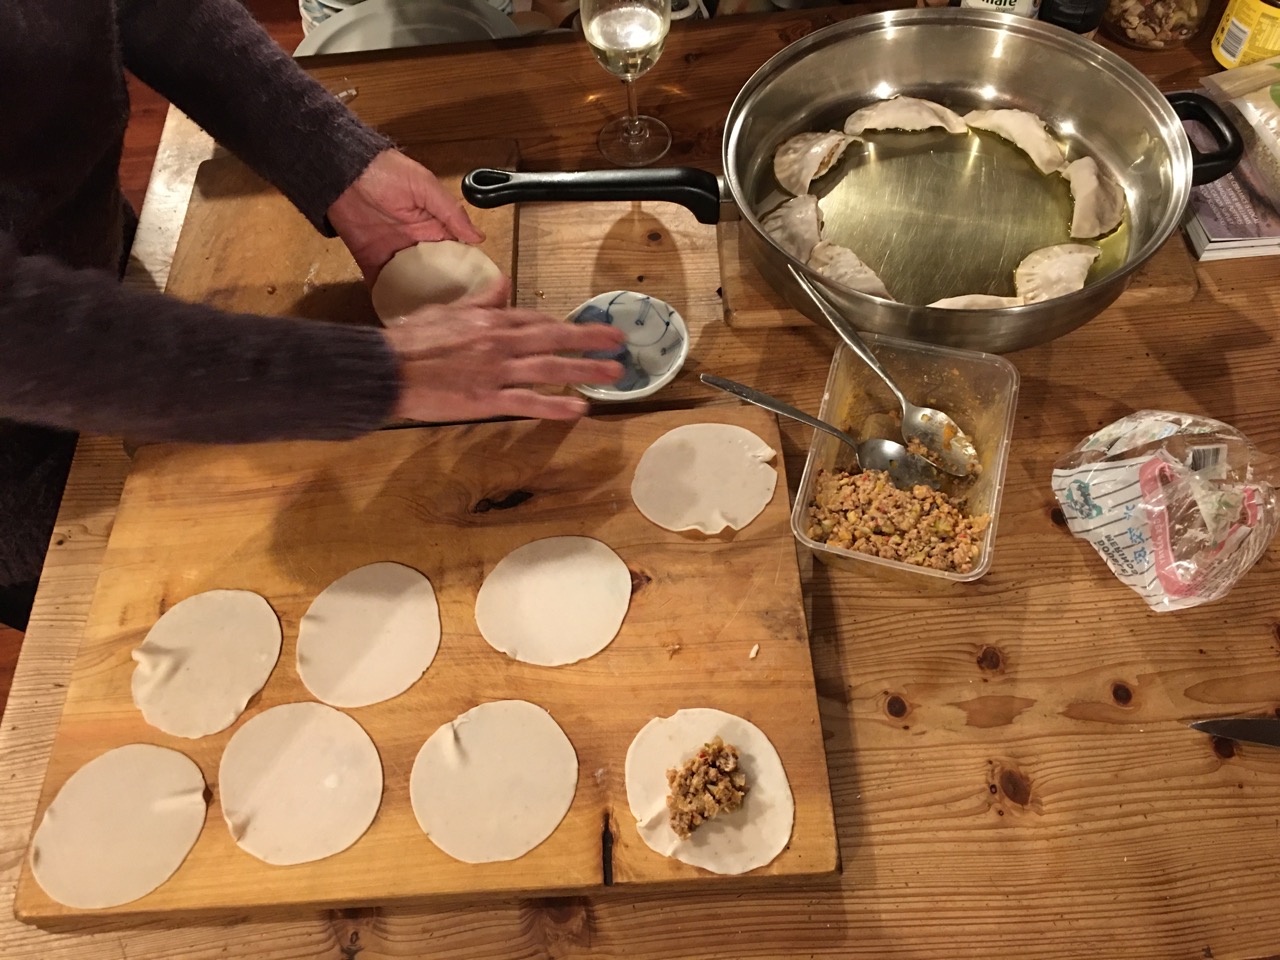
It looks fabulous now. For dinner, we made our own hand made gyoza dumplings, using our own garden produce, carrots, parsnips, onions and a little bit of minced, low-fat, pork.
Thank you to all those people who have helped us get so far.
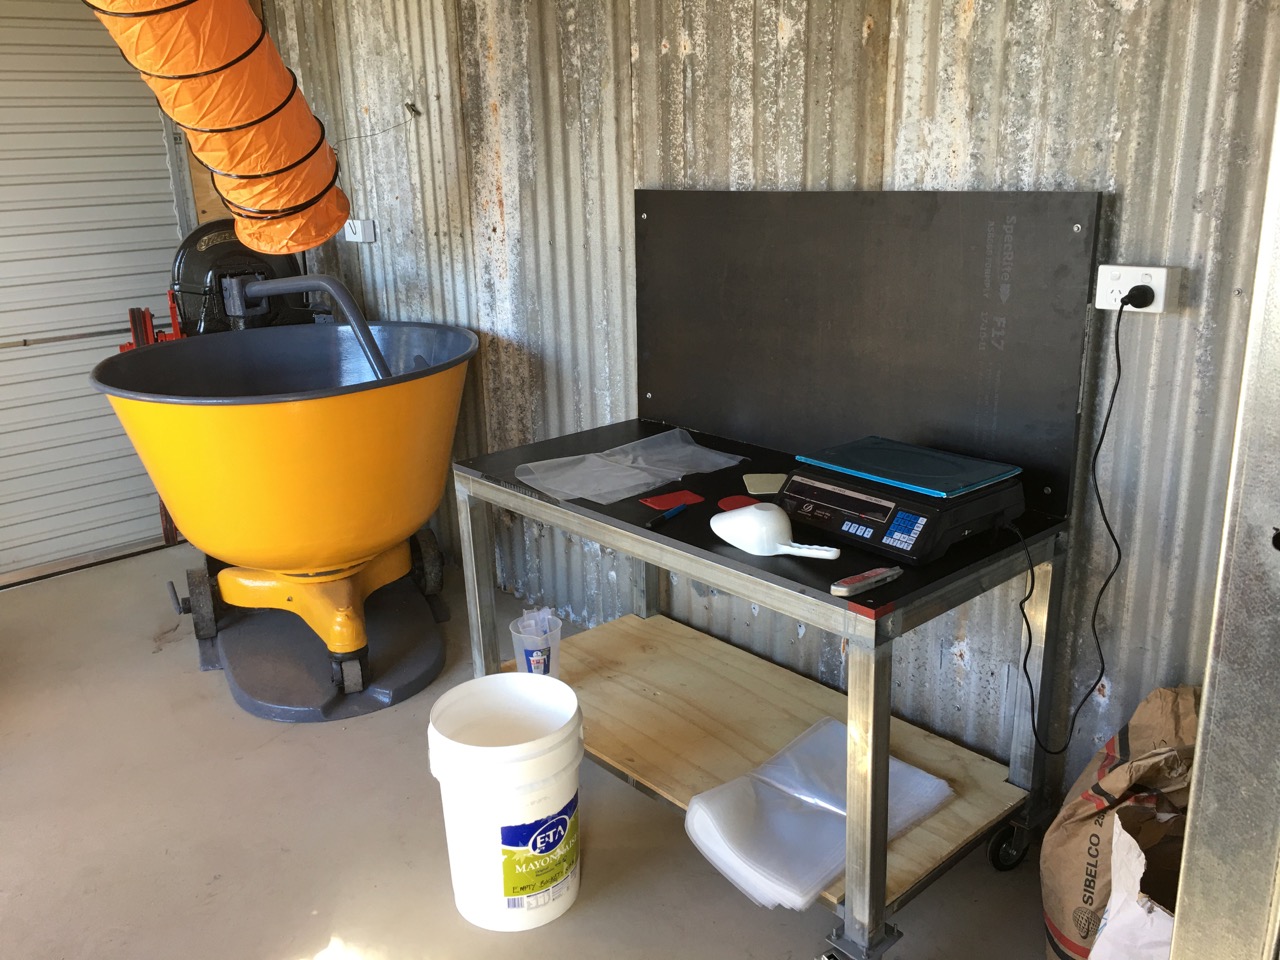
We have our hands in clay again – finally. It’s been 19 months and 3 days since the fire. Today we made our first batch of clay in the new pottery clay making room in the new shed. I spent part of Friday fabricating a wedging bench, because there would be nowhere to work the new batch of clay coming out of the dough mixer into balls and then blocks, before bagging them up, and moving them to the new clay boxes. So I needed a strong bench. Every step has been considered and planned, so I have already built the plastic lined clay boxes. Installed the dust extractor. Rebuilt the dough mixer – for the 2nd time after it was burnt in the pottery fire in 1983 and then again in 2019. Making the wedging/clay prep bench was the last step.
I incorporated a marine ply splash back on my bench, so that in the future, I can stack clay on to the bench quite high prior to pugging, without it falling – that is, once we manage to get a pug mill. We have had one gifted to us, but as we are all in lock down. I can’t get it.We are making clay anyway and bagging it up to age in the new clay box, so that when we get a pug mill, we will vacuum pug it and can use it straight away.
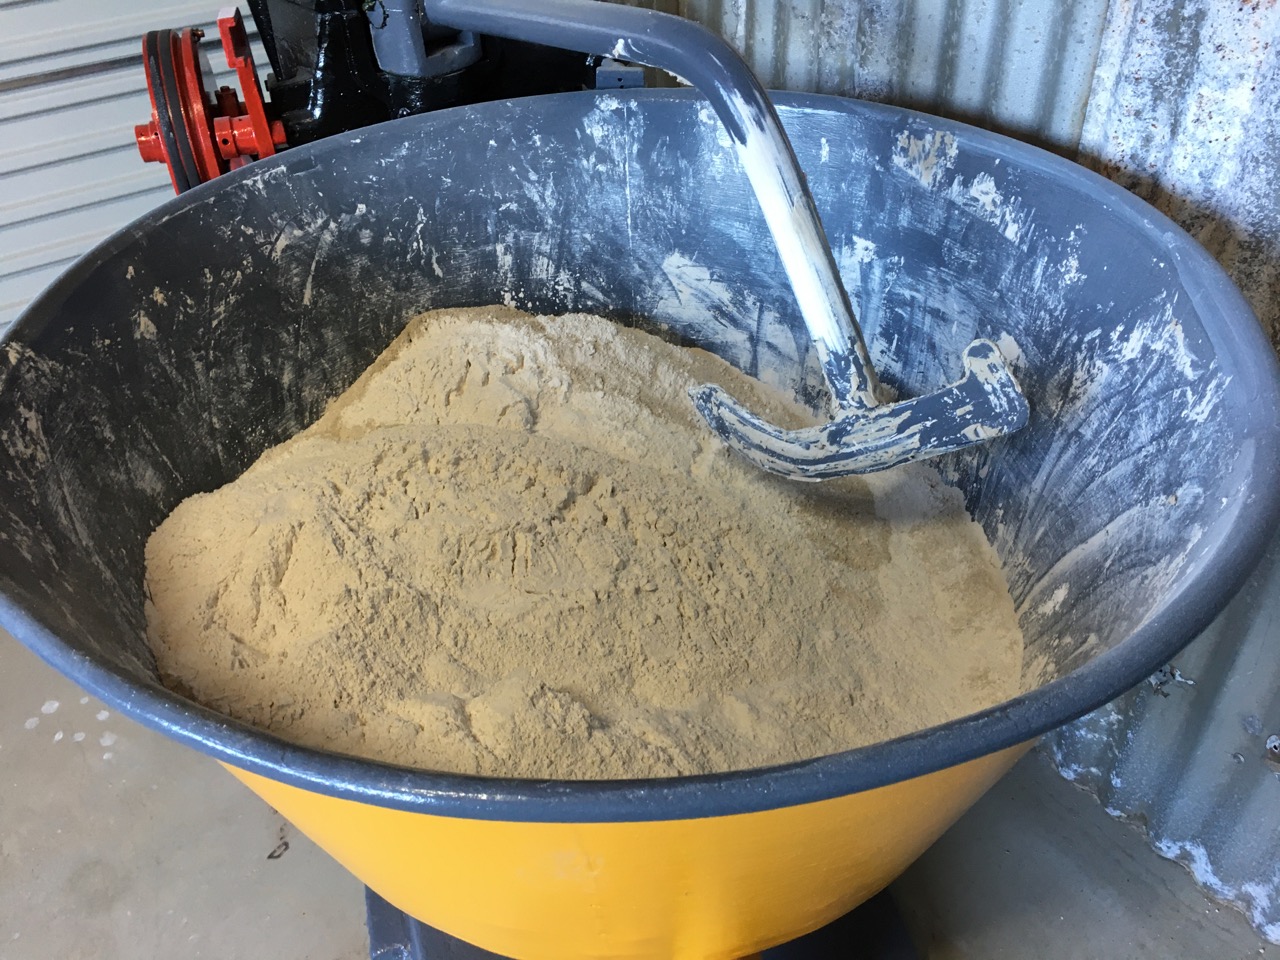
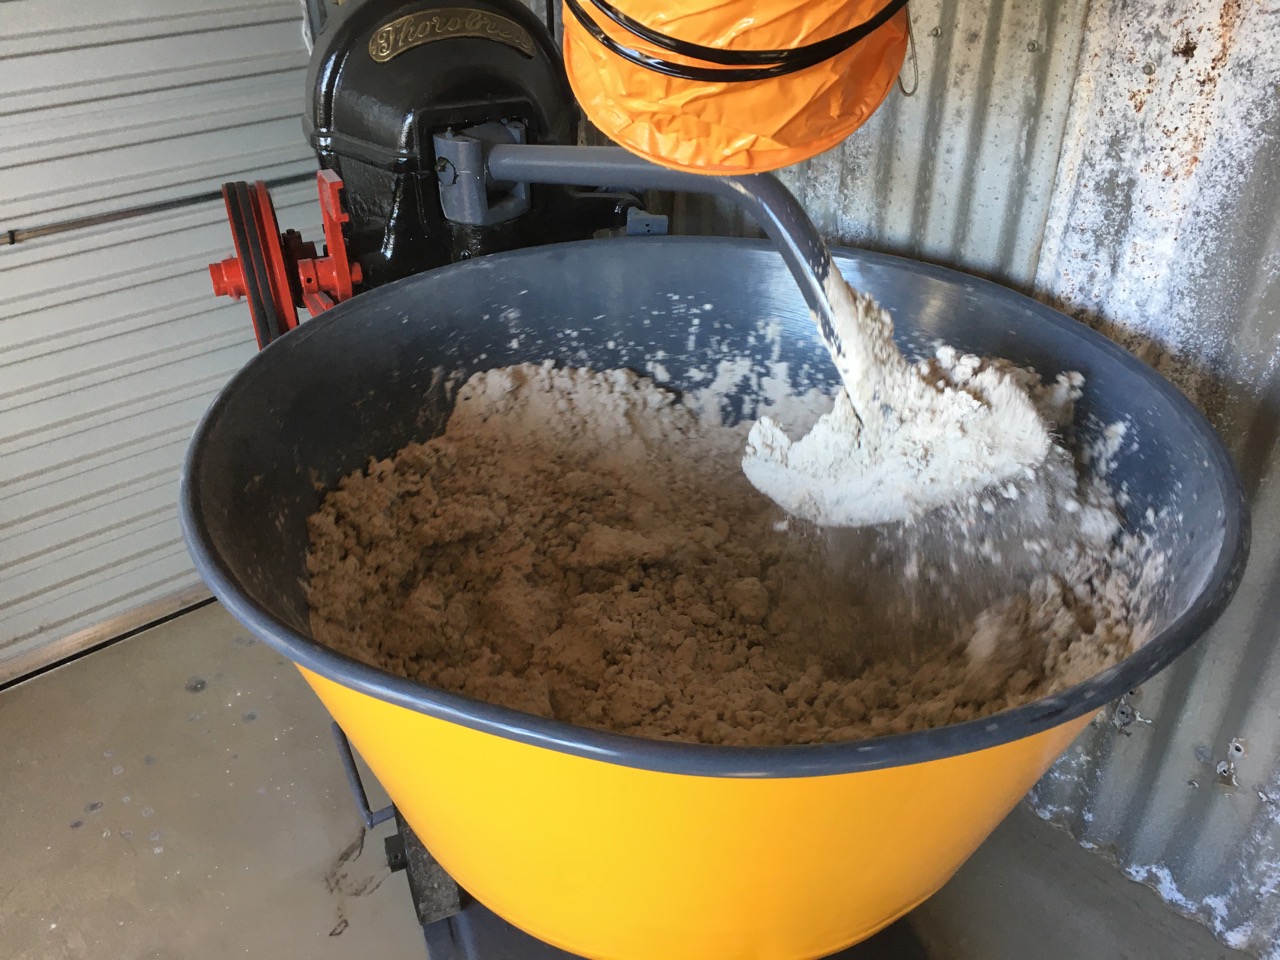
All the dry powdered ingredients are accurately weighed out on the scales and placed slowly and carefully into the dough mixer bowl to minimise any flurry of dust rising up out of the bowl. Any dust that does rise disappears up into the bright orange tube of the exhaust fan mechanism and is issued outside.We mixed the powders dry for a few minutes, until all the ingredients were the same colour and all sense of difference was mixed and mingled in together. Then I added the exact, measured amount of water and let it continue to mix for several more minutes, until the batch becomes stiff and starts to ‘ball-up’. I’ve learnt that this is the time to add the remaining small amount of water that was withheld from the first pour. This last issue of extra water wets the stiffer ‘balled-up’ ingredients and softens them, I then Iet the mixer run for several more minutes until everything is smooth and plastic. Amazingly, when I rebuilt the mixer this time around I had to reshape the mixing bowl that had gone out of shape during the fire and had 4 large splits in the metal rim.The bowl had been a little bit pear shaped since the first fire in ’83. So much so that the mixing arm used to bang into the side of the mis-shapen bowl and had scraped all the paint off in one place. Now after this last fire and re-working, I had to clamp it into some sort of semblance of a round shape as I panel beat it back into a useful shape. I had no real idea of how to approach a job like this. I’m not trained in metal work, just entirely self taught. I muddle through most difficult jobs, lurching from crisis to crisis. I manage to succeed by shear graft and persistence, rather than knowledge and skill. So, I was totally amazed that when I came to use the dough mixer this time round, I discovered that I had indeed managed to make it almost perfectly round again. Well, not perfectly round, it still has a distinct wobble in it, but there is no impact on the wobbly side anymore. There is no wobbly side! Just a general overall wobble. Sort of evenly wobbly! I managed against all the odds to repair it really well. I fully expected it to be worse, not better. I’m no panel beater. So I am really amazed! it’s such a fluke! I am very pleased.
As the clay absorbs the water, it stiffens and balls up.
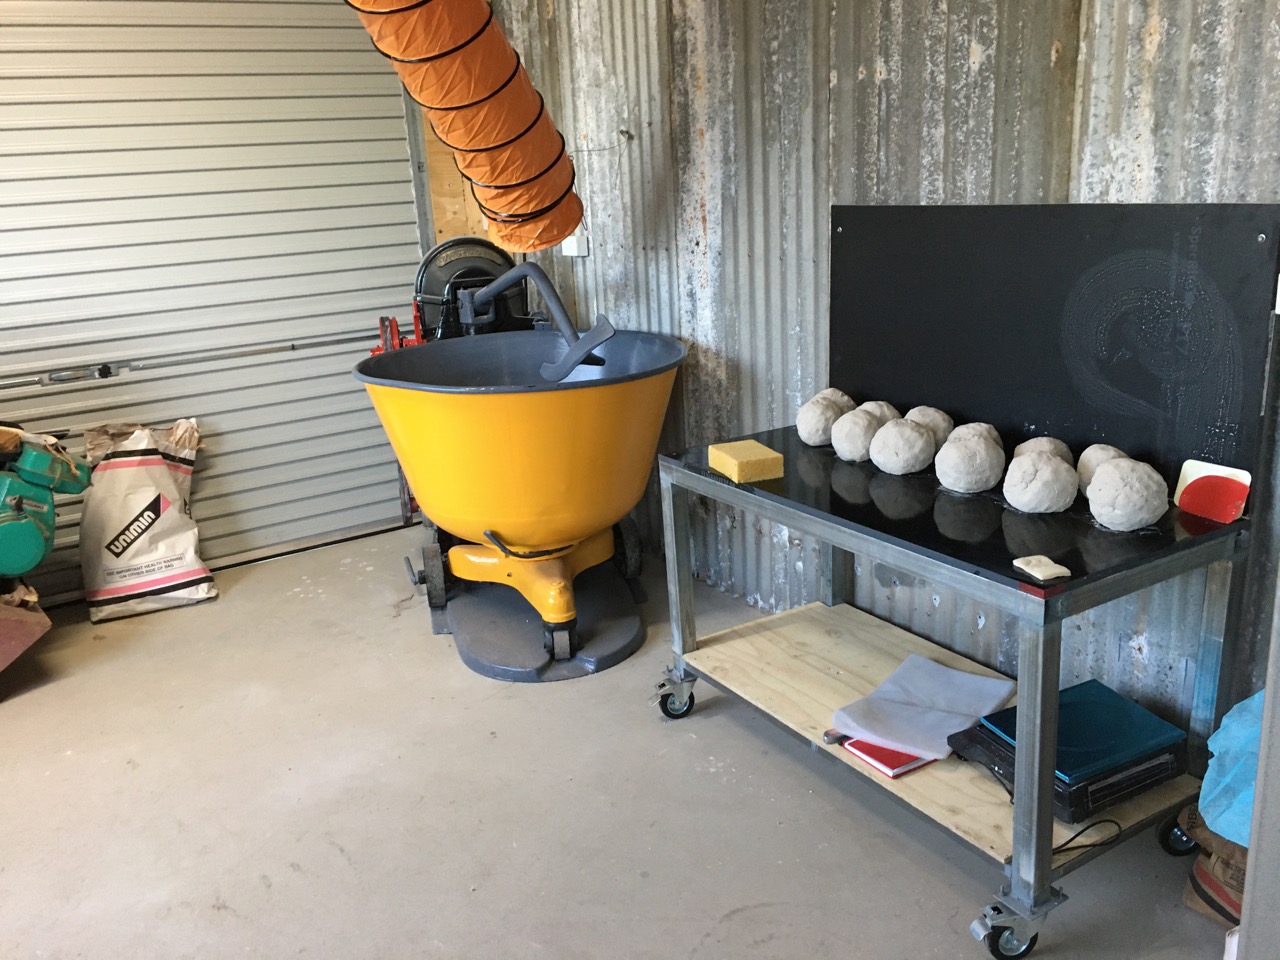
The hardest part of this ‘dry-mix’ clay making, is having to dig the stiff and sticky plastic clay out of the mixer bowl by hand. In the past, I would unload the clay from each batch into a bathtub next to the mixer. I used to make 8 batches in a row, one after the other, and that would make up a tonne of clay. Enough to fill one clay box. Then I would pug it all through the pug mill with no vacuum to speed up the process (the vacuum process slows down the speed of through put). I stacked all the first pugs of clay in a large pyramid stack and then re-pugged it all again with the vacuum on. This time slicing off all the ends of the previous pug sausages and mixing them all together in one handful into the pug mill hopper. This ensured that any mistakes or slight variations in the 8 different mixes were all averaged out in the final pug sausages. It used to take me all day to make up, twice pug, then bag and box a tonne of clay. It was a long day and quite hard work overall. I stopped making dry mix clay over a decade ago. For the past ten years or so, I was crushing, grinding, and ball milling all my porcelain stones, to make my porcelain stone ‘clay’. The only time that I used the dough mixer in the past few years, was to make a big batch of wadding for the wood fired kiln. However, now, on this occasion, we have no pug mill, so it’s all to be done by hand, we work it up by hand into round balls of a couple of kilos, pounding 3 of these together into a block and stacking 3 blocks one on top of the other, before bagging the lot.Each batch we make is 130 kilos and we make 2 batches. It has taken us about an hour and a half for the first batch, but we get better at it, and the second batch only takes one hour to weight out all the ingredients, mix them and unload the batch and bag it all up and place it into the clay box. I scrape down the mixing bowl between each batch, because I don’t want the thin remnants of clay drying out and going hard between batches and causing lumps later, that will need to be hand wedged to be sorted out.
After we have finished the 2nd batch, I sponge down the mixer and clean the bowl, ready for the next use.
As I made the mix a little wet, to allow the water to fully integrate into the clay as it ages. We left the last 25 kgs out over night to stiffen up a little, so that we can wedge it up tomorrow, wire cutting it and kneading it to remove the air bubbles and get this small amount ready for the wheel. I will need to make a series of clay test to get to know this clay, but also to provide tiles for glaze testing. We aren’t ready for any throwing yet.
We haven’t moved the potters wheels that we have been given and loaned by our friends out of the storage barn yet. There is no room to install them in the studio just now, as it is full of stuff that I am still working on, but the time is getting closer. I still need to finish welding up the benches and table for the centre work station of the studio and a table for the gallery. That will be my next job. Meanwhile, the clay is resting in the clay box and hopefully ageing and improving a little
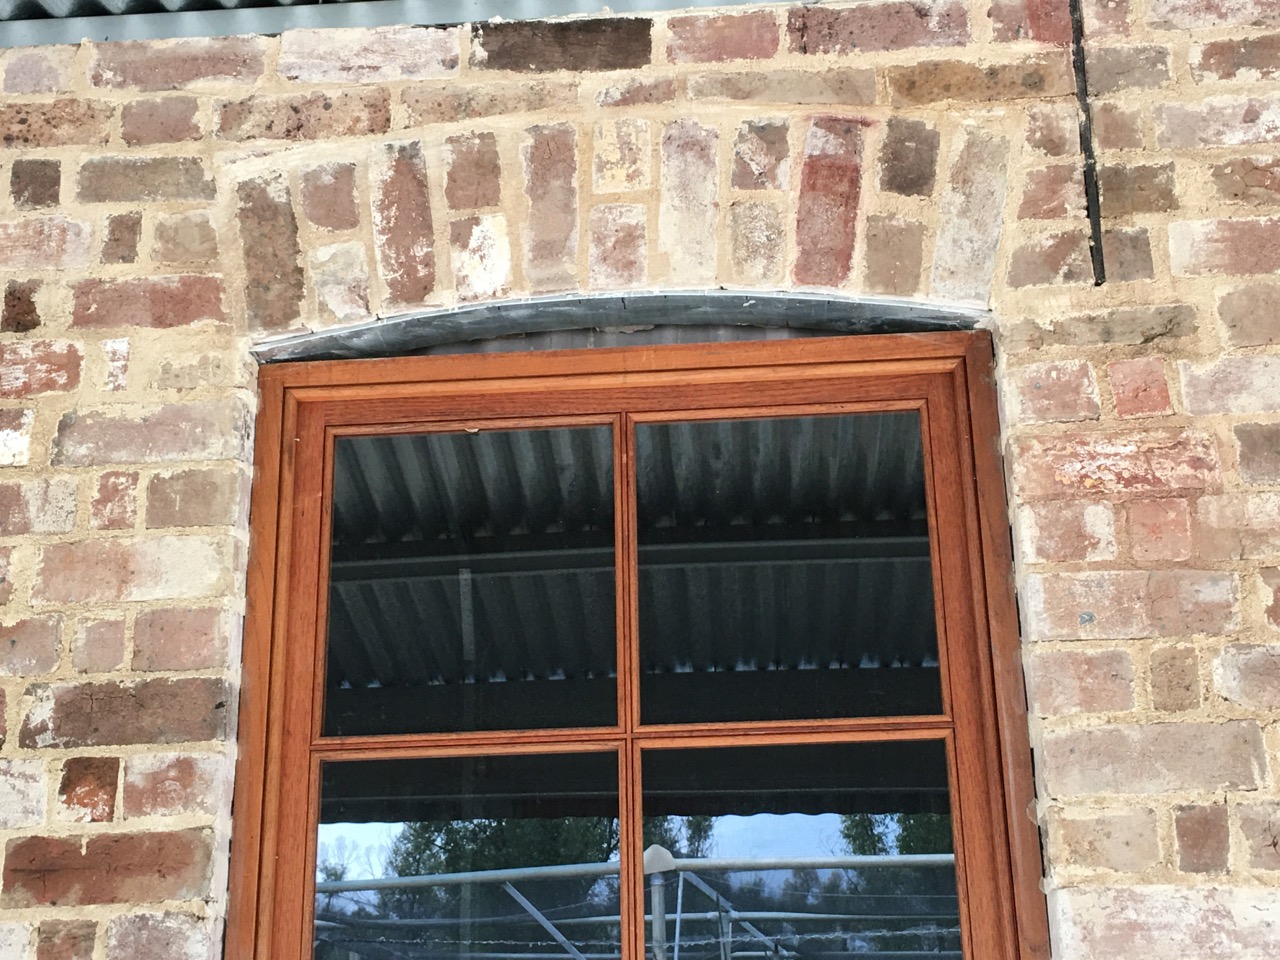
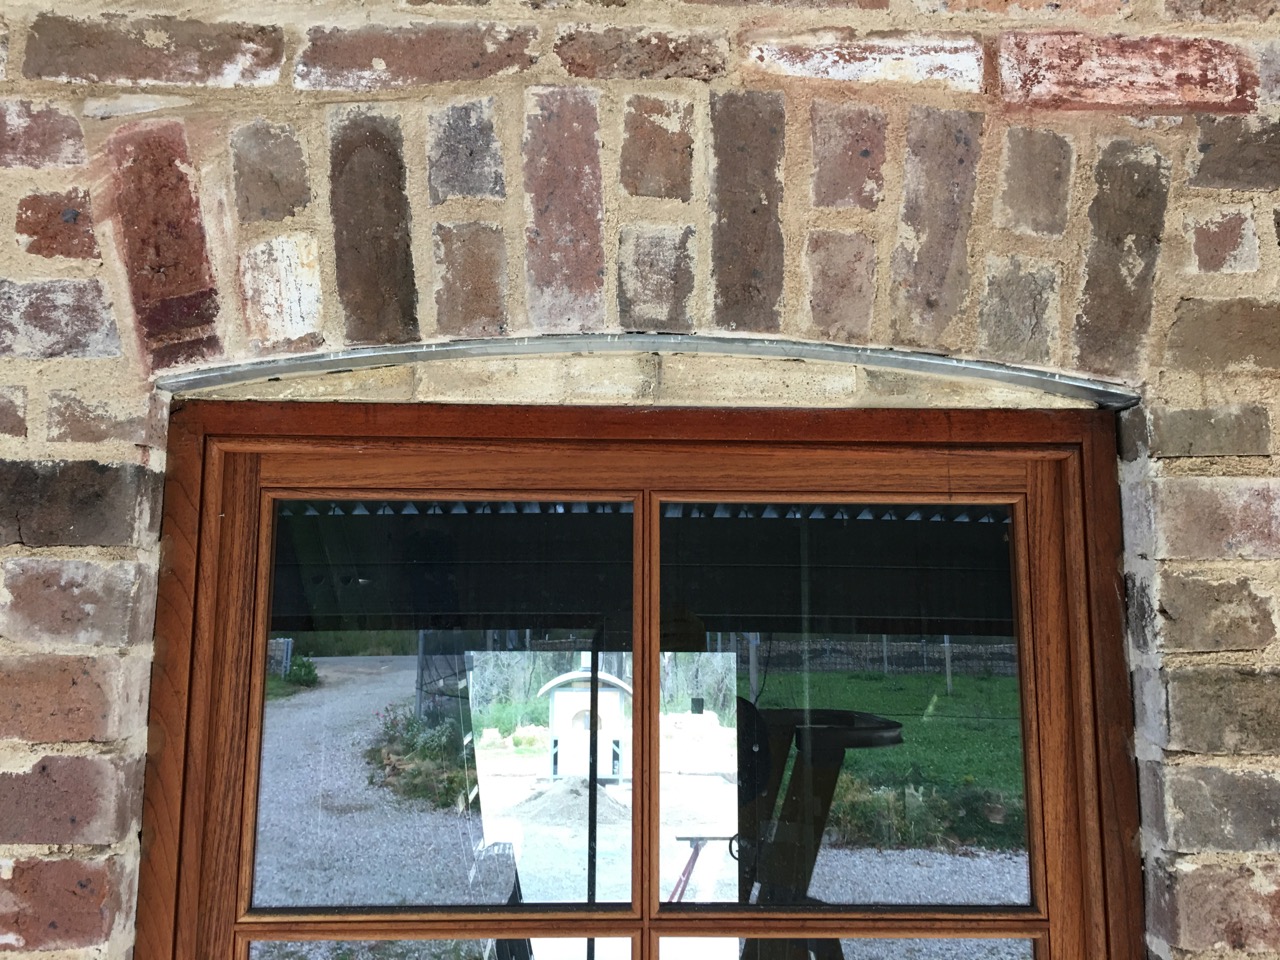
There are now lots of small jobs to convert our cheap and nasty metal framed farm shed into a functional pottery studio. I had to fill the little gap above the wooden windows, between the metal lintel bar that supports the arch brickwork. This is to stop sparks and vermin getting into the cavity. It also looks better and more ‘finished’, but really, I just had to get it done to complete the building so as to get our final approval and occupancy certificate.
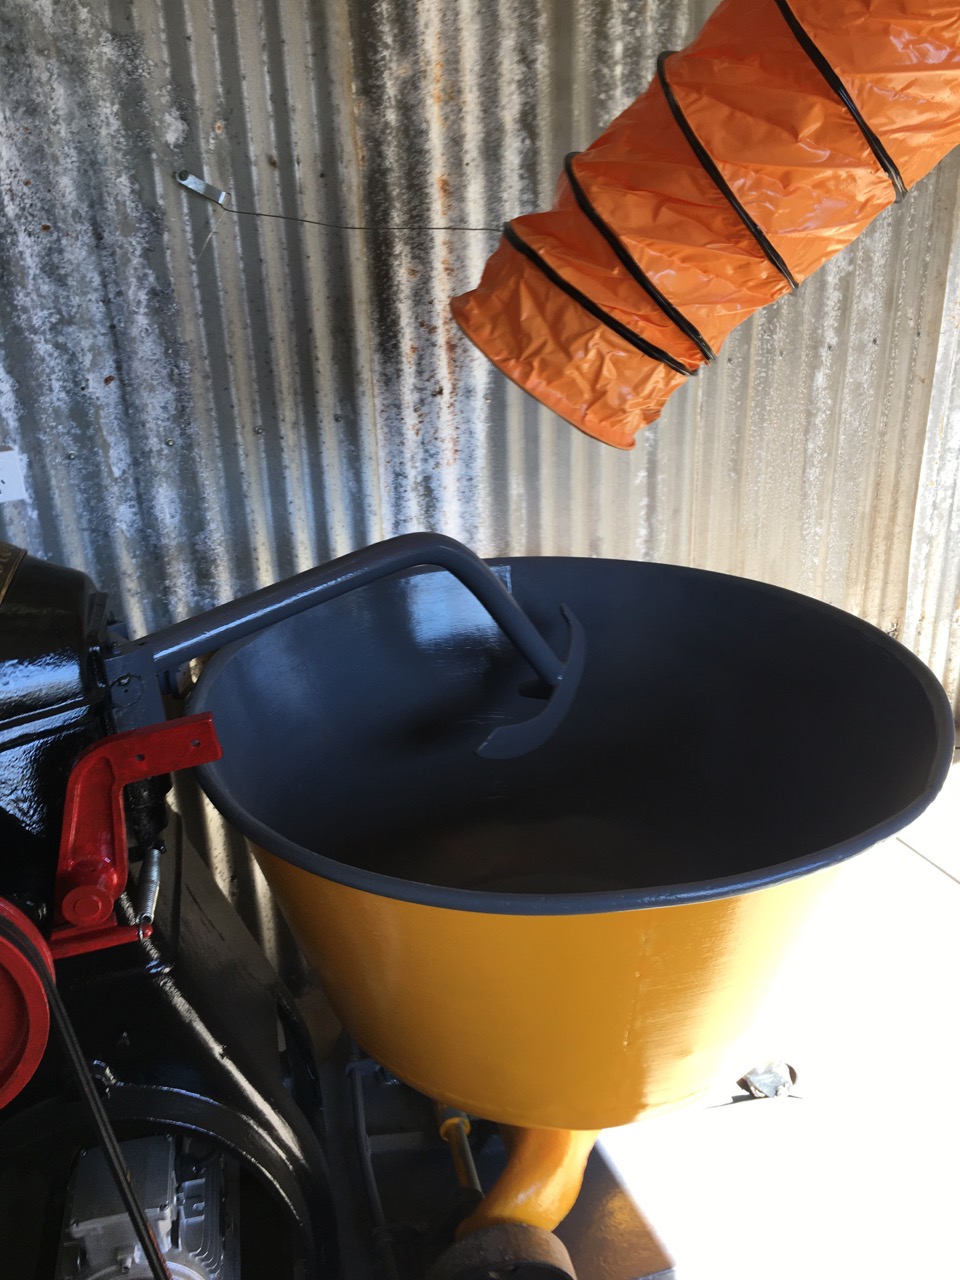
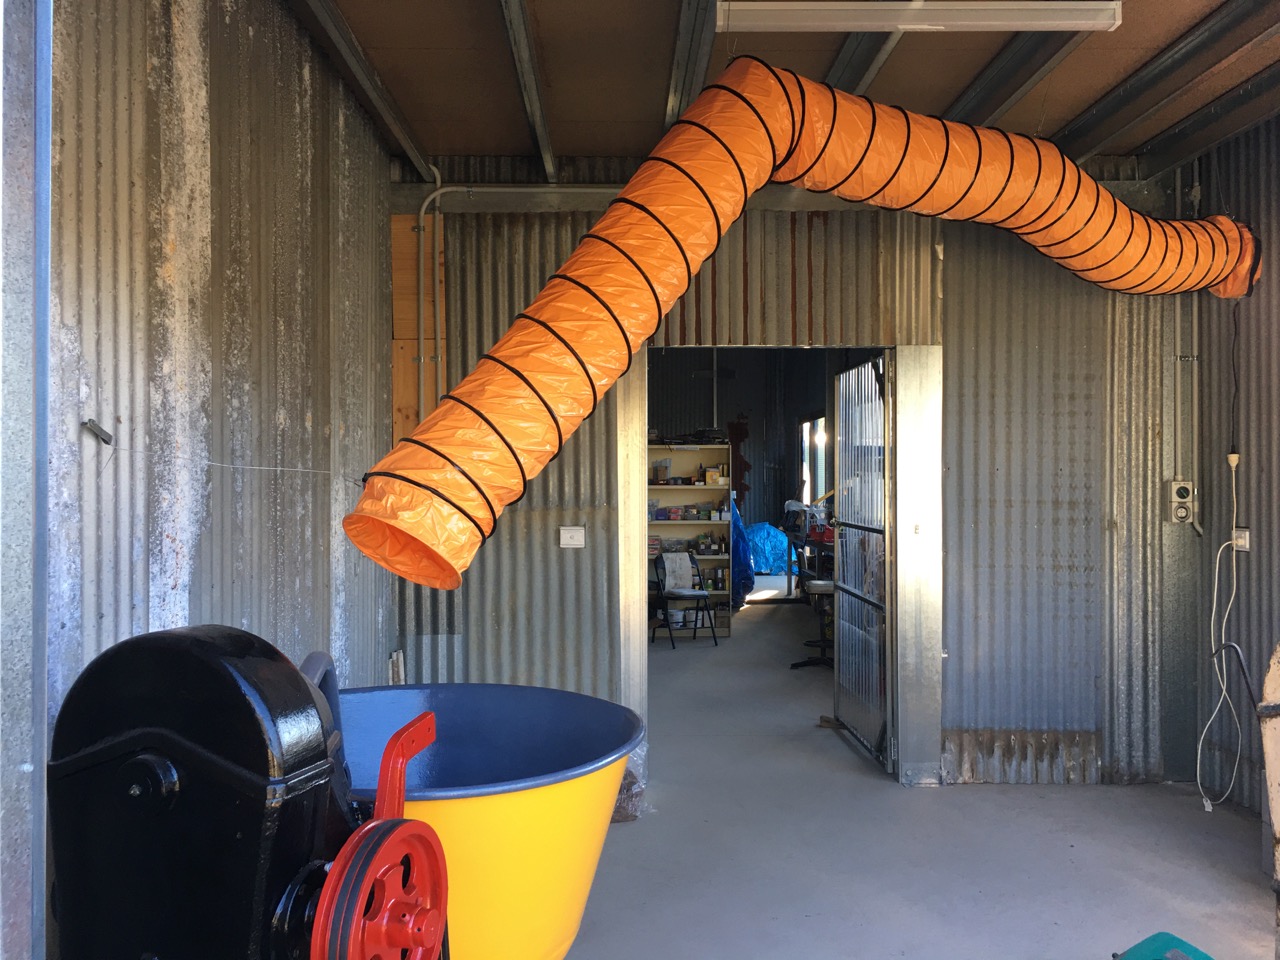
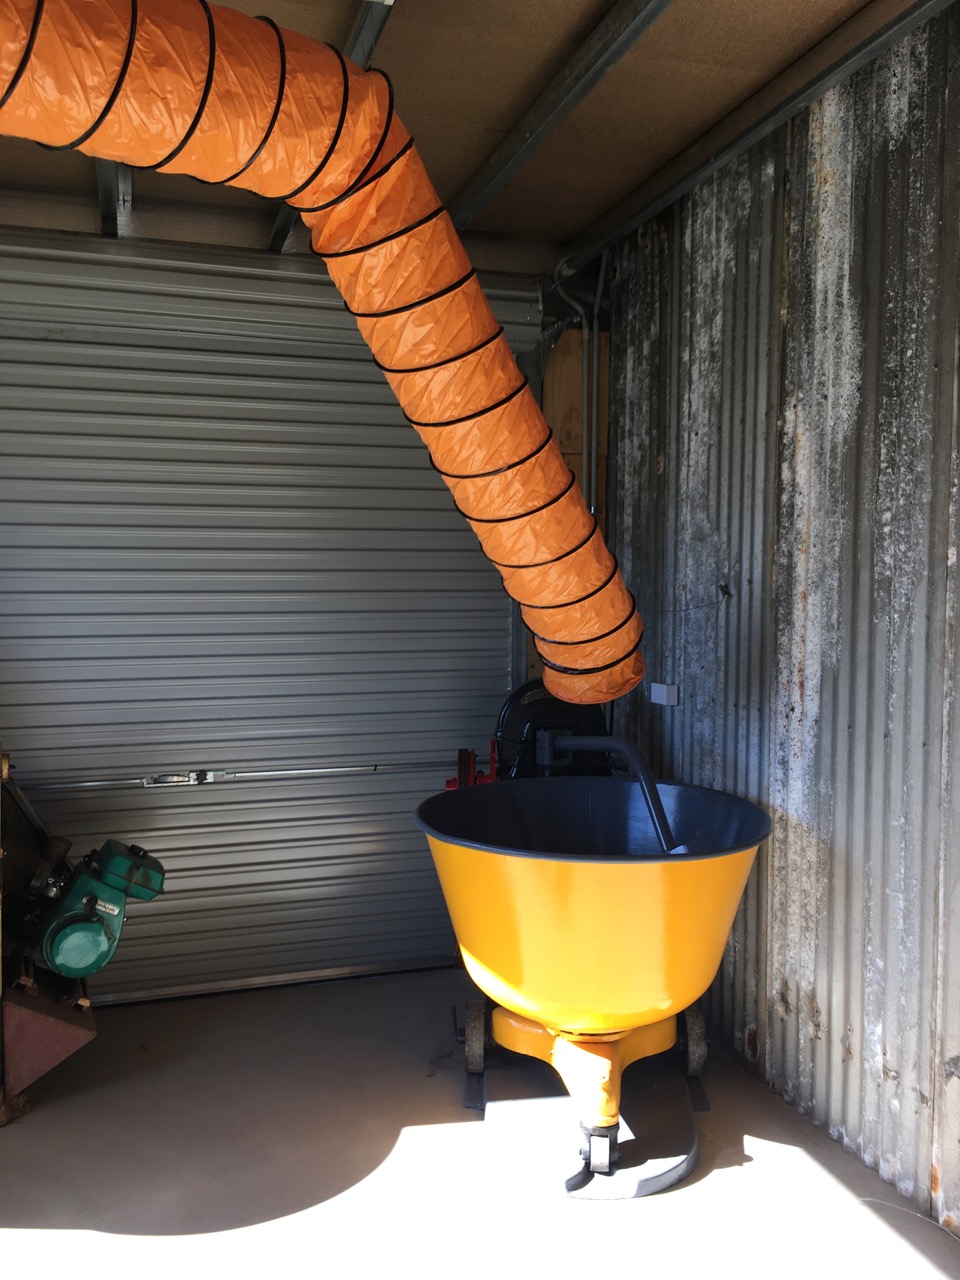
The next most pressing job was to install OH&S ventilation. A fan in the materials processing rooms to take the dust away from the rock crushers and clay mixers. I never had to worry about forced air ventilation in the past, as the machines were more or less outside in the breezeway between the two pottery buildings. Now that I have them all in the one sealed room. It is essential that I fabricate and install good ventilation.
This metal tube has some 2nd hand/re-cycled 1.5mm stainless steel mesh inserted to stop sparks and insects getting into the building.
And a cheap batroom fan in the other end that will be inside the room.
Connected to a long flexible air hose.
With the exhaust fan embedded in the wall, I can direct the cheap flexible suction vent hose to any machine in the room.
I have no idea how other people might achieve this sort of dust extraction, but this is one cheap alternative solution, and mostly home made.
We have been working a bit frantically to get all the things on the list completed so that we can get our final inspection, which, if our building passes, will entitle us to get our occupancy certificate. Once we have this, we can legally move in and fill the place up with pottery equipment and start to use the space as it was intended. The Council Building Inspector called in today in the late afternoon. He gave our work a good scrute and declared that we had completed everything on the list to his satisfaction. He issued us with a carbon copy of his Final Inspection Report and was very complementary about the way that we had transformed a cheap, kit form, tin shed(s) into an interesting building. He commented on our sandstock brickwork and the arch window that visually links the new pottery shed to the Old School building and our use of recycled, old gal iron to enhance the visual amenity of this historic site. I was chuffed. We celebrate with a dozen oysters off the fresh fish truck that come up from the coast on Wednesday, Thursday and Friday, paired with a couple of cheap sushi trays.
Now we can legally move in. Actually, he didn’t comment on the fact that we already had moved in our kilns, clay mixers, rock crushers and ball mills, the benches, pan break and guillotine, they are all in there and ready for work. I have been using the maintenance shed for a couple of months now to restore my machines and actually make the components to fit out the rest of the building.
One of the first things on my list now, is to make some clay, so that it can ‘age’ for a while, to improve its plasticity, so that when we start to make pots again, the clay will be more workable and respond better on the potters wheel. Having a bit of time to age is very important for freshly made clay, when it is made from powdered materials.
Ageing isn’t so important when clay is made by the wet method involving a slow stiffening back from a liquid mix where the raw material is in the crude natural form straight from the ground.
It might be worth explaining here a little bit about clay. When clay is in its natural crude form, it has a multitude of fine, flat, hexagonal particles, sort of laminated like pages of a book. When the clay is soaked in water and stirred into a watery ‘slip’ or slurry, these flat sheet like crystals are slowly liberated one by one and flake off from the ‘book’. This process takes time. The finer the particles, the more ‘plastic’ and workable the clay can be, realising the best of its potential, but it also takes a long time to get the water in between the various surfaces.
Stirring the clay and water mix or ’slip’ up into a fine slurry, sieving it to remove any unwanted particles and then letting the slip sit and settle takes time. Sometimes, the clay particles in the slip don’t settle out due to gravity allowing the water to come to the top where it can be decanted off. If the slip doesn’t settle out, then the mixture has to be tested, measured and treated. This involves measuring the pH of the slip. Usually, the clay will need a small addition of an acid to change the pH to very slightly acid.
Clay particles have an electrostatic charge on their surface. Clay chemistry is very complex, but suffice to say briefly here that clay particles are a little bit like small magnets. What is needed is to get the positive and negative charges to balance so that they attract each other and not to repel. If they are repelling each other the clay will never settle, but stay suspended and cloudy forever. Once acid treated they can be made to become attractive and will form larger clumps that are affected by gravity, and so settle to the bottom, allowing the water to be forced up where it can be decanted off. This process is called ‘flocculating’ . Think of a mob of sheep forming a flock.
I’ve tried many different ways of flocculating my clay particles. Old red wine that was undrinkable due to cork taint, there isn’t much red wine that I wont drink, but cork taint is one that isn’t drinkable, then I’ve tried cheap commercial vinegar, even cheaper imitation vinegar, dilute brick cleaning acid from the hardware, or epsom salts, but my ‘go-to’ dilute acid is the water in our old pottery water tank full of rain water ( carbonic acid) that has been affected by the constant fall of gum tree leaves onto the old pottery iron roof. This caused the roof to rust and created a moderately acidic solution of carbonic and tannic acid. It came out of the tank pale brown, like cold black tea. When I used this water to make slip I didn’t need to add extra acid. I much prefer this natural method of flocculation. It suits my life philosophy of living naturally as possible and treading gently combined with minimal consumption. Once the clay has settled to the bottom and the excess water removed, the thick slurry can be placed out side in the sun and wind to stiffen.
This wet method using crude clay is a very slow process. So to speed thing up potters use can use dried powdered kaolin and powdered non-plastics like felspar and silica blended together in a set recipe in the dry state and then just enough water is added to bring the mix to the required plastic consistency. This is akin to making a cake. Although fast, this method doesn’t wet all the available fine particles and the clay doesn’t develop its full potential plasticity. Its a compromise like everything else in life. This dry mix method is fast and efficient and with a tiny addition of some extra plasticiser like bentonite, the preemptive addition of some acid to the water and a period of ageing, then a reasonable result can be obtained. That is what I intend to attempt this coming week.
When life settles down a little and we have more time, I will make the next batch of clay body by the wet method, using my larger ball mill to mix the liquid slip and allow the slip to sit as a liquid in a large plastic drum for some time and then slowly dry the slip out. This is designed to realise the maximum potential plasticity of the clay body, and is what I have been doing for the past decade to get the most out of my porcelain stones. As they are not inherently plastic, they need all the help that they can get. Tragically, In the fire I lost several tonnes of milled porcelain stone body that I had been ageing for up to 10 years for use in my dotage.
Before I can make this first batch of quick and dirty clay, I want to make a clay storage box to keep it in. Clay ages best somewhere cool, dark and where it will keep damp with a minimal amount of condensation, that means no direct sunlight, so a plastic lined, heavy duty wooden box has worked well for us for the past 35 years.
Luckily, back in 1983 when we were building our last pottery shed, after our 2nd fire, I saw two packing cases on the side of the road placed there outside a factory for the taking. 1200mm x 1200mm x 900mm. Big enough to hold a tonne each. We would fill them and when we had used up the first tonne of clay, we would make another tonne to replace it, and then use the other box full while the freshly made tonne was left to age and improve. We kept up this swap and go method of ageing our clays for many years. Unless I can find two more suitably sized packing cases on my way to the timber-yard today, I’ll be buying a couple of sheets of ply wood and a big sheet of heavy duty plastic, to make some new clay storage boxes.
I still need to line them with plastic – maybe tomorrow?
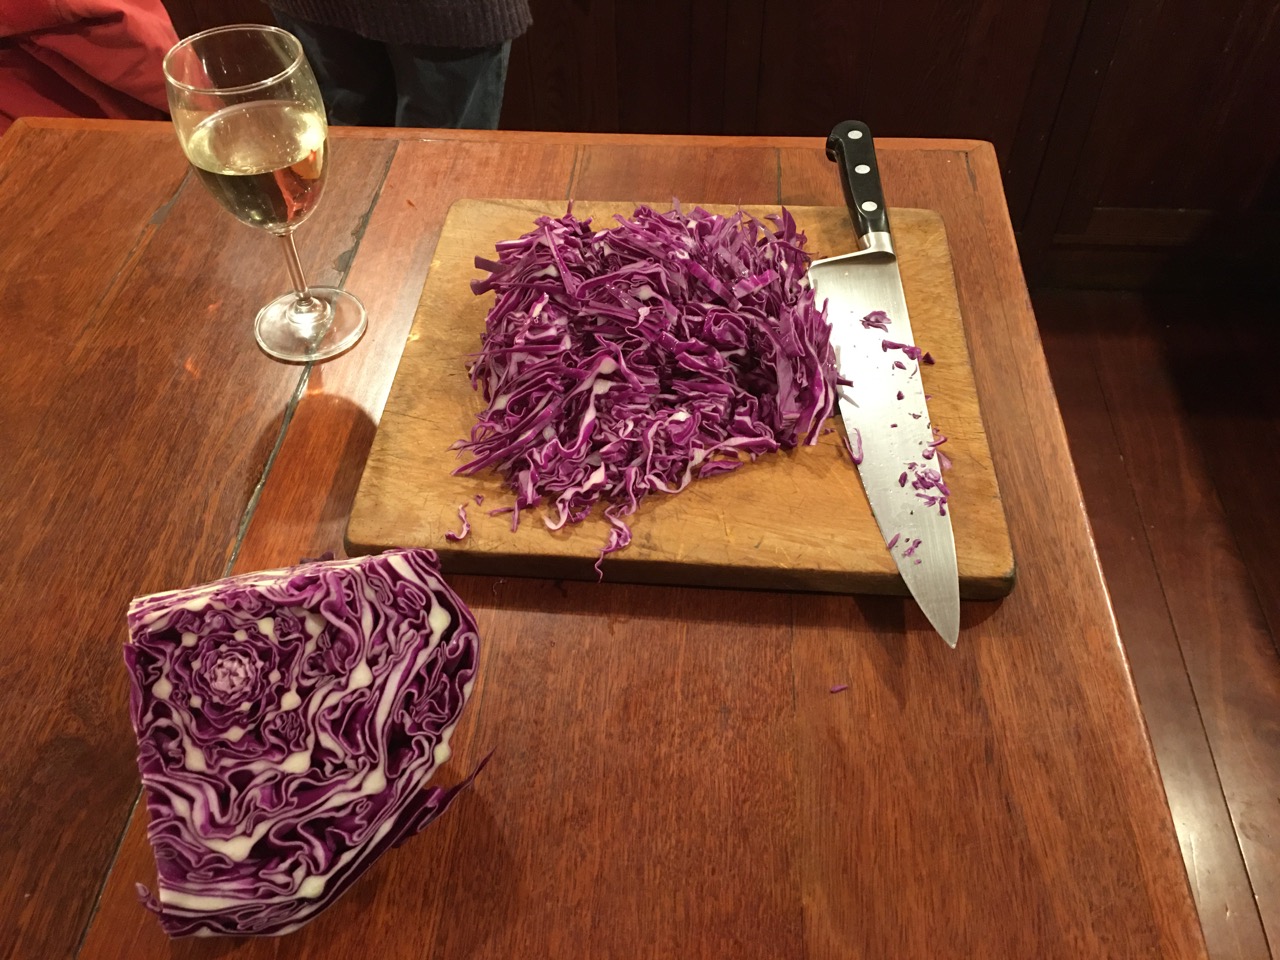
We have survived the longest night of the winter. The frosts have cut the last of the soft plants from the garden. We have harvested the last tomatoes from the dried brown burnt stems of the last surviving tomato plants. We come inside earlier these days at 4:30 and light the fires in the kitchen stove and the lounge room heater. We have just picked the first of the red cabbages for our dinner.
Fortunately for us, we have almost finished all the immediate outside work on the new pottery shed, at least until spring, and we are now concentrating on working inside each day in the relative warmth and comfort of the passively heated and draft free environment of the new pottery. It’s quite amazing how warm it gets in there with no heater on, with just the sunshine in through the north facing windows. It is particularly noticeable that there is no draught inside from the gusty cold chilling wind outside. This is the first pottery that we have had out of the 4 of them that has had no draughty gaps somewhere in the walls, roof or around the doors. Our first 3 buildings burnt down over the 47 years of our life together as potters, All the previous potteries were all home made buildings, as we have never had sufficient money to employ builders. These earlier buildings were created from recycled and scrounged materials, plus home made mud bricks, all with ill fitting and odd shaped windows and doors and no insulation. The last pottery did at least have silver paper in the roof, but no insulation, as it was just too expensive for us at the time. This new pottery is just a tin shed, but the wall cavity is stuffed full of insulwool and all the doors and windows are mostly BAL rated commercial units. We have done all this to get a high BAL fire rating and to prevent this one from burning down in any coming catastrophic bush fire, of which there is bound to be one sometime in the future. This past week I have been lining the pottery studio room with the timber planks that we milled from our own home grown pine trees. Janine and I planed them and sanded them over the past few weeks and now we have had the satisfaction of actually installing them in the metal frame shed. This is just about the only timber in the whole complex of 5 the rooms of the new pottery. It looks great, It is just so nice to have some timber in the place to give that warm natural look and feel. It’s even better to have some of our own home grown timber in the throwing room. The place where we will spend most of our time.
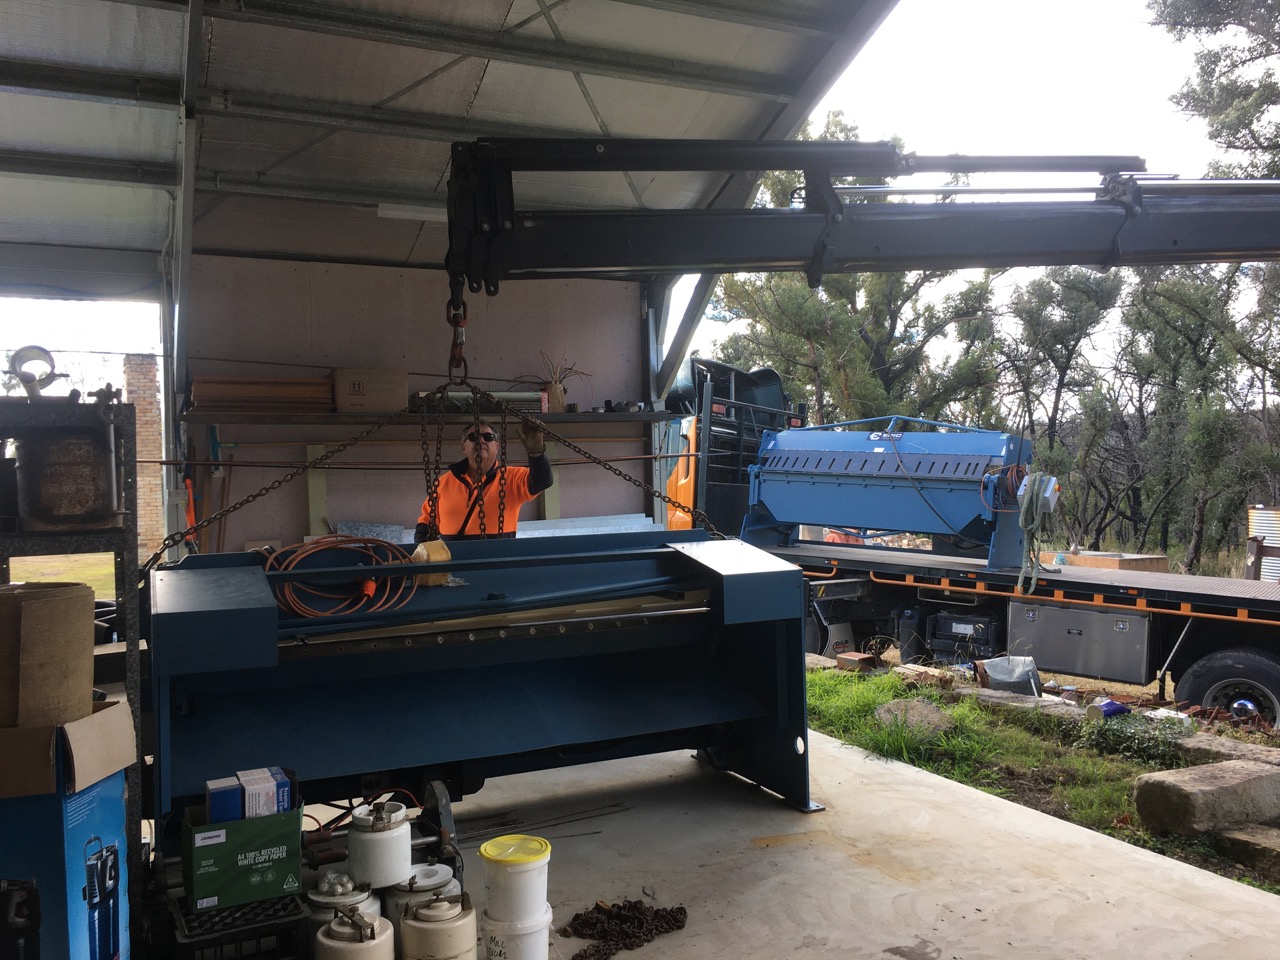
As the big maintenance shed is now almost finished, and I had access to my friend Dave’s big crane truck, as he was working just down the street from me. i got him to move my pan break and guillotine into the new shed while the opportunity presented itself.
Dave picked them up from their temporary home in the new car port building that we hastily built as soon as possible after the fire to house all the equipment that I was busy trying to restore and protect from the elements.We installed them in their new, and hopefully permanent, home in the big new shed. We only just finished the ceiling of this shed a month ago, so this is very timely. It’s also important, because my friend Dave is selling his truck at the end of this month EOFY. After that time it would be a whole lot more difficult to get jobs like these done.
Such an incredible machine, so powerful! This big crane can lift a tonne up to 16 metres from the truck and lifted my big 3 tonne pan break 9 metres into the shed
. Everything seems to be moving along at speed now. I’m beginning to feel positive and optimistic again
. Janine made a beautiful morning soyachino coffee with a gingko leaf
I had it with my piece of toast and some delicious goats milk curd, creamy smooth and with a delicate acidity. Lovely.
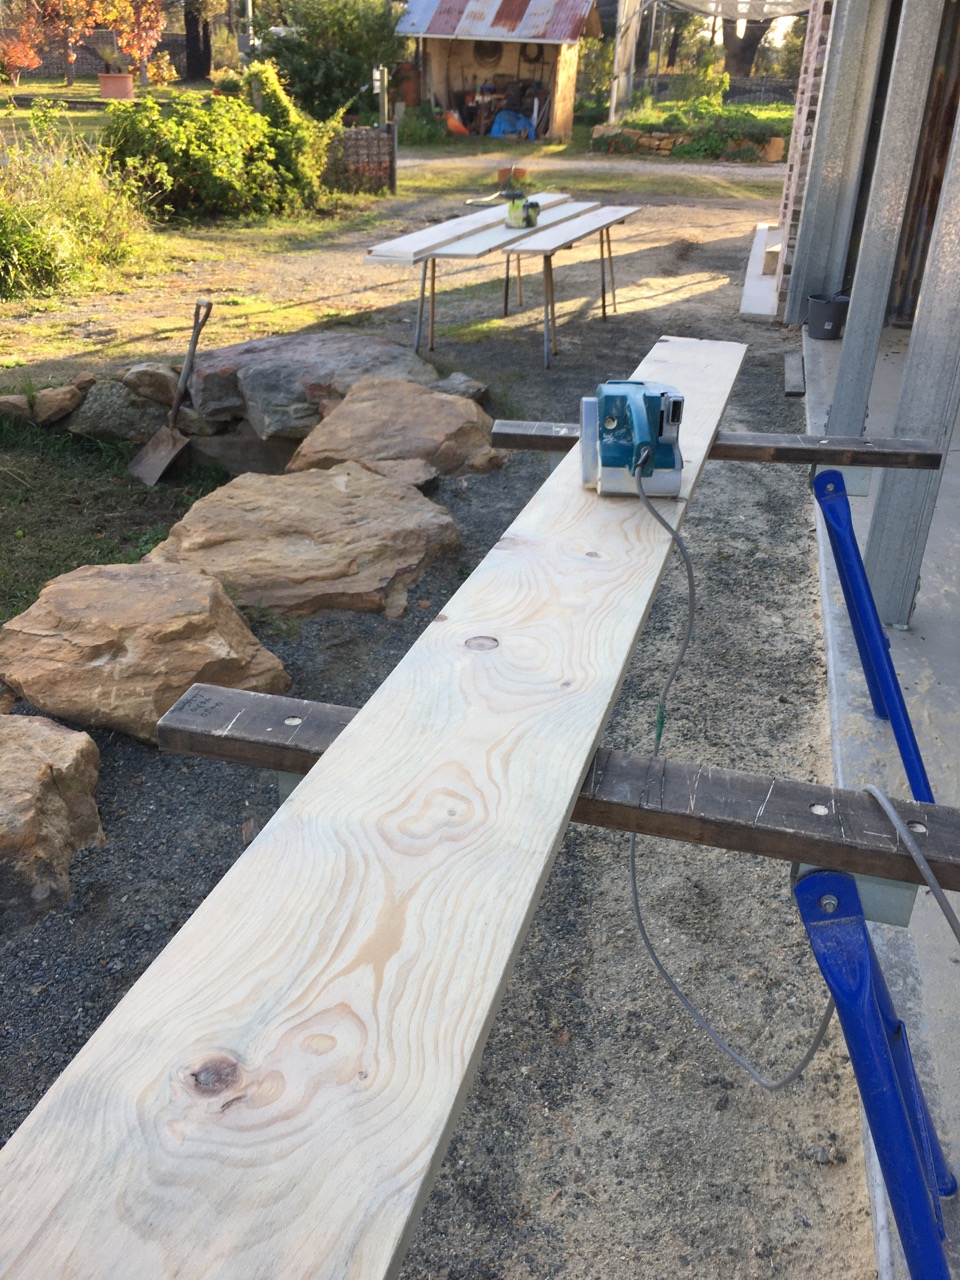
We have been spending some time, on and off, over the past 3 weeks in planing the stack of pine lining boards that we milled out of the dead pine trees that used to grow over our house. Killed by the fire. I couldn’t just let them go. I needed to use the wood for something positive. I also wanted to incorporate something of the old into the new studio. An act of reconciliation. Creating something positive out of this disaster. A creative, positive gesture.
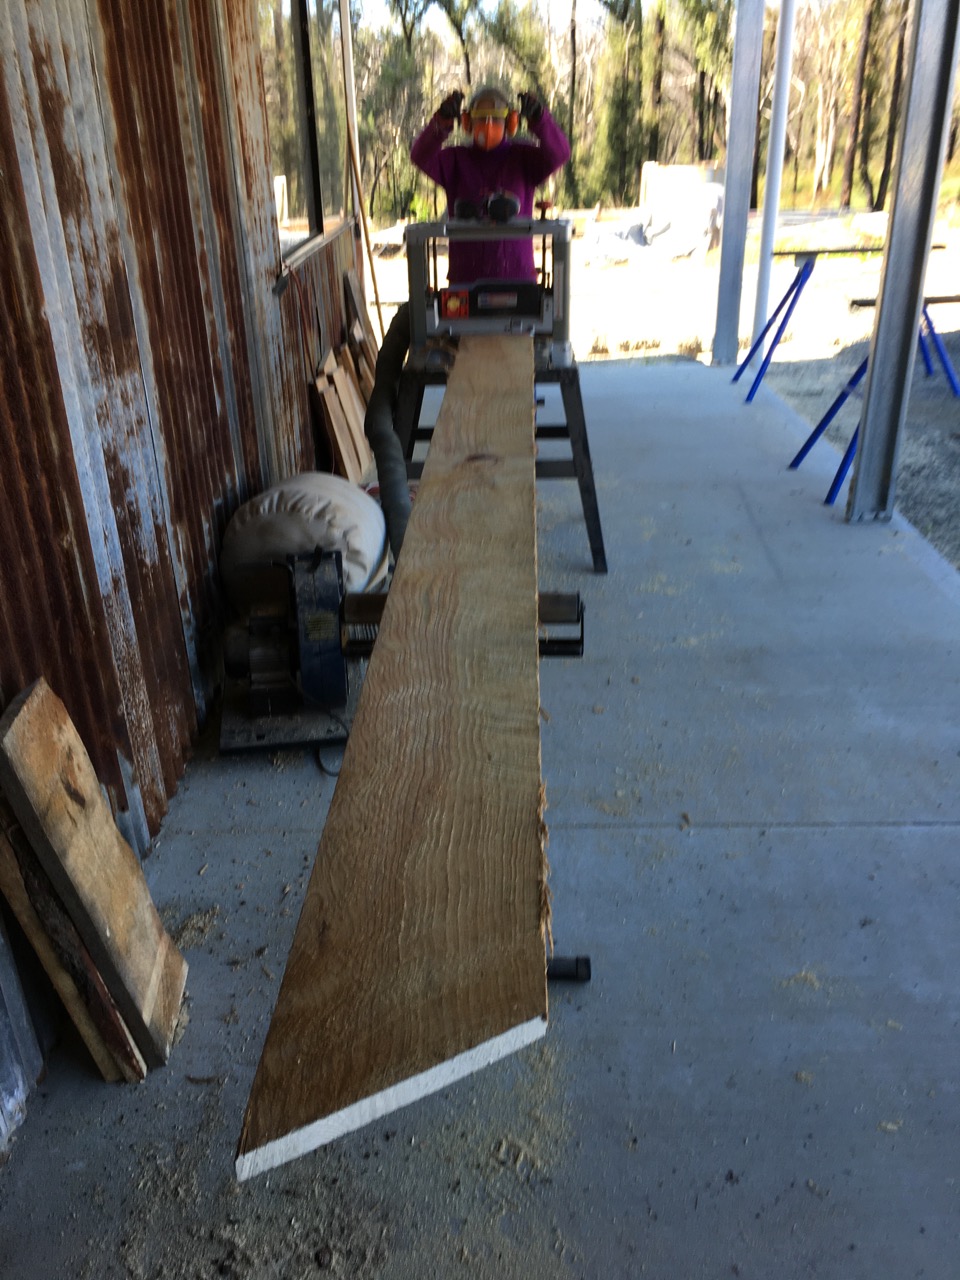
Having sawn the planks to 250mm x 30mm. out of the logs last February, they are now dry enough to use, and we are now ready for them. We spent a week pushing them through the planer machine, thinning them down 1/4 of a millimetre at a time, because the machine is only a toy, and the blades are blunt. We only need to remote most of the circular saw teeth marks. I don’t want them perfect – they’re not, they are full of natural imperfections like knots, resin filled hollows, splits and what might be felling shakes? Half a day at this was enough each day, as there was always so much else to get done. Plus we both have sore arms from a bit of over use.
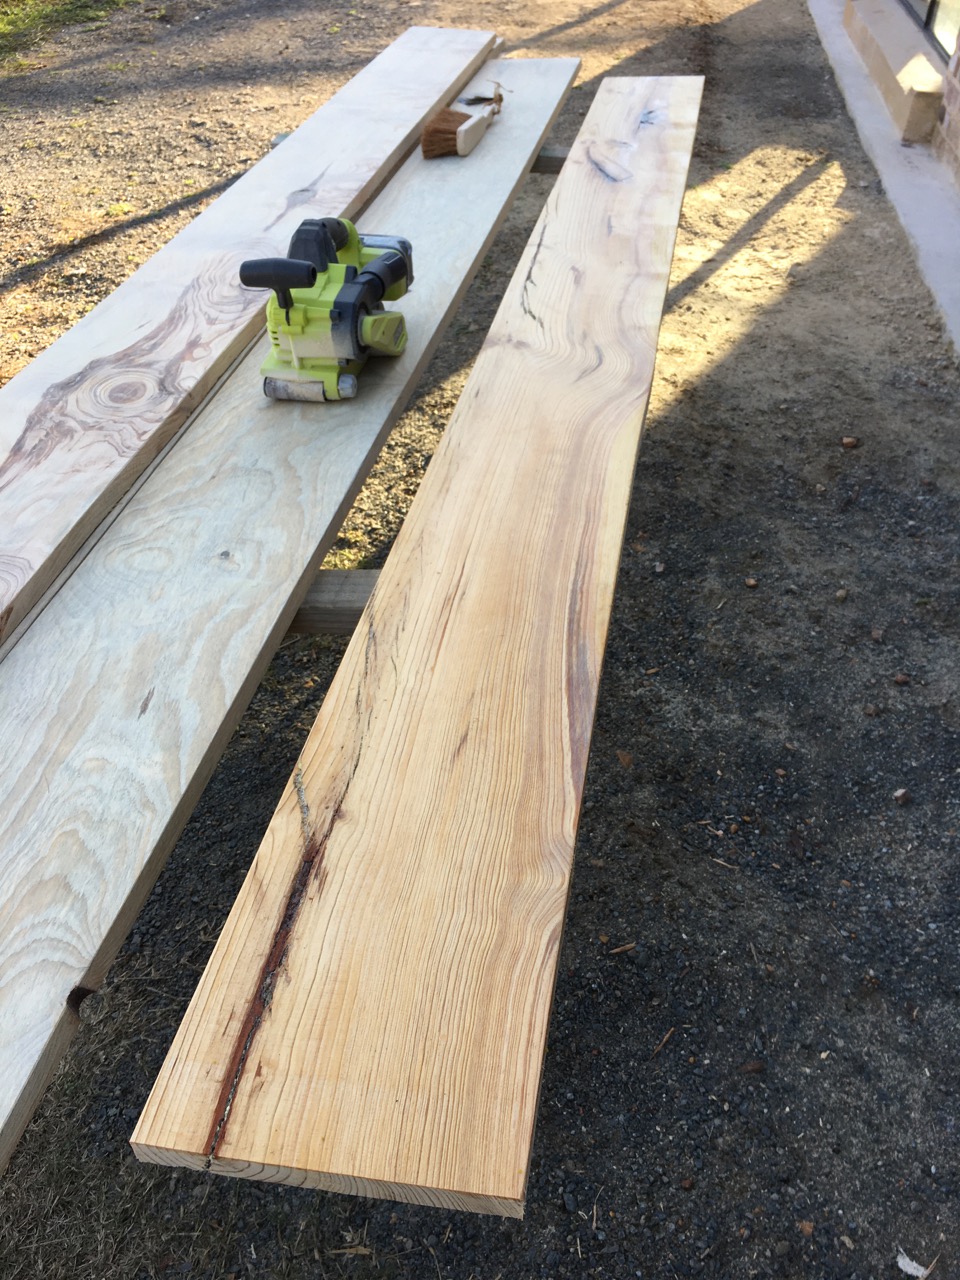
Last week we spent half of each day sanding the boards. First with a belt sander using a 40# grit belt, then again with a 60# belt. We could only work at this work for a few hours a day as the vibration from the sanding machine affected our hands. Too much of this kind of work can cause pins and needles in our fingers. This is natures way of telling you to stop doing whatever you’re doing. So we did.
We used an orbital sander the next day to get a finer finish, we used a 80# paper for this session. After this finer sanding, we wet the boards to raise the grain and stood them up in the pottery to let them dry over night. After drying out, the next day we sanded them all again using a 100# paper. This final sanding left them pretty silky smooth, but still with a lot of their ‘natural’ character. There are 120 boards to be done 4 times over. That’s why it has taken a week.
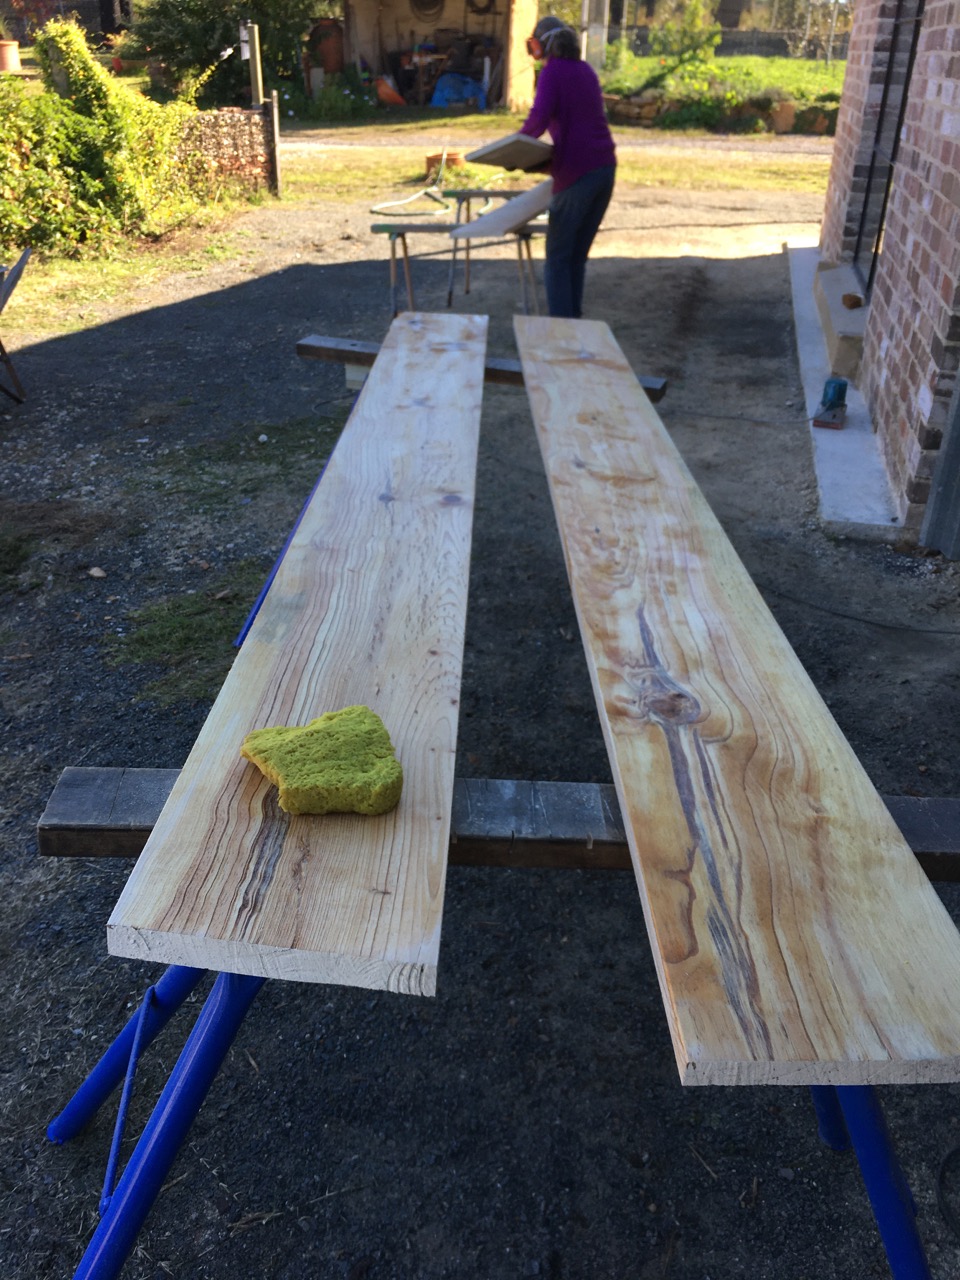
My friend Len Smith gave me all his power tools when we started to rebuild after the fire. Len built his own house, so had collected all the tools that you need to do this sort of work. I used to have a similar set. Having Lens tools allowed me to get a lot done, and saved me a lot of money. Thanks Len! This week I started to put the first few planks up on the wall. It’s very slow work, as each plank has warped around the knots, so has wobbly edges. Fortunately, Len gave me his circular saw and his electric planer. Even so, it still takes time to get the individual warps in each plank to match fairly evenly. Added to that the planks also have some degree of wind and camber. In other words, they have warped in 3 dimensions, like a snow ski and a banana on its side simultaneously. I don’t aspire to perfection. I want a more natural feel. I’m not perfect. We all have our quirks. I don’t expect my pottery studio to be perfect. I want it to express something about me, just like the work that will be made in it.
12 boards up in three days, tediously slow, but kind of rewarding. I’m happy doing this work slowly by myself. Although I’m in a rush to get this epic job finished. I don’t want to miss out on any of the joy of actually doing it, enjoying the feeling of achieving something at each completed stage. This is a hand made shed for potters making hand made pots. It has to have the apropriate character. Although we purchased 5 commercial kit form steel sheds, for speed and convenience, we have given them a character or quality that reflects us. Hopefully it reflects all the thought and effort that we have put into it.There is an aphorism about the journey being more important than arriving. I really feel that to be true just now.
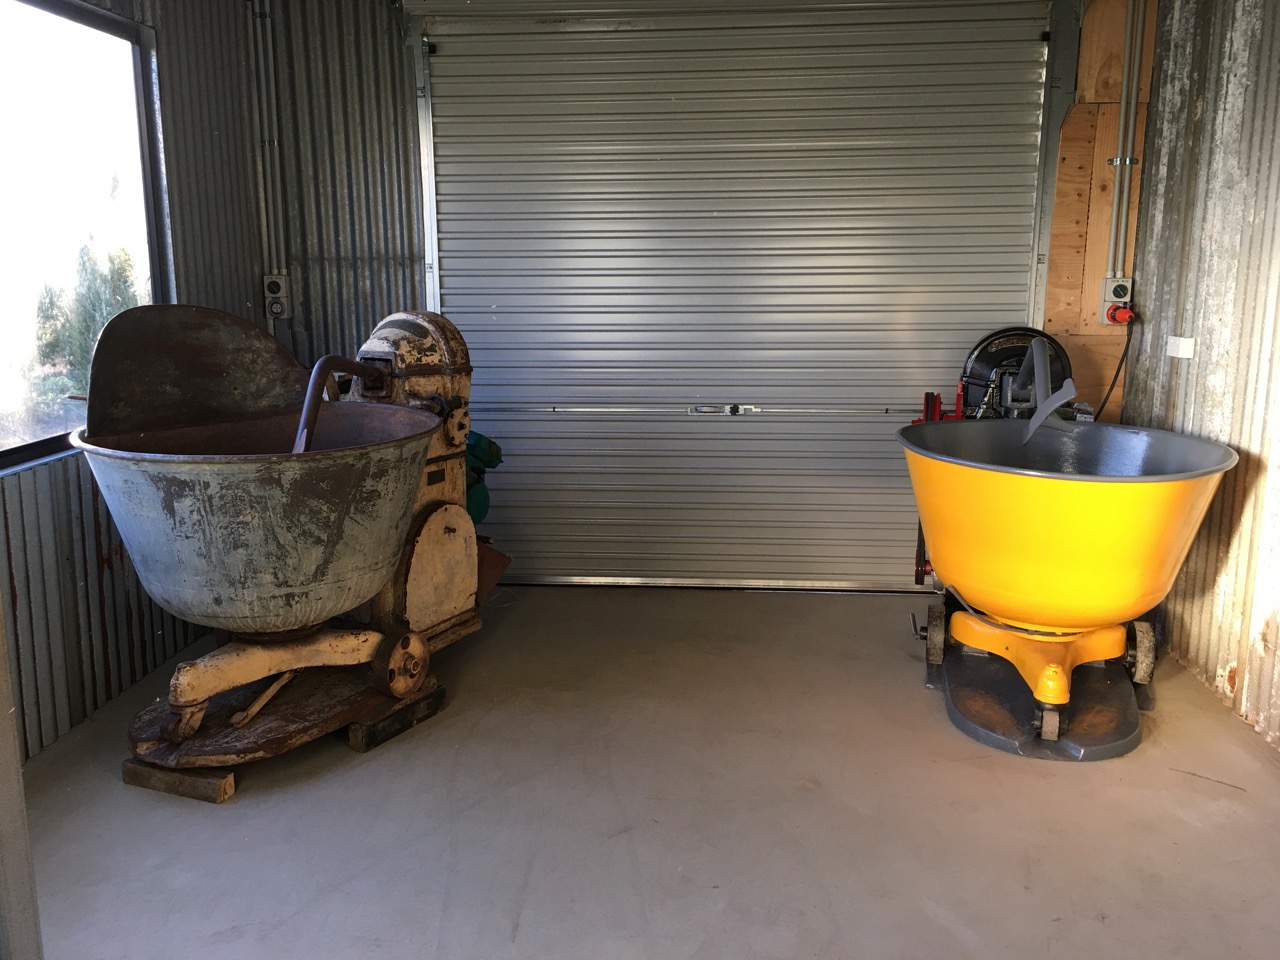
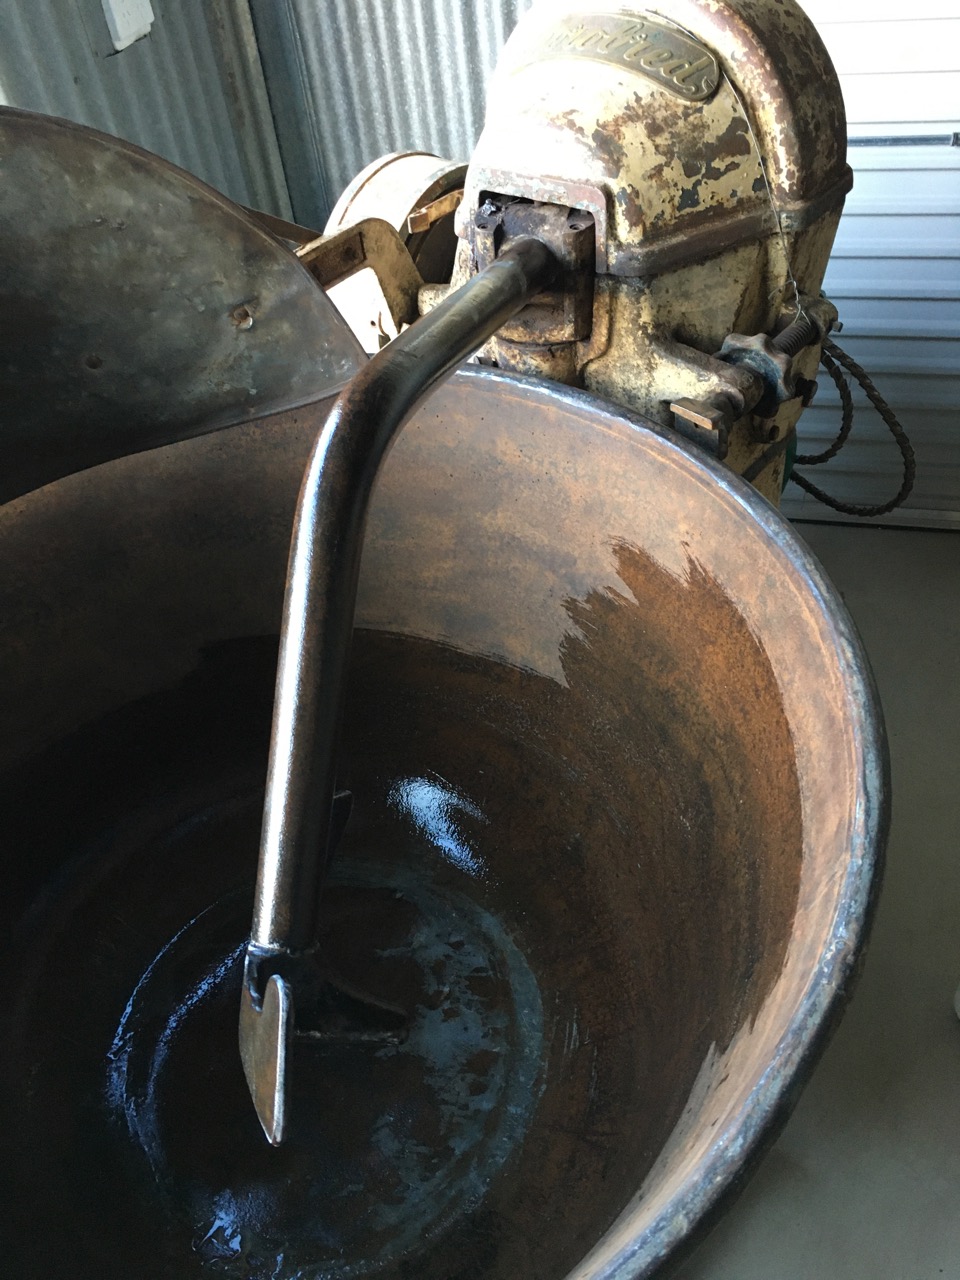
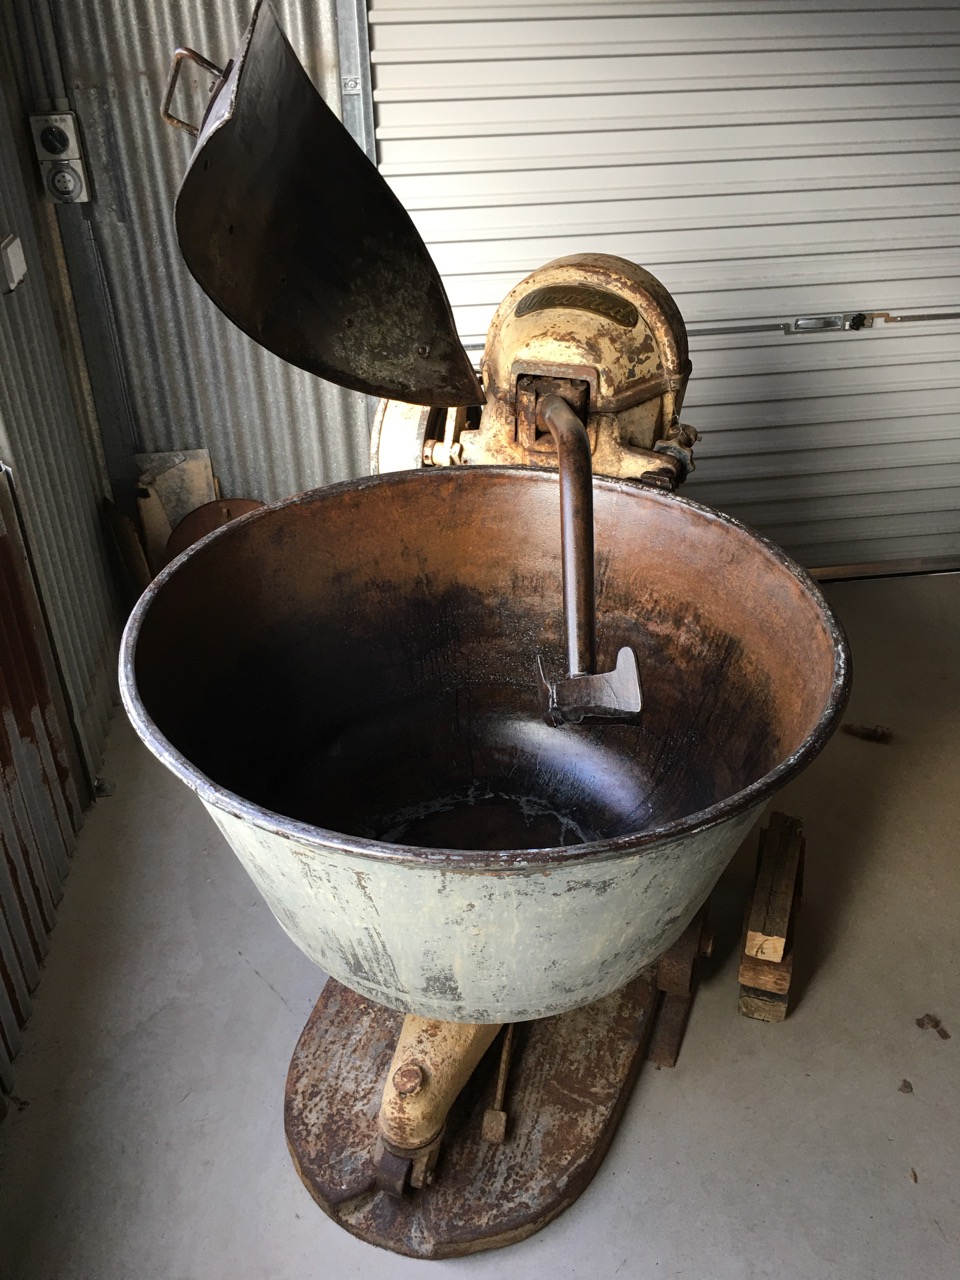
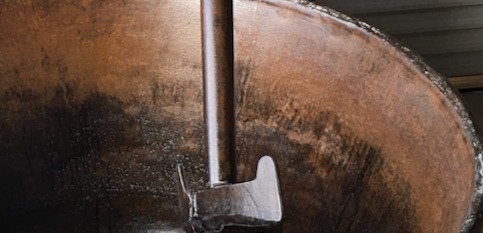
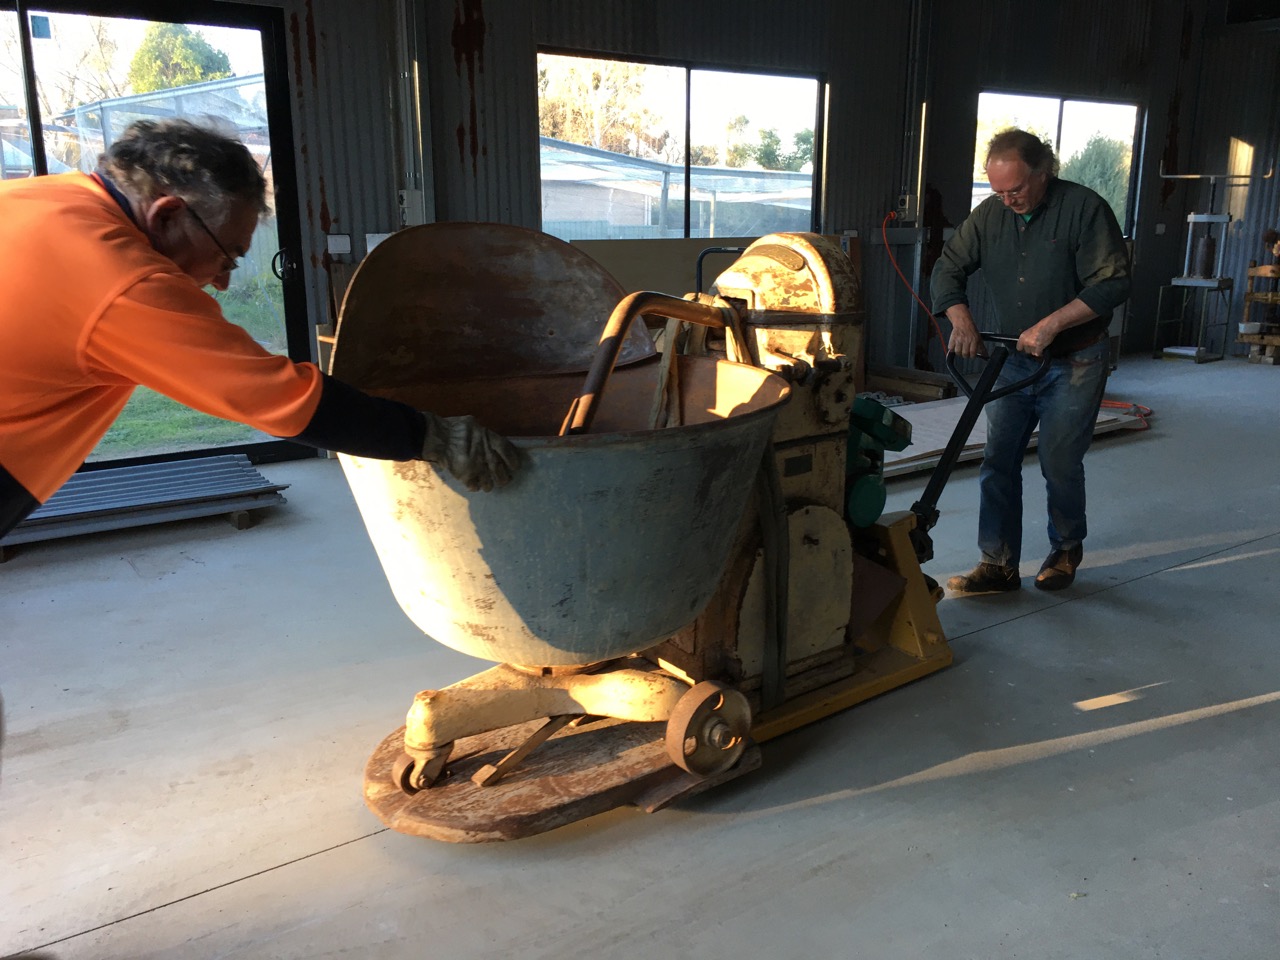
Janine and I bought a very old and well used bakery dough mixer back in 1978. This was a time when a lot of old, small, family run bakeries were being forced out of business by the big multinational food corporations, and a trend towards people buying mass produced bread in super markets, rather than going to the small family bakery.We didn’t have 3 phase power back in those days, so I adapted the dough mixer to run on the power from a 5HP petrol engine interfaced through a rather snazzy torque converter. The sort of thing that adapts automatic gear boxes to engines in cars. I was given it, so didn’t realise how expensive they were. We used that dough mixer in conjunction with a 200 mm. Venco de-airing pug mill for 5 years to mix all our clay bodies. Tragically, That pottery burnt down in 1983. That was a timber building and was totally destroyed by the fire. What was really amazing, was that I was able to rebuild both the pug mill and the dough mixer from the melted and charred remains. I spent a lot of time working on that equipment to get it going again. Luckily this machine was housed in a corner of the building with 2 sets of glass double doors on the corner, so as to allow for good ventilation. As this part of the building had very little wood in it, the machine didn’t get too hot during the fire and none of the cast iron parts cracked. The shaft of the dough mixer got rather bent during the fire, so had a very noticeable wobble in it when I got it going again, but at least I got it going. It was a bit of a mess, but I managed to keep it going for the next 36 years. After that fire, I converted it to a 3 hp single phase electric motor. The biggest motor that you can plug into a 15 amp power point, as that was all the power that we had at the time. It only just managed to do the job, as it wasn’t really powerfull enough, but I was carefull with it and nursed it along. I set it up with a home made, somewhat loose, slip-belt clutch as torque converters are so expensive.
After this last fire in 2019, The machine really got cooked, That’s it in the centre of the picture above, in the burnt out shed. Fortunately, the fire didn’t crack the castings. However, this time the main shaft was so badly bent, that it wouldn’t even rotate. I gave up on it, as I had so much to do to rebuild the new pottery shed that I couldn’t see myself ever really finding the time to fix it. Then, when my friend John Edye retired. I was able to buy his dough mixer. Very lucky timing. I didn’t have a pottery to put it in at the time, but bought it anyway, to make sure that I had it ready for when I could install it. As it happened, John also had loads of other jobs to do, so it sat there for several months, before we could find a mutual time that suited us both, for me to go and collect it. In the interval, my friend Ross turned up one day, He is a really amazing person, who has so much knowledge and life experience with machinery. He saw me working on some of my ruined gear and asked what I planned for the dough mixer. I told him that I had given up on it for the time being, but couldn’t bring myself to abandon it. Ross had a good look at it and said that he thought that he could extract the main shaft from the gearbox and straighten it in his hydraulic press. He had done other jobs like that in the past. So I said “yes please, have a go at it”. I know that I won’t get around to it for a long time – if ever. Luckily, I had poured spent engine oil all over most of the machines to stop them from rusting too much and greased all the bearings to prevent them from siezing up, so as to preserve them until I could find the time to get to them and try to fix them. I also bought a massive tarpolin to cover them. This turned out to be a smart move, as they remained there, under cover, for over a year. I found out through this experience that there is a massive amount of condensation under a plastic tarp, so all the machines that wern’t oiled were very badly rusted. We worked on the dough mixer. Ross and I were able to dismantle all of the moving parts that still moved, and Ross took the main shaft home with him. He called a few weeks ago to say that it was now back in a good shape. Not perfect, but very good. We water-blasted the carcas to remove all the old oil, carbon, ash and burnt paint from it and I moved all the other bits inside, to keep them dry while I set about re-assembling the gearbox and all other moving parts. Ross organised a new oil seal and I had removed the main bearings and soaked it in oil to rinse clean and preserve them.
At this point, it’s looking a bit like a burnt out darlek!
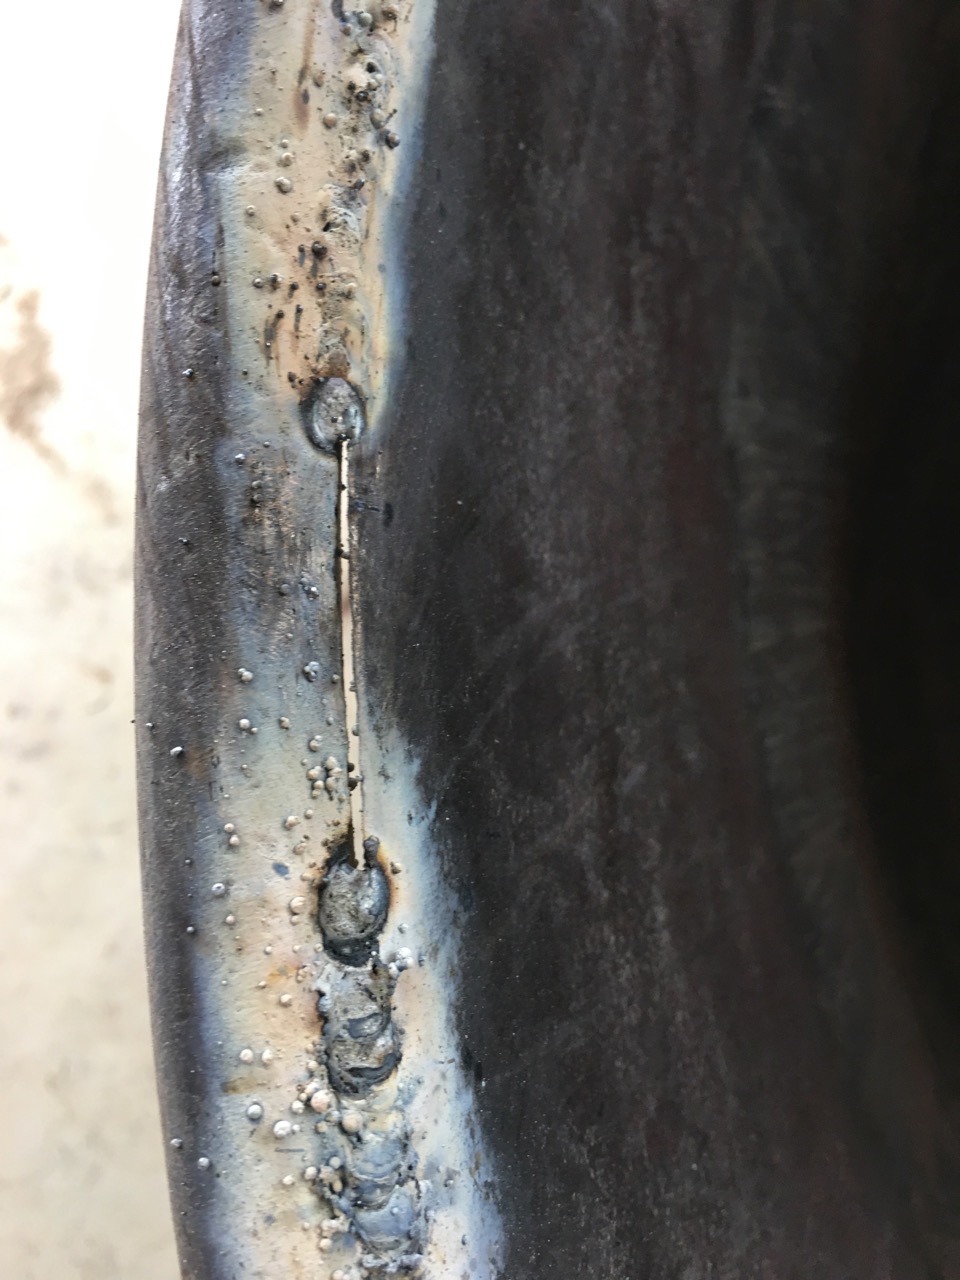
A new 3 phase electric motor, a good clean, some rust converter and a coat of zinc primer and it starts to look as though it will go again. The mixing bowl on the other hand had copped a bit of a hiding. It was split in 4 places around the rim and was no longer completely round, in fact it was a little bit heart shaped. I spent some time on it, a bit at a time, clamping it back in shape and tack welding it together, getting it as round as possible, then welding all the splits back solid again.
After a week of nights, doing all the usual things, rust converter, penetrol sealer, zinc primer, several top coats of hard gloss oil paint and its looking great.
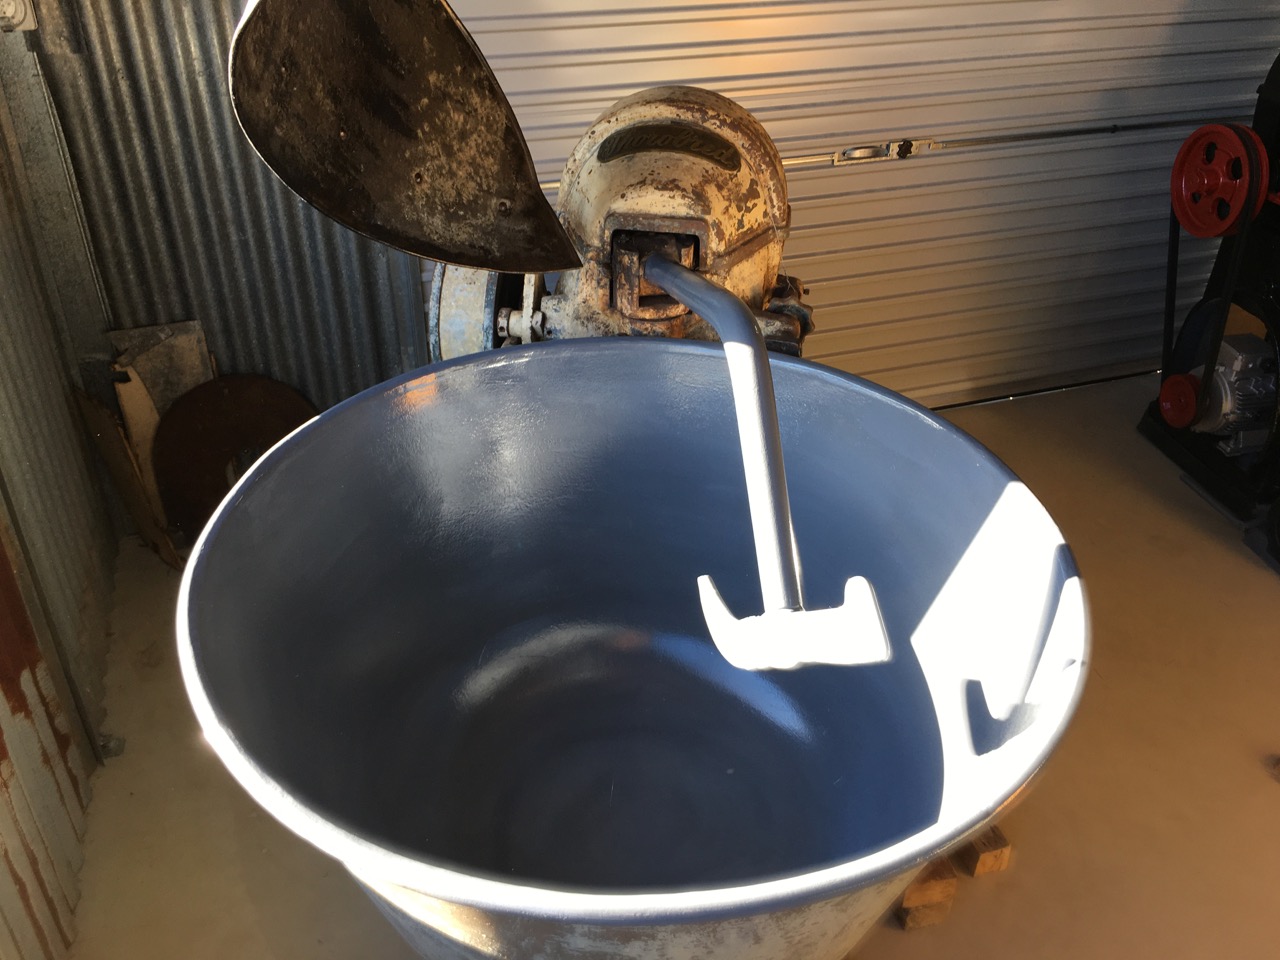
Everything is coming together now. The housing, gearbox and mixing arm have been given their severel top coats and are looking good. I bought a new 3 phase motor, new drive belts and electricals, so when I plugged it in the first time, and it actually went – I was really moved that it was back from the dead. Again! Thanks to Ross!
Now I need a pug mill and we are back in business, ready to make clay again. This restored ‘phoenix like’ twice burnt, and twice restored dough mixer sits in the same room as John Edye’s mixer that I bought when I had absolutely no idea that mine might be recoverable. Hints of ‘two-sheds Jackson’ here. Steve ‘two-mixers’ Harrison. Weirdly, my old ruined one is now ready to work before I have finally gotten around to finishing cleaning out and painting the bowl of John’s machine.
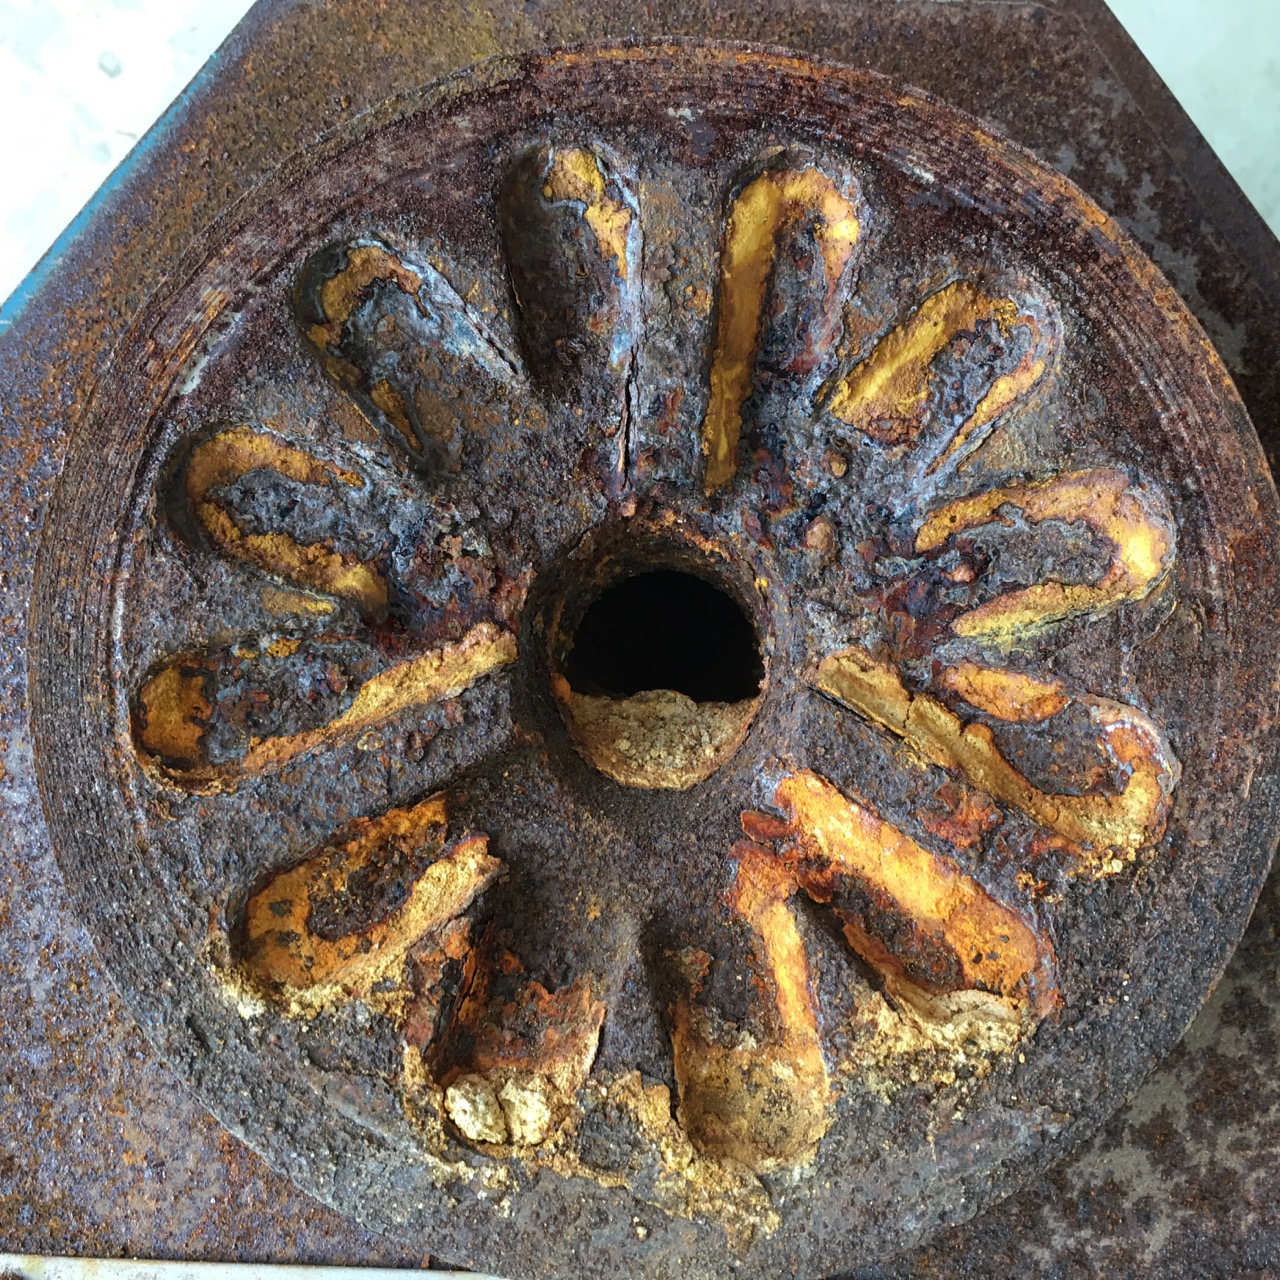
Rust converter being applied inside the bowl and the mixing arm to neutralise the rust, by converting the iron oxide that is very susceptible to oxidation with air when it gets wet, and converting the iron oxide to iron phosphate, which is quite stable and inhibits further rusting. However. The iron phosphate really needs to be sealed with a water impermeable membrane. In this case it also needs to be fairly impact and wear resistant. I have found that an oil based, high zinc, machinery paint works quite well. Well, similar stuff that I used in 1983, the first time that I restored this mixing bowl worked really well and lasted for 36 years! Of course, there is no guarantee that anything on sale today will last as long.
The bowl after rust conversion. I sent this image to John and we both agreed that the inside looked al to like an ancient ‘hare’s fur’ tenmoku glazed tea bowl.
As the year has dragged on into 18 months since the fire. We are flat out busy with the re-building project. We had a slow start waiting for the insurance company to decide what to do, then putting plans to Council for building approval. Everything takes time. We weren’t sitting on our hands during this waiting period. We shifted the burnt out orchard and all its well composted and richly fertile soil up the hill so that we could build the new pottery on the old orchard site. We were able to get that done before the end of winter, so that we could plant all the new bare rooted fruit trees before bud burst.
Although we spend every day working on the building, there is always a few minutes or and hour here and there that can be stolen from the shed project to work on restorring these odd bits of old machinery. I found a couple of unloved bits of machinery that were worth restorring. One was so corroded that it took an angle grinder and then a hammer and cold chisel to clean the rust and scale out and get it unseazed and rotating again. I have become a lot more familiar with bearings, oil seals, gear boxes and pulleys these days.
This is about as bad as it gets before the rust eats through the wall of the machine.
After chipping away at the flakey scale, then attacking it with an angle grinder with a rotary brush, then finally hitting at the stubborn bits with a hammer and cold chisel…
It has come good and has now had a coat of rust converter, phosphoric acid.
There isn’t much that an angle grinder, wire brush, hammer & chisel, then a few coats of rust converter and primer can’t fix. – and a week of evenings!
John Edye, eminent potter and my Friend and collegue of over 40 years has retired from making pots. When I heard that he was retiring last year, I got in touch and asked what he was intending to do with all his equipment. I was very lucky that I was first to ask. As we lost almost everything to the fire in December 2019, It crossed my mind that he may be interested in selling some of it to me. I was particlarly interested in getting a dough mixer for my clay making. As our old one has now gone through two fires, in 1983 and again in 2019. I was lucky enough to get it going again in ’84, although it was quite wobbly afterwards. After this last fire the burning roof beams fell in on it and the main shaft was so badly bent, that I couldn’t rotate anymore.
We bought John’s dough mixer, damp cupboard and some pot boards. It was a bit of a job getting them out of John’s very beautiful, but remote country property, deep in the wet forested gullies between Kulnurra and Wollombi. John was well prepared and had all the gear up on pallets, or steel pipe rollers. My friend Dave has a truck with a pal finger crane, so we were able to get in there and lift the gear out. Everything was much easier at my end, as I have a concrete slab floor for the first time in my life and a pallet lifter trolley to move heavy bits of machinery.
John’s mixer in its new home, with a nice view from the window.
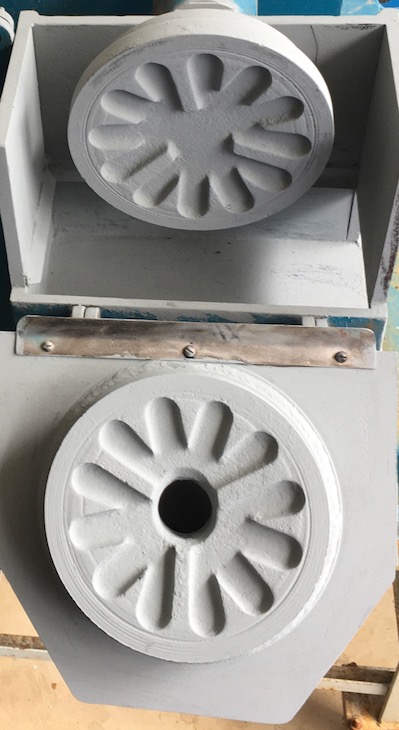
I have started to grind and clean the inside of the bowl. It’s had its first coat of rust converter. it still needs a couple of top coats of a hard wearing oil-based machinery paint to suppress the rust.
I have also been offered a pug mill, shimpo wheel, Leach style kick wheel and various other bits and pieces of pottery gear from other friends who have surplus equipment, are also retired or are choosing to go smaller, but these are yet to arrive here.
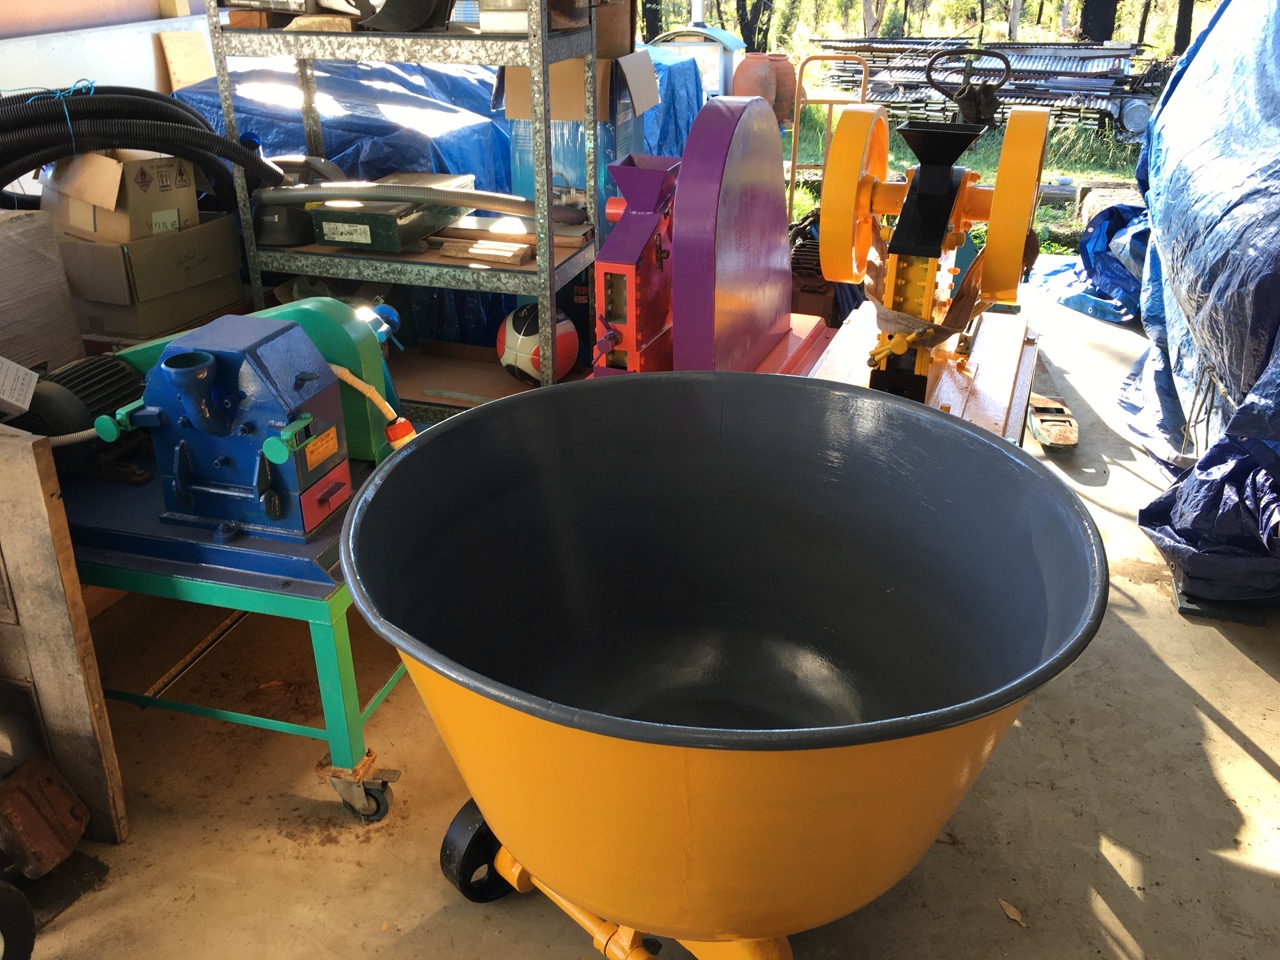
The crusher room in the machinery shed is filling up slowly as I tinker away in my spare time after work between midnight and dawn as I slowly pull apart, clean or replace, then reassemble and finally paint this diverse collection of antique crushers and grinders. This is such a different aspect of my philosophy of self reliance, but actually quite rewarding and enjoyable.
I have painted them up in bright colours like big toys – just to cheer me up a bit.
I need to stop lazing around and get some real work done! The pottery studio needs to be finished, as this is the last room to be completed. Then we can apply to the Council Inspectors to get our final inspection and a Occupation Certificate. I know that there will be many little items that will need to be done and ticked off to get it all through. I just don’t know what they will be yet, not until the inspectors tell me what are.


You must be logged in to post a comment.