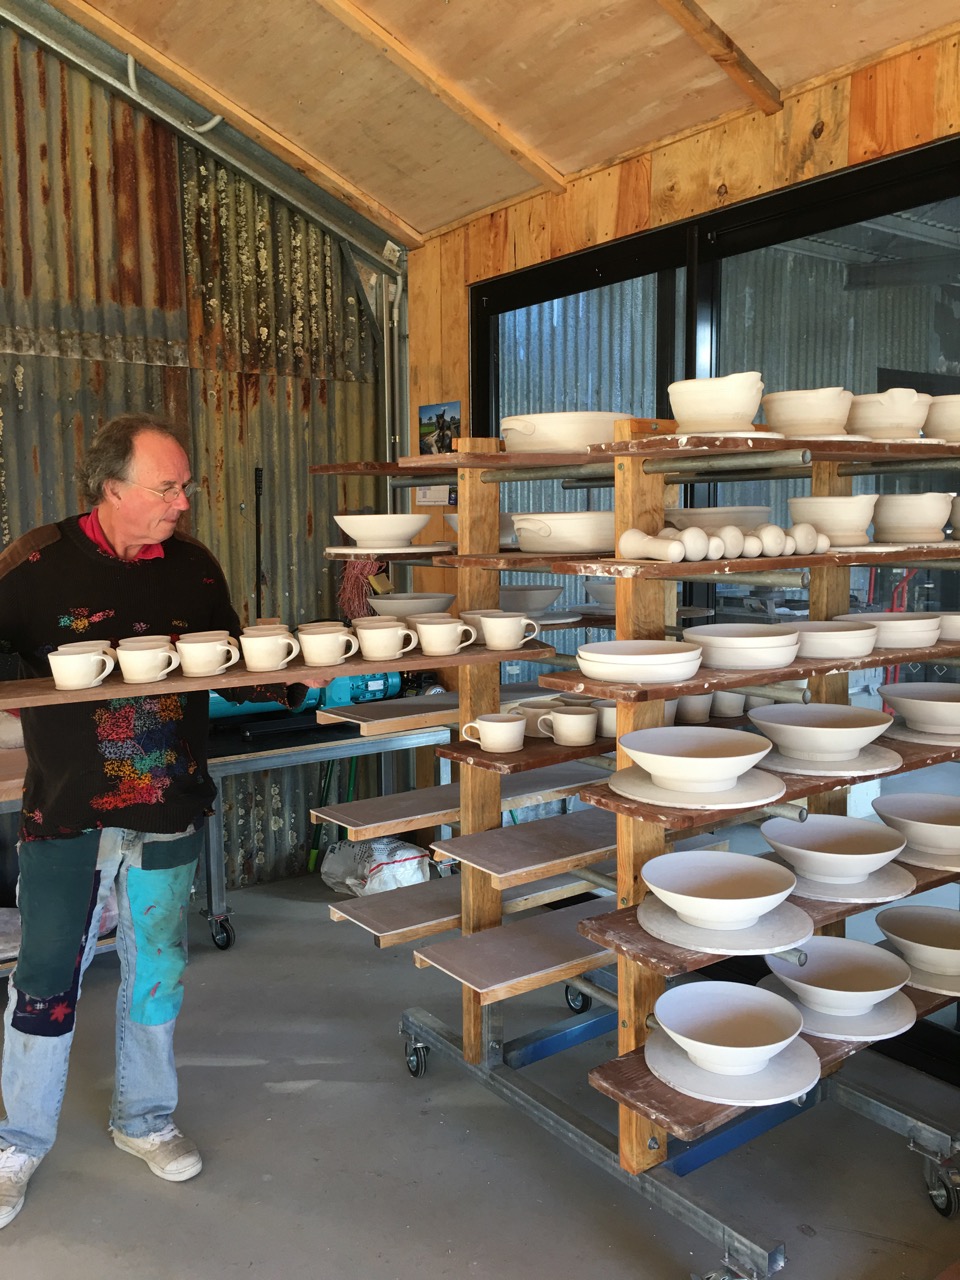
Janine and I have been hard at work making pots, glazing and firing, getting ready for next weekends Open Studio Sale.
Everything else has been put on hold, while we clean up the studio and finish glazing and firing to get pots on the shelves ready for next week.
We will be Open from 10:00am til 4:00pm. each day , Saturday, Sunday and Monday of the long weekend.
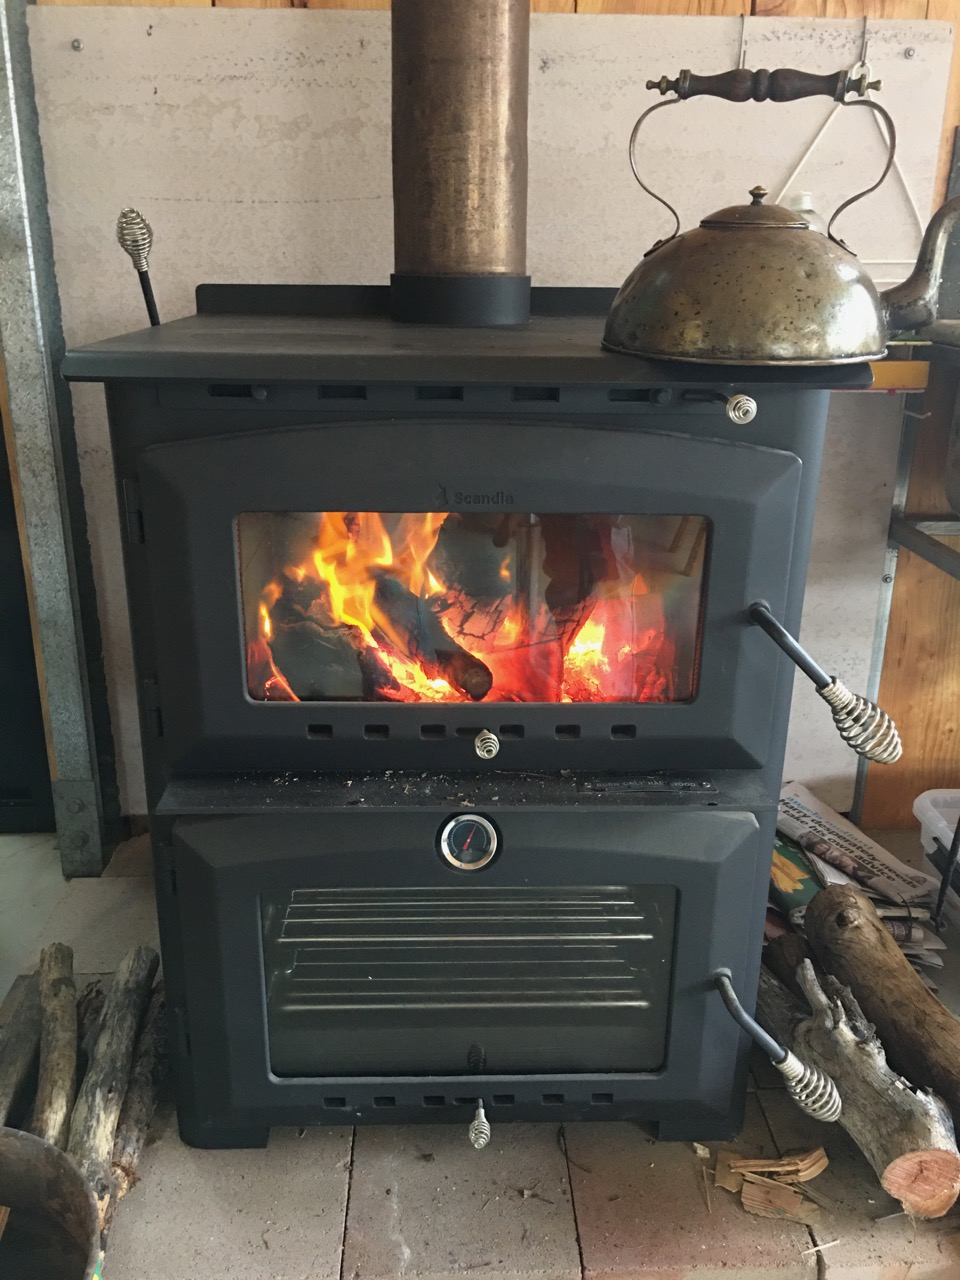
A few weeks ago, it was starting to get cold enough to warrant lighting the wood stove in the pottery studio.
We bought the stove last year in spring when it was the last one in the shop and on sale, reduced by a couple of hundred dollars.
Although it sat there in the pottery uninstalled all year. It turned out to be a good decision.
I saw the same model on sale recently, at the beginning of Winter, for $500 more than we paid.
So I finally got around to installing the chimney and roof flashing in time for this recent very cold spell.
We have had temperatures drop down to just 2 oC this last week, the first week of winter, with so much more to come as the winter proceeds. The stove has had a bit of use each day this week keeping us warm while we work.
This new model of wood burner incorporates an oven as well, so Janine baked a cake during the week to test it out and it worked really well.
I’m looking forward to more fresh baked cake and coffee while we work in future!
Over the past couple of weeks, we have been making pots, working towards the June Long Weekend ‘Pop-Up’ Open Studio Weekend.
I have finished building work for a while. I need to be making pots, no more work on the house until later in the year. I still need to fireproof the facia and eves of the roof against ember attack. The roof is now completely watertight. That’s the first step complete. Andy came back to help me fit the last sheet of roofing iron and then screw down the ridge capping, while I followed behind peening the ridge capping into the corrugations of the roofing iron. A very solid, proper, solid job of roofing. I’m glad that roof work is now over for some time.
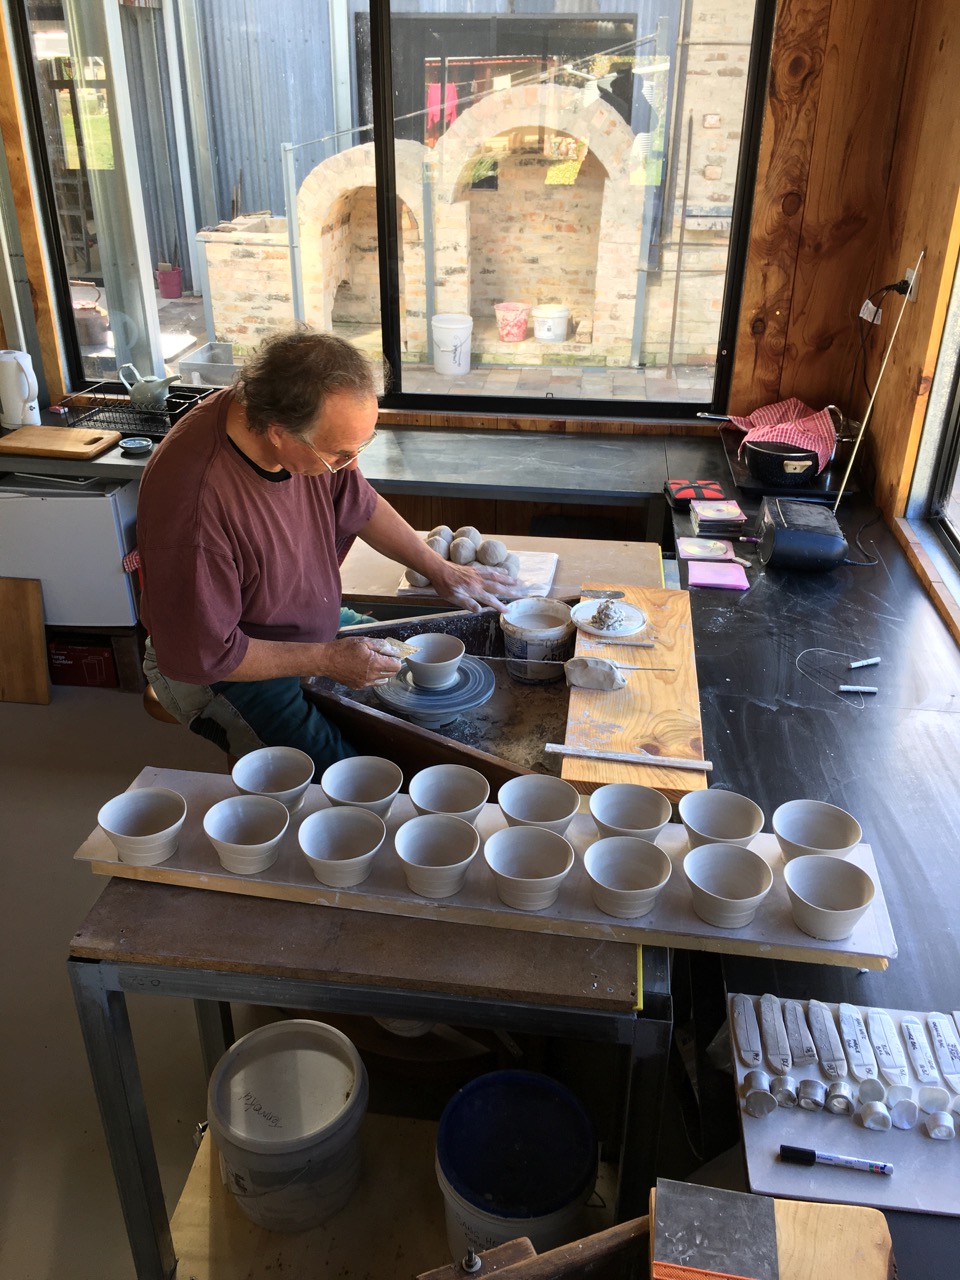
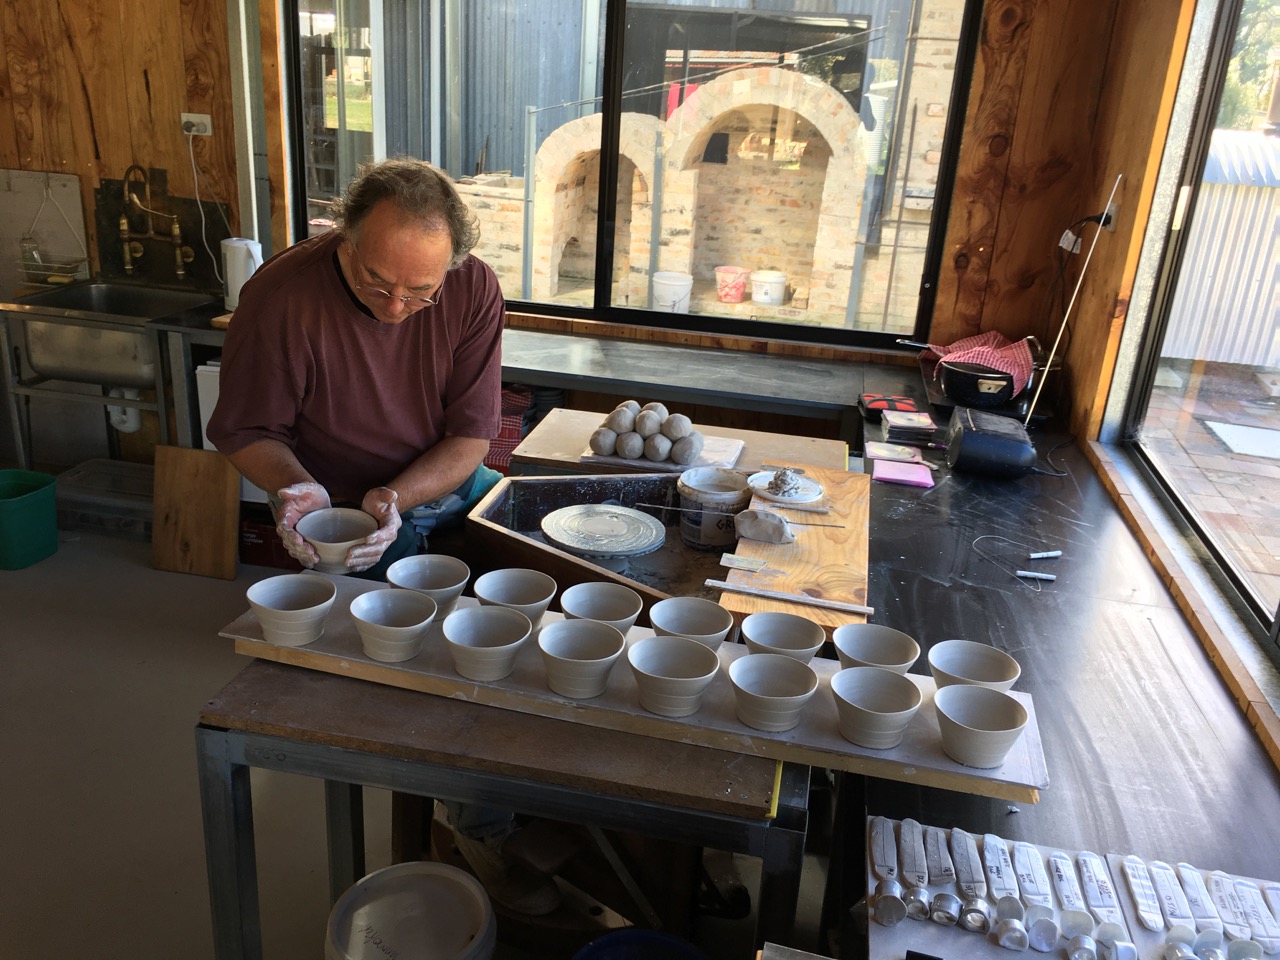
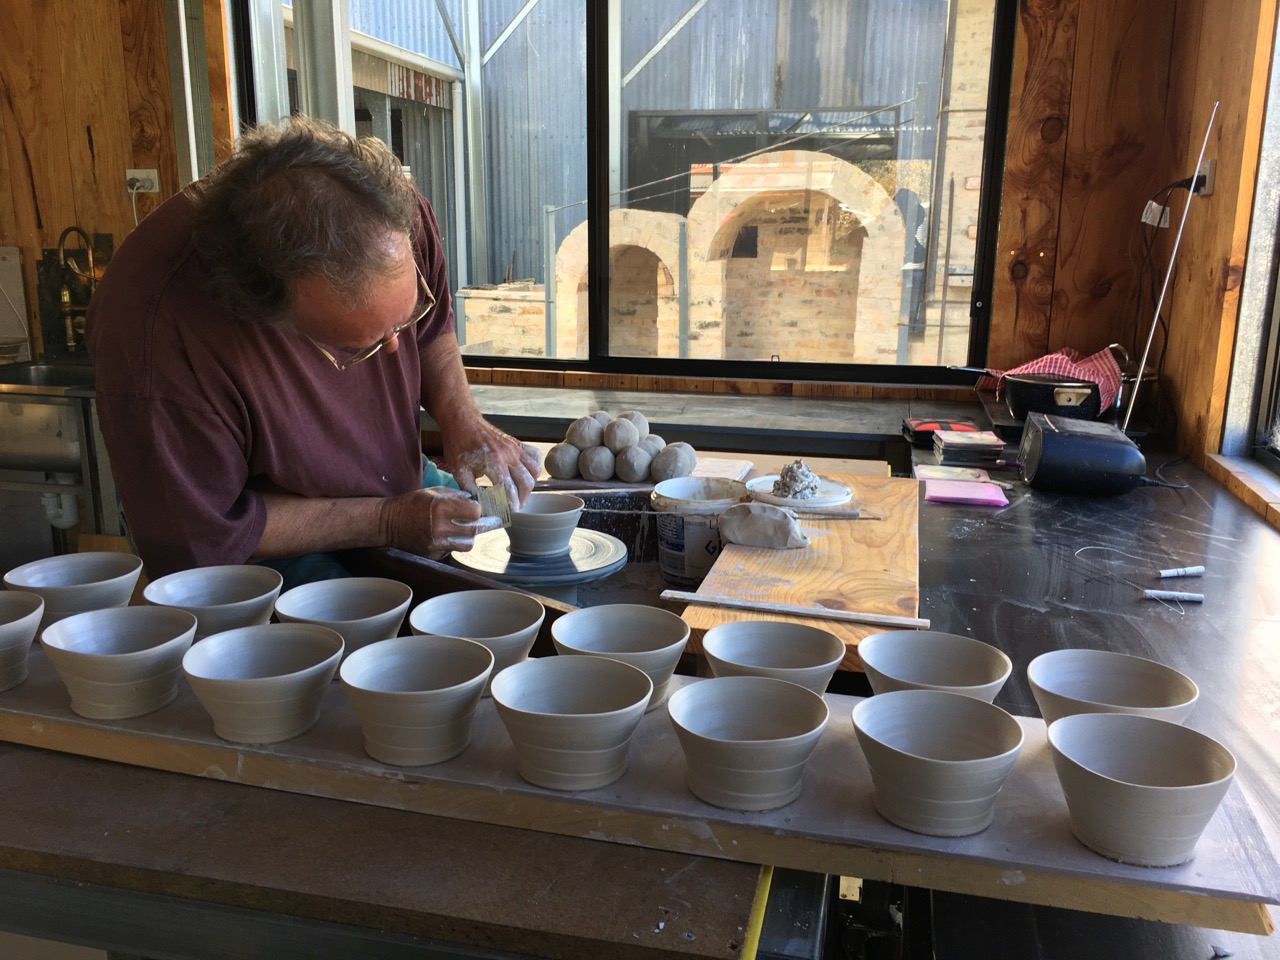
In the pottery we have been throwing and turning domestic items like cups, bowl and plates to fill out the shelves for our Open Studio Sale.
I made 100 cups.
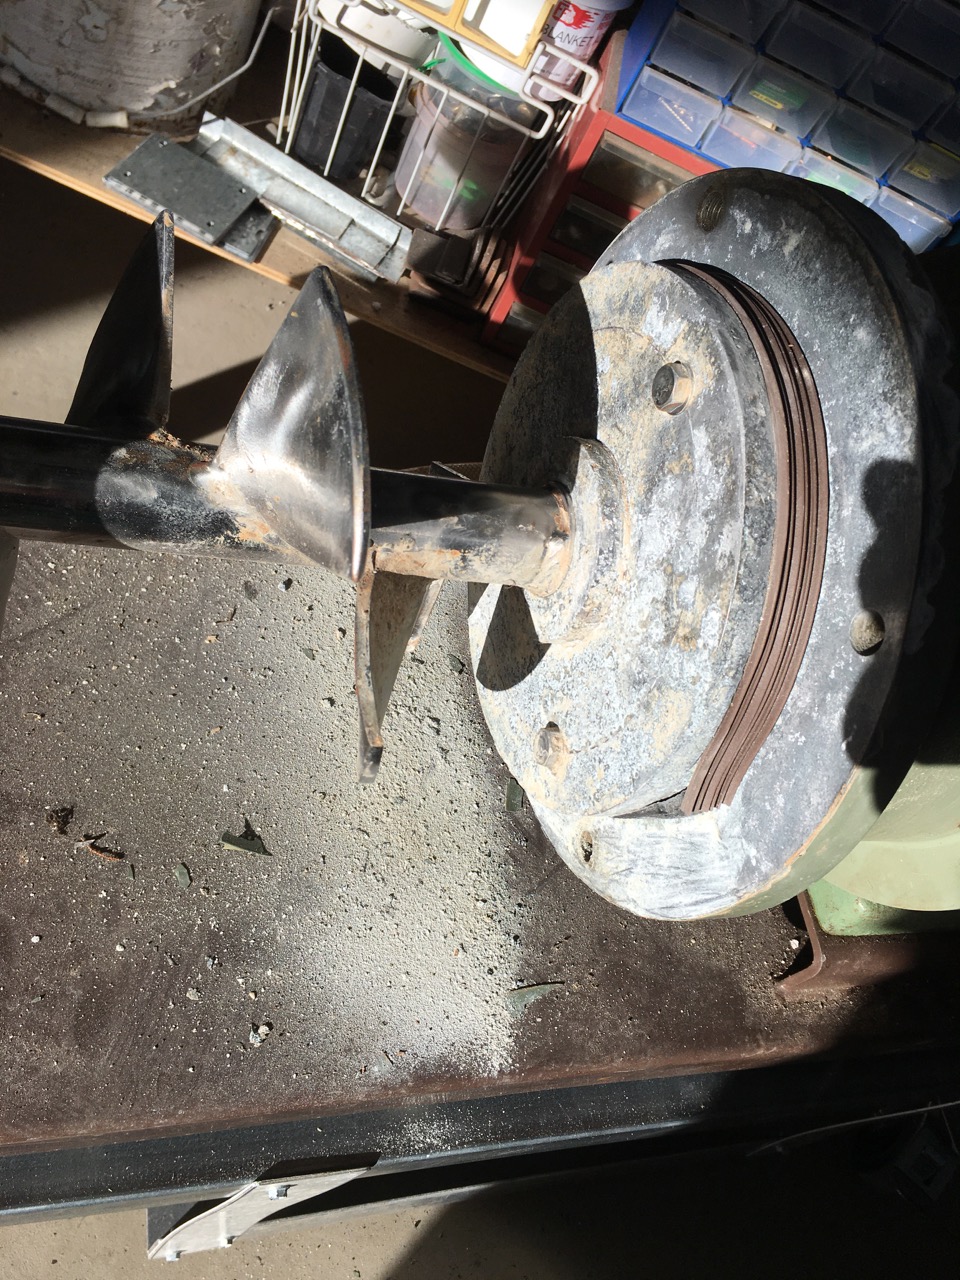
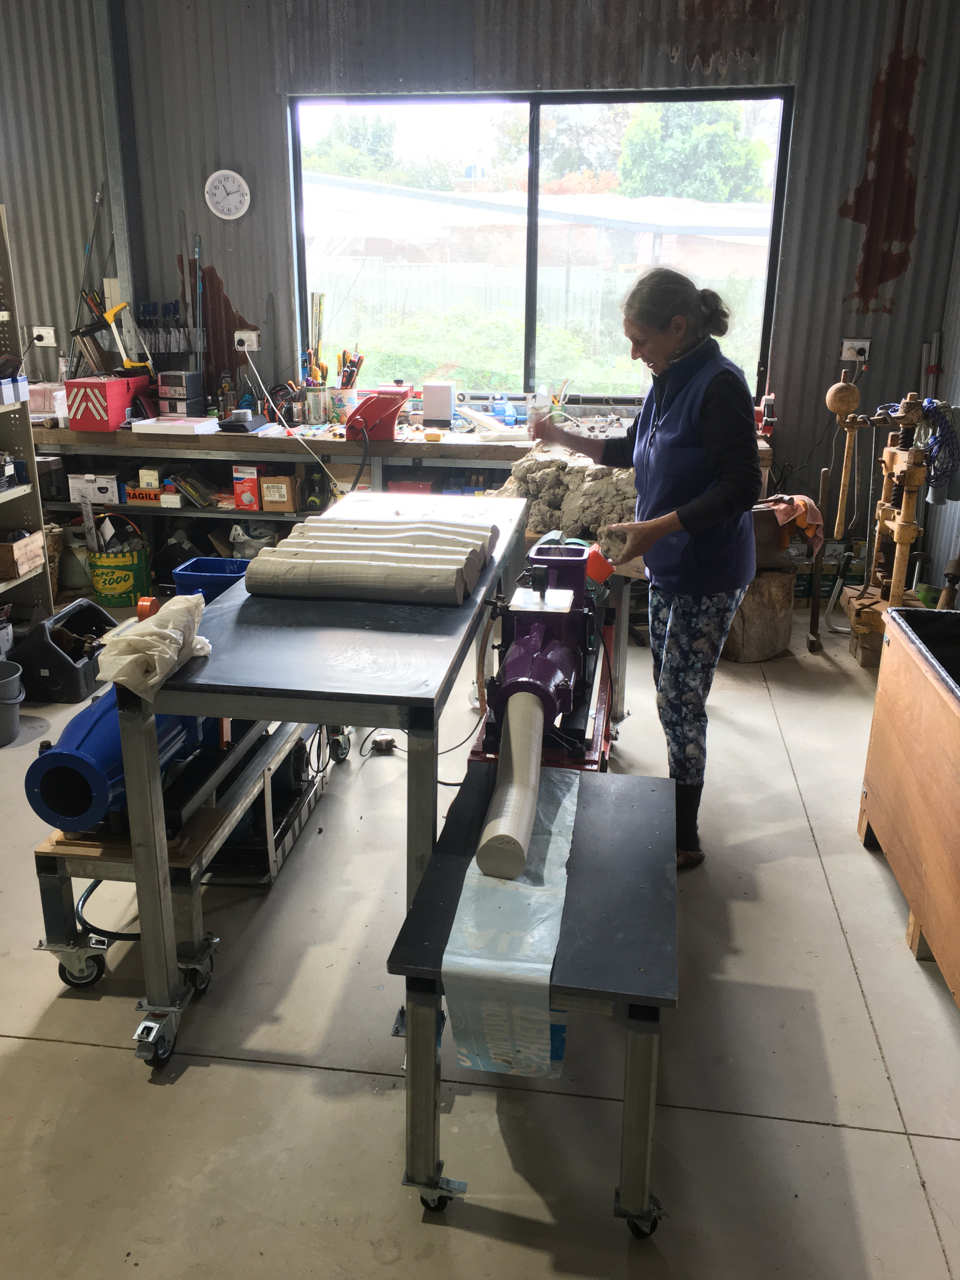
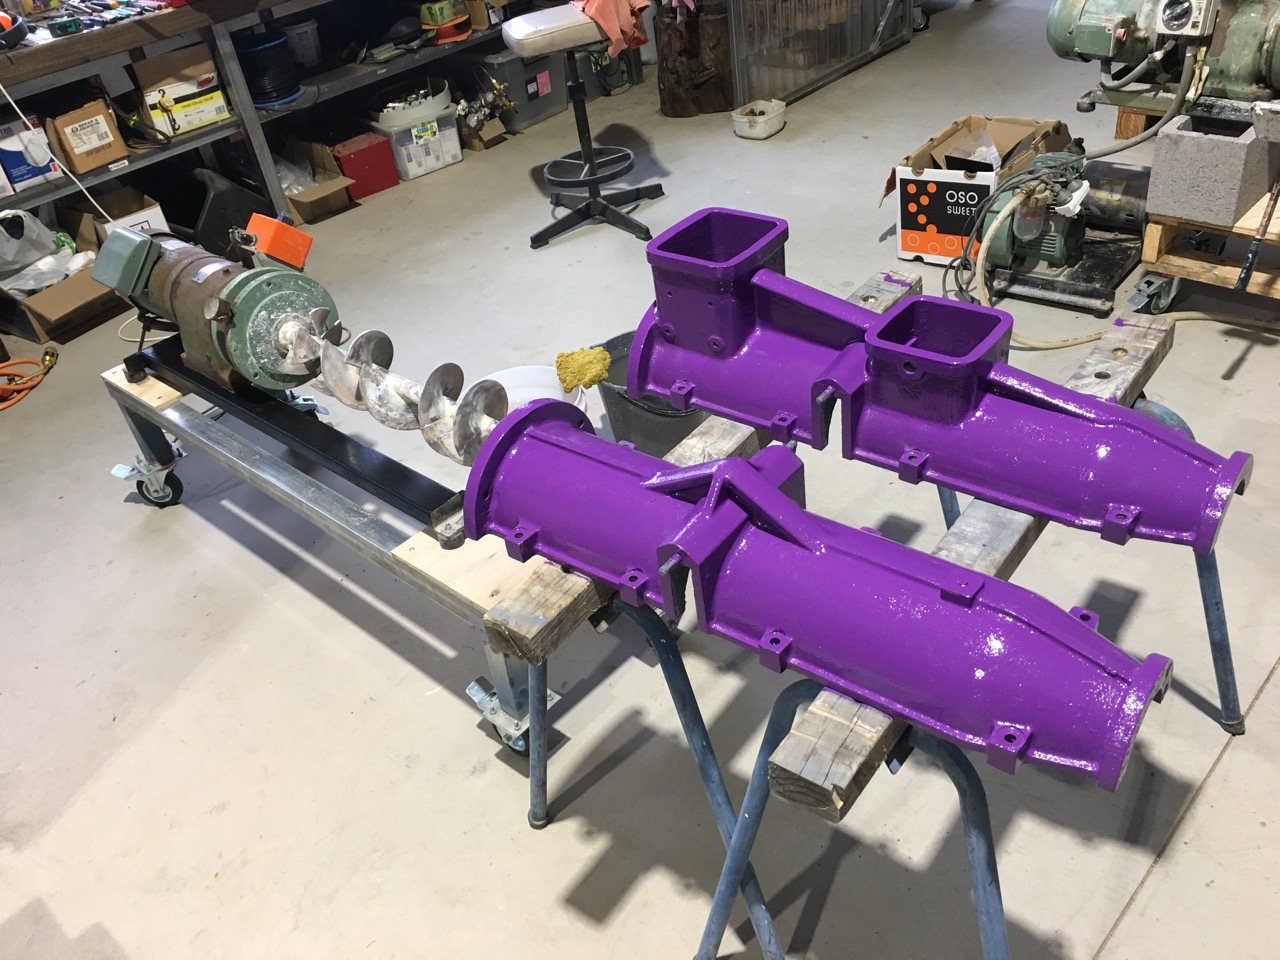
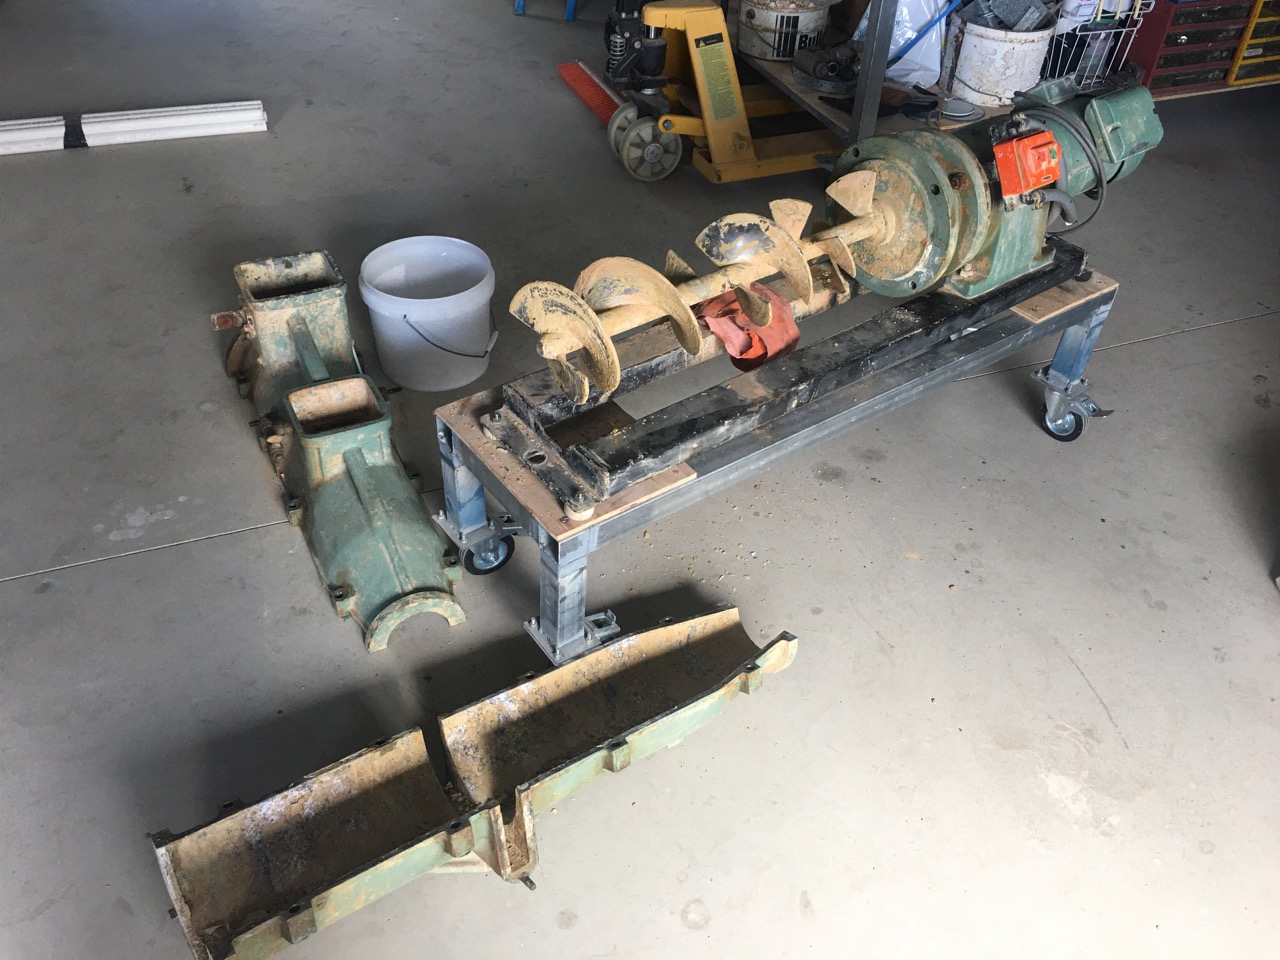
On the on-going pug mill front. I stripped down the big blue pug mill and took the motor off and sent it away to be re-wound and repaired – if that is at all possible? I should know in a weeks time. In the mean time, I took the worn-out vacuum pump off the purple pug and swapped it for the good one that was on the blue pug. So now I have a good working 3” purple pug that we are using for our white stoneware clay and the buggered vacuum pump is now on the blue pug mill that has no motor. A matching pair of non-goers. Well for the time being at least. I will get back onto that problem after our Open Studio Sale.
The blue pug is hoisted up onto a tressle to keep all the new, clean gear box oil down in the gear box while I take off the motor. There is no easy, clean way to drain the oil without some mess, so I’m leaving it here for the time being. Hopefully the motor can be rebuilt and back on the machine within a week or so?
I rang my friend John Edye recently and enquired about the 4” Venco Pug mill that he had for sale a while ago. I bought a lot of his equipment last year when he retired. I didn’t make an offer on the pug mill, as I thought that I was going to get a couple of pug mills from other friends. As these have proved to be a little bit problematic. A rang John and asked if the big pug was still for sale and amazingly it was. I’m so lucky! I bought it over the phone and made the trip up to John’s place to pick it up. Luckily, it isn’t as far away as Melbourne and I could do the return trip all in one day. John assured me that it worked, but that it had a lot of corrosion inside the barrel. I’ve dealt with that before over the years by fill ing the worst holes with a home made epoxy based filler, or ‘wick-in’ thread sealant, that seeps into crevices and sets in the absence of air.
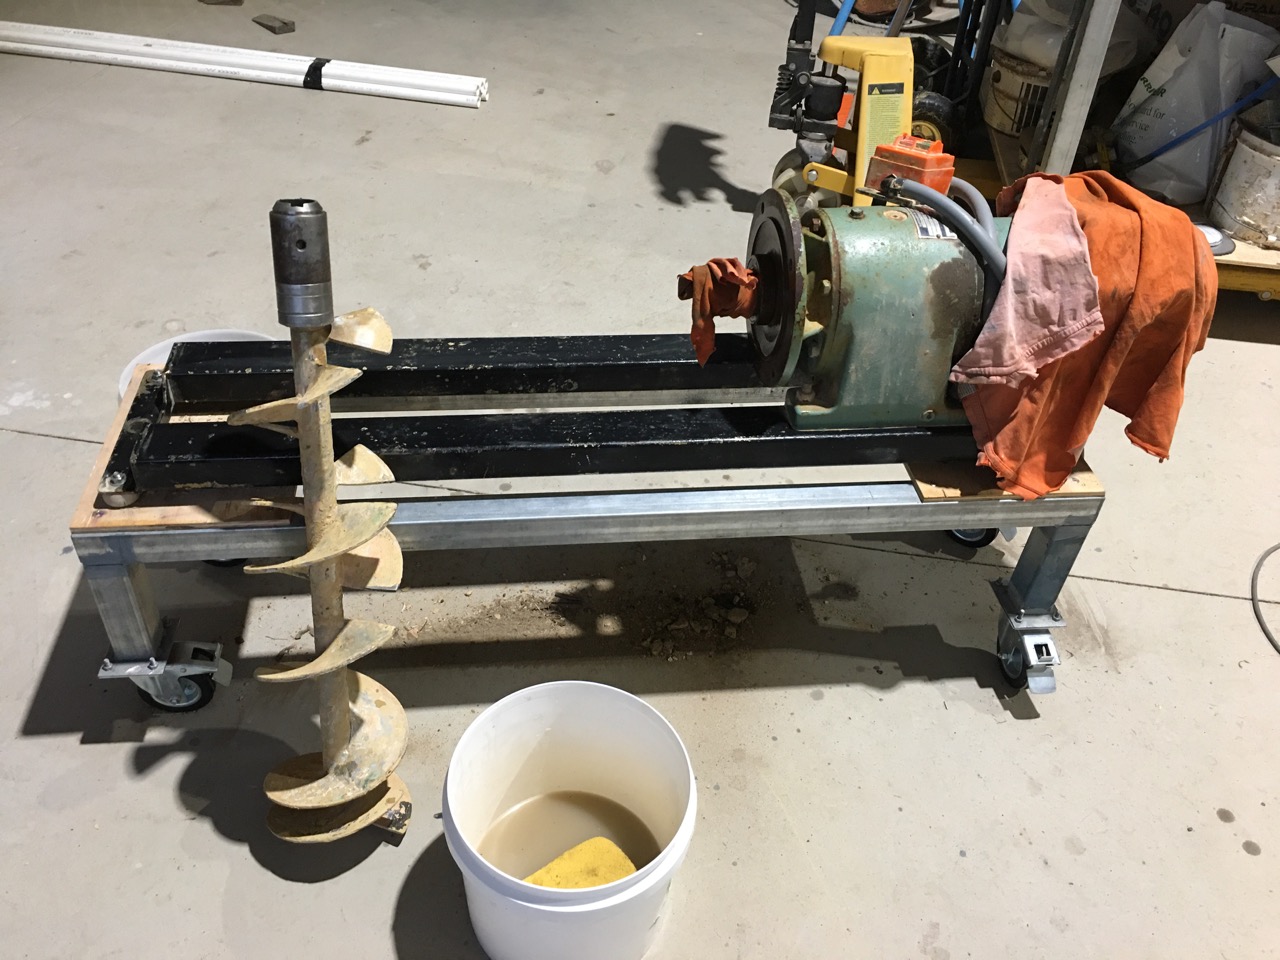
When I got the pug mill home, I was able to lift it off the truck and straight onto a wheeled, steel pug trolley that I had welded up in advance. I even had a vacuum pump cradle welded on underneath for the pump. These machines are way too heavy for me to lift, so having them on a mobile trolley is the way to think about them.
It’s interesting that this machine is the first model of Venco 4” vacuum pug mill and presumably dates from the late 1970’s. It has an inline plunger handle and all the castings are different from the later models.
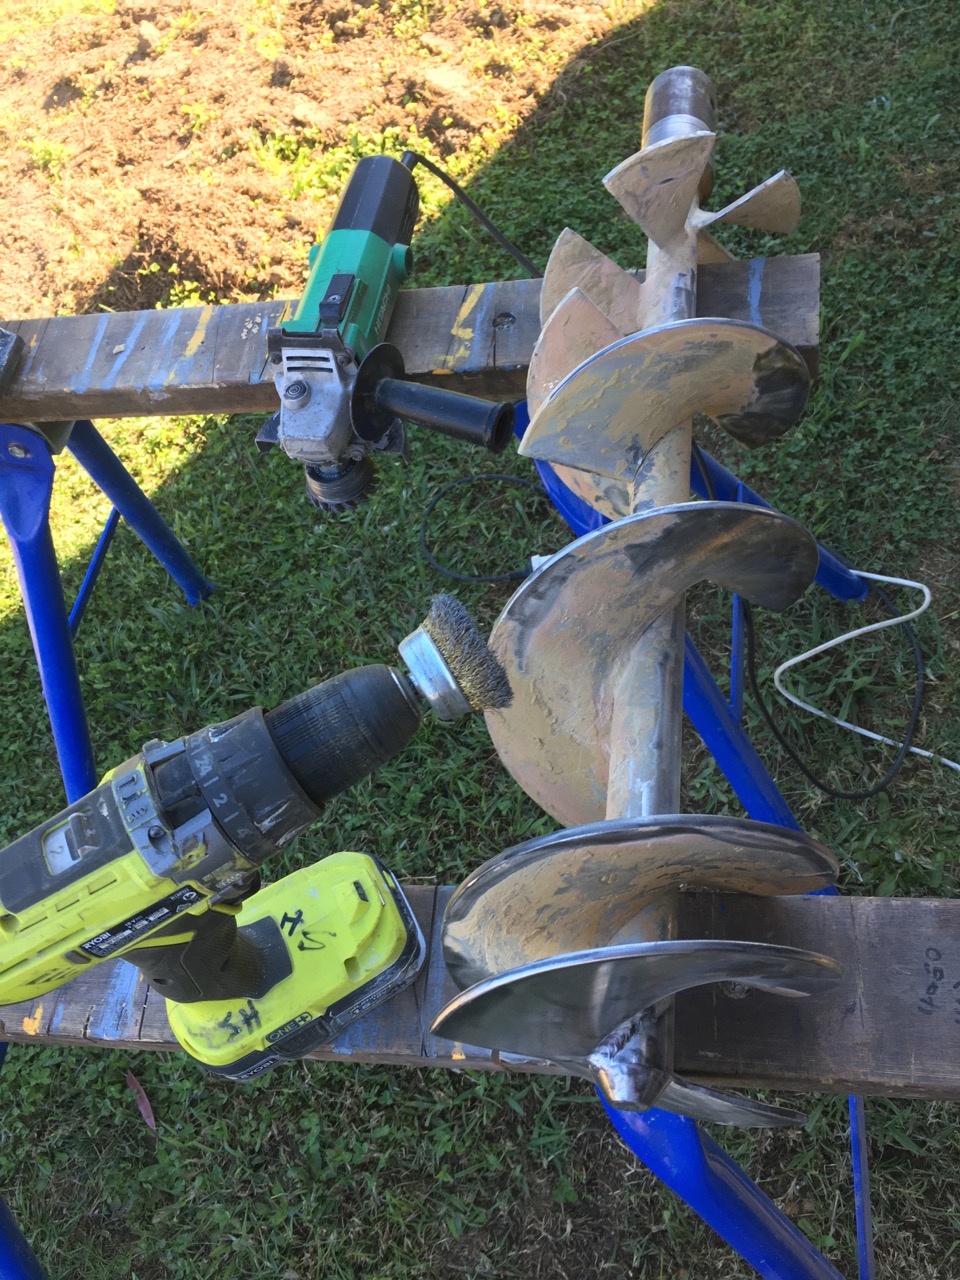
I had a bit of trouble getting all the bolts loose to strip the pug down to clean it out. A few bolts needed the impact-driver to get loose and one snapped off, requiring the hole to be drilled out and the thread re-tapped. Slow and a little bit tedious, but all do-able.
The pitting is deep, but hasn’t gone through the wall and with a little bit of maintenance, will see me out I’m sure. I cleaned everything back to the metal. There was a lot of flakey white aluminium oxide to clean off.
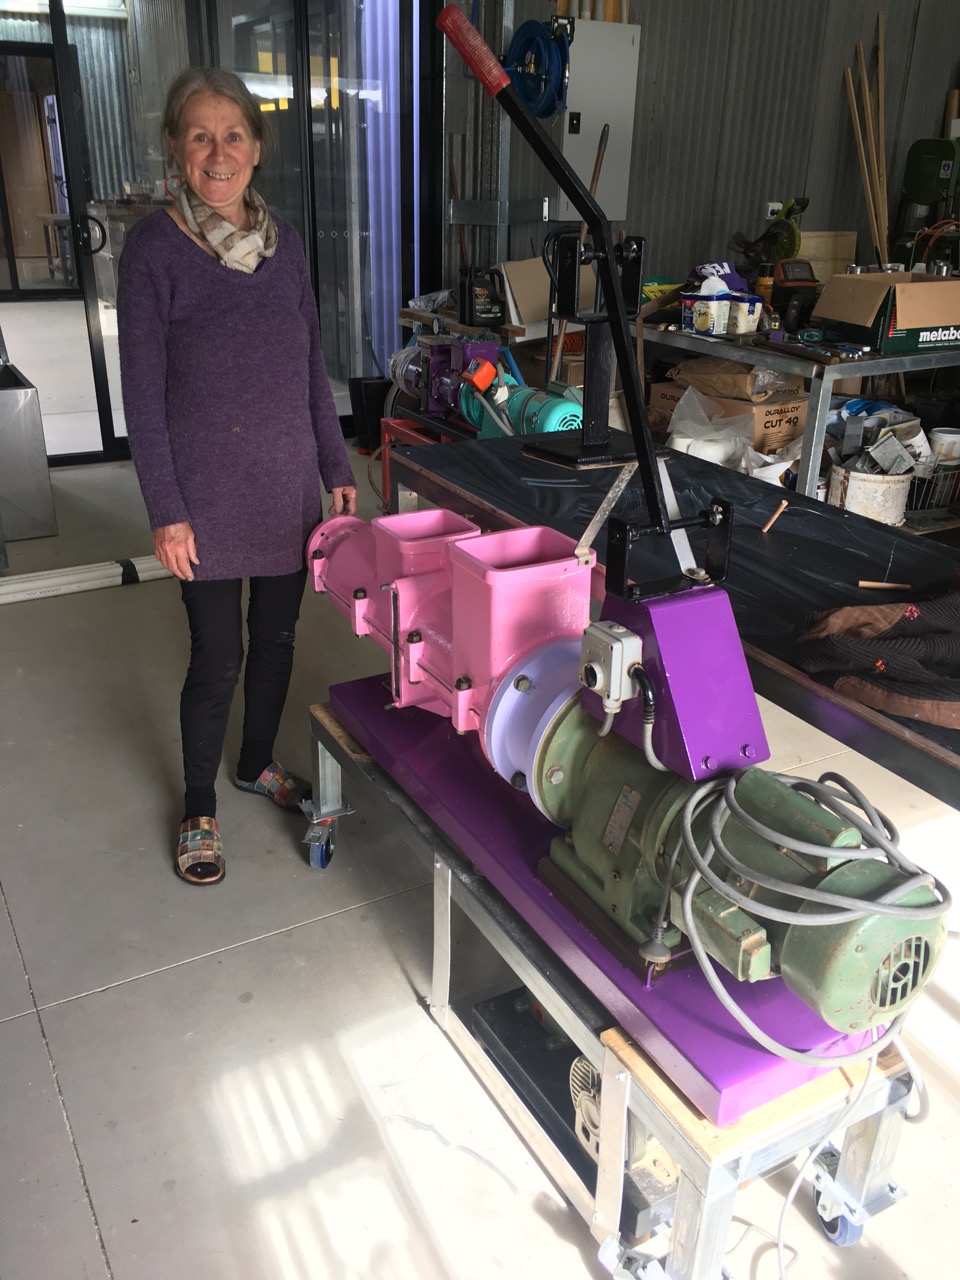
Some etch primer, followed by a couple of coats of paint and it is all back together now and ready for work. I’m not too sure how John will take the new colour scheme I’ve chosen to cheer up the clay making area of the workshop? Pink, purple and mauve, with a little bit of black detailing. I like it!
When all of this clay making machinery trouble is all sorted out, it will make our life so much easier. I am committed to making almost everything myself. To be as self-reliant as possible, in food, in water, in electricity, in wood fuel, and this extends to clay and glaze making in the pottery. The principal difficulty that I am dealing with here is that I’m trying to replace in a couple of years, what it took me to build up over the past 40 years of life experience. I don’t remember it being so difficult in the past, but I guess that I was only dealing with one or two problems per year over that extended time. Now I’m trying to do everything at once. It is a bit easier this time around as I have more life experience and more skills, but I’m so much older now and I don’t have the same energy that I used to. I certainly find it harder to go back down to the workshop at night, after dinner and continue working. Although I still do sometimes!
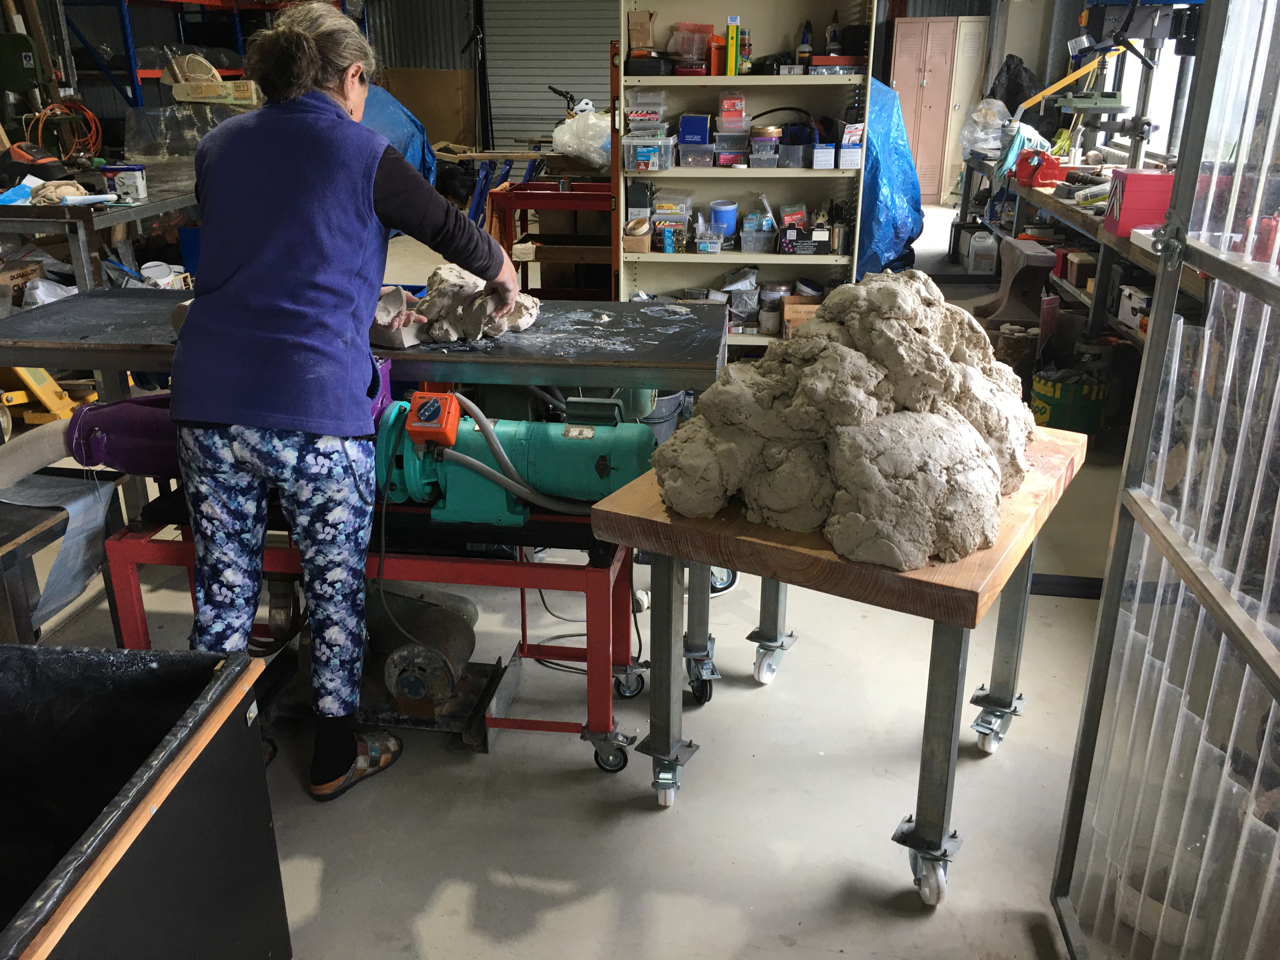
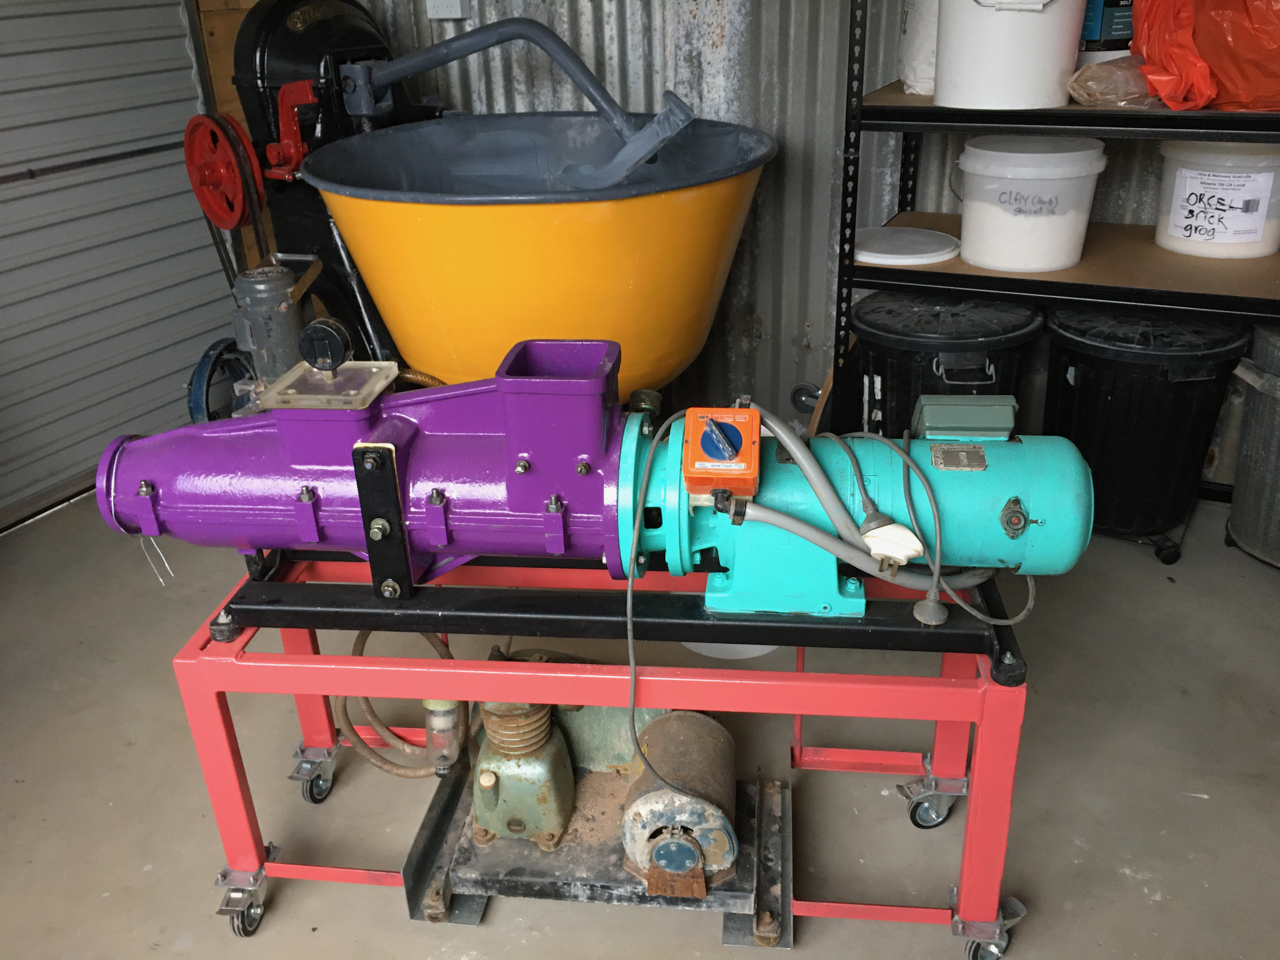
Well, I thought it was. With 2 pug mills apparently fixed. I decided to make up a few batches of clay in the repaired ‘phoenix’ dough mixer. We had run out of the last quarter tonne batch of clay. All we had in the clay box were several bags of recycled turnings that really needed wedging thoroughly, or pugging. We opted to mix all the re-cycled turnings in with the new batches of clay and pug it all together. All well and good. It should have been so easy.
The dough mixer worked perfectly and I soon had a batch of plastic clay on the clay trolley and out to the rebuilt pug mill. Janine started pugging the clay while I mixed a second batch. Each batch is comprised of 100kgs of dry powdered clay, felspar and silica. These powders are all mixed together dry, then I add 24.5 kgs of water to the batch and the mixer stirs it all together into a stiff plastic, sticky mass. It then has to be hauled out of the mixing bowl, bit by bit and stacked onto the clay trolley to be wheeled out to the pug mill.
I could hear the big pug motor ‘whirring’, the gear box grinding, and the vacuum pump making its ‘phut’, ‘phut’, ‘phut’, noise. as I worked in the clay mixer room. Then nothing. When I came out to get the clay trolley to reload it with the 2nd batch. Janine was standing there looking a bit puzzled. The pug mill had stopped. The motor was working when I rebuilt it, but that was without any load on the motor, just ‘free-wheeling’ . As soon as the clay went in, the load on the motor increased and it just stopped. The over load switch clicked in and it wouldn’t restart.
Bummer! We now had 2 loads of clay needing pugging and a machine full of clay, but no action. I couldn’t do anything about it right there and then. The machine will need to be stripped down again at some stage. But right now I need to pug this clay. The only option was to wheel ‘Pugsly’ out. I was hoping to keep it clean and ready to pug the first batch of porcelain clay. That’s now a pipe dream. We start pugging the white stoneware through Pugsly. It starts well enough, but then I realise that the vacuum pump isn’t working. It’s making the right noises, but the clay is coming through with air bubbles in it. I can lift the lid off the vacuum chamber white it is working. This lid should be severely locked down tight by the vacuum pressure. Again, I can’t do anything about it immediately, I’ll have to figure it out later. I need to get the clay made, bagged and into the clay box, before it dries out.
I just spent a month of all my spare time re-building these two machines. One doesn’t work at all and the other doesn’t work a very well. I’m a complete failure as a mechanic. This is a real lesson in humility. When all the clay is finally pugged. Tonights dinner will be humble pie for me. One small up-lifting part of this whole disappointing exercise is that the paint work was a success. It’s bright, colourful and cheering. That’s a small reward.
We spend two days processing all 400 kgs of clay and putting through the pug mill twice. Each batch is pugged and laid out on the clay table in rows and layers of sausages. Because there is the possibility that I could have made an error while weighing out the dry ingredients, or that there might be slight variations in the materials as delivered in the various bags. We pug all 4 batches of clay, then chop the ends off every sausage and re-pug the clay to make sure that every sausage that come s out of the 2nd process has all the same consistency. This is then bagged and stored in the clay box. It’s a bit of teamwork to get it all done efficiently and as quickly as possible, with as little mess as possible. However, inevitably, There will be some clay that gets dropped on the floor.
Once all 400 kgs of the clay is pugged, bagged and in the clay box, a very slow process, as the 3” pug is so much slower than the bigger 4” one. We have to clean up the floor to control the dust. A very small successful part of this protracted failure is that I built all the clay tables and trolleys on wheels, plus I mounted both pug mills on castors. We mop the floor all around the pug mills. Then wheel everything out of the way, and clean the floor under where the pugs were. It’s all quick and easy, and every part of the process of cleaning up is a success. It’s soon time to roll everything back into place. Ready to start pulling both machines to bits and finding out the problems involved, then sorting it all out.
Jane’s big pug has a motor problem. It wants to start, but can’t get going. It must be the starter windings or the starter capacitor. I pull the motor off and take it into town to find someone who knows about such things, to get the parts that I need to get it going again – hopefully. I’m told that it is most likely the starter solenoid. There isn’t one to be had in Mittagong at either of the electrical workshops, so I order one. It should be in next week. Watch this space.
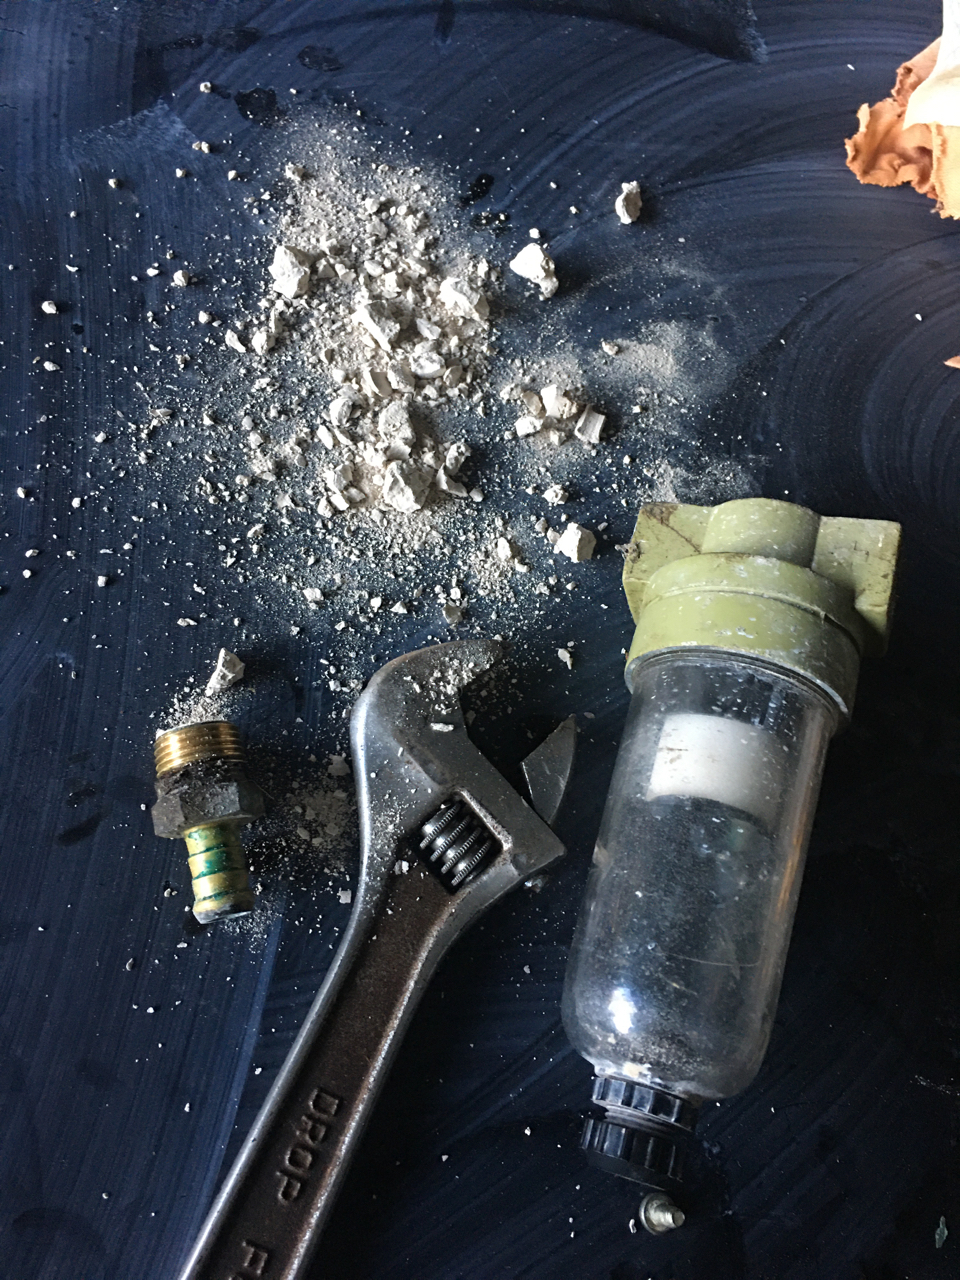
Now for Pugsly’s vacuum pump. I think that it is something to do with the valve, hose and filter, vacuum air line. I disconnect the plastic hose, turn on the vacuum pump and put my finger over the end of the hose and it has hardly any suction at all, but there was some, just a tiny bit. I pulled it all to bits and found a few things out. The first was that the filter had been installed back to front at some stage in the past. Someone has had it to bits at some stage in the past and put it back together back to front. I hadn’t thought to check that when I started work on it. I’m totally hopeless as a fitter and mechanic.
When I got it off. I also discovered that it was chocker block full of white clay – on the pump side, not the pug side of the line. This is theoretically impossible, so that was a bit distressing. As I continued to dis-assemble it all, I also found that the sump of the pump had white clay mixed in with the oil! That would have ground out the bearings! I drain the oil out and replaced it with fresh oil. Ran it for a short time to rinse out all the old oil from the crevices, then drained it again and refilled it with new oil again. After reassembly, I test it and it has quite good suction. So not such a bad outcome.
I decide to have a look at the vacuum pump on the big pugmill. I discover that it has been over filled to the brim with oil. I drain 2/3s of it out until it is back down to the indicated upper level in the sight gauge. Everything else seems to be in order. However, because I’m such a hopeless mechanic, there could still be more issues to deal with the next time that we get to test these machines out.
It would have been so much easier to buy new machines from the start and I wanted to. I even had the money for them set aside to pay for them. But ‘Venco’, the pug mill manufacture here in Australia closed down a few years ago, when Geoff Hill, the proprietor died. The company has re-started under the new ownership of his grand son, but only in a very small and intermittent way. They have no plans to produce the 4” pug mills for some time yet. So far they have only made 2” pug mills, with the first batch of 3” pugs coming through now.
So I am stuck with my ineptitude to muddle things through. I will get it all done, but it is frustrating and very, very slow.
This last few weeks has seen us making pots, but also getting into some serious repairs and maintenance.
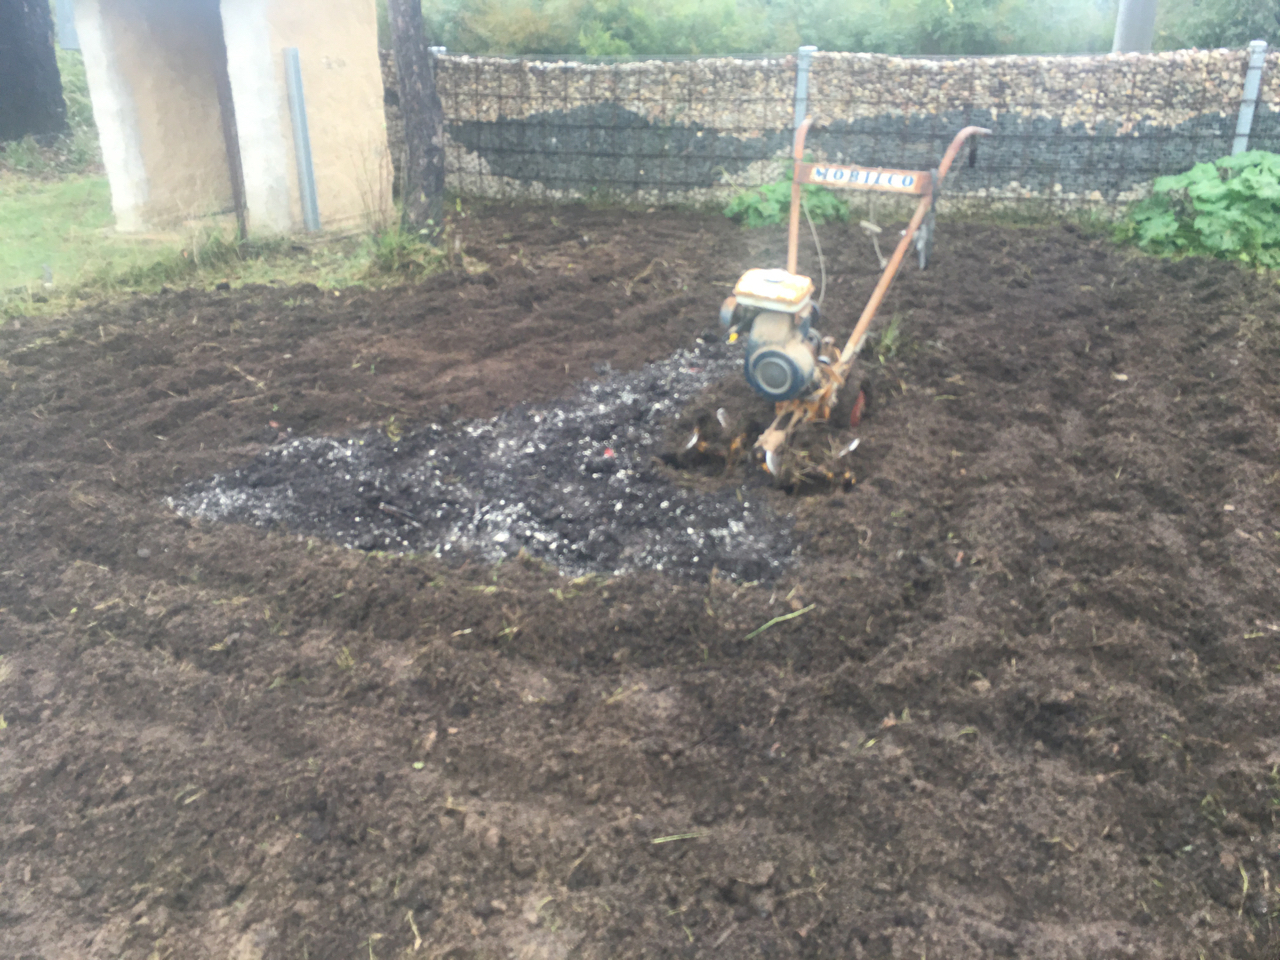
I was outside digging over the ‘cottage garden’ preparing the soil for sowing seeds of a spring/summer flower garden show of colour. I know that now is the time to plant out seeds for spring in this flower garden, as in the veggie garden, where we go almost everyday to harvest food for dinner, do a little bit of weeding and plant out successive sowings of vegetable seeds. I see that the red ‘Flanders’ poppies are germinating in the freshly dug soil where I have recently planted garlic cloves. Poppies decide when the time is right to germinate, but they will only germinate in freshly turned soil. So now is the time to dig over the cottage garden site.
I whipper snipped all the old foliage into mulch, raked it all up and onto the compost, or used it as mulch in other places in the yard.
I took what I thought was the easy alternative of using the cultivator. Not so! I only got 1/4 of the way round and the fuel line blocked up. This machine is a little beauty. I bought it 45 years ago, second hand for $50. It has just gone and gone and gone on working. I only use it a few times a year, but it is so much quicker and easier than hand digging with a garden fork if there is a lot to do. I tweaked the old rubber fuel line and it just snapped clean off in my hand, trailing petrol straight down onto the soil until the small petrol tank was emptied. I walked to the shed and got a pair of pliers to remove the stub end of the fuel line. It was very brittle as its quite old. I have replaced the fuel line a couple of times over the 45 years that I have owned it. The remaining length of line is too short to re-join for a temporary fix, so its another long walk to get some more fresh fuel line from the maintenance shed. With repairs completed, another walk to the fuel shed to get some more petrol and I’m back in business, just a half hour later.
I love this old cultivator. It’s just like me. Out of date and long past its use-by date, but it just seems to be able to keep on going, and going. So solid, reliable and old fashioned. Not very complicated. A good worker. I’m happy to spend time maintaining it to keep it working. It’s a pleasure to be able to own and use such a lovely old Australian made, solid machine that works so simply and so well.
I completed what I set out to do with no more interruptions. Luckily, I had all the parts that I needed on hand, so the job was started and finished on the same day. It’s not always so.
We borrowed Sandy Lockwood’s small pug mill over Xmas and January, as she wasn’t using it over the break and was happy to lend it to us. My wrists weren’t up to wedging another quarter tonne of clay again, so It worked out very well for us both, because after we had finished pugging the new batch of clay and also working through all our stored up re-cycled and bagged turnings and throwing slip. I pulled the pug mill to bits and cleaned it right out. I even saw that the chassis was getting a bit rusted in places, so I cleaned it back, rust converted it and painted it black again. Good as new when we returned it. This pug mill has never been in such good condition since it was built.
That batch of clay is now all used up, so we need to be getting on with getting another pug mill working.
In the old pottery, before the fire, we had two 4” or 100mm dia. Venco vacuum pug mills. One for white clay and one for dark clay. I also had a 3” or a 75mm dia. stainless steel pug mill just for porcelain clay and finally we had a very small 2” or 50mm dia. stainless steel pug for small batches of test bodies and recycling of turnings. That was such a good position to be in. Luxury really. It took me over 40 years to get to that position.
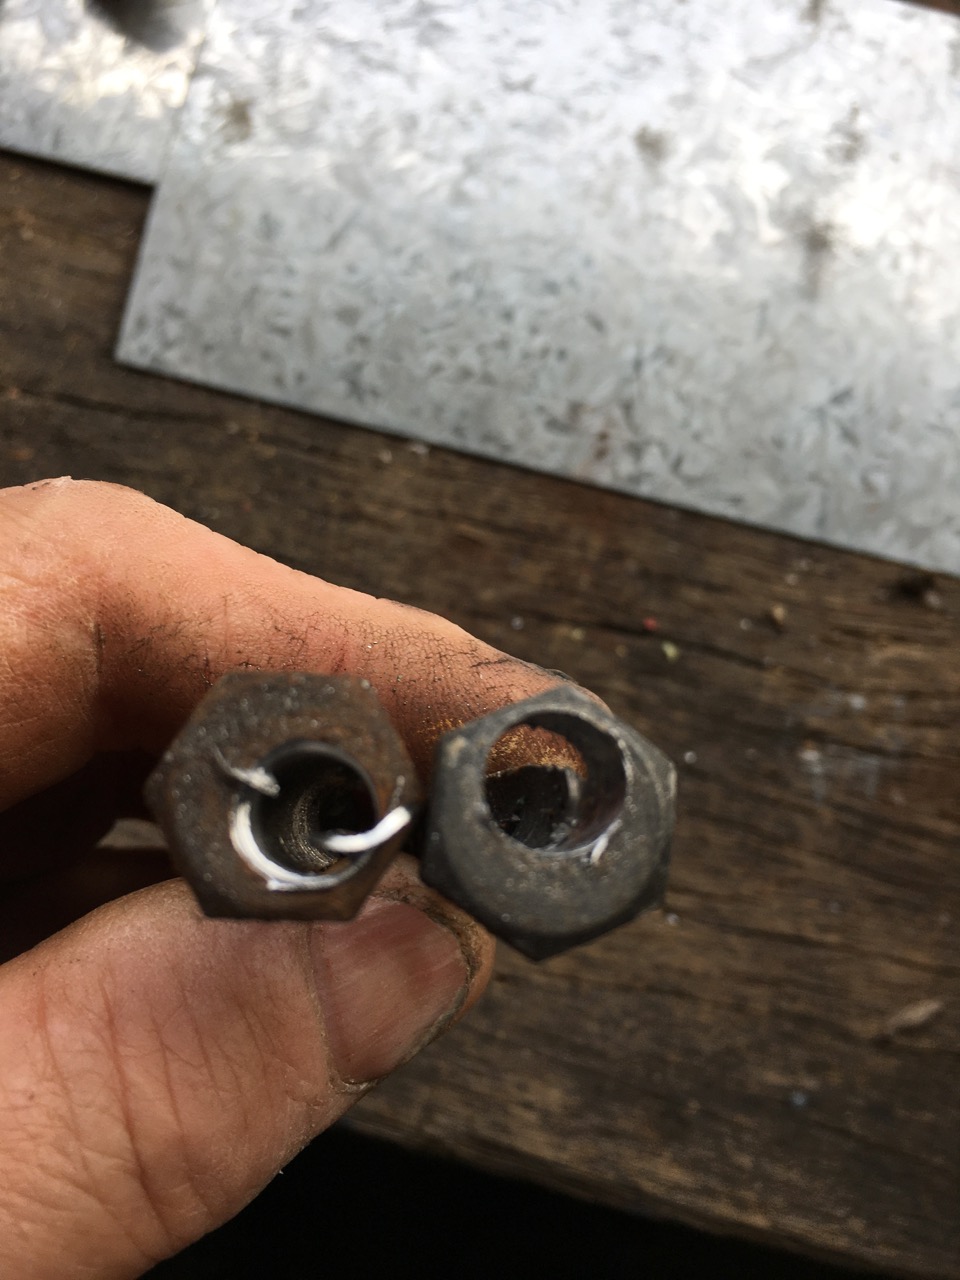
At the beginning of the year, we were given a pug mill from our friend Toni Warburton. It hadn’t been used for a long time. Perhaps 20 or more years? It had been stored in her back shed for time out of mind and was full of dried out clay. That’s not such a problem. What was a problem, was that it had never been taken apart. so all the bolts holding the 2 halves of the pug mill barrel together were rusted and swollen up in their sockets. They couldn’t be removed or even rotated. I could have snapped off the heads trying to get them loose, but then the shattered off ends would have made them very difficult to drill out accurately. So I decided to just drill them all out straight from scratch. A very long and difficult job.
Drilling out all 8 of the bolts took some time. They were all 90mm long, so I started off with a 3mm pilot hole, then increasing from 5 to 7, and then 9mm drill bits, until the bolt was completely hollowed out and could be removed.
I was wondering if I would get away with it, but I didn’t snap off any drill bits, especially the first 3mm drill bit. That would have certainly put an end to it.
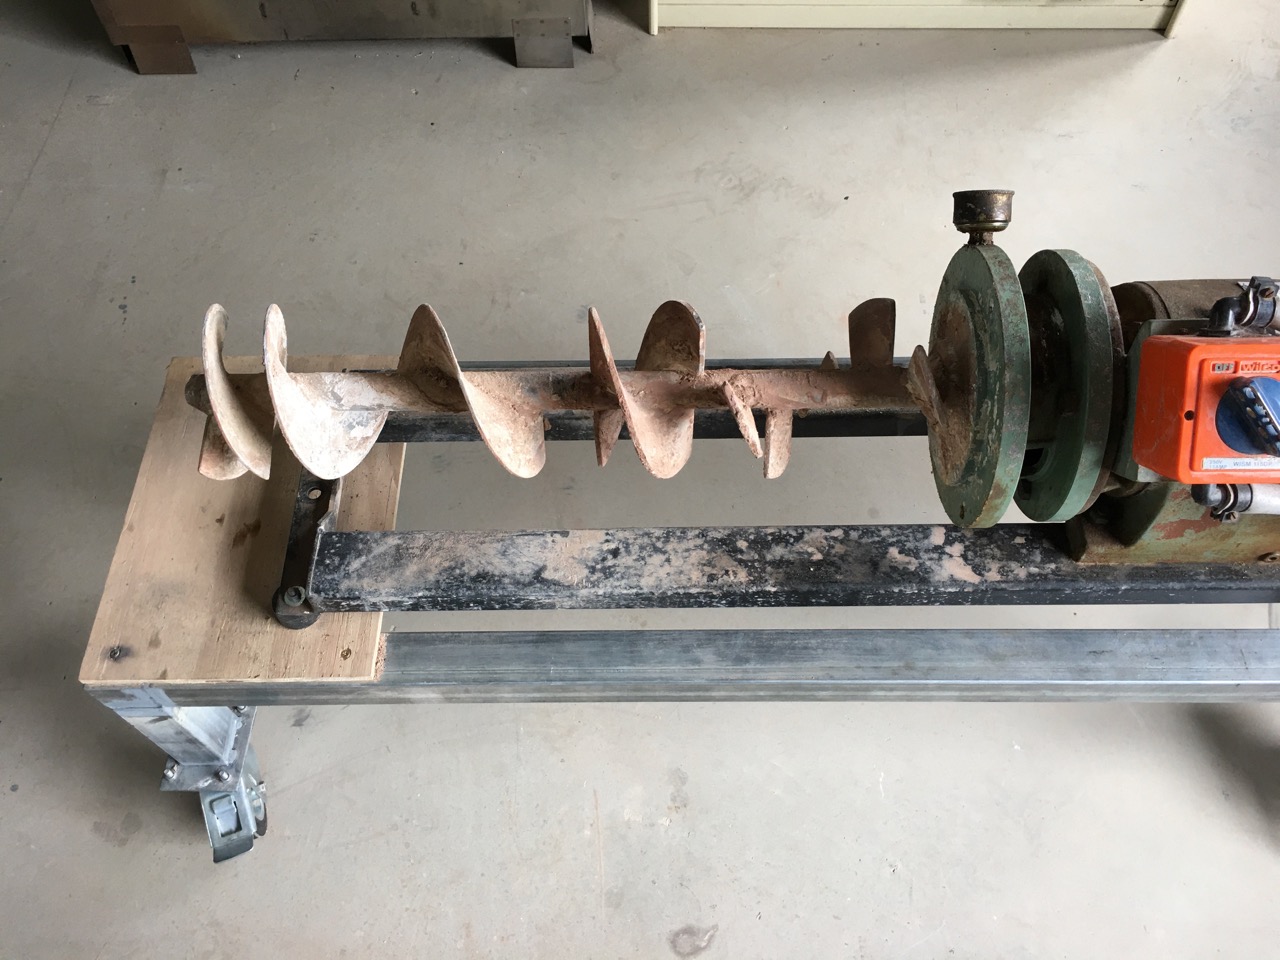
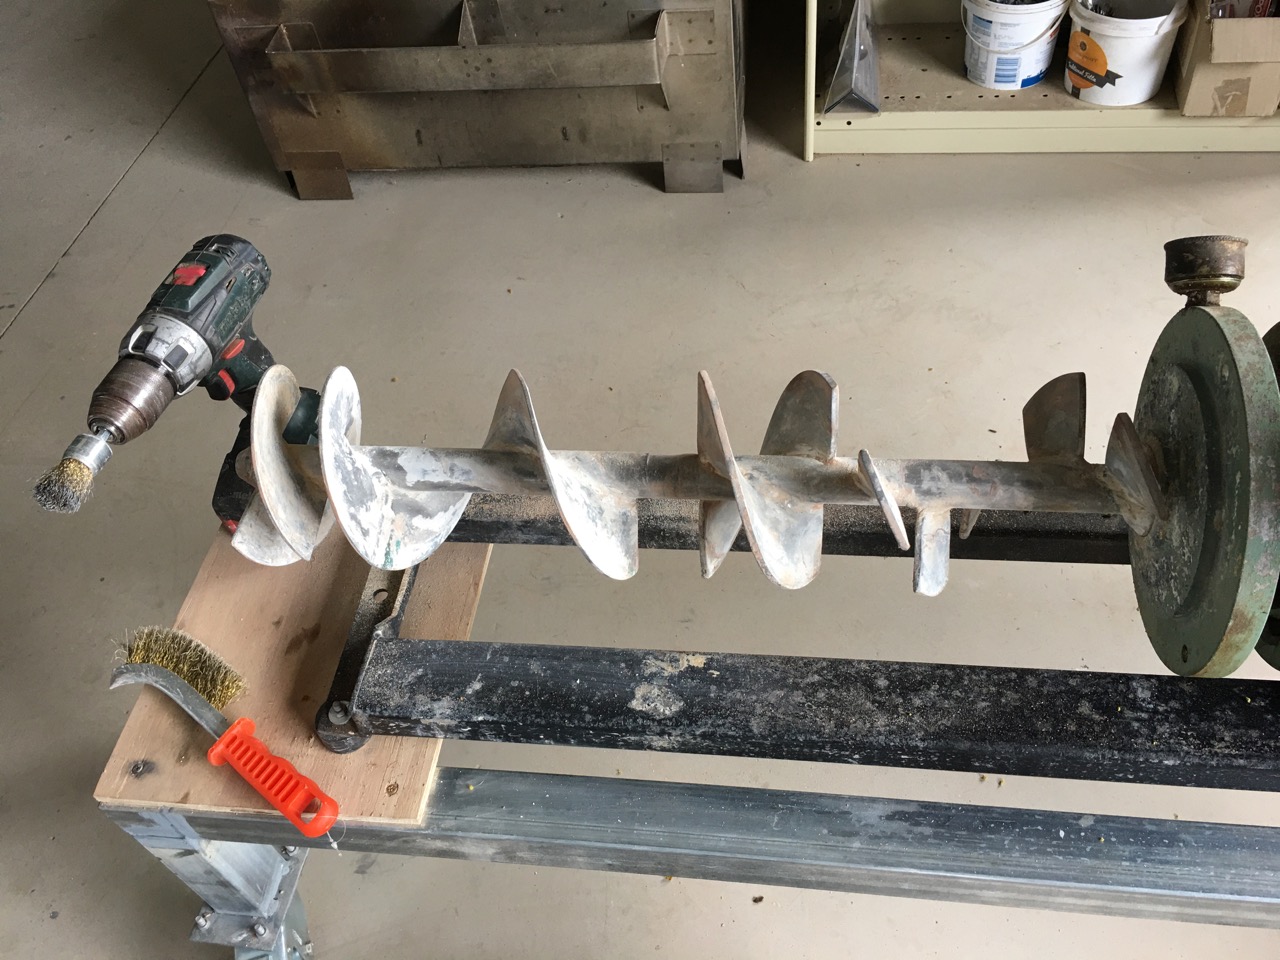
Once I got the barrel apart, I could clean out the dry clay and start to clean it up. The pug mill had previously been used to prepare dark iron bearing terracotta clay. However, I want to use it for white stoneware, so It had to be cleaned out very well. scrupulously well. I made a thorough job of it, starting out with a paint scraper and generally progressing from hand held wire brush, through to a circular wire brush in an electric drill and finishing off with an angle grinder for the most stubborn bits.
I set about removing every trace of terracotta from both the barrel castings and the stainless steel blades and shaft. They cleaned up pretty well. I ground the barrel back to bare metal and gave it a good coat of etch primer to seal it. This wont last in the places of heaviest wear, like in front of the shredding screens and in the reduction cone of the barrel, but elsewhere it will help minimise the ‘salt’ corrosion caused by the alkalis in the clay reacting with the bare aluminium metal under very wet and humid conditions. The barrel is cast out of marine aluminium, but eventually it still corrodes. In the last pottery, I replaced the oldest barrel that I had on my oldest ’70’s ‘Venco’ pug mill in 1984. It was starting to get corrosion patches breaking through the barrel after 35 years! I kept sealing them with ‘LockTite’ ‘wick-in’ each time I took it to bits and serviced it. The Locktite seeps into the crevices and then ‘gels’ to seal off the void. Very cleaver. If this barrel lasts that long, it wont be my problem! Someone else will have to deal with it.
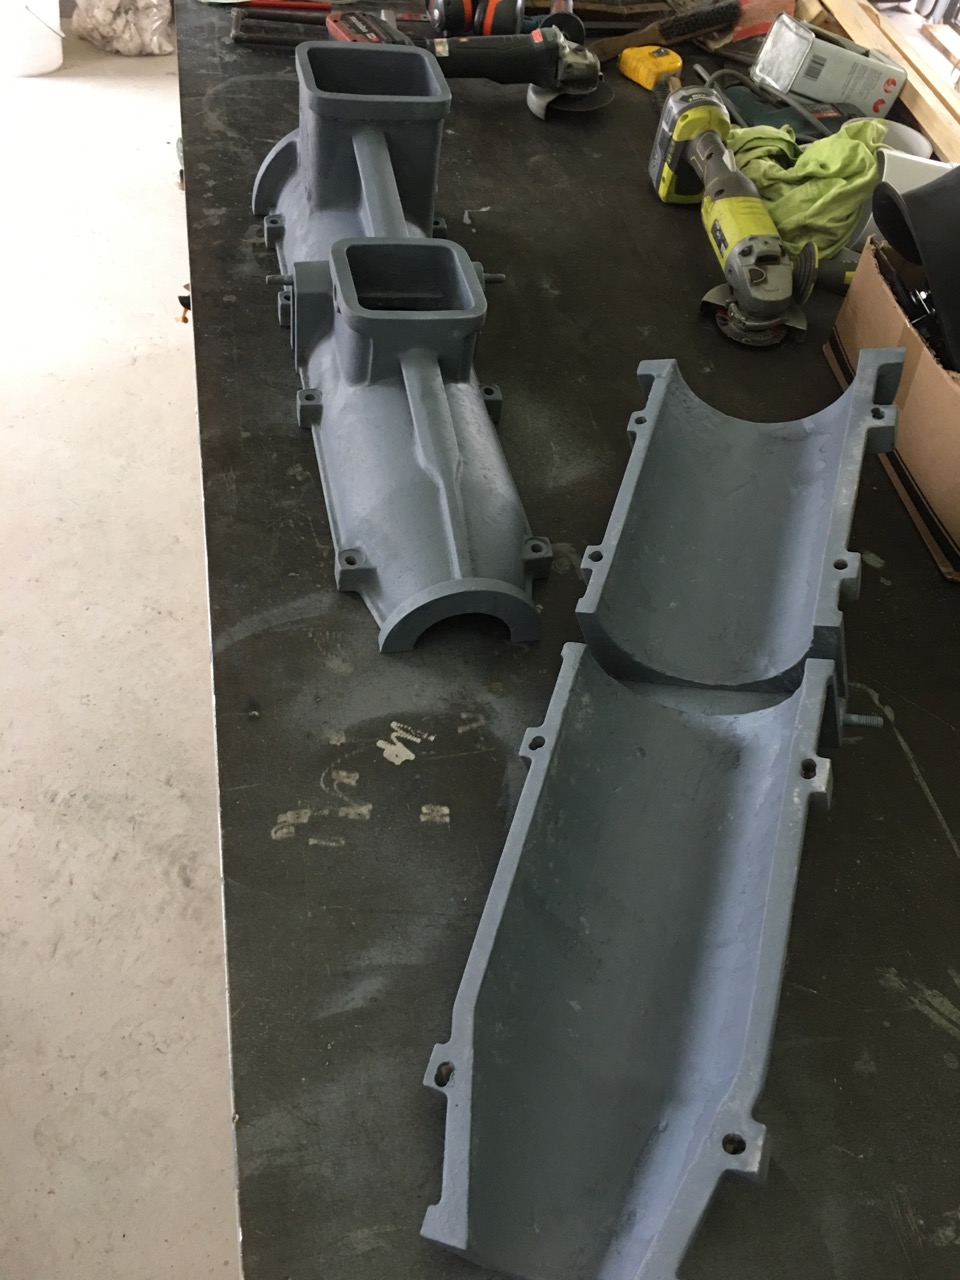
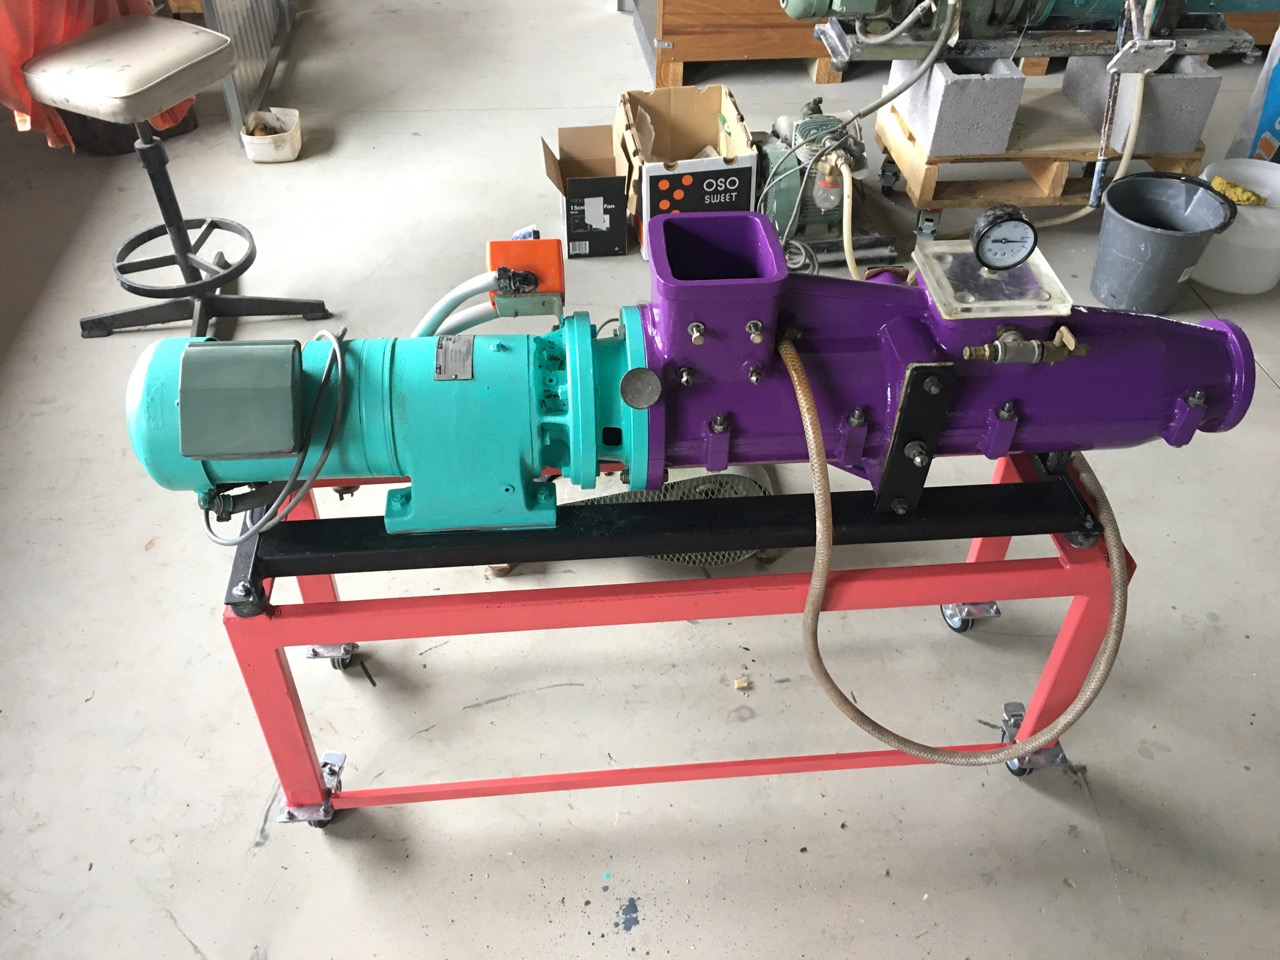
Toni had christened this pub mill ‘Pugsly’, so that is its name now and forever. However, I gave Pugsly a bit of a spruce-up and a new coat of paint.
Bright and cheerful and ready for work. I mounted the vac pump underneath to keep them both close coupled and easy to move around on the one solid castor unit.
This will be our old, but new, porcelain pug mill.
Last year our good friend Jane Sawyer offered us her old Venco pug. She had bought it 2nd hand in the 90’s. She offered it to us as she wasn’t using it anymore. She has another one at ’SlowClay’. This pugmill had stopped working at some stage and was surplus to her needs. We had tried to get it trucked up to Sydney, but no taxi truck company wanted to take on the job of delivering it to the trucking depot for transfer to Sydney. The only quotes I could get were approaching upwards of $1,000. Way too much! So at the start of April. Janine and I made a lightning trip down to Melbourne to collect it. We drove down in the ute, as it has a crane on the back, built for lifting such heavy gear as this. We had 3 days with Jane and took a day of rest to walk into and around Melbourne. The 10 hour drive each way was a bit boring. We changed drivers every 2 hours. It has been a very long time since I drove to Melbourne. The road is all dual carriage way now and a very comfortable drive. The truck is not particularly fuel efficient, so the 20 hour drive cost us $300 in petrol. 1/3 the cost of getting it trucked. But at least we now have it! The best part was that we got to spend a few days with Jane. And, It arrived home safely without being damaged in transit!
This image by Jane Sawyer.
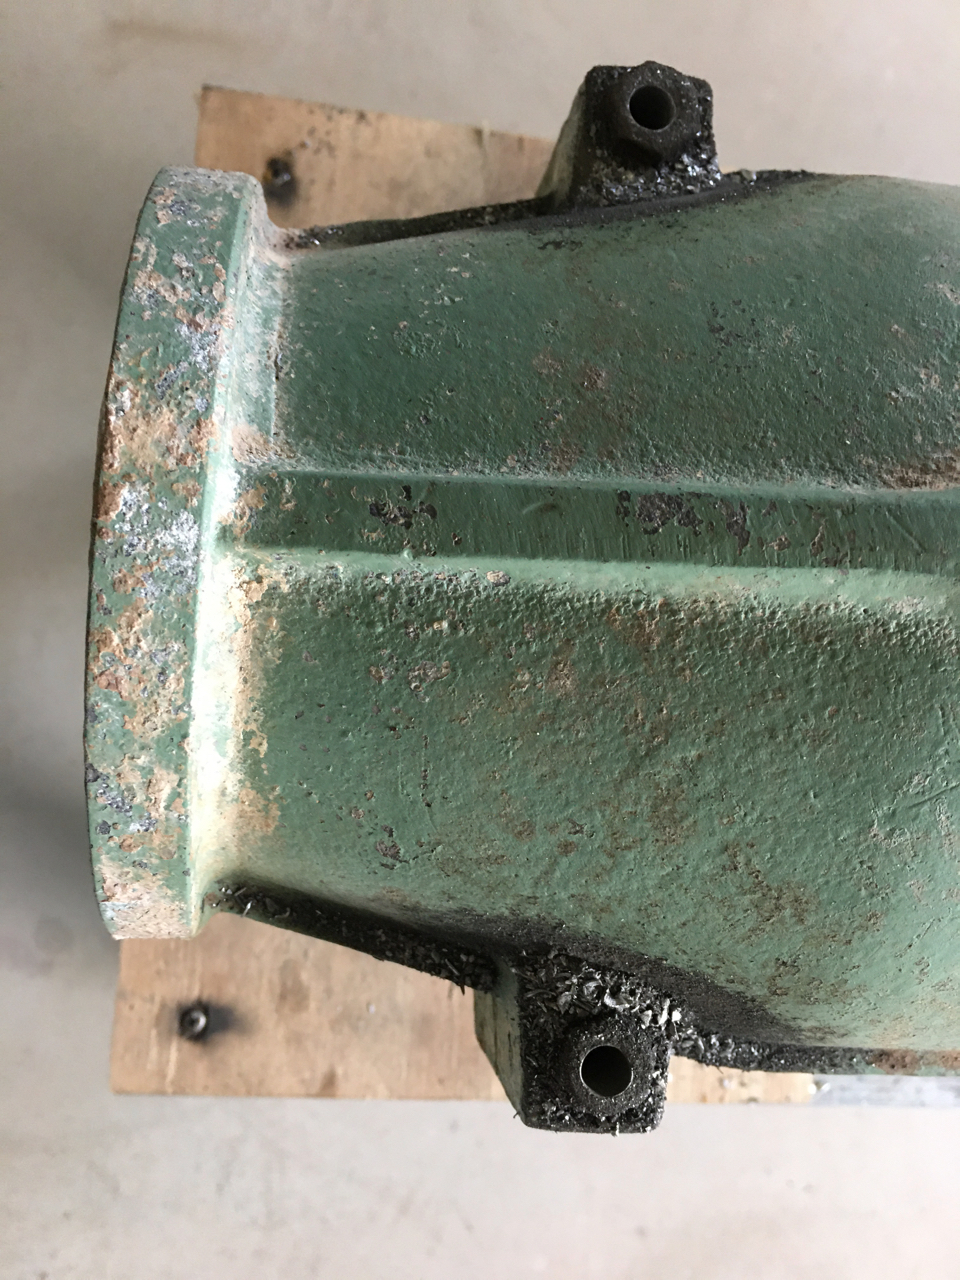
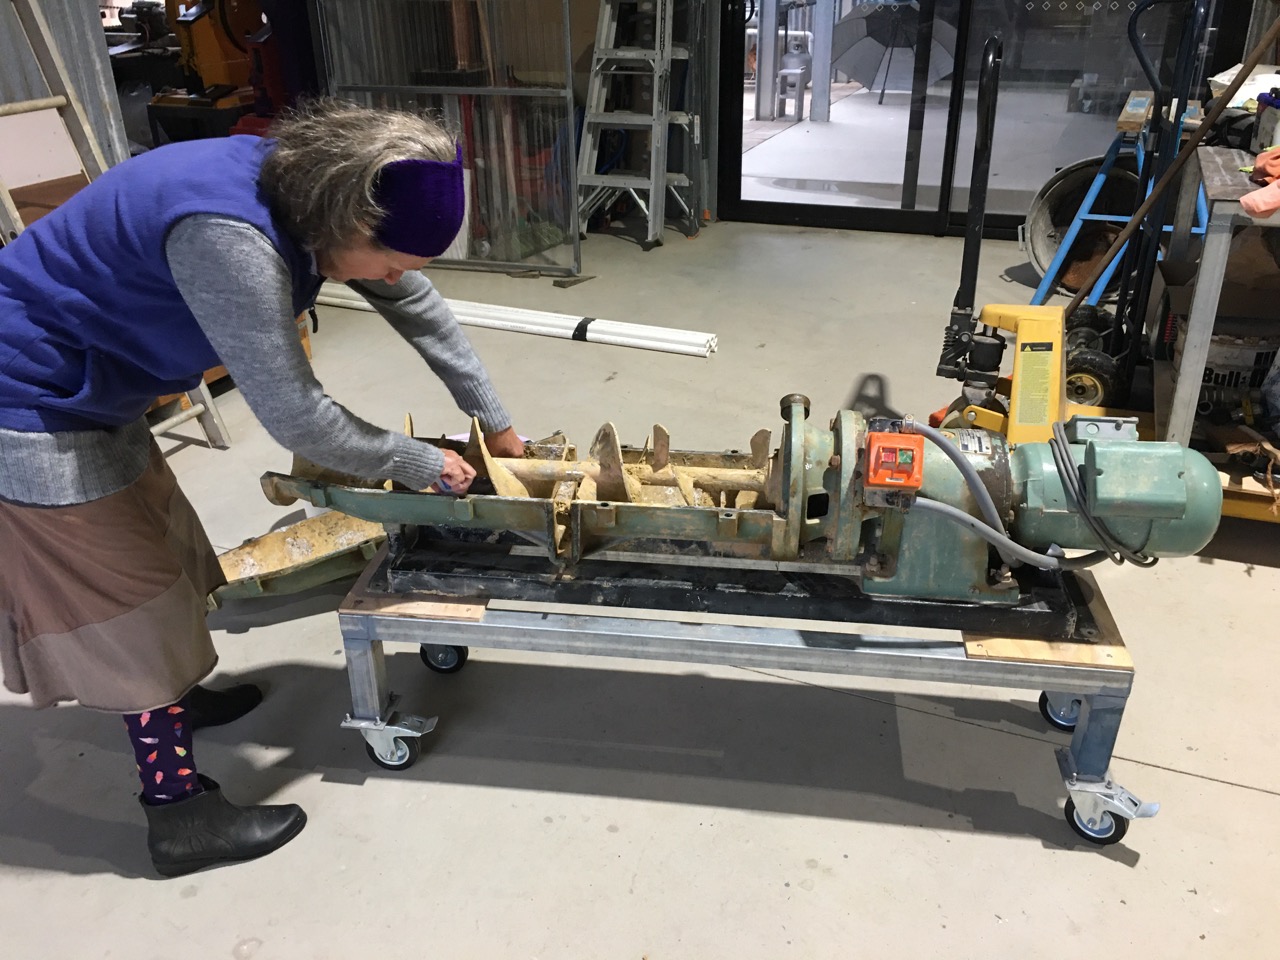
Once home I started to get the pug mill to bits to clean it out. It had also been used for terracotta, so a lot of cleaning was needed. The motor still made a noise when switched on, but instantly went into overload, shut down and stopped humming. It appeared that either the gear box was broken, jammed or a bearing was seized. The only way to find out was to strip it all down to basics. This was easier said than done.
The bottom half of the barrel had seized bolts. I snapped off one of them trying to get it loose, so decided to drill out the other. Once the barrel was off, I tried to remove the collar connecting the gearbox to the barrel. This is where the problem lay. Once I got the bolts out the collar and shaft could only rotate together when I switched on the motor. I eventually got the shaft away from the gearbox, but the collar was very firmly jammed onto the shaft.
I spent a week heating, quenching, oiling, and tapping, several times a day. Whenever I went past. I eventually put the collar in the vice and hit the shaft with a sledge hammer. Gently at first, using a hardwood block to cushion the blow. Nothing happened, so I hit it harder, still nothing. Then I hit it really hard and split the wooden block! But there was possibly a little bit of movement – but only possibly. Was I imagining it? Another hard wood block, and another blow from the sledge hammer saw it definitely move 1 mm.! I dosed it quite liberally with RP7 and left it over night. Several days and 3 hard wood blocks later, the shaft was free.
I discovered that the grease cap on the collar was blocked, so the collar was badly corroded and had swollen up and jammed onto the shaft. The lubricating tube was so badly blocked I couldn’t clear it out. I decided that it was easier to drill out a new greasing tube through the collar to be able to lubricate the shaft into the future.
I welded up a new steel pug mill table/trolley on castors, so that I can move the very heavy pug mill around in the future. I made an under carriage to carry the vacuum pump together with the pug, so that I don’t have to move the vacuum pump separately. This will be our new/old white stoneware pug mill. I’m still waiting to get my hands on another 4” Venco vacuum pug mill for the buff/brown stoneware wood fire clay body. It’ll happen. I just need to be patient.
Bit by bit, slowly, slowly. We are getting everything back to where we were before the fire.
There is a huge sense of satisfaction in being able to take other peoples unused and non-functional pieces of equipment and bring them back into productive use for very little money, by more or less only using my own labour, ingenuity and time. I’ve never done this kind of thing before, so it’s all new to me. I’m just making it up as I go along. There isn’t anything in life that teaches you how to disassemble a pugmill with a seized shaft. I’m lucky. It all worked out well.
It’s an honour and a privilege to own and use these personal links and connections to my friends. There is so much embedded energy in these machines, it’s important to keep them going and avoid waste. it is a delight to see them working properly and being productive again.
We are so lucky to have such Generous, helpful and supportive friends.
Nothing is perfect, nothing is ever finished and nothing lasts.
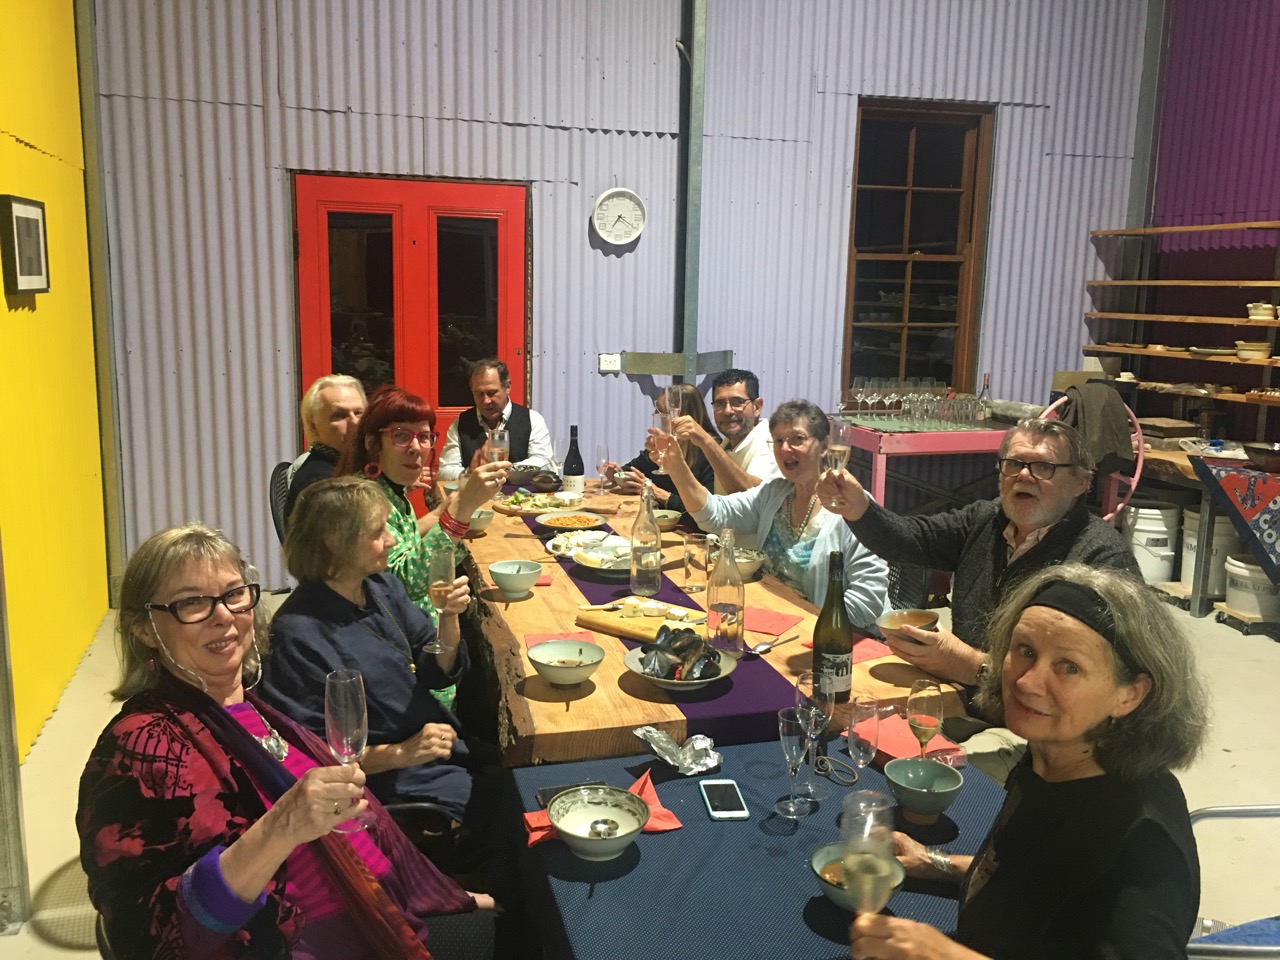
I turned 70 last week. So, on the spur of the moment, I decided to invite all the local creatives from around the village, plus Len and Warren and their partners, who have been so incredibly helpful and supportive over the past two and bit years since the fire.
I was born on the cusp of Pisces and Aries. Not that I hold any interest in, or find any significance in this sort of thing, but it gave me a handle to organise a menu focussed around fish and goat.
I made an amuse of slow braised onion jam, served on narrow flaky pastry fingers, with a single anchovy laid across the top. That was a pretty nice start. I got this recipe from Simon Hopkinson and have had a couple of goes at it. I like his gentle approach to cooking. He has written two books, ‘How to cook roast chicken’ and ‘The good cook’. I liked them both and have tried recipes from both of them at various times.
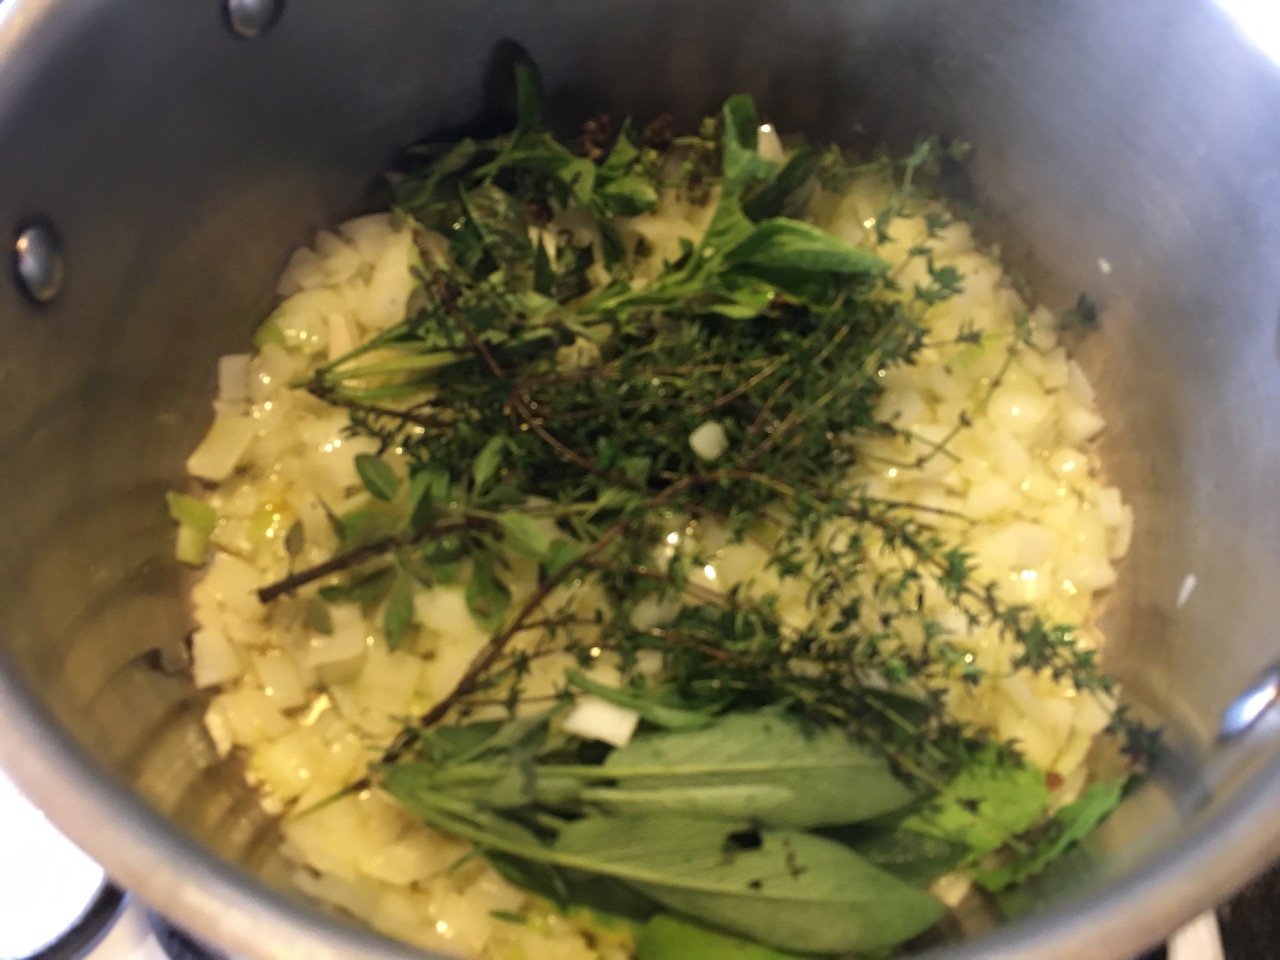
I had filleted a whole snapper the night before for our dinner, so had the fish frame to make stock with. I also bought a salmon head at the fish markets while I was buying all the seafood for the bouillabaisse. These two fish heads and frame made a great start for the stock.
I started the stock with a bouquet garni of fresh garden herbs and onions fried in olive oil. Added the fish heads along with carrots picked freshly from the garden, some very young celery stalks, capsicums and parsley.
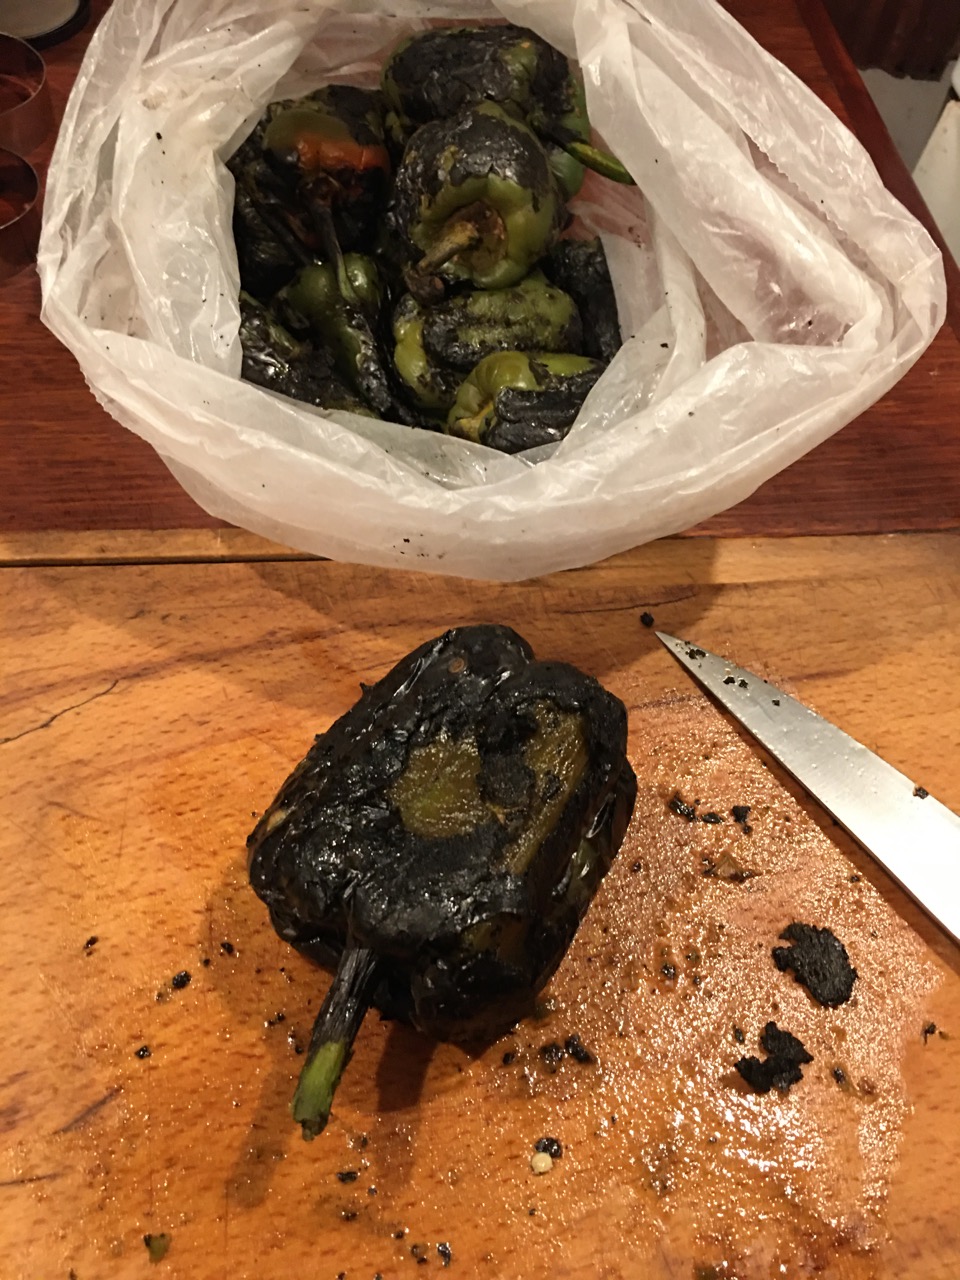
As we have a lot of capsicums at the moment, I roasted the excess over the open flame on the cook top, sweated then out in a bag for an hour and when cooled, I pickled them in a little oil and vinegar. Preserved for later.
The fish head stock was cooked out the night before and when cooled, passed through a sieve to make the clear stock for the bouillabaisse style fish soup. This was to be the first course. A bouillabaisse for the Pisces component of the meal. Just before the party. I added the diced octopus, and boiled it for half an hour to make sure that it was tender, then completed the soup with the fish fillets, prawns and mussels in that order, just before serving.
No one complained and some even returned for a second helping.
The main course was the baked, boned and butterflied leg of chevon to represent Aries. I had put it on earlier in the day for a slow roast and had it ready for the main course.
I made two versions of this course. One baked with home grown and preserved quinces in a light sugar syrup with sweet aromatic spices like star anise, cloves, and cinnamon.
The other baked with wine to stop it drying out with a rub of aromatic savoury herbs, fried onions and garlic.
The big glazing room in the pottery was converted into our dining room for the night and comfortably seated the 12 of us.
We didn’t finish till 1 am. so it must have been a good night.
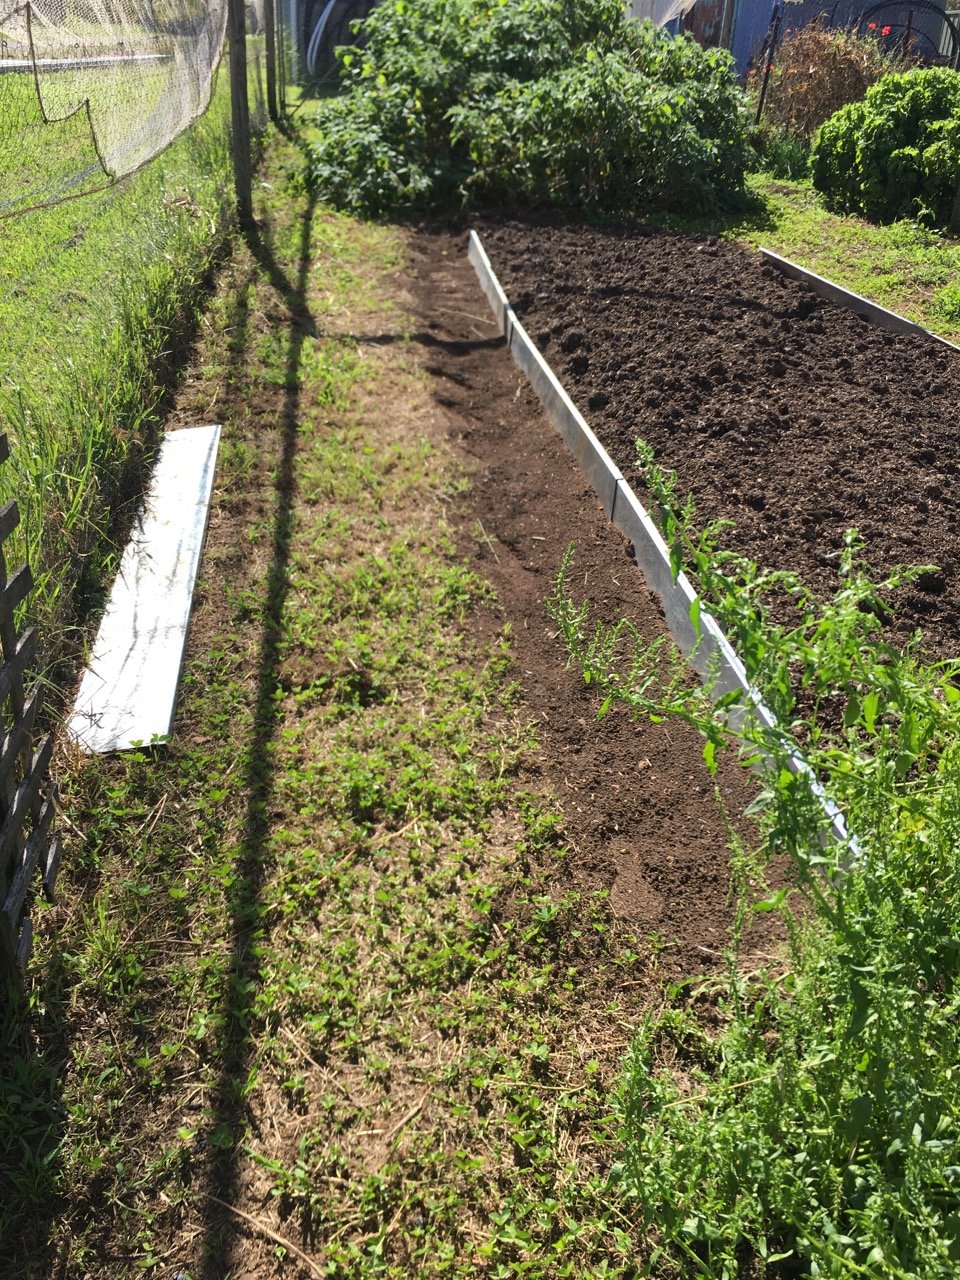
The rest of the week was spent turning porcelain bowls in the pottery and continuing the work of paving along the back of the pottery.
I dug up a line of pavers that we had already laid behind the kiln chimney. I waited until all the pavers were laid, so that I would have all the levels correct and the fall just right.
I removed one single line of tiles, dug down into the gravel substrate and positioned a cheap plastic drainage gutter in the space and then cemented it in. When we have another rain event of biblical intensity, I want the water to flow away from the kiln and be easily removed instead of soaking in.
Now that I almost have a wood fired kiln built, it’s time for me to re-start the stalled research I was doing just before the Black Summer Fires interrupted my work. I have started to make the early tests for my commitment to the PowerHouse Willoughby Bequest. I have been processing some new porcelain bodies from Australian Halloysite, I ball milled them a couple of months ago to allow a bit of time for them to ‘age’. Two months is next to nothing in the broad scheme of things when it comes to single stone porcelains, but every little bit helps. I have also been working with sericite.
Both started off badly!
The halloysite cracked almost instantly as it stiffened up. It is as plastic as wet goats cheese ricotta. Actually, the cheese is much better!
It has so little plasticity that the act of cutting it through with a wire tears it apart underneath. I’ve been working with my local Mittagong halloysite/mica porcelain for almost 20 years now, and its been a difficult relationship. When I do get the pieces off the wheel successfully, I find that they have a desire to warp in the early stage of the firing. Nothing worthwhile ever comes easily. At least not to me anyway. However, I persist, because when I do get a lovely pot out of the kiln successfully, it is really uplifting and rewarding.
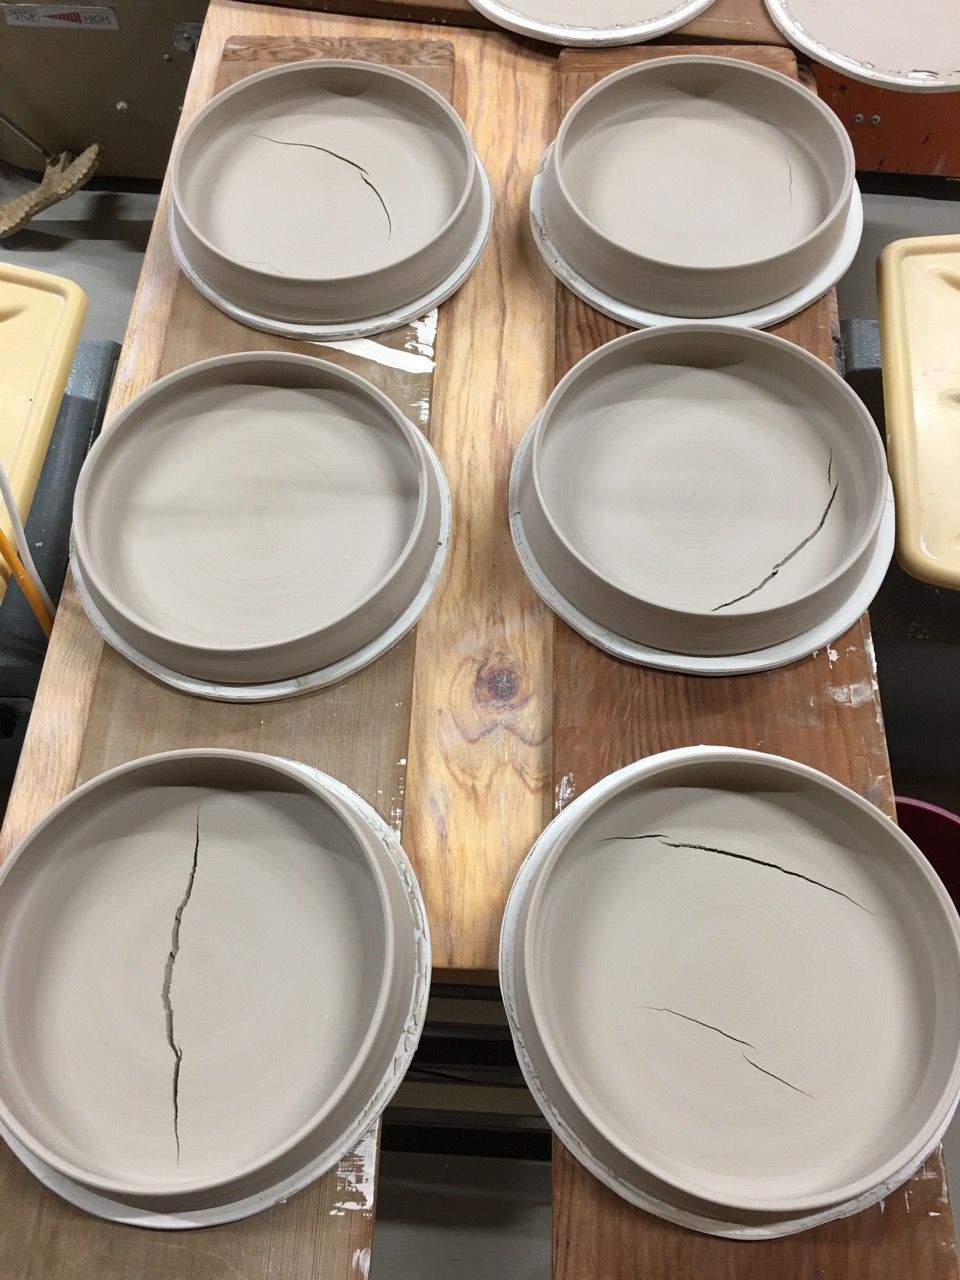
I have also started off badly with the sericite pieces. Any single stone porcelain with such a wide, flat base is going to be problematic, but 100% loss was a bit much as a starter!
I put it down to being out of practice and being distracted, with so much else on my plate. I pugged up this first batch of pots, re-worked the clay and threw it again the next day. The second batch, I cut off with a very fine wire and dried very slowly in the damp cupboard for two weeks. Cutting them off the batt again every 2 or 3 days, to allow them to separate from the base and shrink evenly without too much stress. This has worked. I am amazed how easily this strange stuff sticks itself back together again so easily. I have found that if I use a thicker twisted wire, they stay separated, but almost all of them crack against the line of the cut.
I have tried cutting straight across while the wheel is stationary, and alternatively, cutting off while the wheel is still turning. It has made no difference. They both cracked equally.
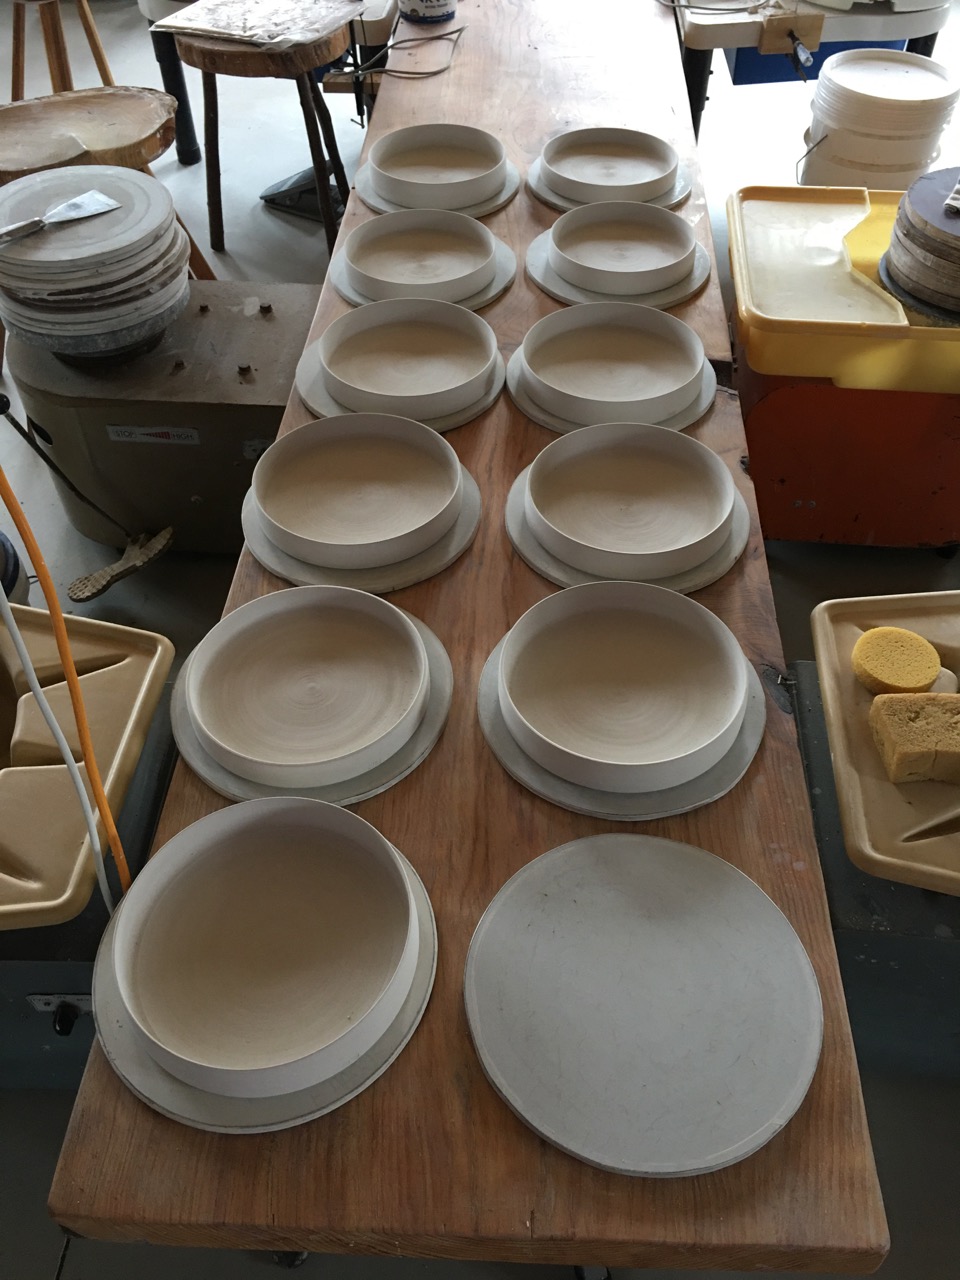
I had virtually no trouble with the smaller, narrow footed pieces. and the larger narrow footed bowls.
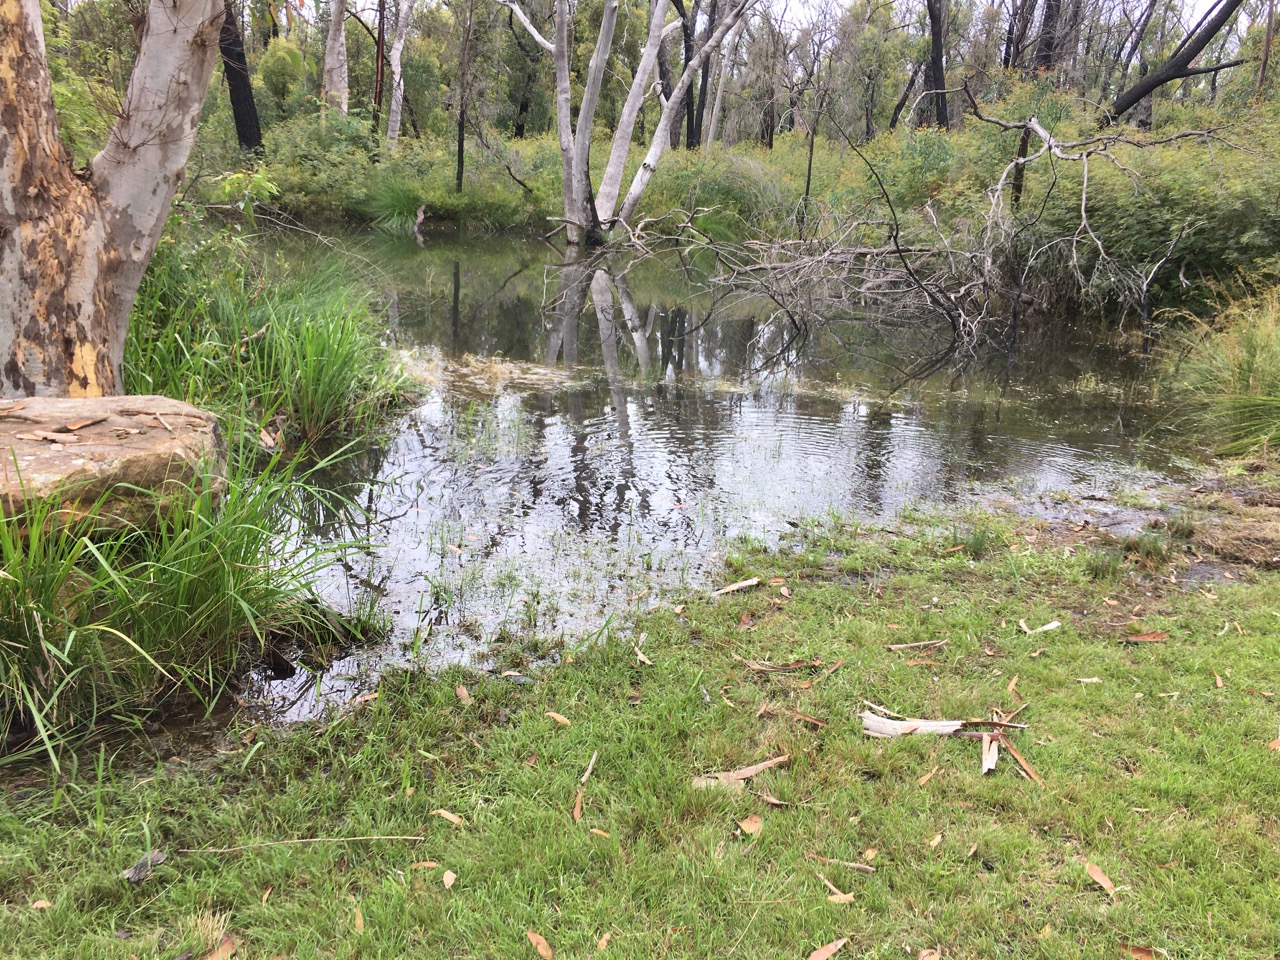
All this continued wet weather has filled all the dams to over-flowing, as well as all the water tanks. Everything is saturated. the ground is seeping water from every ledge and embankment.
The edge of this dam slopes gently down towards the deep area. I mowed about 2 metres into this flooded riparian zone just a couple of weeks ago. Now its totally under water.It is so wet everywhere. It’s great weather for ducks. We have now got over a dozen mature wood ducks grazing the lawns every morning. These would have been some of the tiny little hatchlings that we saw a few months ago. They are looking great and very healthy wandering around eating the lush grass growth. They alternate between the dams and the huge expanse of lush grass that we now have. Unfortunately, they don’t eat enough to keep the grass down low enough to save us from having to mow the grass. It’s a full days job every week.If we don’t keep up to it, it can get out of control and then its much harder to mow, as the mower can’t cut through thick, deep, long, wet grass.
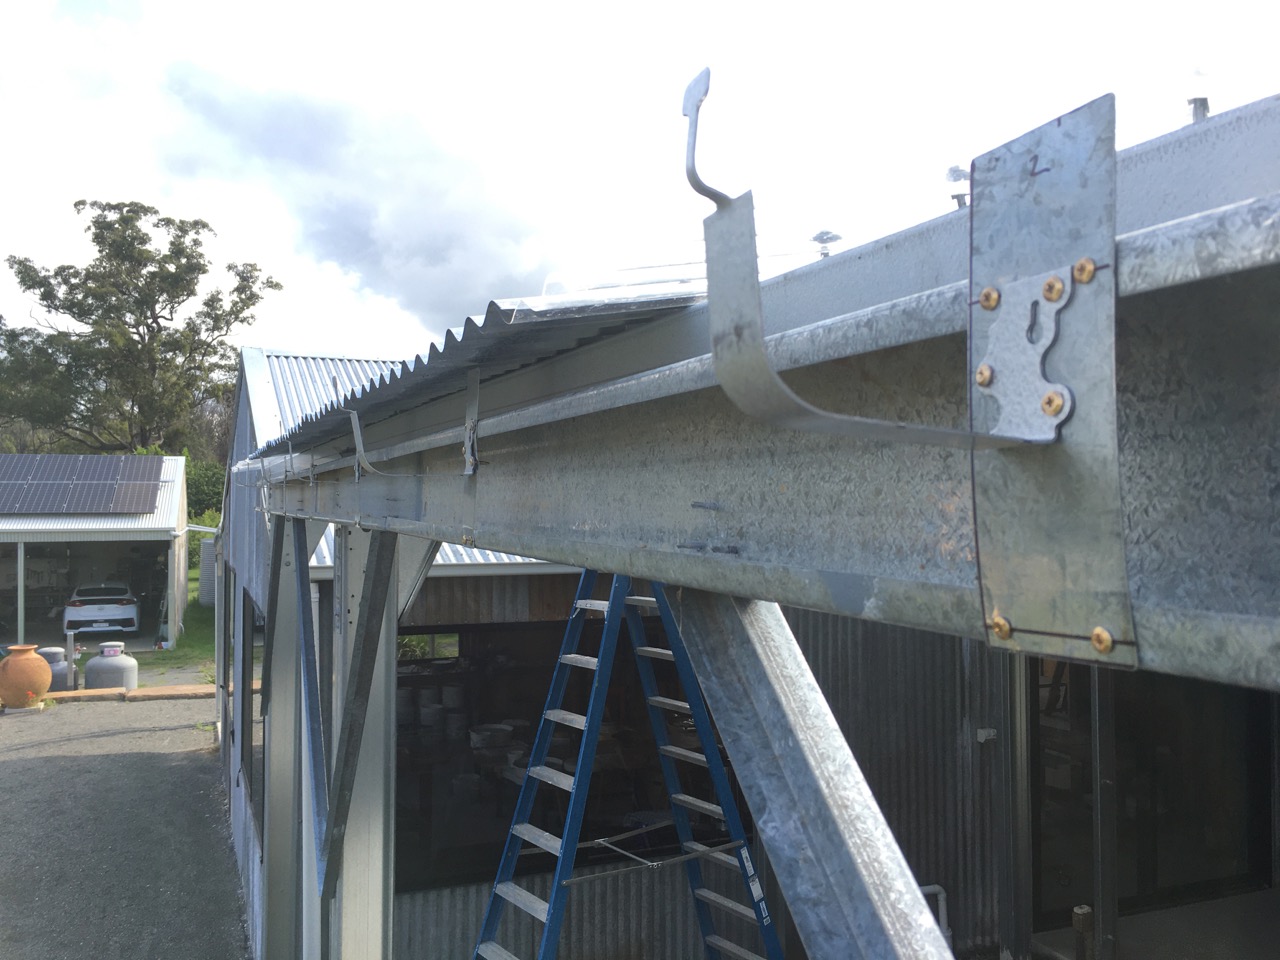
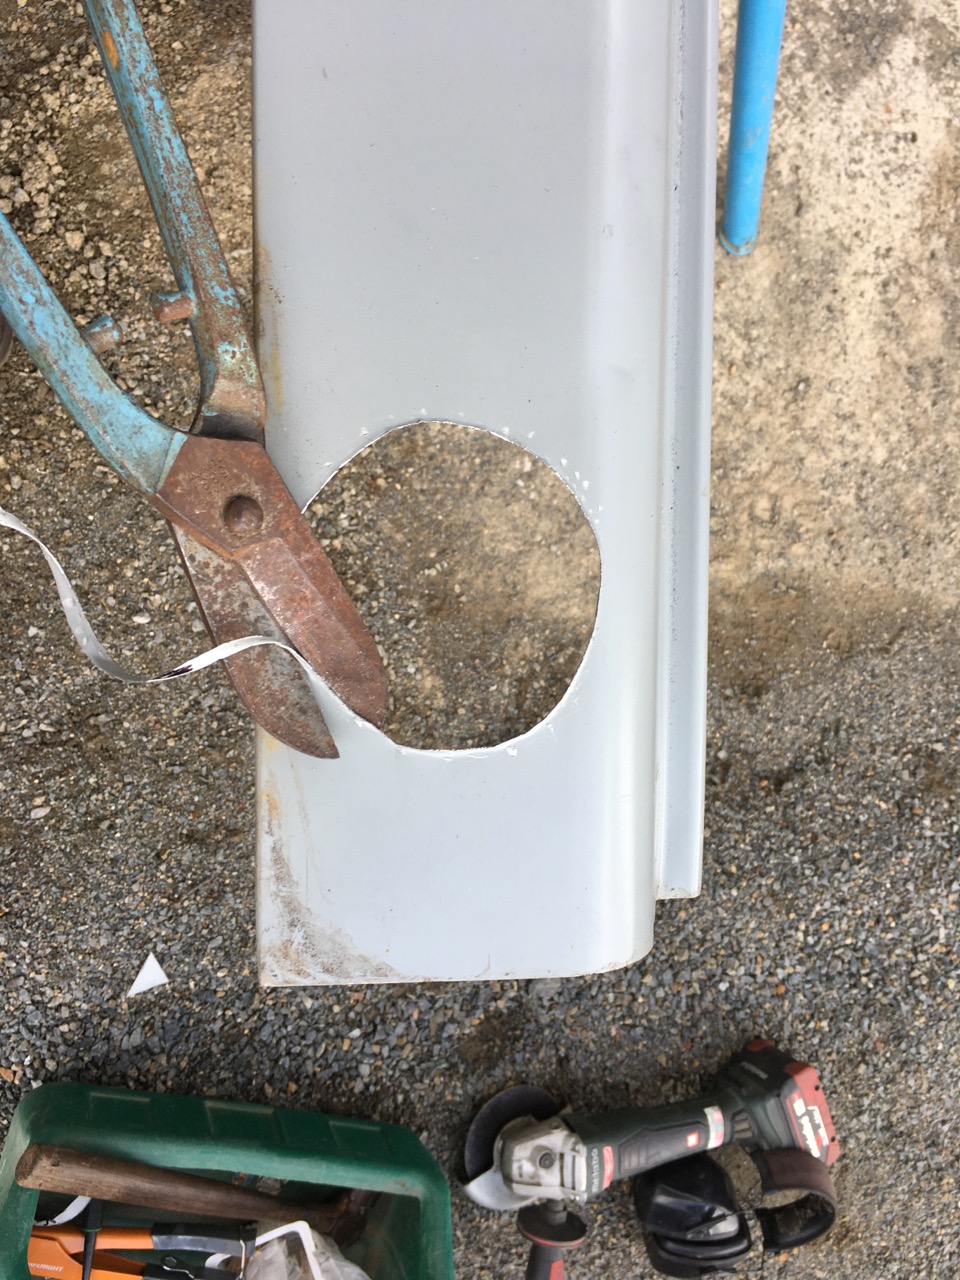
Today I finished installing the guttering on the new kiln shed roof. I spent a day making special metal brackets to span the gap of the ‘C’ section purlins, to support the new gutter with the correct fall.I interrupted the former down pipe that took water straight down the wall from the big shed roof. down into the underground piping system that takes it all down to the big concrete water storage tank. The big shed down pipe now empties onto the kiln shed roof, and then collects with all the water off the kin roof, down the new gutter and back into the old plastic down pipe system. Neat.
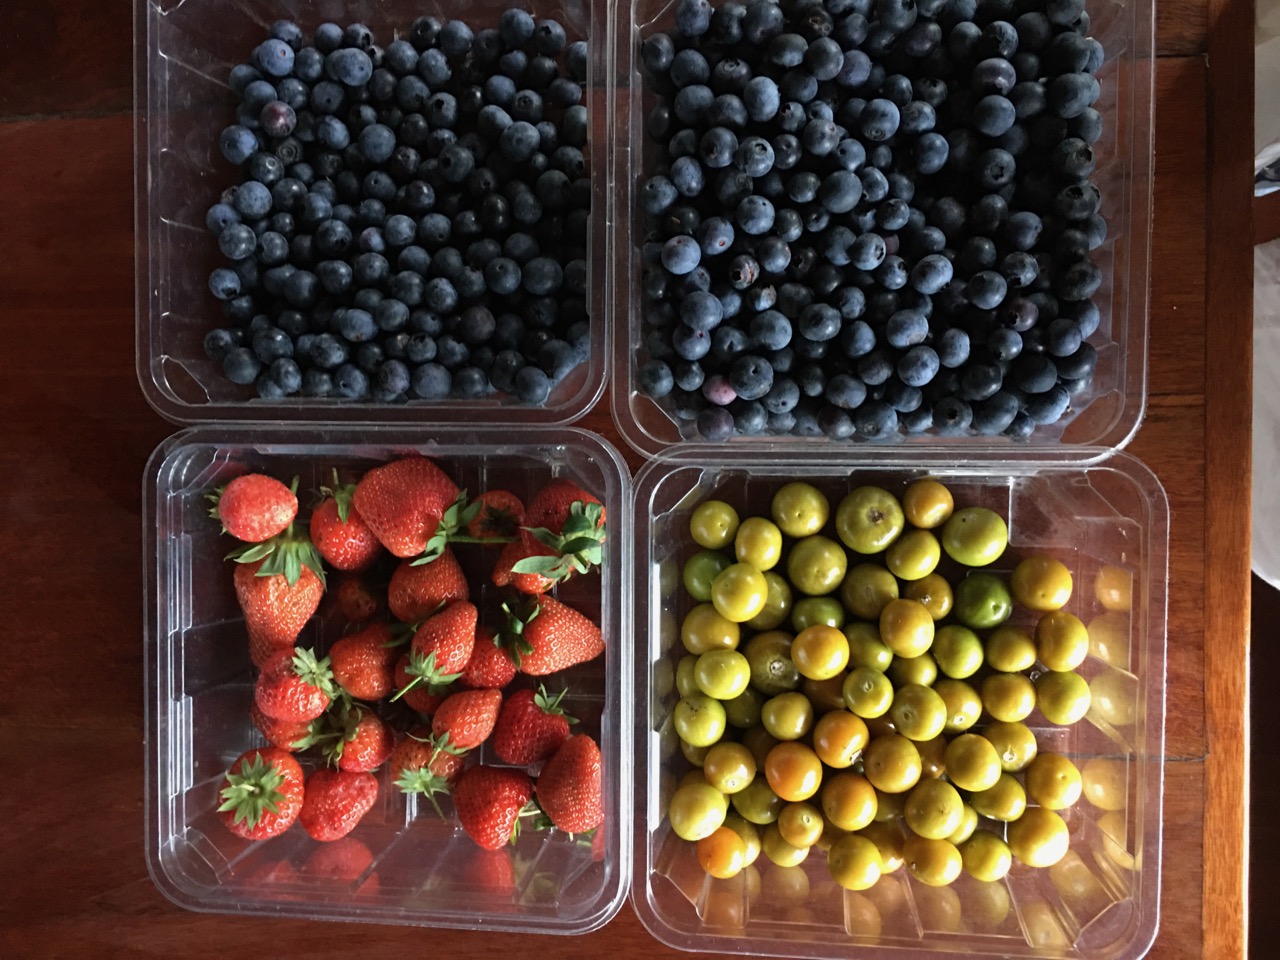
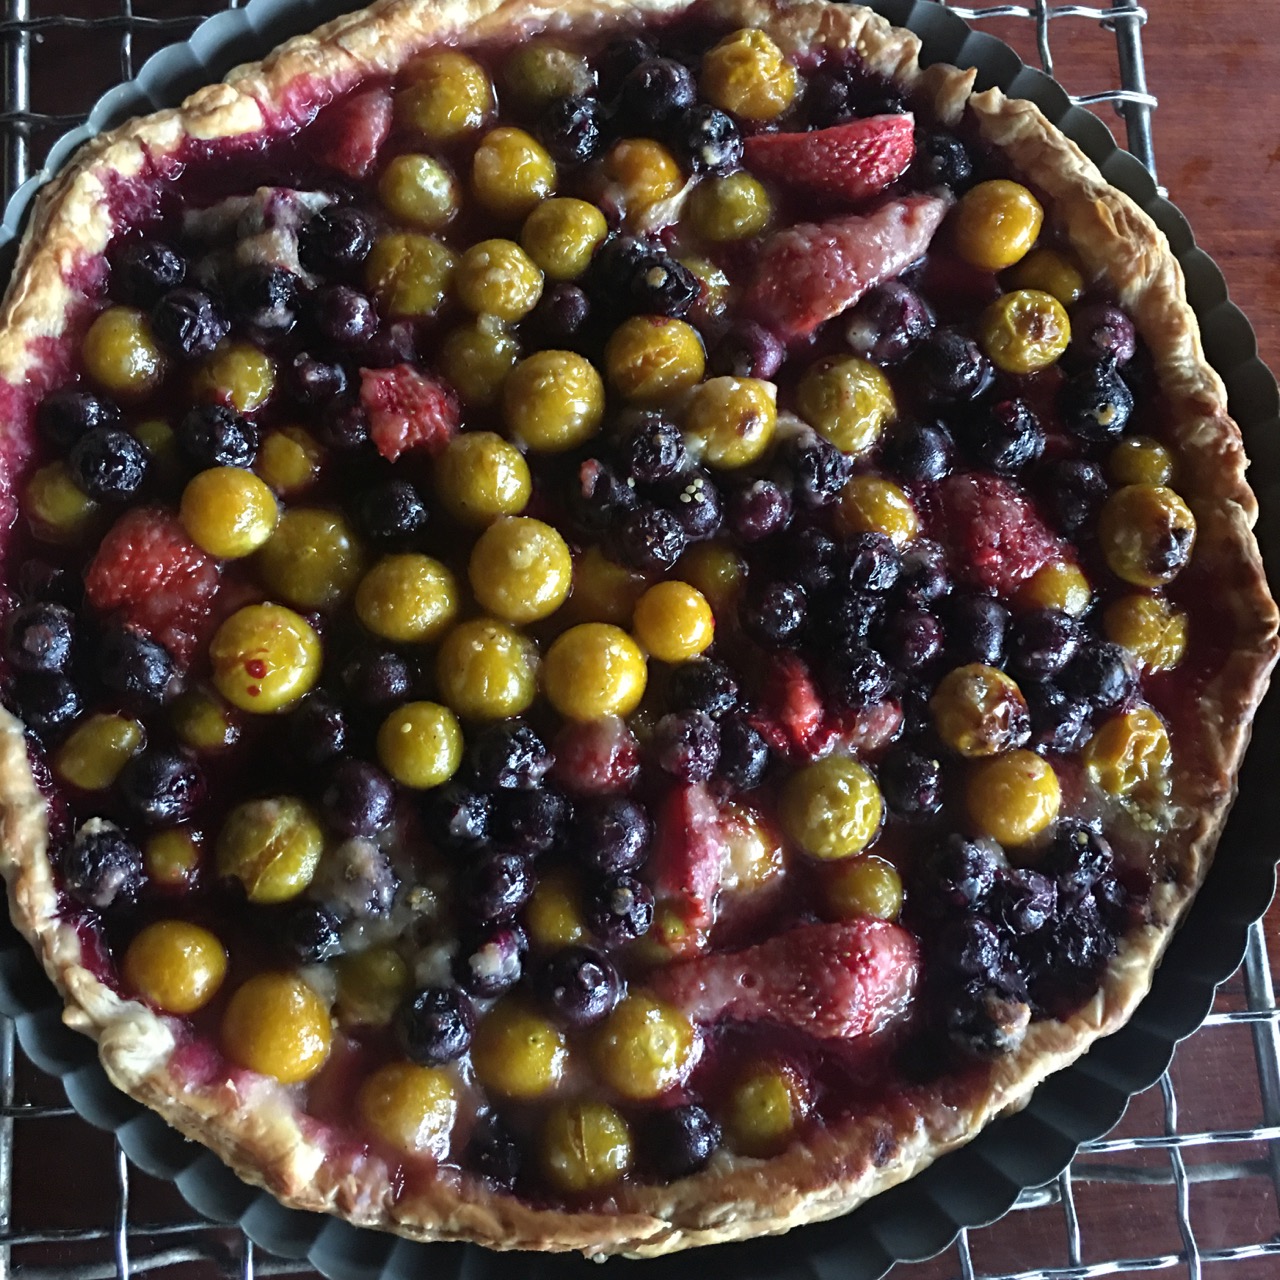
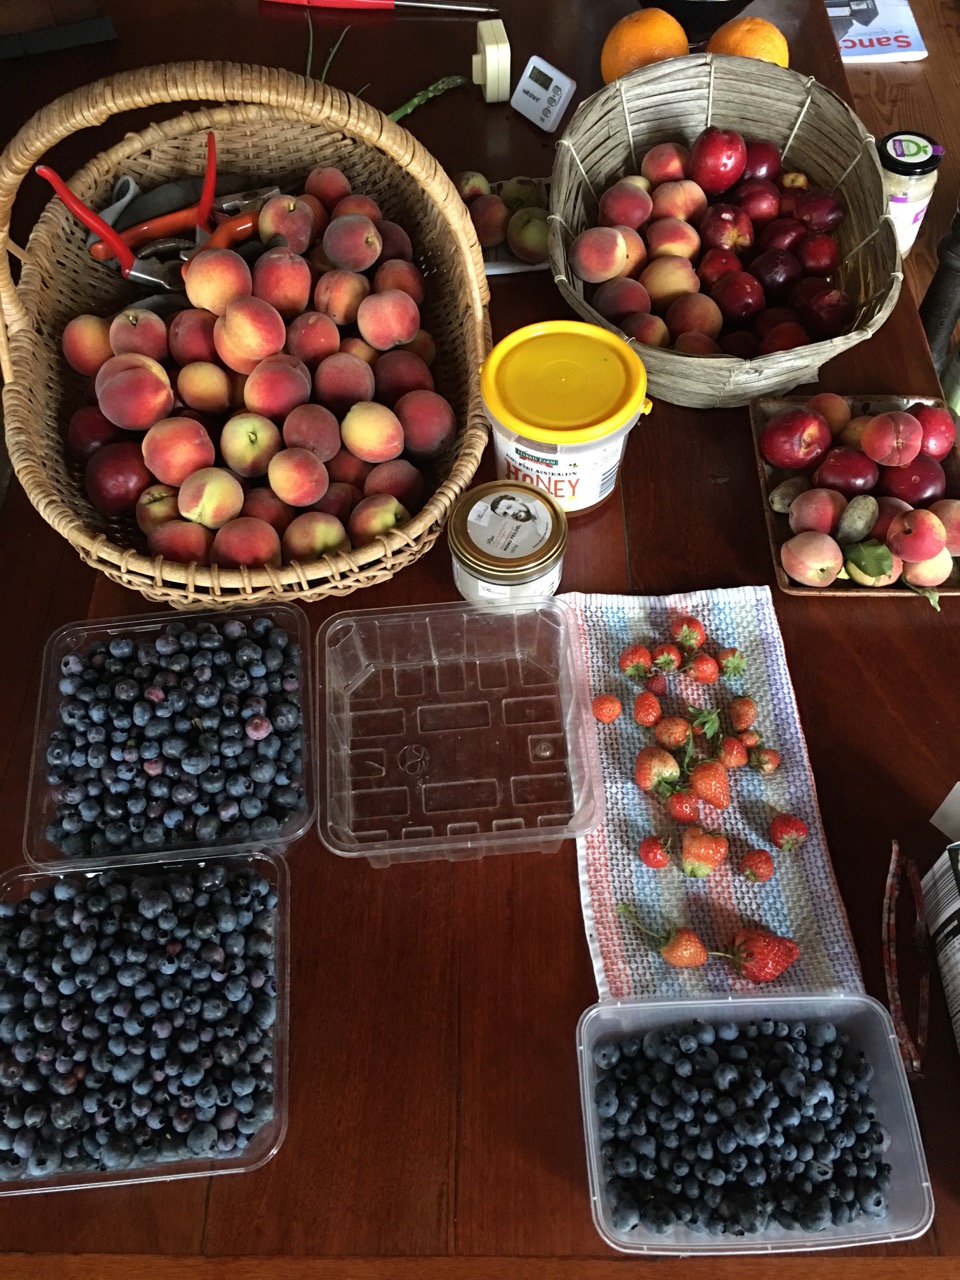
The loganberries have finished now, but the Chinese gooseberries have started and the blue berries are in full season, along with the strawberries. So we are having a lot of fruit salads for breakfast and I have a new variation on berry tart. Strawberry, blueberry and gooseberry tart.
On Wednesday we drove for 4 1/2 hours up to Gloucester to pick up an old Leach potters wheel that was given to me by an old friend, Griselda Brown. We knew Griselda back in the 70’s when we both lived on the outskirts of Sydney. Griselda had studied at the old ‘East Sydney Tech’ Art School where Janine and I both studied with Peter Rushforth, Bernie Sahm and Derek Smith, only Griselda had gone through some years earlier than us, in the mid 60’s.Griselda used to visit us out at Dural, where we had built a big 3 chamber wood fired climbing kiln. She had studied with Michael Cardew in Cornwall after finishing her course here and had a love of wood firing, but was not in a position to build her own wood fired kiln herself. We filled that gap. When Griselda went to Cornwall, she thought that she would be working in the pottery, but Cardew issued her straight into the kitchen and explained that his wife wasn’t living there and her job was to make his meals and clean the house. She could come to the pottery once all her domestic jobs were done! Griselda bought one of the early Leach style potters wheels from J. H. Wilson in Canterbury, who built them here under licence from the Leach Pottery in Cornwall. She had this wheel all her life and as she is considerably older than us now. She is retired and the wheel was sitting idle.It has the full copper tray, with drain pipe and overflow spigot, to stop any water going over the wheel head bearing. It’s in very good condition mechanically, but the wood work has suffered recently as it was stored out in the weather for a while.
When I got it home after our marathon 9 hour drive, the next day, I took the wheel head off and cleaned all the turnings and dust out of the top bearing mount. Gave it a blast with compressed air, oiled the bearing and installed a rubber flange over the shaft to stop any more dust getting to the bearing in the future. Then I made a new plastic collar for the copper tray, as the original copper collar is very low to allow for access to the grub screws holding the wheel head on.
Interestingly, I have never seen an Australian Leach wheel with the wheel head held on with grub screws, needing an Allen key to remove them. This is the fourth different mechanism that I’ve come across used on these wheels over their 25 year history. My first wheel had the wheel head screwed on with a large 1” thread cut into the shaft and head. Then another one had a morse taper and just pressed on, then the third one had a shallow taper and a ’T’ bar pushed through the shaft. After sanding and a couple of coats of tung oil it looks and works great. I sanded the very rusty wheel head to remove a lot of the pitted rust, and then gave it a coat of rust converter to stabilise the corrosion, and finally a light coat of zinc primer to keep it in good nick. I’ve owned 5 of these wheels over my life and tragically lost them all in the past 3 previous fires. I just can’t be trusted with them! I tried a few different ways of looking after the cast iron wheel heads over the years, and this is the best. However, the main point is to always wash the wheel head clean and dry it after use. Most potters wouldn’t be so bothered, but I use white clay and porcelain, so I can’t have rust in the tray or on the wheel head.I’ve always had two of these wheels in use, One kept strictly for porcelain, and the other for stoneware. It’s easier this way and saves a lot of time spent in thorough cleaning between clays.I’m really pleased to have the chance to own and use this wheel that belonged to my friend from a long time ago.
Now that the pressure is off for taking part in the Open Studio events, we can relax a little. We were lucky. We managed to get sufficient glazed work finished to put on a reasonable show.The next big job is to re-build our wood fried kiln, so that I can make the work for the PowerHouse Willoughby Bequest commission. As we are in need a bit of a rest after two years of constant work and anxiety about finances, materials, parts, Local Council regs, electricians and final inspections. It’s good to have this time before Xmas to do a lot less.
Janine is spending a few hours each day back in our lovely new and very comfortable pottery studio, making a few orders from the Open Studio weekends, but principally because I have promised to make a bathroom vanity sink for our neighbours new house. As we were fully occupied recovering from our own bush fire ordeal, we couldn’t help them rebuild their house very much. So making them a bathroom basin is my best gesture towards recovery. The basin is too large for our tiny electric kiln, so will need to be bisque fired in the bigger gas kiln. We can’t afford to fire the kiln with just one pot in it, so Janine is making work to fill the kiln and make the firing more economical We are not pushing ourselves, just taking it slowly. A few hours a day is enough. There are so many other jobs that need our attention, just to keep the veggie garden and orchards in good nik and under control. Mowing is the main job these days, as it keeps on raining and getting warmer, so the grass grows quicker.
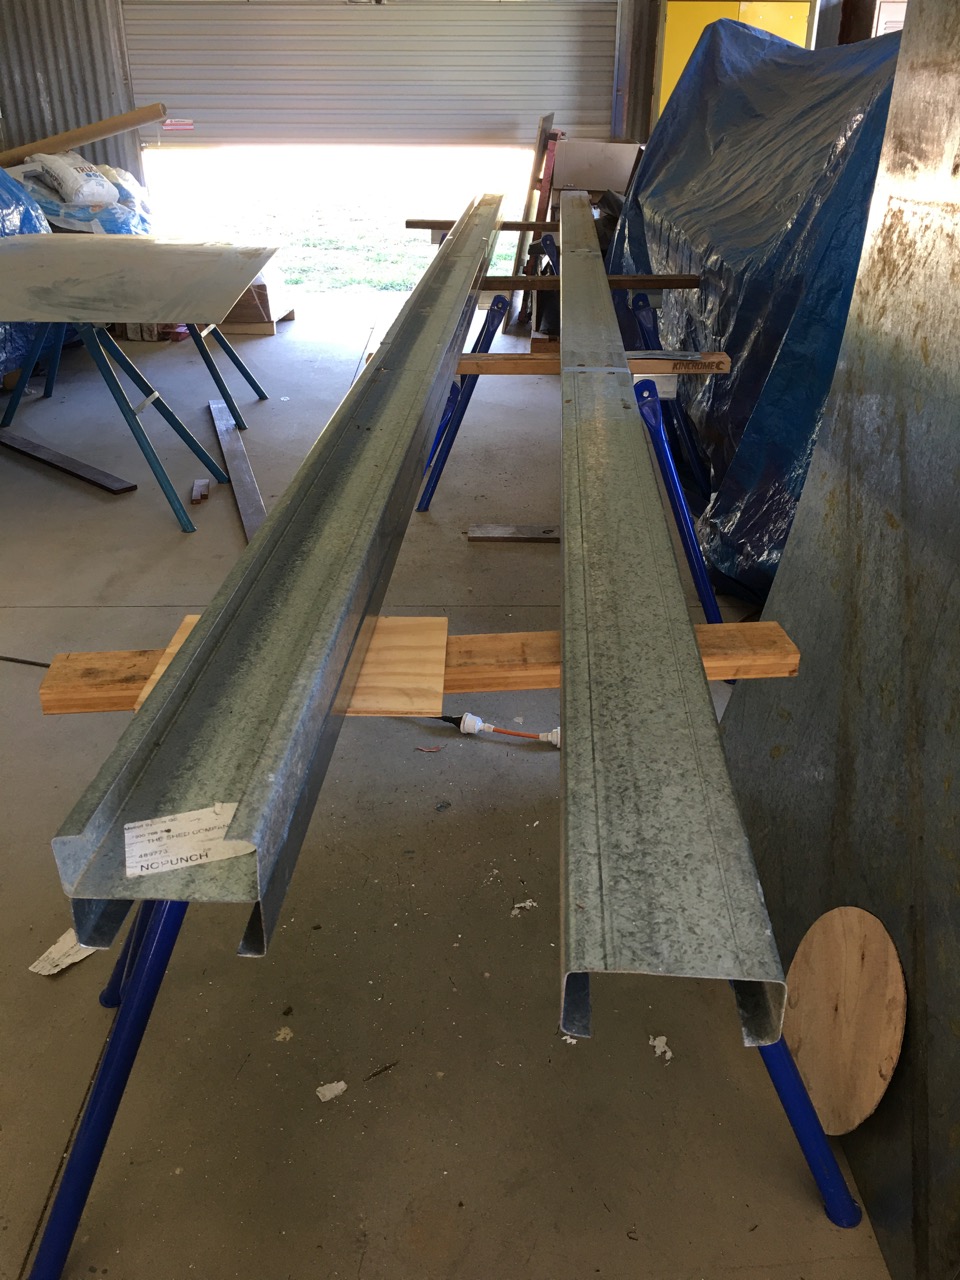
While Janine enjoys the luxury of the new pottery. I am out in the maintenance shed welding together a pile of pressed metal ‘C’ purlin off-cuts. joining them together to make useful longer lengths. I am joining up to 7 small bits into one 6 metre length that is more useful. I will bolt these ‘recovered’ lengths back to back with some new material to make a composite ‘H’ section. These will make very strong uprights and purlins for the new wood kiln roof.
I don’t particularly like working with steel. It’s heavy, sharp, noisy and dangerous stuff to move around, but it surely does a great job of being strong and resilient These thin beams will span great distances. The specific thing that I love about steel is its ability to be welded back together to make it larger and stronger. I’m told that a 25mm weld can hold over a tonne. That’s strong. And if I accidentally make a mistake and cut a piece of steel too short. Well, if it were a piece of wood, it would be wasted. I would have to use it up in another job where a shorter length was needed. You can’t join timber back together. However in the case of steel. It can be welded back together and the joined pieces can be stronger than the original – if its done properly!So I have saved all the off cuts from the pottery shed frame that the builders threw onto the rubbish pile. I put them aside and Janine later stacked them carefully so that now they can be put to good use making the kiln shed frame and roof. Reuse, recycle, up-cycle waste not want not. etc. I take a great deal of pleasure in being able to forestall waste in this way with this kind of ‘thrifty’ building work. It has been being self reliant like this that has got us to where we are now in life on our small income from our creative endeavours. In the mornings we work in the vegetable garden, clearing out swathes of overgrown weedy stuff that has more or less finished its productive life.
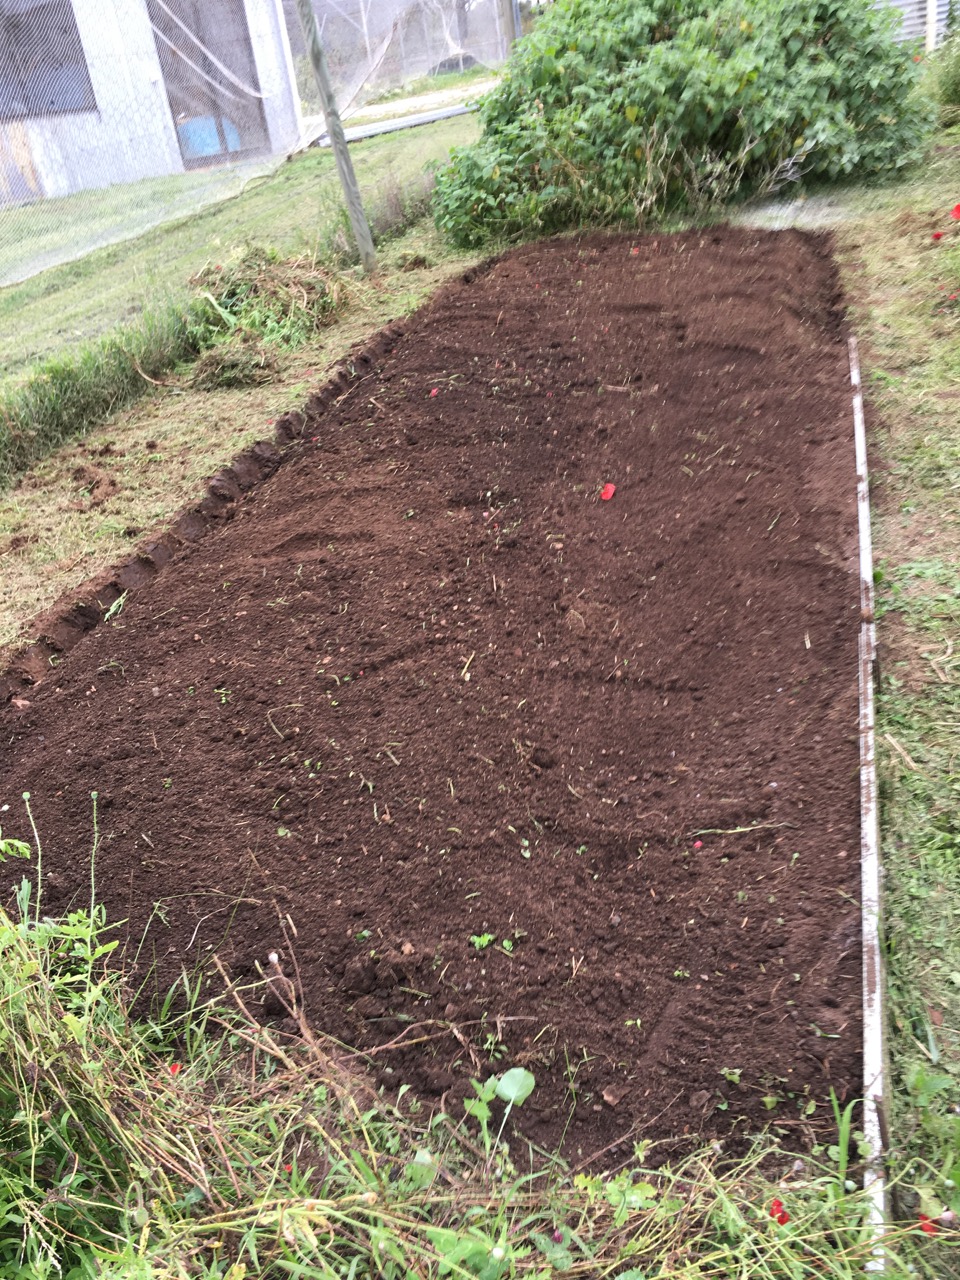
Then when the sun gets up higher, we have lunch and stay inside for the afternoon doing our ‘inside’ jobs until the heat of the day has subsided. Sometimes this heat culminates in a thunderstorm, two days ago we had hail with the thunder storm. This is something like the summer weather that we used to get decades ago. Possibly the last time that we had strong La Nina conditions? If I have to be stuck inside at these times, I spend time making something useful that will improve our lives. Today it was some garden bed edging that I cut and folded out of scrap galvanised sheet steel that had been laying about since the fire. We have decided to shrink the garden beds a little bit to make them narrower. This will result in making the garden paths wider. Once this is completed, we will be able to drive the ride-on mower through the veggie garden and save hours manhandling the whipper snipper around the current narrow paths which is becoming quite tiring work for me these days. Especially as it needs doing almost every week.
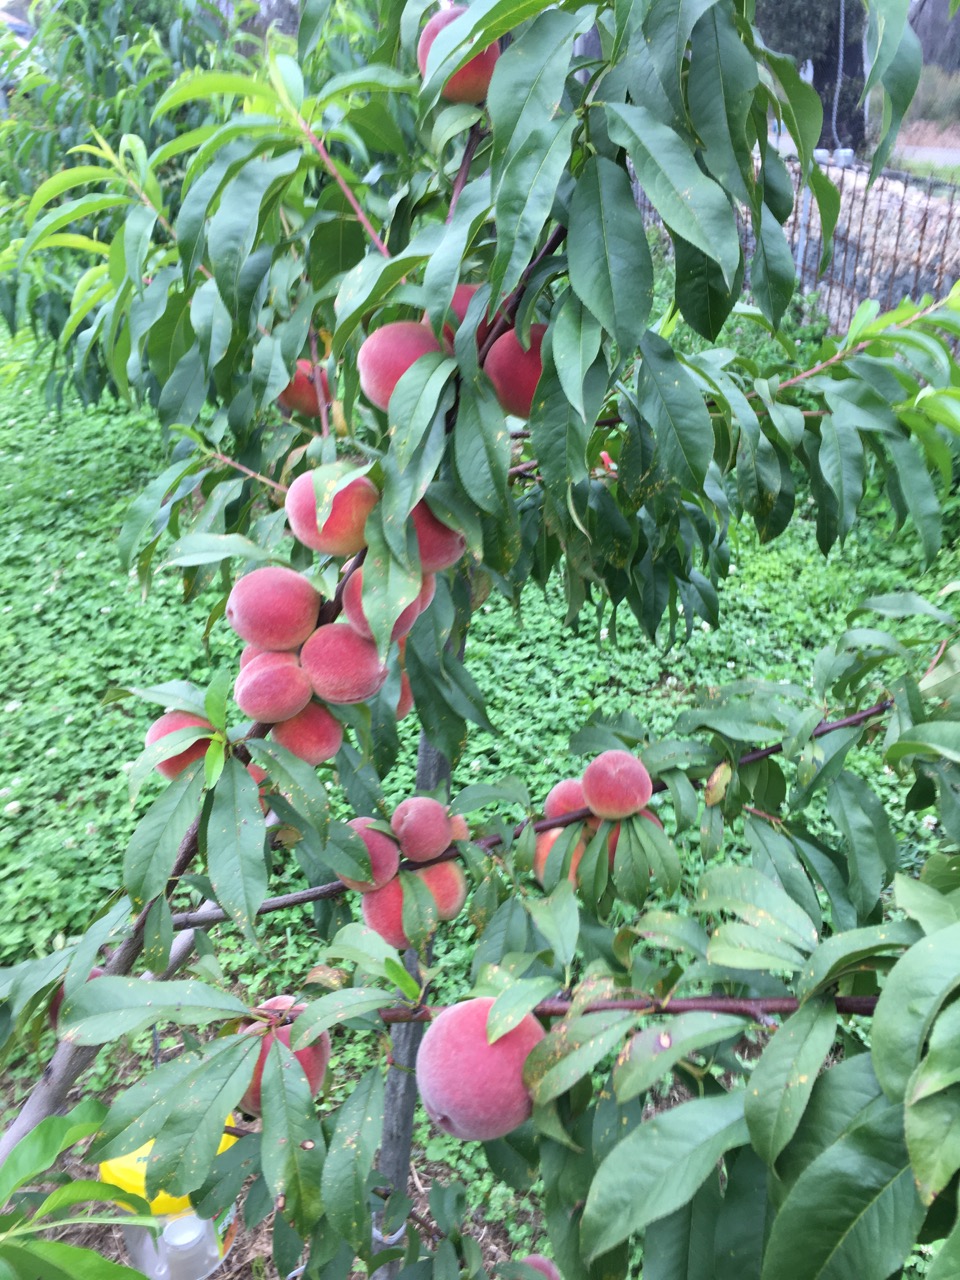
Everything that we have done since the fire has been oriented towards making our future life here easier. Building the new pottery on a cement slab floor for the first time, so everything can be on wheels – possibly including us in our dotage! We have chosen all dwarf root stock grafted fruit trees for the new orchard, so no more climbing up step ladders to prune and harvest fruit. We planted these dwarf grafted whip-sticks in August 2020. These trees are now 16 months old and in their second summer. Some of them are doing really well and have set plenty of fruit. So much so that I had to go around a month ago and pick off half of the crop and compost it before it drained the vitality from the young trees. I picked off over 100 small apples, peaches and necturines. I also did a summer pruning of some of the tallest leggy shoots to keep the trees in a sound open vase shape to promote good growth and development in the future.
Even though I thinned out the crop, we were still able to pick about 40 peaches and twenty necturines this last week.
We are also picking loads of blue berries at the moment. Half a kilo every second day. We have to find ways to use them up, as there are too many to eat as fruit salad in the mornings now. We preserve some and I have started to make blue berry tarts now, as the youngberry and logan berry crops are more or less finished. They never make it past Xmas. But this year in particular the constant rain and the hail really ruined the usual large harvest. Who’d be a farmer or an orchardist? Two years on we have worked ourselves into a really good place. It can only get better. The past is the past. We are not looking back. Everything is in place to create some beautiful and meaningful moments in our life.
We have just had our first Open Studio weekend. It was good. Not too busy, just right. We had an influx on Saturday morning with half a dozen cars in the first hour. We even had a queue at the wrapping table for a short time. but after that it settled down to just one car after another until lunch time and then a long spell of quiet. In the afternoon we had several more visitors spread out more or less evenly until just after 3pm when it stopped.
We were lucky that there was a big function on at Sturt Workshops in Mittagong all day Saturday, so we picked up a few car loads of visitors that called in here on the way past, coming from Sydney and going to Sturt.
We have had only 4 stoneware glaze firings in the 3rd hand gas kiln that I bought back after 26 years out in the wild. It’s now back in captivity and working well.
Sunday was quieter, but still good. We had the same lull in the middle of the day but a much quieter afternoon. It was a great start to this 4th pottery iteration after loosing the first 3 to fires, we have been a lot more cautious about what sort of garden and just how much foliage we can accept near our house and workshop. As this new 4th pottery is almost entirely made of steel, it is a lot less flammable. Steel building can still be ruined by intense fire – they bend and collapse in intense heat. So that is why we have decided to build this new studio in the middle of our block well away from any bush. I have already plumbed the building with fire fighting sprinkler lines. Although as it is so wet they year. I haven’t got around to fitting the sprinklers yet.
I decided to spend those couple of days in the pottery making work for the sale. Everything in it’s own time.
We almost sold out of Janines painted unomi beakers and inlaid lidded boxes, as well as my breakfast bowls.
So on Monday morning we were both back on the wheel making new stock for the up-coming December Open Studio weekends as we have elected to be part of the Southern Highlands ‘Pop-up’ Artists Open Studios on the first two weekends on December, – 4th and 5th, then the 11th and 12th.
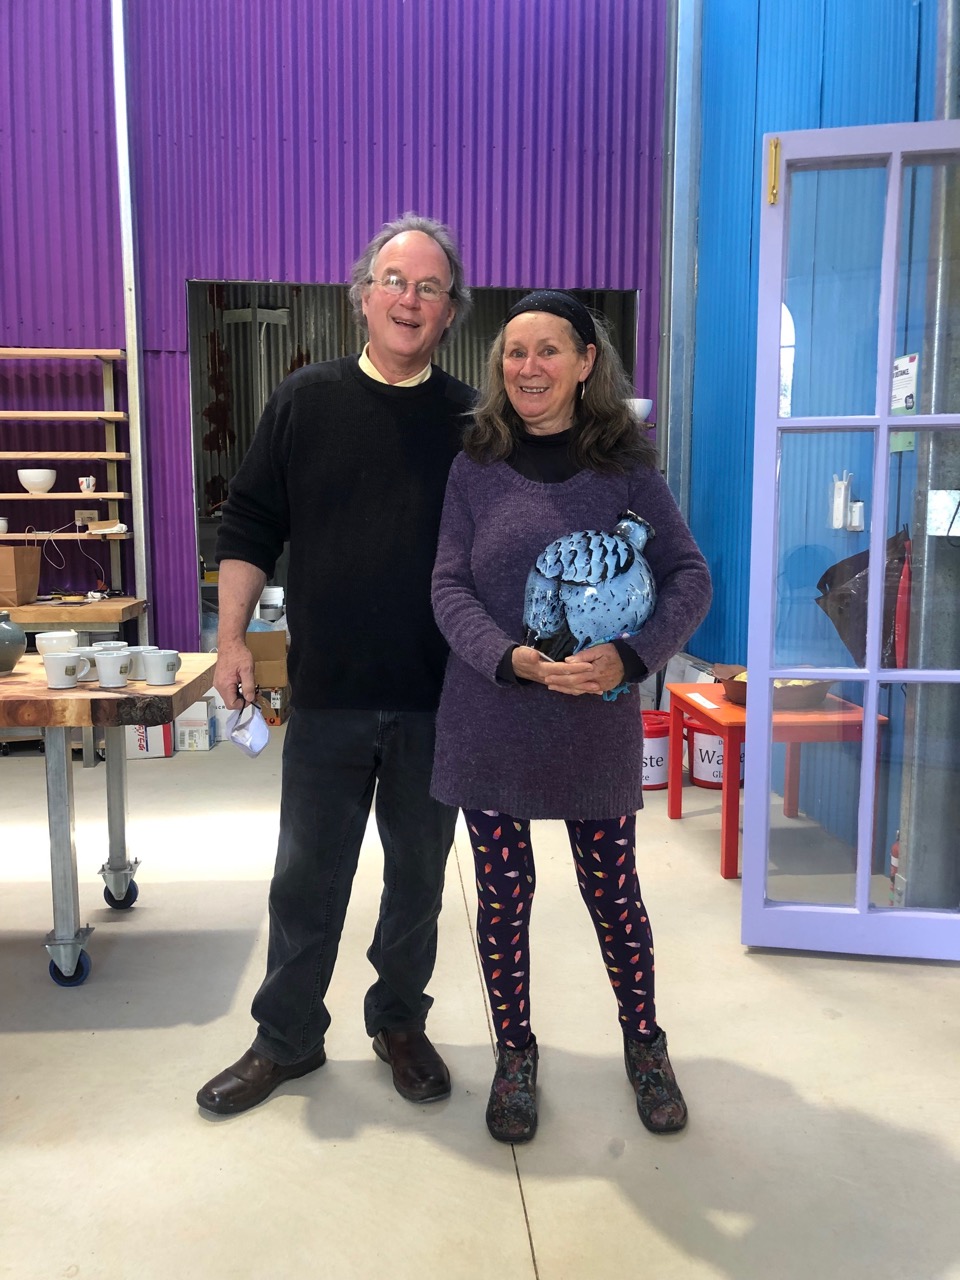
This image of us by Eva Czernis-Ryl. Thank you Eva.
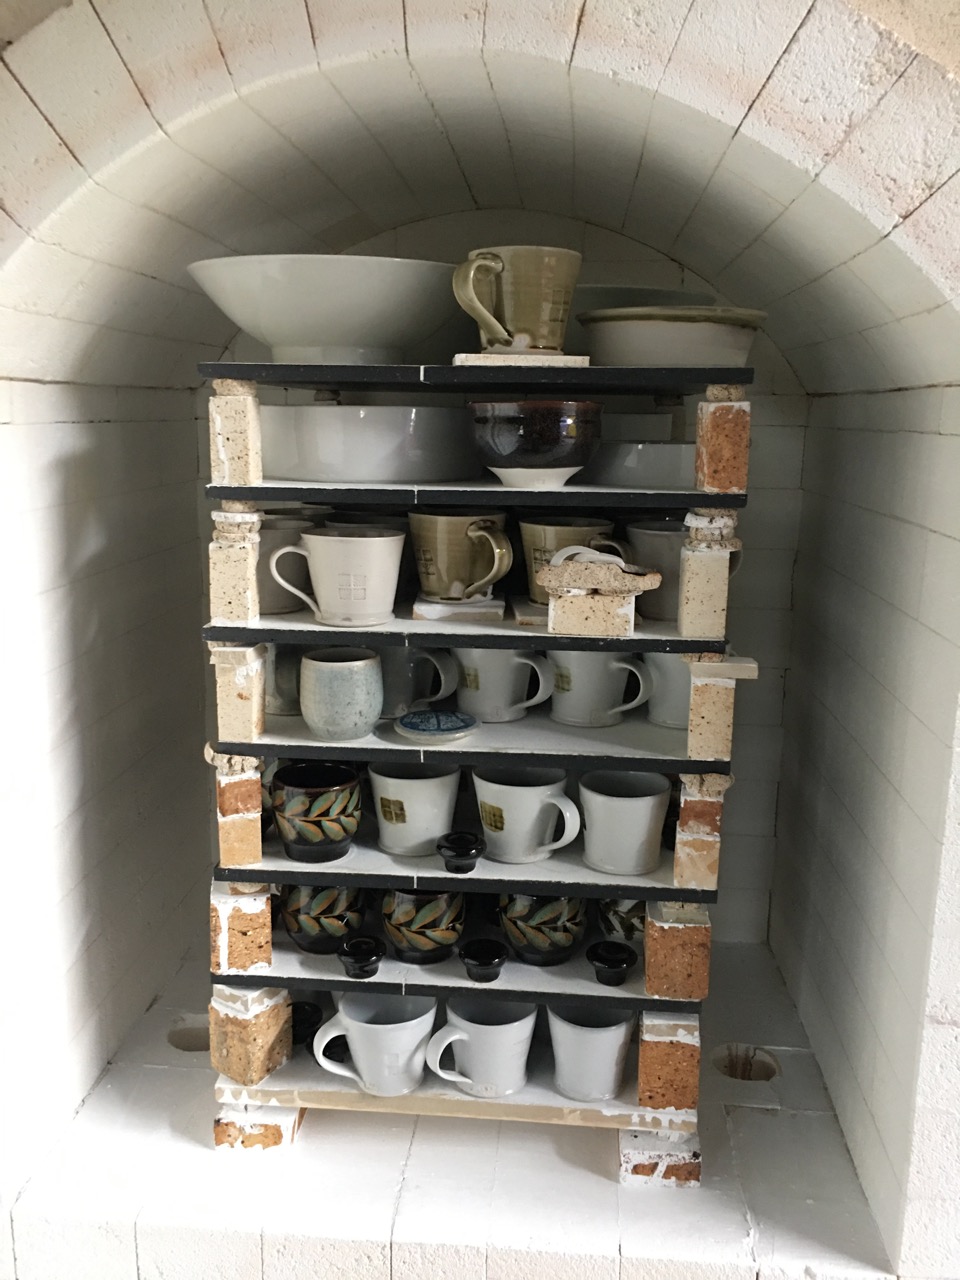
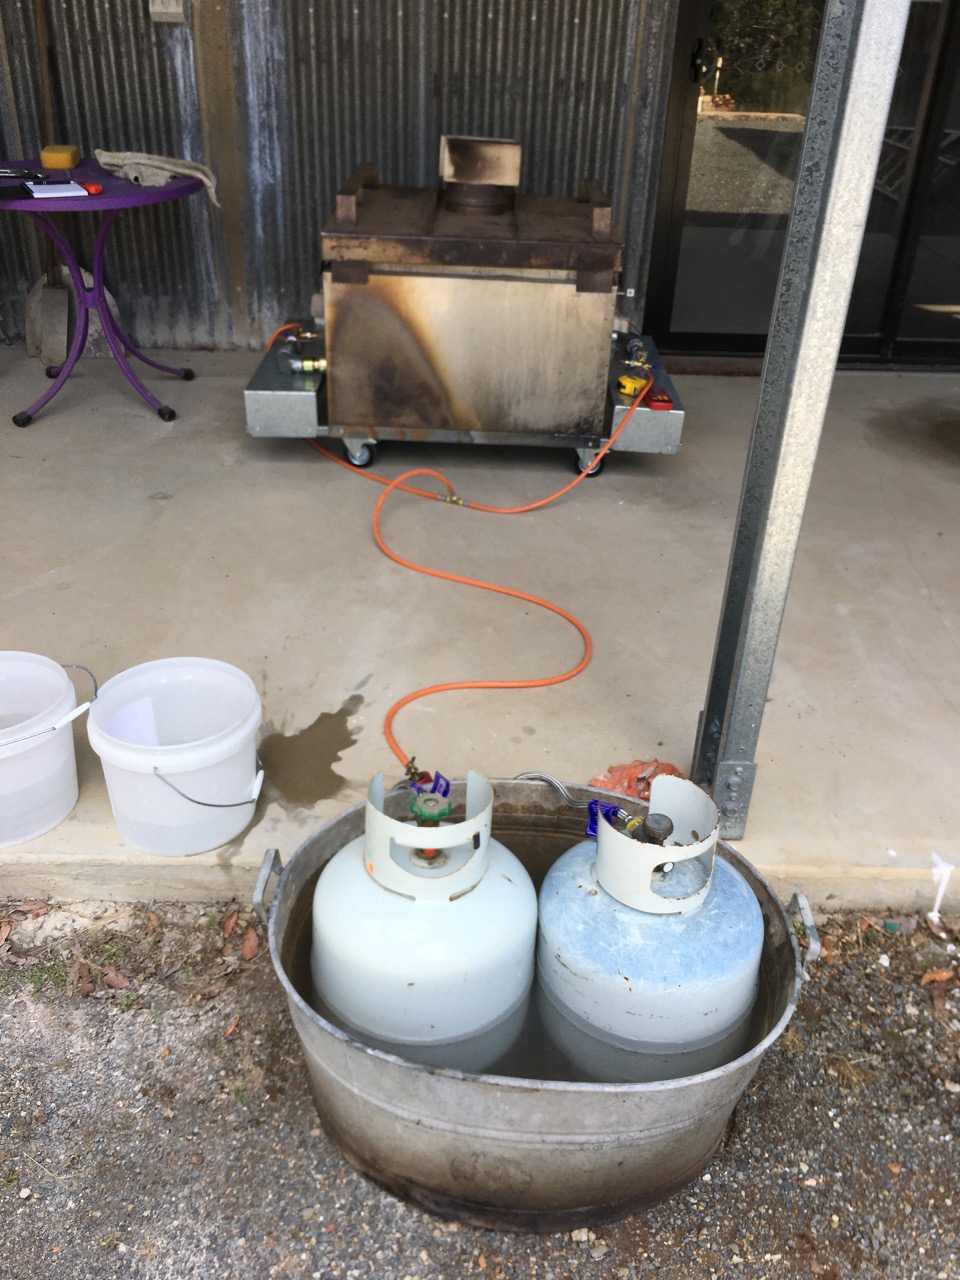
Yesterday we had all three kilns firing at once. A bisque in the little electric kiln, a stoneware reduction glaze in the big gas kiln and another stoneware reduction firing going on in the old relocatable mini wood fired kiln. I recovered it from the ashes of the fire. As it was built from a stainless steel monocoque frame with insulation brick lining, it mostly survived the fire, because it was stored out on the verandah and didn’t get too badly burnt. It just needed some cosmetic TLC on the frame and a new set of castor wheels. Lucky!
It was designed and built as a possible dual fuel kiln to be fired with either wood or LP gas from BBQ bottles. However I had never fitted it with burners and only fired it with wood previously. Now is the time to finish fitting it out with burners. I spent a day making shiny new burners and gal steel mountings. I chose to only pack and fire the bottom half of the kiln , as it is designed to be in two sections. A bottom half with the fire box opening and burner holes – which ever is chosen to be used. Then a top half composed of a removable ceramic fibre ring and lid. The ring can be removed and the lid placed on the base section to make a smaller half sized kiln. Which is what I did yesterday. As it was the first test firing of the kiln, I thought it best to go small for a first firing.
After an initial tweaking and tuning, It worked perfectly and fired to stoneware in reduction easily in 2 1/2 hrs. using less than one 9kg bottle of BBQ gas. I had 2 set up ready with a change over switch just in case, but the 2nd bottle wasn’t needed. I also set them up in a tub of water that can be warmed. In this way I can fire them to dead empty without them freezing. But none of this was necessary yesterday.
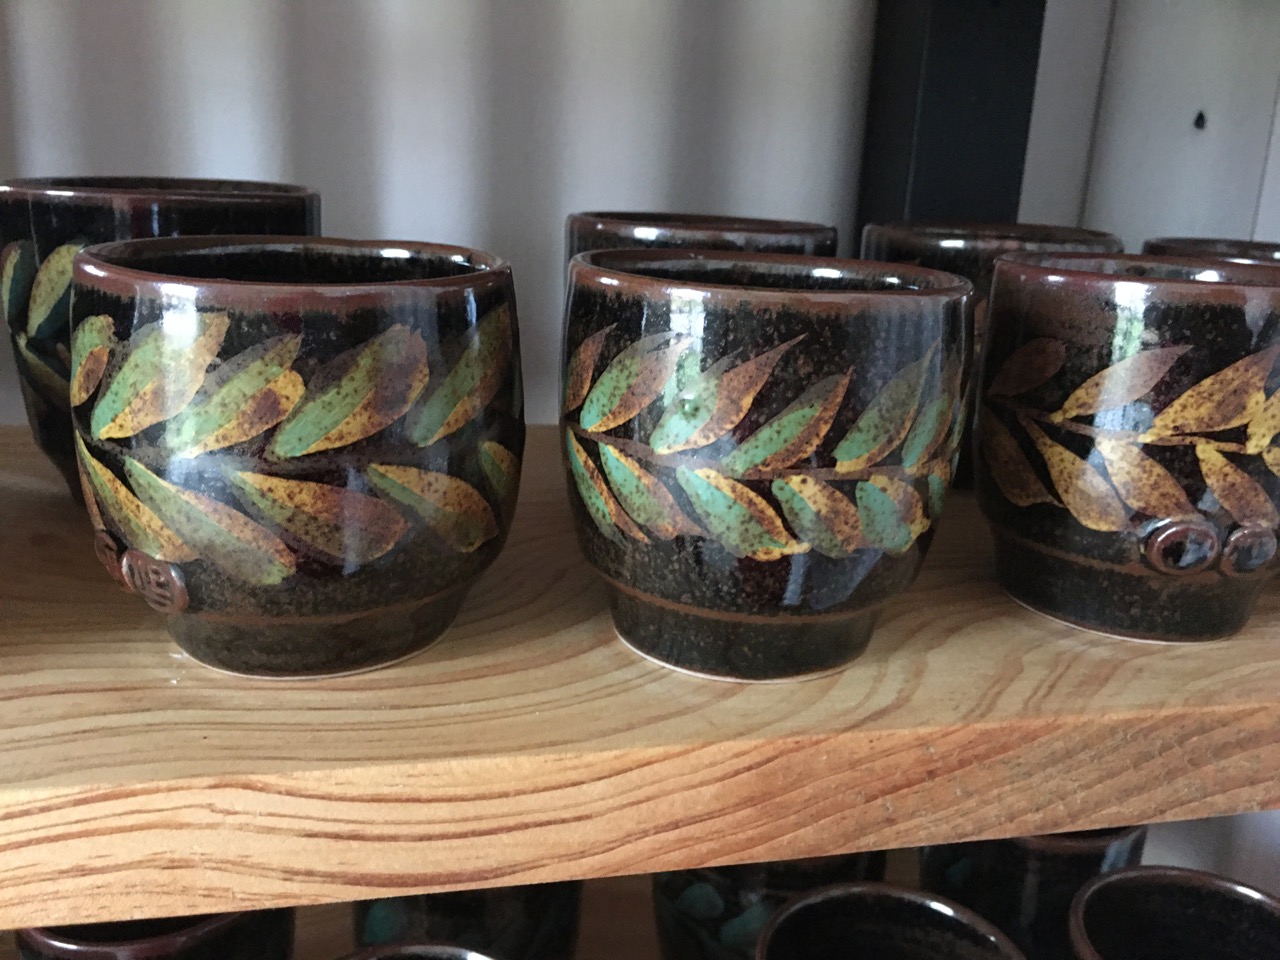
I’m a bit more confident about our local rock glazes now after 3 rounds of test firings. The hares fur/teadust tenmoku is a little more stable.
Both Janine and I have been investigating the use of colours over tenmoku.
and I have managed to stabilise the local Balmoral dirty feldspathic stone and wood ash opalescent Jun glaze.
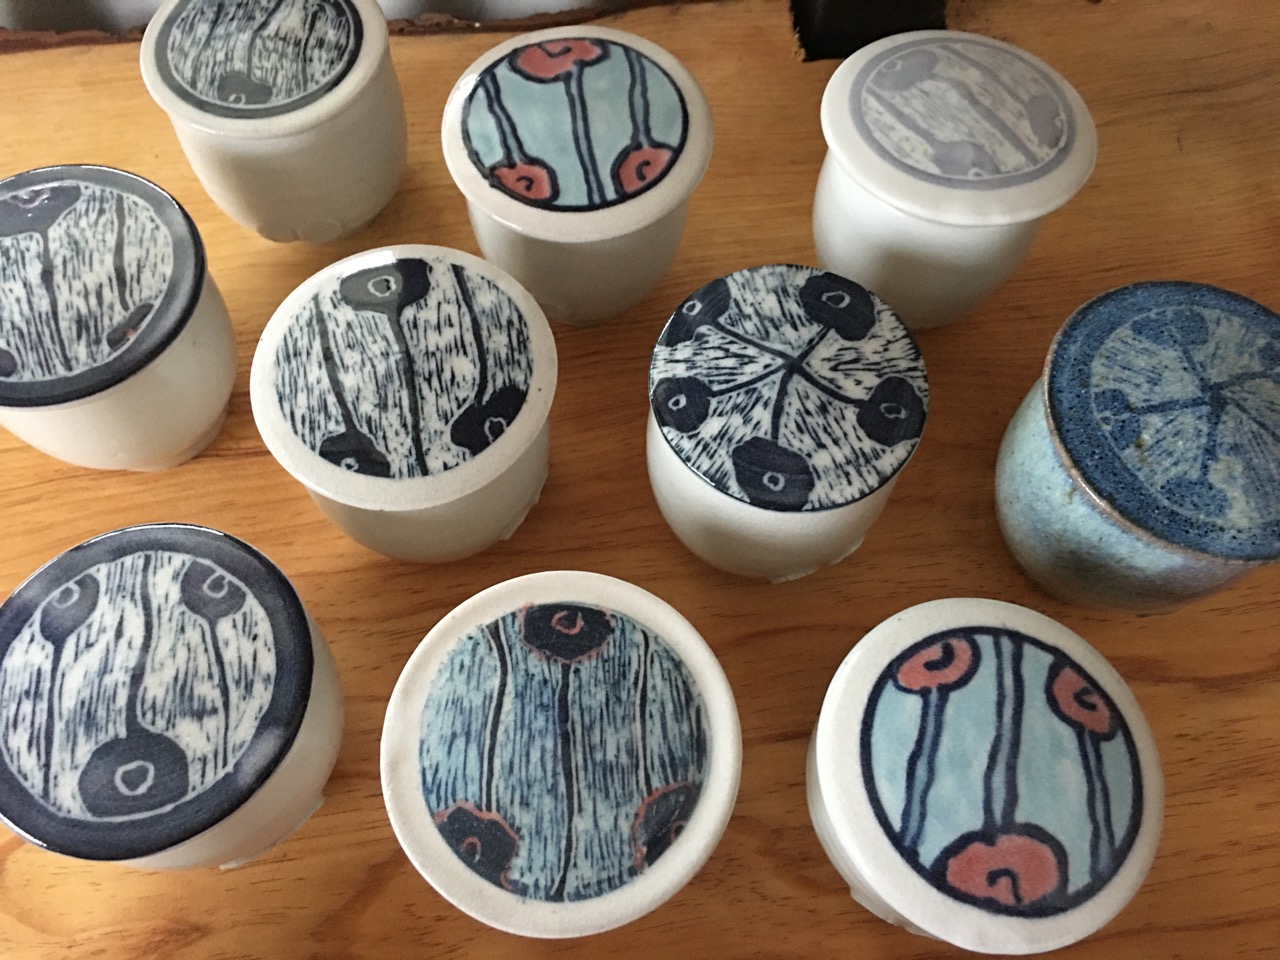
Janine has made some slip decorated lidded boxes.
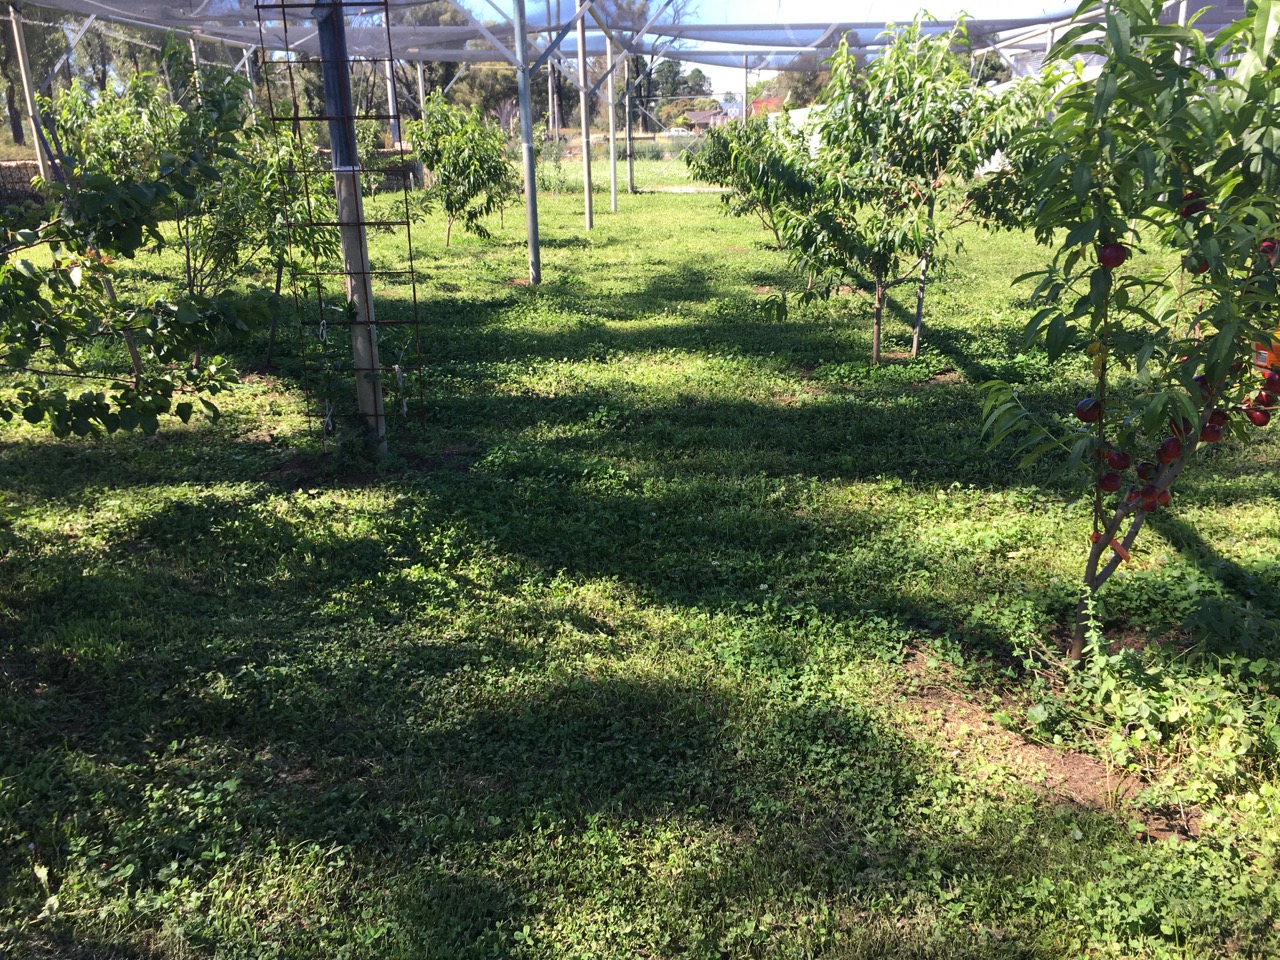
The stone fruit orchard is looking great after a wet start to the spring season and everything is green and luscious.
The almond grove is also very lush and green. All these mature almond trees were burnt and transplanted into this area that was formally a native garden. We have decided to keep the more flammable native bush at a much safer distance from the house now.
The pottery will be open this coming weekend, the 13th and 14th of November as part of the Australian Ceramics Assn. Open Studios weekend that will operate nationally. We will be open in conjunction with Megan Patey in Colo Vale. Megan makes beautiful Majolica and Smoked Arab lustre.
click on the QR code to find your local potter.
Janine and I will be also open on the first two weekends in December and the Southern Highlands Artists Pop-Up Open Studios group.
We will be open on the 4th/5th and in conjunction with Sandy Lockwood, on the 11th/12th of December.
We look forward to being able to show you around the new pottery on one of these 6 days.
We will be following the government recommended COVID19 safety protocols. So please come if you are double vaccinated and have your vaccination certificate. There is our Service NSW, QR code poster on the door for login
We have a covid-safe plan that includes keeping the space very well ventilated and limiting numbers to 4 sq.m. per person.
Please don’t bring dogs, as we have recently had both wood ducks and brown ducks hatching clutches of little ducklings that waddle all around the property with their parents feeding on the lush grass. These are timid wild animals and we have no control over where they wander. So please keep a respectful distance if you are walking around the garden.
Dear Friends, We will be opening our pottery on the weekend of 13th and 14th of November. We are informed that on the 1st of November, the state will be opening up to allow people from the Greater Sydney Region to travel to the regions like ours in the Southern Highlands. We have joined the Open Studio Weekend organised by the Australian Ceramics Assn. and accordingly, we will be open from 10 am to 4.00 pm on both Saturday 13th Nov. and Sunday 14th Nov. We are looking forward to seeing our friends again after such a long time in lock down.
We must remind you all that we will be observing strict Government COVID safe protocols.
Please don’t come unless you are double immunised, and have a vaccine certificate to show us.
We will need to see your vaccination certificate before you can come in and there will be a strict 4 Sq. M. rule applied. That’s 7 people max. in the gallery. Although I can’t imagine that we will get more than 7 people all day, never mind all at one time 🙂 We will have all the doors and windows open for good ventilation and to keep the CO2 levels down to around 450 ppm. As this is considered good practice to minimise the chances of infection. We won’t have a lot of work fired and for sale by that time, as we have only now just had our first stoneware reduction glaze firing full of glaze tests. I have been very busy working on the 3 local igneous rocks that I could collect within 5 km of our home here, or near the supermarket and Post Office on our once a week shopping excursion. That has limited my choices, but it’s a challenge to make the best I can out of what I have available in my immediate vicinity.
Its shaping up to look like we can make a tenmoku and tea dust glazes from the Hill Top basalt found in the next village. A green celadon from some washed felspathic gutter sand, A pale blue celadon, a yellow matt glaze, Blue/yellow mottled glaze, also made from the local ‘Living Waters’ Basalt intrusion, and a pink matt glaze made from the sericite porcelain body. As well as something resembling a pink/orange shino style of glaze made from the Balmoral dirty felspathic igneous stone. Nothing special, but a workable mix to get us started. As long as you are double vaxed, We’d love to see you here at some stage, once we are all allowed to travel inter-regionally. Even if there is only a small selection of our our work on the shelves, we welcome you to call in and see the new shed. I’ll be pleased to give you a tour of the Workshop, Pottery studio and Gallery, as well as the raw material processing facilities that we are in the midst of developing – for those so inclined.
We will probably also be open from then on, each weekend, through until Xmas, but please ring beforehand, just to make sure that we are in and open, and not out doing shopping.


You must be logged in to post a comment.