Today I didn’t clean any bricks. We had an almost full day yesterday when 2 friends came and gave us a hand for most of the day. Janine and I did our ‘normal’ shift from 6.30am till 9.30, then our friends came at 11.00 am and left at almost 7.00 pm.
We did have a long lunch, but it was still a big day on the tools. So today is a designated day off from brick cleaning. Our first
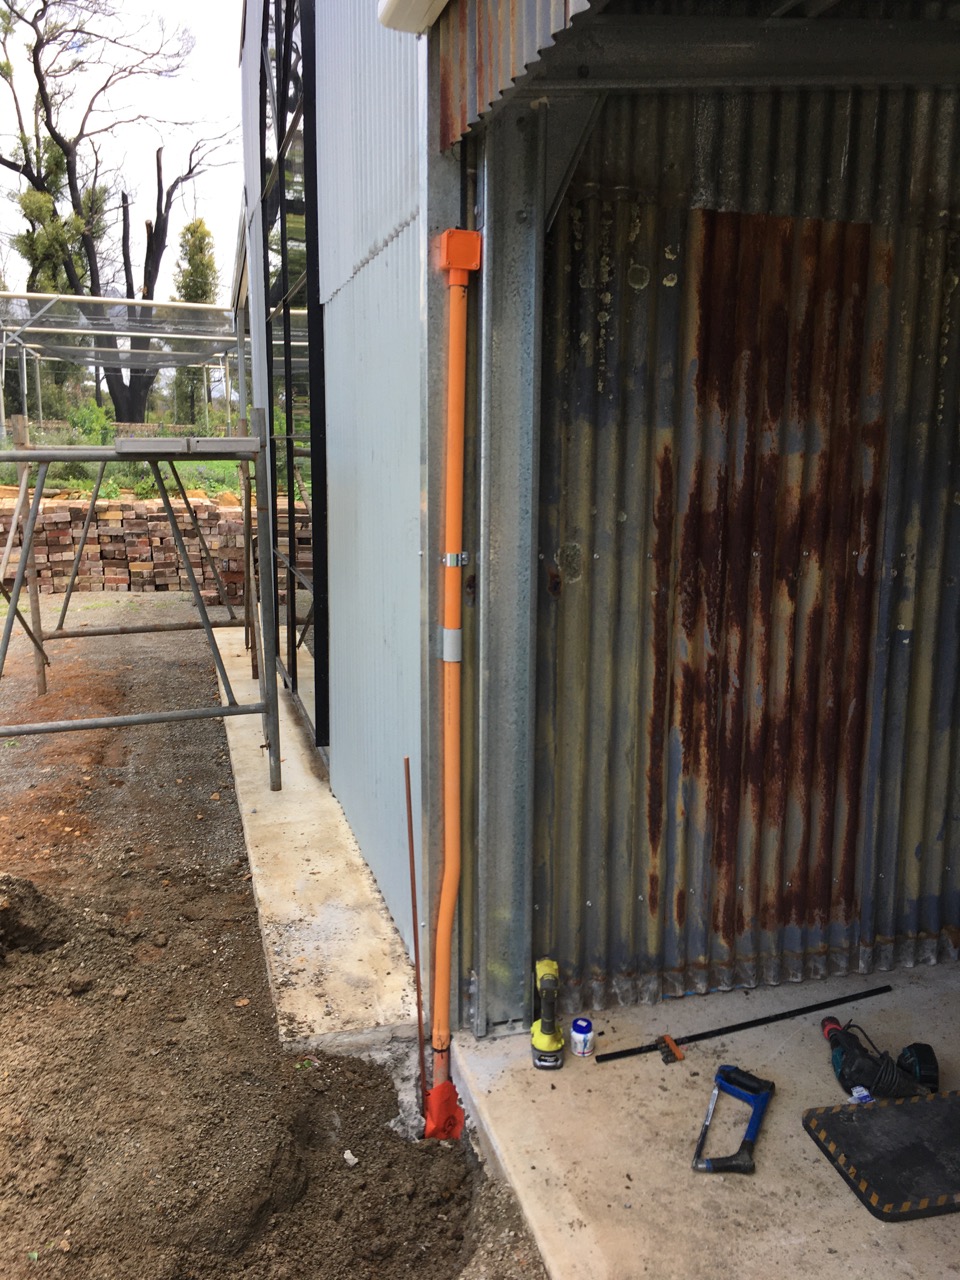
The electricians turned up, so that was good. It’s nice to see some progress. I spent the morning helping them by digging out the old pottery 3 phase cables down to 750mm. deep and exposing the horizontal run of the orange conduit. The sparkies then joined on a longer section of cable and ran it up the outside wall of the Gallery room, and then along to the new main sub-board inside.
My next job was then to fill it all back in again, after laying a sheet of orange ‘warning-electrical cables’ plastic safety strip along the trench, half way up. By doing these mindless labouring jobs myself, it saves paying the high hourly rate to the sparkies, for something so dull and time consuming and saving me some money.
I will need to make some new corner flashing out of gal steel sheet to cover this conduit and make it safe and weatherproof.
The sparkies continued on inside wiring the rest of the building.
Progress in fits and starts. I’m grateful for every little bit of it.
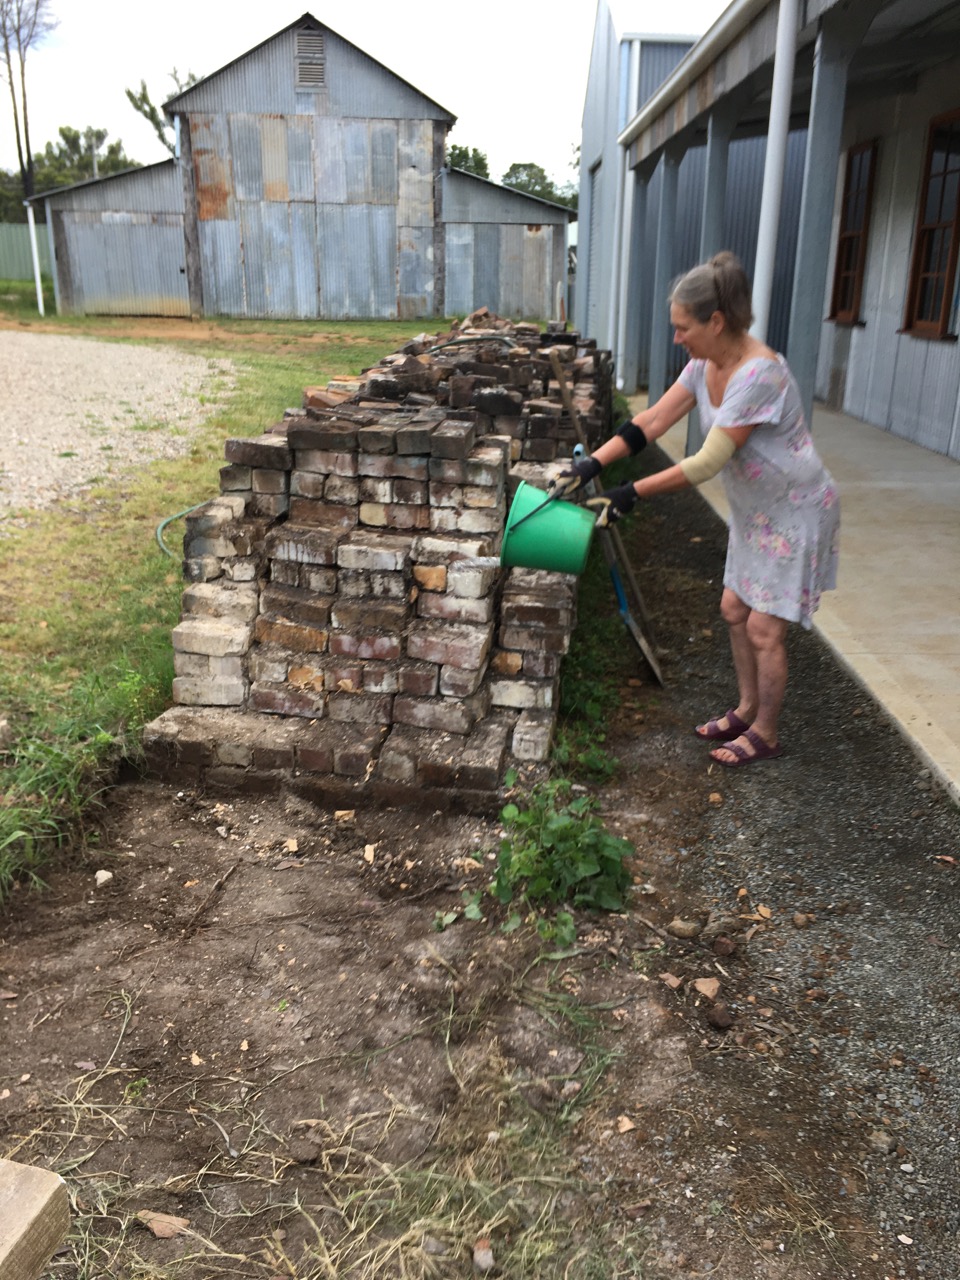
We have been working consistently on the brick cleaning, with have had a couple of friends come and give us a hand during the week and that has sped things up quite a bit. Janine and I have been at it every morning for a few hours from 6.30 to 9 or 9.30. We regularly clean our quota of 100 bricks to stay on target of finishing by the end of the month. With the little bit of help from our friends, we are now well ahead of our target. We had 3 friends here yesterday, so knocked off 300 bricks before lunch.This has brought us to about half way through the cleaning job. Ahead of schedule is a good place to be.
On the other days, we only had Gladys and Edna to help us.
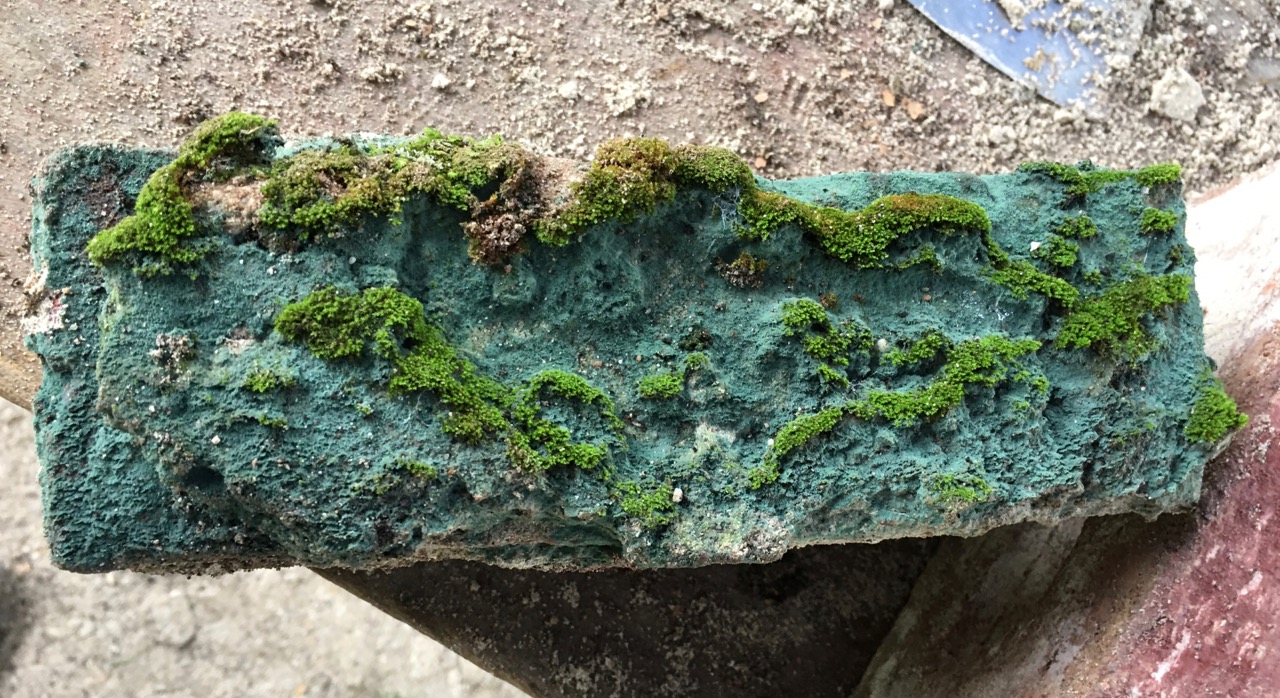
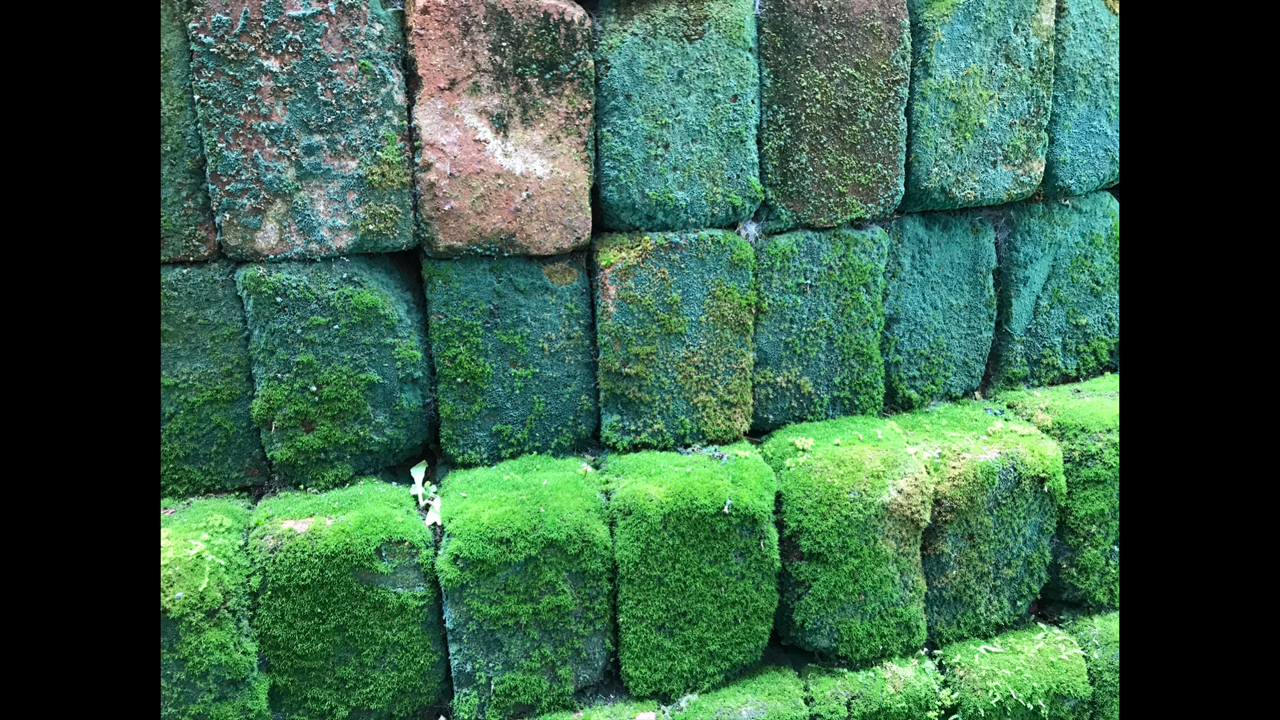
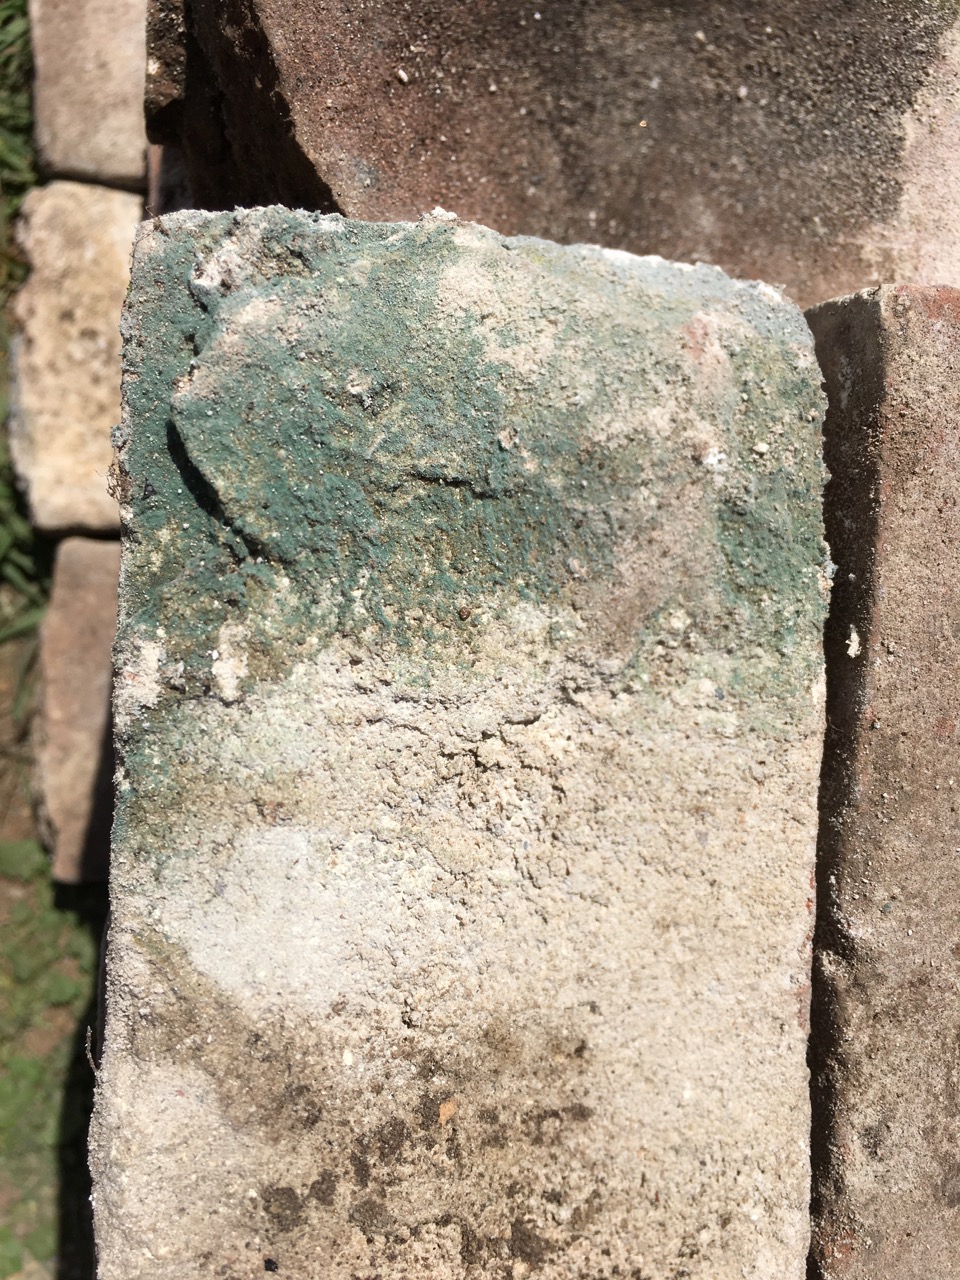
We came across a really lovely example of the blue mould on one brick, with some green moss. I sent a photo of it to my friend Warren. He sent back an image of a pile of his bricks that are a stunning example of both the blue mould and bright green moss.
The weather has turned cooler now with a southerly change coming through yesterday. We were out there cleaning bricks again today and we managed to put in 3 hours from 6.30 to 9.30 simply because it is not too hot. We got over 150 bricks done, plus a number of broken bricks, shorter ones, skinny ones, plus the usual halves and quarters.
We have now cleaned up to around 1,000 bricks in all categories. I have separate piles for 1/4’s, 1/2’s, 3/4’s. Then other piles for bricks that were cut to special tapered shape for use over the window arches. There is a whole category of smaller bricks that we excavated from the footings of the old Mittagong Railway Station. These make up about 10% of the total. I stack them separately, because 33 years ago when we were building our extensions onto the Old School building here in Balmoral, The brick layers would often call out for me to find a taper brick, or a small brick, to fit a particular spot in the bond.
The long original pile of bricks that used to continue all along our drive way, is now significantly shorter. We keep moving the bench up to the pile and then, the next day, the pile has receded back further again, as we clean the bricks and stack them at the other end of the driveway. This stack advances, as the old stack recedes.
You can see where we started on the brick pile on the far right of this picture after the red wheel barrow, there is a patch of green grass surrounded by a ring of white lime mortar. This was where the bench was when we started. When I start again, later today, we will move the bench again up closer to the brick pile.
The cleaned brick pile is looking very healthy.
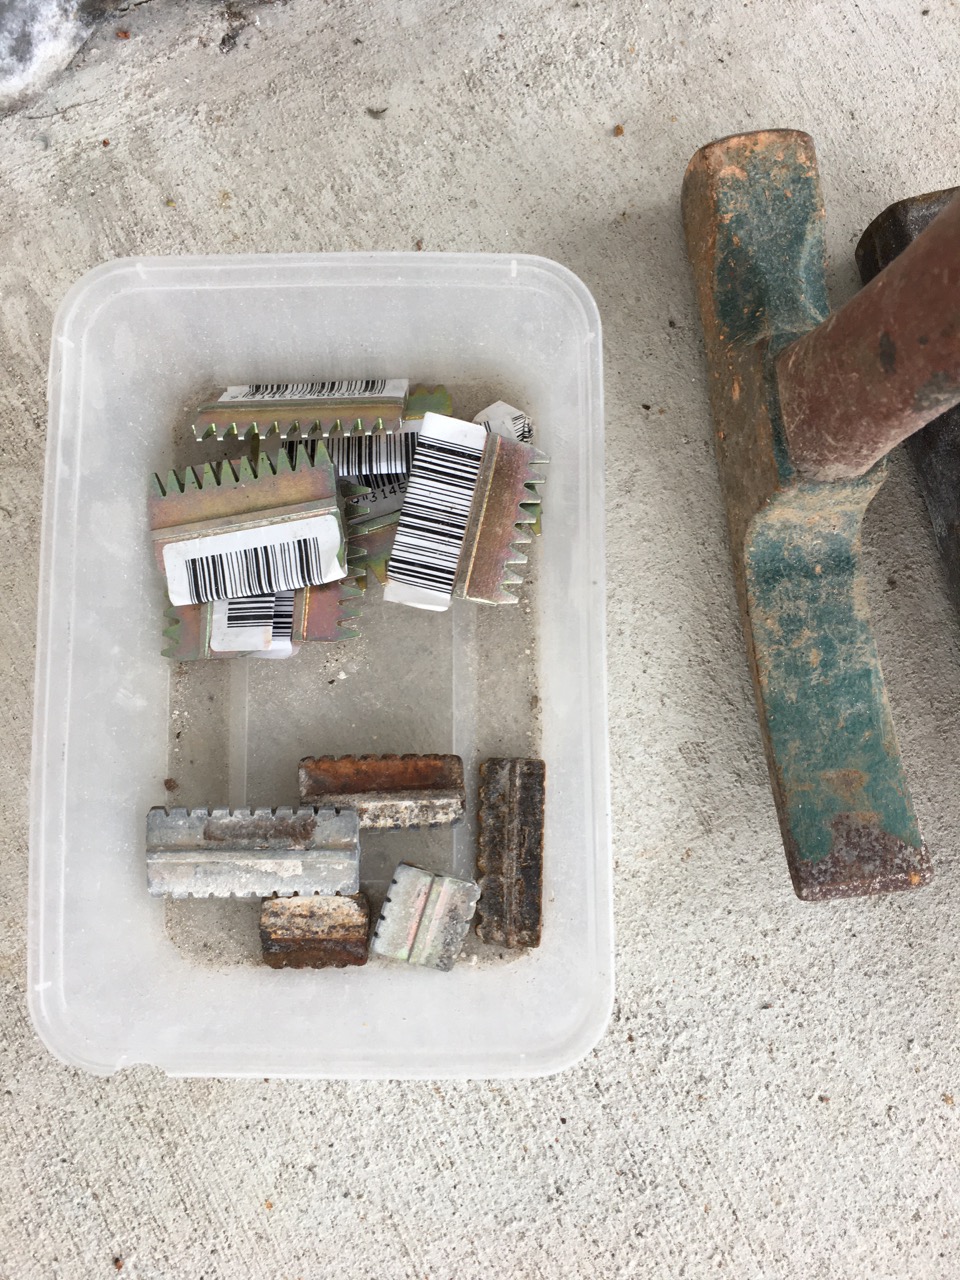
We are so far ahead of my hoped for estimate of 100 bricks a day for 33 days. Getting close to 1000 bricks in 6 days. We are wearing our way through the stock of Scutch combs.
It’s a small but significant measure of our progress.
The other big achievement of yesterday, was the completion of the big arched window. I had the glass delivered just before Xmas, when the glass shop closed for Xmas break. Unfortunately, I had miss-measures one sheet, very slightly over size. It was one of the triangular sheets at the very top. I thought about trying to cut the curved arch end back by 10mm., but decided against it. The glass shop didn’t open again till yesterday, having had 6 weeks off. So I rushed down to Mittagong and got them to cut 1cm. off the curve for me and then brought it home and fitted it.
The window is now complete. An intermittent job that has taken me 11 weeks, but 6 of them waiting for the glass. I’m quite pleased with it, and in particular the fact that I could do it all myself for about $1,000. A massive saving on the cost of having one made. I’m lucky that I have all the skills necessary to be able to do this detailed work for myself. There is a local factory that makes custom made steel framed windows for architects. I was told that the window would be in the region of $20 to 25,000 to have specially commissioned.
I can finally take the scaffolding down now.
I’m really looking forward to seeing this wall bricked up!
We work for a couple of hours every morning from 6 or 6.30 until 8 or 8.30, depending on when we wake up.
We do at least 100 bricks before breakfast. Our brick cleaning tally stands at 600 bricks now. I was thinking at the beginning of this little project that I had over 3,000 bricks to get done. I’m an ageing old man, maybe 100 per day would get them all done in a month. Achievable, without doing myself an injury. So, all in all, I think that we are doing pretty well.
There is a gap between the bench and the brick pile now. That’s progress made tangible.
We were joined this morning, very early on by half a dozen wood ducks, they came wandering past grazing on the grass and made their way up to the front of our land where I planted a patch of clover.
Janine wets the bricks down with some water every now and then to suppress the dust.
Yesterday, I started the day with a new set of scutch combs in the hammers and by the evening they were reduced to being pretty blunt, so I reversed them to get another day out of the the other edge.
Slowly but surely, we will get it all done. The 42 oC temperatures haven’t helped, but we are in for a cool damp change tomorrow, so I might be swapping my home-made Legionaires style, adapted sun hat for a rain coat. At least it will keep the dust down and be so much cooler.
I improvised it by fixing part of an old T shirt to my straw hat with some of Geordie’s old nappy safety pins. Needs will, as needs must.
Janine and I have been getting up early and going out to the brick cleaning bench each day now at around 6-ish. We chip, scrape and clean until we have have 100 done, that takes us about 2 hours. The first day it took us 2 1/2 hours, but we are getting better at it now, so we have knocked half an hour off. We don’t try and do more in the extra time, we just knock off once our quota is filled and then rest our arms and wrists.
We are usually quite hungry after 2 hours of work, so we enjoy our breakfast.
Stopping is good. We don’t want to over-do it early on. After breakfast today Geordie called in with some stuff from a restaurant that he was given and wanted stored. it is starting to look a bit crowded in the new shed already and we haven’t even finished building it yet!
Later in the morning after Geordie left, Janine had a little snooze. The extreme heat makes you tired at our age. I didn’t feel like it so went back out and work for another hour, which was OK after a couple of hours rest. I put up the shade cover thing and did another 100 bricks in just one and a half hours. Maybe I’m getting better at it? Or, maybe I was just working through a pile of bricks that had less lime mortar on them?
When I come to the ones that have cement on them, well, that really slows me down. I have a bit of a go at them, but really, it isn’t worth buggering up my arm muscles on these. I put them aside and I will come back to these in a few days time when there is pile of them built up, and I will get out the diamond saw and just cut the brick, just inside the cement coating, and clean it that way.
Some of the bricks are really pretty.There are a range of colours from red, through orange to yellow, with a few maroon and grey variations. There are also a ring of textures as well. Sandstock bricks have this hand made natural variation in deeply inherent in there making and firing technique.
I found one lovely one that had a blue kind of mossy mould growing on the lime in the mortar. It was quite a pretty blue and a lot of the bricks in one part of the pile had just the right conditions for its to grow. The red brick contrasted well against the blue haze of the mould?, with the rest of the brick having a sooty grey black mould on it.
We only found this in one part of the stack. It obviously had very specific growth conditions.
As the building of the new pottery shed has progressed in fits and starts, I have been busy on several fronts, working behind the scenes doing several jobs in preparation to keep the build progressing, by making windows and doors etc. Two weeks ago it was the stormwater plumbing and at the end of the week, the Council Building Inspector came out and passed the building up to the frame stage and also passed my underground storm water plumbing.
The last two items to be completed and inspected will be the sink, grease trap and drainage/absorption trench. I asked the inspector if i could do all this work myself and he said yes. I can do it all, I don’t need a plumber to sign off on it. So next week I will attempt to dig an adsorption trench 600mm. x 600mm. x 10 metres long and bury the plastic hoops necessary to create a legal drainage system for the sink. I have done all this before over the years, firstly for the first bathroom at the front of the house in 1980, and then again for there new kitchen/laundry/bathroom extension in 1990. It’s not rocket science. Just grunt.
The last inspection will be the final inspection. This will be after the electricians have been and the shed is lined inside with insulation in the walls and with the brickwork completed on the front wall. This will take some time to get done.
This last week I was hanging doors on the front and side verandahs. This has been one of those little jobs that have been idling along in the back ground for the last couple of months. I collected these couple of old doors years ago, just because they were really beautiful objects, even though I didn’t need them at the time. They were too good to pass up.
These days when I drive past piles of other peoples junk on the foot path, waiting for council clean-up. There is nothing worth taking home and re-cycling. It is all just so much plastic and chip board pulp waiting for land fill. The only lasting thing about Ikea furniture is the allenkey!
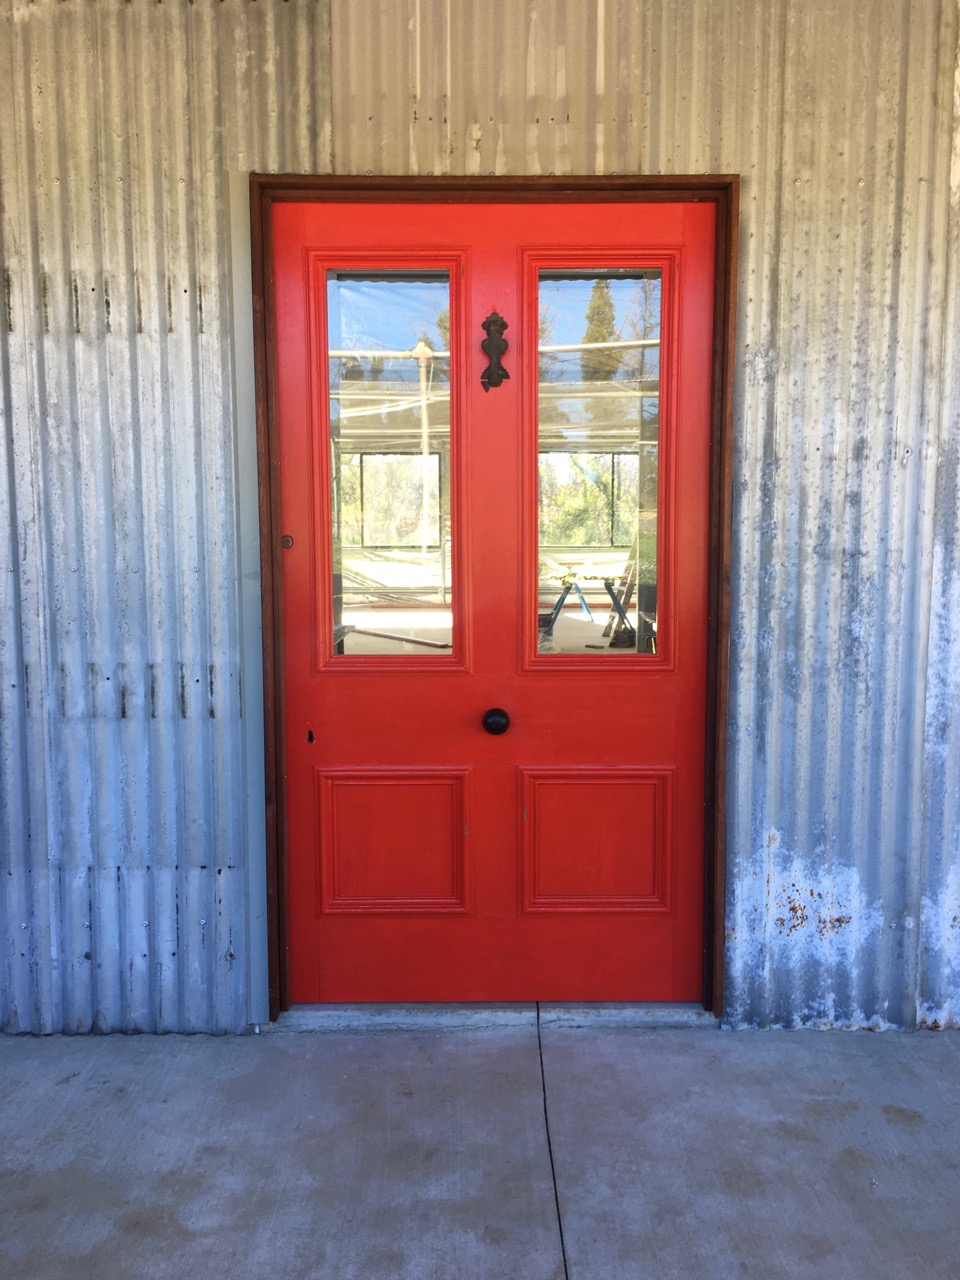
I found one of these old doors 20 years ago, in ‘condom ally’ in Darlinghurst, not far from the National Art School. I used to go there because it allowed all day parking for free at time when there was no space in the Art School. Someone had dumped the door on the side of the ally. I don’t know which house it came from, but it must have been posh as the door is massive. 2.1 metres x 1.2 metres and 55mm. thick. All in Australian cedar, but it had had a hard life and was pretty knocked around. The top two wooden in-set panels in the 4 panel door were smashed out. I saw it and put it up on my roof rack straight away. It sat there all day without being stolen back. So I drove home with it that night.
It sat in the wood shed for years and survived the fire last year. Our friend Megan Patey came to volunteer here one day earlier in the year and asked for a suitable job. So Janine and Megan cleared out the years of built up clutter that had made it’s way into the wood shed and Megan dragged out these two doors. That was a couple of months ago, and I have been tinkering away on them ever since.
The other door was collected off the side of the road on a Council Clean-up day. I saw it and stopped. Checked it out. It was dirty and damaged with the glass panes broken and missing, but it still had one small lead light intact on the top left side. The other 4 panes were smashed. I could see that it was made of Californian red wood timber and was massively thick at 65mm thick! It’s the thickest door I’ve ever handled. It was also stored in the back of the wood shed and survived the fire. So now I know why I saved them all those years ago. I would need them for this last pottery building.
I started cleaning them both back, removing decades of built-up dirt and layers of paint. some of it possibly lead based, considering their age. I worked out side and wore a mask and gloves, just in case. The big cedar door didn’t look good after cleaning. it was too far gone. A lot of splits and cracks and weathering. I decided that the best option was to paint it. I filled all the cracks with polyester gap filler mastic and undercoated it.
The other door was quite badly weathered on the outside face, to the extent that the patina of crackled and flaked paint and slightly exposed patches of bare wood had a very subtle ‘wabi-sabi’ feeling about it. This green-yellow-mustard-grey-brown patina of multi layered flaking paint matched some of the old rusted galvanised iron that I had collected. This combination was too good to waste. I decided there and then that this was the gal iron for the verandah where this door would be hung.
I prised the wooden beading out of the frame holding the lead light in place and moved it to the centre position, then got two new plain glass panes to fit the other two spaces where the other lead lights had been smashed. It came together quite well I think.
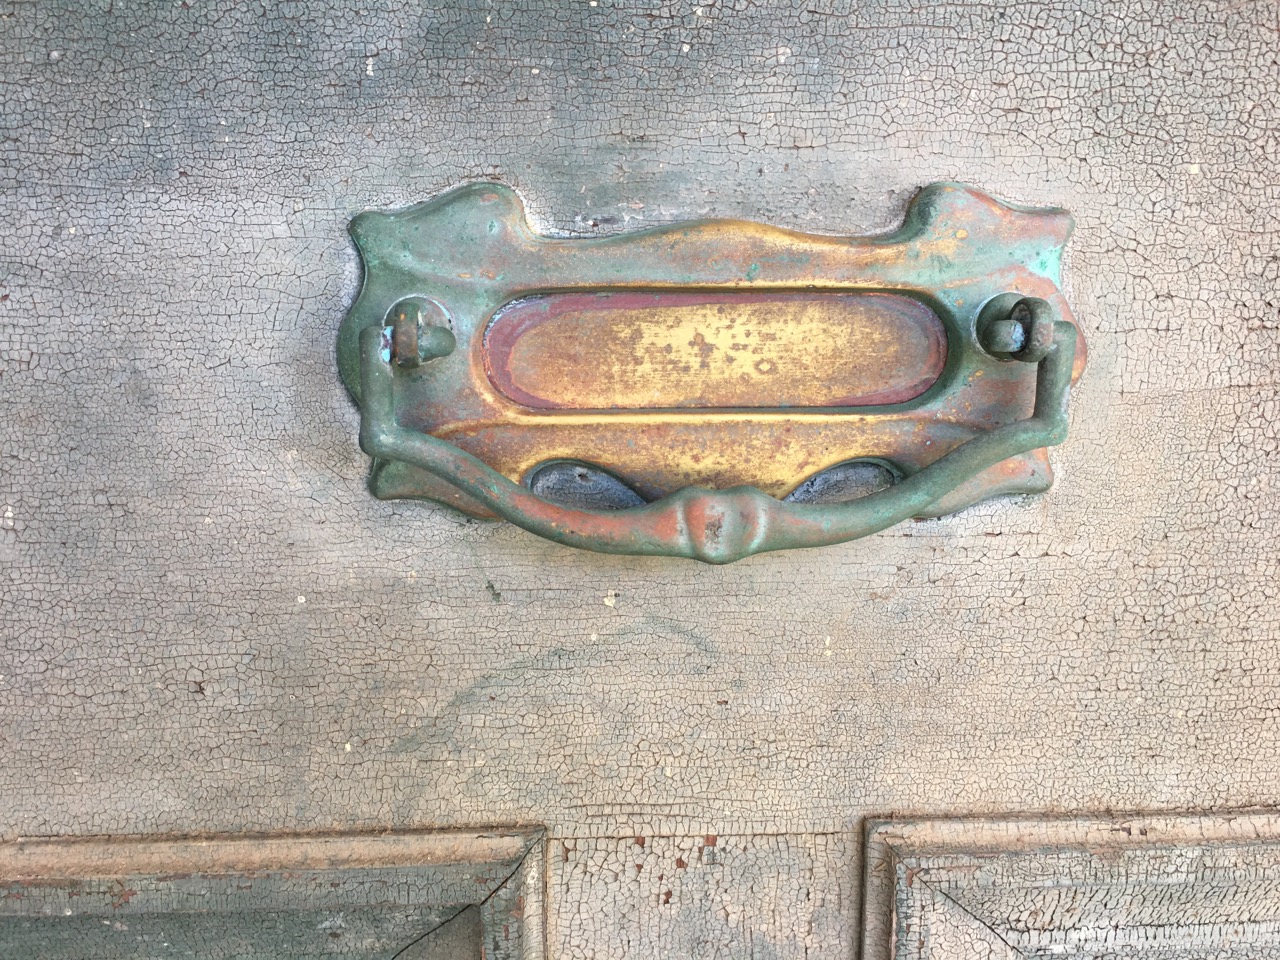
The door knock and letter box slot are just the right combination of yellow brass, red copper oxide and green copper verdigris.I fitted two large panels of laminated safety glass in to the middle two openings. They had been wood in the past, but rather than having wood there. I decided that the door worked better with glass in this instance.
I decided to paint the massive cedar door bright red and use it as the front door facing the street. It looks good, but strong red needs a little bit of black to contrast against it. So I fitted a very old lock that I scrounged way back in the 70’s. I could never find a place for this lock, as it was just too big for any normal door. Finally it has found its place in life. I see a red door and I want to paint the lock black!
My friend Jack Cookson, and I made a key for it.
I think that it works well with the old cast iron door knob, that came off the side door to the old pottery. I recovered this from the ashes after the fire, along with the old cast iron knocker. Just enough black to off-set and highlight the bright red. A little of the old incorporated into the new.
Here again, I decided that the door worked better for us here with glass in the two upper panels rather than wood.
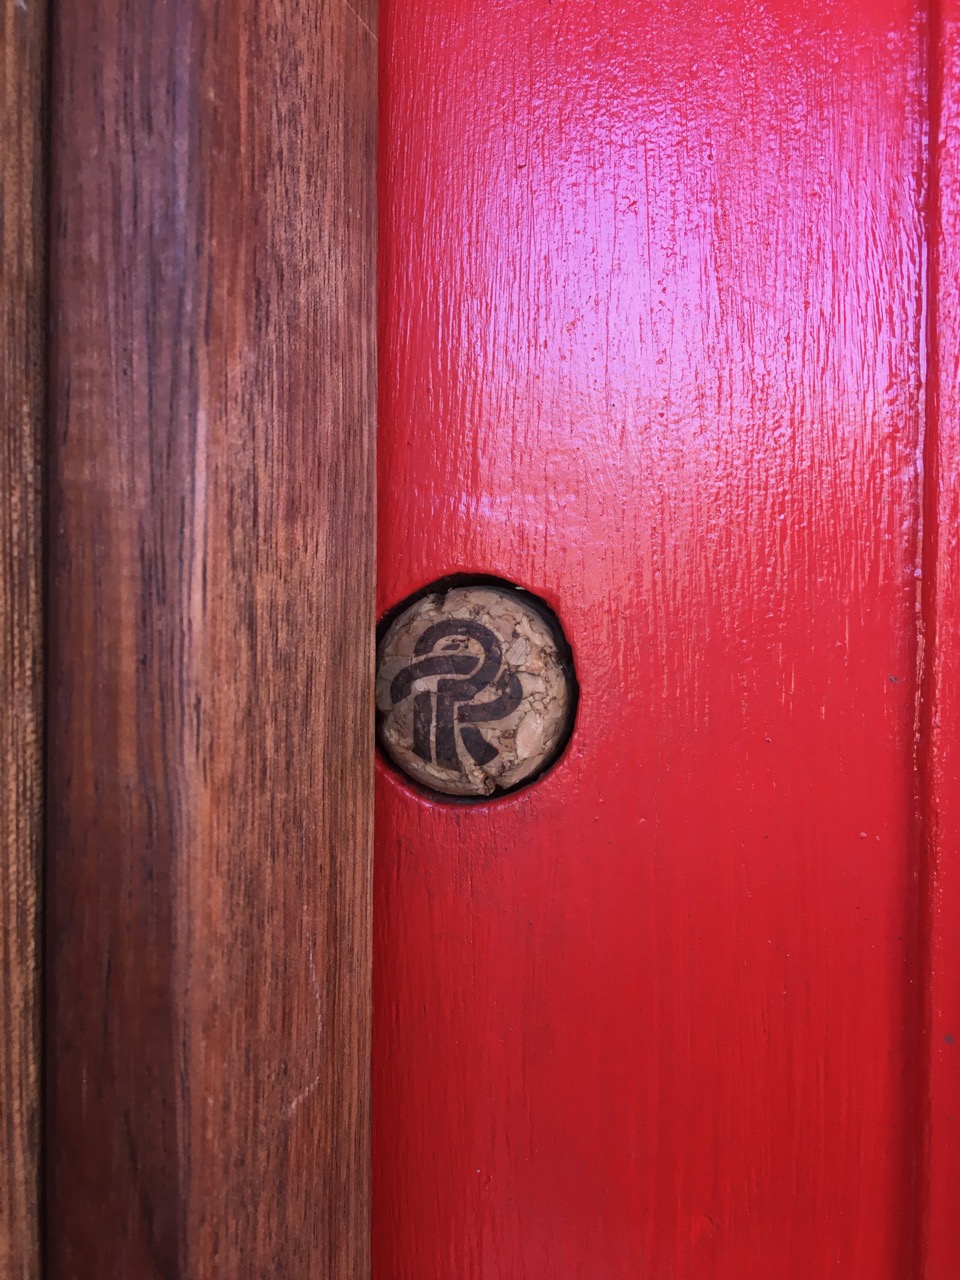
Where the latch key lock should have been. There was a circular hole in the door, regrettably, much too close to the door frame to fit a standard ‘lockwood’ style lock. So I decided to deal with the hole by filling it. My very good friend Warren recently came to give us a hand for a few days of his Xmas holidays. So generous of him! We got a lot of stormwater plumbing done. Warren came bearing gifts! One of his clients had given him a bottle of French ‘Pol Roger’ Champagne for Xmas and he decided to bring it down and share it with us. It was very nice. I saved the cork. Janine realised that the initials on the cork ‘PR’ was not too dissimilar to the clay stamp that our teacher, good friend and mentor Peter Rushforth used on his work, so I incorporated the cork into the door as a little tribute to Peter and Bobby.
This new pottery now has embedded into its structure a load of references and links to our personal history, and our friends past and present. We are ever so grateful to all of you out there who have turned up to give us a hand along the way on this difficult and trying journey.
Nothing is ever finished, nothing is perfect and nothing lasts.
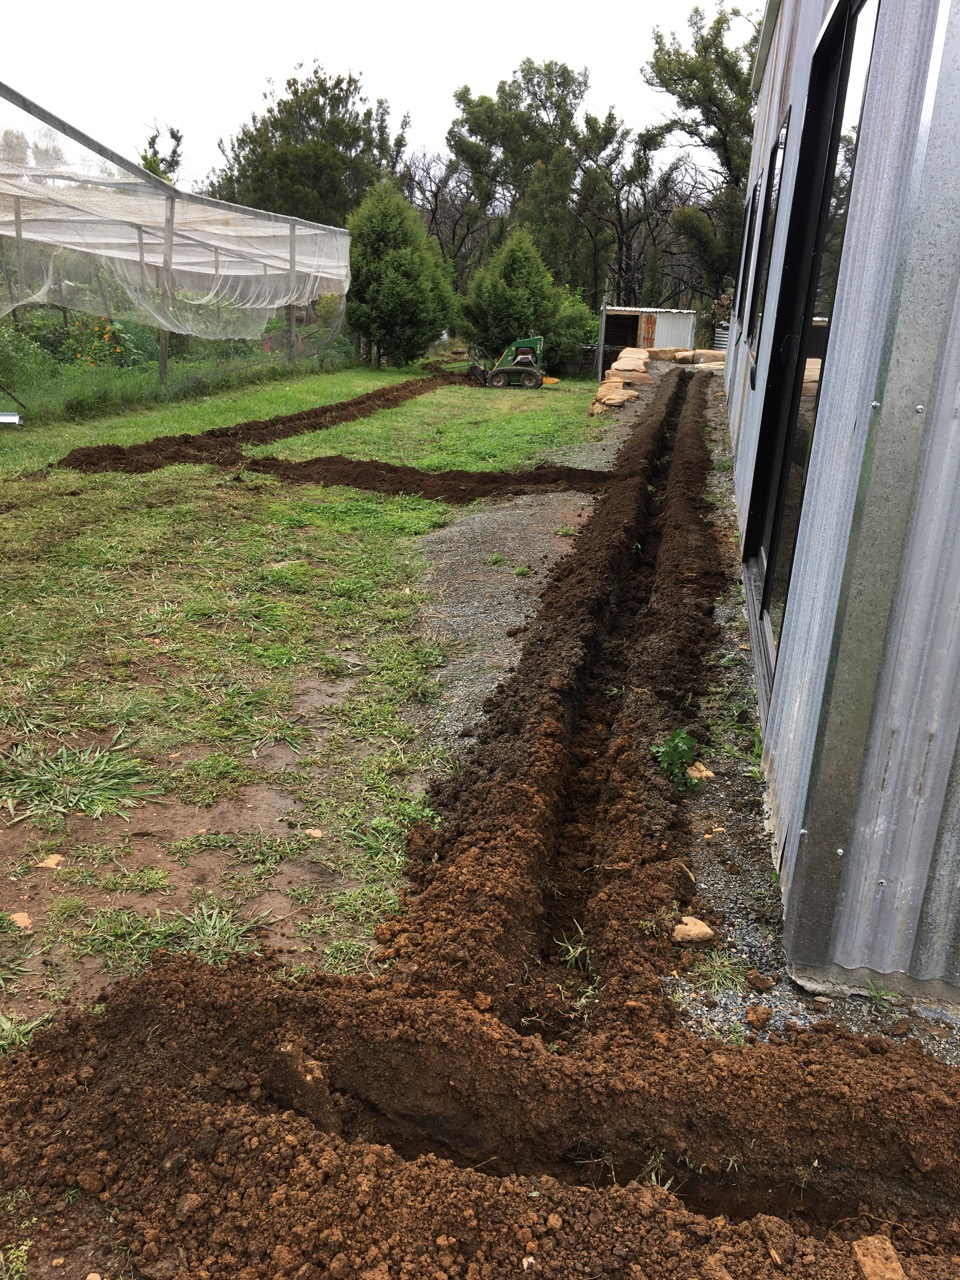
We spent the last week digging 150 metres of trenches. Digging all around the perimeter of the new shed and then down the hill to the big water storage tanks. These water tanks have not had any water flowing into them in 12 months, not since the previously pottery shed burnt down.
Fortunately, Our friends Stu and Robyn Have a half share in a trenching machine and we were able to borrow it for a while to do all the really heavy work, but there is still a lotto getting down on our hands and knees to d the clearing out and lifting difficult flat iron stone rocks that get in the way.
I almost got all the plastic piping installed before a big dump of rain. That put an end to our blur-glue plumbing work for a while. This week I am teaching a Master Class at the Hazelhurst Regional Art Gallery in Sydney, so there will be a weeks wait before I get back to the rather aromatic, acetone based, blue-glue and white plastic plumbing pipes.
Bit by little bit, we make slow progress. we got 120 metres of pipe in the ground before the storm stopped us. I’d have preferred to get it all done before this week-long teaching hiatus interrupted the work. However, I’m very pleased to get the gig. This will be the 8th year straight that I have taught this summer school MasterClass. I’m starting to run out of special techniques that students haven’t been exposed to previously. It has become my way of easing out of Xmas/New Year holiday mode and back in to clay work, but this year it’s more of an interruption to my labouring/building work.
It is strange in the extreme to realise that I have spent a whole year without making a pot. I haven’t touched clay since last years Master Class. This makes me more of a fraud than a master! However, I’m pretty confident that I will have the pottery built and fitted out by the middle of the year, or thereabouts. I’d really like to think that we could have new work for sale by the next ‘Open Studios’ Arts Trail event on the first two weekends of November.
Who knows? It’s a small ambition. But a lot of work to get there. The next step is to get the electricians in to do the first fix wiring. This has to be completed before we can insulate and line al the walls. The insulation and lining has to be completed before we can start to build shelves and benches etc. Then we have to rebuild our kilns…
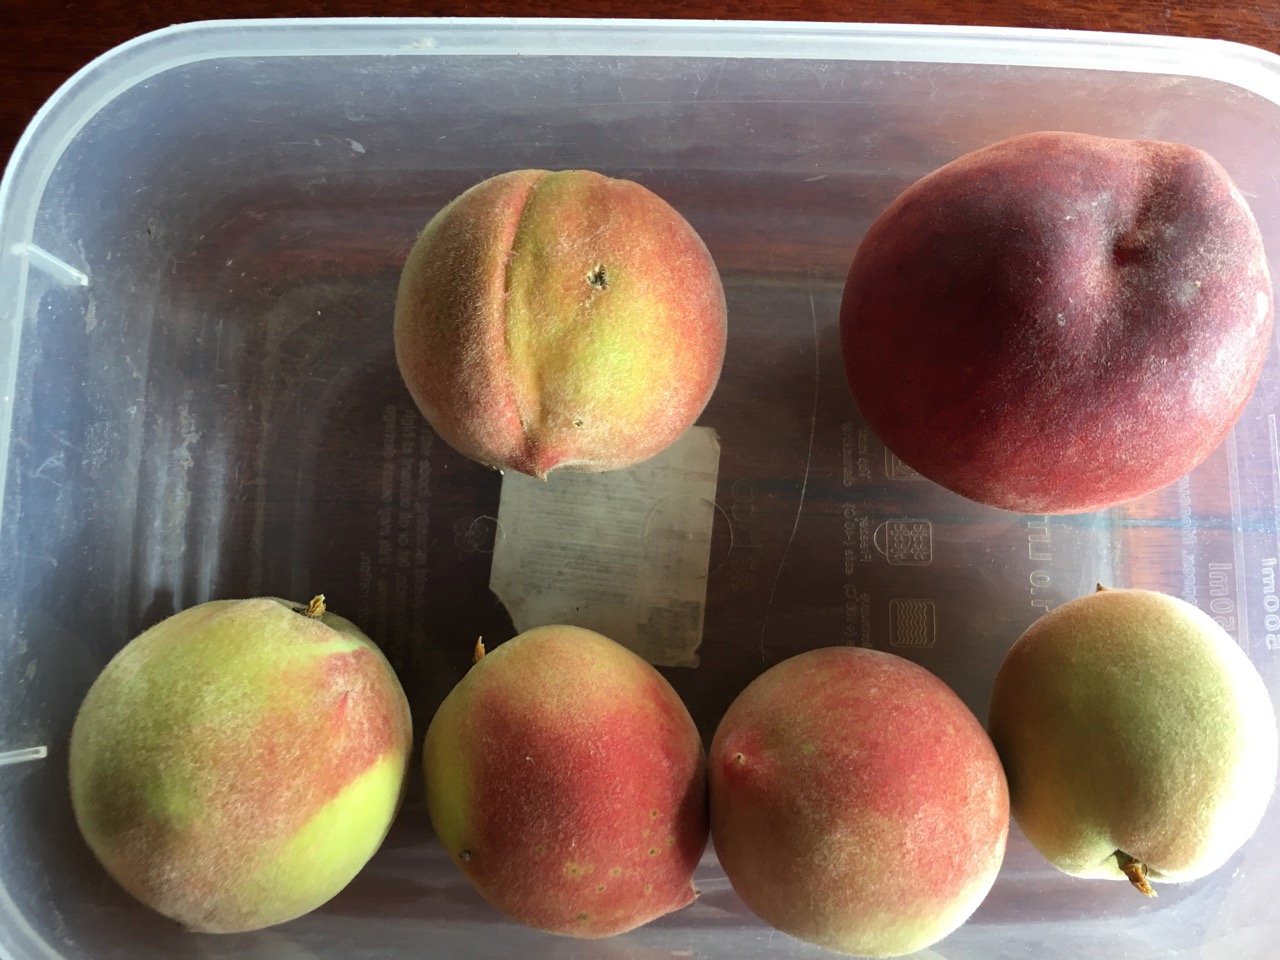
We are only 10 days into summer and we already have both our first tomatoes and now our first peaches. We’ve been picking zucchinis and cucumbers for weeks already. Nothing quite like the flavours, tastes and aromas of the summer garden. Although this all sounds idyllic, it’s possible because of the worlds unabated consumption of carbon based energy. With global heating racing away, unabated like it is and coupled with an embarrassing total lack of political will here in Australia. We also have to accept the changing weather patterns associated with all this heat, like catastrophic bush fires and massive storms. From someone who has lived through a catastrophic fire event. I can clearly say that I’d rather not have to experience it again and the early tomatoes are not worth it.
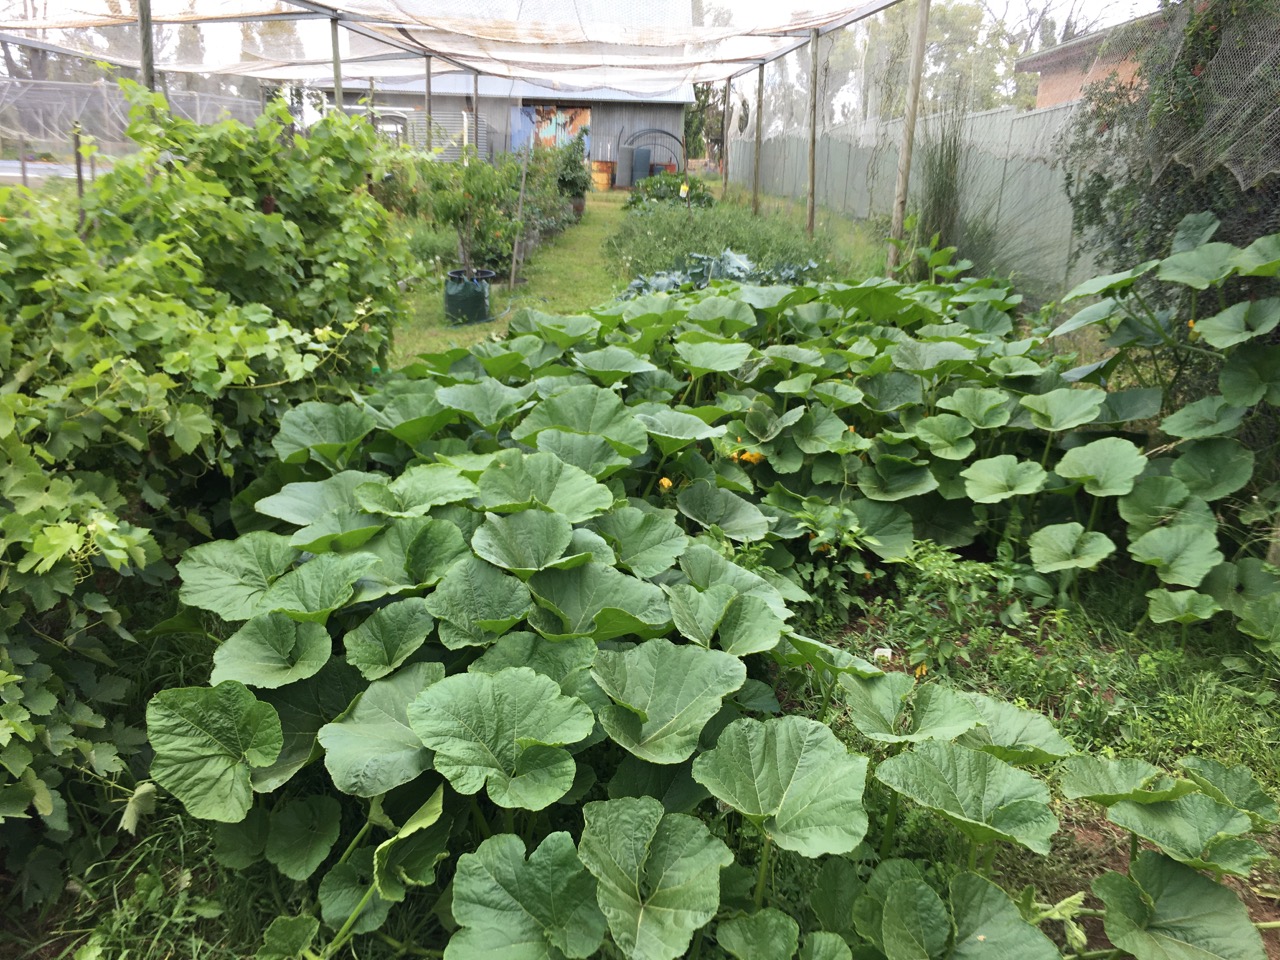
Back in the garden, the pumpkins that I planted on the 12th of September are now 3 months old and taking over the bottom of the garden.
From this to…to this!They are setting a nice crop.
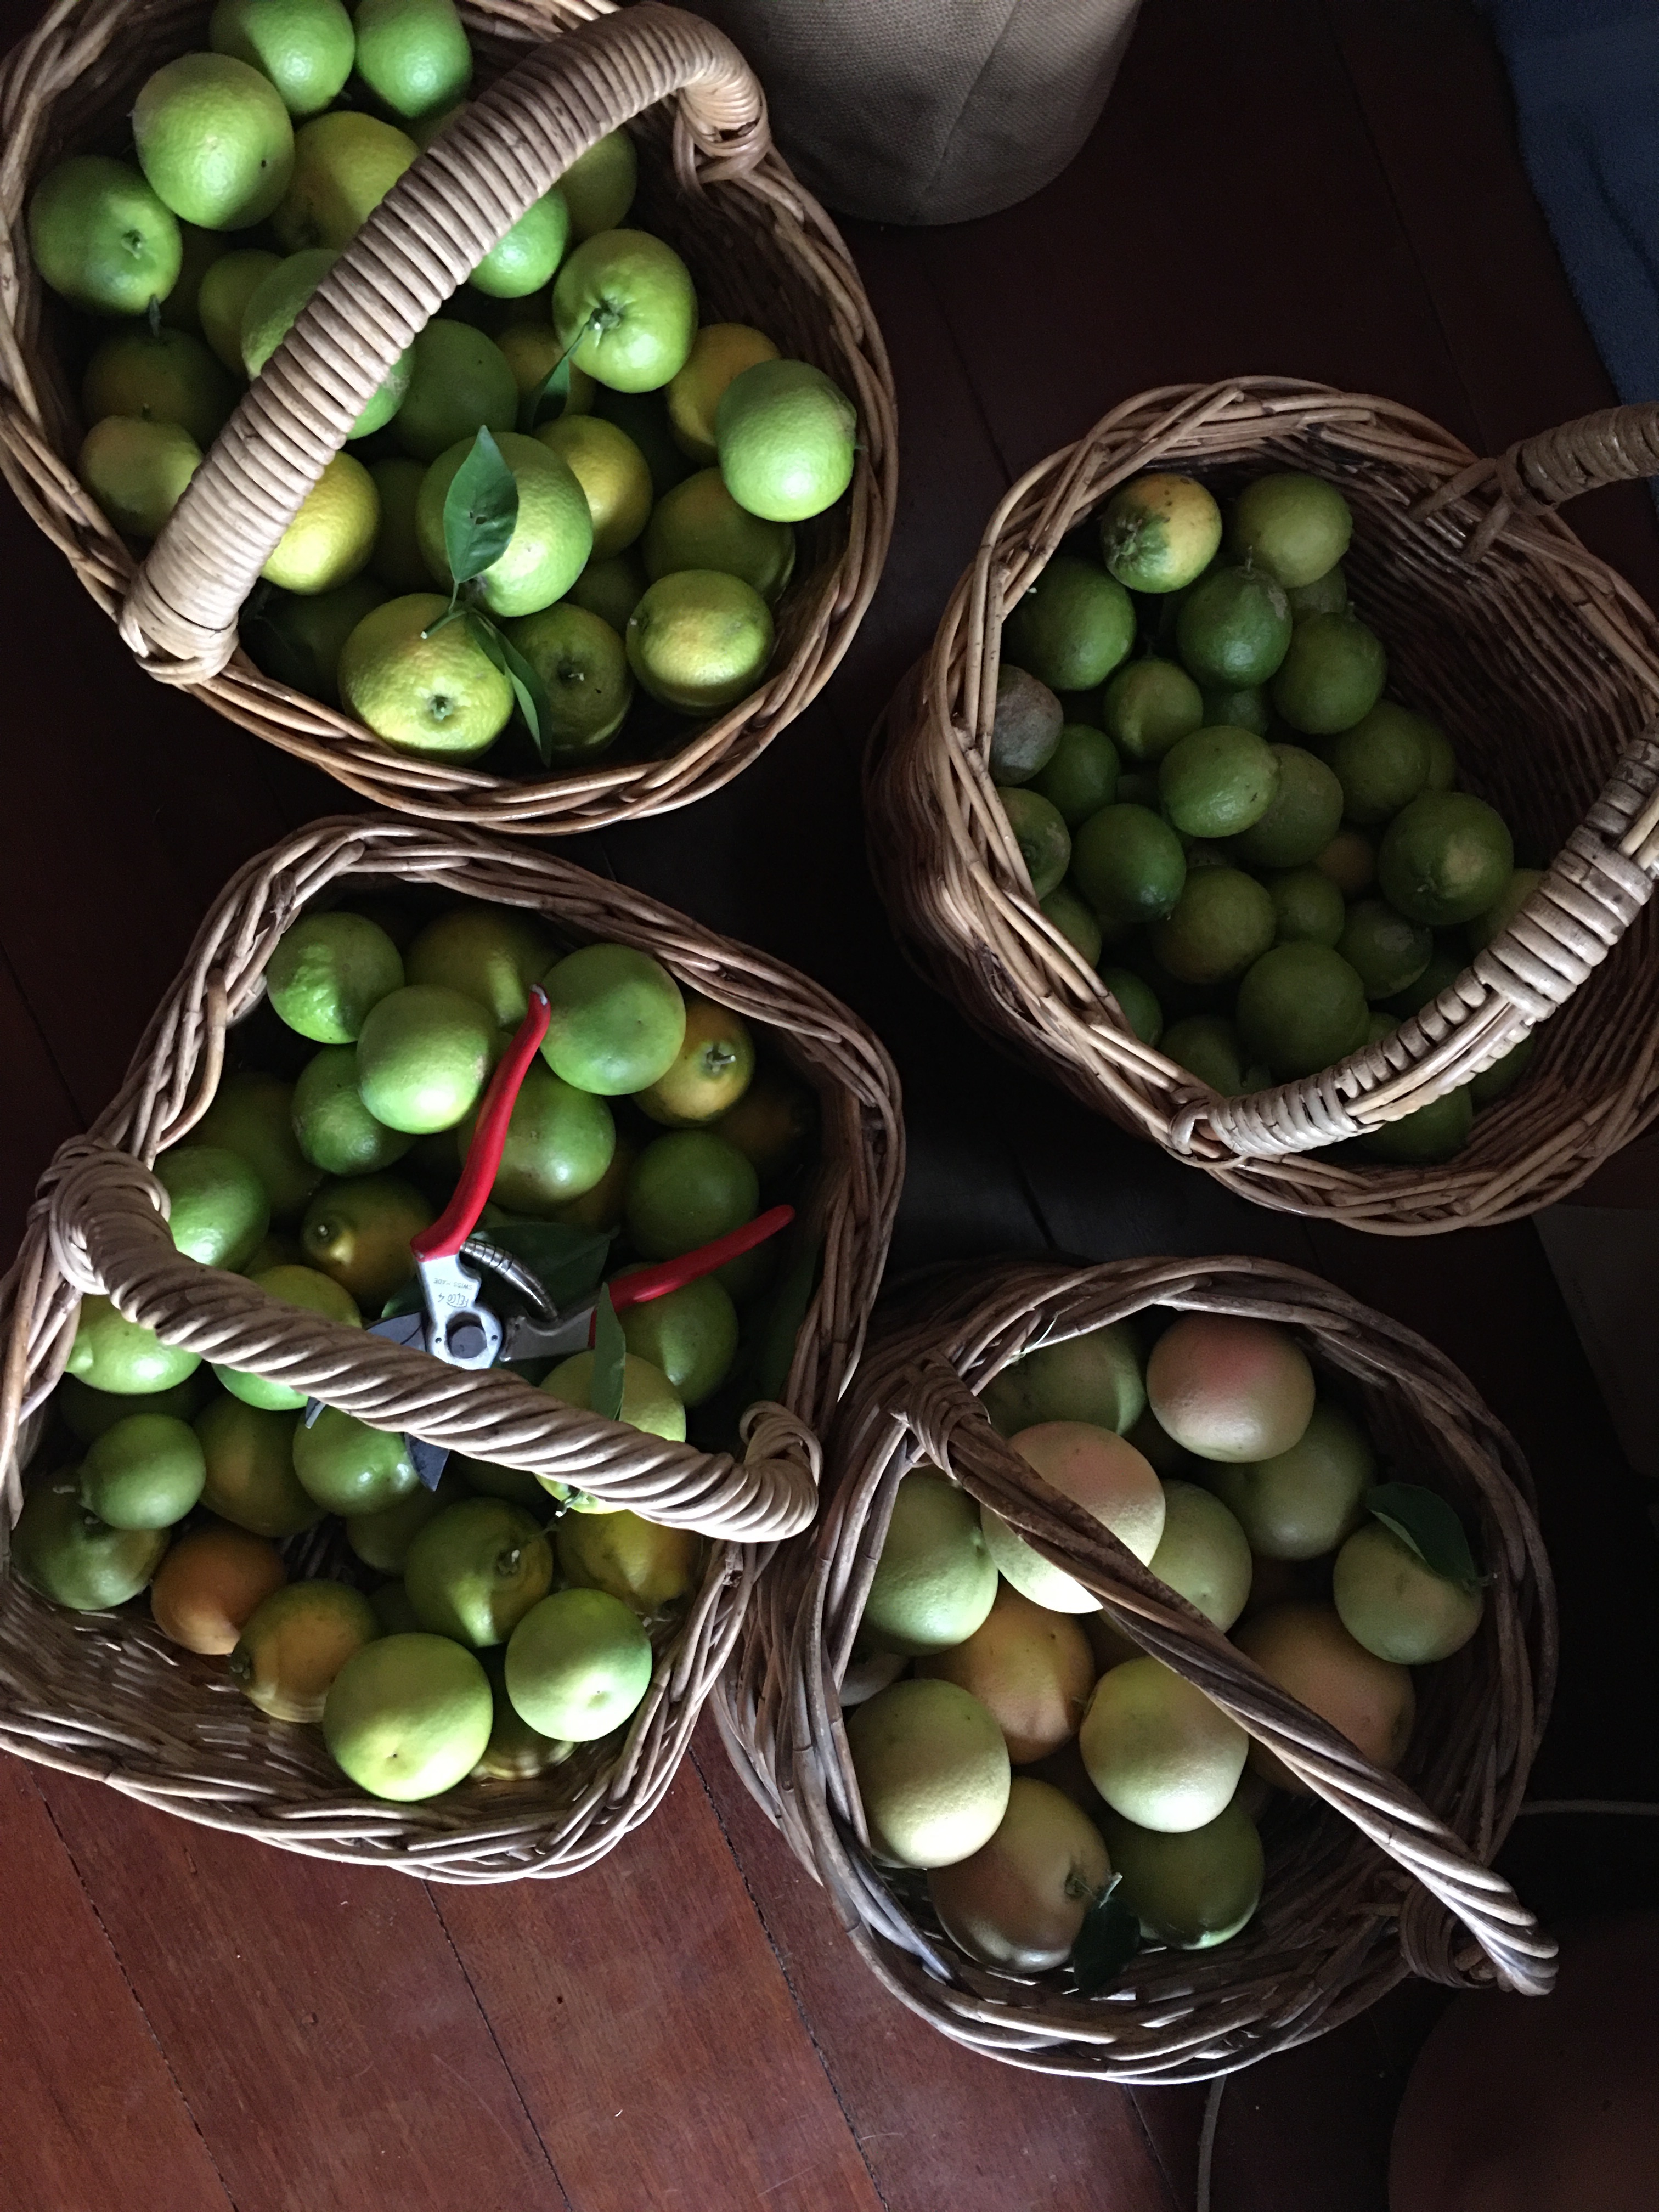
Strangely, we are just harvesting our citrus crop now almost half a year out of seasonal sync. We should be picking them in the winter. Everything has been dislocated by the extreme weather and the catastrophic fire event. All the citrus got burnt, some very badly, such that we lost half of the trees facing the pottery as it burnt. The citrus grove was planted next to, and on the north side of the pottery, using the building to protect the trees from the worst of the winter’s southerly winds. Sheilded in this way and facing the north winter sun, they were in a bit of a sun trap and it suited them very well. We had good crops.
After the fire we watered them well for the first few weeks, whenever we could find the time during the clean-up. Sometimes this meant in the dark before dinner at 9.00pm. The result was that they all re-shot leaves, some only on half the tree that wasn’t so badly burnt. They went on to flower again as if it was a new year, but totally out of sync. We got the strange out of season crop and they then flowered again out of sync, such that we are now harvesting again in summer and not winter.
The entire right hand side of this tree was so badly burnt that it has remained completely dead and needs pruning off. I’m hoping that the tree will eventually put out new shoots on the right hand side and balance itself up.
Apart from the strangeness of it all. They are probably suffering from PTCD. Post Traumatic Citrus Disorder! Also, when the fruit is ready, it isn’t the usual colour. For instance, the tangelos are pale yellow like lemons instead of bright orange. While the lemonades are green like limes instead of yellow. Strange times. I assume that they will slowly revert to the normal seasonal flowering and fruiting regime over time?
All the peach trees were burnt in the stone fruit orchard, but just before the fire. I had lifted two of the smaller trees that were doing very badly in the draught, as I couldn’t keep enough water up to them. I put one of them into a big plastic tub that was hanging around and the other into a large synthetic plastic fibre plant bag that someone had given us. I placed them in the veggie garden where I could water them better, just to see if they would survive. They had recovered well and are now ready to plant out again, but because they had flowered and set fruit, we thought it better to let the fruit ripen and plant them out next winter when they will be dormant.
The out come is that we have a dozen small peaches ripening. Amazing!
The out come is that we have a dozen small peaches ripening. Amazing! And so unexpected. Janine also picked the first apricot off one of the newly planted stone fruit orchard trees. Where the trees were doing well and growing strongly, I left one piece of fruit on each tree that I thought could cope with a ripening fruit and still grow well. That applied to one apricot, one almond and two apple trees. I just couldn’t resist the temptation of seeing and tasting the new fruit varieties.
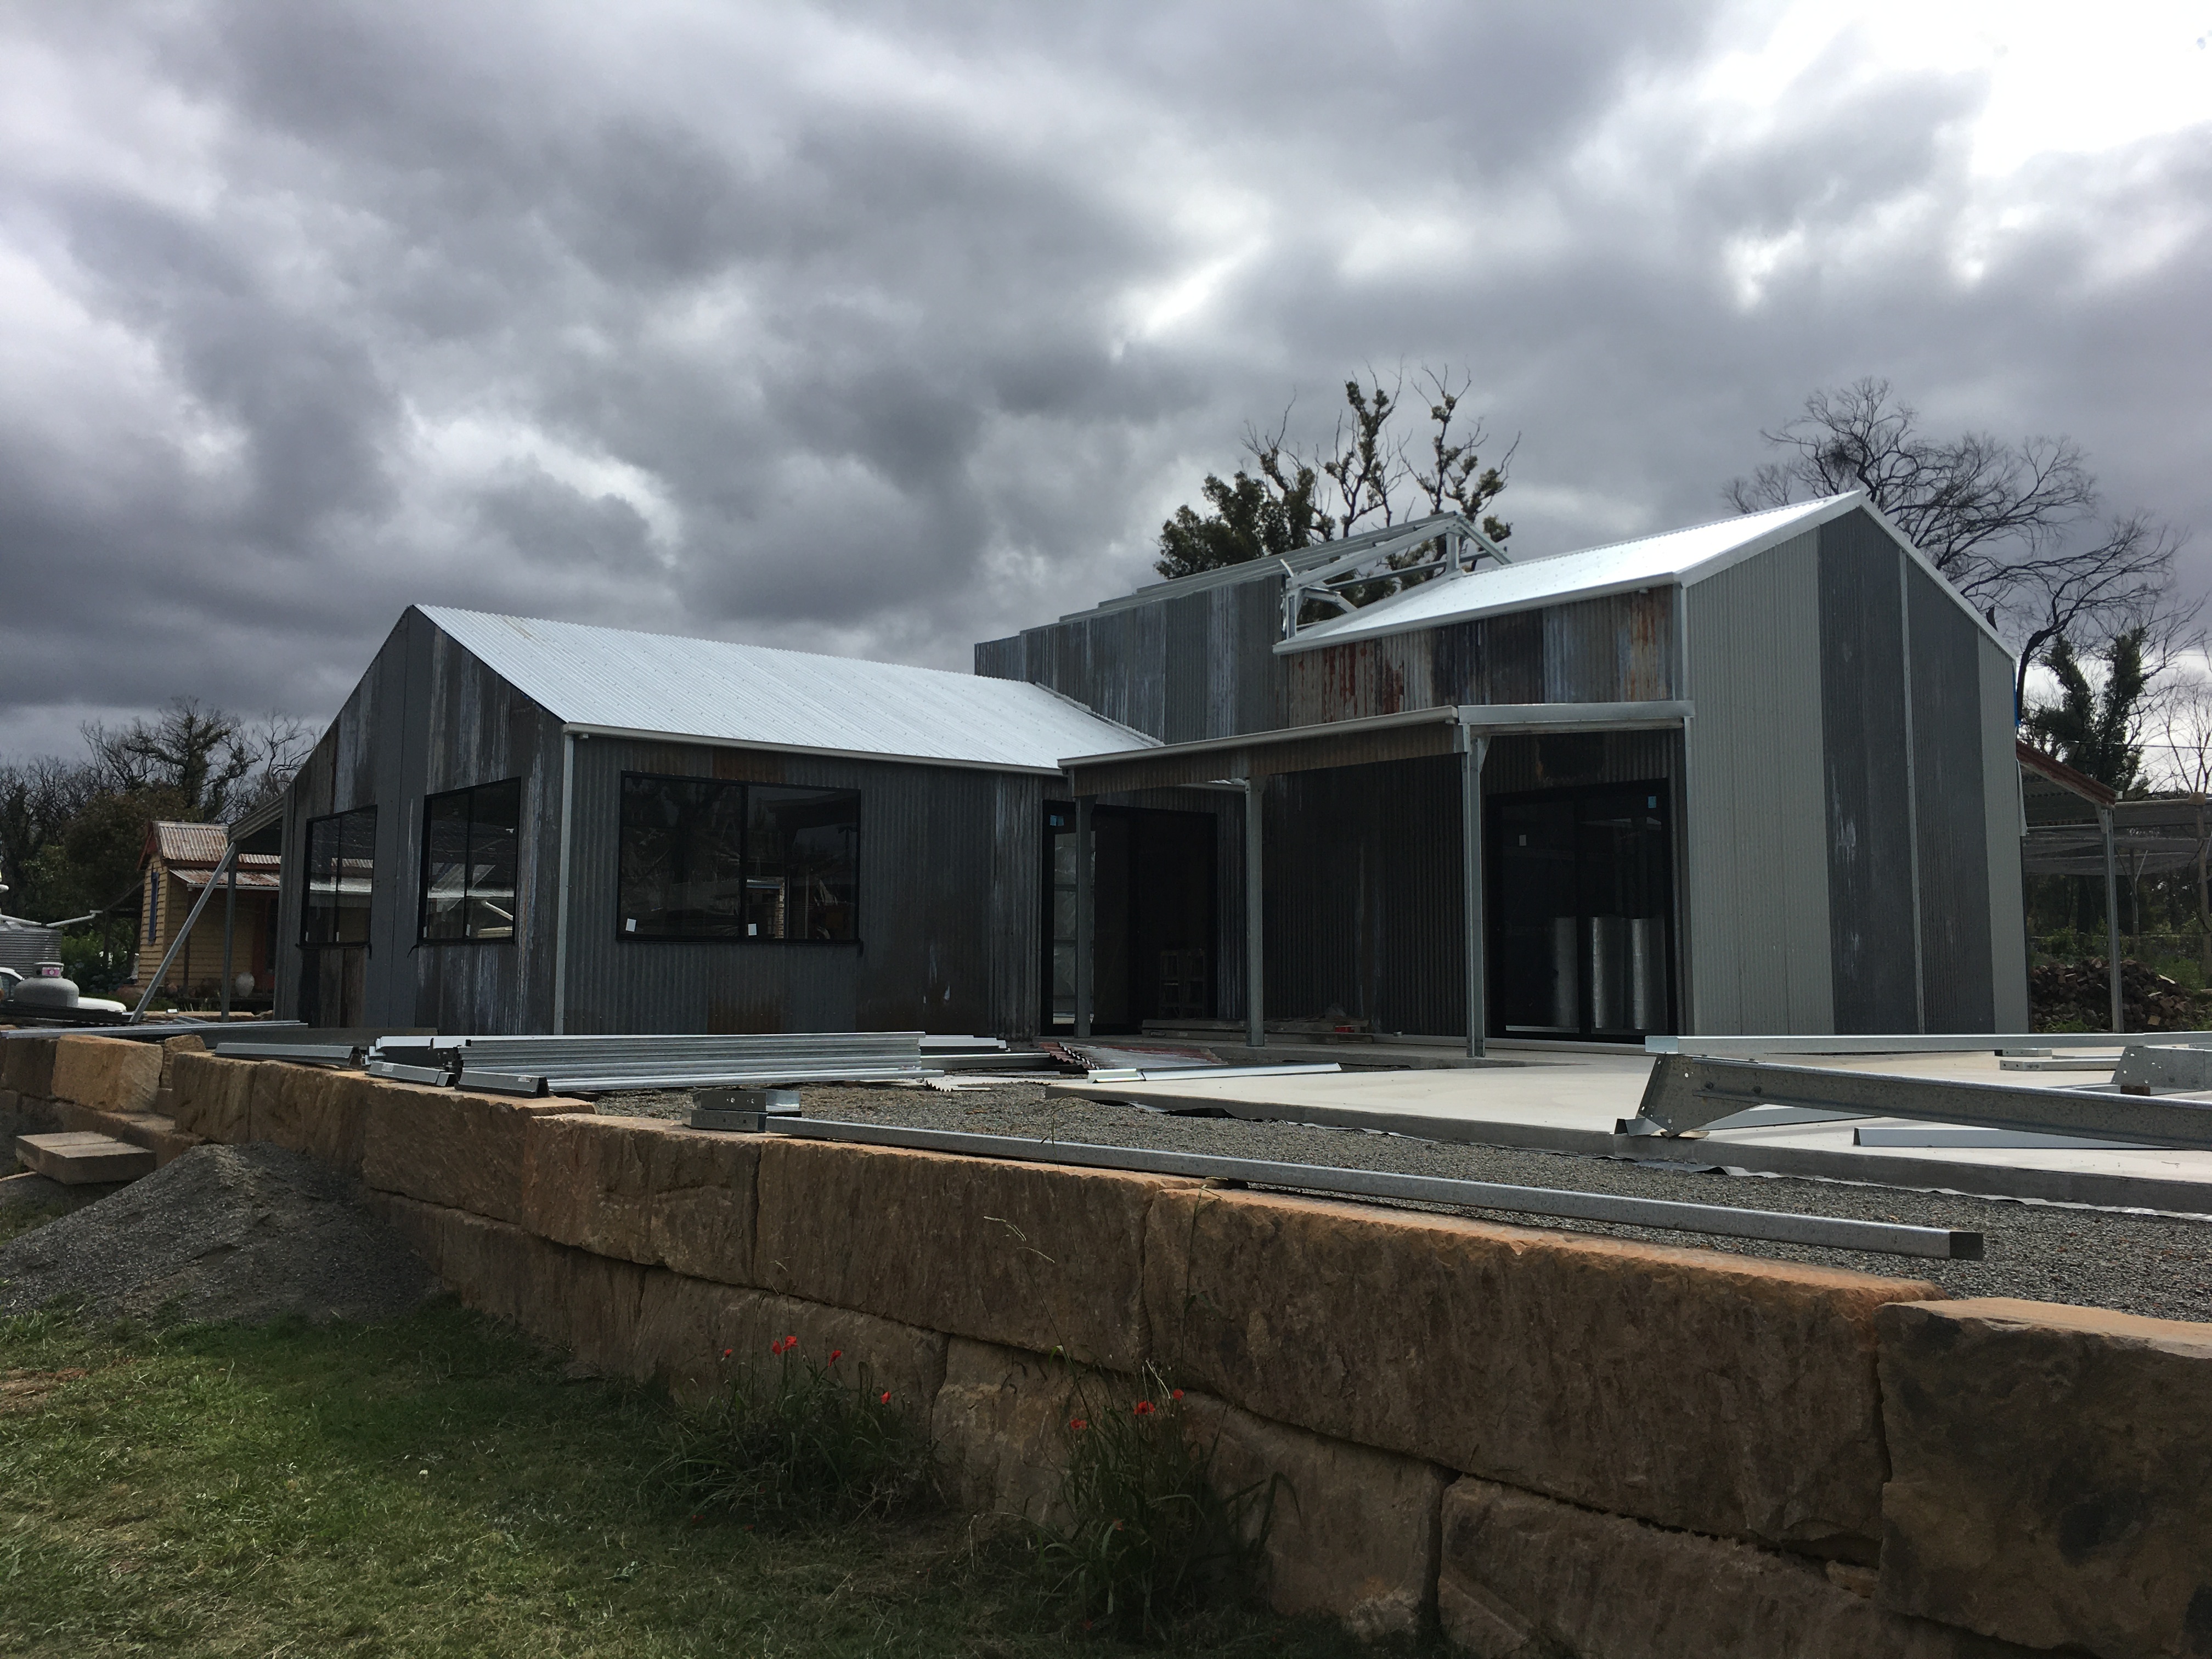
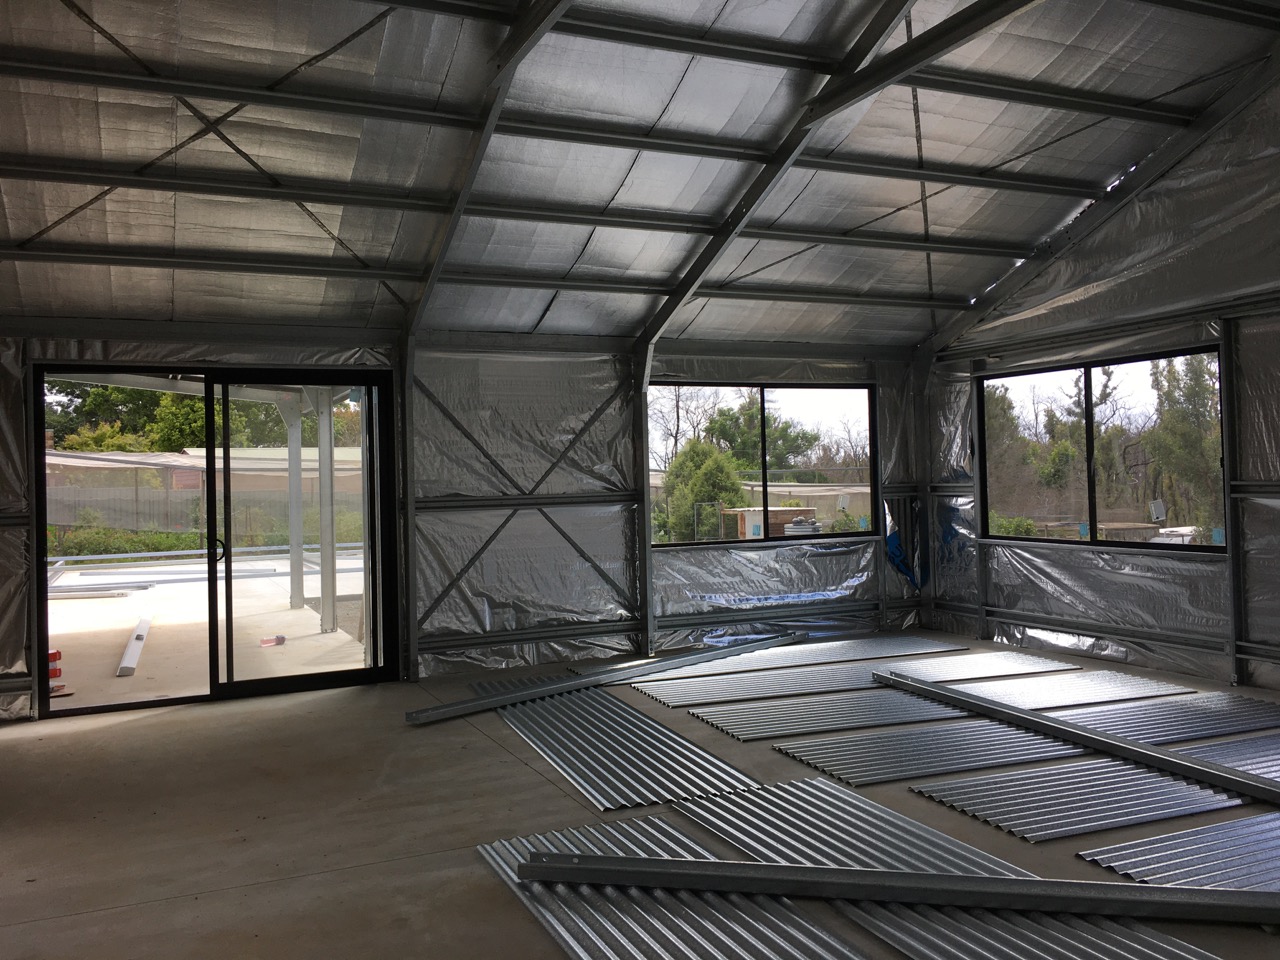
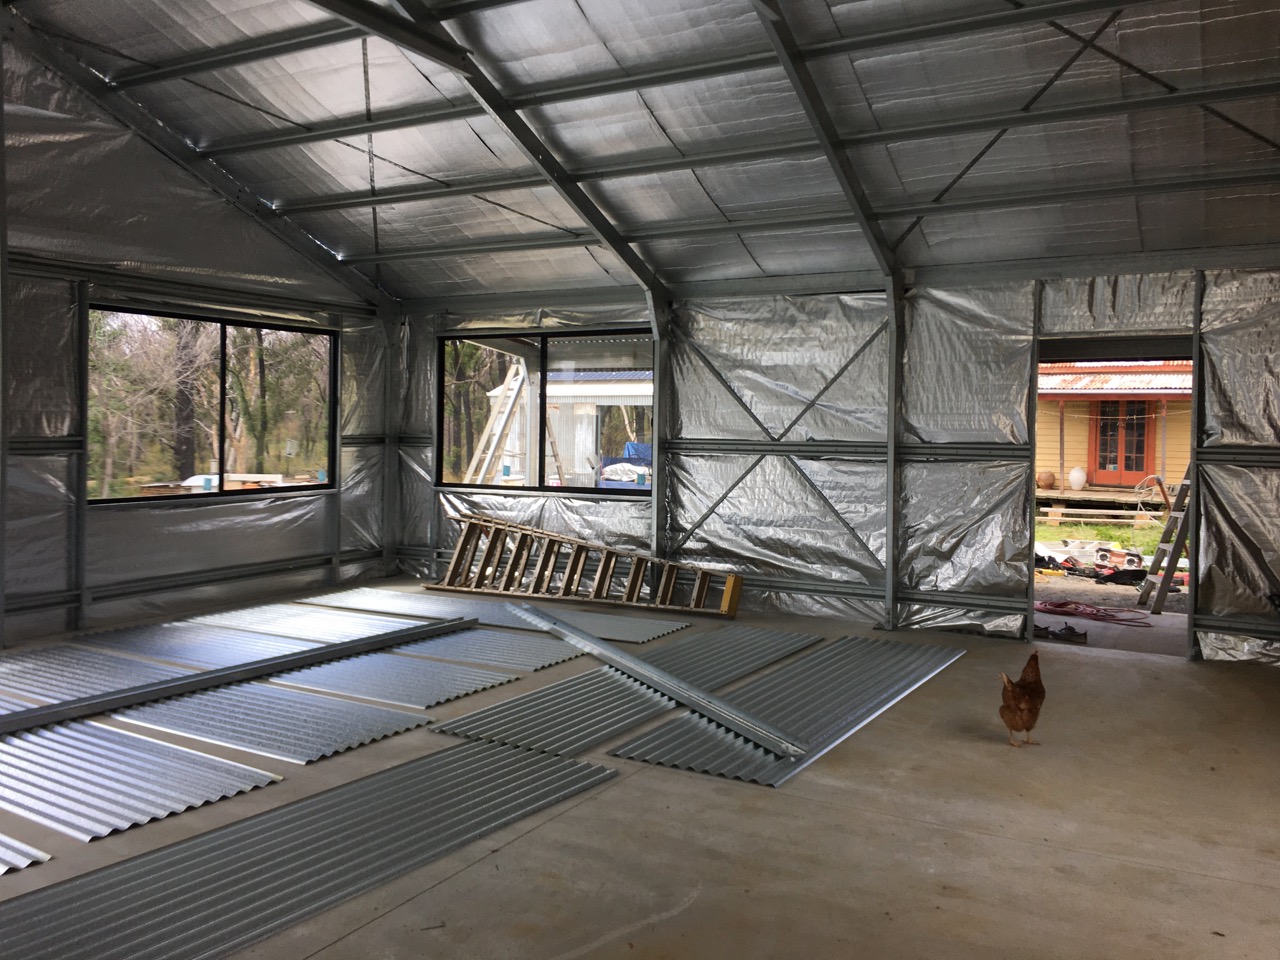
The pottery shed is slowly progressing. Today the builders are putting the roof on the pottery studio. That is really good to see. It was ready to roof yesterday, but it was windy and slightly foggy and damp, making it too slippery and too difficult to roll out the silver roofing insulation in the wind. Today is calm and overcast but not wet, so it’s all go on the roof. I can hardly wait to get inside and see how the light is in there. We now have two roofs on. the kiln room and the creative studio.
I spent a long time working out how to get the best light, at the lowest cost, but not interfering with the structural strength, allowing for enough metal strap ‘X’ bracing, covered with corrugated sheeting to provide sufficient structural wind resistance strength. I’m no engineer, but the shed company’s computer program allowed me to input different options, increasing the glass area until the ‘Computer says No!’
Edna the Chook, came in to check out the new studio too.
I then worked backwards from there, to find the biggest size of standard ‘off-the-shelf’ cheap aluminium windows that would fit the space. No use in paying double to get a custom window made that is only 100mm larger. So I back-tracked down to the best available size. We ended up with 4 windows that are 2.4m. x 1.2m. (8 feet x 4 feet) plus a sliding glass door that is 2.4m x 2.4m.
It will end up darker inside when it is lined and not so oppressively metallic and shiny.
The builders have been working here for a couple of weeks now and there is some progress to show for it. Some days they arrive later and other times they leave early, then have to work on Saturday to make up the time lost. Who’d be a builder? Trying to keep everyone happy. They have more than one job on the go to keep fully employed. Today they aren’t here. They told me that they have to go back to finish off a small job that was waiting for a few extra parts.
I asked if they think that they will finish before Xmas and was told emphatically “Yes!” Anyway, time will tell. Things will happen and everything will get done eventually.
I have been working as the builders labourer here and there to help speed things up. I keep well out of their way, but let them know I’m always ready to help where needed.
I spend the beginning of each day getting things sorted for the builders, putting the various parts in place as they are needed. I don’t have to do this. I choose to do it to keep the pace of the build up. If there is something menial to do, then it’s better that I do it, so as to keep them being productive. Then throughout the day I spend my time in the temporary workshop shed restoring doors and building windows, getting them ready for the builders. Sometimes making custom ‘flashing’ from sheet steel on the guillotine and pan break. Then in the afternoon and evening I spend time sorting and cutting old sheets of iron ready for the next day.
Yesterday, I spent part of the day cutting up sheets of tin into small narrow strips to make the little facia on the verandahs. It’s fiddly and time consuming hunting through the piles of off-cuts of tin to find suitably rusty and patinated bits that all match, or are compatible aesthetically and are suitable for the use and then to order them to make a pleasing composition. They just didn’t get it at first, but now It’s working out OK. So far I’m happy with it.
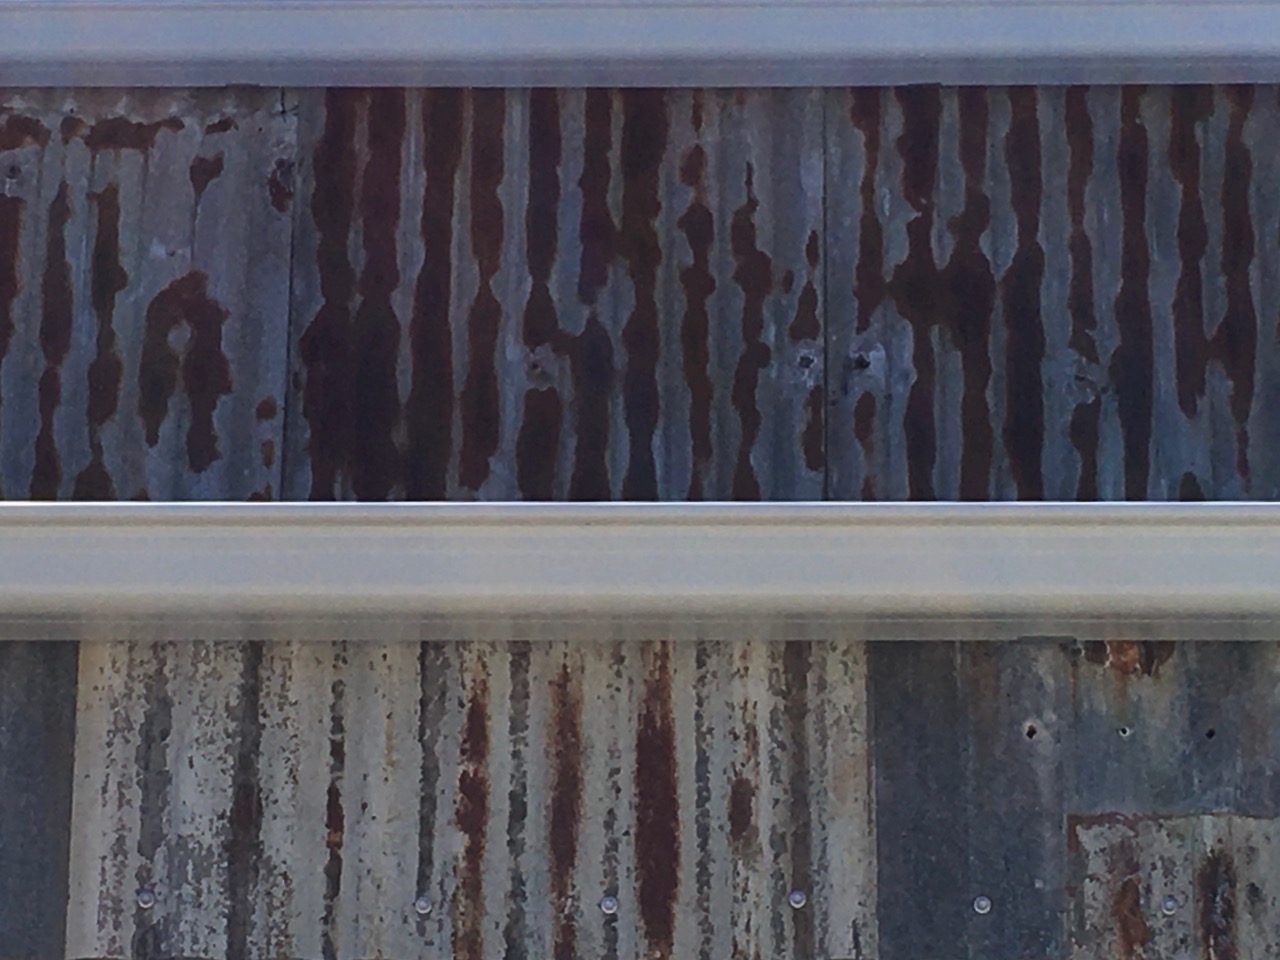
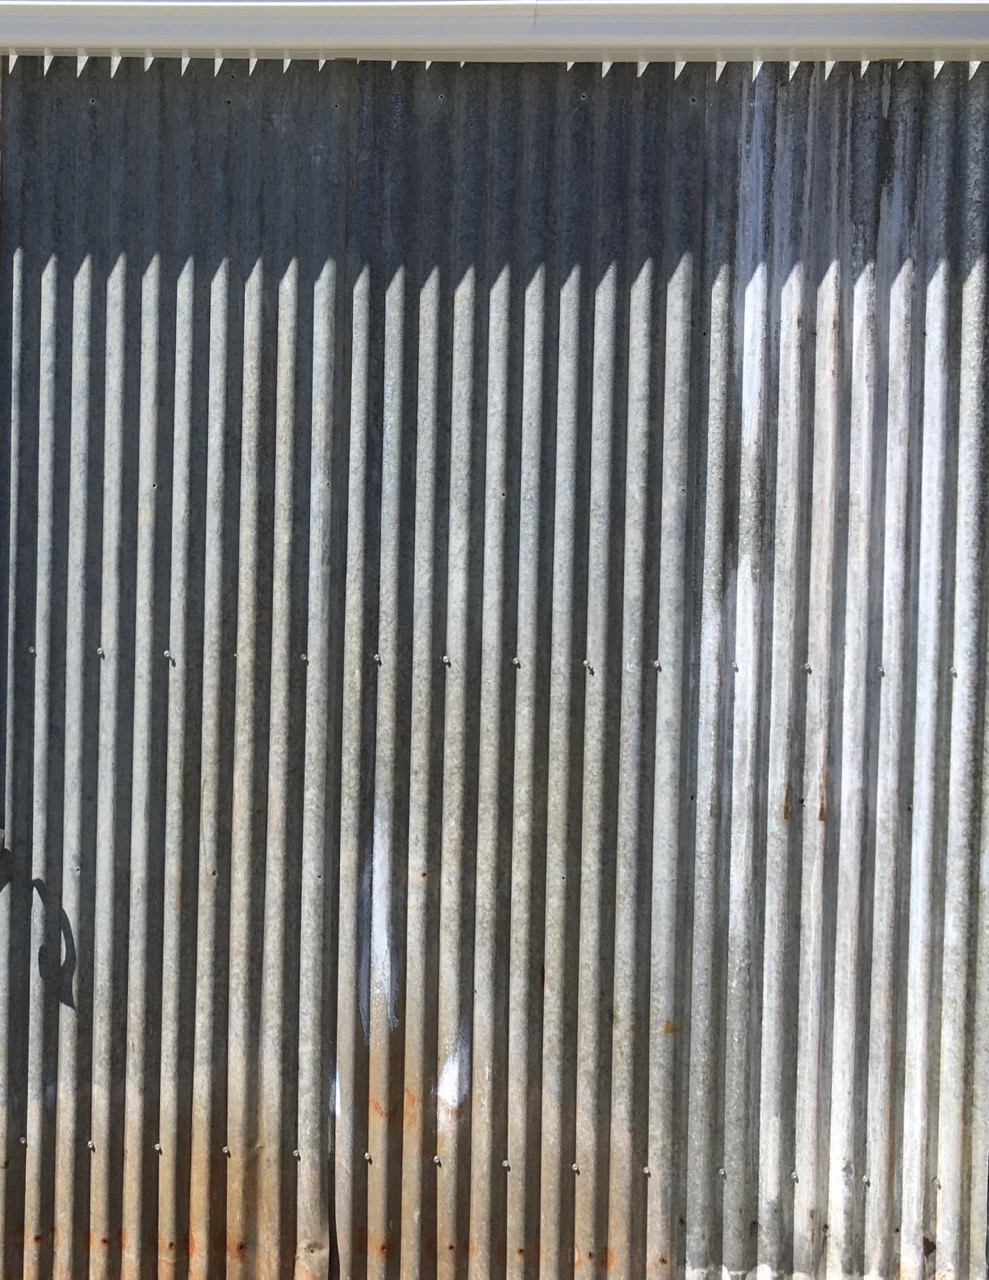
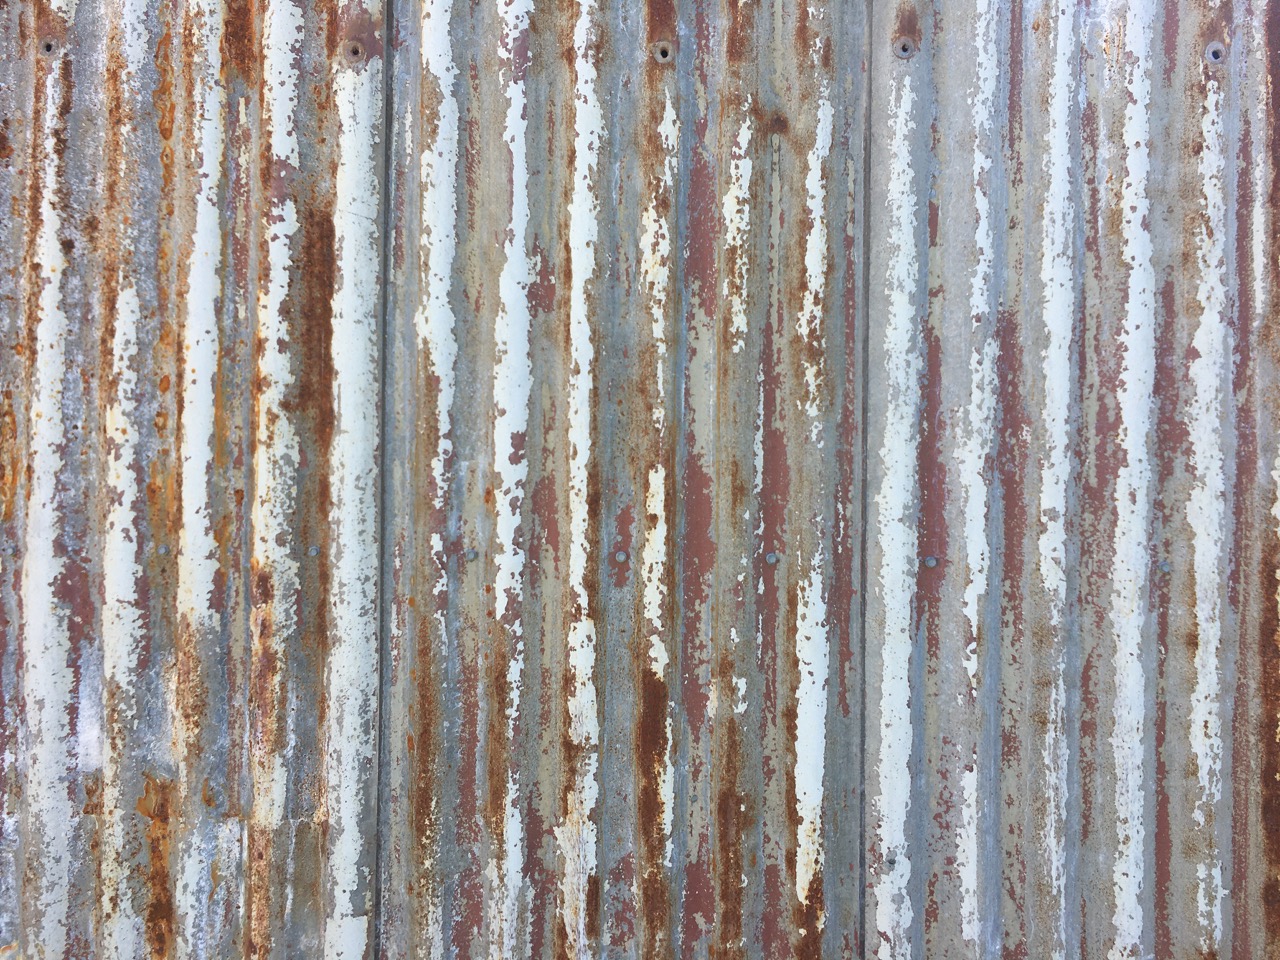
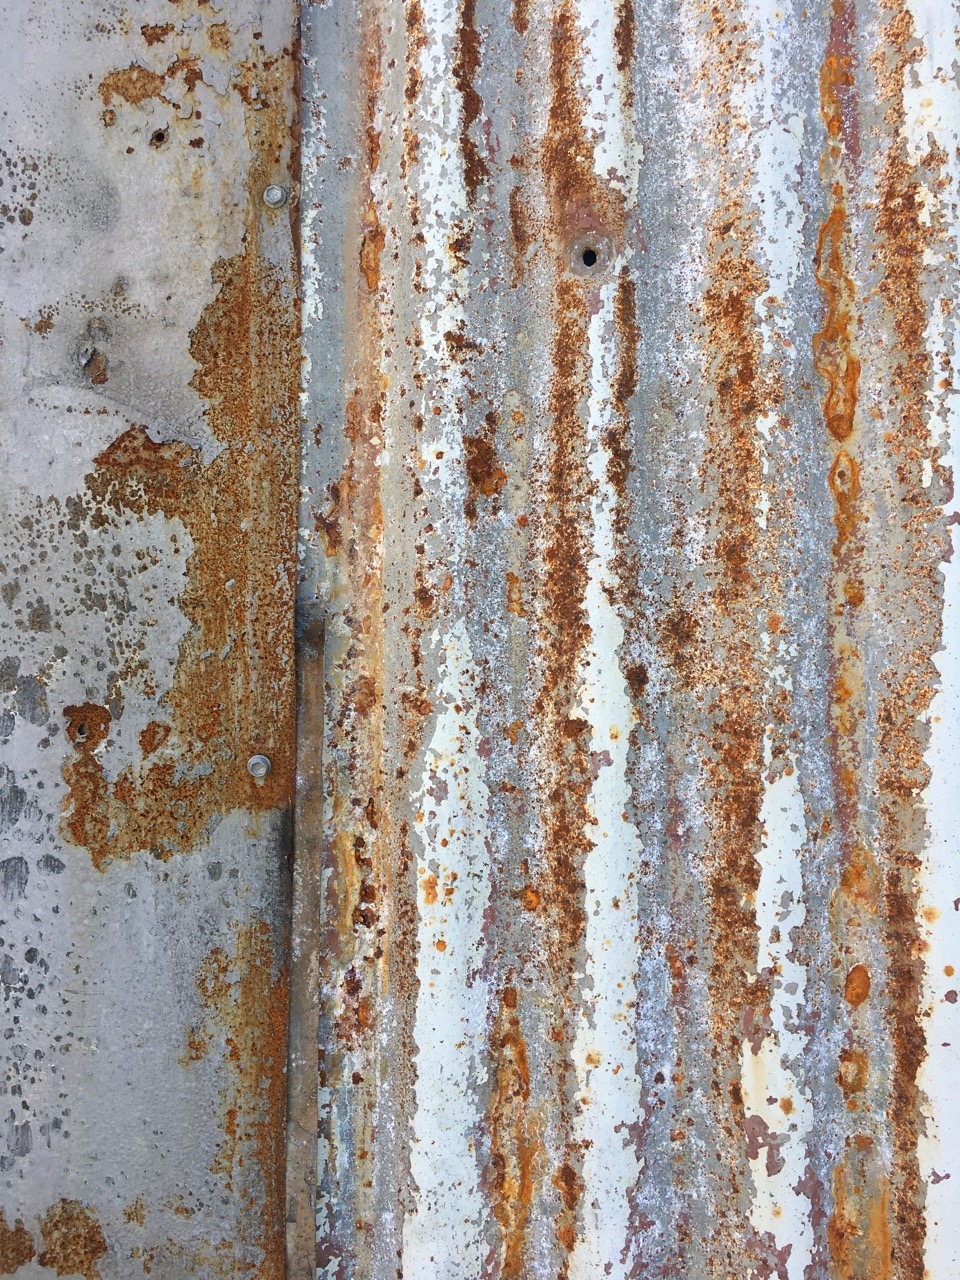
Each day I hunt through the stacks of 2nd hand, corrugated iron looking for just the right ones that all go together with the same or at least compatible surface textures, colours and rusty patches that have developed on their surfaces over their previous life. The builders didn’t understand this at first. It took a few days to get them to tune in on our ‘weird’ artistic aesthetic. I love the ‘wabi-sabi’ nature of old matt grey and slightly rusty iron. The builder couldn’t understand this approach at first. He is used to making car ports and garages that are totally shiny and every line dead straight, with all the screw heads just the right colour to match the ‘colour-bond’ sheeting. I think that he found it quite confronting to be asked to use 2nd hand galvanised iron, with all its rusted patina, dents and quirky character.
To make it even harder for him, I have collected every sheet that I could scrounge, with total disregard to whether or not the different ages of sheeting, with their different variations of corrugated profiles would match. It turns out that something as simple as corrugated iron can come from different eras with different ‘standard’ profiles. So what I have learnt is that there is no ‘standard’, and that the shape changes every so often to suit the manufacturers needs, due to changes in manufacturing machinery and techniques. For instance, the oldest sheeting was rolled sideways and the newer sheeting is rolled lengthways, then there was the change from imperial measure to metric. Older sheeting is thicker and heavier, while the most recent lengths are much thinner, but made from high tensile steel.
It’s an eclectic mix of whatever I could scrounge over the past 6 months. However, with careful selection – given enough time, I have been able to go through all of the dozen piles and sort out the closest matches. I saved the best, most rustic sheets, for the side facing the house that we will see every day and also inside the pottery studio. The worst, and by this I mean the perfect, modern, coloured, ‘colour-bond’ sheeting, was set aside for the front of the building that will eventually be bricked up and covered over, using our left-over sandstock bricks from when we built the house many years ago. In this way the front of the pottery facing the street will have a similar colour and texture as the Old School building. This is an attempt to maintain the visual amenity of the street scape.
In other areas, where I have been forced to use up the mottled variations of ‘colour bond’ sheeting, green, blue, grey and cream. These will eventually be painted over. I secretly hope that I do such a bad job of this, that some of it starts to peel off and flake a bit, just to keep in relationship to some of the other flakey iron buildings on the site.
Other outer walls are just plain weathered grey gal iron look. I have to use whatever I could find. And it all has to be used, as I don’t have the luxury of having too much to choose from. It has turned out that each elevation of the complex of 5 attached sheds has its own unique ‘shed-scape’ character. It has been a little bit of an effort to explain to the builders every day, the importance to me of matching the so-called ‘shit iron’ look that I’m after. ‘Wabi-sabi’ doesn’t translate into the Australian Building code, and isn’t dealt with in the TAFE course in steel shed construction 101!
We have made progress though. The builder said to me yesterday that he thought that it has started to turn out OK. “It doesn’t look as bad as I thought it would. That probably means that you are really happy with it”!
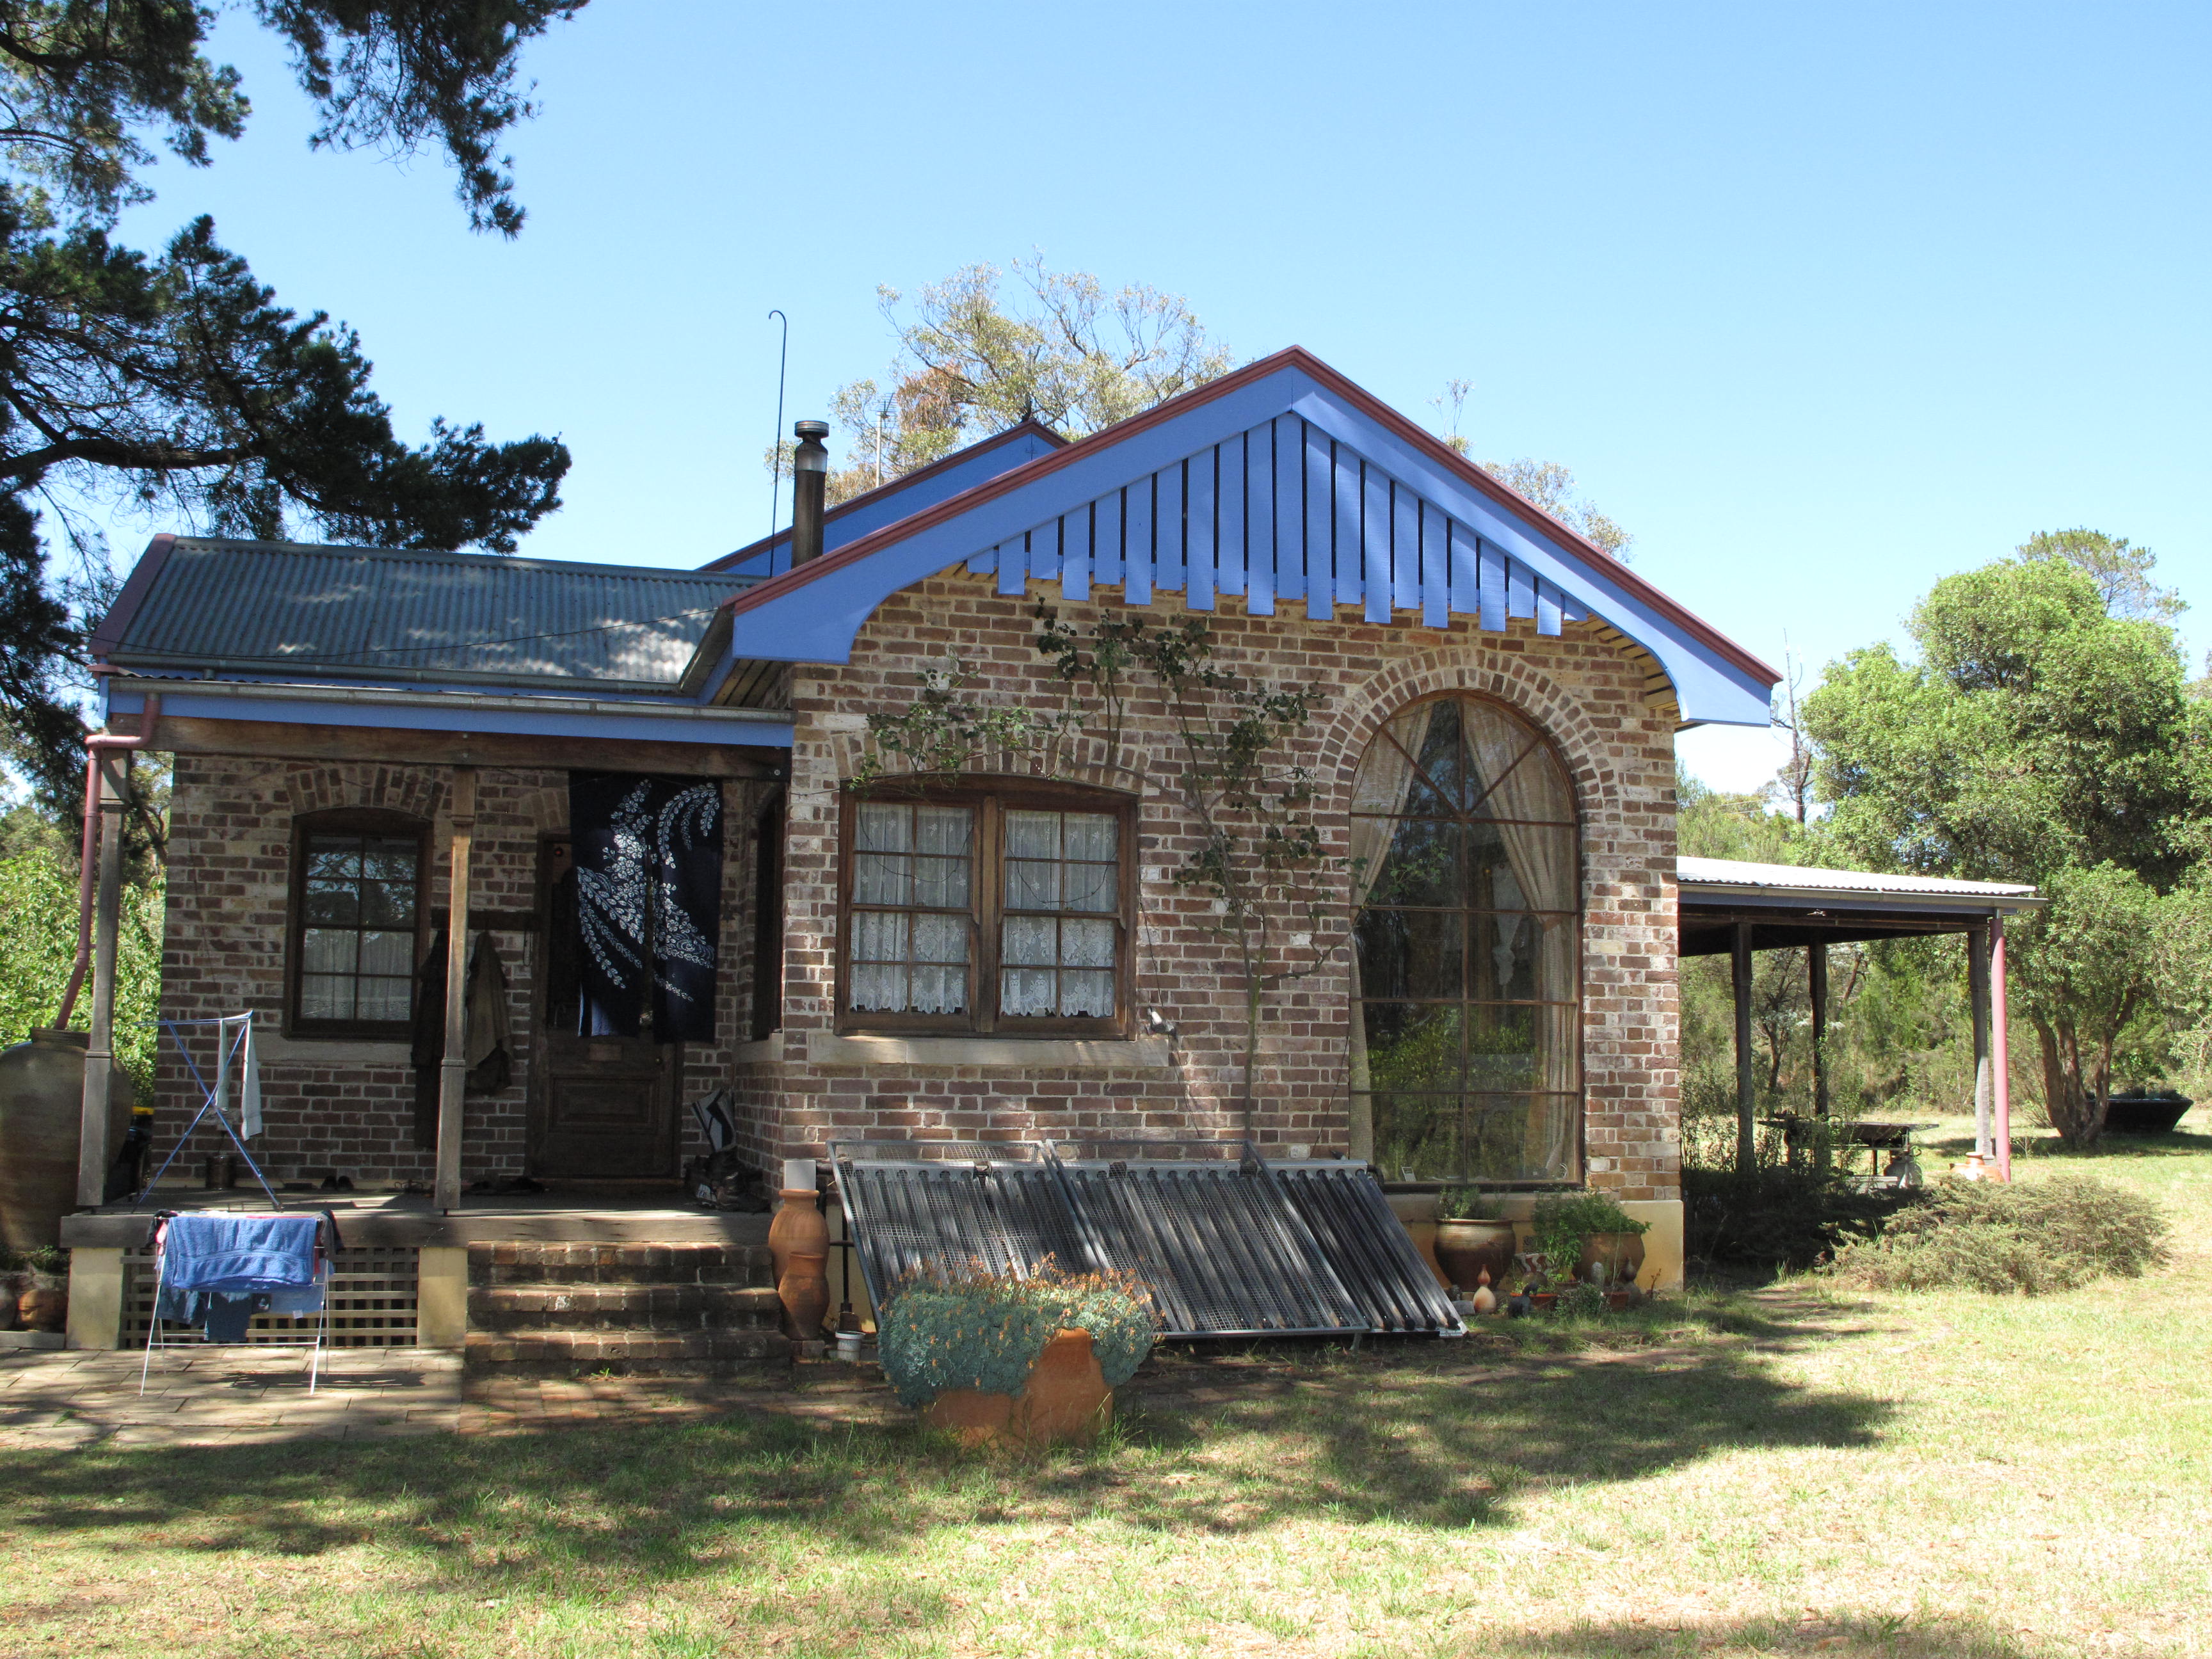
I’ve spent the last few weeks working on an arch window for the new pottery workshop. I want to make a window that reflects the existing window in the house opposite to the new pottery. I have a plan to brick up the external west and south walls of the new pottery building, those that face the street and the house. We have a lot of leftover sand stock bricks from when we built the house. We put in a large arched window in the north face of the new kitchen. It worked well and I’m very happy with it. I built that window out of western red cedar. I taught my self to steam wood so that I could bend the sections to make the arch window. I want to reflect this architectural conceit in the new pottery. My idea is to have the 2 windows facing each other.
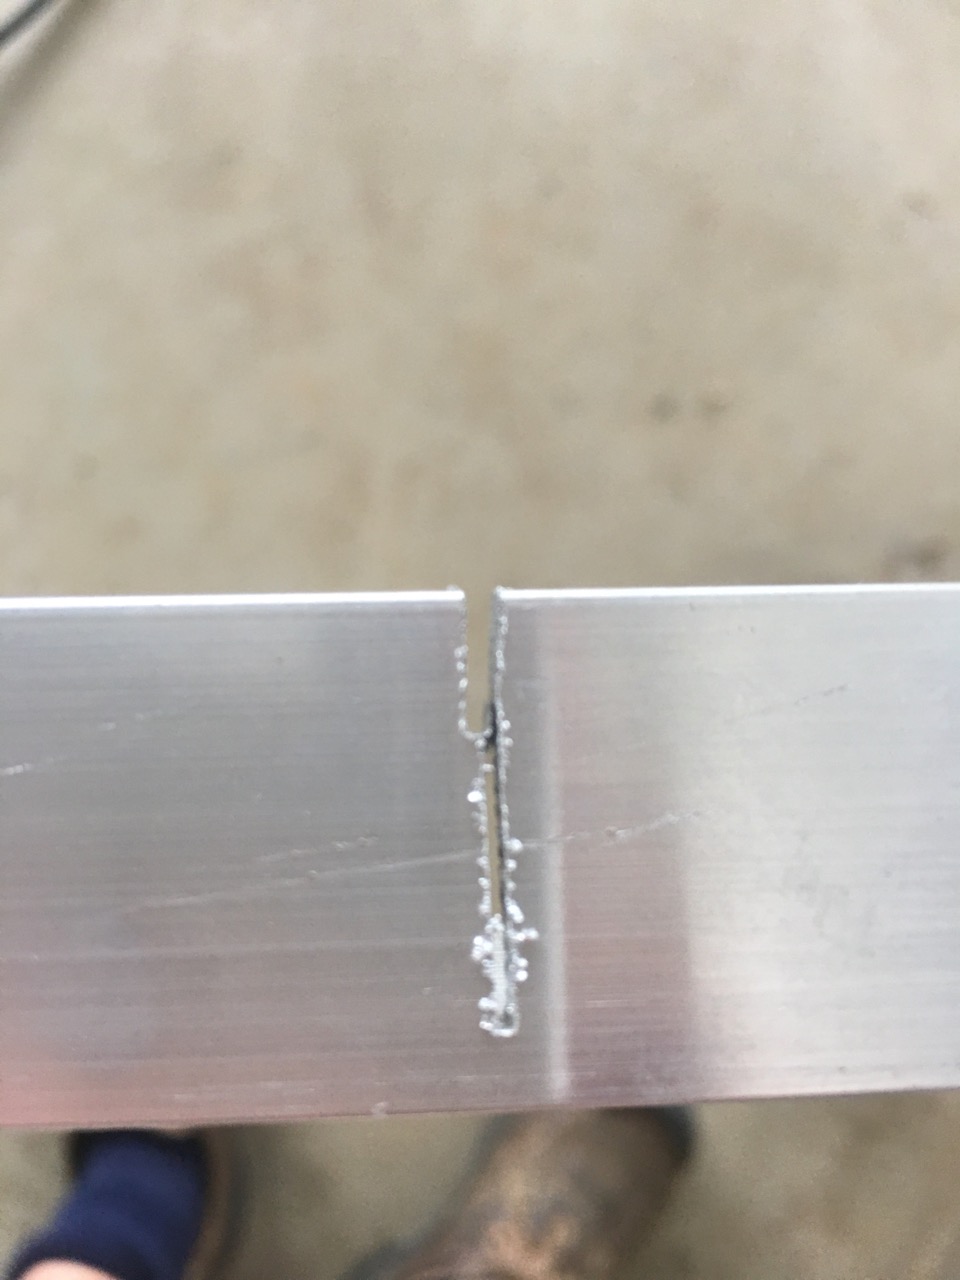
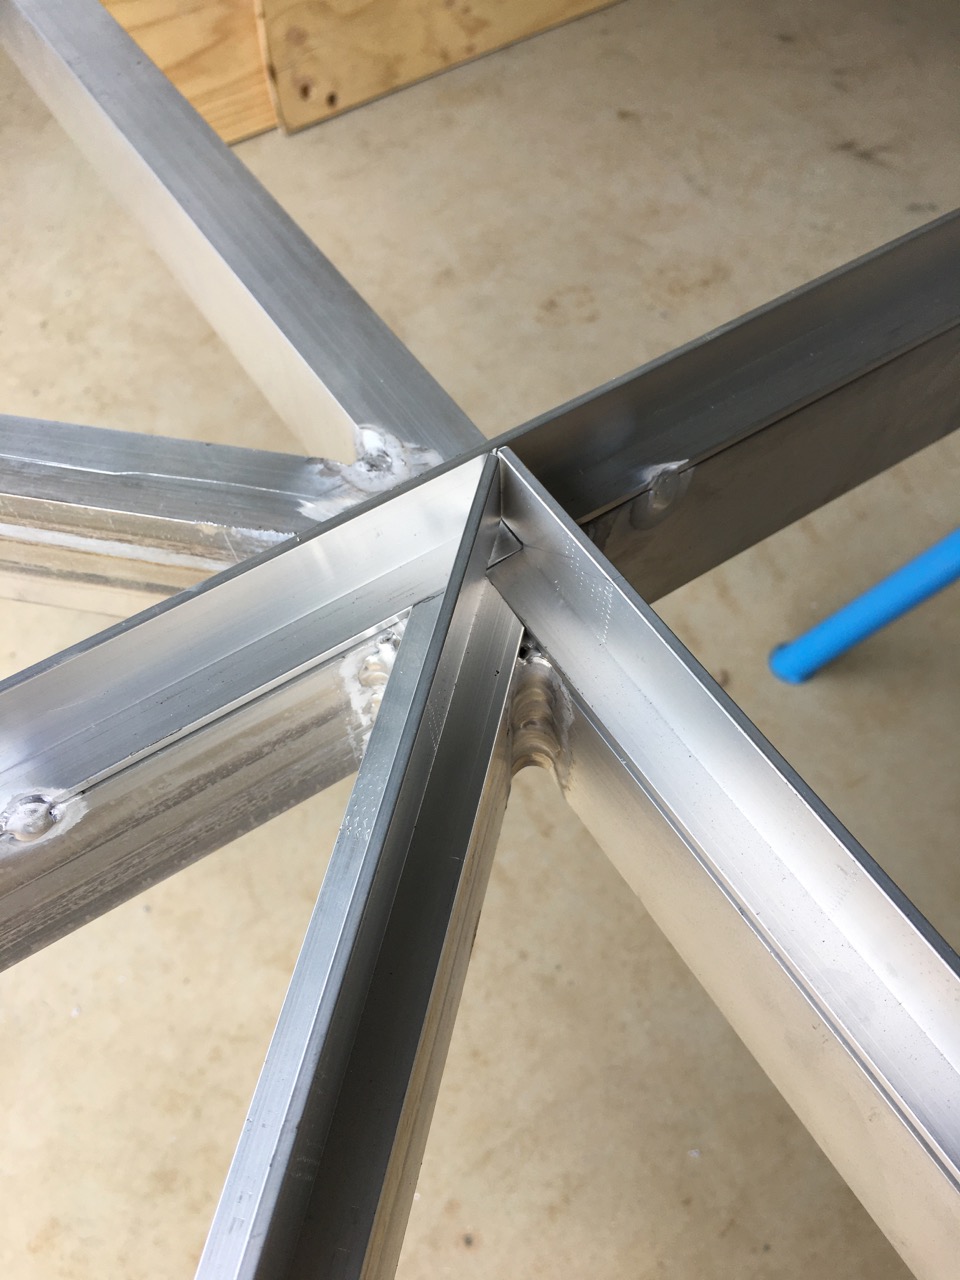
There is a slight problem with the original idea and that is that a cedar wood window might be quite flammable. I want to try and build this new pottery with a fire resistance rating ‘BAL40’. 50 being the highest possible rating. One way to do this is to make the window frame out of metal. I decided to give it a go using aluminium, as most of the other windows in the pottery will be black aluminium framed. One of the benefits of aluminium is that it can be obtained in extruded forms like hollow sections, ‘T’ sections and angles. It is also very light and not too expensive compared to ‘merbau’ timber. I was able to buy a series of sections that I could weld together to make a complex frame that could be both light and strong – and fire resistant!
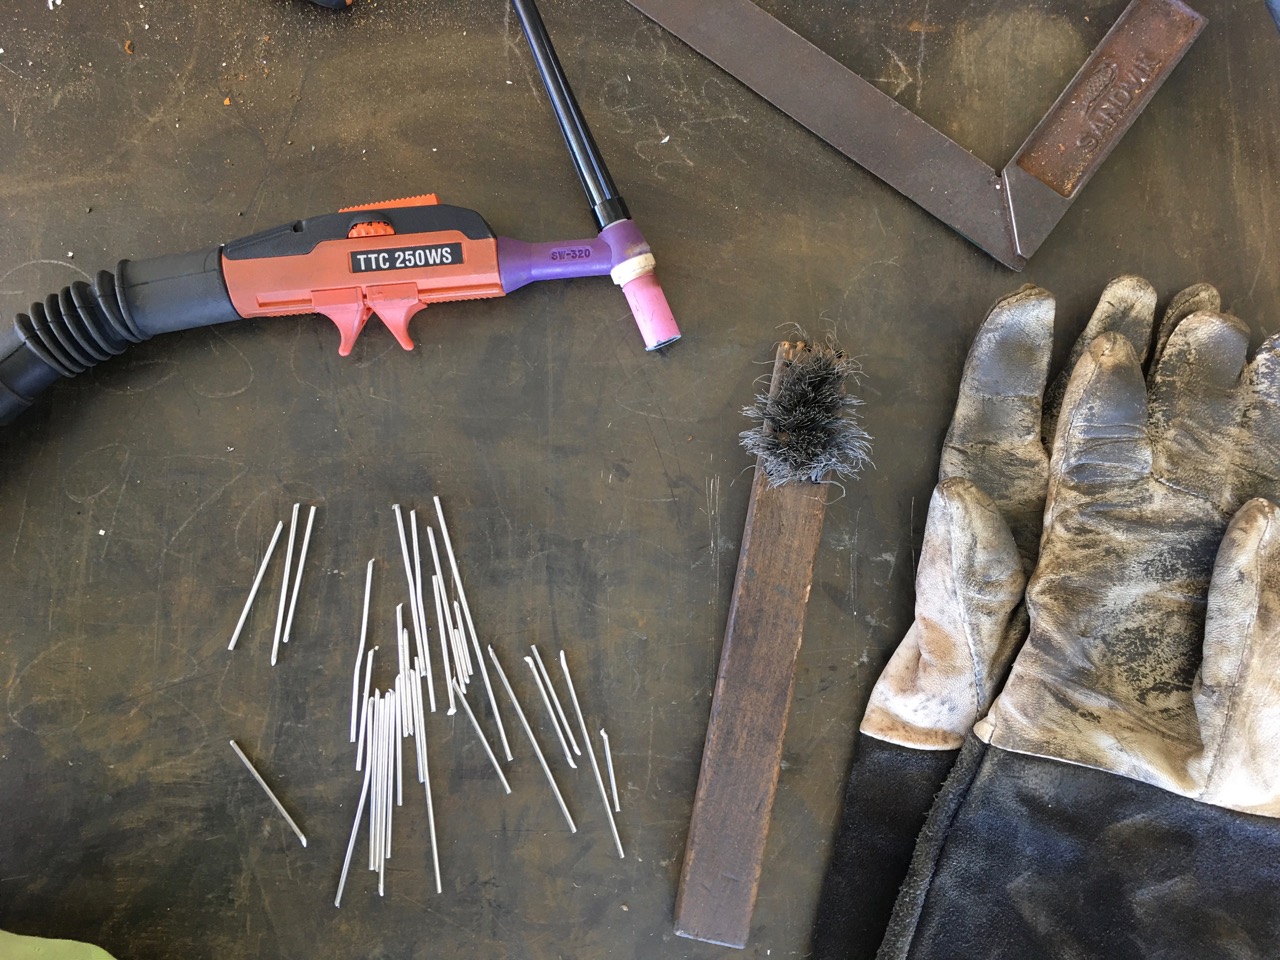
The other important issue is that aluminium is tricky to weld, but fortunately I taught myself to weld it years ago when I was building electric potters kilns, as marine aluminium is one of the longest lasting kiln frame materials for electric kilns. So the welding problem was not a problem. The difficult part in welding a big window of this size, 4 metres by 2 metres, is that aluminium expands and contracts a lot with heat, so it can very quickly warp our of shape. I usually clamp aluminium down onto my steel welding bench to keep it straight. However, in this case, the window is bigger than my bench, more than twice as big, so I had to weld it on the floor. This meant that I couldn’t clamp it down. So I have had to weld it intermittently with long gaps to allow the window to cool dawn so that it would remain flat and straight. This is why it has taken me so long, with just two welding sessions each day.
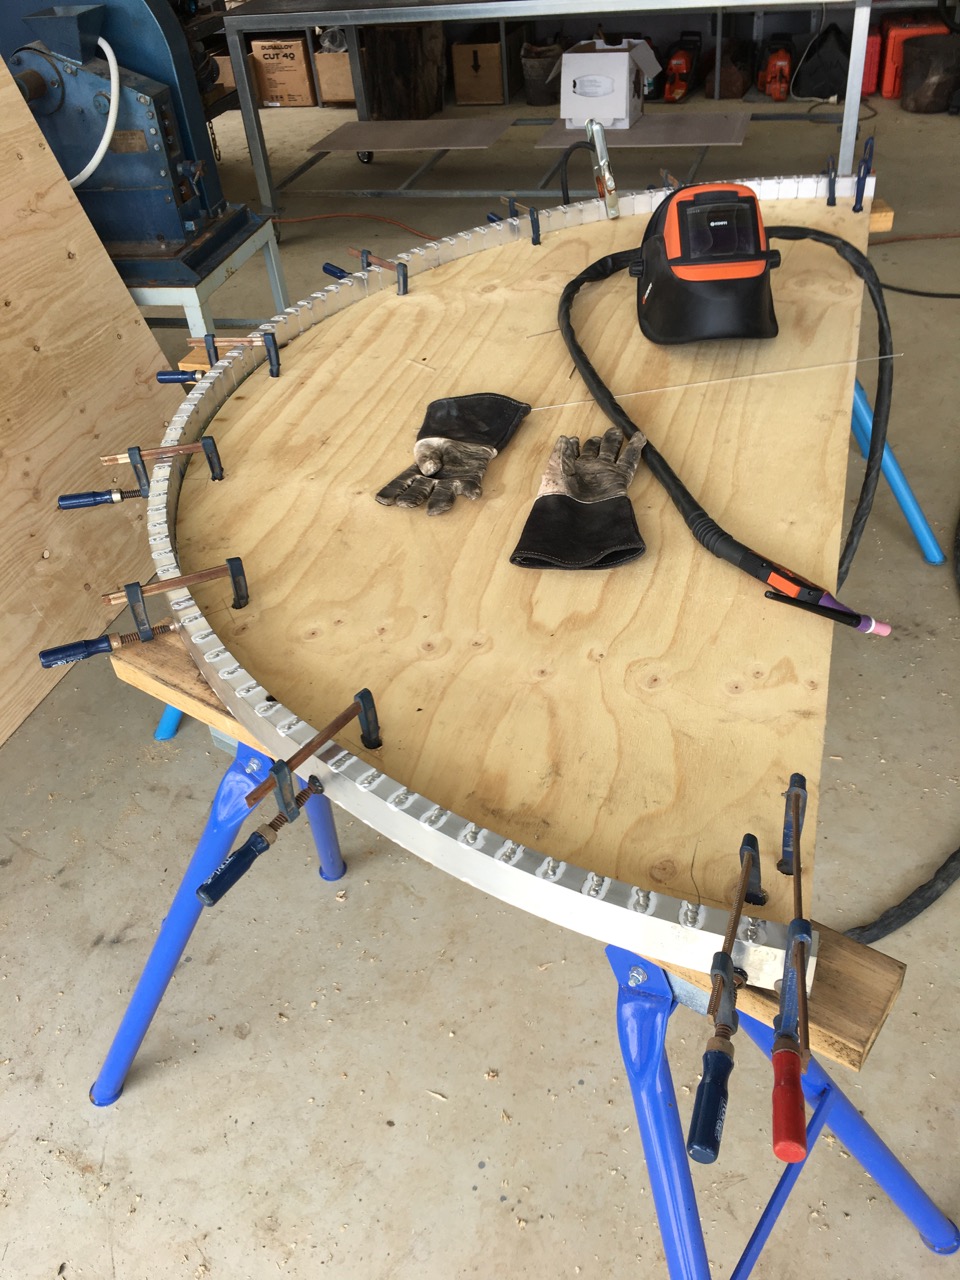
I made a wooden former to shape the arch
In order to bend the hollow section, I needed to make some cuts in the metal so that I could bend it round in an arc. I worked out that the difference between the inner and outer circumferences of a two metre arc was about 80mm. So I made 80 equally spaced cuts into the frame with a hacksaw, these were about 1mm across. It ought to have worked, but it didn’t. It wasn’t enough, the bend was too difficult to make by hand. I decided that I needed to make another cut with a thin blade angle grinder of about 1.5 mm wide. I made this cut just about 6 mm deep. The combination of the two allowed me to bend the arc easily by hand. I then clamped it to a plywood form, so that it would stay put while it expanded and contracted during welding. I welded the cuts back together. The whole section is now just as strong as it was before it was cut.
There are rolling machines that do this sort of thing easily, but I don’t know of any here in the Highlands. Besides, I am happy to do all the work myself in my own way, finding my own solutions. Using what I know and using what i have at hand. This is self reliance.
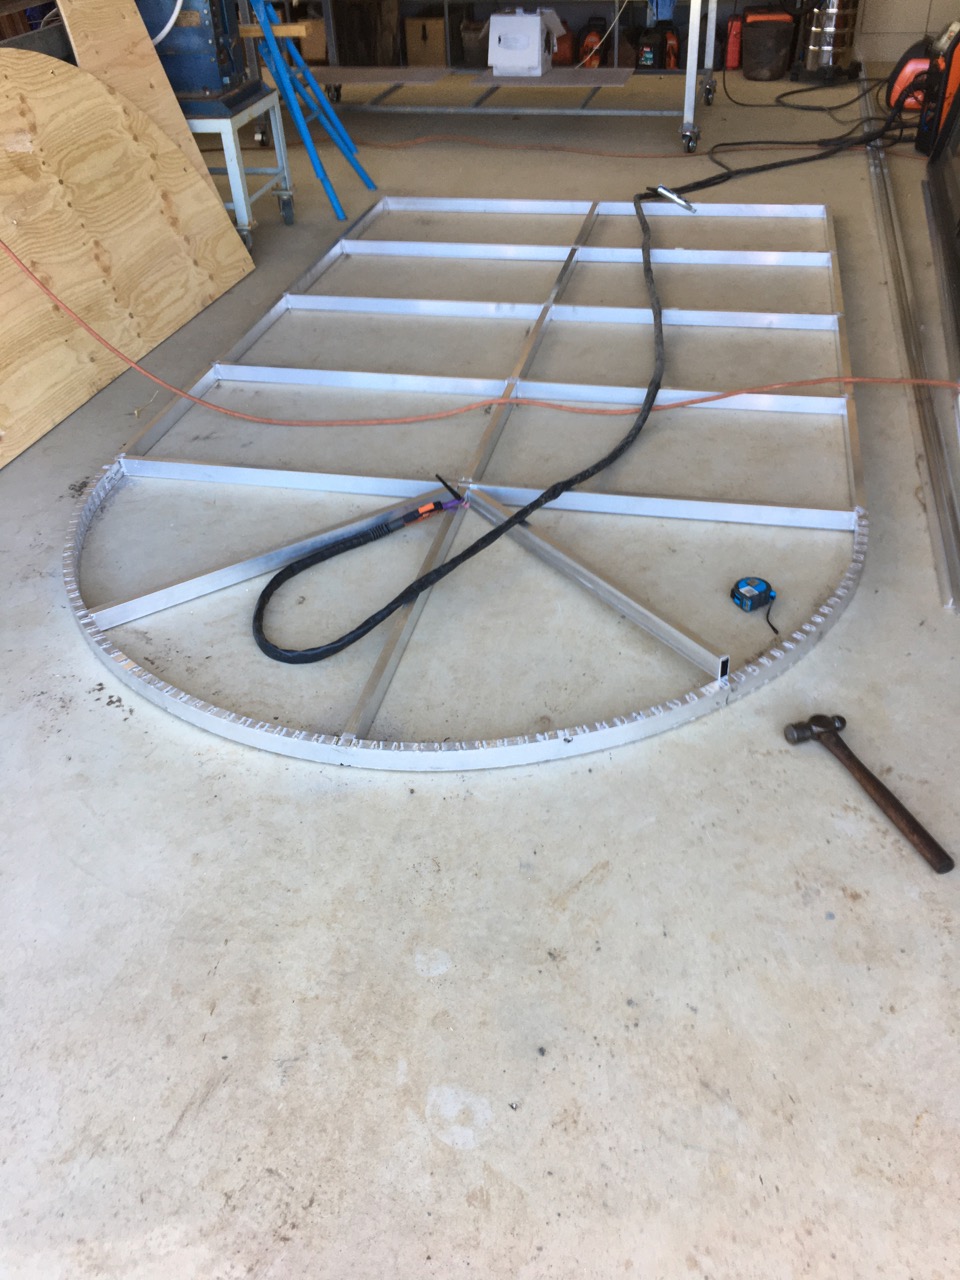
I tacked the arc onto the square section and it started to look like a window. Once the box sections were assembled, I needed to add the ‘T’ sections on top and an angle section around the edges. These are essentially the glazing bars. The rectangular hollow section is just a supporting frame to resist the wind pressure. These ‘T’ sections needed a little bit of fine cutting and filing to get to fit nicely, but it worked out OK. Clamping everything all the time is essential to keep it all flat and straight during welding.
Its taken many hours of thinking, measuring, cutting, fitting, clamping, tacking, cooling and then welding to get to this stage.
So far I have used over 50 metres of filler rod in all the tacks and box section welds. It’s a slow business, I’m hoping that it will work. each of these little butt-end rods was once a metre long.
In this image, the structure is complete, but it’s not a window yet, however, I started to think that it just might work. There is still a way to go at this stage. I still have to fit the architrave around it and then a fixing fin, but it’s almost there.
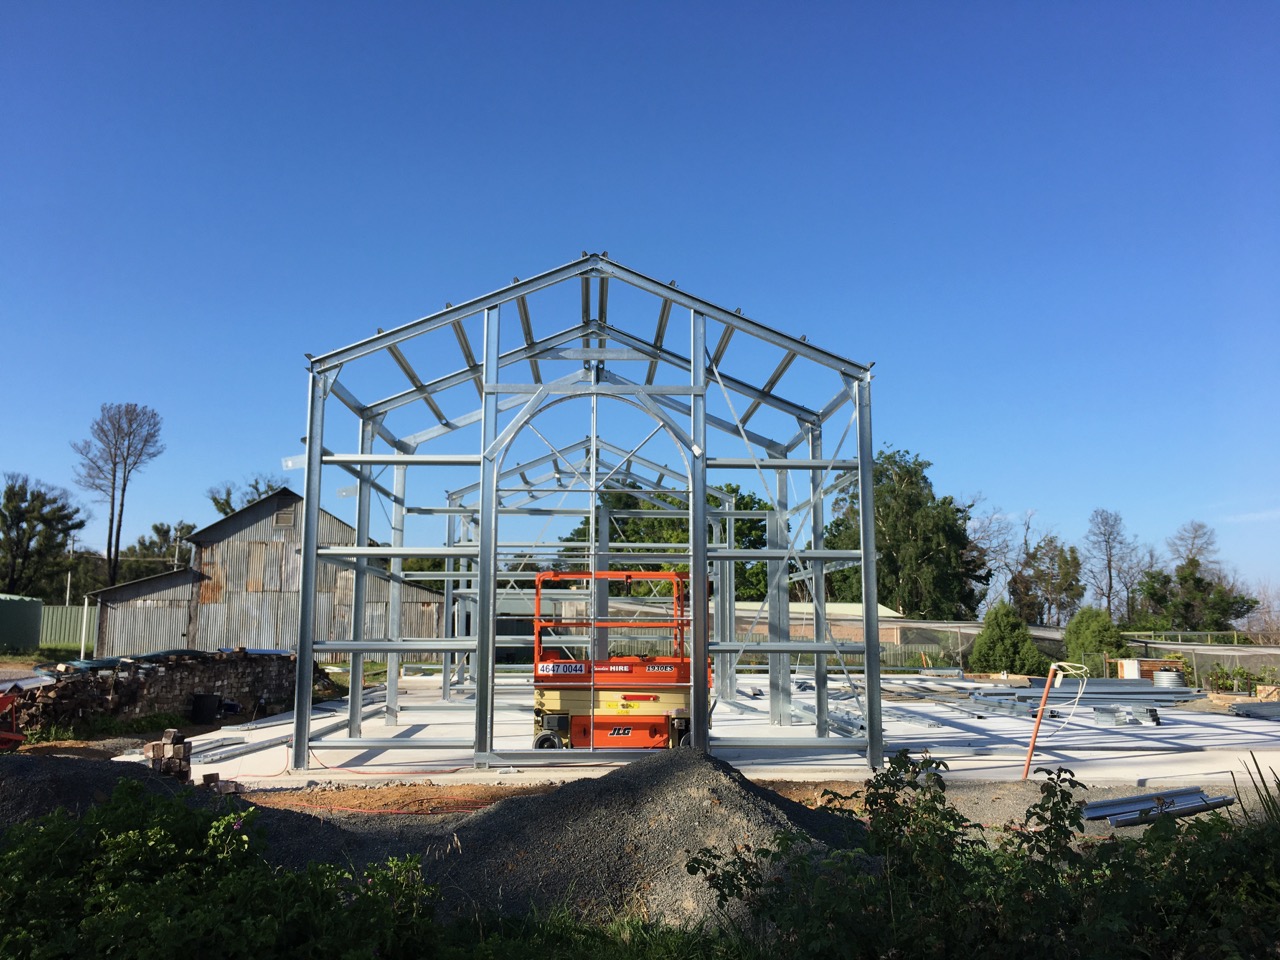
The builders finally turned up months late. We paid our deposit on the first of July, straight after the Council passed our DA. They told us that it would take 5 weeks for the kit to be delivered, There was some sort of stuff-up and the kit eventually took 12 weeks to be delivered. That was 2 months ago on the 23rd of September.
The builders have eventually arrived.
On the positive side. All the waiting around gave us the time to work on the yard and the clean-up, the orchard and the garden.
So the beginnings of a frame have appeared. Certainly enough to fit my big arch window in the end wall.
With any luck, we might be at lock-up stage before Xmas?


You must be logged in to post a comment.