We are 1 1/2 hour drive south of Sydney. Please join us for our 1/2 price, Xmas sale, where everything in the gallery will be sold at 50% off! One day only. Sunday 14th December.
No tricks or gimmicks. Everything will be for sale at half of the usual marked price.
This is a definite once-off event.
We pride our selves on making highly sustainable ceramics, fired using PV sunshine or our own home grown timber. All our clay bodies and glazes are home made, on-site. We also offer tours of our workshop.
Please consider calling in and doing some discount priced Xmas Shopping.
We have never done this kind of thing before. It’s all new to us. Please come and take advantage of us!
We will also have a few of our friends with us;
Karen, who will be displaying her hand made jewellery. Roxanne, who will be showing some of her impressionistic paintings of my pots, and our son Geordie, who will be selling his hand made fruit cordials. Made from the organically grown fruit in our orchard and other fruit from local orchards.
Tours of the gardens and orchards will be available.
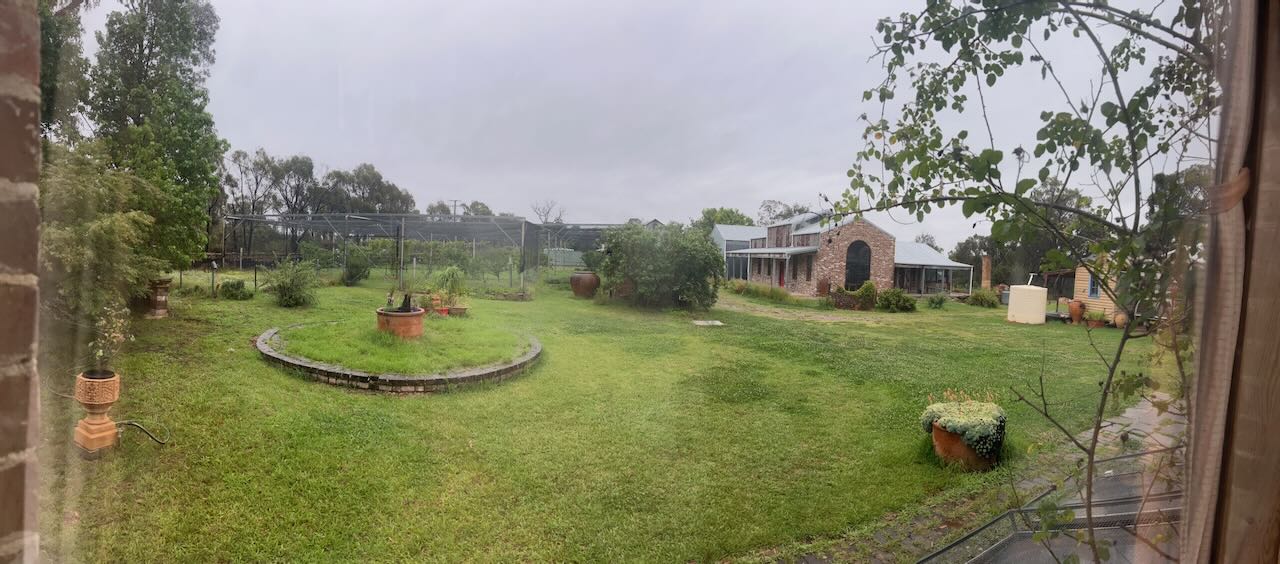
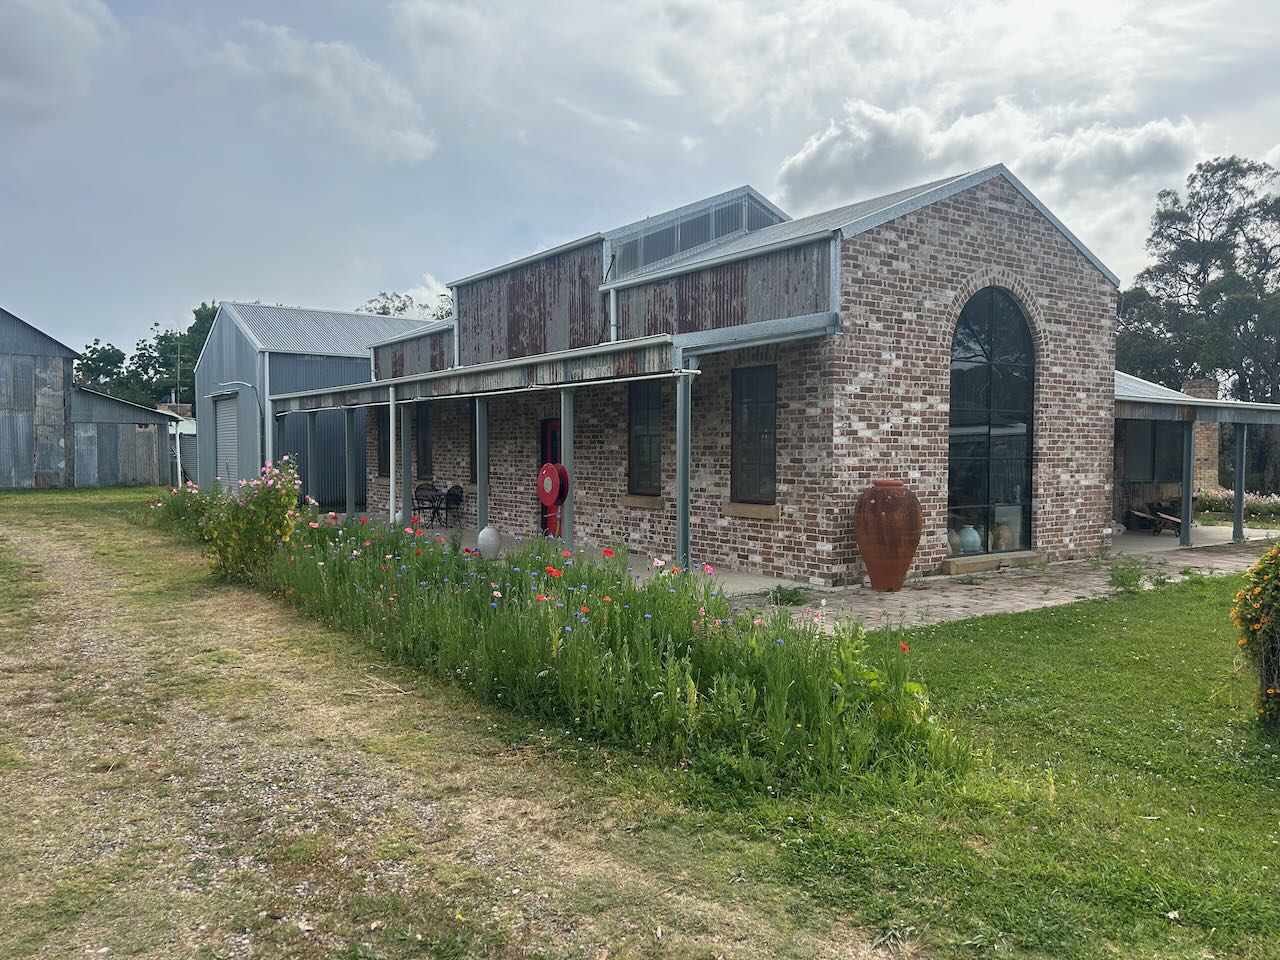
The Pottery studio and gardens.
Our son Geordie, making some of his ‘adult’ cordials.
Karen’s jewellery display.
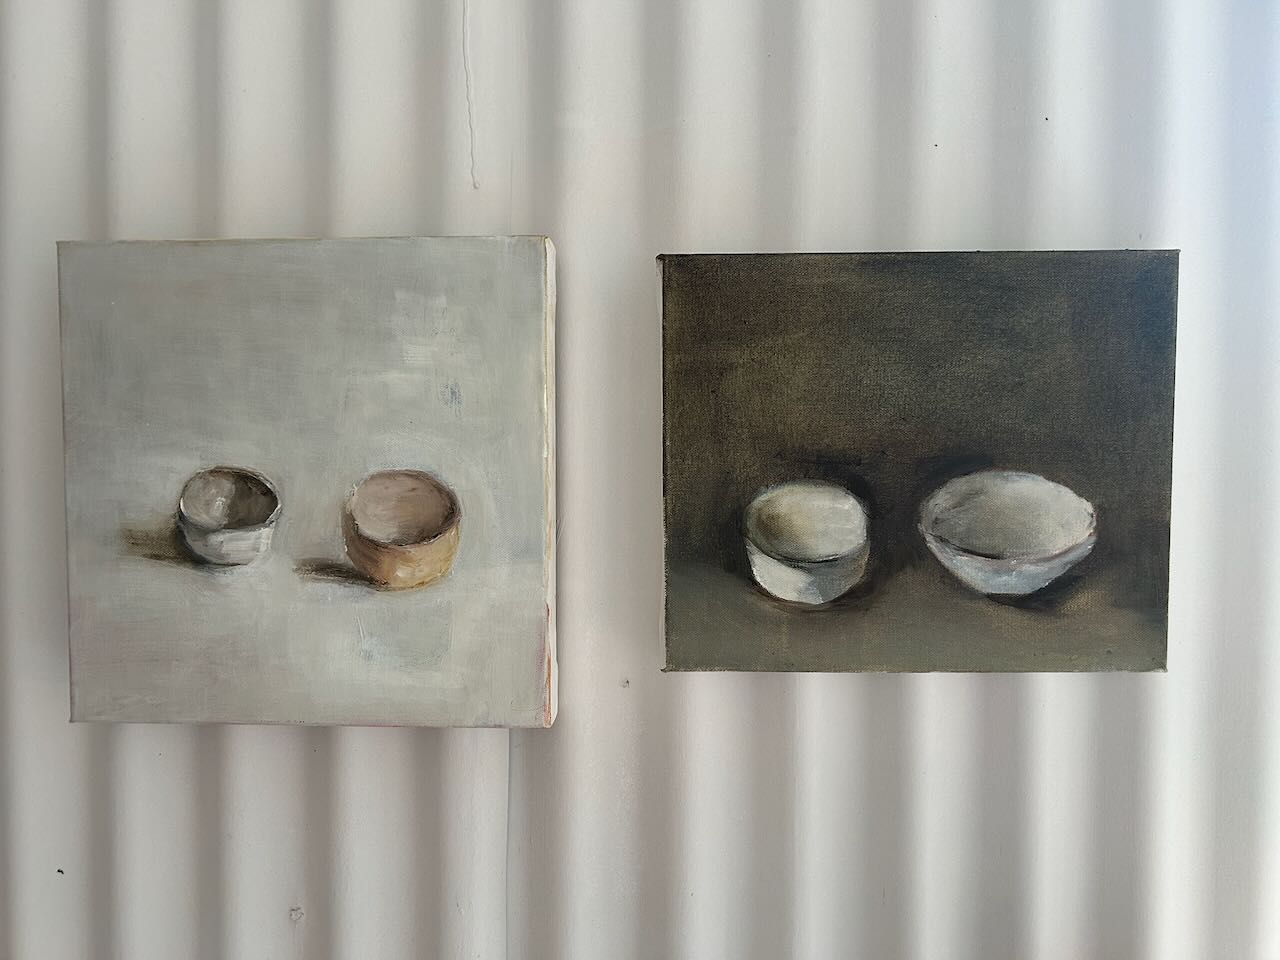
Roxanne’s beautiful and expressionistic paintings of pots.
We have picked the first red tomato of the summer, well before Xmas. Always an achievement, but not so special these recent years, as with accelerating global heating, we are so much hotter and everything in the garden is ripening earlier.
When we moved here to the highlands in 1976, we couldn’t get a ripe berry off our newly planted berry canes until January. These days the berry crop is all over and gone well before Xmas.
We are harvesting peaches, apricots, the last of the late sour cherries, as well as strawberries and blueberries. We don’t make any pots over December and January, as we are full time involved in managing the fruit from the orchards and the summer flush of vegetables.
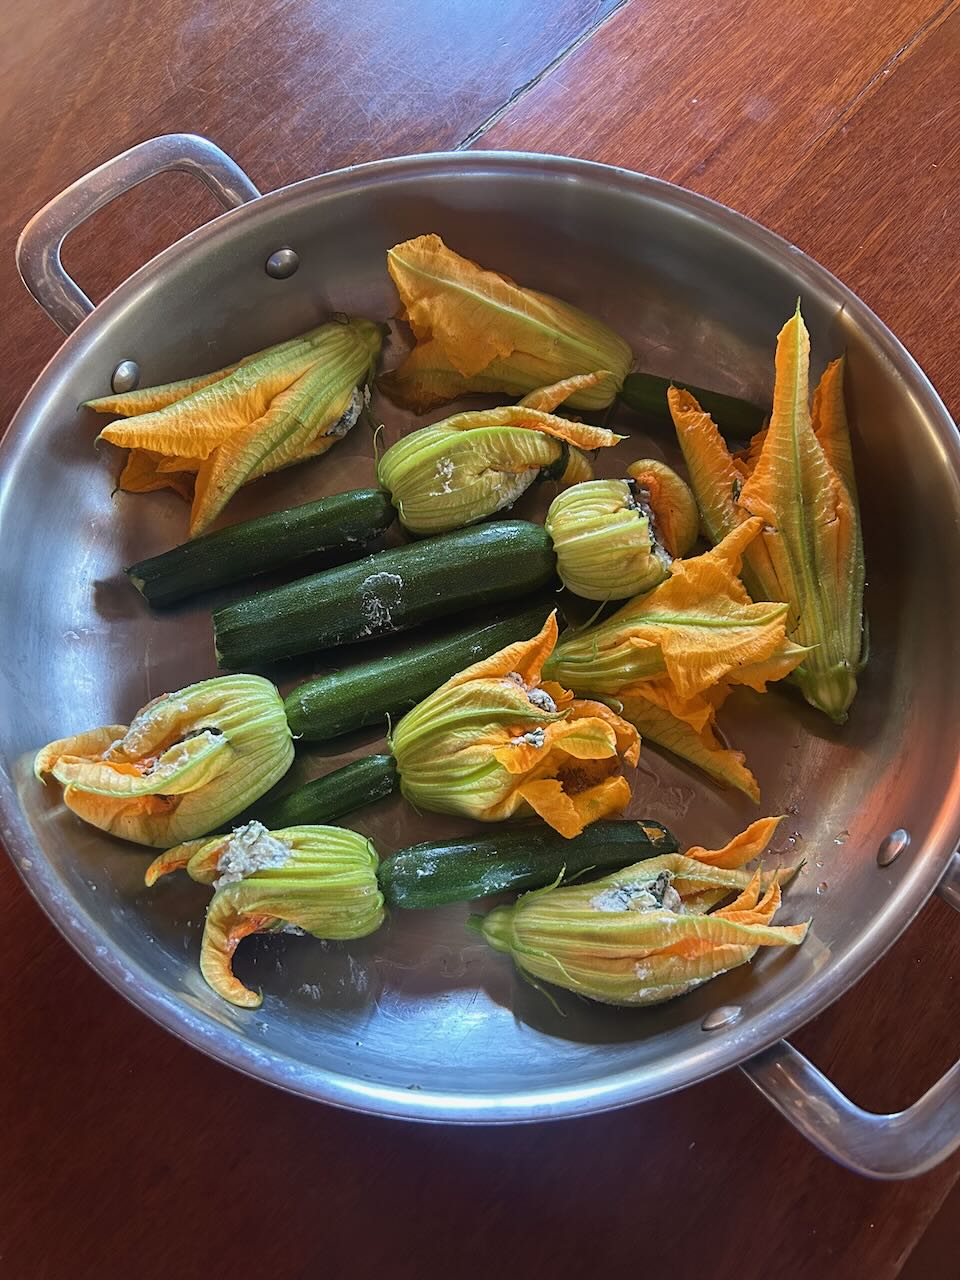
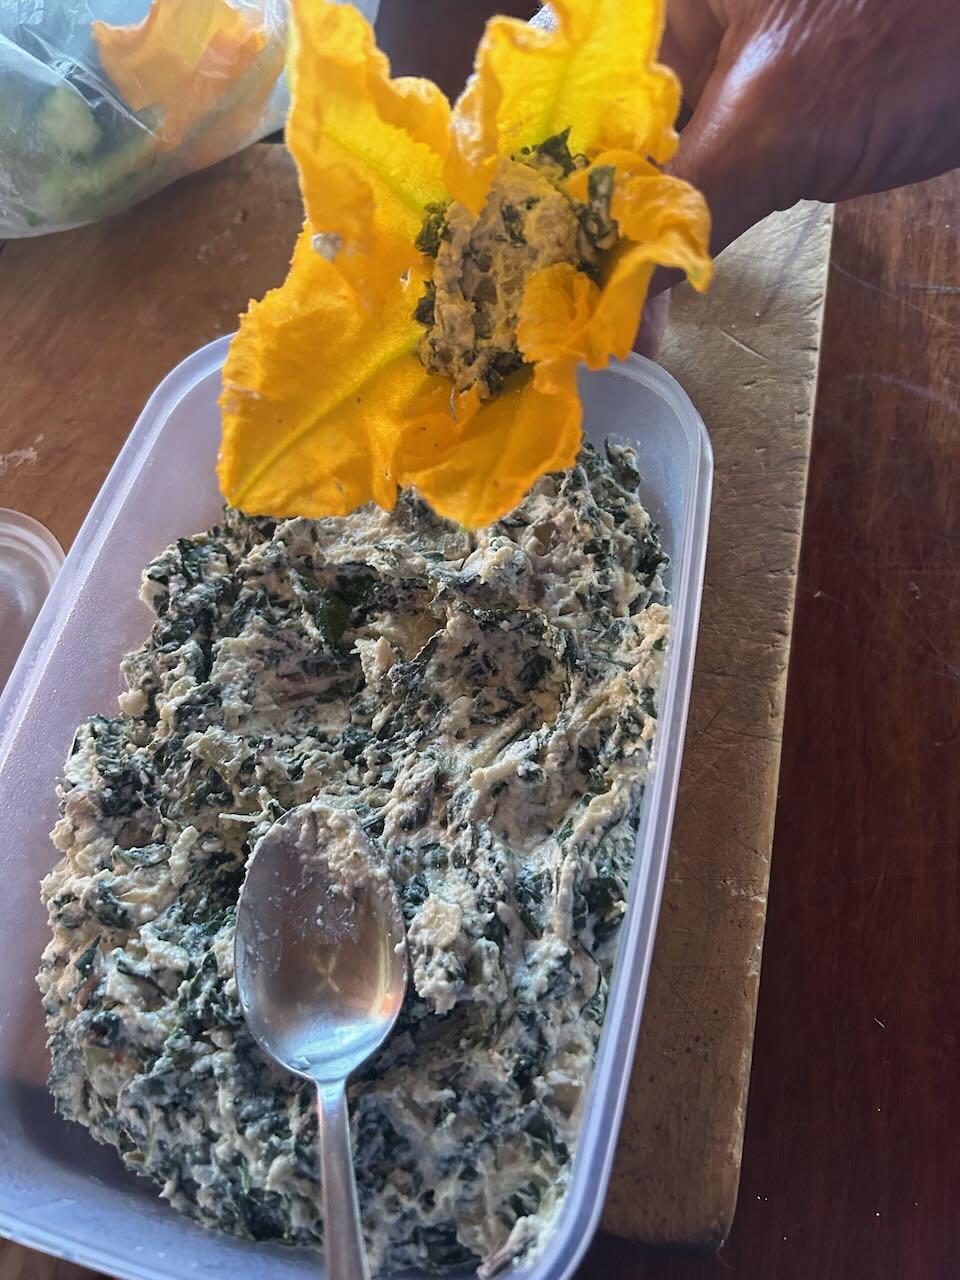
The zucchinis are going mad, so we are having a few meals of stuffed zucchini flowers. It’s a lovely summer time light meal. It achieves 2 important outcomes, by picking the flowers off the plant with the nascent fruit attached behind, it makes a colourful and delicious meal, but it also takes the fruit off so early that they don’t get a chance to explode into marrows if you just glance away for a moment or loose concentration, zucchinis fill out so very fast! Managing zucchinis means defusing them every morning early before they expand like The Big Bang!
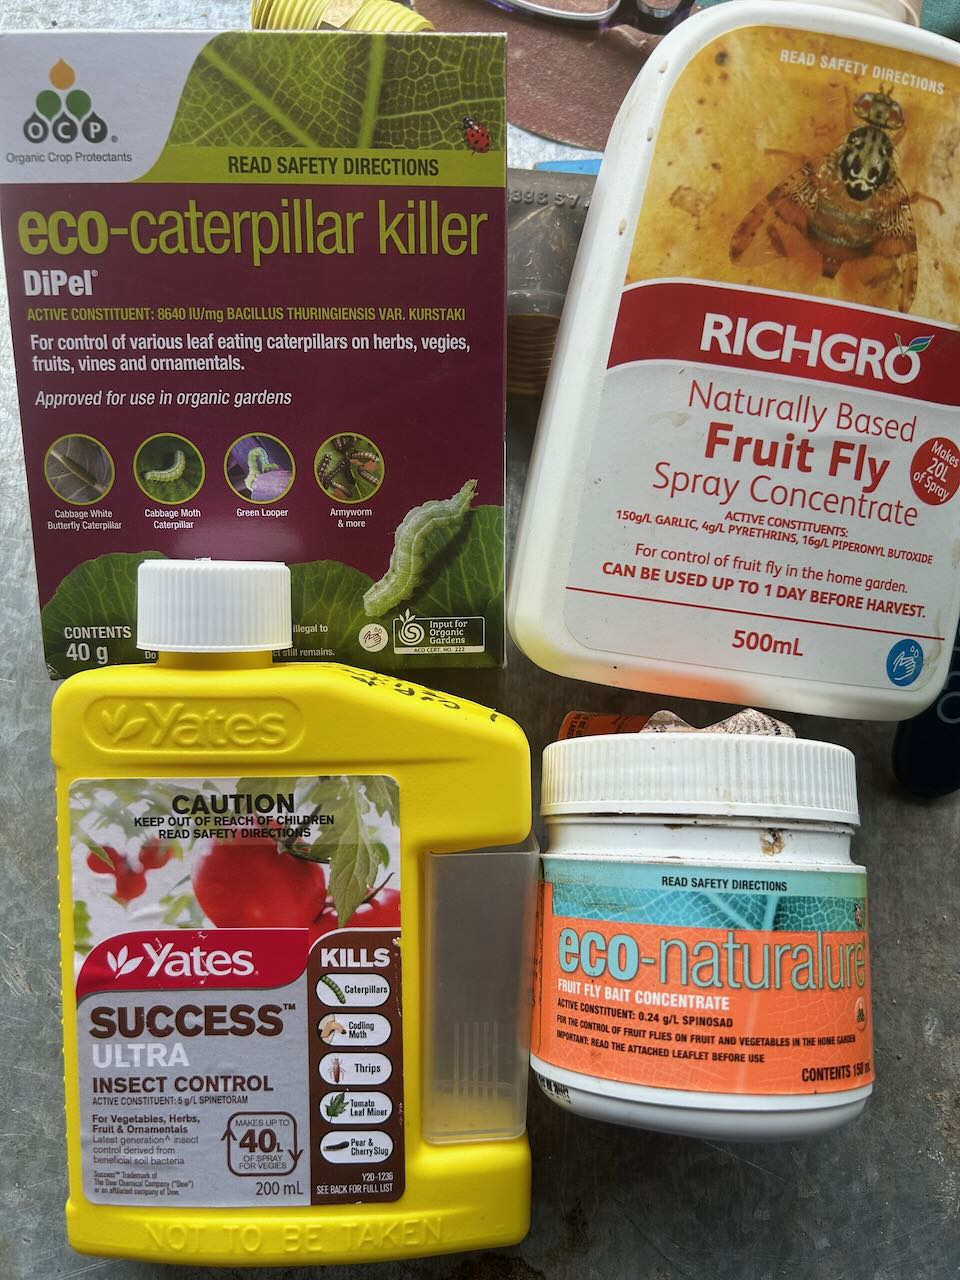
The heat also means fruit fly problems, we get in early in October/November with ‘DAK’ pots, male fruit fly lures, and protein lures for the female flys. I also spray a ‘spinetoram’ soil bacteria and dipel bacteria for the codling moths. I also place codling moth lures in half a dozen of the various trees that are susceptible to codling moth, like apples, pears and quinces. Everything we do is approved for organic gardening. Still, with all this effort, we still get fruit fly strike. It’s important to pick the fruit early and cook it to preserve it either in the freezer or in ‘Vacola’ vacuum jars, and stored for later in the year.
Last weekend I ran a couple of pottery ’tool-making’ workshops. I take small groups of 5 or 6 potters through the steps in making their own tools specific to their particular needs and preferences. There are at least a dozen specific tools that anyone could choose to make but to be realistic, a novice tool maker can only realistically achieve 3 or 4 really nice and well crafted tools in a day, so you have to chose what is most appealing and useful ti you. I don’t expect everyone to finish every tool on the day, but if all the roughing out is done and only the fine finishing is left to do. It’s best to take it home and do all that time consuming fine sanding and oiling at a later time. Best to make use of my skills and my workshop equipment to get as much done here as is realistically achievable in the time.
Making your own tools gives you 2 important outcomes, firstly the tool will be exactly what you want and need, unlike some of the rubbish that is sold in the ‘basic’ pottery tool set sold in the cheap shops. The only good item in that plastic bag is the sponge! the rest all need work. The best thing to do with badly designed tools is to cut them up or down to make them more appropriate. Don’t be afraid, just cut it, grind it, file it or whatever until it does the job that you want. If you can’t make it work for you, just put it away and make a good one from scratch.
This is the 2nd important outcome. It gives you the skills and insight to design and make the exact tool for you for that particular job. If it doesn’t work, then you know how to re-shape it until it does work how you want. Just because you bought it – possibly at great expense – from a reputable craft shop, doesn’t mean that it will be the best shape for you. If it doesn’t work, don’t hesitate. Don’t waste time struggling with it. Take the initiative, cut it up or grind some off it, or possibly just put it in the ‘Down-To-Experience-Bucket’ and make a proper one.
There is also a 3rd benefit. Making your own tools can be virtually free by recycling scrap material. There is a huge sense of satisfaction in sitting back and admiring a beautifully crafted tool that you made yourself from a branch off a fruit tree growing in your garden. Home grown organic tools. AND, so rewarding and satisfying. Making your own things feeds your soul. Re-use, re-purpose, re-cycle.
I made a stir fry of garden veggies and tofu for dinner to feed my soul and my belly.
Nothing is perfect, nothing is ever finished and nothing lasts.
It’s the last days of spring, and I have been very busy doing all sorts of little jobs that have been waiting for me to find some ‘spare’ time. We were so flat out busy working in the pottery leading up to the open Studios weekends. Now it’s time for other things.
Although it’s still spring, it seems like summer has been with us here in Balmoral Village for the past 6 weeks and more. The lush green spring growth is long gone. It’s been hot and dry, interspersed with cold, blustery, windy days. The net effect has been to dry everything out. The paddocks and lawn around the house have browned off. The soil in the vegetable garden has dried out to the point of shrinking, and starting to crack open in the places where we are not watering the nascent, emerging seedlings, destined to become our summer food source. We keep the soil moist around the seedlings and let the other areas stay dry – until I need that spot to plant more vegetables.
We have spent years nurturing the local soil here. Improving it with multiple applications of compost and manure, interspersed with additions of lime and dolomite. Over the decades, the depth of the fertile, friable topsoil has increased to over 300 mm.possibly more in places. I never seem to hit the hard iron stone and sandy loam layer anymore. The worms take the organic matter down deep and mix it well. I just keep adding compost to the top as a fertilising mulch.
It was a real shock and learning experience to discover how effective worms are at disseminating organic matter down through soil to amazing depths, given time and repeated applications of organic matter/compost. After the bad fires here in 2019, our orchard trees got very badly burnt, so I decided to move the orchard up closer to the street and to build the new pottery on the old orchard site. When we started to dig out the stumps of the 45 year old fruit trees, I was amazed that the rick chocolate brown top soil when down half a metre or more. When I planted those trees in 1976, the holes I dug for each tree were dug through hard yellow stoney loam. What a change in the soil profile over those years. Thank you worms.
The zucchinis are starting to produce well now. They come on quite fast from seedlings to fruiting in a few weeks in this warm weather. I have been picking them small with the flower still on and stuffing the flowers with cottage cheese and herbs for a light fun dinner.
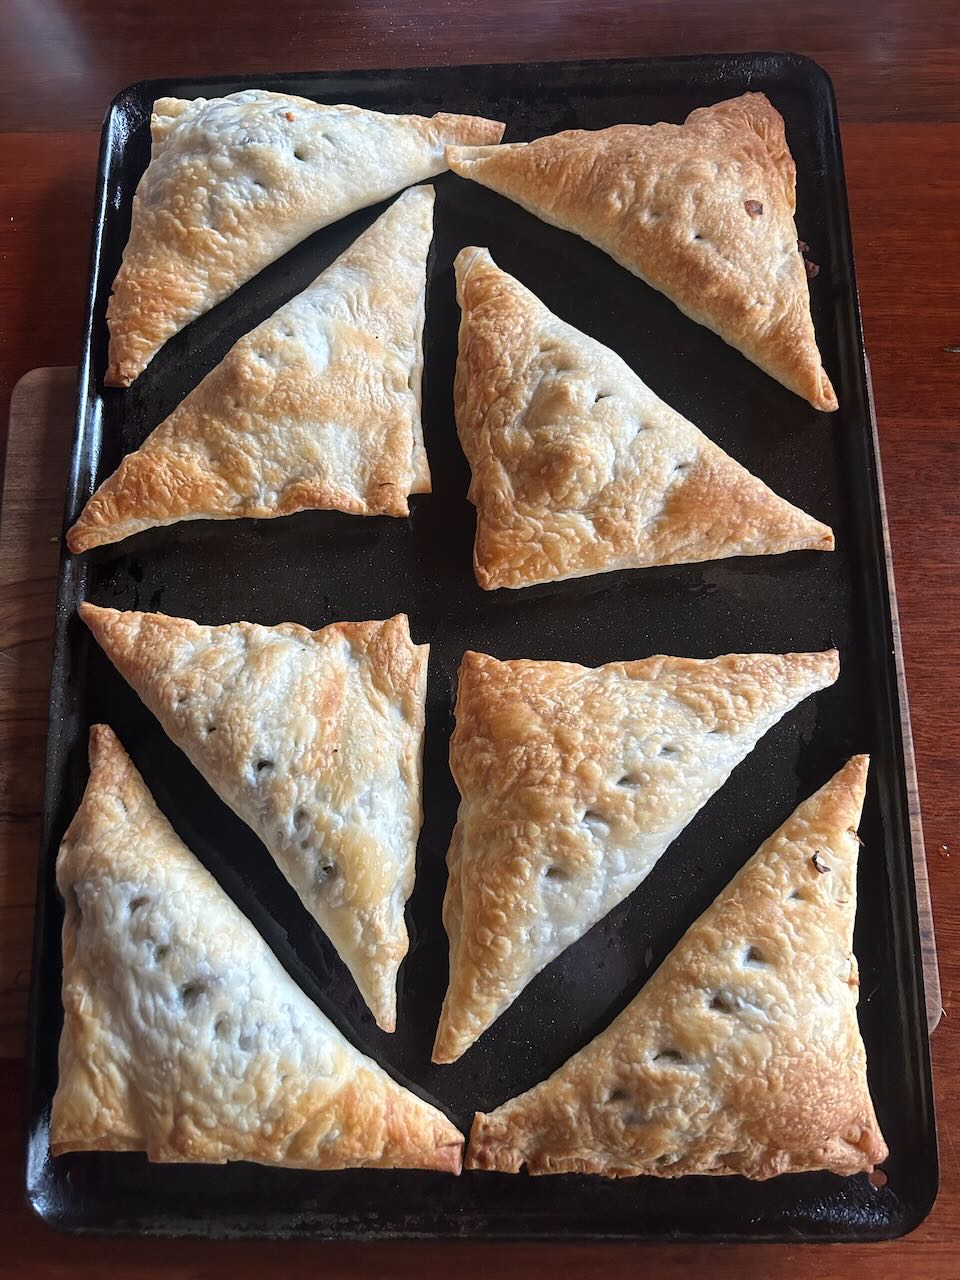
We also have plenty of silver beet/chard at the moment, although it is starting to bolt with the longer days. I have planted more seeds for a follow-on crop. I have been making spanakopita-like spinach and cheese triangles, or spanapotterka as I like to call them, or sometimes whole pies with a similar filling. It’s a great way to use up our excess of leafy greens, as they bolt away in the heat, and maximise our return from them before they are all gone. but it does need the ricotta, fetta, blue cheese and herbs mix to make it special. Plus a light touch of chilli.
I have also been making a few fruit tarts as well. Something for a more relaxed and comforting morning tea. Since the Open Studio sales are over and the 50% off Xmas sale hasn’t happened yet. Not until the 14th of December. The pottery is all cleaned out and set up for sales, I don’t want to mess it all up making more pots just now, as we still have plenty of stock. So I have time in the garden and kitchen catch up and do a lot of things that I like to do, but haven’t had the time to fit in, until now.
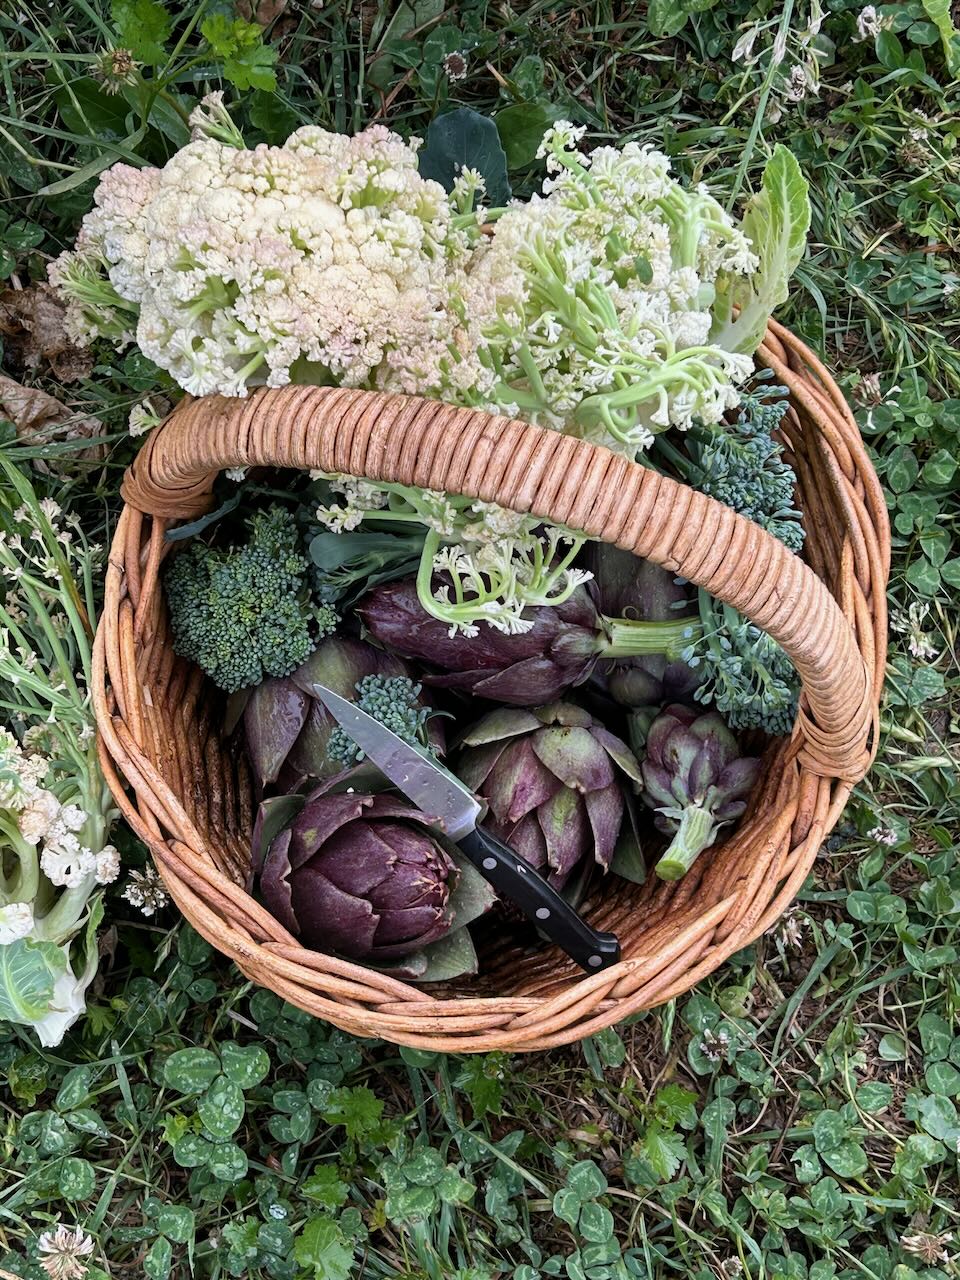
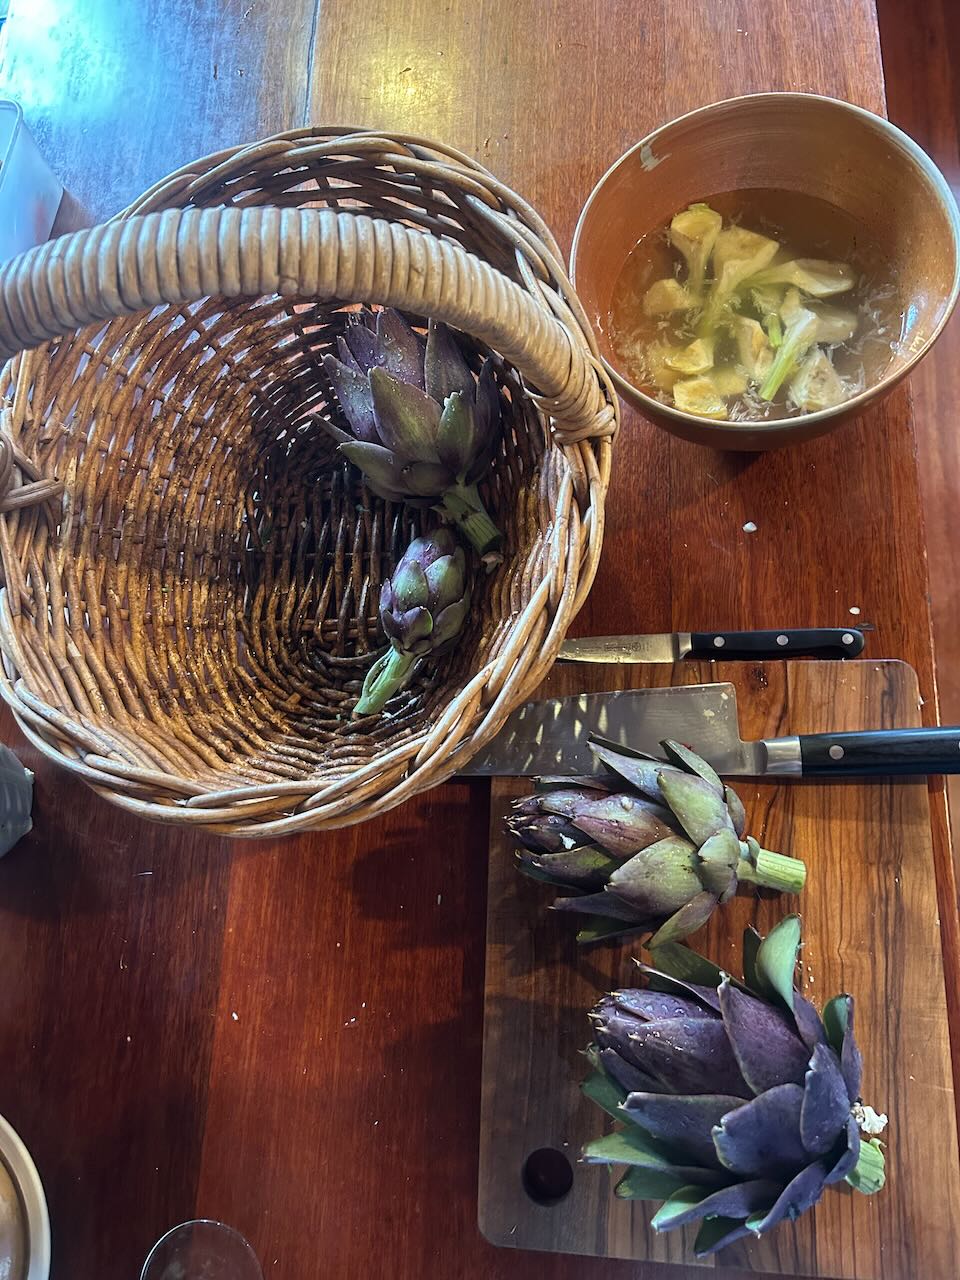
We have picked the last of the artichokes and cauliflowers. I made a vegetable pasta with the artichoke hearts and as the cauliflower was so far gone. I mashed it up and used it as vegetable filling to bulk out the sauce with last summer’s tomato passata.
This week we picked the last of the cherries and the first of the apricots.
I like working in the garden, especially in the warmth of the season, before it gets too hot. Everything responds so well and so fast at this time of year. There is always some fragrance in the air and birdsong on the wind, often fighting over the last of the high fruit in the mulberry tree or some other treasured and favoured food source. They squabble and chatter and squark and carry on, endless entertainment.
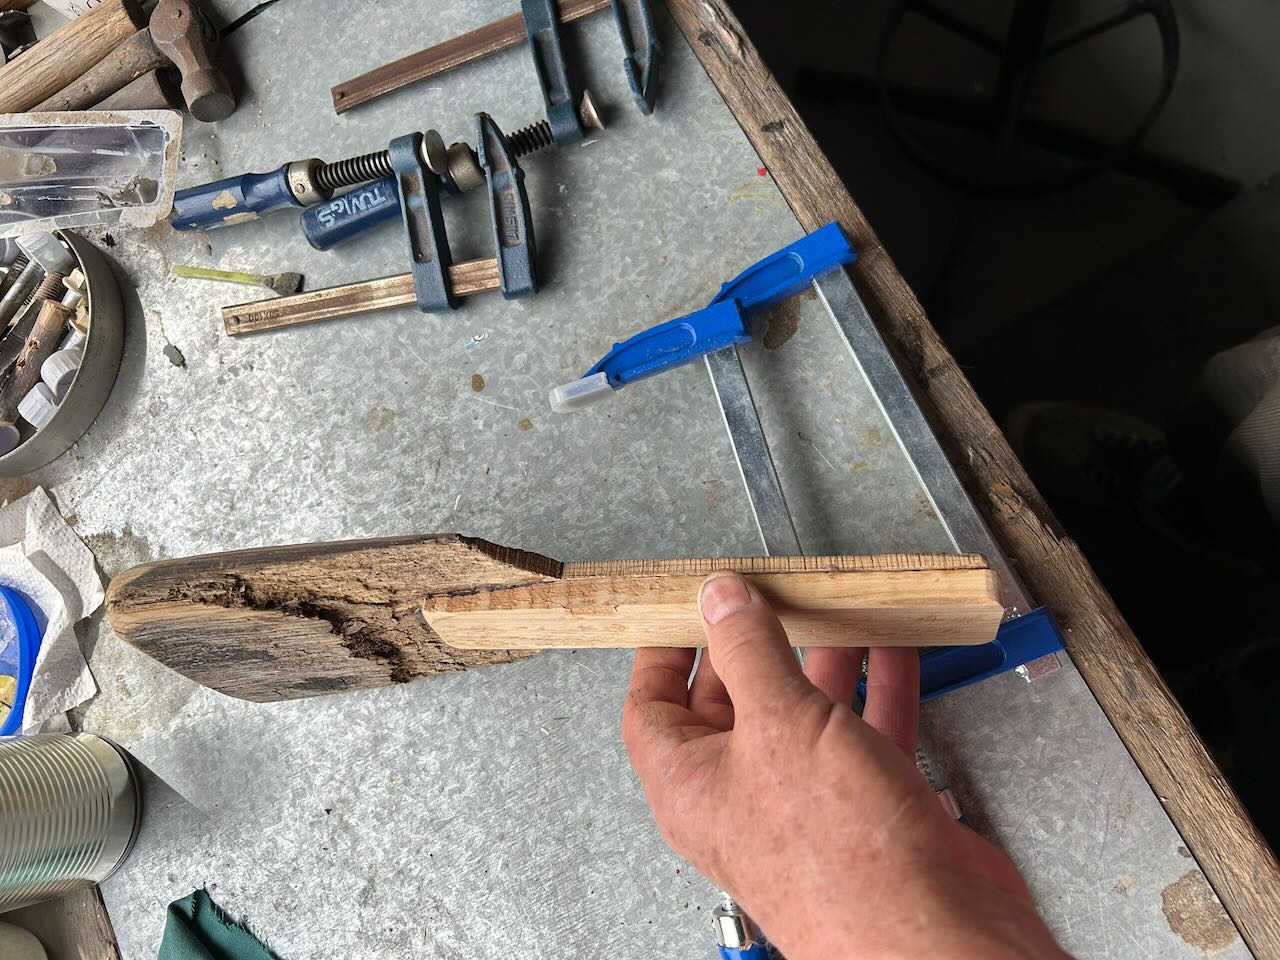
While in the garden, I noticed that one of the ancient wooden barrels that I bought 3rd, or even 4th hand, some 30 years ago, have finally rotted away to the point of collapsing. The staves have rotted away from the inside with the constant wetting and drying as we water the blueberries that we are growing in them.
I hate to see waste, so I made one of the rotted staves into a textured pottery tool. A paddle for creating texture while changing the shape of a larger pot. I’m teaching a weekend workshop of tool making next weekend, so this can be one of the projects. i have lots of these old textured staves now. I had to shape and add and new wooden baton, to reinforced and strengthen the handle. A rewarding project that avoids waste and recycles some old timber into something useful and precious. I love the natural, organic texture of the old weathered wood.
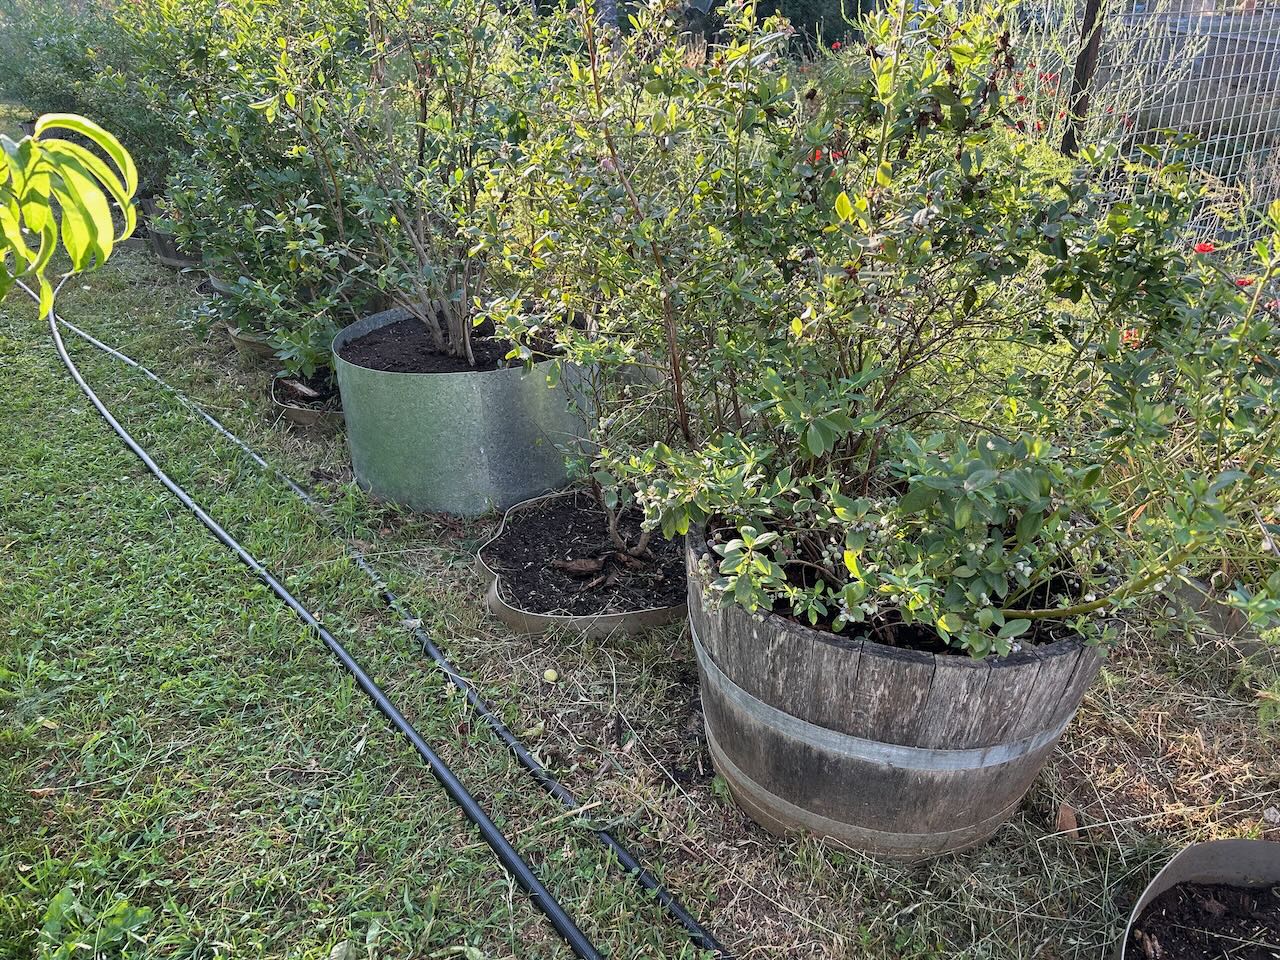
Once that was done I set to and cut, folded and rolled a new galvanised steel sheet ring to slide over the old soil base to keep the bush alive. I slipped the ring up and over the bush, down around the soil base. I made the new ring to be just 50mm larger in diameter to make the job easy. It fitted perfectly! I filled the small gap around the edge with some light soil and compost mix, eventually watering it all in to settle it down. It cost me about $30 to make this new steel pot, and it was quick and easy, as I didn’t need to move the plant and all its soil. A new 1/2 wine barrel would cost a couple of hundred dollars these days. So out of our budget range. $30 seems cheap to me for a 750mm dia garden pot, 400 mm high.
This new steel pot isn’t as beautiful, rustic and weathered as the old wooden barrels. The wood has a certain ‘natural’ beauty that I love, but I ask myself. “Are they 6 times better?” Possibly? But then I think of trying to lift the 100kgs of soil and root ball up and into a new wooden pot. I couldn’t do it anymore. So I’m playing it safe. I’m happy with the new pot.
Of course work in the pottery is never completely over. We have a summer school and other throwing weekend workshops booked in for the new year, so It’s time to make more clay body to get it all laid down and ageing, ready for when it’s needed in the new year. Our pottery workshop is laid out in such a way that the creative side is quite seperate from the more dusty, noisey, messy side of the business where we crush and grind all our glaze materials and make our clay bodies.
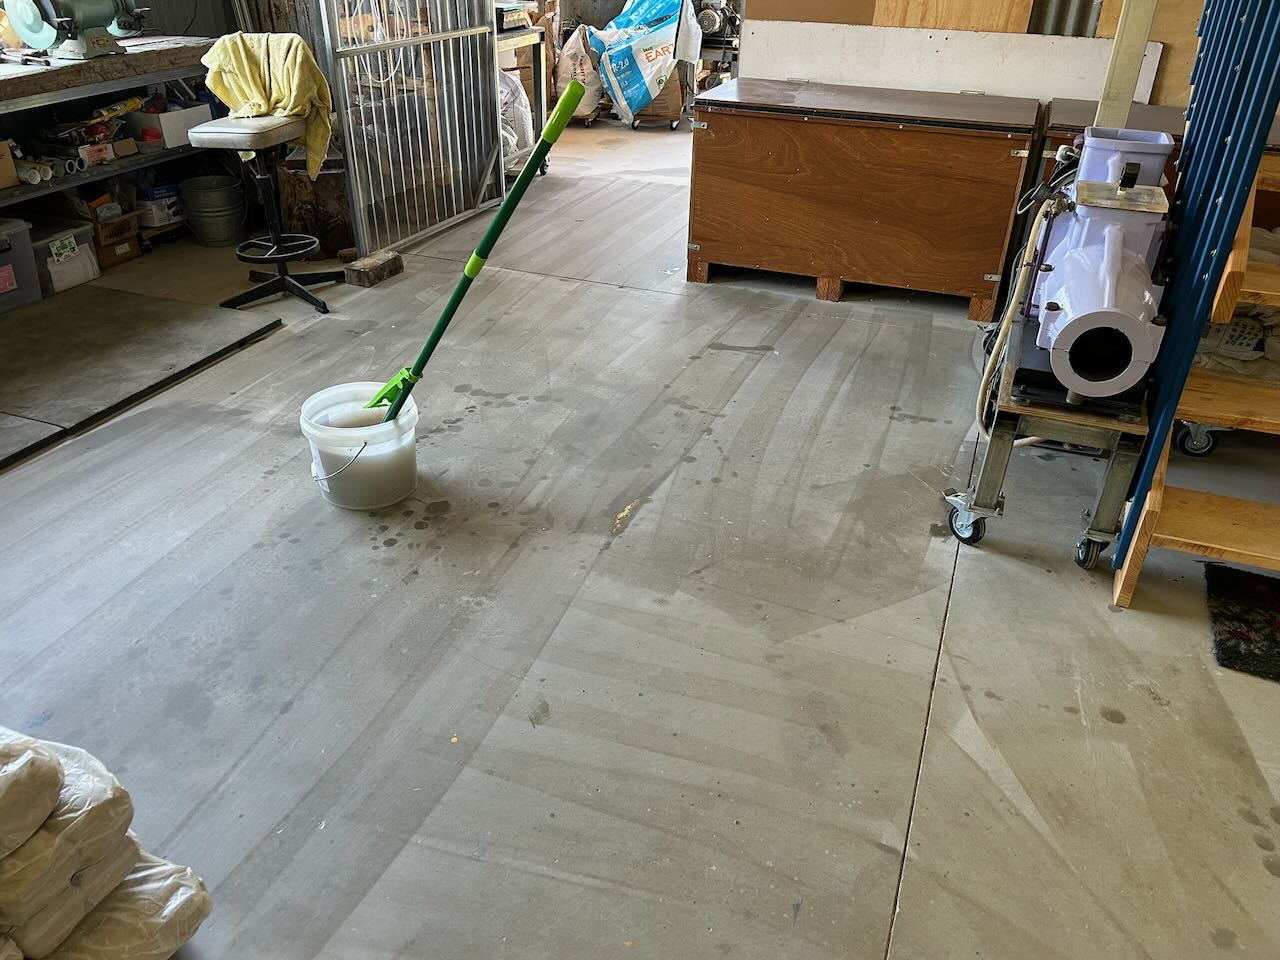
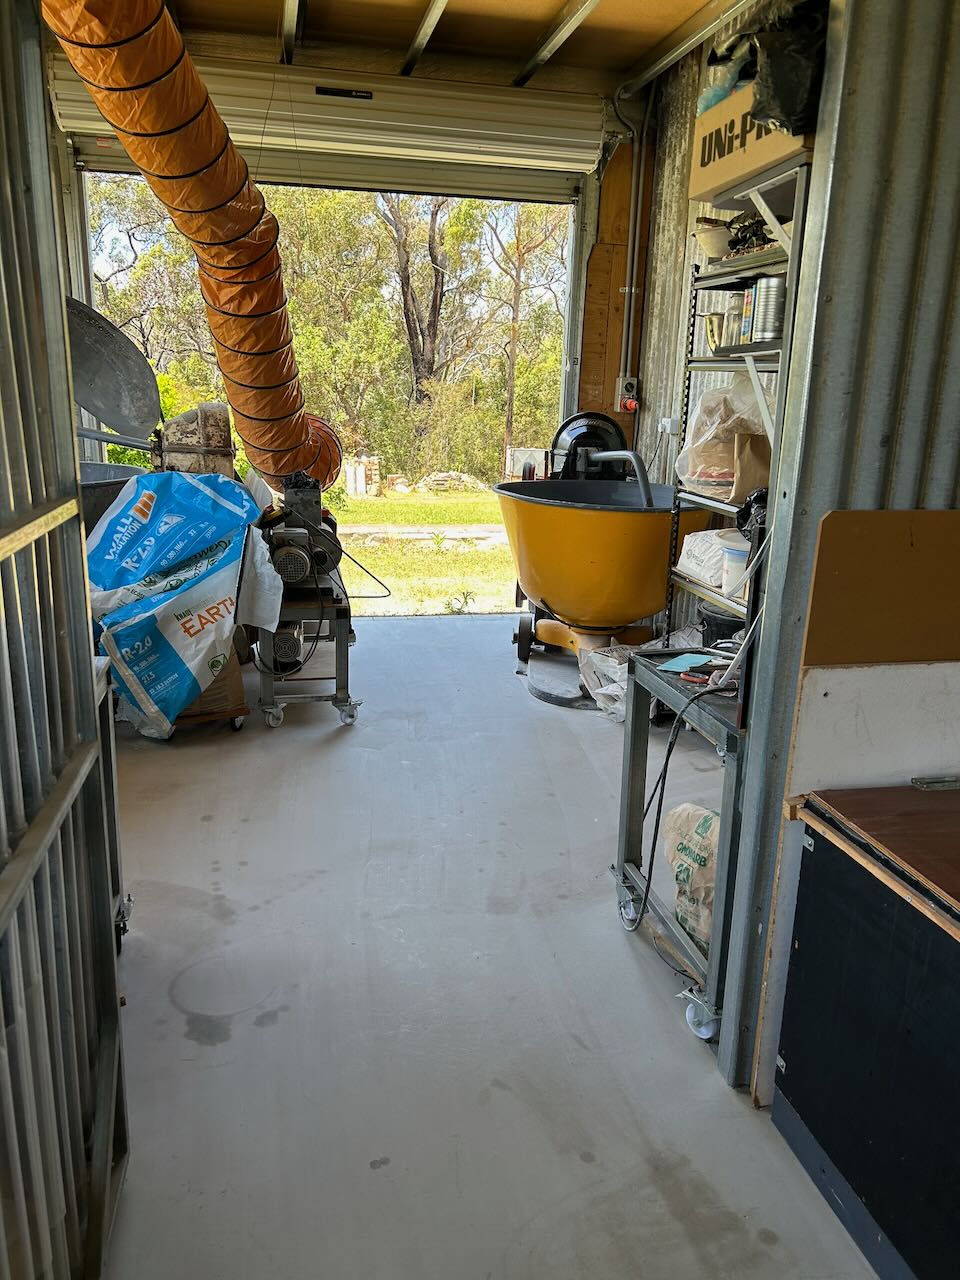
Janine and I have processed over a tonne of clay this year through our equipment. Each batch that we make is unique. As we do everything ourselves, we can make each batch of clay slightly different in order to closely match the type of projects that we are planning to make. This latest batch is slightly coarser in texture to facilitate making larger forms. The added grit helps the clay to stand up better in larger forms. We also make fine stoneware as well as porcelain.
After all the clay is processed, pugged twice and then bagged and put to bed, everything is scrubbed down and the floor is mopped.
I like to keep the workshop as dust free as is possible. After a change of water and a 2nd mopping, the big roller doors at each end of the workshop are opened up and the breeze flows through and drys the floor.
We are good now for the next 3 months. We are very lucky to have such good equipment that allows us to make large amounts of clay like this in a couple of days. All this gear is very old and has had a difficult history. But I manage to keep it all going, maintaining it as best as I can, cobbling together disparate parts and spares from here and there and making up special bits where they aren’t available any more. Its a challenge, and rewarding when it all works.
Nothing is even finished, nothing is ever perfect, and nothing lasts.
It’s been so dry lately, we haven’t had significant rain for over 2 months. Just a couple of millimetres every now and then. All our fruit trees and garden vegetables are suffering. We have to water every day now, as the daytime temperatures rise significantly. The situation isn’t helped by the hot, gusty, dry winds, desiccating everything with green leaves. I have recently planted out a lot of little seedlings, so they need daily watering to keep them alive.
There are even cracks developing in the bare earth of the veggie garden, where the weeds have dried out and died. I haven’t seen cracked soil like this since the last drought ending in the catastrophic bush fires of 2019. It’s not an endearing sign.
We are OK for the moment, as there is still some water in the the dams, but they are all low, the main top dam is very low. I will have to pump water up from the lowest dam, up to the middle dam, and then from there, up into the top dam. It’s our natural summer routine of the transhumance of water!
It’s quite a rigmarole and takes a couple of days of pumping. However, although it is a lot of work and it is time consuming. I consider myself so lucky that we have the dams that we dug here 4 decades ago, so that we can continue to water our gardens. I was once told that, the harder you work, the luckier you get, or so it seems just now. Now that all the sweat, effort and aching muscles are forgotten. Maybe, It isn’t luck!
I use one of the petrol driven fire fighting pumps to do the transfer. It keeps the pump motor in good nik. I know that it is starting easily but not running reliably. That’s important to know going into such a dry start to summer. I will need to pull the carbi off tomorrow and see what’s going on. This is a job that can’t be put off. It needs to be done now. I need to know that I can activate the fire fighting system immediately and reliably when needed.
I need this pump to be 100% reliable before the summer heat comes in. motors need constant attention.
I’m reminded that nothing is ever finished, nothing is perfect and nothing lasts.
Although we are still in the last month of spring, already the grass has dried off in the paddocks and lawn around the house. I am watering the 4 new avocado trees every 2nd day, just to keep some moisture in the soil for them to get established. It must be quite a shock to their system, to go from a mollycoddled, tropical, irrigated and shade cloth covered nursery environment, to this hot, dry, windy place. 3 of the trees have dropped a few leaves in the past few days in this wind. Not a good sign, but what can we do?
If the summer looks like getting worse, and that’s very likely. I might have to cover them in shade cloth to ease the stress. Just until they settle in and start to produce some new leaves and a spurt of growth at the tips. They hate drying out, but hate getting water logged even worse, so watering every 2nd day seems to be keeping the soil just moist. The last time that I planted 4 new avocado trees, the wallabies came in and ate the tops out over night. So this time the wire mesh fencing went up around them straight away. And guess what? The wallaby left its tracks right up to the new trees last night, and the wire mesh did its job.
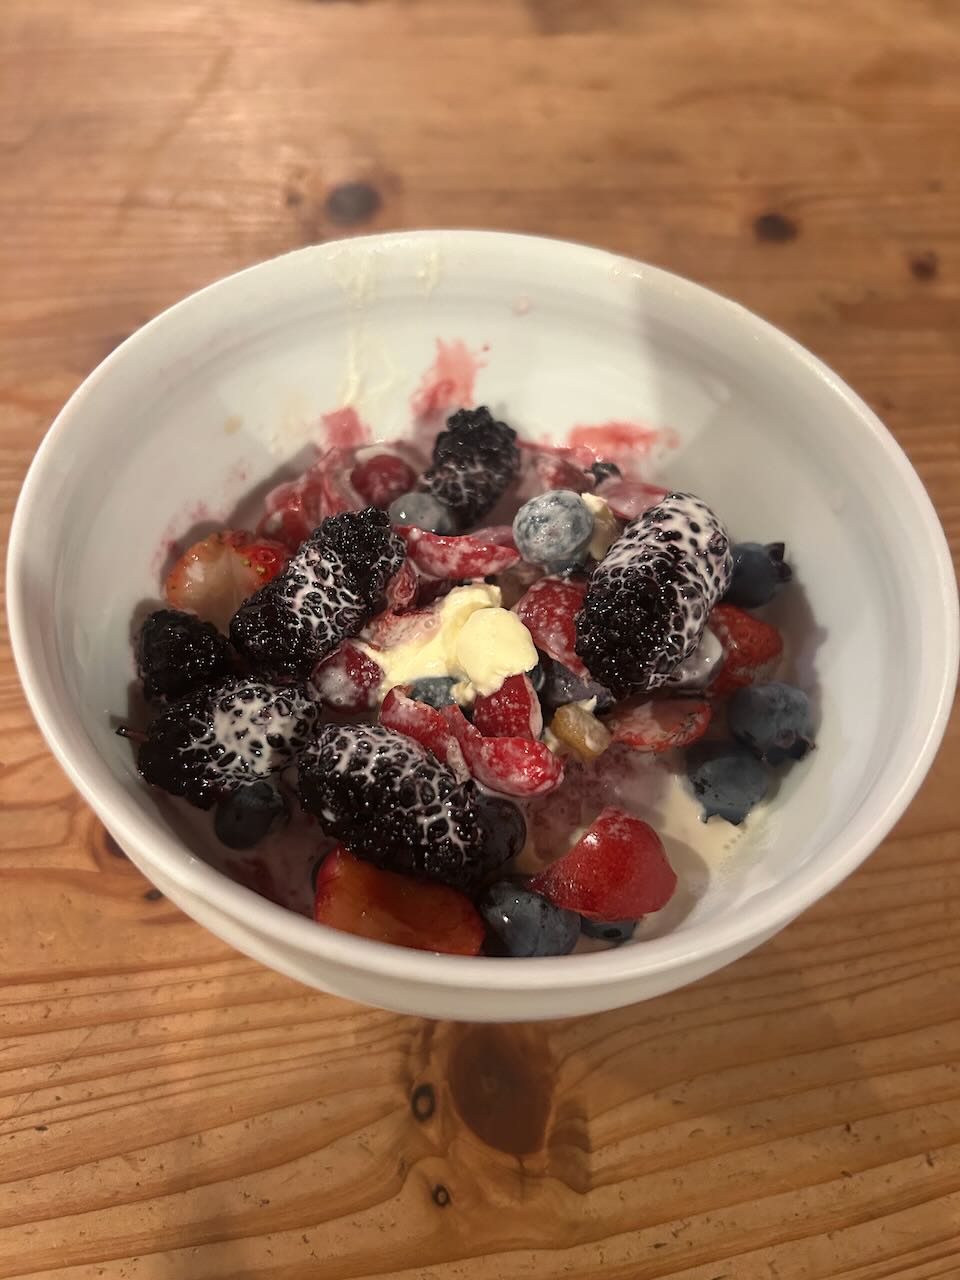
Some of the dozen new dwarf cherry trees that I planted last winter have had their first tiny crop of cherries on them. We are enjoying deserts of mixed orchard fruits of cherries, mulberries, blueberries and strawberries, dressed with a little fresh cream. That is pretty special and makes all the past mowing, weeding, pruning and watering so worthwhile.
The mulberries are in full season just now, so I have been making mulberry tarts. It’s a definite once-a-year treat. As the fruiting season only lasts a couple of weeks.
Our son Geordie has started a new business making small batch, seasonal cordials, while he waits for his liquor licence to come through. He has been a gin distiller for the past few years since the fire. He has now gone out on his own. Without the liquor licence, he can’t sell his gin as yet. But he can make and sell his special, small batch, local, seasonal cordials. A lot of the produce for this has come from our garden and orchards so far.
He has been making lemon cordial from our lemons with the sophisticated addition of lemon balm, lemon thyme and lemon grass to fill out the flavour profile. These are adult cordials. Made in small batches from our real, home grown, organic fruit. unsprayed, unwaxed, freshly picked, just minutes off the tree. No carbon miles, just carbon feet. Actually, we walked, so no carbon at all!. His fruit cordials offer solid, rich flavours, sophisticated flavours, not just some sugary flavoured coloured water.
Yesterday we made a very nice, rich, dark, mulberry/lime cordial with the addition of 3 different mint leaves, chocolate mint, spear mint and garden mint, plus kaffir lime leaves and our home grown and hand squeezed Tahitian lime juice.
One of my favourites is his strawberry and basil cordial, beautifully flavour-full and a delicately dense pink colour. The combination is surprisingly good, but we can only make this combination in the spring/summer season when we can grow enough sweet basil. These are definitely, small batch, seasonal products.
Geordie has called his company, ‘Bantam Beverages’, small batch, seasonal drinks. He was selling them here during the Arts trail – Open Studio sale. We sold out of the strawberry and basil, and only had a few bottles of the lemon mix left. We are helping make more stock now, so he will have more bottles to sell on the special, one day only, half price sale on the Sunday 14th of December.
Come along on Sunday 14th of December for a free tasting and some 1/2 price pots.
Sunday 14th December. 9am – 5pm.
Steve and Janine’s Pottery Workshop, at the old School,
Now that the Arts Trail, Open Studios weekends are over for another year, it’s time to start thinking about the next December Weekend Workshop and January Summer School.
I’m planning to offer a one day tool making workshop on the first weekend in December, Saturday 6th. Tool Making. The cost is $150. (1 day)
As these workshops often fill up. I may offer another one later on in the year? If there is sufficient interest.
Those of you who have attended our workshops in the past, will know that Janine and I make most of our own tools and equipment, from simple cutting wires and turning tools, through to the extreme of making our own fire bricks to build our own wood fired kiln. We have even built our own workshop buildings over the years. We have a go at everything. We try to be as self-reliant as we can be, without being fanatical and boring.
For this workshop, I’m planning to demonstrate making a range of simple tools from throwing tools and profiles, to turning tools, paddles, small callipers and stainless needle tool, turning tools etc.
Its a one day workshop and all the materials are included, recycled cedar and pine wood, stainless steel and galvanised steel, fruit tree prunings, nylon line, etc.
No experience necessary, but it would be an advantage if you were interested in learning to use some power tools like a jig saw, bench grinder and electric sander, etc. it make the work quicker, But this is not necessary.
You don’t have to use power tolls. If you are squeamish about power tools. There are slower alternatives using just all hand tools, but this will be much slower. You won’t necessary get every project finished. I’m happy to set you up with these hand tool alternatives. You can finish them at home – if needed. Hand-working and especially the hand-finishing, sanding/filing/oiling, can be the most rewarding part.
10 am till 4 pm. Please bring something to share for lunch.
We have a fridge to store perishable food items, and we provide a hot water urn, plus tea and coffee provided.
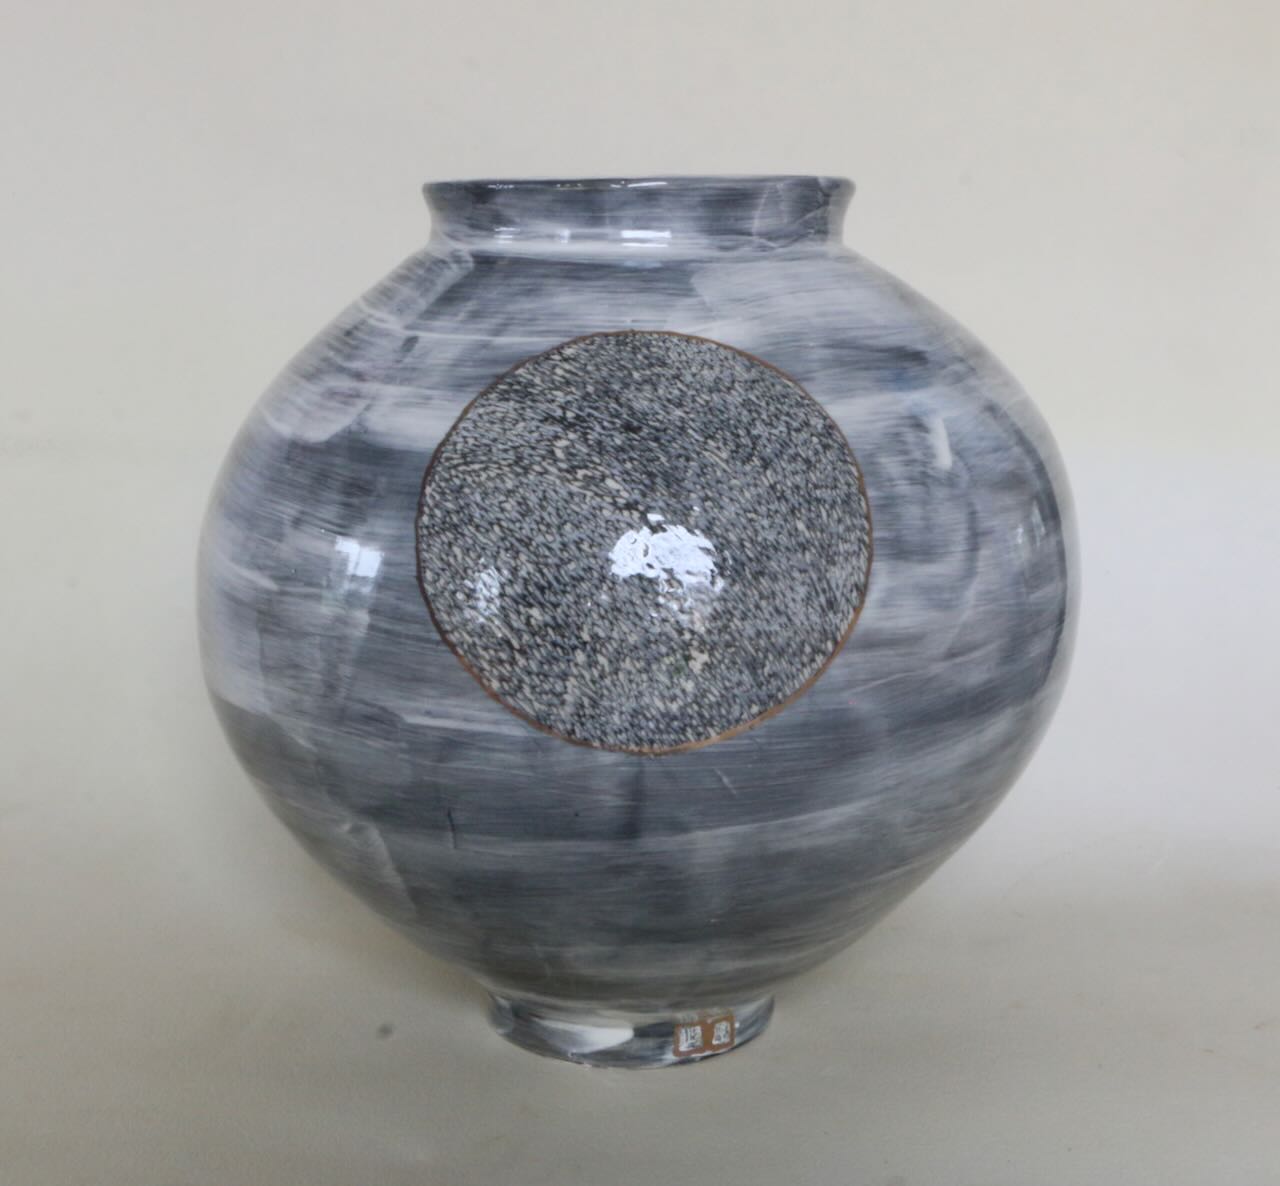
January Summer School. Joined forms. Throwing Korean inspired, Australian ‘Moon Jars’. (4 Days)
This is an intermediate to advanced wheel throwing workshop. You must be able to centre and throw 3 kgs on the potters wheel.
4 days from January 3rd to 6th. Cost $600
I’ll be providing our own specially developed, textured clay body specifically prepared in-house for the throwing of larger items.
10 am till 4 pm . Please bring something to share for lunch.
We have a fridge to store perishable food items, and we provide a hot water urn plus tea and coffee.
Places are limited, so first in best dressed.
later in the year, I’m thinking about offering other courses;
Geology/rock glazes for potters course (3 days, one weekend, plus an extra Sunday.).
Domestic ware, repetition throwing to a specific weight and size. An exercise in discipline. (2 days)
Throwing for wood firing. (2 days)
Stoneware Wood firing (3 days) winter time only. (one weekend, plus an extra Sunday.)
Please reply if you are interested in either of these 2 workshops, and I’ll put you on my waiting list.
If we can get enough numbers, the workshops will run.
Best wishes Steve
Dr. Steve Harrison PhD. MA (Hons) hotnsticky@ozemail.com.au blog; tonightmyfingerssmellofgarlic.com Potter, retired kiln surgeon, clay doctor, wood butcher and Post Modern Peasant.
Gundungurra/Dharawal Country I acknowledge the traditional custodians of this land, and recognise that sovereignty was never ceded and that we are all on stolen land.
I pay my respects to Elders, past, present and emerging.
We are making use of that quiet time between weekend studio sales.Last week, we had the first of the Open Studio weekends for the Arts Trail. It went well.
We had a slow start on Saturday, and then it went completely quiet in the afternoon. Janine made use of the quiet time, to go into Mittagong and visit 3 other studios that she was keen to see. She said it was also a bit quiet in town as well. Balmoral Village is a long way out of town, a 20 minute drive, so we expect to see less people here than they get in town. In Mittagong or Bowral, there is a wide range of choice, all within 3 to 5 mins.
On the other hand, Sunday was moderately busy for us, and it kept up all day, so that was good. Never run off our feet, but just one car followed another, so we constantly had a couple of people in the gallery all day. To the extent that we had to stagger our lunches to be on-hand to serve customers. We were lucky to have our friend Karen with us to help out, so Janine and I could spend time with our visitors to answer questions and explain the aesthetic choices that we had made in creating the variety of work on show.
As there were not too many visitors last weekend. The Gallery is still full up with pots waiting for new owners to take them home.
So this week we have been in the quiet time between the two busy weekends. In The Eye of the Storm. We made use of this special ‘time-off’ rest period, to do a bit of gardening. We weeded and dug-over the old annual flower garden area that I created and fenced off after the fire, so as to keep the chickens, wallabies, rabbits and wombat out of the garden. No fence, No flowers! In the years since the fire, I have created other annual flower beds on both sides of the pottery and also along the driveway, so that the older, fenced-off garden slipped out of use for floral display. Janine has now claimed it as her new herb garden, so hence all the digging.
After using the cultivator to dig over the new herb patch for Janine. I then had 2 days building a dry stone retaining wall and back filling it with 10 tonnes of topsoil/compost mix to create a deep terrace for a new avocado bed. We have had an avocado tree for over 45 years. It’s very well established, but only ever has a few fruit on it. This is because avocados, although self fertile, are only marginally so. In fact, there are two Groups of avocados, known as ’Type A’ and ‘Type B’. You need one of each to get the extra fertilisation for good ‘fruit-set’.
Some years before the fire, in about 2015, I planted 2 more ‘Type A’ and 2 x ’Type B’ grafted trees. After a few years, they started to mature and flower. That year we had a massive crop of hundreds of fruit on our old tree. Success! I don’t know what variety our old tree is, so it was necessary to plant at least one of each A & B to ensure good fertility. I chose to plant 2 different varieties of each group.
Shortly after that massive crop. The catastrophic bush fires swept through here and incinerated every thing in its path. All the little new avocado trees were vaporised to below ground level. The old tree was very badly burnt and lost all its smaller branches. I thought that it had died. However, when the rains came, it very slowly put out some new shoots and started to regrow. It’s only half the size that it was, but at least it is still alive.
Having seen that extra trees of either ‘Type A’ or ’Type B’, solved the fertility problem. I decided, after everything had settled down again, post clean-up and rebuilding, that I would replant more young avocados trees. Again I chose 2 x ‘Type A’ and 2 x ’Type B’ grafted trees. Sadly, in the years post fire, we had torrential rains for months on end, the ground was so soggy. I spent quite some time digging extra drains to help clear all the water away. Unfortunately, avocados are very susceptible to root rot, ‘phytophthora’ soil fungus. All the new avocados drowned and died! I decided after that to give up on growing avocados. As each grafted tree cost between $50 and $80, I have spent around $500 of these trees over my lifetime here. I could buy a lot of smashed avocado sandwiches for that!
However, I am an eternal optimist, so recently, I decided to give it one last go. I have bought 4 more trees, but this time grafted onto dwarfing rootstock ‘Velvick’, which is also mildly resistant to phytophthora.
This explains the new elevated, well drained, garden bed and stone retaining wall. This new terraced area is 4m x 10m and 500 to 600 mm deep. Filled with a rich mixture of sandy top soil and organic compost mix. 10 tonnes in all. It was quite an effort and I’m feeling my age today. As Leonard Cohen once said. “I ache in the places that I use to play”.
This will definitely be my last go at avocados. It should provide a well drained, rich soil for the new trees to grow in. Well elevated above the natural soil level, I’m hoping that this might be the solution.
They are right in front of the water tanks, so no problem with irrigation.
All that I have to concern myself with now is the winter frosts! But that’s a while off yet.
With a restful break like this. I need to get back to work to recover!
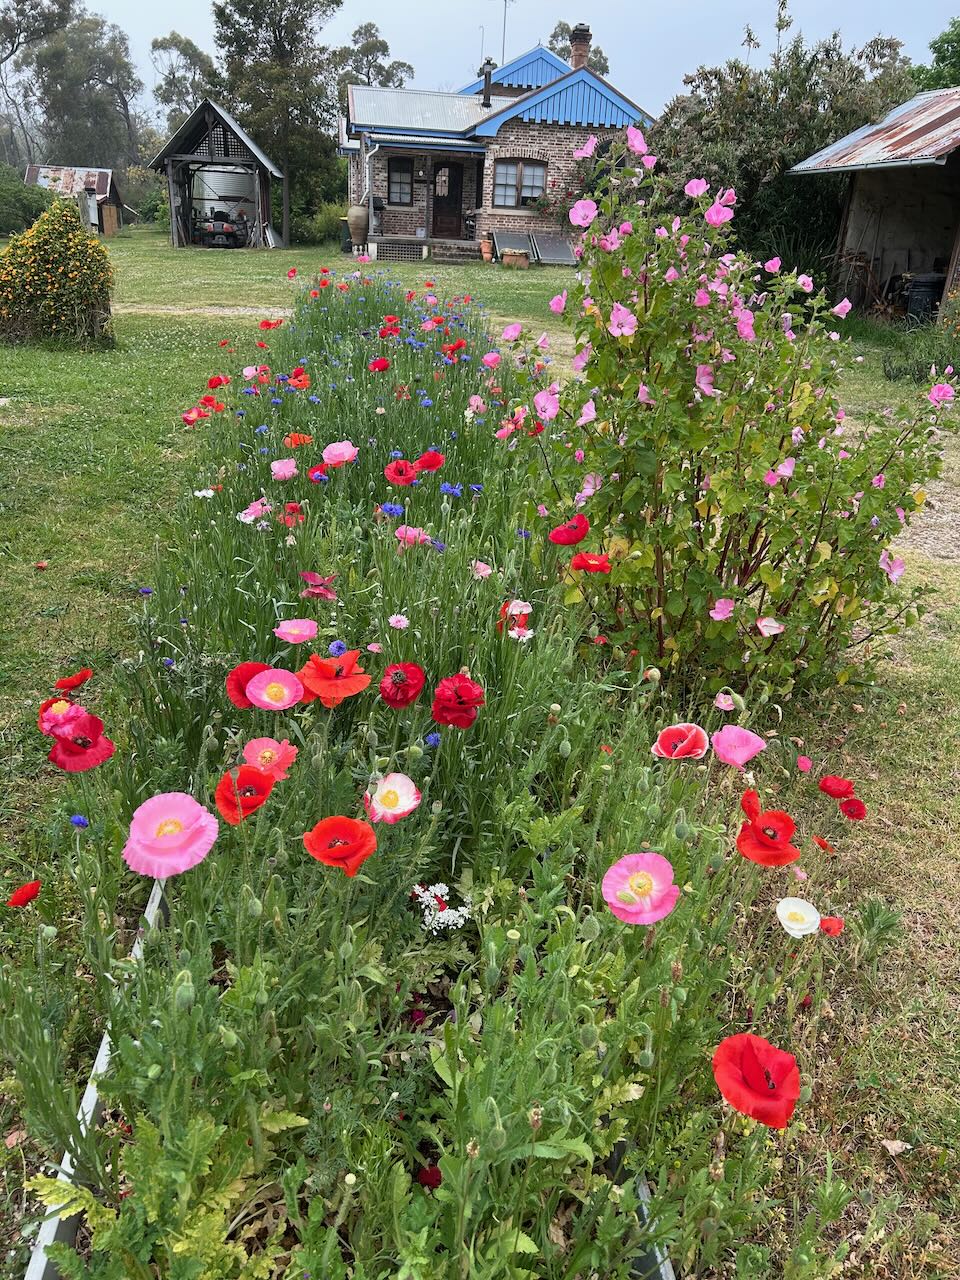
The pottery and its garden are looking great just now and for the next few weeks. All the spring flowers are coming out, just in time for the Open Studio weekends.
We are firing both electric kilns every day for the past week. We are getting all of the final glaze firings done. Working like a well oiled machine. We have been so lucky, that the sun has been shining bright every day – until today. It’s overcast with just a few spots of drizzly rain now and then. Just enough to stop me wanting to go out and do some gardening. I have two more firings on. One stoneware and one gold lustre firing. It’s all coming together.
We have managed to do all our firings on sunshine up until this afternoon, when it had turned quite overcast. Not only have we managed to glaze everything with our own electricity, but I have been careful to manage it so that I have kept both electric cars fully charged, at the same time and still been able to sell just a little of our occasional excess back to the grid to cover our daily access charges. It’s important to me to live a green, low carbon, passive, low energy, non polluting, life of minimal consumption, and we are doing it. We are managing it pretty well. But this afternoon, I will be withdrawing some expensive ‘green’ sustainable energy from the grid, for the last 3 hours of these current firings.
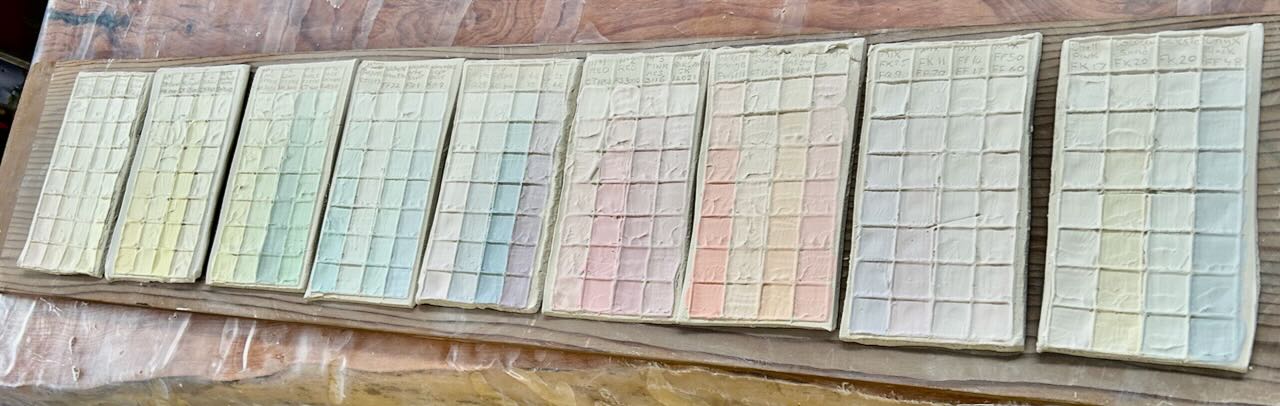
I have been experimenting with some new coloured pastel slips that I developed before we went to WA for the conference. See my previous post; More rain and tasting cider, Posted on
I weighed out almost 300 different pastel tones of stoneware slips.
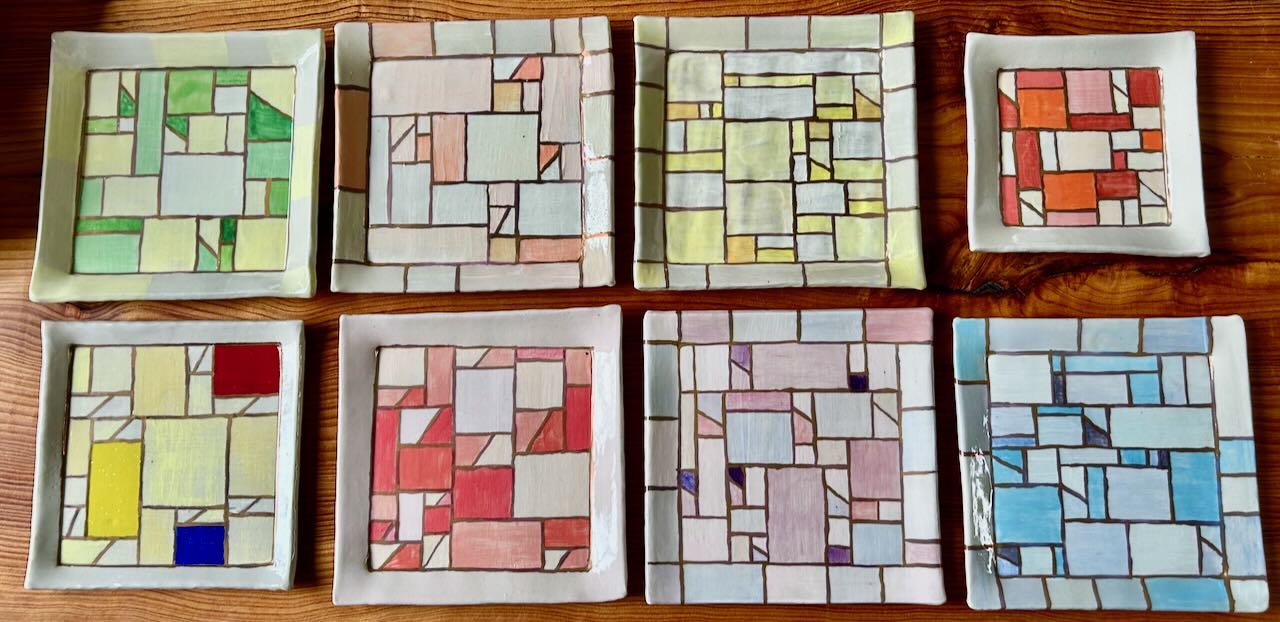
Using these colours, I tried making some new square plates, with a Korean inspired ‘Bojagi’ traditional fabric design. I’m very pleased with them, for a first attempt. I quite like the one were I ‘channel’ Piet Mondrian. Mondrianic bojagi!
I have also been making some more Korean inspired ‘Moon Jars’, but with an Australian twist. No photos yet, that are still in the kilns.
Please call in to see us on the next two weekends 1st/2nd and the 8th/9th of November. We will have tea or coffee and even cake for the first in and best fed.
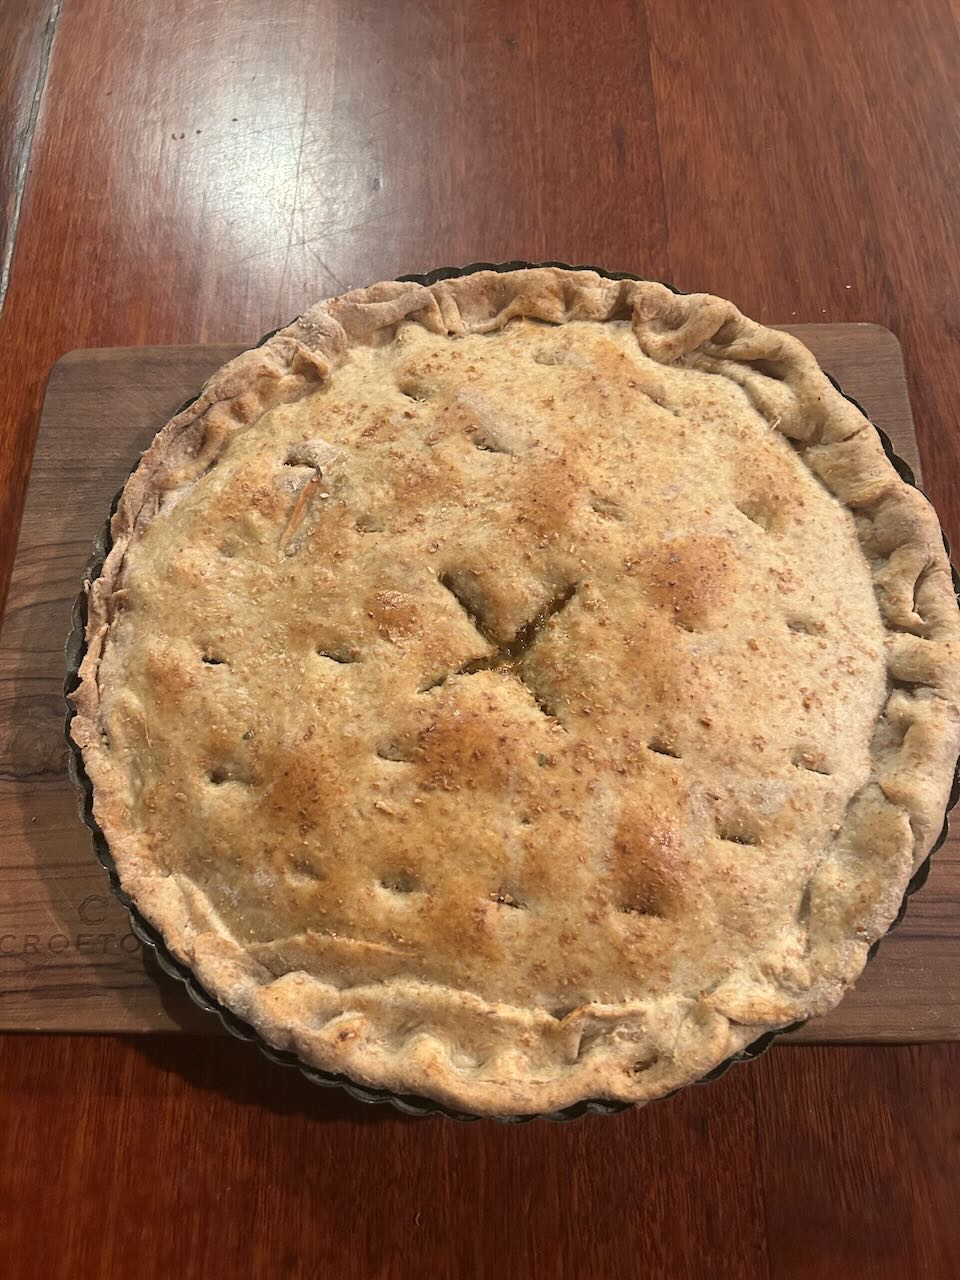
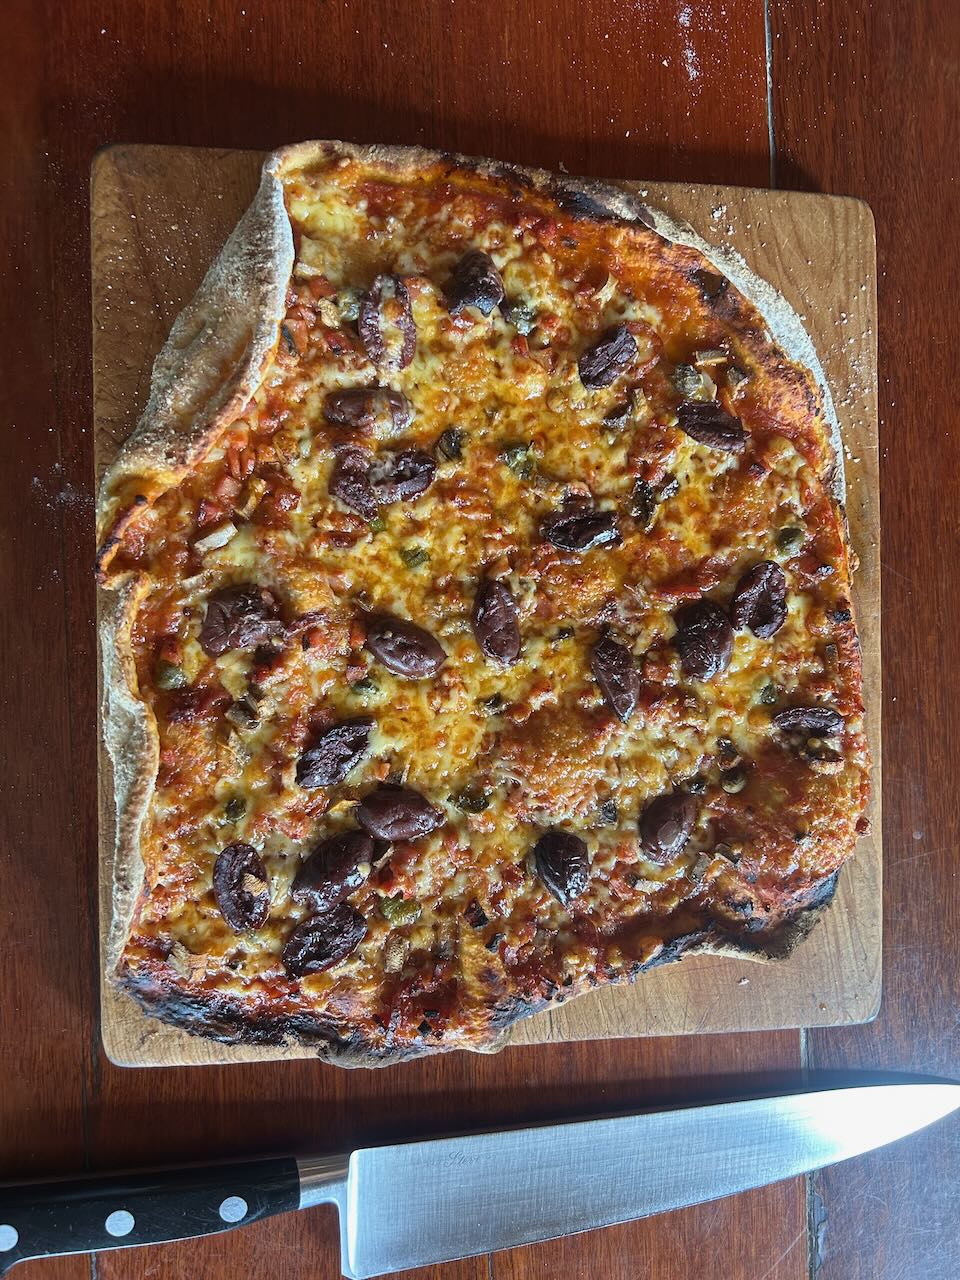
In the kitchen, I’ve been harvesting lots of leaks, and making chicken and leak pie. I’ve got quite quick at knocking up small batches of wholemeal pastry for pie crusts and pizza bases.
We may be very busy in the pottery, but there is always time to raid the garden for food for dinner and to cook up something wholesome and delicious for dinner.
We are in the final preparation for the Southern Highlands Open Studios Arts Trail. We will be open on the first two weekends of November. We will also be part of the Australian Ceramics Assn Open Studios event at the same time.
We are doing the last few firings now and spending a bit of time fettling and polishing all the glazed pots. This last week I have been cleaning and grinding the pots form my last Wood kiln firing. From now on it will be too hot, dry and therefore dangerous to fire the wood fired kiln until next autumn. All of our firings from now on will only be in the electric kiln fired using our 100% self generated solar energy, mostly from our PV panels but with a little bit of back up from our lithium batteries. In this way we can fire on a combination of todays sunshine and some of yesterdays stored sunshine as well.
When the battery is full and we are not firing the kilns. I charge up the electric cars. No point in selling it to the grid for next to nothing if I can use it in some way myself. Once both the cars are charged, I charge up the ride on mower and the power tools etc.
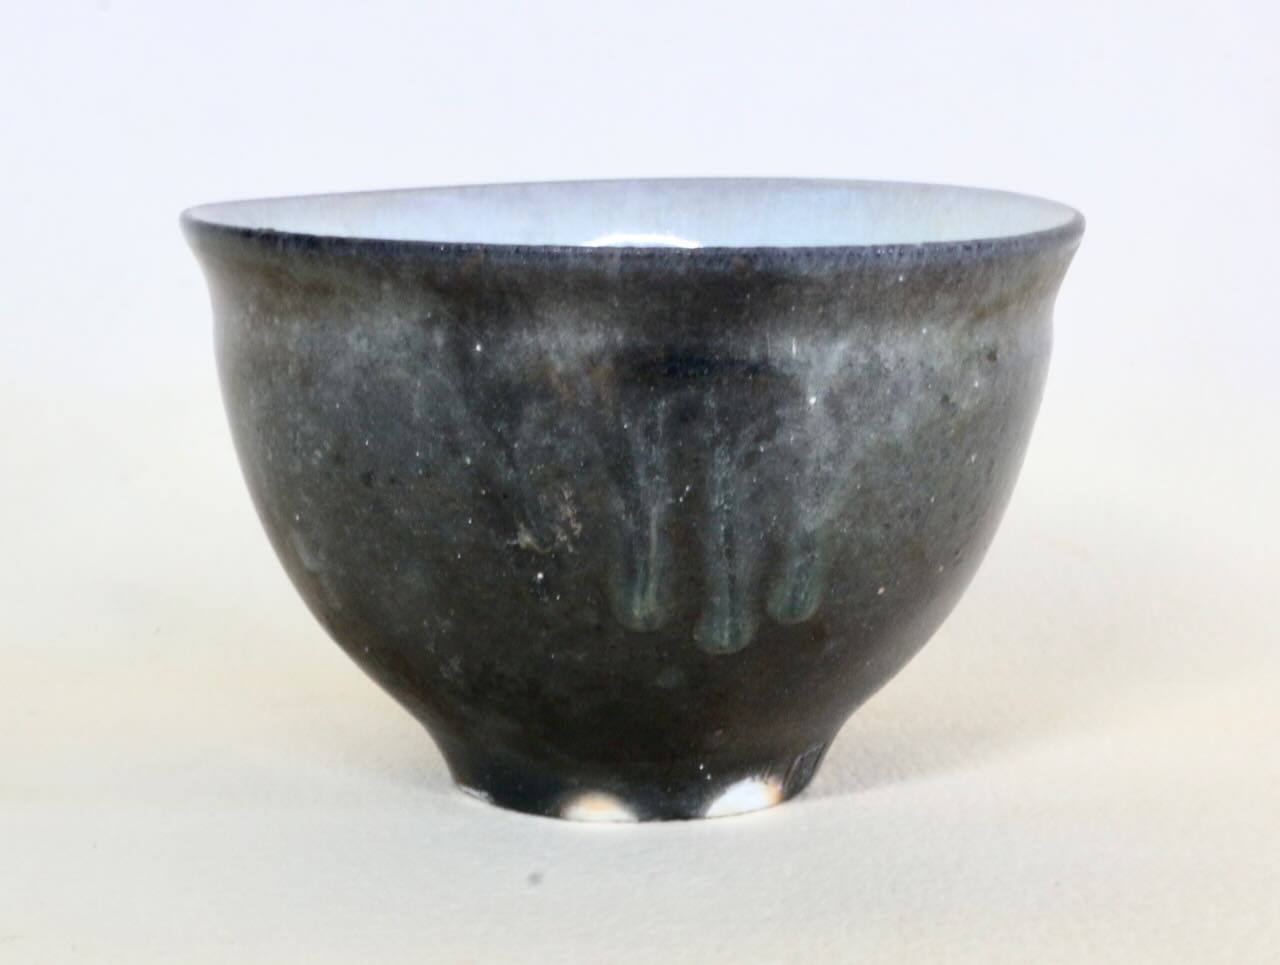
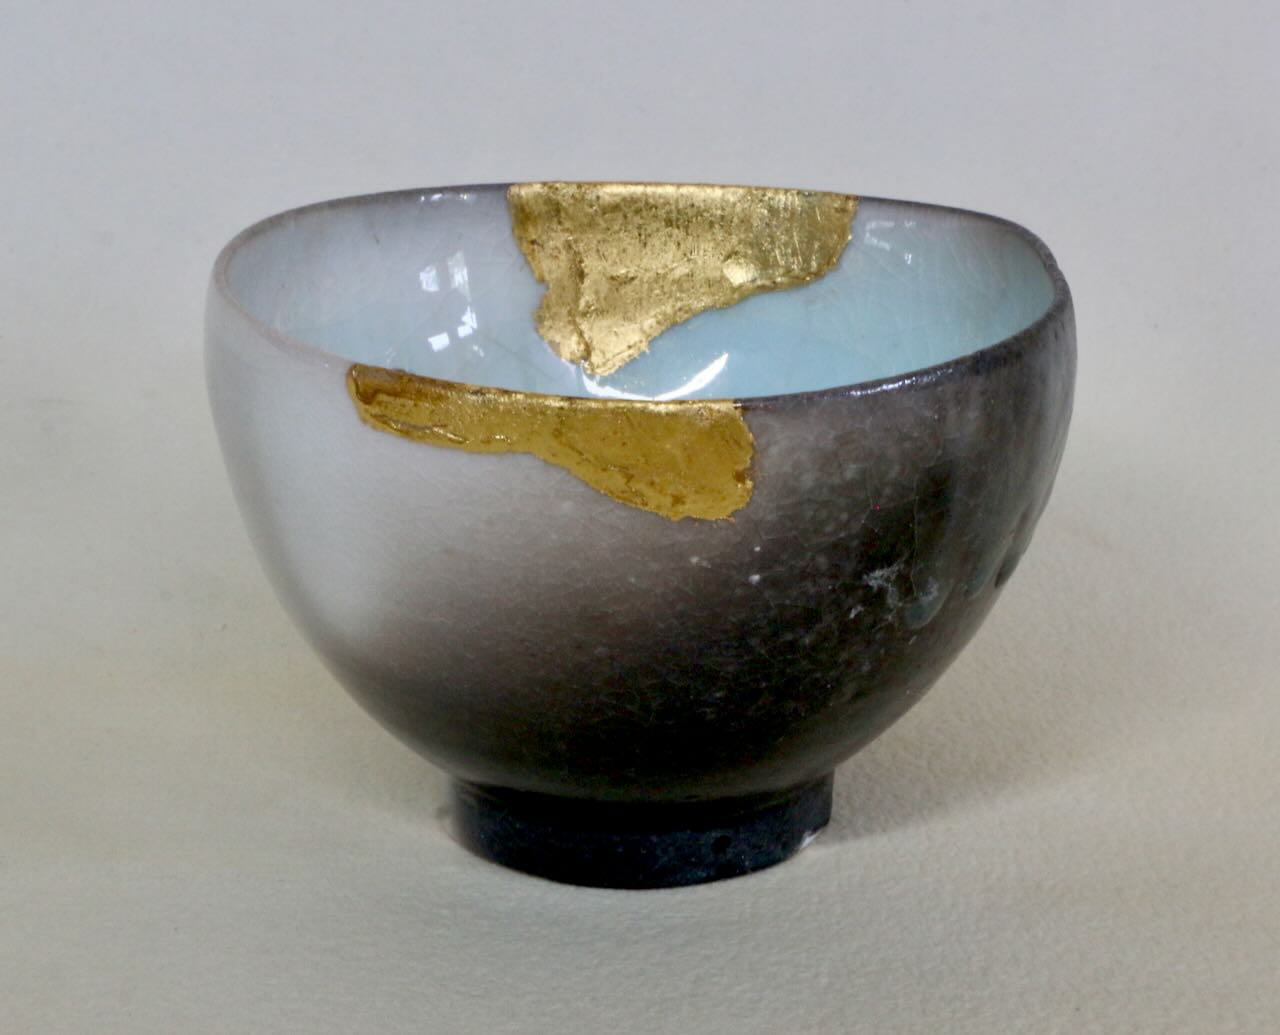
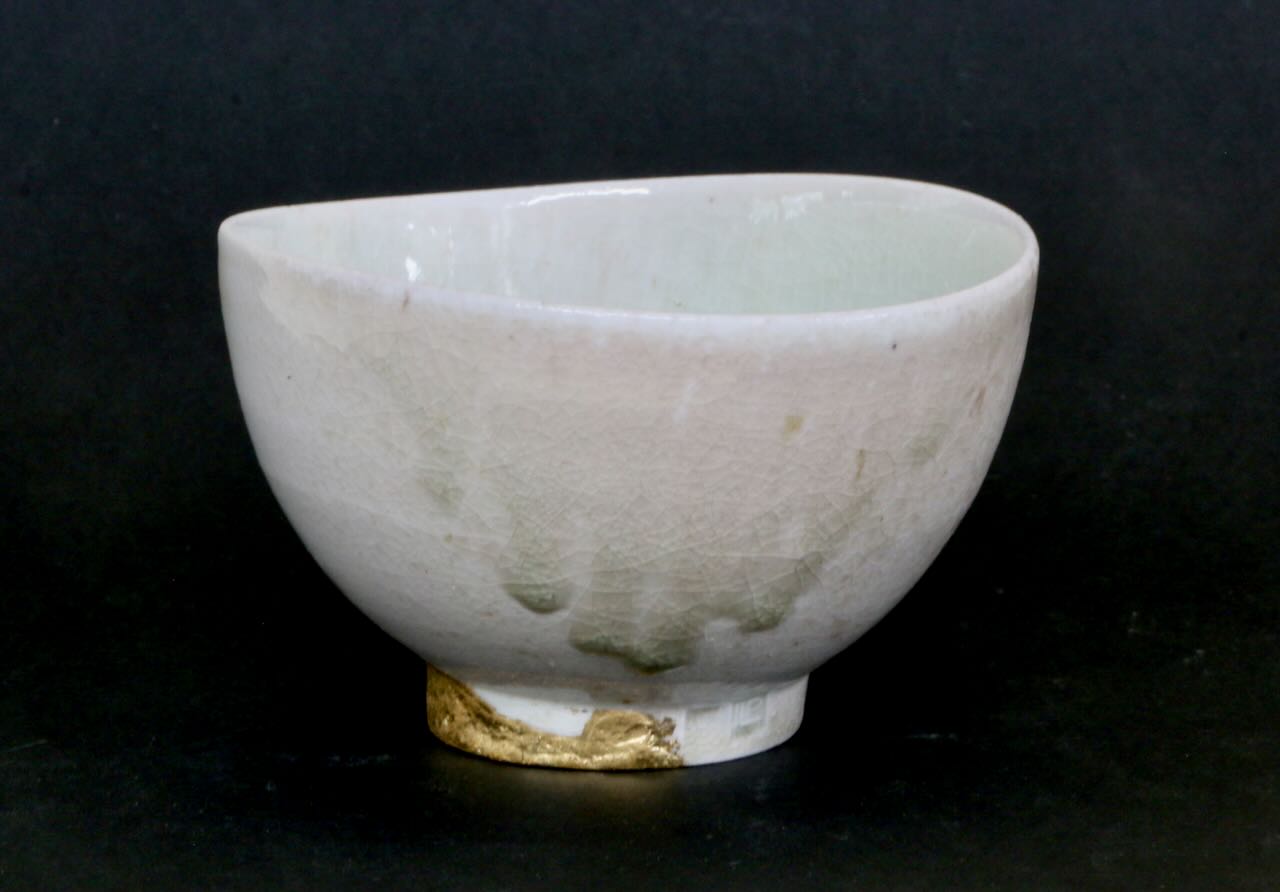
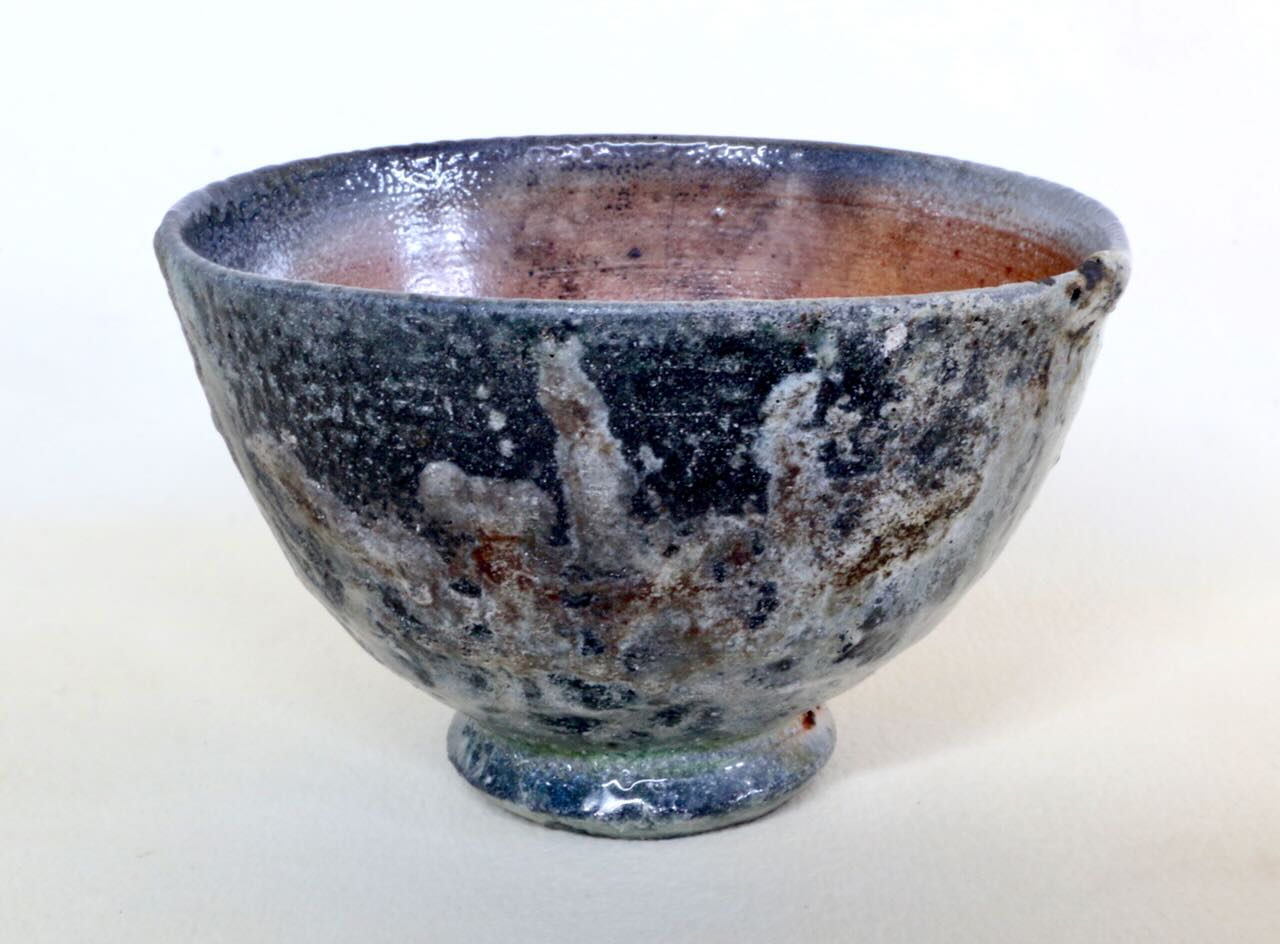
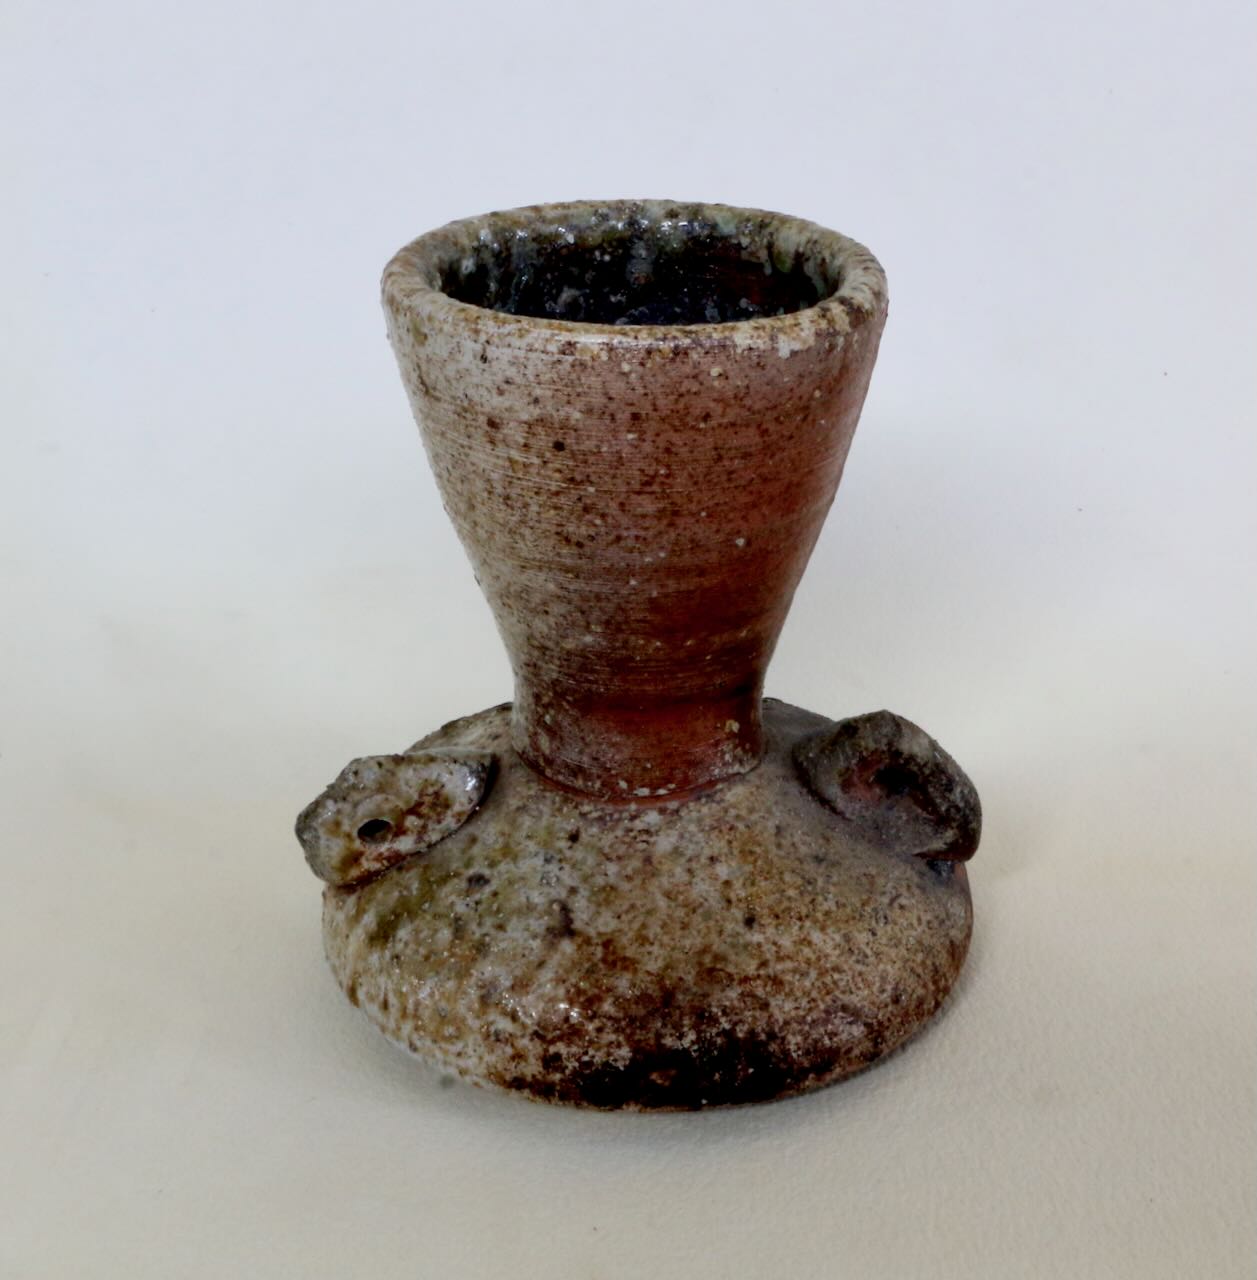
This week I have been doing a bit of ‘kintsugi’ repair on a few wood fired pots that got a little damage in the kiln, a couple of them ‘kissed’ in the firing. One was knocked over by a stray log during stoking, and another got so much wood ash deposit on the fire face that it ran down and stuck it to its wadding. All the usual little mishaps that befall pots in the ‘Zone of Death’. That part of the setting at the very front of the wood fired kiln chamber where the most beautiful pots are created, but are also most vulnerable to damage. I am capable of make some very spectacular shards!
I love it when the translucent white porcelain gets so heavily reduced that it turns black with carbon inclusion. This contrasts so well with the delicate pale, but intense blue of the limpid blue celadon. Alas, fine thin porcelain doesn’t enjoy the intense conditions in the front of the kiln and often dunts (cracks). I’m most happy when I can get a good piece out of the firing whole and in good condition. However, such pots are rare.
In the piece above. It looks as if you can see my finger prints where I have dipped a glaze, but in fact, these white marks are the fine white porcelain body showing through where the little balls of wadding were placed around the foot to keep it up off the kiln shelf during firing. The naturally deposit ash glaze on the front of the pot had started run, but luckily, it hasn’t glued the bowl to the shelf. Really good porcelain pots are a rarity from this part of the kiln.
‘Kintsugi’ gold leaf repair is a way of restoring a beautiful, but slightly damaged pot back to full radiance. I think that if a good pot is damaged in the fire that made it so lovely in the first instance, then it’s worth giving it a bit of love and TLC to make it even more beautiful. I lavish a lot of effort, skill and time into retrieving them from the scrap bench and repairing these sensitive and beautiful items, bringing them back to life. Some times gluing a broken or chipped piece back together, and at other times actually rebuilding a bit of the surface that is missing. In this way I bring them back to life and give them an honourable new existence. They are even more precious then, than they were if they had come from the kiln undamaged. I am recognising their potential beauty and honouring it. In this slow, patient application of time and effort they become more special to me.
These porcelain bowls are absolutely white, but one of them have such a high degree of carbon fused into their surface during the reduction cycle, that it appears to be black. But when you look inside the bowl, it is glazed with a delicate blue celadon. I love this dramatic contrast of black and pale blue! The white bowl above has so much ash glaze built up on the fire face of the bowl that the ash began to run down and glue the bowl to the kiln shelf, running down over the wadding and making a fluid pool of ash glaze on the shelf. Tragically, I broke part of the foot off trying to extricate it from the glassy mess. I built up the missing part of the foot, back to its original form with the kintsugi technique and finishing it with 24 karat gold. All three of these bowls above, are very translucent.
Besides the translucent, white porcelain which I have reduced to matt black with carbon inclusion. (my way of permanently removing carbon from the atmosphere. Permanent carbon sequestration!) Besides these delicate porcelain bowls, I have also been firing some more robust stoneware bodies that I have made. These bodies have a much better survival rate in the ‘Zone of Death’, but still get the occasional chips or ‘kiss’ marking that need some delicate attention.
Each of these ‘rougher’ pieces has their own particular charm and character. I like them all equally.
I hope to see you at some time over the first two weekends in November. You can check them out for yourself.
The Southern Highlands Arts Trail for 2025 kicks off in just 3 weeks. We will be open on the first two weekends in November 1st & 2nd, then the 8th & 9th of November.
We will be open all days from 10 til 4pm, but are happy to open on any day during the 2 week period if you let us know that you are coming. We live here. We’ll be here every day working in the pottery or gardens.
We are recently returned from Western Australia, where we were taking part in the Australian Ceramics Triennial. I was there to present a paper on how to reduce carbon pollution from our (potters) kiln chimneys. I’ve spent a couple of years researching, building and testing a scrubber for the top of my kiln chimney, to minimise the release of PM2.5 carbon particles, that are a result of the combustion of carbon fuels.
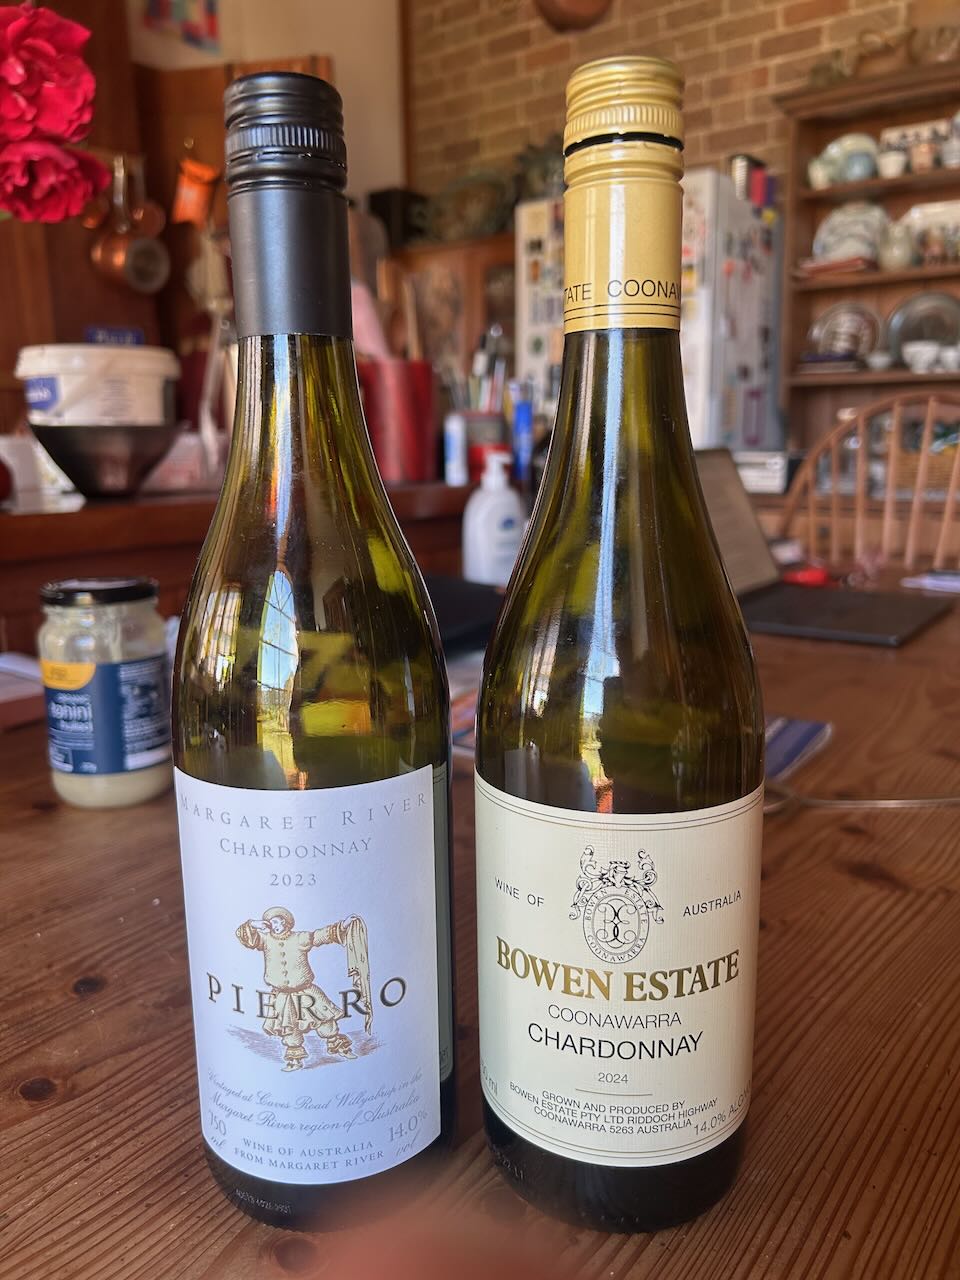
We decided that if we were to travel so far for this event, then apart from purchasing carbon credit off-sets for the flights, we should make the most of our time away and go down to Margaret River and have a look around, and possibly taste some wines. So we did.
I discovered the best chardonnay that I have ever tasted in my life. The Chardonnay from ‘Pierro’ vineyard in Margret River. Really deep, dry, rich, fragrant, and lasting flavour. Only a slight hint of sweetness. Highly recommended for a tasting if you are ever down there. $117 per bottle, but even $5 just to taste it! A once in a life time experience.
I’m perfectly ready to accept that there are better chardonnays out there. I see them for sale in posh catalogues, costing even more, but I’ll never know, as I never buy wines anywhere near $100 per bottle – til now. I really enjoyed it. But that was it. Never again. As I said. A once in a lifetime experience. So glad that I called in. I’d never heard of them previously. A small producer, unirrigated, crop-thinned, hand picked, wild yeast, a year in small French oak sitting on lees. Perfect!
My favourite chardonnay up until now, and will continue to be, into the future, is Bowen Estate Chardonnay from the Coonawarra. Beautifully dry, well balanced, classic chardonnay fragrance, lingering finish, and a lot more approachable and affordable at $25. But still kept only for special meals and occasions.
While there we watched the sun set over the ocean in the West. Saw lots of wild flowers and visited two excellent museums. It was a full trip.
At the conference, we saw and heard a lot of presentations and demonstrations. A few duds, some really excellent. Something for everyone and every taste and interest. In fact, so much going on that it was impossible to see and hear everything, as there was always too much to choose from and some programming conflicts of my choices, meant that I missed a few things while watching others. Not a bad thing.
I really enjoyed watching, Ruth Ju-Shih Li, intermittently, over 3 days, create an amazing porcelain hand built sculpture as a performance and then dissolve it back into sludge with water.
I had to think long and hard before I decided to commit the crime of flying to the other side of Australia. Such a lot of carbon debt! I did however choose to buy carbon off-set credits to make some gesture towards minimising the damage. I support ‘Green Fleet’ for this purpose. I’m not advocating or recommending this organisation. This is not an advert. I don’t do that. But if you are unfamiliar with the concept of purchasing carbon credits to off-set some of your personal global warming damage. Maybe you could do an internet search and see what is involved.
In the end I did decide to go to Fremantle, as I was offered the chance to speak about my research on minimising the PM 2.5 carbon particulates from kiln chimneys. Something no one else is prosecuting at the current time. It doesn’t appear on anybody’s radar currently, but there is a mass of information to be found if you look. Most of it quite disturbing. In some ways, presenting this lecture is in itself an act of promoting carbon minimisation. I also offered to present a second paper to the conference on the use of solar power with battery back-up as a low carbon means of firing ceramics, but it was politely declined. No real interest within the committee it seems.
Oh Boy! I read in the news today… (Thank you John Lennon.) About the current average cost to each household in Australia for their energy bill. It currently stands at $5,800 pa. Janine and I have made an effort to minimise our energy bills. Particularly our carbon related energy consumption. We run a low energy household, and have had solar power installed since 2007. We haven’t paid an electricity bill since then. Since the big fire in 2019, everything that we had to replace was carefully considered and was always electric. So now we only spend $400 a year to put petrol in our plug-in hybrid car, and $150 a year to buy petrol for the mower, chainsaws and fire fighting pumps. Thats just 10% of the national average. I’m proud of that.
In Fremantle, we stayed with someone who told me that when his two daughters were still at home, he was paying $350 per day for electricity! there was a swimming pool involved I understand.
When we put solar on our roof, we essentially paid our lifetime electricity bills all at once in advance. We didn’t choose to do it to save money. We were very concerned about the future with global heating and the next few generations. As it turned out, we have saved a small fortune, going on current national average power bills..
I recently saw in a supermarket advertising magazine/brochure, that you can now buy a 10 kW battery and 6.5 kW of Solar PV for $7,000. Or even better, 20kw battery with 6.5kw of PV for $8500.
That is so incredibly cheap!
Caution! if something is too good to be true…..
But certainly worth looking into. Please exercise due diligence.
I am not recommending this product. I have no allegiance to this supermarket and I am not in receipt of any payment or commission for mentioning it. I don’t do that. I just think that it might be worth a very severe, and deep investigation, because it just might be OK.
Don’t waste your money. Ask around, search out reviews and customer experiences. get yourself informed. I’m a bit sceptical about the price. However, it just might be a good deal?
Back home our garden is flourishing, as our lovely neighbour Tina has been watering things on the hot and dry windy days. So many plants have burst into flower in our absence, as they were just buds when we left.
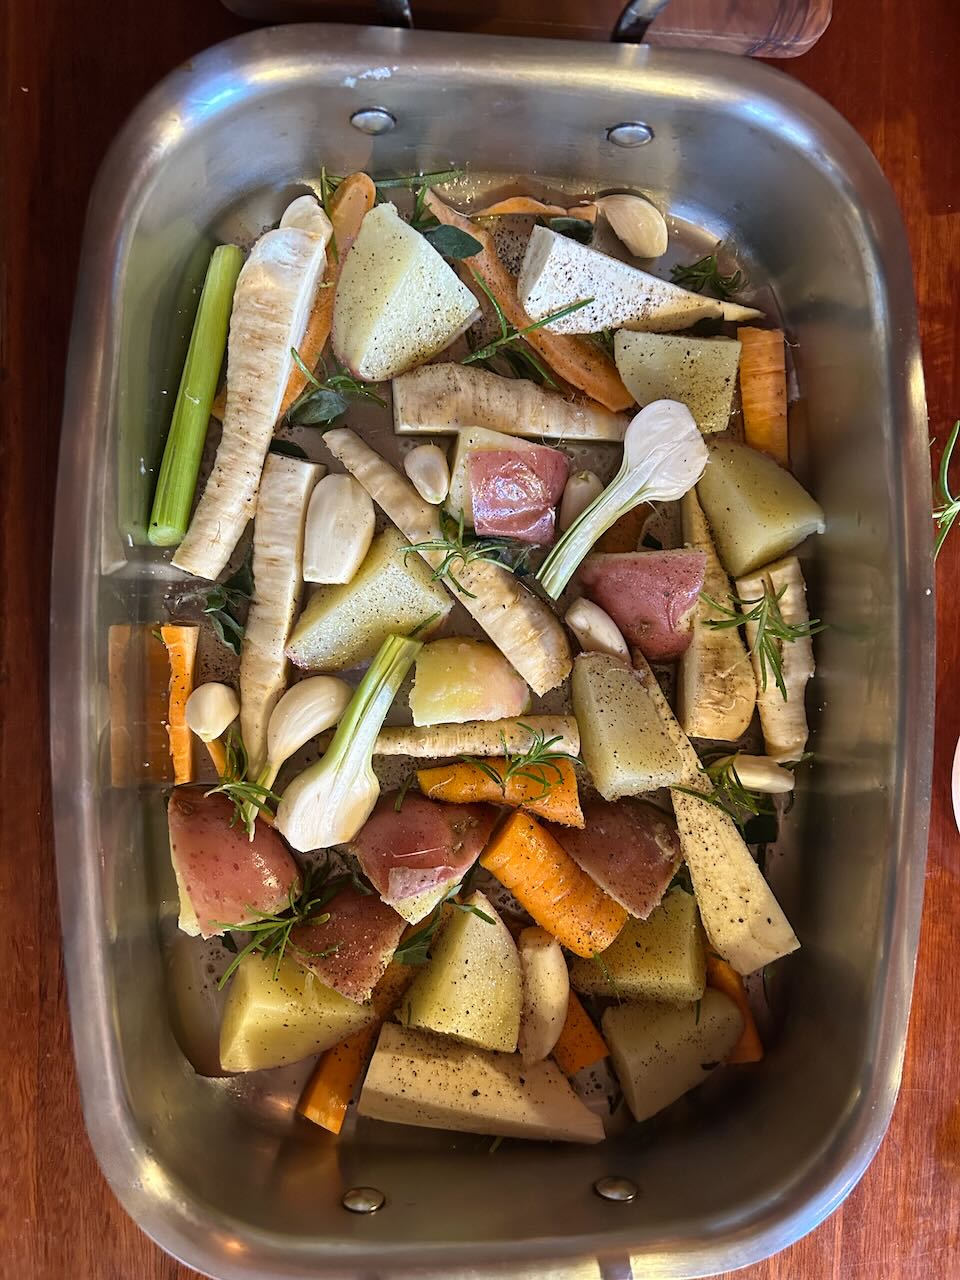
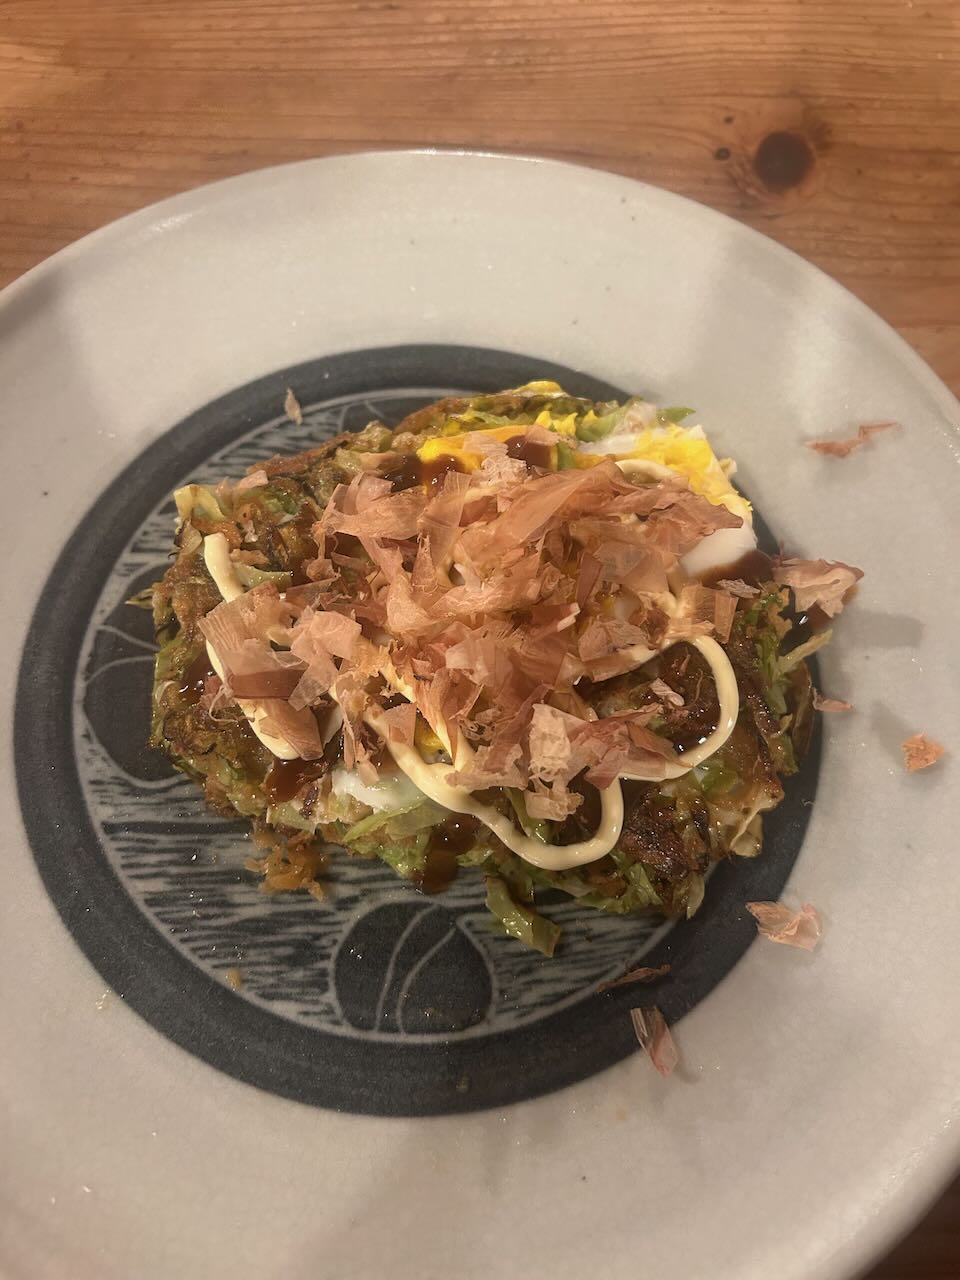
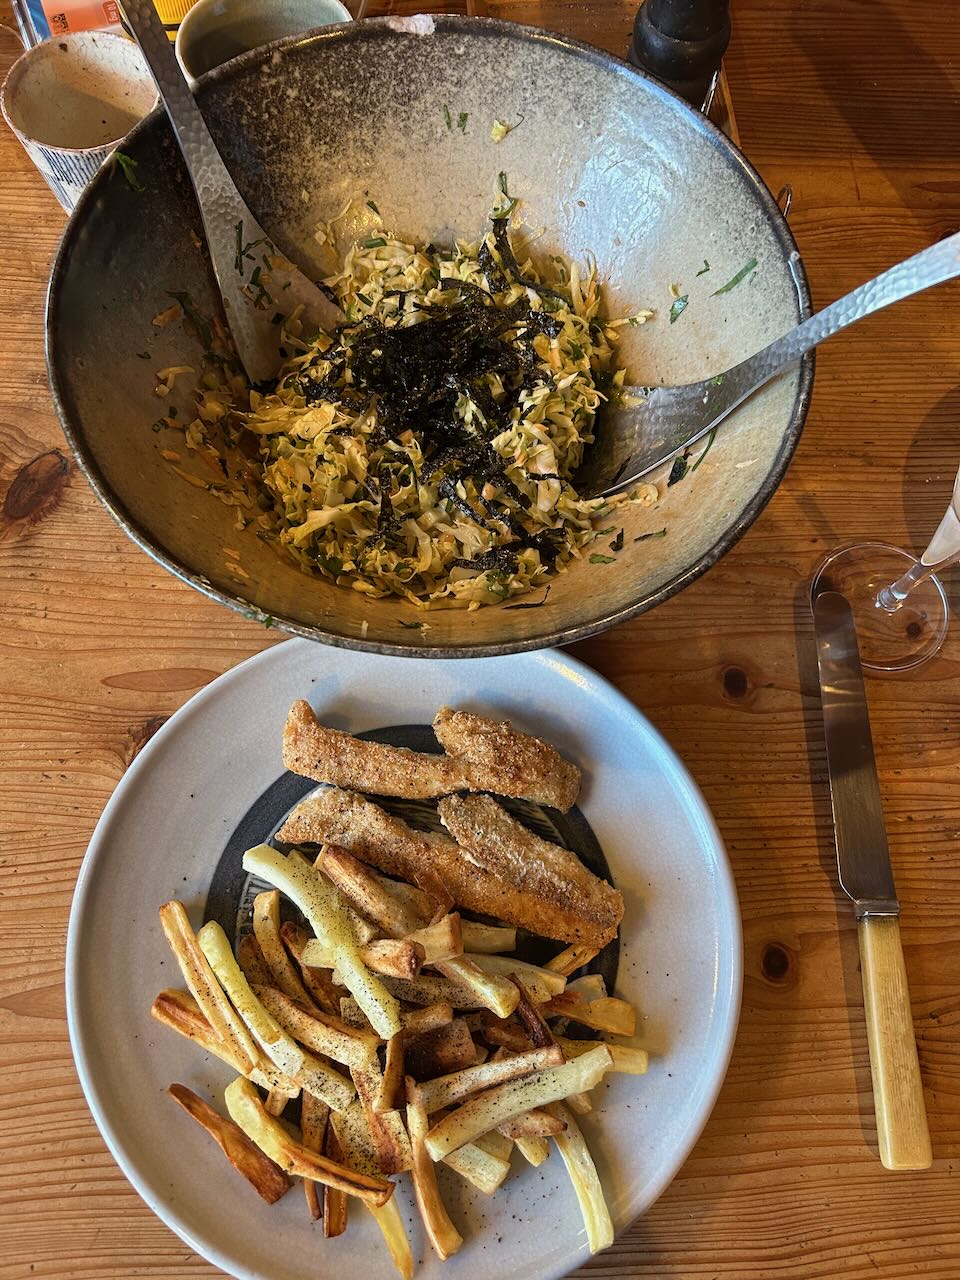
The veggie garden is still very productive. Fish and parsnip chips with a Japanese inspired cabbage salad. Oka-nomiyaki, an Australian version of Japanese cabbage pancake. Baked mixed vegetables etc.
I just planted out the first few tomatoes seedlings. It’s still a little bit early, but I like to get an early start. It doesn’t always work out well, but worth a try, to get a ripe red tomatoes before Xmas. Last year, my early plantings all ended up shrivelled by a late frost. Such is life! It doesn’t stop me trying. A sure fire way to know that it’s the right time is when I see the wild, self-sown seeds start to pop up. But that will be another month yet.
I’ve just finished reading two books on AI. I thought that I should get myself informed in some small way, as it is coming fast and we are told will be part of almost everything that we do in no time at all. When I was working in Korea back in April/May, everyone in my circle was using it in some way. Most on their phones as recreation, others having to take courses as part of their workplace training. Some as a requirement of their studies. It was everywhere in my environment, daily experiences and exchanges with my cohort. I’m not that interested in using it. I even have ’siri’ switched off. But sure enough, I will probably be forced to engage with it at some time, – probably sooner than I imagine. I’m not a Luddite, but I’m not rushing in either. It will come soon enough, or so I’m told. I can’t see it helping me to pack the kiln, or weed the vegetables!
Richard Susskind has spent his entire life working on AI. From his Doctorate on AI at Oxford in 1980 right up until the present time, it has been his complete lifes focus. He expresses some caution, but overall, I got the impression that he is pretty ‘gung-ho’ about its potential and trajectory. As someone who has been completely immersed in its development, he feels that any shortcomings can and will be managed and overcome to make it the servant of humanity.
Harari on the other hand, as a scholar of the history of information technology. He also received his PhD from Oxford. He is quite sceptical and is very cautious about what might happen. He is not involved in any AI development. He simply looks at what has happened in the past with the development and implementation of past information technologies.
His book takes us on a long journey from the stone-age through the Bible, the witch hunts to Stalinism and on to modern popularism, and how every new technology has been coopted for individual gain, power and profit.
After reading Susskind I was a little better informed, but still perplexed. After reading Harari, I’m not exactly scared, but certainly concerned. I am at least better informed. I didn’t sit down and read them cover to cover. I read them chapter by chapter, one or two each evening. I’d rather be outside gardening if the weather is nice, or inside potting when it’s not, as these are the things that bring me the greatest pleasure. The luxury of reading is an after-dinner activity, where it has to compete with sowing patches on my worn out clothes, or watching the idiot box, on the rare occasion when there is something worth watching. So it’s taken me a month to read them both, and over that time, my attention has fallen on various articles in the news, concerning AI.
Yesterday, I read that Australian tech billionaire, Scott Farquhar wants unfettered access to all copyright material free of charge to train AI Large Language Models. He claims that AI will deliver $115 billion in productivity gains. If it does, which I’m sceptical about. That money certainly wont be going to any person whose creative copyright was stolen to train them. It will be completely swallowed by the tech billionaires, who will progress to Gazillionaires and we’ll all be charged to access our own material and any supposed benefit that might accrue.
I also read that $1.5 billion is being invested every day in AI development. Those investors are going to want their money back with interest. AI access is going to be very expensive and will be embedded in everything that we do and purchase.
I recently read an interview with Demis Hassabis. Sir Demis is a British artificial intelligence researcher and entrepreneur. He is the chief executive officer and co-founder of Google DeepMind and a UK Government AI Adviser. He, as an AI developer is totally sucked in by the hype that he is creating. Of course, he is making a motza out of it too – no surprises there. He is claiming that it will be ten times more productive than the industrial revolution and 10 time faster, plus, everyone will be getting rich and having time off etc etc. Isn’t it amazing how these very clever blokes. and let there be no doubt about it, they are ever so bright. How can they be so stupid with a capitol S! Hassabis and Farquhar are talking like simpletons (with a capitol S). None of their claims are likely to come to fruition in the way that they state. I’m not very clever, but I can smell bull s**t a mile off. Many people will be worse off when they loose their jobs.
There is already sufficient wealth in the world for everyone to be well fed, comfortable, safe and with access to effective health care, but as Harari points out, corruption, nepotism and greed mean that 70% of the available wealth is all tied up in pointless and excessive accumulation of useless assets like super yachts, personal jumbos, spare mansions in multiple countries etc. etc. Non-productive, excessive consumption, for no good reason – other than excessive greed and stupidity. (with a capitol S)
Hassabis claims, “we should be in a world of what I sometimes call radical abundance. He paints a picture of medical advances, room-temperature superconductors, nuclear fusion, advances in materials, mathematics. It should lead to incredible productivity and therefore prosperity for society. We should be in an amazing world of abundance for maybe the first time in human history.”
He uses the word ‘should’ a lot. But it won’t turn out like he is suggesting! No good will come of this over-hyping of AI. There will still be a four year waiting list for an operation in NSW, There will still be genocide in Gaza and senseless slaughter in Ukraine. They should know better! They should be talking about all the unemployment that is going to come along with it. How will this prosper society?
I heartily recommend Yuval Noah Harari’s book “Nexus”.
On a brighter note;
In Korea, they have these giant TV screens on the side of major roads used for advertising, just like we have static bill boards here.
I got these images sent to me from 2 different friends a few days apart. I can see that it is me on a giant TV screen on the side of the freeway in Korea. I can’t read it, but I know the image. Its from the TV documentary made about my work in Korea during my recent trip there. I’m assuming that it is an add for the doco?
It’s all about my work researching low emissions technology in wood kiln firings, and introducing it to potters, research institutions and universities, to try and clean up the atmosphere, and make the world a better place. Potters aren’t responsible for very much of the atmospheric pollution in the world on a per capita percentage basis, cleaner cars and industrial processes will make a much bigger impact, but every little bit helps. Potters must play their part. I’m doing my bit – without AI.
The main reason for potters and ceramic institutions being interested in my work, is because there is a substantial local blow-back when people see a kiln chimney belching out black smoke. So they quite rightly ask, why are they still allowed to be so filthy and polluting? Change is coming, albeit slowly. A World-Wide the ban on diesel engined vehicles starts to come in, in some countries in 2035, and by most by 2050.
Once coal burning power stations are all closed down, and these broad, society wide changes are introduced. I predict that it will be impossible for a potter to belch out black smoke and get away with it. There will be legislation to severely limit carbon particulate emissions. Potters need to be engaging with this issue now, so that when the time comes, we can show that we can, if not eliminate, then at least severely limit any PM 2.5’s emitted from our chimneys.
It’s going to be a big challenge, and might not prove to be even possible, but the sooner we start, the sooner we will get to a good workable and hopefully affordable solution. We have about 10 years.


You must be logged in to post a comment.